ESP JAGUAR XJ6 1994 2.G Owner's Manual
[x] Cancel search | Manufacturer: JAGUAR, Model Year: 1994, Model line: XJ6, Model: JAGUAR XJ6 1994 2.GPages: 521, PDF Size: 17.35 MB
Page 428 of 521
0
0
0
Body Systems Body Repair
A4.1 BODY REPAIR
Introduction
This section contains information, specifications and procedures for body repair and rectification of the Jaguar sedan
range (with standard wheelbase).
All repairs, whether structural or cosmetic, must ensure the continuance of the Paint Surface and Corrosion warranty,
where applicable.
Following repair or rectification, the vehicle must be returned to the original manufactured condition with regard to
occupant safety, dimensional accuracy, finish and corrosion protection.
Similarly, repaired vehicles must be fully checked, and where appropriate reset, with regard to steering, suspension,
restraint and
braking systems.
A4.1.1 Health and Safety
(Please Read The
Fol/owing Notes Carethlly)
Where legislation governing working conditions and practises is applicable, you should observe it. Do not forget that
you have a duty, to yourself and those around you, to act in a responsible manner in the workplace.
In the United Kingdom the Health and Safety
at Work Act (1974) places a duty on employers and employees to ensure,
whenever possible, safe working conditions and practices. Wherever a potential hazard is notified to, or identified by
the operator, he must employ the correct safety procedures and equipment.
Should
a personal injury occur as a result of any workshop activity, seek medical help as soon as possible and do not
attempt self-treatment other than by the application of first aid.
With the constant introduction of new materials in the manufacture of vehicles,
it is important that potential risks are
identified and precautions made known.
WARNING: READ AND UNDERSTAND WORKING PRACTICES CLIMATE CONTROL SYSTEMS, SECTION 14, WITH SPECIAL REFERENCE TO
ERY
/ RECYCLE / RECHARGE EQUIPMENT.
WEAR SUITABLE EYE AND SKIN PROTECTION.
OBSERVE ALL APPLICABLE SAFETY REQUIREMENTS.
DO
NOT VENT REFRIGERANT DIRECTLY TO ATMOSPHERE, ALWAYS USE JAGUAR APPROVED RECOV
-
Issue 1 August 1994 1 X300 VSM
Page 429 of 521
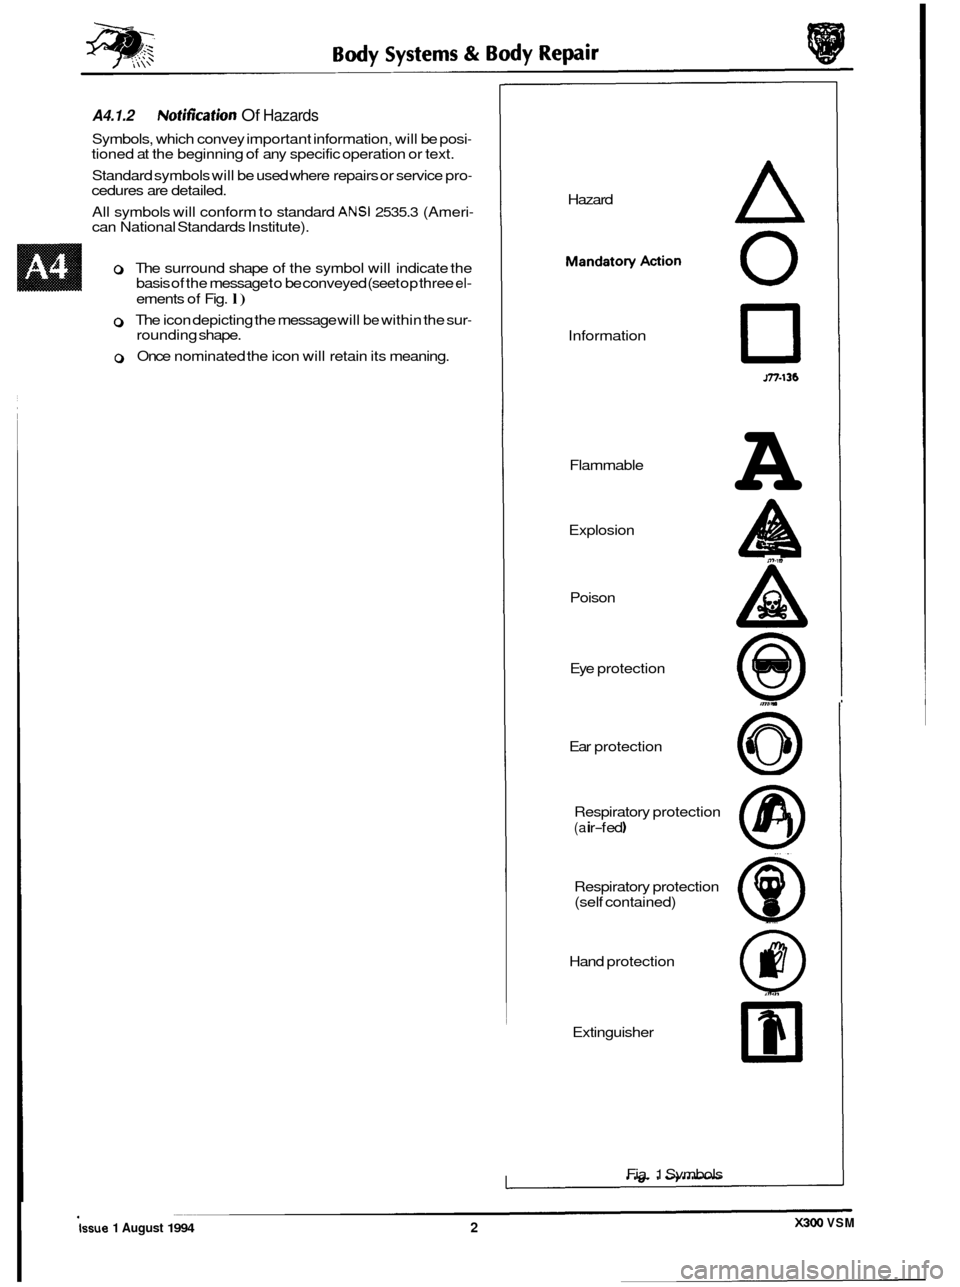
A4.1.2 Notification Of Hazards
Symbols, which convey important information, will be posi- tioned at the beginning of any specific operation or text.
Standard symbols will be used where repairs or service pro
- cedures are detailed.
All symbols will conform to standard
ANSl 2535.3 (Ameri- can National Standards Institute).
0 The surround shape of the symbol will indicate the
basis of the message to be conveyed (see top three el-
ements of Fig. l)
0 The icon depicting the message will be within the sur- rounding shape.
0 Once nominated the icon will retain its meaning. Hazard
A
Information
0
Jn-136
Flammable
Explosion
Poison
Eye protection
A ,774s
m-l*
A
m I.
Ear protection
@
@
Respiratory protection
(a i r-f ed 1
Respiratory protection
(self contained)
Hand protection
Extinguisher
Fia.
1 Svmbols
0
0
0
X300 VSM Issue 1 August 1994 2
Page 430 of 521
Systems Repair Body & Body -
A4.1.3. POTENTIAL RISKS I
A4.1.3. Paint
Organic solvents, found in paints, may cause damage or severe irritation to liver, kidneys, digestive tracts and respira- tory system if inhaled over long periods of time.
Prolonged exposure to isocyanates may cause lung sensitization. Asthma
-like symptoms may develop with subse-
quent exposure to very low concentrations of isocyanates.
Solvent inhalation can cause dizziness or loss of consciousness.
Splashes of solvents, paint activators and additives can cause damage to the eyes and may cause dermatitis. Peroxide
and acid catalysts may cause burns.
Inhalation of
spray dust and sanding debris may cause lung damage.
I
A4.1.3.2 Applied Heat (Welding)
There is considerable risk of damage to eyes and skin when welding or flame cutting.
Fire is a serious danger and many materials or fluids within the vehicle are highly flammable.
Toxic and dangerous fumes may be liberated when any of the following are subjected to heat:
0 Expanded foam
0 Corrosion protection
0 Trim and seat materials
0 Paints which contain isocyanates
0 Adhesive and sealing compounds
When heated to a temperature of 3OO0C, polyurethane based compounds may liberate small quantities of isocyanate.
Many types of nitrogen containing chemicals may be liberated as breakdown products; these chemicals can contain
isocyanates, oxides of nitrogen and hydrogen cyanide.
Potentially toxic or asphyxiant fumes and gases are produced by welding, for example; zinc oxide with zinc coated
panels, and ozone gas from the MIG process.
A4.1.3.3 Metal Repair
There is considerable risk of damage to eyes, ears and skin when metal cutting, forming, or dressing is being carried
out.
Soldering may be hazardous because of heat generated fumes and skin contact with the materials.
A4.1.4. PRECAUTIONS
A4.1.4.1 Paint
The inhalation of sprays, fumes, or dust during paint application or sanding processes should always be avoided. En- sure that there is efficient ventilation / extraction at all times. Paint spraying should be confined as far as possible to
spray booths. Personnel with a history of asthma should not be engaged in any process which involves the use of
isocyanates. Any operator working inside
a spray booth where isocyanate material is present must use air-fed breath- ing equipment. Supplied air to the visor should be fed at the recommended pressure and filtered to remove oil, water,
and fumes. Operators involved in handling mixing or spraying should wear protective clothing - gloves and goggles,
to avoid skin and eye contact.
A particle mask or canister type respirator should be worn when sanding.
A4.1.4.2 Applied Heat
When welding, flame cutting, brazing etc, the operator should use as appropriate, goggles, mask/fume extractor and
flameproof protective clothing. It is especially important when working with polyurethane compounds to use air-fed
breathing equipment.
Ensure that
at all times the appropriate fire fighting equipment is available and that personnel are trained in its use.
A4.1.4.3 Metal Repair
Appropriate eye and hand protection should be worn when sanding, drilling, cutting, chiselling, flatting or welding.
Operators should wear
a face mask or air-fed visor when sanding or flatting either body solder or fillers.
When
a soldering operation has been completed, swarf must be removed from the work area and the operator must
wash his hands thoroughly.
X300 VSM 3 Issue 1 August 1994
Page 431 of 521
Body Systems & Body Repair
A4.1.5 GENERAL REPAIR NOTES
The following advice should be noted before ANY repair work is carried out.
0 Disconnect the vehicle battery ground lead (disconnect the alternator where electric welding is used) and take
note of the reconnection procedures as detailed in Section 15.
0 Where structural parts are straightened or renewed, a body alignment / straightening jig must be used.
0 Where appropriate, structural sections should be straightened by cold processes. Heat, especially excessive
heat, will reduce the strength of steels.
0 Repairs may only be carried out successfully, and any warranties protected, if genuine Jaguar replacement parts
and Jaguar approved materials are used.
0 Tools, procedures and facilities must be right for the job. Do not compromise the quality of the work by using
inappropriate methods.
0 All trim and electrical components in the locality of the repair must be removed or disconnected prior to panel
removal / replacement; this is especially important where hollow sections may contain harnesses, tubes or
foam, see section
A4.3.5.
0 The welding and gas processes detailed in the following sections are the only ones recommended by Jaguar
Cars Ltd.
0 Ensure that you have read and understood the safety related procedures in this and other relevant sections.
WARNING: DO NOT WORK
IN THE VICINITY OF A LIVE AIR BAG, REMOVE IT COMPLETELY. READ WORKING PRAC- TICES AIR BAG, SECTION 15. ANY SEAT BELT WHICH HAS BEEN WORN IN AN ACCIDENT MUST BE RENEWED. PLEASE SEE SECTION
AGE LOCATIONS. 13 FOR IMPORTANT INFORMATION REGARDING 'TEAR LOOP' SEAT BELTS / BUCKLES AND ANCHOR-
CAUTION: Electric arc welding should not be used on Jaguar vehicles. The high vottages produced by this process will cause irreparable damage to the electrical control and microprocessor systems.
A4.1.5.1 Welding and Gas Processes Special Notes
Resistance spot welding, MIG welding and all gas processes may only be carried out on bare, unpainted or unplated,
metal.
The flanges of panels which are to be welded together must be clean, corrosion free and treated as appropriate,
with either weld-through primer or inter-weld sealer; use only materials and processes in accordance with the 'Body Seal-
ing and Preservation Manual' and relevant application areas in section A4.3.1.1.
See 'Zinc Coated Panels' section A4.2.
Generally, the resistance spot welding equipment used in the motor vehicle repair industry does not produce a weld
of equivalent strength to that of the manufacturer. Therefore, the expression 'single row of resistance spot welds'
means that the spots should be spaced on a pitch of
19mm to 25mm. This will usually result in more spot welds than
found in the original factory joint.
To remove resistance spot welds, a resistance spot weld cutter should be used.
If the new joint is to be MIG plug welded, the old resistance spot welds should be cut from the panel which is to be
retained and those holes used for plug welding.
Suitable holes may also be drilled or punched;
8,O mm dia for sections up to 1,6 mm, and 10,O mm dia for thicker sec- tions.
0
0
0
X300 VSM Issue 1 August 1994 4
Page 445 of 521
Body Systems & Body Repair
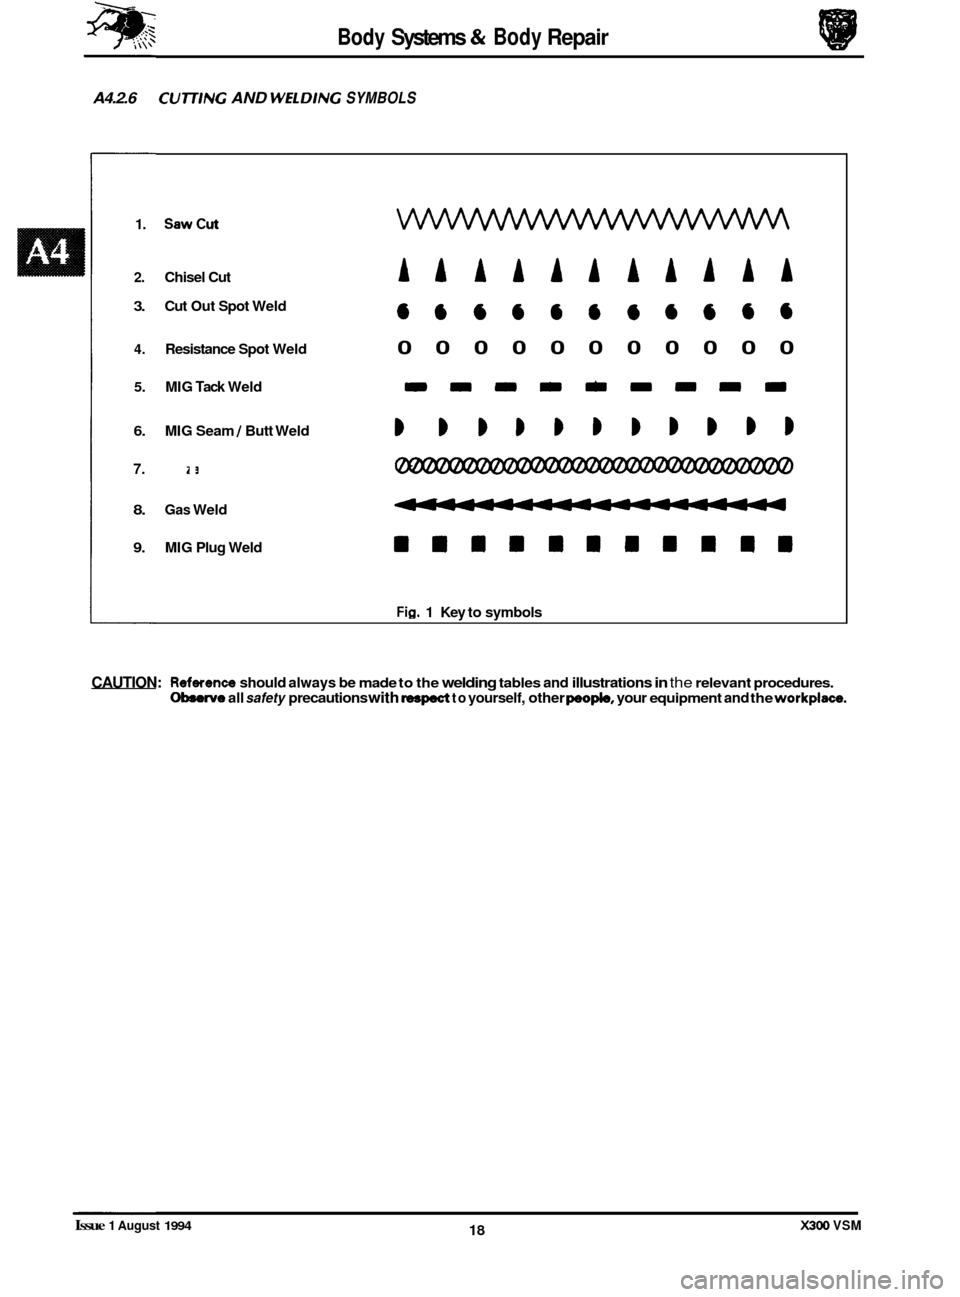
A4.2.6 CU77/NG AND WELDlNG SYMBOLS
1. SawCut
2. Chisel Cut AkAAAkAAkAA
666666@6646
4. Resistance Spot Weld 00000000000
3. Cut Out Spot Weld
5. MIG Tack Weld DmmDmm=m=
6. MIG Seam / Butt Weld BBBBBBBBBBB
7. Braze
8. Gas Weld
9. MIG Plug Weld WIIBIIBBIII
Fig. 1 Key to symbols
CAUTION: Reference should always be made to the welding tables and illustrations in the relevant procedures. Obsenfo all safety precautions with respect to yourself, other peopIe, your equipment and the workplace.
0
0
X300 VSM 18 Issue 1 August 1994
Page 464 of 521
conditions.
. Tighten all fixings to specification.
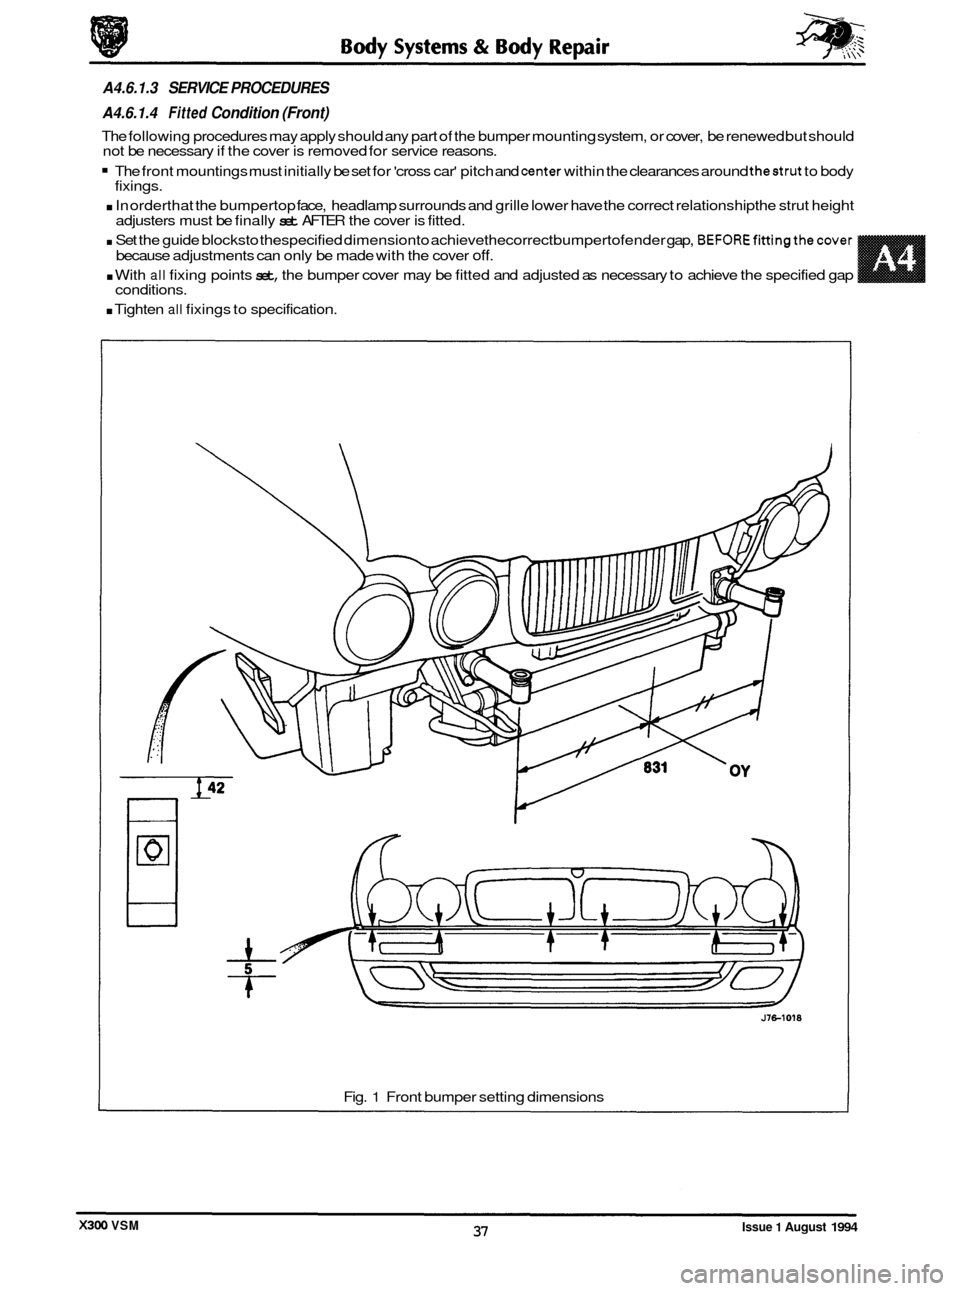
A4.6.1.3 SERVICE PROCEDURES
A4.6.1.4
Fitted Condition (Front)
The following procedures may apply should any part of the bumper mounting system, or cover, be renewed but should
not be necessary if the cover is removed for service reasons.
The front mountings must initially be set for 'cross car' pitch and center within the clearances around thestrut to body
. In orderthat the bumpertop face, headlamp surrounds and grille lower have the correct relationship the strut height
. Set the guide blocksto thespecified dimensionto achievethecorrect bumpertofender gap, BEFOREfittingthecover
. With all fixing points set, the bumper cover may be fitted and adjusted as necessary to achieve the specified gap
fixings.
adjusters must be finally
set AFTER the cover is fitted.
because adjustments can only be made with the cover
off.
Fig. 1 Front bumper setting dimensions
Issue 1 August 1994 37 X300 VSM
Page 465 of 521
Body Systems & Body Repair
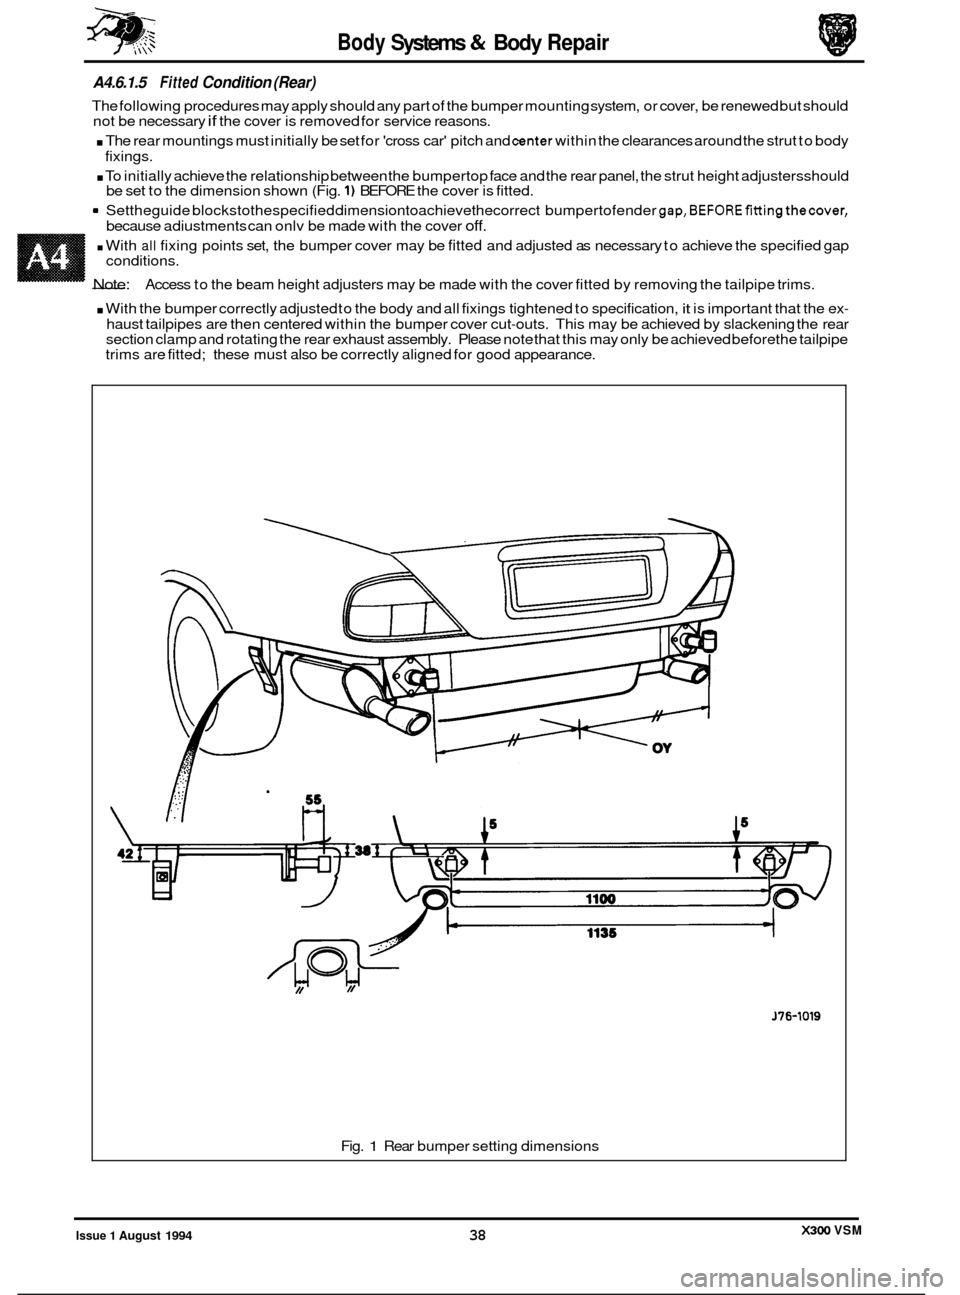
A4.6.1.5 Fitted Condition (Rear)
The following procedures may apply should any part of the bumper mounting system, or cover, be renewed but should
not be necessary if the cover is removed for service reasons.
. The rear mountings must initially be set for 'cross car' pitch and center within the clearances around the strut to body
. To initially achieve the relationship between the bumpertop face and the rear panel, the strut height adjustersshould
9 Settheguide blockstothespecified dimensiontoachievethecorrect bumpertofender gap,BEFOREfittingthecover,
fixings.
be set to the dimension shown (Fig.
1) BEFORE the cover is fitted.
because adiustments can onlv be made with the cover
off.
. With all fixing points set, the bumper cover may be fitted and adjusted as necessary to achieve the specified gap
- Note:
conditions.
Access to the beam height adjusters may be made with the cover fitted by removing the tailpipe trims.
. With the bumper correctly adjusted to the body and all fixings tightened to specification, it is important that the ex-
haust tailpipes are then centered within the bumper cover cut-outs. This may be achieved by slackening the rear
section clamp and rotating the rear exhaust assembly. Please note that this may only be achieved before the tailpipe
trims are fitted; these must also be correctly aligned for good appearance.
J76-1019
Fig. 1 Rear bumper setting dimensions
X300 VSM Issue 1 August 1994 38
Page 481 of 521
84
- Security System - RESTRICTED /SSU€
A5.2.7 Inclination sensor
Located adjacent to the SLCM underthe luggage compartment LH side linerto give indication of unauthorized jacking / lifting of the vehicle.
A5.2.8 Intrusion sensors
Located above each front door to give indication of unauthorized entry into the vehicle passenger compartment.
A5.2.9 Reader exciter coil
Forms an integral part of the ignition switch to prove correct key insertion by communicating key transponder signal
to control module.
A5.2.10 Reader exciter module
Located on the steering column to receive signals from the reader/ exciter coil and disarm the engine immobilization
system on correct demand.
A5.2.11 Security active indicator
An LED built into the central locking switch to indicate when security system is armed.
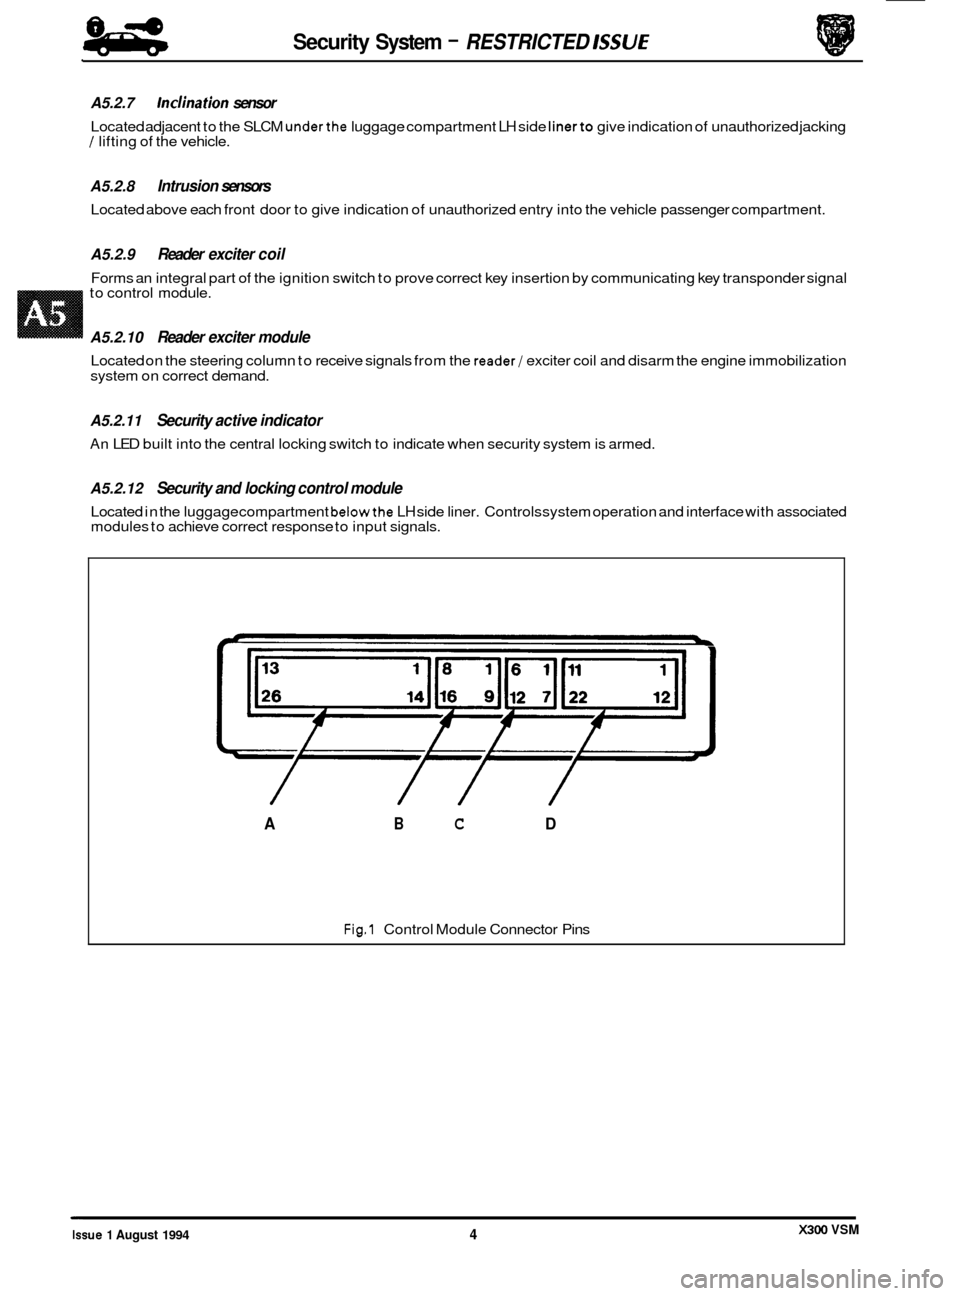
A5.2.12 Security and locking control module
Located in the luggage compartment belowthe LH side liner. Controls system operation and interface with associated
modules to achieve correct response to input signals.
L
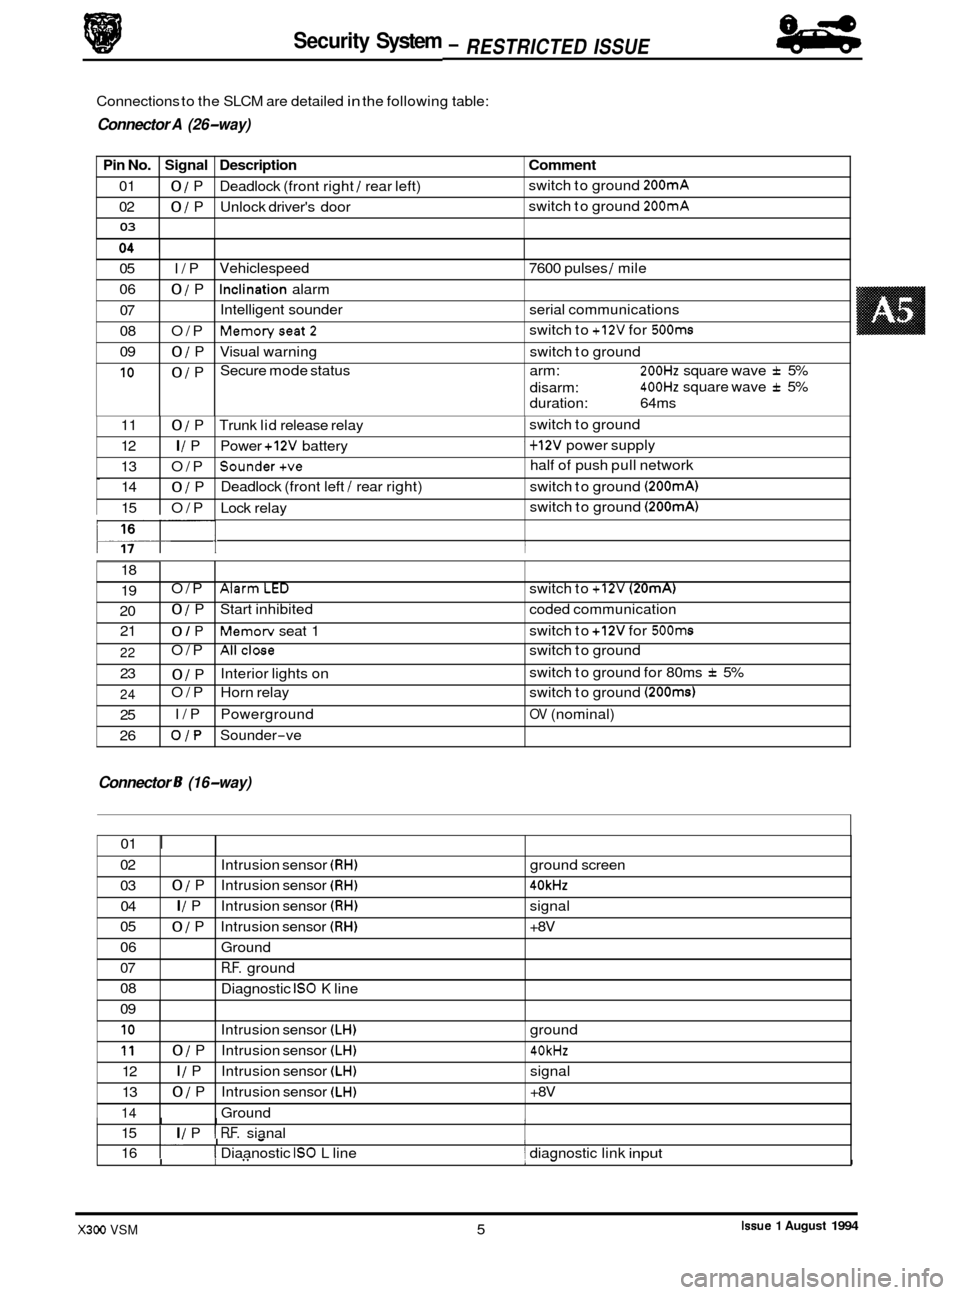
Fig.1 Control Module Connector Pins
/ // /
A B C D
X300 VSM Issue 1 August 1994 4
Page 482 of 521
Security System
Pin No. Signal Description
01 0 / P Deadlock (front right / rear left)
02
0 / P Unlock driver's door
03
Connections to the SLCM are detailed in the following table:
9 Connector A (26-way)
Comment
switch to ground 200mA
switch to ground 200mA
05 I/P
06
0 / P
07
08 O/P
09
0 / P
10 0 / P Vehiclespeed
7600 pulses
/ mile
Inclination alarm
Intelligent sounder serial communications
Memoryseat2
Visual warning switch to ground
Secure mode status arm:
200Hz square wave f 5%
400Hz square wave f 5%
switch
to
+12V for 500ms
disarm:
duration: 64ms
0
117- I I
11 0 / P Trunk lid release relay 1 switch to ground
12
I / P Power +12V battery 1 + 12V power supply
13 O/P
Sounder+ve half of push pull network
14
0 / P Deadlock
(front left / rear right) switch to ground (200mA)
15 O/P Lock relay switch
to ground (200mA)
18
19
20 21 O/P
AlarmLED switch
to +12V (20mA)
0 / P Start inhibited coded communication
0 / P Memorv seat 1 switch
to +12V for 500ms
Connector 8 (16-way)
22
23
24
25
26 O/P
Allclose switch
to ground
0 / P
O/P Horn relay switch to ground
(200ms)
I/P Powerground OV (nominal)
OJP Sounder-ve
Interior lights
on switch
to ground for 80ms
f 5%
01
I
02
03 04
05
06
07
08
09
I I I I 15 I I / P I R.F. sianal
Intrusion
sensor
(RH) ground screen
0 / P Intrusion sensor (RH) 40kHz
I / P Intrusion sensor (RH) signal
0 / P Intrusion sensor (RH) +8V
Ground
R.F. ground
Diagnostic
IS0 K line
I. I - I 16 I I Diaanostic IS0 L line 1 diagnostic link input
10
11
12
13
14
.I
I I" 1- I
Intrusion sensor (LH) ground
0 / P Intrusion sensor (LH) 40kHz
I / P Intrusion sensor (LH) signal
0 / P Intrusion sensor (LH) +8V
Ground
Issue 1 August 1994 X300 VSM 5
84
- RESTRICTED ISSUE -
Page 484 of 521
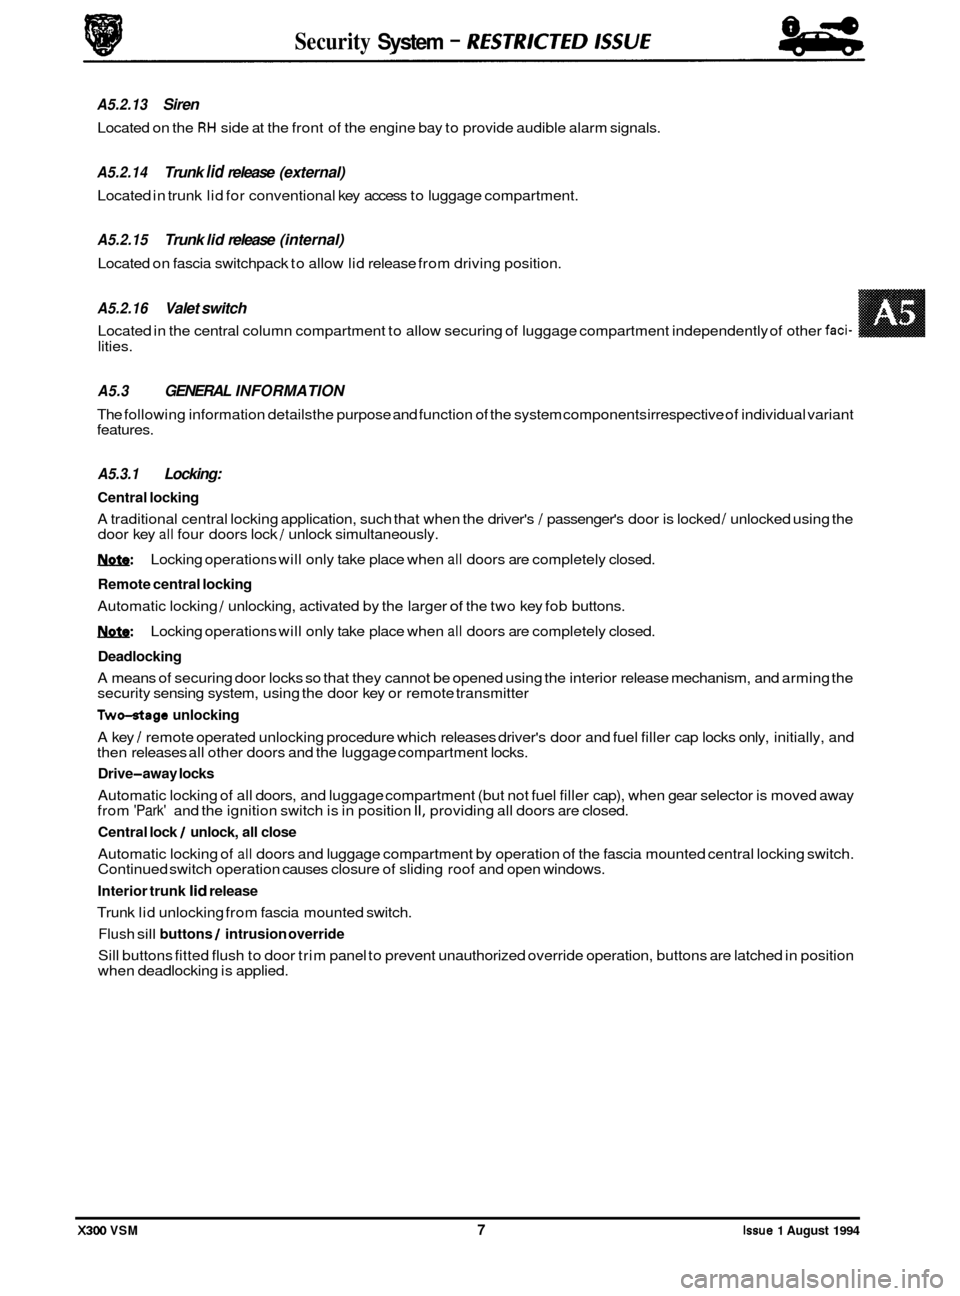
lities.
A5.3 GENERAL INFORMATION
The following information detailsthe purpose and function of the system components irrespective of individual variant
features.
A5.3.1 Locking:
Central locking
A traditional central locking application, such that when the driver's / passenger's door is locked / unlocked using the
door key all four doors lock / unlock simultaneously.
1ynfe: Locking operations will only take place when all doors are completely closed.
Remote central locking
Automatic locking / unlocking, activated by the larger of the two key fob buttons.
1ynfe: Locking operations will only take place when all doors are completely closed.
Deadlocking
A means of securing door locks so that they cannot be opened using the interior release mechanism, and arming the
security sensing system, using the door key or remote transmitter
Two-otage unlocking
A key / remote operated unlocking procedure which releases driver's door and fuel filler cap locks only, initially, and
then releases all other doors and the luggage compartment locks.
Drive-away locks
Automatic locking of all doors, and luggage compartment (but not fuel filler cap), when gear selector is moved away
from 'Park' and the ignition switch is in position II, providing all doors are closed.
Central lock / unlock, all close
Automatic locking of all doors and luggage compartment by operation of the fascia mounted central locking switch.
Continued switch operation causes closure of sliding roof and open windows.
Interior trunk lid release
Trunk lid unlocking from fascia mounted switch.
Flush sill buttons / intrusion override
Sill buttons fitted flush to door trim panel to prevent unauthorized override operation, buttons are latched in position
when deadlocking is applied.
Security System - RESTRKTED lSSUE
A5.2.13 Siren
Located on the RH side at the front of the engine bay to provide audible alarm signals.
A5.2.14 Trunk lid release (external)
Located in trunk lid for conventional key access to luggage compartment.
A5.2.15 Trunk lid release (internal)
Located on fascia switchpack to allow lid release from driving position.
A5.2.16 Valet switch
Located in the central column compartment to allow securing of luggage compartment independently of other faci-
X300 VSM 7 Issue 1 August 1994