automatic transmission fluid JAGUAR XJ6 1994 2.G Workshop Manual
[x] Cancel search | Manufacturer: JAGUAR, Model Year: 1994, Model line: XJ6, Model: JAGUAR XJ6 1994 2.GPages: 521, PDF Size: 17.35 MB
Page 8 of 521
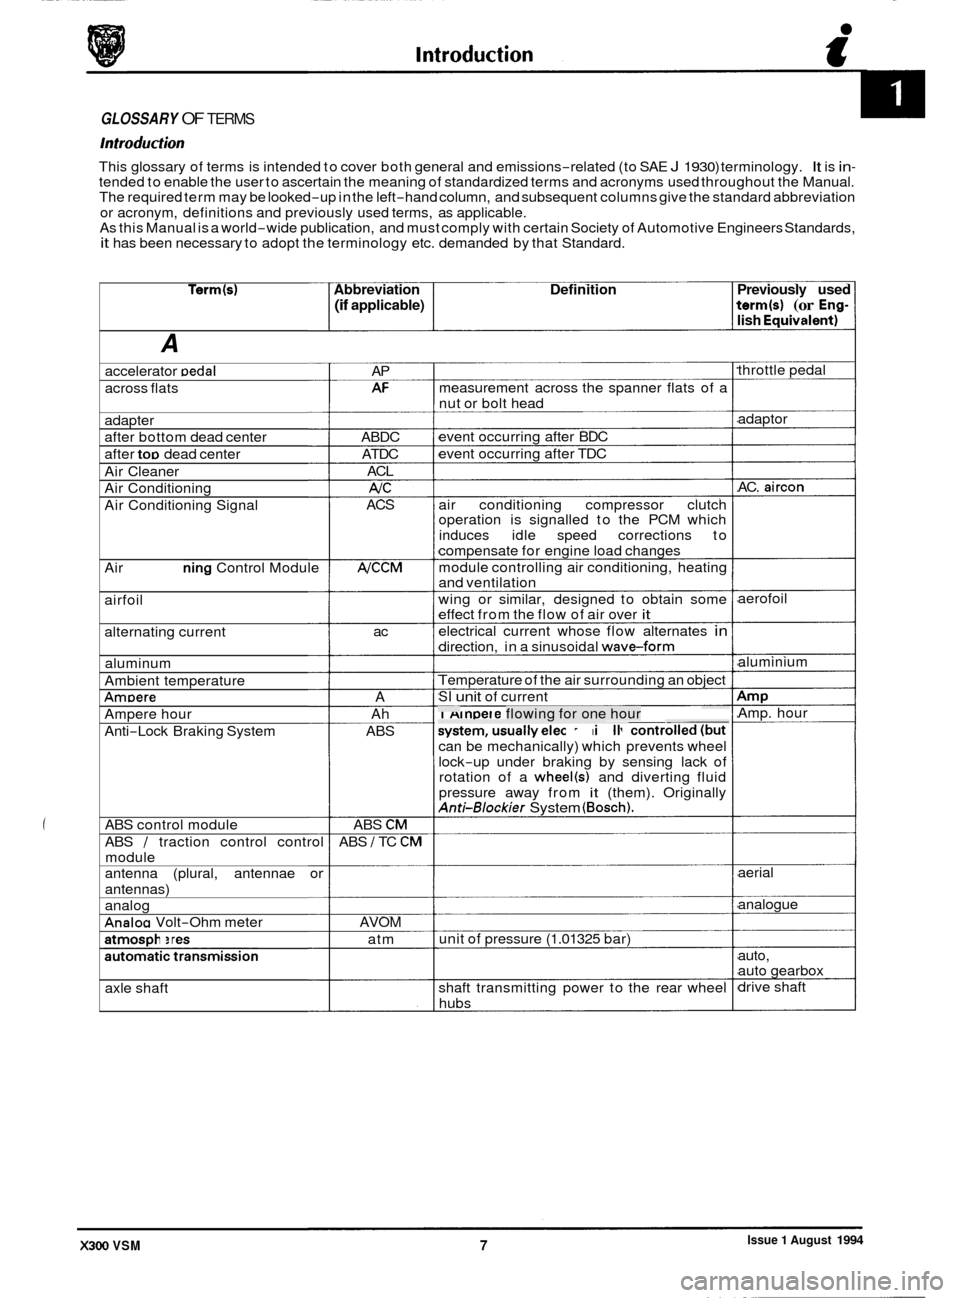
GLOSSARY OF TERMS
Introduction
This glossary of terms is intended to cover both general and emissions-related (to SAE J 1930) terminology. It is in- tended to enable the user to ascertain the meaning of standardized terms and acronyms used throughout the Manual.
The required term may be looked-up in the left-hand column, and subsequent columns give the standard abbreviation
or acronym, definitions and previously used terms, as applicable.
As this Manual is a world
-wide publication, and must comply with certain Society of Automotive Engineers Standards, it has been necessary to adopt the terminology etc. demanded by that Standard.
Term(s) Abbreviation Definition Previously used
(if applicable) term(s) (or Eng- lish Eauivalent)
A
throttle pedal
accelerator Dedal AP
AI= measurement across the spanner flats of a
across flats
nut or bolt head
adaptor
AC.
aircon
adapter
after bottom dead center
after
too dead center event
occurring after BDC
event occurring after TDC
ABDC
ATDC ACL
AIC
ACS
Air
Cleaner
Air Conditioning
Air Conditioning Signal air conditioning
compressor clutch
operation is signalled to the PCM which
induces idle speed corrections to
compensate for engine load changes
module controlling air conditioning, heating
and ventilation
wing or similar, designed to obtain some
effect from the flow of air over
it
electrical current whose flow alternates in
direction, in a sinusoidal waveform
NCCM Air Conditioning Control Module
airfoil aerofoil
alternating current ac
aluminium
aluminum
Ambient temperature Temperature
of the air surrounding an object
SI unit of current AmDere A Amp Amp. hour -~ 1 Ampere flowing for one hour
system, usually ele&o&ally controlled (but ~- __. .. . Ampere hour
Anti
-Lock Braking System Ah
ABS can be mechanically) which prevents wheel
lock
-up under braking by sensing lack of
rotation of a wheel(s) and diverting fluid
pressure away from
it (them). Originally Anti-Blockier System (Bosch).
ABS control module
ABS
/ traction control control
module ABS
CM
ABS I TC CM
aerial
antenna (plural, antennae or
antennas)
analog
Analoa Volt-Ohm meter analogue
AVOM unit of pressure
(1.01325 bar)
atmospheres
automatic transmission atm
auto,
auto gearbox
drive shaft
axle shaft shaft
transmitting power to the rear wheel
hubs
.-
Issue 1 August 1994 X300 VSM 7
Page 22 of 521
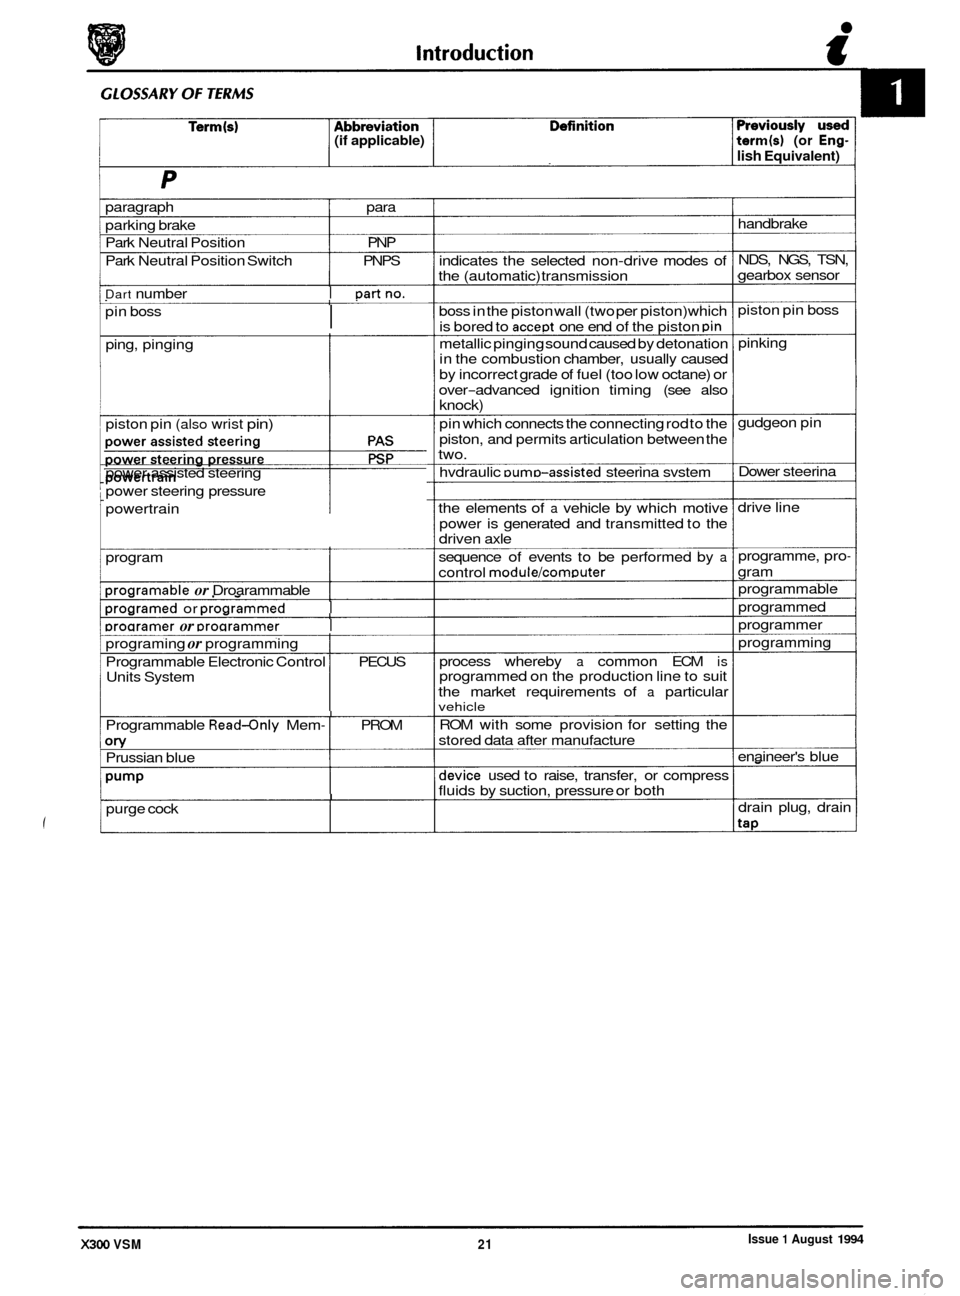
(if applicable) term(s) (or Eng-
lish Equivalent)
paragraph para
parking brake
Park Neutral Position PNP
Park Neutral Position Switch PNPS
Dart number I Dartno.
I pin boss
ping, pinging
piston pin
(also wrist pin)
power assisted steering
power steering pressure
. powertrain
program
Droaramable or Droarammable I
Droaramed or Droarammed I
Droaramer or Droarammer I
programing or programming
Programmable Electronic Control
I PECUS
Units System
I Programmable Read-only Mem- I PROM
on/ Prussian blue
Pump
purge cock I
indicates the selected non-drive modes of
the (automatic) transmission
boss in the piston wall (two per piston) which
is bored to
accept one end of the piston pin
metallic pinging sound caused by detonation
in the combustion chamber, usually caused
by incorrect grade of fuel (too low octane) or
over
-advanced ignition timing (see also knock)
pin which connects the connecting rod to the
piston, and permits articulation between the
two.
hvdraulic
DumD-assisted steerina svstem
the elements of
a vehicle by which motive
power is generated and transmitted to the
driven axle
sequence of events to be performed by
a
control module/comDuter
process whereby a common ECM is programmed on the production line to suit
the market requirements of
a particular vehicle
ROM with some provision for setting the
stored data after manufacture
device used to raise, transfer, or compress
fluids by suction, pressure or both handbrake
NDS, NGS, TSN,
gearbox sensor
piston pin boss
pinking
gudgeon pin
Dower steerina
drive line
programme, pro
-
gram
programmable
programmed
programmer
programming
enaineer's blue
drain plug, drain
tap
Issue 1 August 1994 X300 VSM 21
Page 27 of 521
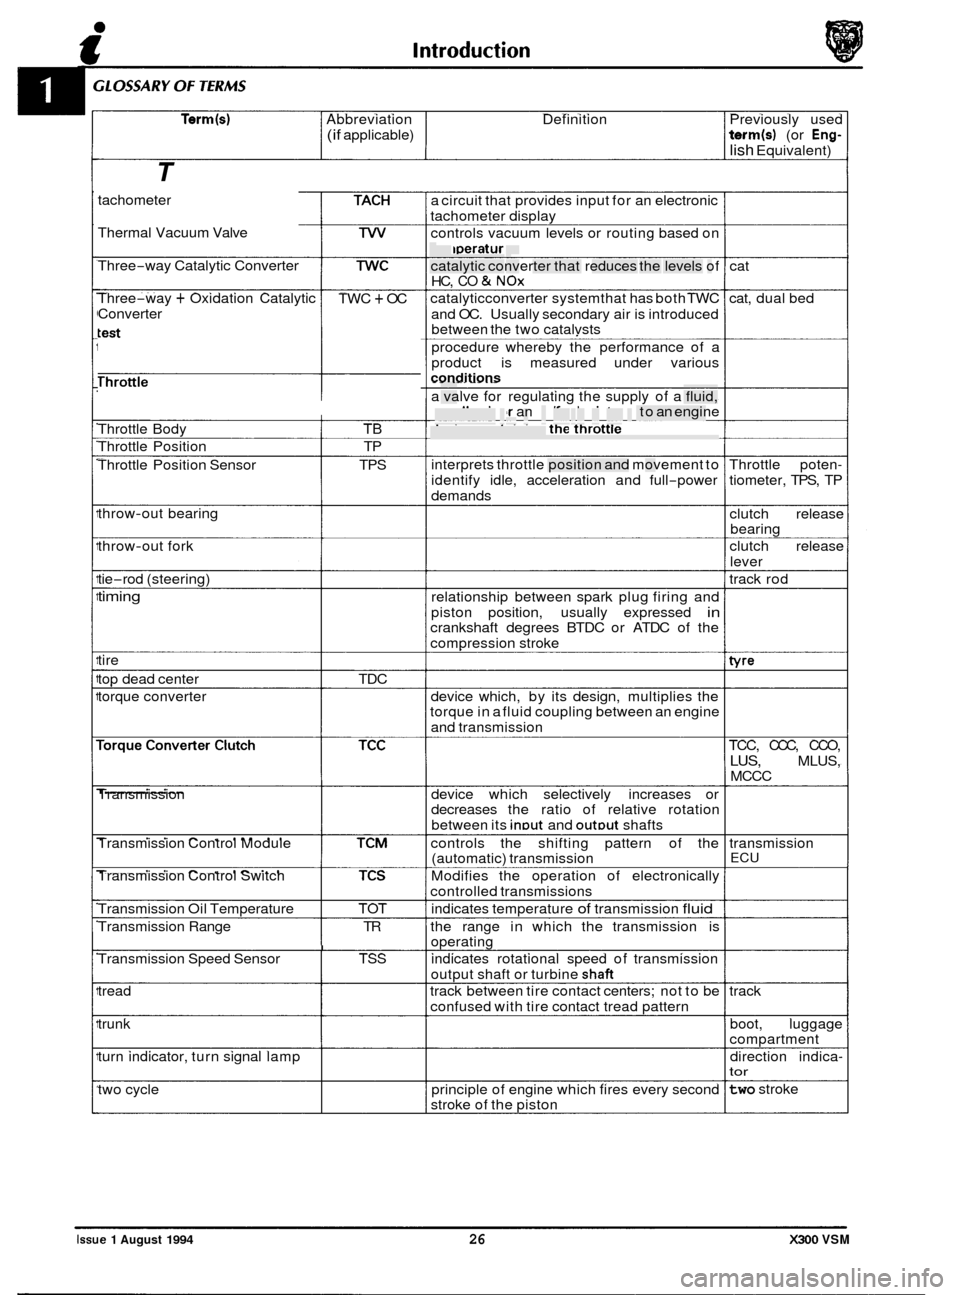
Term(s) Abbreviation Definition Previously used
(if applicable) term(s) (or Eng-
lish Equivalent)
T
tachometer
Thermal Vacuum Valve
Three
-way Catalytic Converter
Three
-way + Oxidation Catalytic
Converter TWC + OC
Throttle
------I
Throttle Body TB
Throttle Position TP
Throttle Position Sensor TPS
throw
-out bearing
throw
-out fork
tie
-rod (steering)
timing
tire
top dead center TDC
torque converter
Transmission
Transmission Control Module
Transmission Control Switch
Transmission Oil Temperature TOT
Transmission Range TR
I Transmission Speed Sensor TSS
tread
trunk
turn indicator, turn signal lamp
two cycle a
circuit that provides input for an electronic
tachometer display
controls vacuum levels or routing based on
temperature
catalytic converter that reduces the levels of
HC,
CO & NOx
catalyticconverter systemthat has both TWC
and OC. Usually secondary air is introduced
between the two catalvsts
procedure whereby the performance of a
product is measured under various
conditions - - . -. . . - . . -
a valve for regulating the supply of a fluid,
usually air or an aidfuel mixture, to an engine
device containing the throttle
interprets throttle position and movement to
identify idle, acceleration and full
-power
demands
relationship between spark plug firing and
piston position, usually expressed
in crankshaft degrees BTDC or ATDC of the
compression stroke
device which, by its design, multiplies the
torque in a fluid coupling between an engine
and transmission
device which selectively increases or
decreases the ratio of relative rotation
between its
inDut and outDut shafts
controls the shifting pattern of the
(automatic) transmission
Modifies the operation of electronically
controlled transmissions
indicates temperature
of transmission fluid
the range in which the transmission is
operating
indicates rotational speed of transmission
output shaft or turbine
shaft
track between tire contact centers; not to be
confused with tire contact tread pattern
principle of engine which fires every second
stroke of the piston cat
cat, dual bed
Throttle poten
-
tiometer, TPS, TP
clutch release
bearing
clutch release
lever
track rod
tvre
TCC, CCC, CCO,
LUS, MLUS,
MCCC
transmission
ECU
track boot, luggage
compartment
direction indica
- tor
two stroke
Issue 1 August 1994 26 X300 VSM
Page 56 of 521
Cooling System (AJl6) m
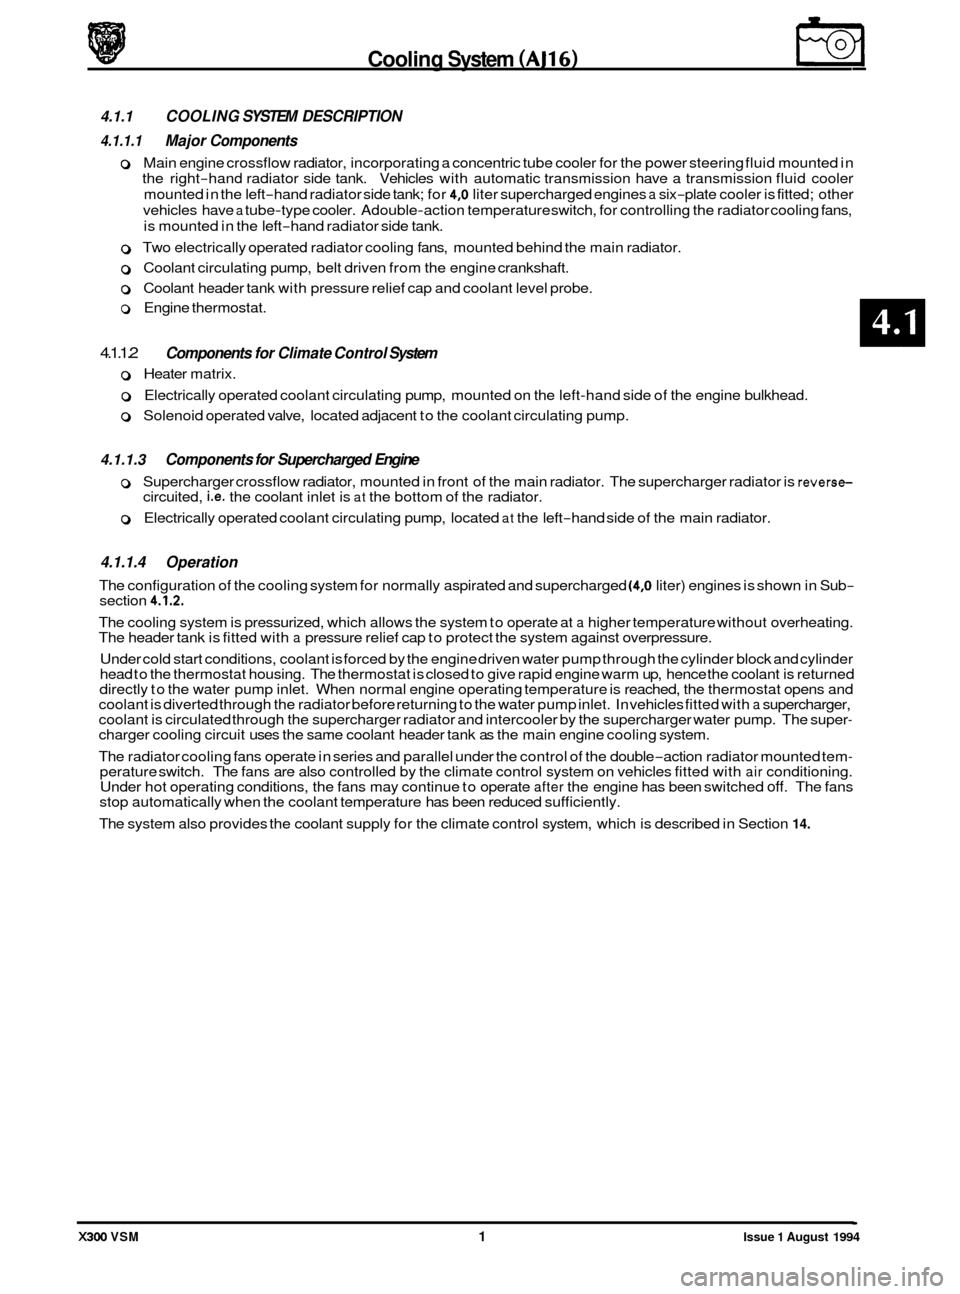
4.1.1 COOLING SYSTEM DESCRIPTION
4.1.1.1 Major Components
o Main engine crossflow radiator, incorporating a concentric tube cooler for the power steering fluid mounted in
the right
-hand radiator side tank. Vehicles with automatic transmission have a transmission fluid cooler
mounted in the left
-hand radiator side tank; for 4,O liter supercharged engines a six-plate cooler is fitted; other
vehicles have
a tube-type cooler. Adouble-action temperature switch, for controlling the radiator cooling fans,
is mounted in the left
-hand radiator side tank.
0 Two electrically operated radiator cooling fans, mounted behind the main radiator.
0 Coolant circulating pump, belt driven from the engine crankshaft.
0 Coolant header tank with pressure relief cap and coolant level probe.
o Engine thermostat.
4.1.1.2
0 Heater matrix.
o Electrically operated coolant circulating pump, mounted on the left-hand side of the engine bulkhead.
o Solenoid operated valve, located adjacent to the coolant circulating pump.
Components for Climate Control System
4.1.1.3 Components for Supercharged Engine
0 0 Supercharger crossflow radiator, mounted in front of the main radiator. The supercharger radiator is reverse- circuited, i.e. the coolant inlet is at the bottom of the radiator.
0 Electrically operated coolant circulating pump, located at the left-hand side of the main radiator.
4.1.1.4 Operation
The configuration of the cooling system for normally aspirated and supercharged (4,O liter) engines is shown in Sub- section 4.1.2.
The cooling system is pressurized, which allows the system to operate at a higher temperature without overheating.
The header tank is fitted with a pressure relief cap to protect the system against overpressure.
Under cold start conditions, coolant is forced by the engine driven water pump through the cylinder block and cylinder
head to the thermostat housing. The thermostat is closed to give rapid engine warm up, hence the coolant is returned
directly to the water pump inlet. When normal engine operating temperature is reached, the thermostat opens and
coolant is diverted through the radiator before returning to the water pump inlet. In vehicles fitted with
a supercharger,
coolant is circulated through the supercharger radiator and intercooler by the supercharger water pump. The super- charger cooling circuit uses the same coolant header tank as the main engine cooling system.
The radiator cooling fans operate in series and parallel under the control of the double
-action radiator mounted tem- perature switch. The fans are also controlled by the climate control system on vehicles fitted with air conditioning.
Under hot operating conditions, the fans may continue to operate after the engine has been switched off. The fans
stop automatically when the coolant temperature has been reduced sufficiently.
The system also provides the coolant supply for the climate control system, which is described in Section
14.
X300 VSM 1 Issue 1 August 1994
Page 66 of 521
Cooling System (V12
4.2.1 COOLING SYSTEM DESCRIPTION I
4.2.1.1 Major Components
o Engine crossflow radiator, incorporating a concentric tube cooler for the power steering fluid mounted in the
left
-hand radiator side tank. Vehicles with automatic transmission have a six-plate transmission fluid cooler
mounted in the right
-hand radiator side tank. A double-action temperature switch, for controlling the electric
radiator cooling fans, is mounted in the left
-hand radiator side tank.
0 Engine driven, viscous-coupled, radiator cooling fan
0 Two electrically operated radiator cooling fans, mounted in front of the radiator.
o Coolant circulating pump, belt driven from the engine crankshaft.
0 Coolant header tank with pressure relief cap and coolant level probe.
0 Two engine thermostats, one in each cylinder bank.
4.2.1.2
0 Heater matrix.
0 Electrically operated coolant circulating pump, mounted on the left-hand side of the engine bulkhead.
o Solenoid operated valve, located adjacent to the coolant circulating pump.
Components for Climate Control System
1
4.2.1.3 Operation
The configuration of the cooling system is shown in Sub-section 4.2.2.
The cooling system is pressurized, which allows the system to operate at a higher temperature without overheating.
The header tank is fitted with a pressure relief cap to protect the system against overpressure.
Under cold start conditions, coolant is forced by the engine driven water pump through each cylinder block and cylin
- der head to the thermostat housings. The thermostats are closed to give rapid engine warm up, hence the coolant is
returned via the engine cross pipe to the water pump inlet. When normal engine operating temperature is reached,
the thermostats open and coolant is diverted through the radiator before returning to the water pump inlet.
If the engine driven fan is unable to provide sufficient cooling, the electrically operated fans operate in series and paral
-
lel underthe control of the radiator mounted temperature switch. Under hot operating conditions, the electric fans may
continue to operate after the engine has been switched off. The fans stop automatically when the coolant temperature
has been reduced sufficiently.
The system also provides the coolant supply for the climate control system, which is described in Section 14.
I
I X300 VSM 1 Issue 1 August 1994
Page 116 of 521
Manual Transmission & clutch (AJ16)
I Molykote FB 180 grease
Brake (clutch) fluid
- minimum
DOT 4
Dexron IID Transmission oil
Loctite
573
Tivoli Kay Adhesives No. 5696
Withdrawal arm pivots / Gearshift lever ball
Clutch hydraulic system
Front cover securing bolts
Exhaust sealer also used
in
ZF automatic
transmissions
Application
Material removal to clean up clutch face
IU SERVICE DATA
Specification
Up to lmm maximum
X300 VSM iii Issue 1 August 1994
Page 136 of 521

Automatic Transmission (AJ16)
SECTION CONTENTS
Subsection Title SRO Page
I to IV ............ Preliminary Pages .................................................................... i
8.1.1 ............. General Description .................................................................. 1
8.1.2 ............. Transmission Fluid. Renew (3. 2L and 4. OL) ......................... 44.24.02 ............. 6
8.1.3 ............. Transmission Control Module. Renew (4. OL) ........................ 44.15.32 ............. 7
8.1.4 ............. Transmission Rotary Switch. Adjust (4. OL) .......................... 44.15.37 ............. 8
8.1.5
............. Transmission Rotary Switch. Renew (4.0L) .......................... 44.15.36 ............. 9
8.1.6 ............. Transmission Fluid Filter, Renew (3. 2L and 4. OL)
8.1.7 ............. Fluid Pan. Renew (4. OL) ......................................... 44.24.04 ............
8.1.8 ............. Fluid Pan. Renew (3. 2L) ......................................... 44.24.04 ............ 12
8.1.9
............. Fluid Pan Gasket. Renew (3. 2L) .................................. 44.24.05 ............ 12
8.1.10.
........... Transmission Speed Sensor, Renew (4. OL) .......................... 44.15.34 ............ 13
8.1.1 1 ............ Transmission Internal Harness Multi-pin Socket '0' ring. Renew (4. OL) . 4424.20 ............ 14
Valve Body Assembly, Renew (4. OL) ............................... 44.40.01 ............ 15
.................... 44.24.07 ............ 11
11
8.1.12 ............
8.1.13 ............ Valve Body Assembly, Renew (3.2L) ............................... 44.40.01 ............ 16
X300 VSM i Issue 1 August 1994
Page 143 of 521
bZF Automatic Transmission (AJ16) -
0
8.1.2 TRANSMISSION FLUID, RENEW
SRO 44.24.02
= Raise the hood and fit a fender cover.
. Raise the vehicle on a ramp.
. Place a drain tin in position beneath the transmission drain
Release and remove the transmission drain plug; allow
. Fit the drain plug with a new washer and torque tighten.
Reposition the drain tin beneath the dipstick tube union.
Remove the screw securing the dipstick tube bracket.
. Release the dipstick tube union nut and disconnect the
tube from the fluid pan.
. Drain the transmission fluid.
Clean the tube unions, reconnect the dipstick tube to the
. Lower the vehicle on the ramp.
. Remove the transmission dipstick.
. Renew the transmission fluid filter, see Subsection 8.1.6.
Fill the transmission with the correct fluid, see the ZF Auto-
Note: It will not be possible to get all the initial fill quantity
of fluid into the transmission.
. Refit the dipstick.
. Startthe engine, apply all brakes and run the transmission
With the engine still running, remove the dipstick.
Clean the dipstick and refit.
Remove the dipstick and check the transmission fluid
. Add fluid until the correct level is achieved.
. Stop the engine and refit the dipstick.
. Checkfluidleveltothe'HOT'marksaftera20mileroad run
(3,2L AND 4,OL)
Plug.
the fluid to drain.
fluid pan and torque tighten the union nut.
0
matic Transmissions Service Manual, General Data.
through
all gear positions and select 'Park'.
level. Remove the fender cover and lower the hood.
to ensure accurate results.
m
e
0
X300 VSM Issue 1 August 1994 6
Page 145 of 521
Automatic Transmission (AJ16)
8.1.4 TRANSMISSION ROTARY SWITCH, ADjUST
SRO 44.15.37
. Raise the vehicle on a ramp.
. Position the shift lever to 'N' ensuring that the stalk enters
the gate
'N' notch centrally.
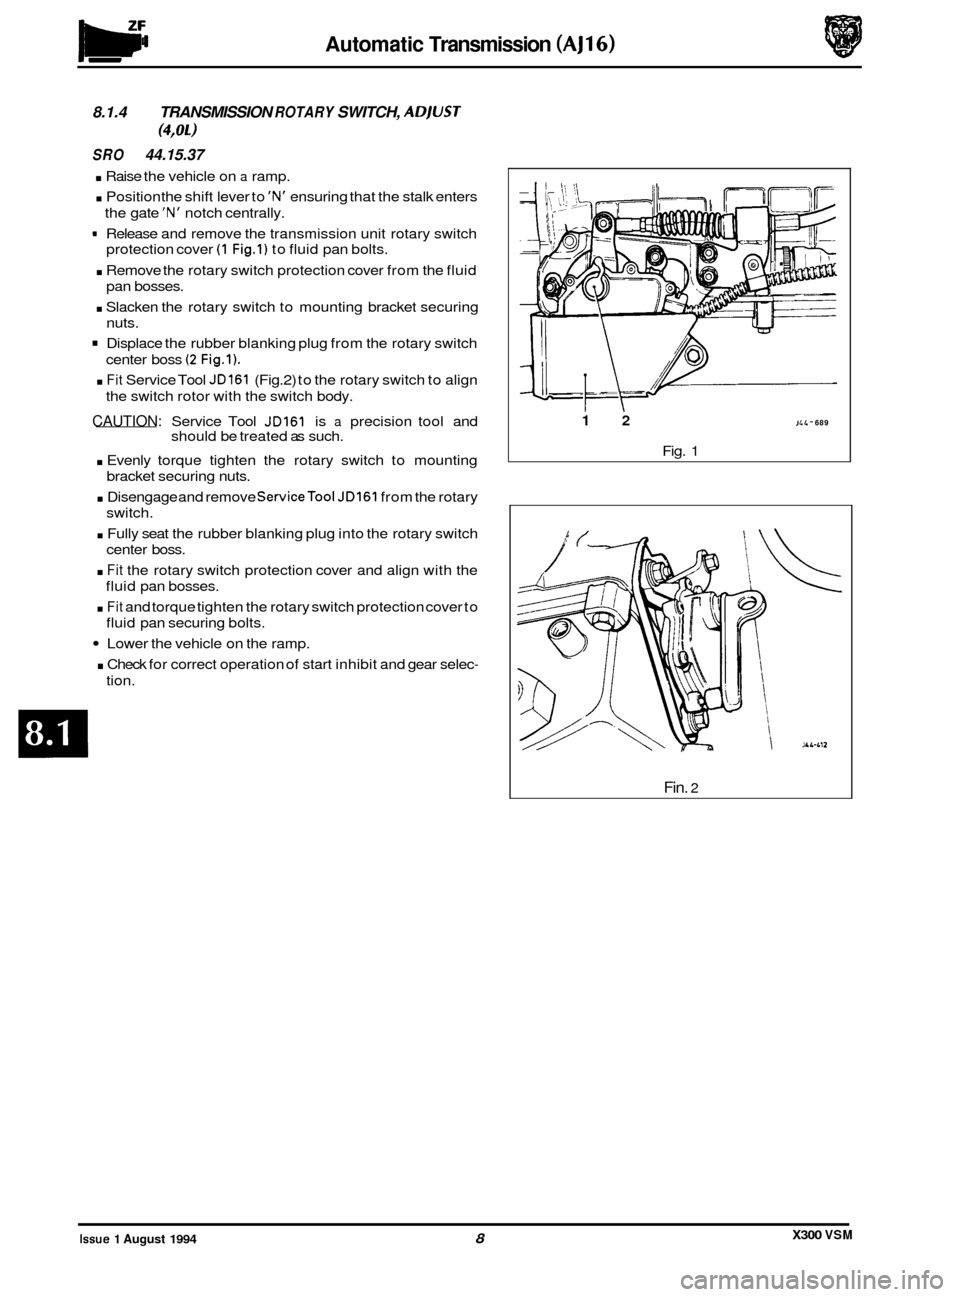
9 Release and remove the transmission unit rotary switch
protection cover
(1 Fig.1) to fluid pan bolts.
. Remove the rotary switch protection cover from the fluid
pan bosses.
. Slacken the rotary switch to mounting bracket securing
nuts.
Displace the rubber blanking plug from the rotary switch
center boss
(2 Fig.1).
. Fit Service Tool JD161 (Fig.2) to the rotary switch to align
the switch rotor with the switch body.
CAUTION: Service Tool JD161 is a precision tool and
. Evenly torque tighten the rotary switch to mounting
. Disengage and remove ServiceTool JD161 from the rotary
. Fully seat the rubber blanking plug into the rotary switch
. Fit the rotary switch protection cover and align with the
. Fit and torque tighten the rotary switch protection cover to
Lower the vehicle on the ramp.
. Check for correct operation of start inhibit and gear selec-
(4,011
should be treated as such.
bracket securing nuts.
switch.
center boss.
fluid pan bosses.
fluid pan securing bolts.
tion.
12 JL 4 - 689
Fig. 1
Fin. 2
X300 VSM Issue 1 August 1994 8
Page 148 of 521
Automatic Transmission (AJl6)
8.1.6 TRANSMISSION FLUID FILTER, RENEW
SRO 44.24.07
9 Raise the hood and fit a fender cover.
. Raise the vehicle on a ramp.
. Drain the transmission lubrication system, see Sub-sec-
. Removethefluid pan,seeSub-section8.1.7 (4,OL)orSub-
. Release and remove the fluid filter securing screws; dis-
. Remove and discard the filter '0' ring.
. Clean the new filter and mating faces.
. Fit the '0' ring to the new filter; fit and seat the filter assem-
. Fit and torque tighten the filter securing screws.
. Refitthefluidpan,seeSub-section8.1.7 (4,OL)orSub-sec-
. Lower the vehicle on the ramp.
. Refill the transmission unit with fluid, see Subsection
8.1.2.
Remove the fender cover and lower the hood.
(3,2L AND 4,011
tion 8.1.2.
section
8.1.8 (3,2L).
place and remove the fluid filter.
bly to the valve body.
tion 8.1.8
(3,2L).
8.1.7 FLUID PAN, RENEW (4,OL)
SRO 44.24.04
. Raise the hood and fit a fender cover.
. Raise the vehicle on a ramp.
. Drain the transmission lubrication system, see Sub-sec-
tion 8.1.2.
Release and remove the rotary switch protection cover to
fluid pan securing screws; remove the rotary switch
protect ion cover.
Release and remove the fluid pan securing bolts and
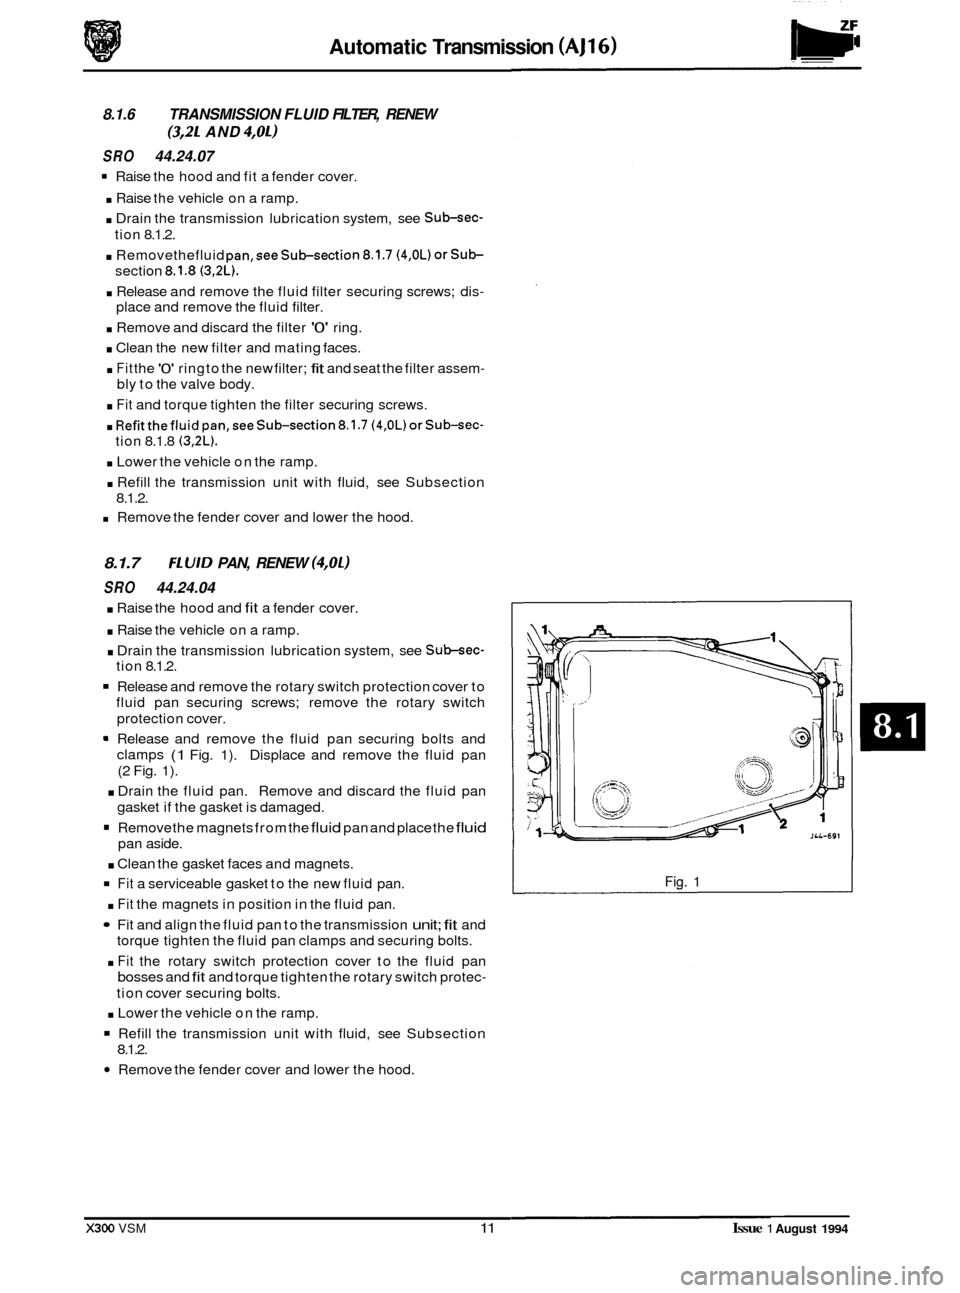
clamps
(1 Fig. 1). Displace and remove the fluid pan
(2 Fig. 1).
. Drain the fluid pan. Remove and discard the fluid pan
gasket if the gasket is damaged.
Remove the magnets from the fluid pan and place the fluid
pan aside.
. Clean the gasket faces and magnets.
Fit a serviceable gasket to the new fluid pan.
. Fit the magnets in position in the fluid pan.
Fit and align the fluid pan to the transmission unit; fit and
torque tighten the fluid pan clamps and securing bolts.
. Fit the rotary switch protection cover to the fluid pan
bosses and fit and torque tighten the rotary switch protec-
tion cover securing bolts.
. Lower the vehicle on the ramp.
Refill the transmission unit with fluid, see Subsection
Remove the fender cover and lower the hood.
8.1.2.
Fig. 1
X300 VSM 11 Issue 1 August 1994