warning light JAGUAR XJ6 1997 2.G Owner's Guide
[x] Cancel search | Manufacturer: JAGUAR, Model Year: 1997, Model line: XJ6, Model: JAGUAR XJ6 1997 2.GPages: 227, PDF Size: 7.2 MB
Page 123 of 227
3261 Jaguar XJ6
9
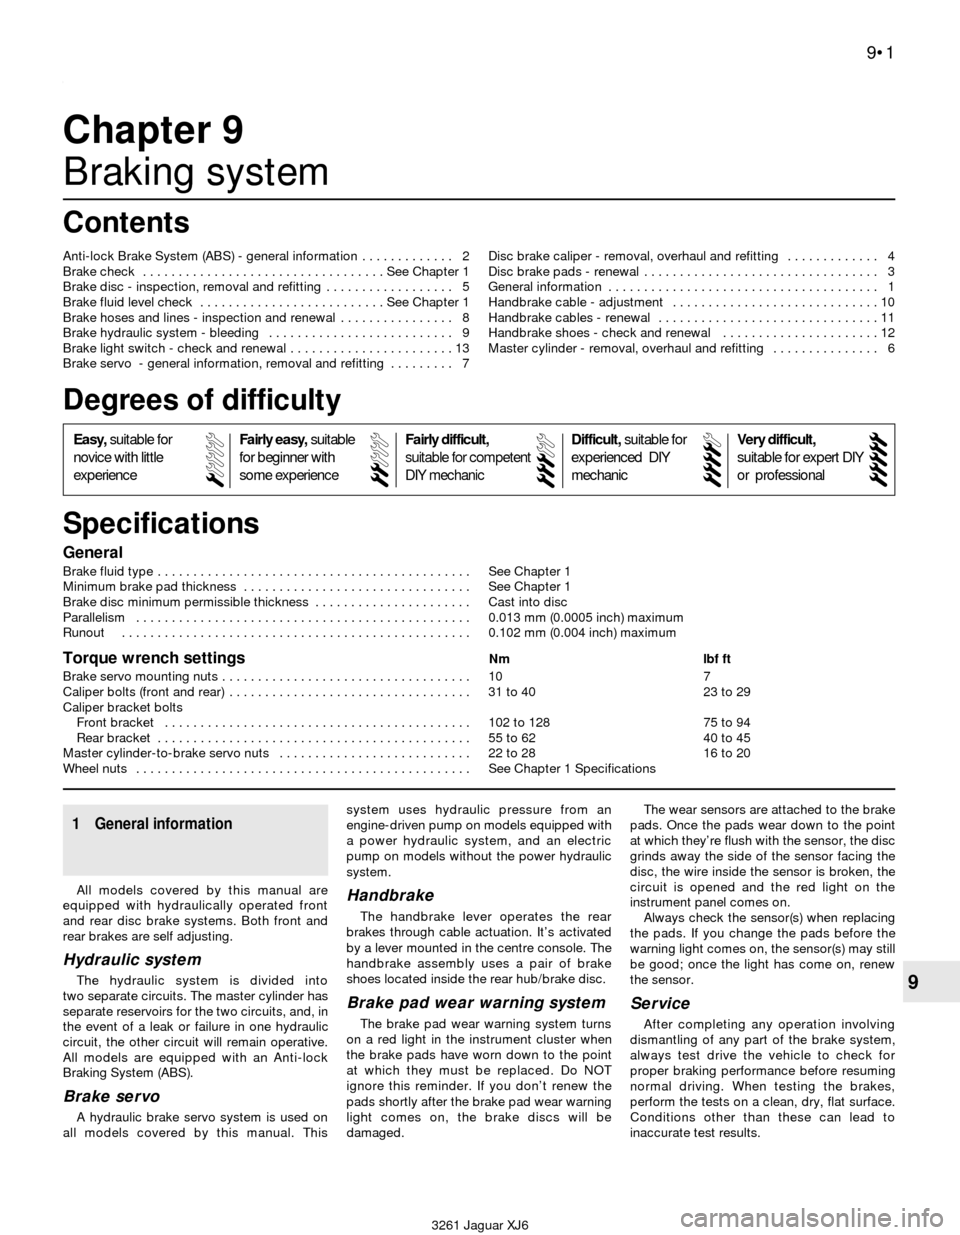
Chapter 9
Braking system
General
Brake fluid type . . . . . . . . . . . . . . . . . . . . . . . . . . . . . . . . . . . . . . . . . . . . See Chapter 1
Minimum brake pad thickness . . . . . . . . . . . . . . . . . . . . . . . . . . . . . . . . See Chapter 1
Brake disc minimum permissible thickness . . . . . . . . . . . . . . . . . . . . . . Cast into disc
Parallelism . . . . . . . . . . . . . . . . . . . . . . . . . . . . . . . . . . . . . . . . . . . . . . . 0.013 mm (0.0005 inch) maximum
Runout . . . . . . . . . . . . . . . . . . . . . . . . . . . . . . . . . . . . . . . . . . . . . . . . . 0.102 mm (0.004 inch) maximum
Torque wrench settingsNm lbf ft
Brake servo mounting nuts . . . . . . . . . . . . . . . . . . . . . . . . . . . . . . . . . . . 10 7
Caliper bolts (front and rear) . . . . . . . . . . . . . . . . . . . . . . . . . . . . . . . . . . 31 to 40 23 to 29
Caliper bracket bolts
Front bracket . . . . . . . . . . . . . . . . . . . . . . . . . . . . . . . . . . . . . . . . . . . 102 to 128 75 to 94
Rear bracket . . . . . . . . . . . . . . . . . . . . . . . . . . . . . . . . . . . . . . . . . . . . 55 to 62 40 to 45
Master cylinder-to-brake servo nuts . . . . . . . . . . . . . . . . . . . . . . . . . . . 22 to 28 16 to 20
Wheel nuts . . . . . . . . . . . . . . . . . . . . . . . . . . . . . . . . . . . . . . . . . . . . . . . See Chapter 1 Specifications Anti-lock Brake System (ABS) - general information . . . . . . . . . . . . . 2
Brake check . . . . . . . . . . . . . . . . . . . . . . . . . . . . . . . . . . See Chapter 1
Brake disc - inspection, removal and refitting . . . . . . . . . . . . . . . . . . 5
Brake fluid level check . . . . . . . . . . . . . . . . . . . . . . . . . . See Chapter 1
Brake hoses and lines - inspection and renewal . . . . . . . . . . . . . . . . 8
Brake hydraulic system - bleeding . . . . . . . . . . . . . . . . . . . . . . . . . . 9
Brake light switch - check and renewal . . . . . . . . . . . . . . . . . . . . . . . 13
Brake servo - general information, removal and refitting . . . . . . . . . 7Disc brake caliper - removal, overhaul and refitting . . . . . . . . . . . . . 4
Disc brake pads - renewal . . . . . . . . . . . . . . . . . . . . . . . . . . . . . . . . . 3
General information . . . . . . . . . . . . . . . . . . . . . . . . . . . . . . . . . . . . . . 1
Handbrake cable - adjustment . . . . . . . . . . . . . . . . . . . . . . . . . . . . . 10
Handbrake cables - renewal . . . . . . . . . . . . . . . . . . . . . . . . . . . . . . . 11
Handbrake shoes - check and renewal . . . . . . . . . . . . . . . . . . . . . . 12
Master cylinder - removal, overhaul and refitting . . . . . . . . . . . . . . . 6
9•1
Specifications Contents
Easy,suitable for
novice with little
experienceFairly easy,suitable
for beginner with
some experienceFairly difficult,
suitable for competent
DIY mechanic
Difficult,suitable for
experienced DIY
mechanicVery difficult,
suitable for expert DIY
or professional
Degrees of difficulty
54321
1 General information
All models covered by this manual are
equipped with hydraulically operated front
and rear disc brake systems. Both front and
rear brakes are self adjusting.
Hydraulic system
The hydraulic system is divided into
two separate circuits. The master cylinder has
separate reservoirs for the two circuits, and, in
the event of a leak or failure in one hydraulic
circuit, the other circuit will remain operative.
All models are equipped with an Anti-lock
Braking System (ABS).
Brake servo
A hydraulic brake servo system is used on
all models covered by this manual. Thissystem uses hydraulic pressure from an
engine-driven pump on models equipped with
a power hydraulic system, and an electric
pump on models without the power hydraulic
system.
Handbrake
The handbrake lever operates the rear
brakes through cable actuation. It’s activated
by a lever mounted in the centre console. The
handbrake assembly uses a pair of brake
shoes located inside the rear hub/brake disc.
Brake pad wear warning system
The brake pad wear warning system turns
on a red light in the instrument cluster when
the brake pads have worn down to the point
at which they must be replaced. Do NOT
ignore this reminder. If you don’t renew the
pads shortly after the brake pad wear warning
light comes on, the brake discs will be
damaged.The wear sensors are attached to the brake
pads. Once the pads wear down to the point
at which they’re flush with the sensor, the disc
grinds away the side of the sensor facing the
disc, the wire inside the sensor is broken, the
circuit is opened and the red light on the
instrument panel comes on.
Always check the sensor(s) when replacing
the pads. If you change the pads before the
warning light comes on, the sensor(s) may still
be good; once the light has come on, renew
the sensor.
Service
After completing any operation involving
dismantling of any part of the brake system,
always test drive the vehicle to check for
proper braking performance before resuming
normal driving. When testing the brakes,
perform the tests on a clean, dry, flat surface.
Conditions other than these can lead to
inaccurate test results.
Page 124 of 227
Test the brakes at various speeds with both
light and heavy pedal pressure. The vehicle
should stop evenly without pulling to one side
or the other. Avoid locking the brakes,
because this slides the tyres and diminishes
braking efficiency and control of the vehicle.
Tyres, vehicle load and wheel alignment are
factors which also affect braking performance.
2 Anti-lock Brake system
(ABS)- general information
The Anti-lock Brake System is designed to
maintain vehicle steerability, directional stability
and optimum deceleration under severe
braking conditions on most road surfaces. It
does so by monitoring the rotational speed of
each wheel and controlling the brake line
pressure to each wheel during braking. This
prevents the wheels from locking up.
The ABS system has three main units - the
wheel speed sensors, the electronic control unit
and the modulator (hydraulic control unit). The
sensors - one at each wheel - send a variable
voltage signal to the electronic control unit,
which monitors these signals, compares them
to its program and determines whether a wheel
is about to lock up. When a wheel is about to
lock up, the control unit signals the hydraulic
unit to reduce hydraulic pressure (or not
increase it further) at that wheel’s brake caliper.
Pressure modulation is handled by three
electrically-operated solenoid valves - one for
each front wheel and one for the rear wheels -
inside the modulator.
If a problem develops within the system, an
“ABS” warning light will glow on the dashboard.
Sometimes, a visual inspection of the ABS
system can help you locate the problem.
Carefully inspect the ABS wiring harness. Pay
particularly close attention to the harness and
connections near each wheel. Look for signs of
chafing and other damage caused by
incorrectly routed wires. If a wheel sensor
harness is damaged, the sensor should be
replaced (the harness and sensor are integral).
Warning: Do NOT try to repair an
ABS wiring harness. The ABS
system is sensitive to even thesmallest changes in resistance. Repairing
the harness could alter resistance values
and cause the system to malfunction. If the
ABS wiring harness is damaged in any way,
it must be replaced.
Caution: Make sure the ignition is turned
off before unplugging or reattaching any
electrical connections.
Diagnosis and repair
If a dashboard warning light comes on and
stays on while the vehicle is in operation, the
ABS system requires attention. Although
special electronic ABS diagnostic testing tools
are necessary to properly diagnose the system,
you can perform a few preliminary checks
before taking the vehicle to a dealer service
department or other qualified repair workshop.
a) Check the brake fluid level in the master
cylinder reservoir.
b) Verify that all ABS system electrical
connectors in the engine compartment
are plugged in.
c) Check the fuses.
d) Follow the wiring harness to each front
wheel and to the differential sensor and
verify that all connections are secure and
that the wiring is undamaged.
If the above preliminary checks do not
rectify the problem, the vehicle should be
diagnosed by a dealer service department.
Due to the complex nature of this system, all
actual repair work must be done by a dealer
service department or other qualified repair
workshop.
3 Disc brake pads- renewal
2
Warning: Disc brake pads must
be replaced on both front wheels
or both rear wheels at the same
time - never renew the pads on
only one wheel. Also, the dust created by
the brake system may contain asbestos,
which is harmful to your health. Never blow
it out with compressed air and don’t inhale
any of it. An approved filtering mask should
be worn when working on the brakes. Do
not, under any circumstances, use
petroleum-based solvents to clean brake
parts. Use brake system cleaner only!
Note:The following procedure applies to both
the front and rear brake pads.
1Remove the cap from the brake fluid
reservoir and siphon off about two-thirds of
the fluid from the reservoir. Failing to do this
could result in fluid overflowing when the
caliper pistons are pressed into their bores.
2Loosen the wheel nuts, raise the front of the
vehicle and support it securely on axle stands.
3Remove the front wheels. Work on one
brake assembly at a time, using the
assembled brake for reference if necessary.
4Inspect the brake disc (see Section 5).
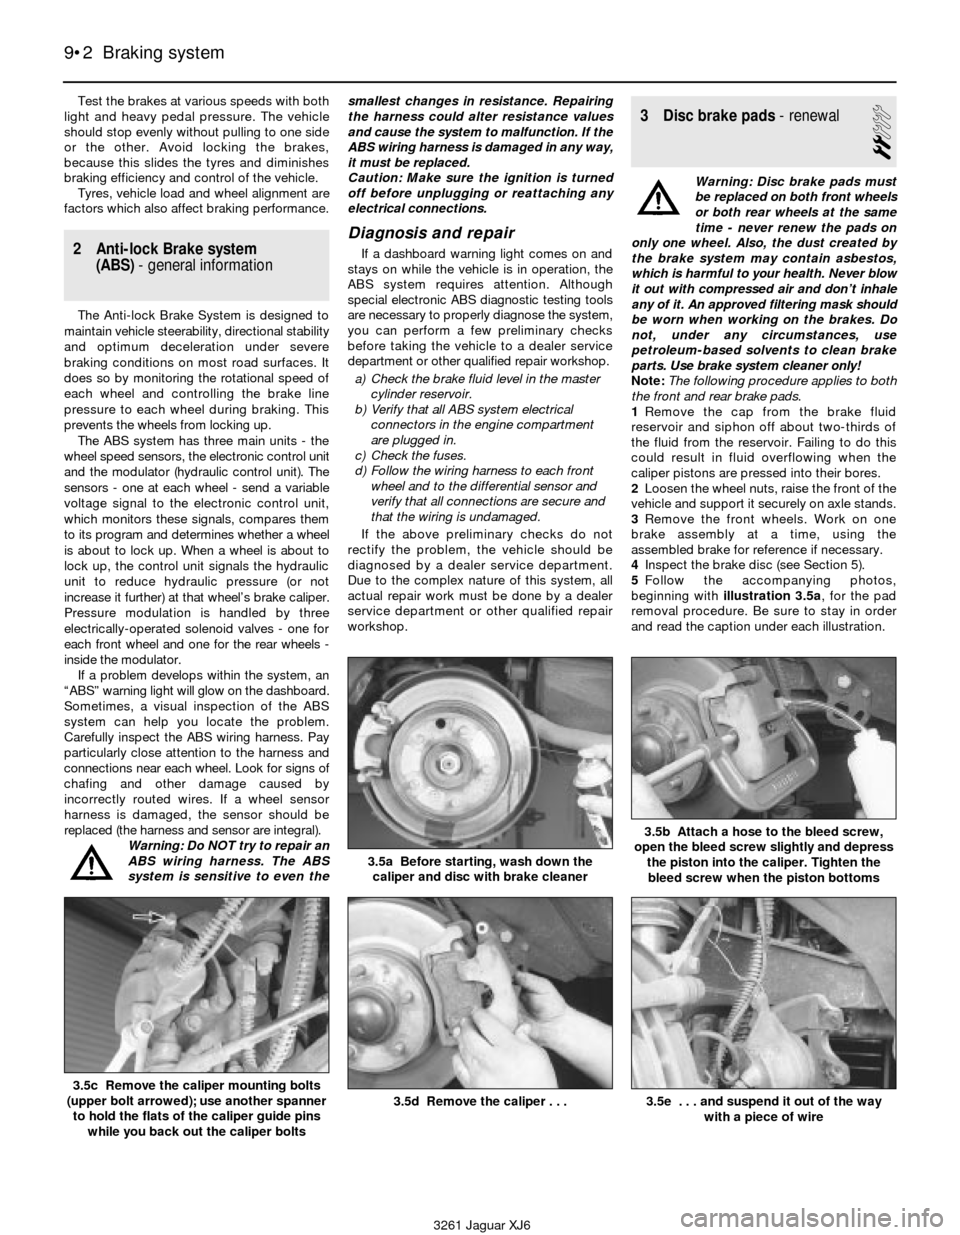
5Follow the accompanying photos,
beginning with illustration 3.5a, for the pad
removal procedure. Be sure to stay in order
and read the caption under each illustration.
9•2 Braking system
3.5a Before starting, wash down the
caliper and disc with brake cleaner
3.5b Attach a hose to the bleed screw,
open the bleed screw slightly and depress
the piston into the caliper. Tighten the
bleed screw when the piston bottoms
3.5c Remove the caliper mounting bolts
(upper bolt arrowed); use another spanner
to hold the flats of the caliper guide pins
while you back out the caliper bolts3.5d Remove the caliper . . .3.5e . . . and suspend it out of the way
with a piece of wire
3261 Jaguar XJ6
Page 125 of 227
6Be sure to buy new pads with wear
sensors. Pattern pads may not have wear
sensors; refitting pads without wear sensors
will cause the dash warning light to come on.
7To refit the new pads, reverse the removal
procedure. When refitting the caliper, be sure
to tighten the mounting bolts to the torque
listed in this Chapter’s Specifications.
8After the job is completed, depress the
brake pedal a few times to bring the pads into
contact with the discs. The pedal should be at
normal height above the floorpan and firm.
Check the brake fluid level and add enough to
top it up (see Chapter 1). Inspect carefully for
leaks and check the operation of the brakes
before placing the vehicle into normal service.
9Tighten the wheel nuts to the specified
torque.
4 Disc brake caliper- removal,
overhaul and refitting
3
Warning: Dust created by the
brake system may contain
asbestos, which is harmful to
your health. Never blow it out
with compressed air and don’t inhale any
of it. An approved filtering mask should be
worn when working on the brakes. Do not,
under any circumstances, use petroleum-
based solvents to clean brake parts. Use
brake system cleaner only!
Note 1:The following procedure applies to
both front and rear calipers.
Note 2:If an overhaul is indicated, explore all
options before beginning the job. New andfactory rebuilt calipers are available on an
exchange basis, which makes this job quite
easy. If you decide to rebuild the calipers,
make sure a rebuild kit is available before
proceeding. Always rebuild the calipers in
pairs - never rebuild just one of them.
Removal
1Loosen the wheel nuts, raise the front or
rear of the vehicle and place it securely on
axle stands. Remove the wheel.
2If you’re just removing the caliper for
access to other components, it isn’t
Braking system 9•3
9
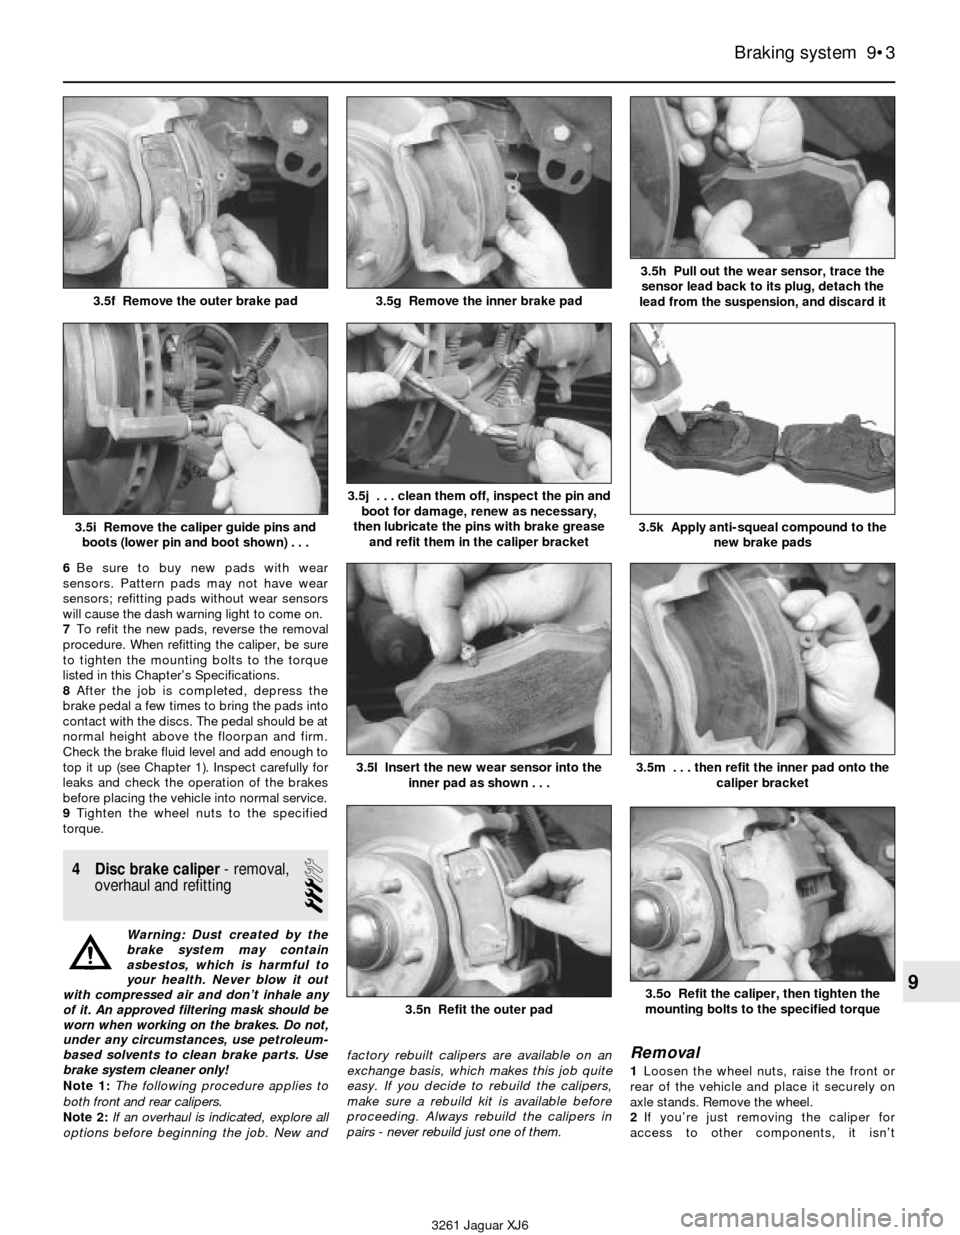
3.5f Remove the outer brake pad3.5g Remove the inner brake pad
3.5h Pull out the wear sensor, trace the
sensor lead back to its plug, detach the
lead from the suspension, and discard it
3.5i Remove the caliper guide pins and
boots (lower pin and boot shown) . . .
3.5j . . . clean them off, inspect the pin and
boot for damage, renew as necessary,
then lubricate the pins with brake grease
and refit them in the caliper bracket
3.5k Apply anti-squeal compound to the
new brake pads
3261 Jaguar XJ6
3.5l Insert the new wear sensor into the
inner pad as shown . . .
3.5n Refit the outer pad
3.5m . . . then refit the inner pad onto the
caliper bracket
3.5o Refit the caliper, then tighten the
mounting bolts to the specified torque
Page 126 of 227

necessary to detach the brake line. If you’re
removing the caliper for overhaul, detach the
hose from the metal line at the frame bracket
(see Section 8), then disconnect the brake line
from the caliper with a flare-nut spanner to
protect the fitting (see illustration). Plug the
metal line to keep contaminants out of the
brake system and to prevent losing brake
fluid.
3Refer to illustration 3.5c and unbolt the
front or rear caliper.
Overhaul
4Before you remove the piston, place a
wood block between the piston and caliper to
prevent damage as it is removed.
5To remove the piston from the caliper,
apply compressed air to the brake fluid hose
connection on the caliper body (see
illustration). Use only enough pressure to
ease the piston out of its bore. Remove the
dust boot.
Warning: Be careful not to place
your fingers between the piston
and the caliper as the piston
may come out with some force.
Be sure to wear eye protection when using
compressed air.
6Inspect the mating surfaces of the piston
and caliper bore wall. If there is any scoring,
rust, pitting or bright areas, renew the
complete caliper unit with a new one.
7If these components are in good condition,
remove the piston seal from the caliper bore
using a wooden or plastic tool (see
illustration). Metal tools may damage the
cylinder bore.
8Remove the caliper guide pins and the
rubber dust boots from the caliper bracket.
9Wash all the components in brake system
cleaner.
10Using the correct rebuild kit for your
vehicle, reassemble the caliper as follows.11Submerge the new rubber seal in clean
brake fluid and refit it in the lower groove in
the caliper bore, making sure it isn’t twisted.
12Coat the piston with clean brake fluid and
stretch the new dust boot over the bottom of
the piston. Hold the piston over the caliper
bore and insert the rubber flange of the dust
boot into the upper groove in the bore. Start
with the side farthest from you and work your
way around toward the front until it is
completely seated. Push the piston into the
caliper bore until it is bottomed in the bore,
then seat the top of the dust boot in the
groove in the piston.
13Lubricate the sliding surfaces of the guide
pins with silicone-based grease (usually
supplied in the kit), then refit the new dust
boots and pins into the caliper bracket.
Refitting
14Refit the caliper by reversing the removal
procedure (see Section 3).
15If the brake hose was disconnected from
the caliper, bleed the brake system (see
Section 9).
5 Brake disc- inspection,
removal and refitting
2
Note:The following procedure applies to both
the front and rear brake discs.
Inspection
1Loosen the wheel nuts, raise the vehicle
and support it securely on axle stands.
Remove the wheel and refit three nuts to hold
the disc in place. If the rear brake disc is being
worked on, release the handbrake.
2Remove the brake caliper as outlined in
Section 4. It is not necessary to disconnect
the brake hose. After removing the caliper,
suspend it out of the way with a piece of wire.
3Visually inspect the disc surface for scoring
or damage. Light scratches and shallow
grooves are normal after use and may not
always be detrimental to brake operation, but
deep scoring - over 0.015 inch - requires disc
removal and refinishing by an automotive
machine shop. Be sure to check both sides of
the disc (see illustration). If pulsating has
9•4 Braking system
4.7 Remove the piston seal from the
caliper bore using a wooden or plastic tool
(metal tools may damage the
cylinder bore)5.3 The brake pads on this vehicle were
obviously neglected, as they wore down to
the rivets and cut deep grooves into the
disc - this disc must be replaced
3261 Jaguar XJ6 4.2 Use a flare-nut spanner to protect the brake hose fitting when
unscrewing it from the caliper
4.5 With the caliper padded to catch the piston, use compressed
air to force the piston out of its bore - make sure your fingers are
not between the piston and the caliper
Page 128 of 227
Refitting
8Place the disc on the hub and refit the disc
retaining screw. Tighten the screw securely.
9Refit the caliper mounting bracket, using a
new safety wire on the mounting bolts.
10Refit the brake pads and caliper (see
Section 3). Tighten all fasteners to the torque
listed in this Chapter’s Specifications.
11Refit the wheel and wheel nuts, then lower
the vehicle to the ground. Tighten the wheel
nuts to the specified torque (see Chapter 1
Specifications). Depress the brake pedal a
few times to bring the brake pads into contact
with the disc.
12Adjust the handbrake shoes, if necessary.
13Check the operation of the brakes
carefully, if possible before driving the vehicle
on public roads.
6 Master cylinder- removal,
overhaul and refitting
3
Note:Although master cylinder parts and
rebuild kits are available for most models, we
recommend replacing the master cylinder with
a new or remanufactured unit, if possible.
Removal
1The master cylinder is connected to the
brake servo, which is attached to the pedal
box, in front of the bulkhead on the driver’s
side of the engine compartment.
2Remove as much fluid as you can from the
reservoir with a syringe.
3Place rags under the line fittings and
prepare caps or plastic bags to cover the
ends of the lines once they are disconnected.
Caution: Brake fluid will damage paint.
Cover all body parts and be careful not to
spill fluid during this procedure.
4Disconnect the electrical connector for the
low fluid level warning light (see illustration).
5Loosen the brake line fittings at the mastercylinder (see illustration). Use a flare-nut
spanner to prevent rounding off the nuts. Pull
the brake lines away from the master cylinder
slightly and plug the ends to prevent
contamination.
6Remove the nuts attaching the master
cylinder to the servo (see illustration). Pull
the master cylinder off the studs and lift it out
of the engine compartment. Again, be careful
not to spill fluid as this is done.
Overhaul
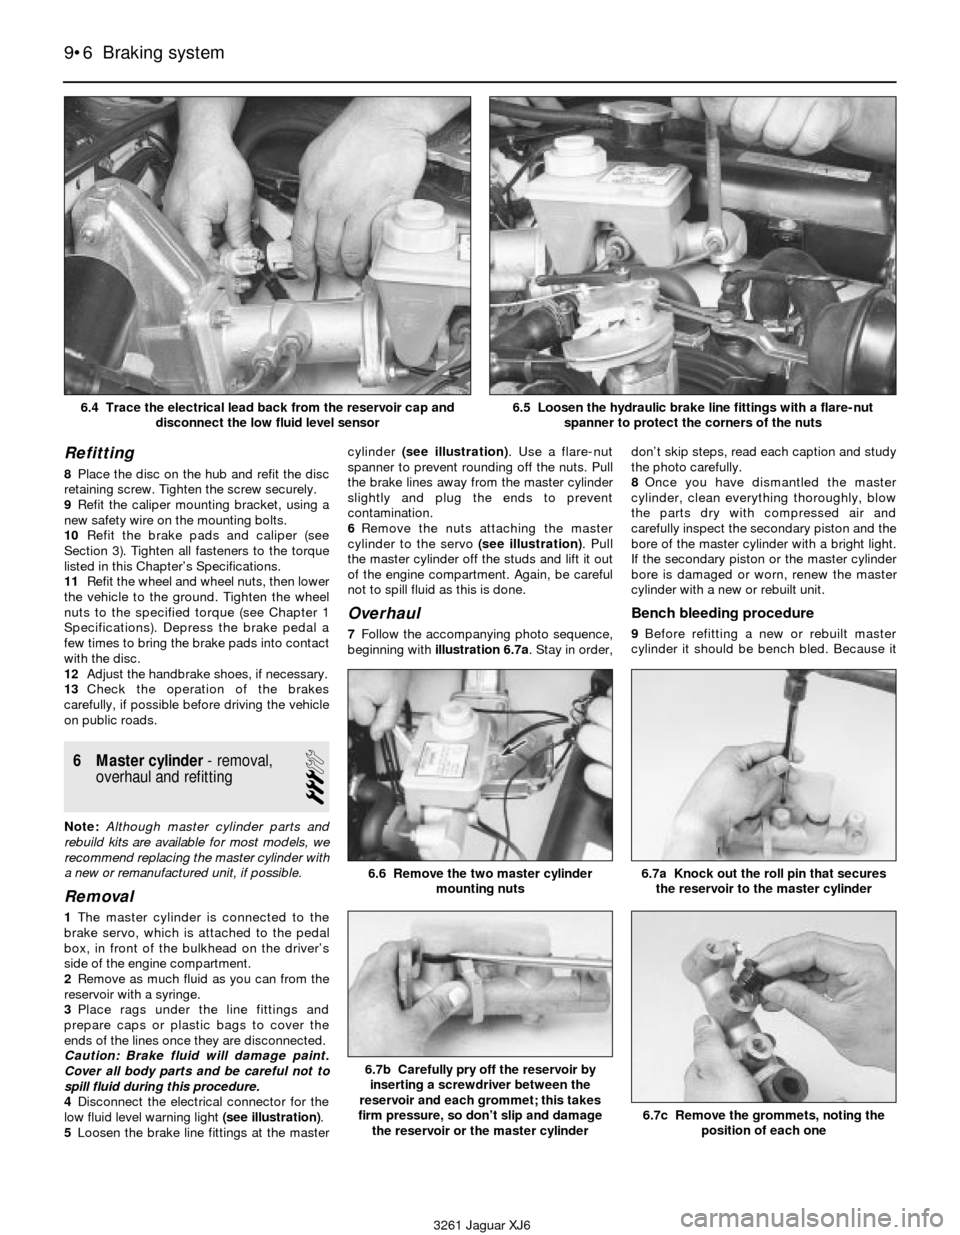
7Follow the accompanying photo sequence,
beginning with illustration 6.7a. Stay in order,don’t skip steps, read each caption and study
the photo carefully.
8Once you have dismantled the master
cylinder, clean everything thoroughly, blow
the parts dry with compressed air and
carefully inspect the secondary piston and the
bore of the master cylinder with a bright light.
If the secondary piston or the master cylinder
bore is damaged or worn, renew the master
cylinder with a new or rebuilt unit.
Bench bleeding procedure
9Before refitting a new or rebuilt master
cylinder it should be bench bled. Because it
9•6 Braking system
6.7a Knock out the roll pin that secures
the reservoir to the master cylinder
6.7b Carefully pry off the reservoir by
inserting a screwdriver between the
reservoir and each grommet; this takes
firm pressure, so don’t slip and damage
the reservoir or the master cylinder
6.7c Remove the grommets, noting the
position of each one
6.6 Remove the two master cylinder
mounting nuts
3261 Jaguar XJ6 6.4 Trace the electrical lead back from the reservoir cap and
disconnect the low fluid level sensor
6.5 Loosen the hydraulic brake line fittings with a flare-nut
spanner to protect the corners of the nuts
Page 132 of 227
6Carefully check to make sure the
suspension and steering components do not
make contact with the hoses. Have an
assistant push on the vehicle and also turn the
steering wheel from lock-to-lock during
inspection.
7Bleed the brake system (see Section 9).
Metal brake line renewal
8When replacing brake lines, use the proper
parts only. Do not use copper line for any
brake system connections. Purchase steel
brake lines from a dealer or motor factors..
9Unless you’re using factory renewal brake
lines, you may need a tubing bender to bend
the lines to the proper shape.
10First, remove the line you intend to renew,
lay it on a clean workbench and measure it
carefully. Obtain a new line of the same length
and bend it to match the pattern of the old
line.
Warning: Do not crimp or
damage the line. No bend should
have a smaller radius than
9/16-inch. Make sure the
protective coating on the new line is
undamaged at the bends.
11When refitting the new line, make sure it’s
well supported by the brackets, the routing
matches the original and there’s plenty of
clearance between moving or hot
components.
12After refitting, check the master cylinder
fluid level and add fluid as necessary. Bleed
the brake system as outlined in Section 9 and
test the brakes carefully before driving the
vehicle. Be sure there are no leaks.
9 Brake hydraulic system-
bleeding
2
Warning: Wear eye protection
when bleeding the brake
system. If the fluid comes in
contact with your eyes,
immediately rinse them with water and
seek medical attention.Note:Bleeding the hydraulic system is
necessary to remove any air which has entered
the system during removal and refitting of a
hose, line, caliper or master cylinder.
1It will probably be necessary to bleed the
system at all four brakes if air has entered the
system due to low fluid level or if the brake
lines have been disconnected at the master
cylinder.
2If a brake line was disconnected at only one
wheel, then only that caliper or wheel cylinder
must be bled.
3If a brake line is disconnected at a fitting
located between the master cylinder and any
of the brakes, that part of the system served
by the disconnected line must be bled.
4Bleed the right rear, the left rear, the right
front and the left front caliper, in that order,
when the entire system is involved.
5Remove any residual vacuum from the
servo and pressure in the anti-lock braking
system (if equipped) by applying the brake
about 30 times with the engine off.
6Remove the master cylinder reservoir cover
and fill the reservoir with brake fluid. Refit the
cover. Note:Check the fluid level often during
the bleeding operation and add fluid as
necessary to prevent the fluid level from falling
low enough to allow air into the master
cylinder.
7Have an assistant on hand, as well as a
supply of new brake fluid, an empty clear
plastic container, a length of 3/16-inch clear
tubing to fit over the bleed screws and a
spanner to open and close the bleed screws.
8Beginning at the right rear wheel, loosen the
bleed screw slightly, then tighten it to a point
where it is snug but can still be loosened
quickly and easily.
9Place one end of the tubing over the bleed
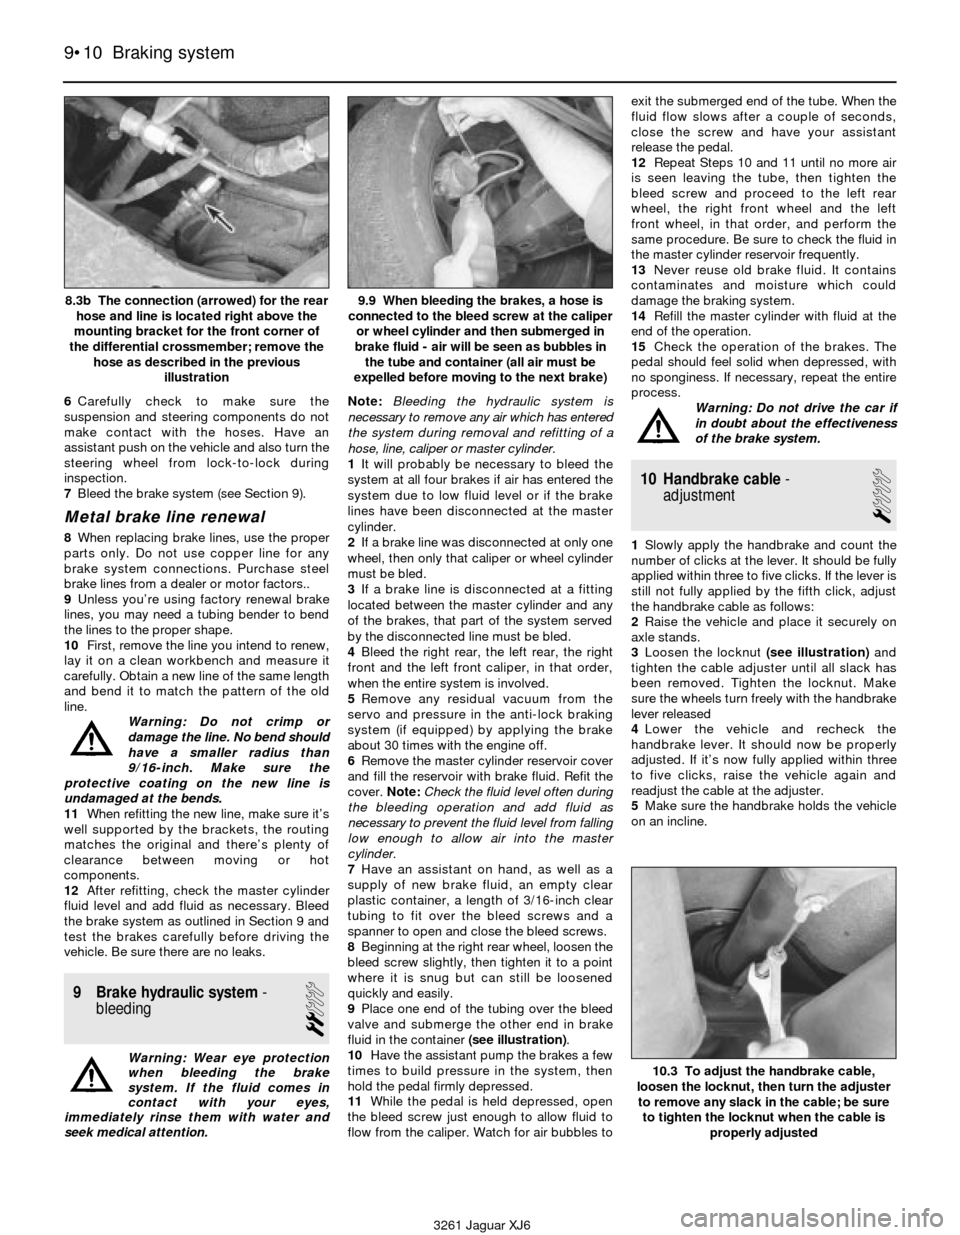
valve and submerge the other end in brake
fluid in the container (see illustration).
10Have the assistant pump the brakes a few
times to build pressure in the system, then
hold the pedal firmly depressed.
11While the pedal is held depressed, open
the bleed screw just enough to allow fluid to
flow from the caliper. Watch for air bubbles toexit the submerged end of the tube. When the
fluid flow slows after a couple of seconds,
close the screw and have your assistant
release the pedal.
12Repeat Steps 10 and 11 until no more air
is seen leaving the tube, then tighten the
bleed screw and proceed to the left rear
wheel, the right front wheel and the left
front wheel, in that order, and perform the
same procedure. Be sure to check the fluid in
the master cylinder reservoir frequently.
13Never reuse old brake fluid. It contains
contaminates and moisture which could
damage the braking system.
14Refill the master cylinder with fluid at the
end of the operation.
15Check the operation of the brakes. The
pedal should feel solid when depressed, with
no sponginess. If necessary, repeat the entire
process.
Warning: Do not drive the car if
in doubt about the effectiveness
of the brake system.
10 Handbrake cable-
adjustment
1
1Slowly apply the handbrake and count the
number of clicks at the lever. It should be fully
applied within three to five clicks. If the lever is
still not fully applied by the fifth click, adjust
the handbrake cable as follows:
2Raise the vehicle and place it securely on
axle stands.
3Loosen the locknut (see illustration)and
tighten the cable adjuster until all slack has
been removed. Tighten the locknut. Make
sure the wheels turn freely with the handbrake
lever released
4Lower the vehicle and recheck the
handbrake lever. It should now be properly
adjusted. If it’s now fully applied within three
to five clicks, raise the vehicle again and
readjust the cable at the adjuster.
5Make sure the handbrake holds the vehicle
on an incline.
9•10 Braking system
8.3b The connection (arrowed) for the rear
hose and line is located right above the
mounting bracket for the front corner of
the differential crossmember; remove the
hose as described in the previous
illustration9.9 When bleeding the brakes, a hose is
connected to the bleed screw at the caliper
or wheel cylinder and then submerged in
brake fluid - air will be seen as bubbles in
the tube and container (all air must be
expelled before moving to the next brake)
10.3 To adjust the handbrake cable,
loosen the locknut, then turn the adjuster
to remove any slack in the cable; be sure
to tighten the locknut when the cable is
properly adjusted
3261 Jaguar XJ6
Page 160 of 227
selector towards the rear of the vehicle. Pull
up on the rear half of the radio trim bezel while
gently detaching the clips securing the front,
then remove the bezel from the vehicle.
6Remove the radio and heater control
assembly (see Chapter 12).
7Remove the dashboard centre trim panel
(see Section 26), then remove the centre air
conditioning duct from the vehicle (see
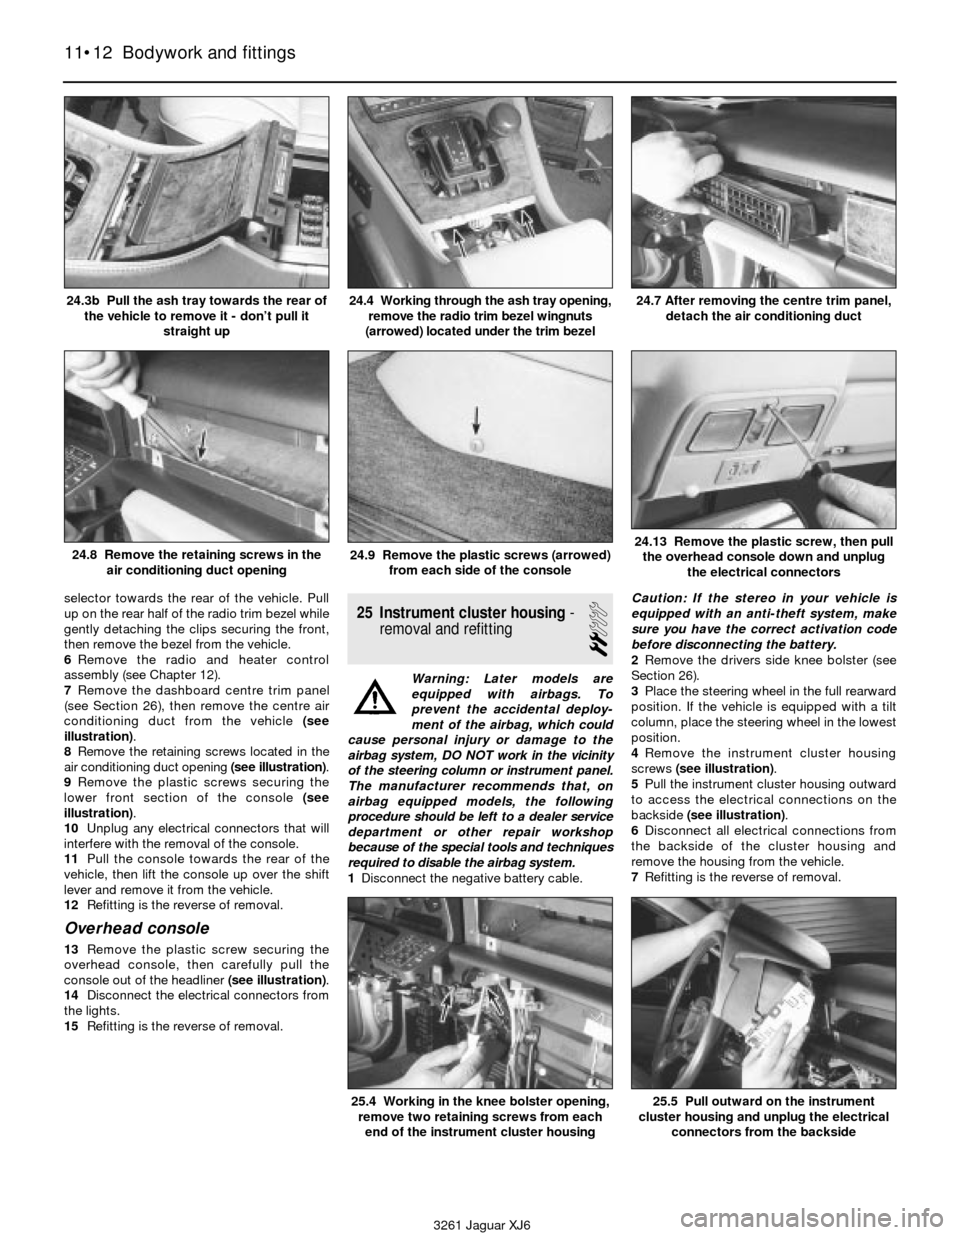
illustration).
8Remove the retaining screws located in the
air conditioning duct opening (see illustration).
9Remove the plastic screws securing the
lower front section of the console (see
illustration).
10Unplug any electrical connectors that will
interfere with the removal of the console.
11Pull the console towards the rear of the
vehicle, then lift the console up over the shift
lever and remove it from the vehicle.
12Refitting is the reverse of removal.
Overhead console
13Remove the plastic screw securing the
overhead console, then carefully pull the
console out of the headliner (see illustration).
14Disconnect the electrical connectors from
the lights.
15Refitting is the reverse of removal.
25 Instrument cluster housing-
removal and refitting
2
Warning: Later models are
equipped with airbags. To
prevent the accidental deploy-
ment of the airbag, which could
cause personal injury or damage to the
airbag system, DO NOT work in the vicinity
of the steering column or instrument panel.
The manufacturer recommends that, on
airbag equipped models, the following
procedure should be left to a dealer service
department or other repair workshop
because of the special tools and techniques
required to disable the airbag system.
1Disconnect the negative battery cable. Caution: If the stereo in your vehicle is
equipped with an anti-theft system, make
sure you have the correct activation code
before disconnecting the battery.
2Remove the drivers side knee bolster (see
Section 26).
3Place the steering wheel in the full rearward
position. If the vehicle is equipped with a tilt
column, place the steering wheel in the lowest
position.
4Remove the instrument cluster housing
screws (see illustration).
5Pull the instrument cluster housing outward
to access the electrical connections on the
backside (see illustration).
6Disconnect all electrical connections from
the backside of the cluster housing and
remove the housing from the vehicle.
7Refitting is the reverse of removal.
11•12 Bodywork and fittings
24.3b Pull the ash tray towards the rear of
the vehicle to remove it - don’t pull it
straight up24.4 Working through the ash tray opening,
remove the radio trim bezel wingnuts
(arrowed) located under the trim bezel24.7 After removing the centre trim panel,
detach the air conditioning duct
24.8 Remove the retaining screws in the
air conditioning duct opening24.9 Remove the plastic screws (arrowed)
from each side of the console24.13 Remove the plastic screw, then pull
the overhead console down and unplug
the electrical connectors
3261 Jaguar XJ6
25.4 Working in the knee bolster opening,
remove two retaining screws from each
end of the instrument cluster housing25.5 Pull outward on the instrument
cluster housing and unplug the electrical
connectors from the backside
Page 168 of 227
5Disconnect the electrical connectors from
underneath the steering column and remove
the switch or switches from the vehicle.
6Refitting is the reverse of removal.
9 Ignition switch
and key lock cylinder-
removal and refitting
2
Warning: Later models are
equipped with airbags. To
prevent accidental deployment
of the airbag, which could cause
personal injury or damage to the airbag
system, DO NOT work in the vicinity of the
steering column or instrument panel. The
manufacturer recommends that, on airbag
equipped models, the following procedure
be performed at a dealer service
department or other properly equipped
repair facility because of the special tools
and techniques required to disable the
airbag system.
Caution: If the stereo in your vehicle is
equipped with an anti-theft system, make
sure you have the correct activation code
before disconnecting the battery.1Disconnect the negative battery cable.
2Remove the steering wheel (Chapter 10).
3Remove the steering column trim covers
(see Chapter 11).
4Remove the steering column switch
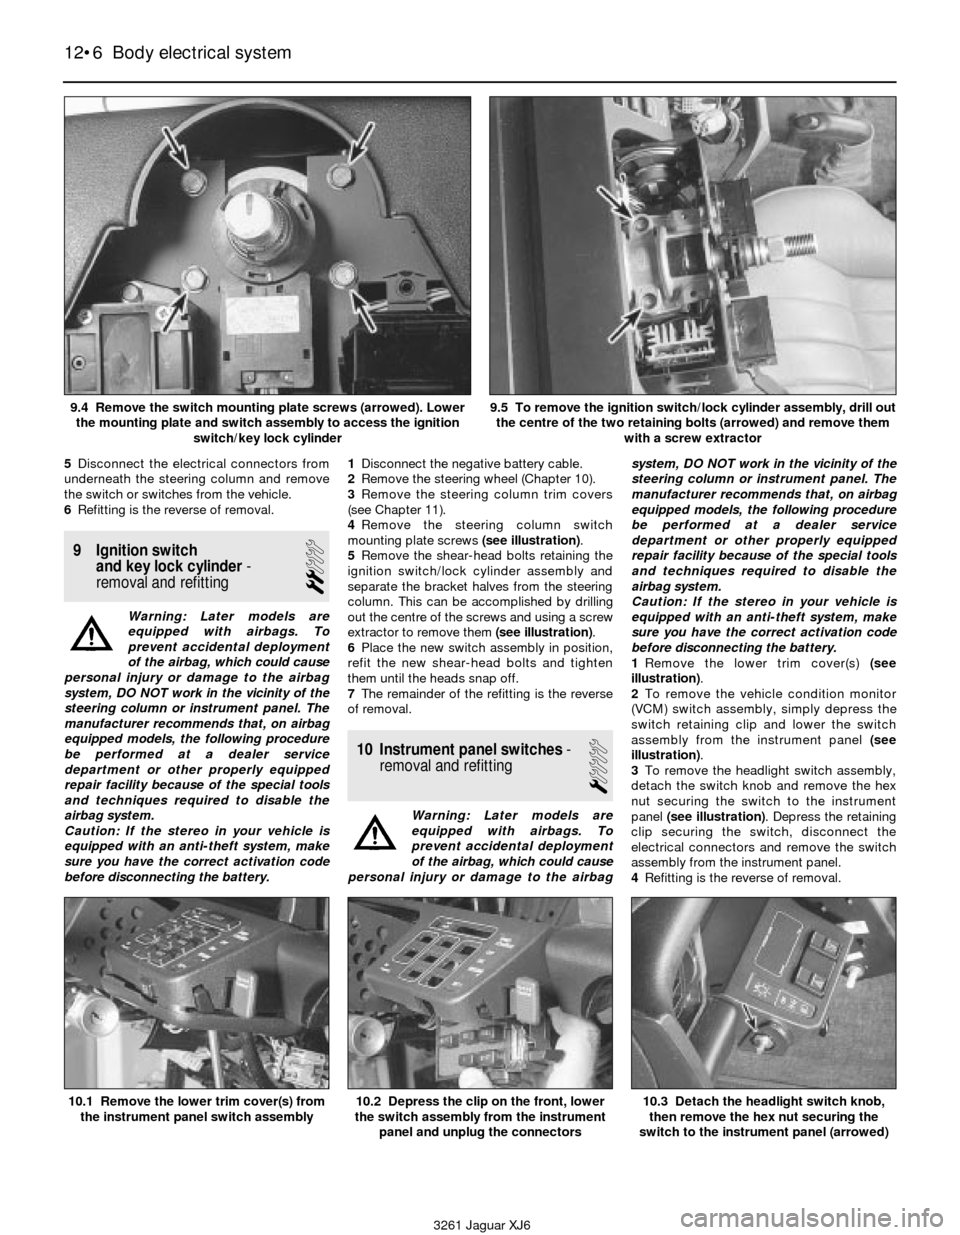
mounting plate screws (see illustration).
5Remove the shear-head bolts retaining the
ignition switch/lock cylinder assembly and
separate the bracket halves from the steering
column. This can be accomplished by drilling
out the centre of the screws and using a screw
extractor to remove them (see illustration).
6Place the new switch assembly in position,
refit the new shear-head bolts and tighten
them until the heads snap off.
7The remainder of the refitting is the reverse
of removal.
10 Instrument panel switches-
removal and refitting
1
Warning: Later models are
equipped with airbags. To
prevent accidental deployment
of the airbag, which could cause
personal injury or damage to the airbagsystem, DO NOT work in the vicinity of the
steering column or instrument panel. The
manufacturer recommends that, on airbag
equipped models, the following procedure
be performed at a dealer service
department or other properly equipped
repair facility because of the special tools
and techniques required to disable the
airbag system.
Caution: If the stereo in your vehicle is
equipped with an anti-theft system, make
sure you have the correct activation code
before disconnecting the battery.
1Remove the lower trim cover(s) (see
illustration).
2To remove the vehicle condition monitor
(VCM) switch assembly, simply depress the
switch retaining clip and lower the switch
assembly from the instrument panel (see
illustration).
3To remove the headlight switch assembly,
detach the switch knob and remove the hex
nut securing the switch to the instrument
panel (see illustration). Depress the retaining
clip securing the switch, disconnect the
electrical connectors and remove the switch
assembly from the instrument panel.
4Refitting is the reverse of removal.
12•6 Body electrical system
10.1 Remove the lower trim cover(s) from
the instrument panel switch assembly10.2 Depress the clip on the front, lower
the switch assembly from the instrument
panel and unplug the connectors10.3 Detach the headlight switch knob,
then remove the hex nut securing the
switch to the instrument panel (arrowed)
3261 Jaguar XJ6 9.4 Remove the switch mounting plate screws (arrowed). Lower
the mounting plate and switch assembly to access the ignition
switch/key lock cylinder
9.5 To remove the ignition switch/lock cylinder assembly, drill out
the centre of the two retaining bolts (arrowed) and remove them
with a screw extractor
Page 171 of 227

6If the voltage is 6 volts, the element is okay
(there is no break). If the voltage is 12 volts,
the element is broken between the centre
of the element and the positive end. If the
voltage is 0 volts the element is broken
between the centre of the element and earth.
7To find the break, place the voltmeter
positive lead against the defogger positive
terminal. Place the voltmeter negative lead
with the foil strip against the heating element
at the positive terminal end and slide it toward
the negative terminal end. The point at which
the voltmeter deflects from zero to several
volts is the point at which the heating element
is broken (see illustration).
Repair
8Repair the break in the element using a
repair kit specifically recommended for this
purpose.
9Prior to repairing a break, turn off the system
and allow it to cool off for a few minutes.
10Lightly buff the element area with fine
steel wool, then clean it thoroughly with
rubbing alcohol.
11Use masking tape to mask off the area
being repaired.
12Thoroughly mix the epoxy, following the
instructions provided with the repair kit.
13Apply the epoxy material to the slit in the
masking tape, overlapping the undamaged
area about 3/4-inch on either end (see
illustration).
14Allow the repair to cure for 24 hours before
removing the tape and using the system.
17 Headlights- renewal
1
Warning: Later models are
equipped with halogen gas-filled
headlight bulbs which are underpressure and may shatter if the surface is
damaged or the bulb is dropped. Wear eye
protection and handle the bulbs carefully,
grasping only the base whenever possible.
Do not touch the surface of the bulb with
your fingers because the oil from your skin
could cause it to overheat and fail
prematurely. If you do touch the bulb
surface, clean it with rubbing alcohol.
Sealed beam units
1Remove the radiator grille (see Chapter 11).
2Detach the headlight bezel trim cover (see
illustration).
3Remove the headlight bezel (see
illustrations).
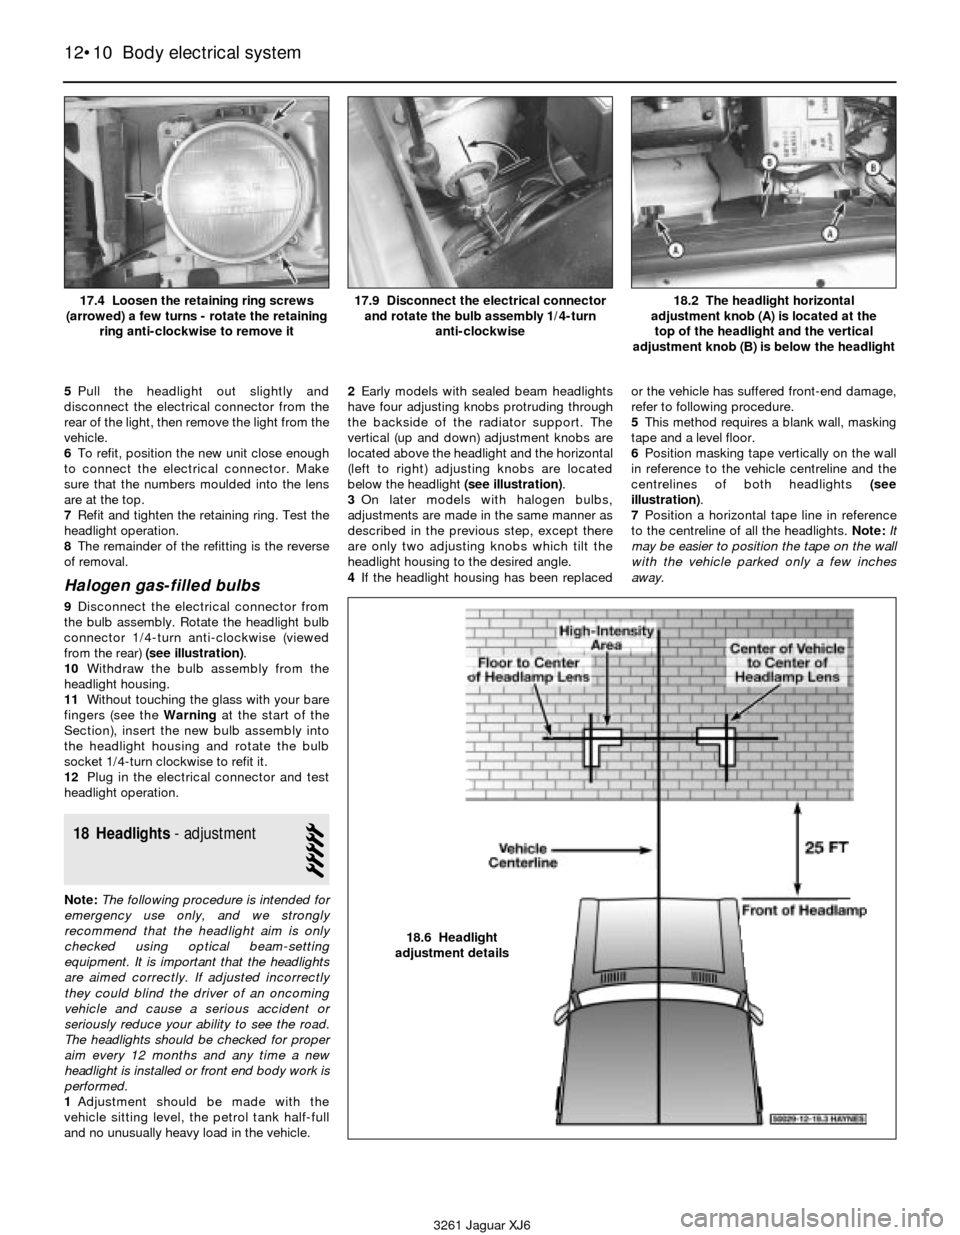
4Remove the screws which secure the
retaining ring and withdraw the ring. Support
the light as this is done (see illustration).
Body electrical system 12•9
12
16.13 Apply masking tape to the inside of
the window at the damaged area, then
brush on the special conductive coating17.2 Remove the screws (arrowed) and
detach the headlight bezel trim cover
17.3a Remove the two retaining screws
at the top and the one in the grille opening
(arrowed)17.3b The retaining screw at the
outside lower corner can be accessed
from under the bumper
3261 Jaguar XJ6 16.5 To determine if a heating element has broken, check the
voltage at the centre of each element. If the voltage is 6-volts, the
element is unbroken; if the voltage is 12-volts, the element is
broken between the centre and the positive end. If there is no
voltage, the element is broken between the centre and earth
16.7 To find the break, place the voltmeter positive lead against
the heated window positive terminal, place the voltmeter negative
lead with the foil strip against the heating element at the positive
terminal end and slide it toward the negative terminal end -
the point at which the voltmeter reading changes abruptly is the
point at which the element is broken
Page 172 of 227
5Pull the headlight out slightly and
disconnect the electrical connector from the
rear of the light, then remove the light from the
vehicle.
6To refit, position the new unit close enough
to connect the electrical connector. Make
sure that the numbers moulded into the lens
are at the top.
7Refit and tighten the retaining ring. Test the
headlight operation.
8The remainder of the refitting is the reverse
of removal.
Halogen gas-filled bulbs
9Disconnect the electrical connector from
the bulb assembly. Rotate the headlight bulb
connector 1/4-turn anti-clockwise (viewed
from the rear) (see illustration).
10Withdraw the bulb assembly from the
headlight housing.
11Without touching the glass with your bare
fingers (see the Warningat the start of the
Section), insert the new bulb assembly into
the headlight housing and rotate the bulb
socket 1/4-turn clockwise to refit it.
12Plug in the electrical connector and test
headlight operation.
18 Headlights- adjustment
5
Note:The following procedure is intended for
emergency use only, and we strongly
recommend that the headlight aim is only
checked using optical beam-setting
equipment. It is important that the headlights
are aimed correctly. If adjusted incorrectly
they could blind the driver of an oncoming
vehicle and cause a serious accident or
seriously reduce your ability to see the road.
The headlights should be checked for proper
aim every 12 months and any time a new
headlight is installed or front end body work is
performed.
1Adjustment should be made with the
vehicle sitting level, the petrol tank half-full
and no unusually heavy load in the vehicle.2Early models with sealed beam headlights
have four adjusting knobs protruding through
the backside of the radiator support. The
vertical (up and down) adjustment knobs are
located above the headlight and the horizontal
(left to right) adjusting knobs are located
below the headlight (see illustration).
3On later models with halogen bulbs,
adjustments are made in the same manner as
described in the previous step, except there
are only two adjusting knobs which tilt the
headlight housing to the desired angle.
4If the headlight housing has been replacedor the vehicle has suffered front-end damage,
refer to following procedure.
5This method requires a blank wall, masking
tape and a level floor.
6Position masking tape vertically on the wall
in reference to the vehicle centreline and the
centrelines of both headlights (see
illustration).
7Position a horizontal tape line in reference
to the centreline of all the headlights. Note:It
may be easier to position the tape on the wall
with the vehicle parked only a few inches
away.
12•10 Body electrical system
3261 Jaguar XJ618.2 The headlight horizontal
adjustment knob (A) is located at the
top of the headlight and the vertical
adjustment knob (B) is below the headlight
17.4 Loosen the retaining ring screws
(arrowed) a few turns - rotate the retaining
ring anti-clockwise to remove it17.9 Disconnect the electrical connector
and rotate the bulb assembly 1/4-turn
anti-clockwise
18.6 Headlight
adjustment details