Anti theft JAGUAR XJ6 1997 2.G Workshop Manual
[x] Cancel search | Manufacturer: JAGUAR, Model Year: 1997, Model line: XJ6, Model: JAGUAR XJ6 1997 2.GPages: 227, PDF Size: 7.2 MB
Page 3 of 227

3261 Jaguar XJ6
REPAIRS & OVERHAUL
Engine and associated systems
Engine in-car repair procedures Page 2A•1
Engine removal and overhaul procedures Page 2B•1
Cooling, heating and air conditioning systems Page 3•1
Fuel and exhaust systems Page 4•1
Engine electrical systems Page 5•1
Emissions and engine cone control systems Page 6•1
Transmission
Automatic transmissionPage 7•1
DrivetrainPage 8•1
Brakes and suspension
Braking systemPage 9•1
Suspension and steering systems Page 10•1
Body equipment
Bodywork and fittingsPage 11•1
Body electrical systems Page 12•1
Wiring diagramsPage 12•16
REFERENCE
Dimensions and weights Page REF•1
Jacking and vehicle support Page REF•1
Radio/cassette unit anti-theft system - precaution Page REF•1
Conversion factorsPage REF•2
Use of EnglishPage REF•3
Buying spare parts and vehicle identification Page REF•4
General repair procedures Page REF•5
Tools and working facilities Page REF•6
MOT test checksPage REF•8
Fault findingPage REF•12
Glossary of technical terms Page REF•18
IndexPage REF•22
Contents
Page 40 of 227
attached to the bolt threaded into the
front of the crankshaft. Apply pressure on
the bolt in a clockwise direction only.
Never turn the bolt anti-clockwise.
b) A remote starter switch, which may save
some time, can also be used. Follow the
instructions included with the switch.
Once the piston is close to TDC, use a
socket and ratchet as described in the
previous paragraph.
c) If an assistant is available to turn the
ignition switch to the Start position in
short bursts, you can get the piston close
to TDC without a remote starter switch.
Make sure your assistant is out of the car,
away from the ignition switch, then use a
socket and ratchet as described in
Paragraph a) to complete the procedure.
5Note the position of the terminal for the
number one spark plug lead on the distributor
cap. If the terminal isn’t marked, follow the
plug lead from the number one cylinder spark
plug to the cap.
6Use a felt-tip pen or chalk to make a mark
on the distributor body directly under the
number one terminal (see Chapter 5).
7Detach the cap from the distributor and set
it aside (see Chapter 1 if necessary).
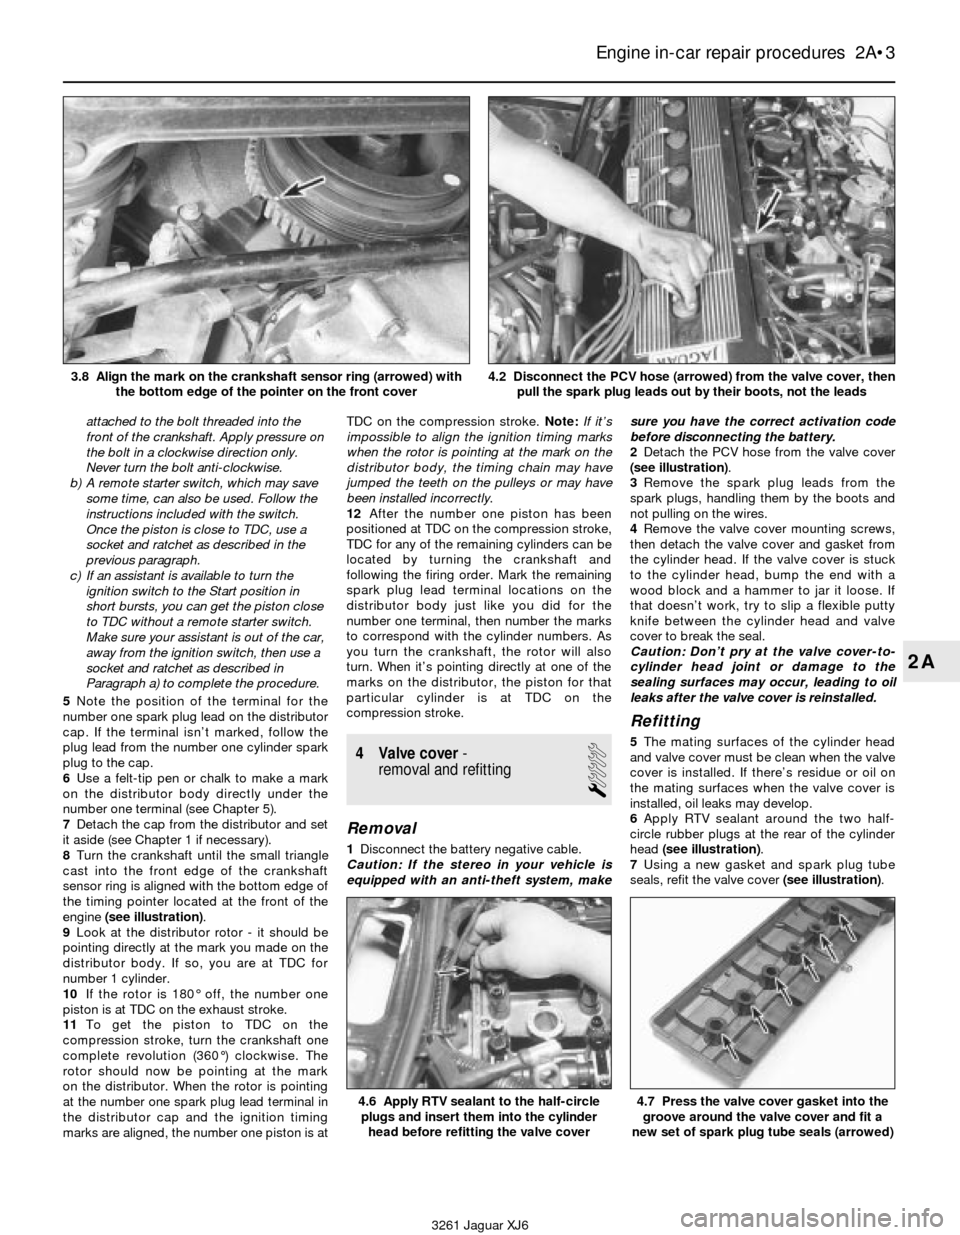
8Turn the crankshaft until the small triangle
cast into the front edge of the crankshaft
sensor ring is aligned with the bottom edge of
the timing pointer located at the front of the
engine(see illustration).
9Look at the distributor rotor - it should be
pointing directly at the mark you made on the
distributor body. If so, you are at TDC for
number 1 cylinder.
10If the rotor is 180° off, the number one
piston is at TDC on the exhaust stroke.
11To get the piston to TDC on the
compression stroke, turn the crankshaft one
complete revolution (360°) clockwise. The
rotor should now be pointing at the mark
on the distributor. When the rotor is pointing
at the number one spark plug lead terminal in
the distributor cap and the ignition timing
marks are aligned, the number one piston is atTDC on the compression stroke. Note:If it’s
impossible to align the ignition timing marks
when the rotor is pointing at the mark on the
distributor body, the timing chain may have
jumped the teeth on the pulleys or may have
been installed incorrectly.
12After the number one piston has been
positioned at TDC on the compression stroke,
TDC for any of the remaining cylinders can be
located by turning the crankshaft and
following the firing order. Mark the remaining
spark plug lead terminal locations on the
distributor body just like you did for the
number one terminal, then number the marks
to correspond with the cylinder numbers. As
you turn the crankshaft, the rotor will also
turn. When it’s pointing directly at one of the
marks on the distributor, the piston for that
particular cylinder is at TDC on the
compression stroke.
4 Valve cover-
removal and refitting
1
Removal
1Disconnect the battery negative cable.
Caution: If the stereo in your vehicle is
equipped with an anti-theft system, makesure you have the correct activation code
before disconnecting the battery.
2Detach the PCV hose from the valve cover
(see illustration).
3Remove the spark plug leads from the
spark plugs, handling them by the boots and
not pulling on the wires.
4Remove the valve cover mounting screws,
then detach the valve cover and gasket from
the cylinder head. If the valve cover is stuck
to the cylinder head, bump the end with a
wood block and a hammer to jar it loose. If
that doesn’t work, try to slip a flexible putty
knife between the cylinder head and valve
cover to break the seal.
Caution: Don’t pry at the valve cover-to-
cylinder head joint or damage to the
sealing surfaces may occur, leading to oil
leaks after the valve cover is reinstalled.
Refitting
5The mating surfaces of the cylinder head
and valve cover must be clean when the valve
cover is installed. If there’s residue or oil on
the mating surfaces when the valve cover is
installed, oil leaks may develop.
6Apply RTV sealant around the two half-
circle rubber plugs at the rear of the cylinder
head (see illustration).
7Using a new gasket and spark plug tube
seals, refit the valve cover (see illustration).
Engine in-car repair procedures 2A•3
2A
4.6 Apply RTV sealant to the half-circle
plugs and insert them into the cylinder
head before refitting the valve cover4.7 Press the valve cover gasket into the
groove around the valve cover and fit a
new set of spark plug tube seals (arrowed)
3261 Jaguar XJ6 3.8 Align the mark on the crankshaft sensor ring (arrowed) with
the bottom edge of the pointer on the front cover
4.2 Disconnect the PCV hose (arrowed) from the valve cover, then
pull the spark plug leads out by their boots, not the leads
Page 41 of 227
8Tighten the screws to the torque listed in
this Chapter’s Specifications in three or four
equal steps.
9Refit the remaining components, start the
engine and check for oil leaks.
5 Intake manifold-
removal and refitting
2
Removal
1Disconnect the negative cable from the
battery.
Caution: If the stereo in your vehicle is
equipped with an anti-theft system, make
sure you have the correct activation code
before disconnecting the battery.
2Refer to Chapter 4 to remove the
accelerator and cruise-control linkage, safely
relieve the fuel system pressure, and
disconnect the fuel supply lines.
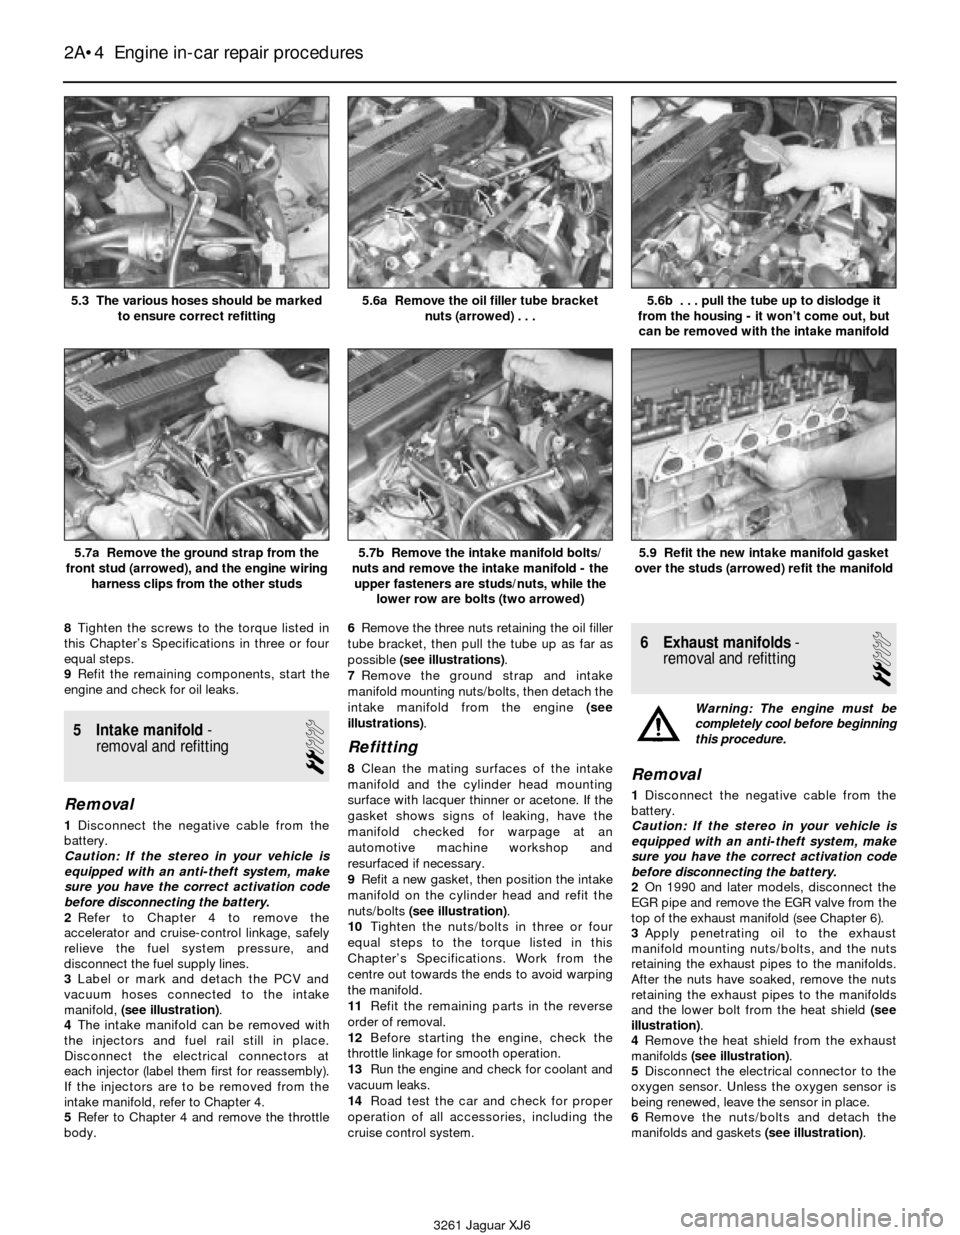
3Label or mark and detach the PCV and
vacuum hoses connected to the intake
manifold, (see illustration).
4The intake manifold can be removed with
the injectors and fuel rail still in place.
Disconnect the electrical connectors at
each injector (label them first for reassembly).
If the injectors are to be removed from the
intake manifold, refer to Chapter 4.
5Refer to Chapter 4 and remove the throttle
body.6Remove the three nuts retaining the oil filler
tube bracket, then pull the tube up as far as
possible (see illustrations).
7Remove the ground strap and intake
manifold mounting nuts/bolts, then detach the
intake manifold from the engine (see
illustrations).
Refitting
8Clean the mating surfaces of the intake
manifold and the cylinder head mounting
surface with lacquer thinner or acetone. If the
gasket shows signs of leaking, have the
manifold checked for warpage at an
automotive machine workshop and
resurfaced if necessary.
9Refit a new gasket, then position the intake
manifold on the cylinder head and refit the
nuts/bolts (see illustration).
10Tighten the nuts/bolts in three or four
equal steps to the torque listed in this
Chapter’s Specifications. Work from the
centre out towards the ends to avoid warping
the manifold.
11Refit the remaining parts in the reverse
order of removal.
12Before starting the engine, check the
throttle linkage for smooth operation.
13Run the engine and check for coolant and
vacuum leaks.
14Road test the car and check for proper
operation of all accessories, including the
cruise control system.
6 Exhaust manifolds-
removal and refitting
2
Warning: The engine must be
completely cool before beginning
this procedure.
Removal
1Disconnect the negative cable from the
battery.
Caution: If the stereo in your vehicle is
equipped with an anti-theft system, make
sure you have the correct activation code
before disconnecting the battery.
2On 1990 and later models, disconnect the
EGR pipe and remove the EGR valve from the
top of the exhaust manifold (see Chapter 6).
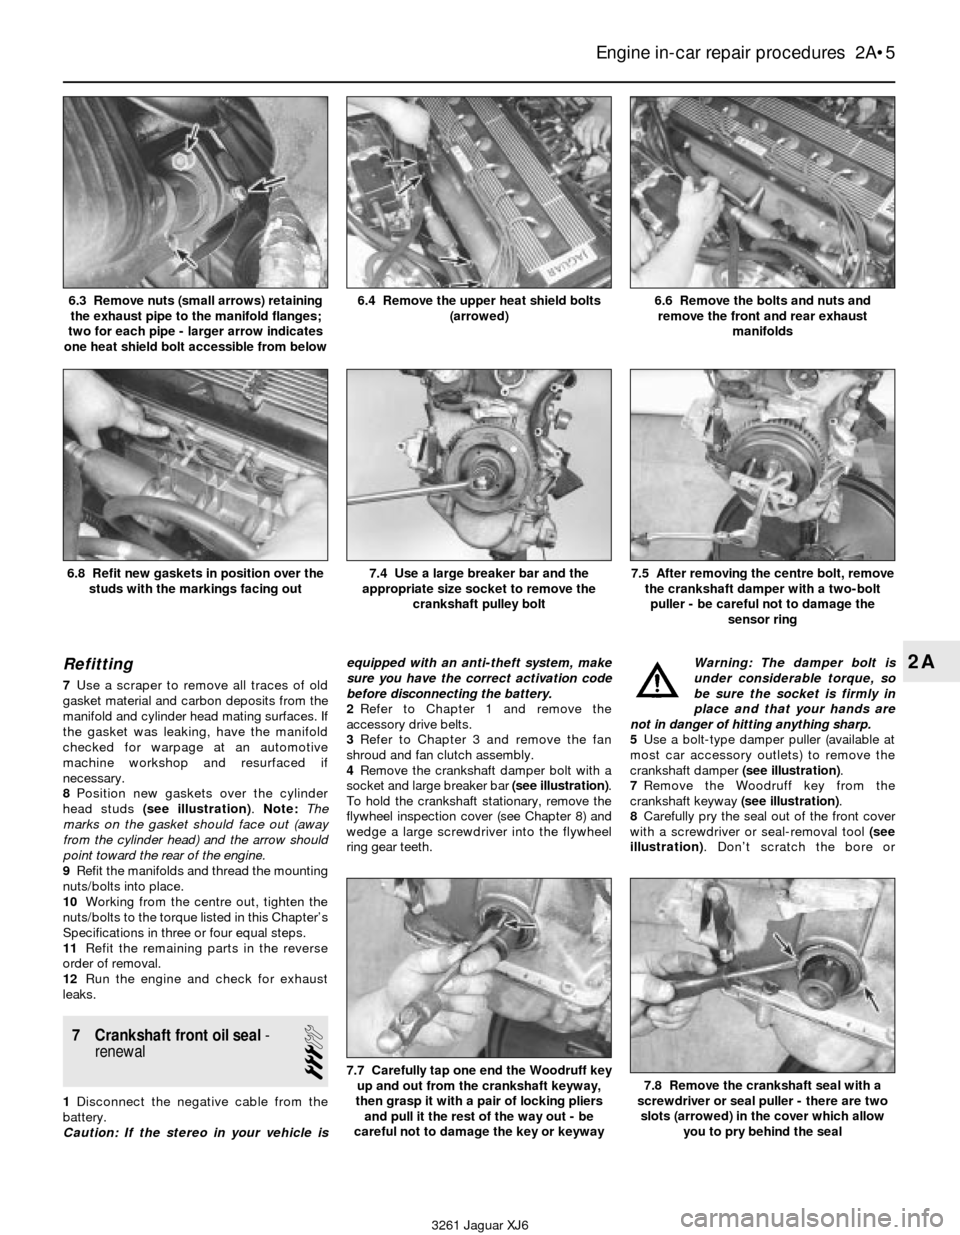
3Apply penetrating oil to the exhaust
manifold mounting nuts/bolts, and the nuts
retaining the exhaust pipes to the manifolds.
After the nuts have soaked, remove the nuts
retaining the exhaust pipes to the manifolds
and the lower bolt from the heat shield (see
illustration).
4Remove the heat shield from the exhaust
manifolds(see illustration).
5Disconnect the electrical connector to the
oxygen sensor. Unless the oxygen sensor is
being renewed, leave the sensor in place.
6Remove the nuts/bolts and detach the
manifolds and gaskets (see illustration).
2A•4 Engine in-car repair procedures
5.3 The various hoses should be marked
to ensure correct refitting5.6a Remove the oil filler tube bracket
nuts (arrowed) . . .5.6b . . . pull the tube up to dislodge it
from the housing - it won’t come out, but
can be removed with the intake manifold
5.7a Remove the ground strap from the
front stud (arrowed), and the engine wiring
harness clips from the other studs5.7b Remove the intake manifold bolts/
nuts and remove the intake manifold - the
upper fasteners are studs/nuts, while the
lower row are bolts (two arrowed)5.9 Refit the new intake manifold gasket
over the studs (arrowed) refit the manifold
3261 Jaguar XJ6
Page 42 of 227
Refitting
7Use a scraper to remove all traces of old
gasket material and carbon deposits from the
manifold and cylinder head mating surfaces. If
the gasket was leaking, have the manifold
checked for warpage at an automotive
machine workshop and resurfaced if
necessary.
8Position new gaskets over the cylinder
head studs (see illustration). Note:The
marks on the gasket should face out (away
from the cylinder head) and the arrow should
point toward the rear of the engine.
9Refit the manifolds and thread the mounting
nuts/bolts into place.
10Working from the centre out, tighten the
nuts/bolts to the torque listed in this Chapter’s
Specifications in three or four equal steps.
11Refit the remaining parts in the reverse
order of removal.
12Run the engine and check for exhaust
leaks.
7 Crankshaft front oil seal-
renewal
3
1Disconnect the negative cable from the
battery.
Caution: If the stereo in your vehicle isequipped with an anti-theft system, make
sure you have the correct activation code
before disconnecting the battery.
2Refer to Chapter 1 and remove the
accessory drive belts.
3Refer to Chapter 3 and remove the fan
shroud and fan clutch assembly.
4Remove the crankshaft damper bolt with a
socket and large breaker bar (see illustration).
To hold the crankshaft stationary, remove the
flywheel inspection cover (see Chapter 8) and
wedge a large screwdriver into the flywheel
ring gear teeth. Warning: The damper bolt is
under considerable torque, so
be sure the socket is firmly in
place and that your hands are
not in danger of hitting anything sharp.
5Use a bolt-type damper puller (available at
most car accessory outlets) to remove the
crankshaft damper (see illustration).
7Remove the Woodruff key from the
crankshaft keyway (see illustration).
8Carefully pry the seal out of the front cover
with a screwdriver or seal-removal tool(see
illustration). Don’t scratch the bore or
Engine in-car repair procedures 2A•5
2A
6.3 Remove nuts (small arrows) retaining
the exhaust pipe to the manifold flanges;
two for each pipe - larger arrow indicates
one heat shield bolt accessible from below6.4 Remove the upper heat shield bolts
(arrowed)6.6 Remove the bolts and nuts and
remove the front and rear exhaust
manifolds
6.8 Refit new gaskets in position over the
studs with the markings facing out
7.7 Carefully tap one end the Woodruff key
up and out from the crankshaft keyway,
then grasp it with a pair of locking pliers
and pull it the rest of the way out - be
careful not to damage the key or keyway7.8 Remove the crankshaft seal with a
screwdriver or seal puller - there are two
slots (arrowed) in the cover which allow
you to pry behind the seal
7.4 Use a large breaker bar and the
appropriate size socket to remove the
crankshaft pulley bolt7.5 After removing the centre bolt, remove
the crankshaft damper with a two-bolt
puller - be careful not to damage the
sensor ring
3261 Jaguar XJ6
Page 43 of 227
damage the crankshaft in the process (if the
crankshaft is damaged, the new seal will end
up leaking).
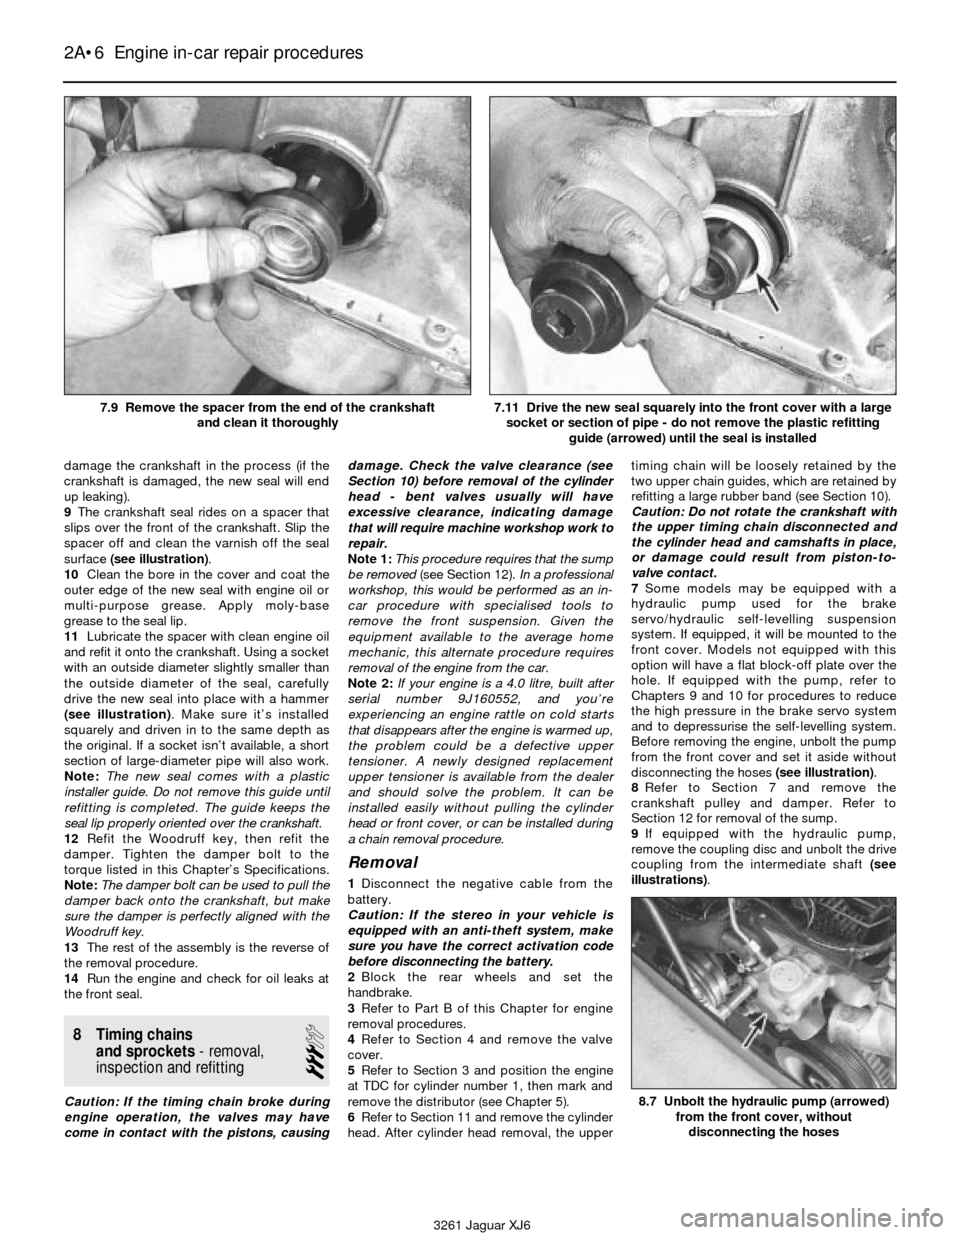
9The crankshaft seal rides on a spacer that
slips over the front of the crankshaft. Slip the
spacer off and clean the varnish off the seal
surface (see illustration).
10Clean the bore in the cover and coat the
outer edge of the new seal with engine oil or
multi-purpose grease. Apply moly-base
grease to the seal lip.
11Lubricate the spacer with clean engine oil
and refit it onto the crankshaft. Using a socket
with an outside diameter slightly smaller than
the outside diameter of the seal, carefully
drive the new seal into place with a hammer
(see illustration). Make sure it’s installed
squarely and driven in to the same depth as
the original. If a socket isn’t available, a short
section of large-diameter pipe will also work.
Note:The new seal comes with a plastic
installer guide. Do not remove this guide until
refitting is completed. The guide keeps the
seal lip properly oriented over the crankshaft.
12Refit the Woodruff key, then refit the
damper. Tighten the damper bolt to the
torque listed in this Chapter’s Specifications.
Note:The damper bolt can be used to pull the
damper back onto the crankshaft, but make
sure the damper is perfectly aligned with the
Woodruff key.
13The rest of the assembly is the reverse of
the removal procedure.
14Run the engine and check for oil leaks at
the front seal.
8 Timing chains
and sprockets- removal,
inspection and refitting
3
Caution: If the timing chain broke during
engine operation, the valves may have
come in contact with the pistons, causingdamage. Check the valve clearance (see
Section 10) before removal of the cylinder
head - bent valves usually will have
excessive clearance, indicating damage
that will require machine workshop work to
repair.
Note 1:This procedure requires that the sump
be removed (see Section 12).In a professional
workshop, this would be performed as an in-
car procedure with specialised tools to
remove the front suspension. Given the
equipment available to the average home
mechanic, this alternate procedure requires
removal of the engine from the car.
Note 2:If your engine is a 4.0 litre, built after
serial number 9J160552, and you’re
experiencing an engine rattle on cold starts
that disappears after the engine is warmed up,
the problem could be a defective upper
tensioner. A newly designed replacement
upper tensioner is available from the dealer
and should solve the problem. It can be
installed easily without pulling the cylinder
head or front cover, or can be installed during
a chain removal procedure.
Removal
1Disconnect the negative cable from the
battery.
Caution: If the stereo in your vehicle is
equipped with an anti-theft system, make
sure you have the correct activation code
before disconnecting the battery.
2Block the rear wheels and set the
handbrake.
3Refer to Part B of this Chapter for engine
removal procedures.
4Refer to Section 4 and remove the valve
cover.
5Refer to Section 3 and position the engine
at TDC for cylinder number 1, then mark and
remove the distributor (see Chapter 5).
6Refer to Section 11 and remove the cylinder
head. After cylinder head removal, the uppertiming chain will be loosely retained by the
two upper chain guides, which are retained by
refitting a large rubber band (see Section 10).
Caution: Do not rotate the crankshaft with
the upper timing chain disconnected and
the cylinder head and camshafts in place,
or damage could result from piston-to-
valve contact.
7Some models may be equipped with a
hydraulic pump used for the brake
servo/hydraulic self-levelling suspension
system. If equipped, it will be mounted to the
front cover. Models not equipped with this
option will have a flat block-off plate over the
hole. If equipped with the pump, refer to
Chapters 9 and 10 for procedures to reduce
the high pressure in the brake servo system
and to depressurise the self-levelling system.
Before removing the engine, unbolt the pump
from the front cover and set it aside without
disconnecting the hoses (see illustration).
8Refer to Section 7 and remove the
crankshaft pulley and damper. Refer to
Section 12 for removal of the sump.
9If equipped with the hydraulic pump,
remove the coupling disc and unbolt the drive
coupling from the intermediate shaft (see
illustrations).
2A•6 Engine in-car repair procedures
8.7 Unbolt the hydraulic pump (arrowed)
from the front cover, without
disconnecting the hoses
3261 Jaguar XJ6 7.9 Remove the spacer from the end of the crankshaft
and clean it thoroughly
7.11 Drive the new seal squarely into the front cover with a large
socket or section of pipe - do not remove the plastic refitting
guide (arrowed) until the seal is installed
Page 45 of 227

23Clean and lubricate the lower tensioner.
Fill the lower tensioner oil reservoir with engine
oil and refit it on the engine block, aligning the
notch in the tensioner with the lug on the back
of the guide (see illustrations). This should
remove all slack from the lower timing chain. If
not, push the lower tensioner guide back and
forth a few times to prime the tensioner.
24Refit the upper chain tensioner guide and
mounting bracket to the engine block.
Caution: Before fully tightening the
mounting bracket to the engine block,
make sure the mount and chain guide are
clear of the lower chain, auxiliary sprocket
and intermediate sprocket. If necessary,
position the mount for clearance before
tightening the mounting bolts.
25Refit the oil pump drive chain and
sprocket to the crankshaft (see Section 13).
26Refit the upper chain fixed guide to the
engine block and place the upper timing chain
over the intermediate sprocket and auxiliary
shaft sprocket, draping the excess chain over
the top of the fixed guide. Lubricate the chain
and sprockets with clean engine oil.27Gather the loose portion of the upper
timing chain and place it between the upper
guides. Use a large rubber band to hold the
two guides snugly around the chain (see
Section 11).
28If necessary, renew the intermediate shaft
seal (see illustrations).
29Apply a thin coat of RTV sealant to the
engine side of the front cover and RTV sealant
to the oil-pan mating surface (bottom of the
front cover), then refit the front cover. Note:
Make sure the top surface of the cover aligns
with the top surface of the engine block, by
checking with a straightedge(see illustration).
30Refer to Section 11 for refitting of the
cylinder head and Section 10 for refitting of
the camshafts and connection of the upper
timing chain to the two camshaft sprockets.
31The remainder of the refitting is the
reverse of the removal procedure. If your car
is equipped with the hydraulic/self-levelling
suspension, refit the drive coupling and
coupling disc to the intermediate shaft (see
illustrations 8.9a and 8.9b). Coat the
mounting surface of the pump with RTVsealant and make sure the tang on the pump
aligns with the slot in the intermediate shaft
before bolting the pump to the front cover.
Refer to Section 7 for refitting of the
crankshaft spacer, damper and puller.
Caution: DO NOT start the engine until
you’re absolutely certain that the timing
chains are installed correctly. Serious and
costly engine damage could occur if the
chains are installed wrong.
32Run the engine and check for proper
operation.
9 Auxiliary shaft- renewal
3
Caution: If the stereo in your vehicle is
equipped with an anti-theft system, make
sure you have the correct activation code
before disconnecting the battery.
1Refer to Chapter 10 and remove the power
steering pump, without disconnecting the
hoses. Remove the plastic power steering
pump drive coupling disc.
2A•8 Engine in-car repair procedures
8.28a Drill a small hole in the intermediate
shaft seal, thread a sheet metal screw into
it and use a small slide-hammer pull the
seal out of the cover8.28b Drive the new seal in with a seal-
driver or socket, to the same depth as the
original seal8.29 Bolt the front cover on hand tight, use
a straightedge to make sure the cover’s
top surface is level with the top of the
engine block, then tighten the cover bolts
3261 Jaguar XJ6 8.23a Add oil to the reservoir in the lower tensioner . . .
8.23b . . . and refit the tensioner against the guide -
after it’s installed, push the tensioner guide back and forth
a few times to prime the tensioner
Page 50 of 227
11 Cylinder head-
removal and refitting
4
Note:The engine must be completely cool
before beginning this procedure.
Removal
1Disconnect the battery negative cable.
Caution: If the stereo in your vehicle is
equipped with an anti-theft system, make
sure you have the correct activation code
before disconnecting the battery.
2Drain the coolant from the engine block and
radiator (see Chapter 1).
3Drain the engine oil and remove the oil filter
(see Chapter 1).
4Remove the bonnet for easier access, if
necessary (see Chapter 11).
5Remove the intake manifold (see Section 5).
6Remove the exhaust manifolds (Section 6).
7Remove the valve cover (see Section 4).
8Refer to Section 3 and Position the engine
at TDC for cylinder number 1. Remove the
distributor (see Chapter 5).
9Remove the camshafts and sprockets (see
Section 10). Place the upper chain between
the two upper chain guides and wrap a large
rubber band around the two guides, retaining
the chain and guides.
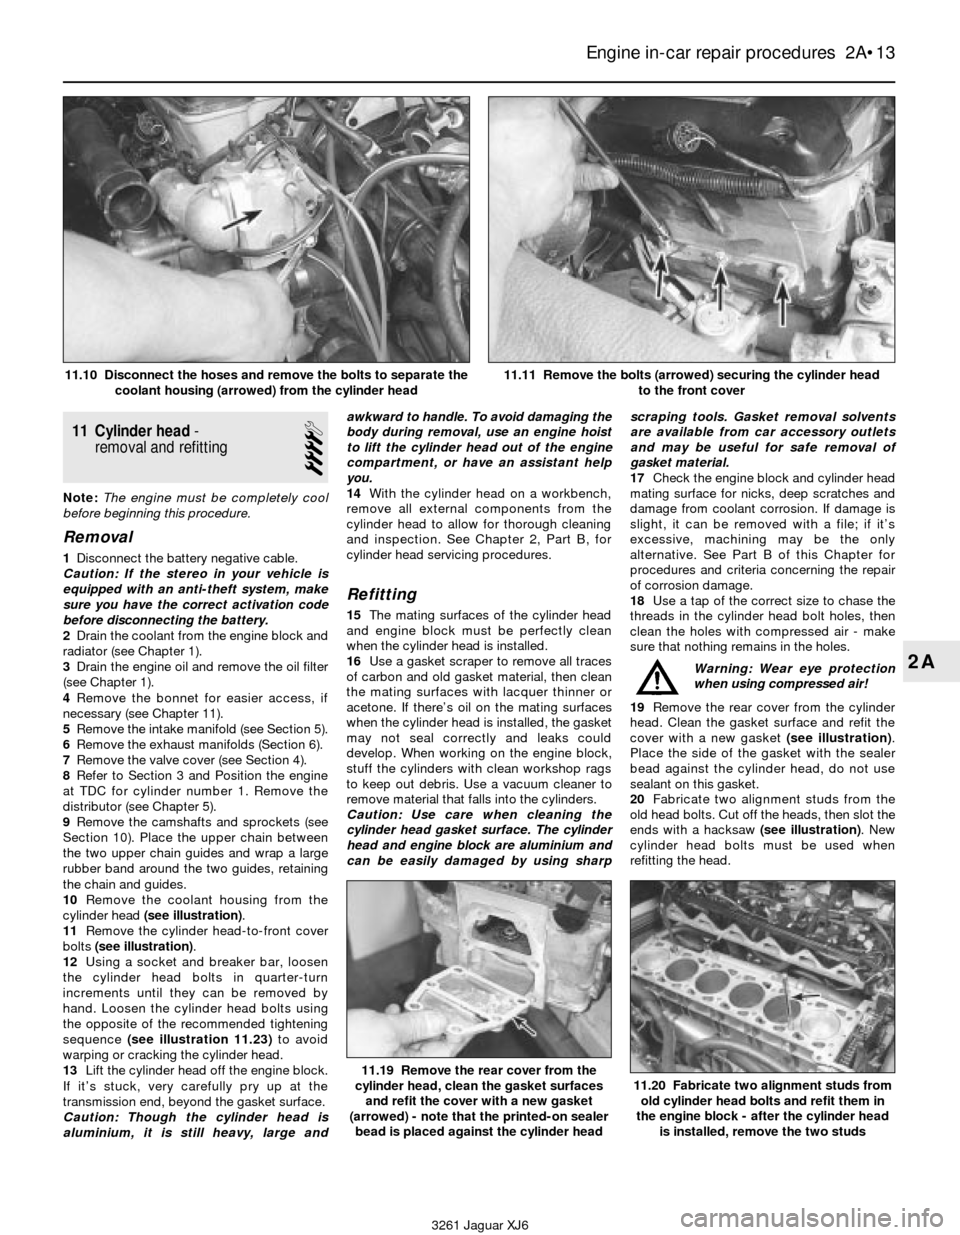
10Remove the coolant housing from the
cylinder head (see illustration).
11Remove the cylinder head-to-front cover
bolts (see illustration).
12Using a socket and breaker bar, loosen
the cylinder head bolts in quarter-turn
increments until they can be removed by
hand. Loosen the cylinder head bolts using
the opposite of the recommended tightening
sequence (see illustration 11.23)to avoid
warping or cracking the cylinder head.
13Lift the cylinder head off the engine block.
If it’s stuck, very carefully pry up at the
transmission end, beyond the gasket surface.
Caution: Though the cylinder head is
aluminium, it is still heavy, large andawkward to handle. To avoid damaging the
body during removal, use an engine hoist
to lift the cylinder head out of the engine
compartment, or have an assistant help
you.
14With the cylinder head on a workbench,
remove all external components from the
cylinder head to allow for thorough cleaning
and inspection. See Chapter 2, Part B, for
cylinder head servicing procedures.
Refitting
15The mating surfaces of the cylinder head
and engine block must be perfectly clean
when the cylinder head is installed.
16Use a gasket scraper to remove all traces
of carbon and old gasket material, then clean
the mating surfaces with lacquer thinner or
acetone. If there’s oil on the mating surfaces
when the cylinder head is installed, the gasket
may not seal correctly and leaks could
develop. When working on the engine block,
stuff the cylinders with clean workshop rags
to keep out debris. Use a vacuum cleaner to
remove material that falls into the cylinders.
Caution: Use care when cleaning the
cylinder head gasket surface. The cylinder
head and engine block are aluminium and
can be easily damaged by using sharpscraping tools. Gasket removal solvents
are available from car accessory outlets
and may be useful for safe removal of
gasket material.
17Check the engine block and cylinder head
mating surface for nicks, deep scratches and
damage from coolant corrosion. If damage is
slight, it can be removed with a file; if it’s
excessive, machining may be the only
alternative. See Part B of this Chapter for
procedures and criteria concerning the repair
of corrosion damage.
18Use a tap of the correct size to chase the
threads in the cylinder head bolt holes, then
clean the holes with compressed air - make
sure that nothing remains in the holes.
Warning: Wear eye protection
when using compressed air!
19Remove the rear cover from the cylinder
head. Clean the gasket surface and refit the
cover with a new gasket (see illustration).
Place the side of the gasket with the sealer
bead against the cylinder head, do not use
sealant on this gasket.
20Fabricate two alignment studs from the
old head bolts. Cut off the heads, then slot the
ends with a hacksaw (see illustration). New
cylinder head bolts must be used when
refitting the head.
Engine in-car repair procedures 2A•13
2A
11.19 Remove the rear cover from the
cylinder head, clean the gasket surfaces
and refit the cover with a new gasket
(arrowed) - note that the printed-on sealer
bead is placed against the cylinder head11.20 Fabricate two alignment studs from
old cylinder head bolts and refit them in
the engine block - after the cylinder head
is installed, remove the two studs
3261 Jaguar XJ6 11.10 Disconnect the hoses and remove the bolts to separate the
coolant housing (arrowed) from the cylinder head
11.11 Remove the bolts (arrowed) securing the cylinder head
to the front cover
Page 55 of 227

6Slowly and carefully press the seal and
retainer squarely onto the crankshaft (see
illustration). The plastic sleeve may be
pushed out as the retainer seats on the engine
block. Remove the plastic sleeve.
7Refit and tighten the retainer bolts to the
torque listed in this Chapter’s Specifications.
8The remaining steps are the reverse of
removal.
16 Engine mounts-
check and renewal
3
1Engine mounts seldom require attention,
but broken or deteriorated mounts should be
renewed immediately or the added strain
placed on the driveline components may
cause damage or wear.
Check
2During the check, the engine must be
raised to remove the weight from the mounts.3Raise the car and support it securely on
axle stands, then position a jack under the
engine sump. Place a large wood block
between the jack head and the sump, then
carefully raise the engine just enough to take
the weight off the mounts. Do not position the
wood block under the drain plug.
Warning: DO NOT place any part
of your body under the engine
when it’s supported by a jack!
4Check the front mounts to see if the rubber
is cracked, hardened or separated from the
metal plates. Sometimes the rubber will split
down the centre.
5Check for relative movement between the
mount plates and the engine or frame (use a
large screwdriver or pry bar to attempt to
move the mounts). If movement is noted,
lower the engine and tighten the mount
fasteners.
6Rubber preservative should be applied to
the mounts to slow deterioration.
Renewal
7Disconnect the battery negative cable.
Caution: If the stereo in your vehicle is
equipped with an anti-theft system, make
sure you have the correct activation code
before disconnecting the battery.
8Raise the car and support it securely on
axle stands. Support the engine as described
in paragraph 3.
Caution: Ensure the cooling fan doesn’t hit
the shroud as the engine is raised.
9To remove either engine mount, remove the
nut from the engine bracket, then raise the
engine (see illustration).
10From underneath the car, lower the
steering gear (see Chapter 10) for access to
the nut retaining the insulator to the chassis
bracket.
11Refitting is the reverse of removal. Use
thread-locking compound on the mount
bolts/nuts and be sure to tighten them
securely.
12See Chapter 7 for transmission mount
renewal.
2A•18 Engine in-car repair procedures
3261 Jaguar XJ6 15.6 Refit the retainer and oil seal onto the crankshaft
16.9 Front engine mount (A)
and retaining nut to engine bracket (B)
Page 59 of 227
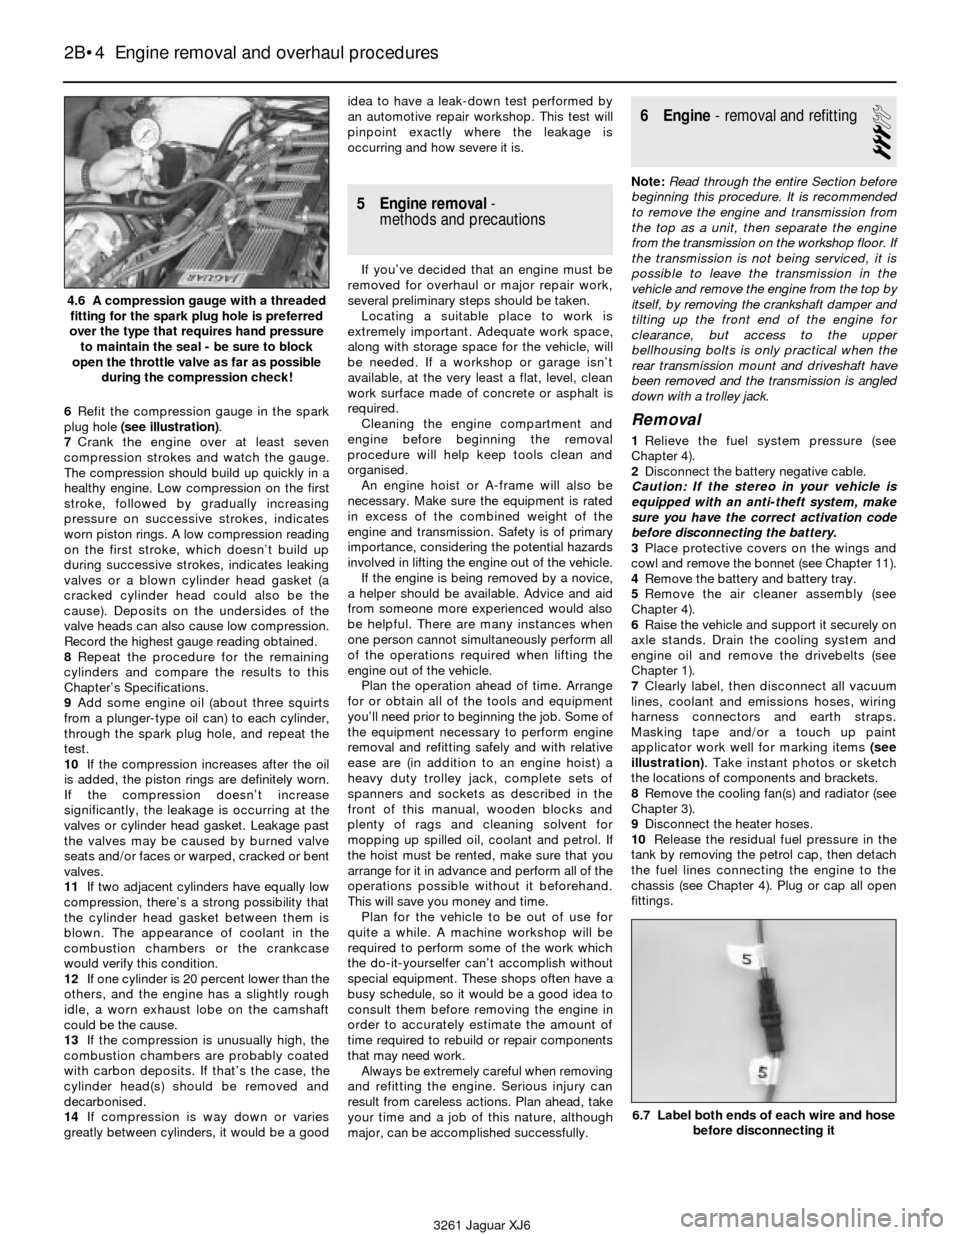
6Refit the compression gauge in the spark
plug hole (see illustration).
7Crank the engine over at least seven
compression strokes and watch the gauge.
The compression should build up quickly in a
healthy engine. Low compression on the first
stroke, followed by gradually increasing
pressure on successive strokes, indicates
worn piston rings. A low compression reading
on the first stroke, which doesn’t build up
during successive strokes, indicates leaking
valves or a blown cylinder head gasket (a
cracked cylinder head could also be the
cause). Deposits on the undersides of the
valve heads can also cause low compression.
Record the highest gauge reading obtained.
8Repeat the procedure for the remaining
cylinders and compare the results to this
Chapter’s Specifications.
9Add some engine oil (about three squirts
from a plunger-type oil can) to each cylinder,
through the spark plug hole, and repeat the
test.
10If the compression increases after the oil
is added, the piston rings are definitely worn.
If the compression doesn’t increase
significantly, the leakage is occurring at the
valves or cylinder head gasket. Leakage past
the valves may be caused by burned valve
seats and/or faces or warped, cracked or bent
valves.
11If two adjacent cylinders have equally low
compression, there’s a strong possibility that
the cylinder head gasket between them is
blown. The appearance of coolant in the
combustion chambers or the crankcase
would verify this condition.
12If one cylinder is 20 percent lower than the
others, and the engine has a slightly rough
idle, a worn exhaust lobe on the camshaft
could be the cause.
13If the compression is unusually high, the
combustion chambers are probably coated
with carbon deposits. If that’s the case, the
cylinder head(s) should be removed and
decarbonised.
14If compression is way down or varies
greatly between cylinders, it would be a goodidea to have a leak-down test performed by
an automotive repair workshop. This test will
pinpoint exactly where the leakage is
occurring and how severe it is.
5 Engine removal-
methods and precautions
If you’ve decided that an engine must be
removed for overhaul or major repair work,
several preliminary steps should be taken.
Locating a suitable place to work is
extremely important. Adequate work space,
along with storage space for the vehicle, will
be needed. If a workshop or garage isn’t
available, at the very least a flat, level, clean
work surface made of concrete or asphalt is
required.
Cleaning the engine compartment and
engine before beginning the removal
procedure will help keep tools clean and
organised.
An engine hoist or A-frame will also be
necessary. Make sure the equipment is rated
in excess of the combined weight of the
engine and transmission. Safety is of primary
importance, considering the potential hazards
involved in lifting the engine out of the vehicle.
If the engine is being removed by a novice,
a helper should be available. Advice and aid
from someone more experienced would also
be helpful. There are many instances when
one person cannot simultaneously perform all
of the operations required when lifting the
engine out of the vehicle.
Plan the operation ahead of time. Arrange
for or obtain all of the tools and equipment
you’ll need prior to beginning the job. Some of
the equipment necessary to perform engine
removal and refitting safely and with relative
ease are (in addition to an engine hoist) a
heavy duty trolley jack, complete sets of
spanners and sockets as described in the
front of this manual, wooden blocks and
plenty of rags and cleaning solvent for
mopping up spilled oil, coolant and petrol. If
the hoist must be rented, make sure that you
arrange for it in advance and perform all of the
operations possible without it beforehand.
This will save you money and time.
Plan for the vehicle to be out of use for
quite a while. A machine workshop will be
required to perform some of the work which
the do-it-yourselfer can’t accomplish without
special equipment. These shops often have a
busy schedule, so it would be a good idea to
consult them before removing the engine in
order to accurately estimate the amount of
time required to rebuild or repair components
that may need work.
Always be extremely careful when removing
and refitting the engine. Serious injury can
result from careless actions. Plan ahead, take
your time and a job of this nature, although
major, can be accomplished successfully.
6 Engine- removal and refitting
3
Note:Read through the entire Section before
beginning this procedure. It is recommended
to remove the engine and transmission from
the top as a unit, then separate the engine
from the transmission on the workshop floor. If
the transmission is not being serviced, it is
possible to leave the transmission in the
vehicle and remove the engine from the top by
itself, by removing the crankshaft damper and
tilting up the front end of the engine for
clearance,but access to the upper
bellhousing bolts is only practical when the
rear transmission mount and driveshaft have
been removed and the transmission is angled
down with a trolley jack.
Removal
1Relieve the fuel system pressure (see
Chapter 4).
2Disconnect the battery negative cable.
Caution: If the stereo in your vehicle is
equipped with an anti-theft system, make
sure you have the correct activation code
before disconnecting the battery.
3Place protective covers on the wings and
cowl and remove the bonnet (see Chapter 11).
4Remove the battery and battery tray.
5Remove the air cleaner assembly (see
Chapter 4).
6Raise the vehicle and support it securely on
axle stands. Drain the cooling system and
engine oil and remove the drivebelts (see
Chapter 1).
7Clearly label, then disconnect all vacuum
lines, coolant and emissions hoses, wiring
harness connectors and earth straps.
Masking tape and/or a touch up paint
applicator work well for marking items (see
illustration). Take instant photos or sketch
the locations of components and brackets.
8Remove the cooling fan(s) and radiator (see
Chapter 3).
9Disconnect the heater hoses.
10Release the residual fuel pressure in the
tank by removing the petrol cap, then detach
the fuel lines connecting the engine to the
chassis (see Chapter 4). Plug or cap all open
fittings.
2B•4 Engine removal and overhaul procedures
4.6 A compression gauge with a threaded
fitting for the spark plug hole is preferred
over the type that requires hand pressure
to maintain the seal - be sure to block
open the throttle valve as far as possible
during the compression check!
6.7 Label both ends of each wire and hose
before disconnecting it
3261 Jaguar XJ6
Page 75 of 227
Heating system
The heating system consists of two blower
fans, one under the dash on the right and one
on the left, and a heater core located within
the heater/air conditioning assembly which is
under the dash and behind the console.
Hoses connect the heater core to the engine
cooling system. Heater function is controlled
by the heater/air conditioning control head on
the dashboard. Hot engine coolant is
circulated through the heater core. When the
heater mode is activated, a flap door opens to
expose the heater box to the passenger
compartment. A fan switch on the control
head activates the blower motor, which forces
air through the core, heating the air.
Air conditioning system
The air conditioning system consists of a
condenser mounted in front of the radiator, an
evaporator mounted in the heat/air
conditioning assembly behind the console and
under the centre of the dash, a compressor
mounted on the engine, a filter-drier which
contains a high pressure relief valve and the
plumbing connecting all of the above.
A blower fan forces the warmer air of the
passenger compartment through the
evaporator core (sort of a radiator-in-reverse),
transferring the heat from the air to the
refrigerant. The liquid refrigerant boils off into
low pressure vapour, taking the heat with it
when it leaves the evaporator. The
compressor keeps refrigerant circulating
through the system, pumping the warmed
coolant through the condenser where it is
cooled and then circulated back to the
evaporator.
2 Antifreeze/coolant-
general information
Warning: Do not allow antifreeze
to come in contact with your
skin or painted surfaces of the
vehicle. Rinse off spills immediately withplenty of water. Antifreeze is highly toxic if
ingested. Never leave antifreeze lying
around in an open container or in puddles
on the floor; children and pets are
attracted by it’s sweet smell and may drink
it. Check with local authorities about
disposing of used antifreeze. Many
communities have collection centres which
will see that antifreeze is disposed of
safely. Never dump used antifreeze on the
ground or into drains.
Note:Non-toxic antifreeze is now
manufactured and available at local car
accessory outlets, but even these types
should be disposed of properly.
The cooling system should be filled with a
water/ethylene-glycol based antifreeze
solution, which will prevent freezing down to
at least -20° F, or lower if local climate
requires it. It also provides protection against
corrosion and increases the coolant boiling
point.
The cooling system should be drained,
flushed and refilled every 24,000 miles or
every two years (see Chapter 1). The use of
antifreeze solutions for periods of longer than
two years is likely to cause damage and
encourage the formation of rust and scale in
the system. If your tap water is “hard”, i.e.
contains a lot of dissolved minerals, use
distilled water with the antifreeze.
Before adding antifreeze to the system,
check all hose connections, because
antifreeze tends to leak through very minute
openings. Engines do not normally consume
coolant. Therefore, if the level goes down, find
the cause and correct it.
The exact mixture of antifreeze-to-water
you should use depends on the relative
weather conditions. The mixture should
contain at least 50-percent antifreeze, but
should never contain more than 70-percent
antifreeze. Consult the mixture ratio chart on
the antifreeze container before adding
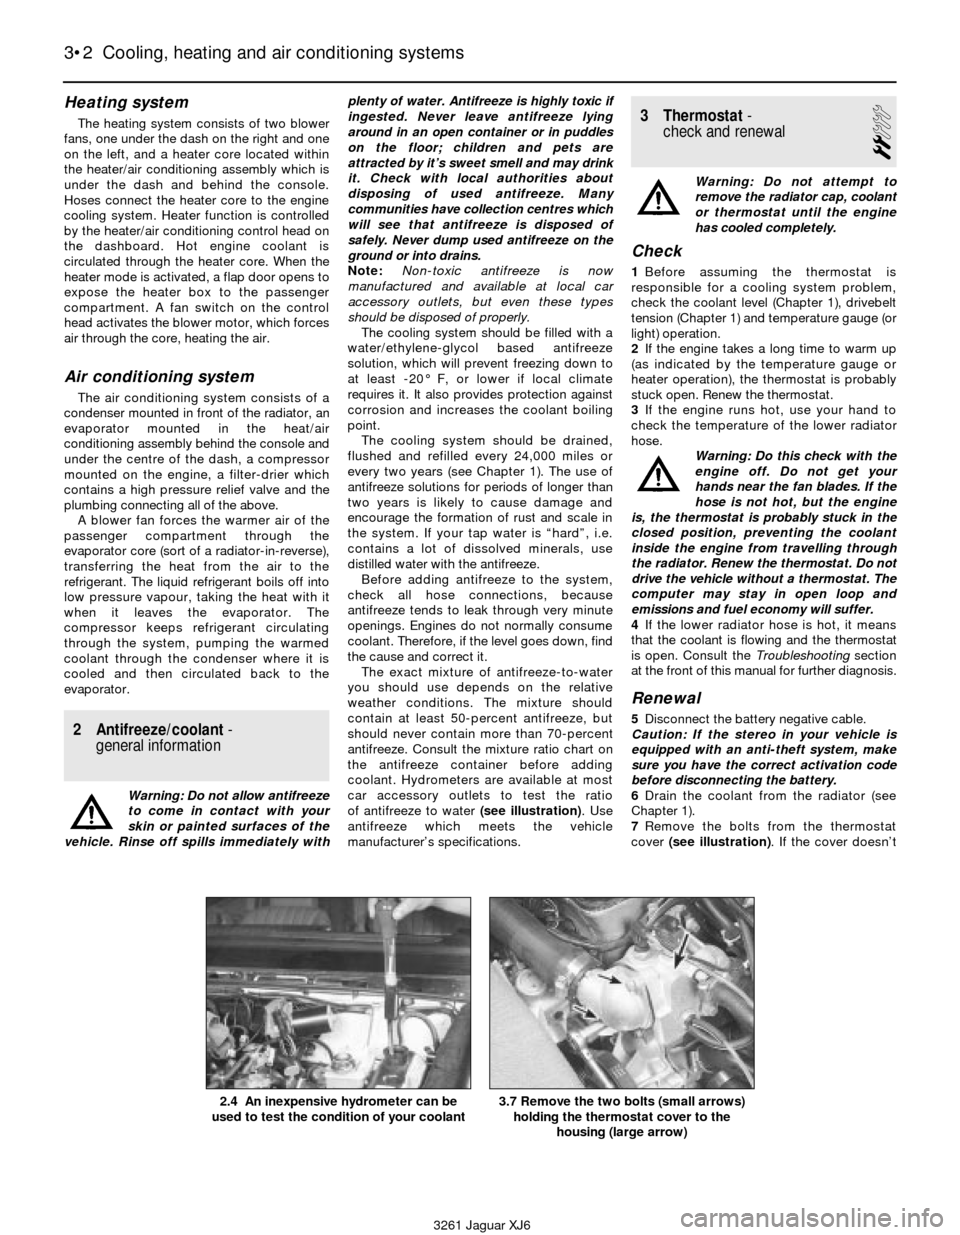
coolant. Hydrometers are available at most
car accessory outlets to test the ratio
of antifreeze to water (see illustration). Use
antifreeze which meets the vehicle
manufacturer’s specifications.
3 Thermostat-
check and renewal
2
Warning: Do not attempt to
remove the radiator cap, coolant
or thermostat until the engine
has cooled completely.
Check
1Before assuming the thermostat is
responsible for a cooling system problem,
check the coolant level (Chapter 1), drivebelt
tension (Chapter 1) and temperature gauge (or
light) operation.
2If the engine takes a long time to warm up
(as indicated by the temperature gauge or
heater operation), the thermostat is probably
stuck open. Renew the thermostat.
3If the engine runs hot, use your hand to
check the temperature of the lower radiator
hose.
Warning: Do this check with the
engine off. Do not get your
hands near the fan blades. If the
hose is not hot, but the engine
is, the thermostat is probably stuck in the
closed position, preventing the coolant
inside the engine from travelling through
the radiator. Renew the thermostat. Do not
drive the vehicle without a thermostat. The
computer may stay in open loop and
emissions and fuel economy will suffer.
4If the lower radiator hose is hot, it means
that the coolant is flowing and the thermostat
is open. Consult the Troubleshootingsection
at the front of this manual for further diagnosis.
Renewal
5Disconnect the battery negative cable.
Caution: If the stereo in your vehicle is
equipped with an anti-theft system, make
sure you have the correct activation code
before disconnecting the battery.
6Drain the coolant from the radiator (see
Chapter 1).
7Remove the bolts from the thermostat
cover (see illustration). If the cover doesn’t
3•2 Cooling, heating and air conditioning systems
3261 Jaguar XJ6 2.4 An inexpensive hydrometer can be
used to test the condition of your coolant
3.7 Remove the two bolts (small arrows)
holding the thermostat cover to the
housing (large arrow)