clock reset JAGUAR XJ6 1997 2.G Workshop Manual
[x] Cancel search | Manufacturer: JAGUAR, Model Year: 1997, Model line: XJ6, Model: JAGUAR XJ6 1997 2.GPages: 227, PDF Size: 7.2 MB
Page 113 of 227

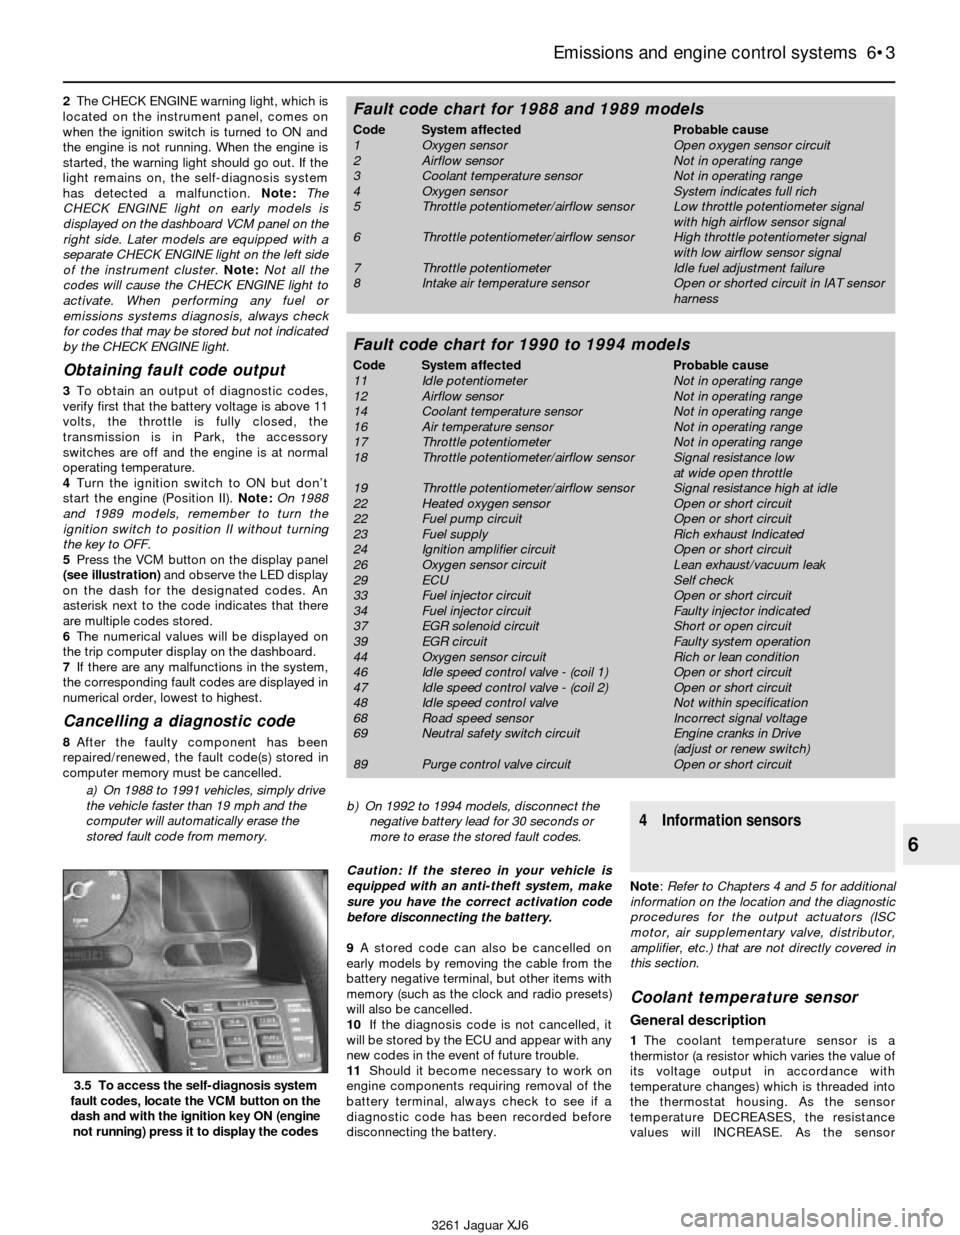
2The CHECK ENGINE warning light, which is
located on the instrument panel, comes on
when the ignition switch is turned to ON and
the engine is not running. When the engine is
started, the warning light should go out. If the
light remains on, the self-diagnosis system
has detected a malfunction. Note: The
CHECK ENGINE light on early models is
displayed on the dashboard VCM panel on the
right side. Later models are equipped with a
separate CHECK ENGINE light on the left side
of the instrument cluster.Note:Not all the
codes will cause the CHECK ENGINE light to
activate. When performing any fuel or
emissions systems diagnosis, always check
for codes that may be stored but not indicated
by the CHECK ENGINE light.
Obtaining fault code output
3To obtain an output of diagnostic codes,
verify first that the battery voltage is above 11
volts, the throttle is fully closed, the
transmission is in Park, the accessory
switches are off and the engine is at normal
operating temperature.
4Turn the ignition switch to ON but don’t
start the engine (Position II). Note:On 1988
and 1989 models, remember to turn the
ignition switch to position II without turning
the key to OFF.
5Press the VCM button on the display panel
(see illustration)and observe the LED display
on the dash for the designated codes. An
asterisk next to the code indicates that there
are multiple codes stored.
6The numerical values will be displayed on
the trip computer display on the dashboard.
7If there are any malfunctions in the system,
the corresponding fault codes are displayed in
numerical order, lowest to highest.
Cancelling a diagnostic code
8After the faulty component has been
repaired/renewed, the fault code(s) stored in
computer memory must be cancelled.
a) On 1988 to 1991 vehicles, simply drive
the vehicle faster than 19 mph and the
computer will automatically erase the
stored fault code from memory.b) On 1992 to 1994 models, disconnect the
negative battery lead for 30 seconds or
more to erase the stored fault codes.
Caution: If the stereo in your vehicle is
equipped with an anti-theft system, make
sure you have the correct activation code
before disconnecting the battery.
9A stored code can also be cancelled on
early models by removing the cable from the
battery negative terminal, but other items with
memory (such as the clock and radio presets)
will also be cancelled.
10If the diagnosis code is not cancelled, it
will be stored by the ECU and appear with any
new codes in the event of future trouble.
11Should it become necessary to work on
engine components requiring removal of the
battery terminal, always check to see if a
diagnostic code has been recorded before
disconnecting the battery.
4 Information sensors
Note: Refer to Chapters 4 and 5 for additional
information on the location and the diagnostic
procedures for the output actuators (ISC
motor, air supplementary valve, distributor,
amplifier, etc.) that are not directly covered in
this section.
Coolant temperature sensor
General description
1The coolant temperature sensor is a
thermistor (a resistor which varies the value of
its voltage output in accordance with
temperature changes) which is threaded into
the thermostat housing. As the sensor
temperature DECREASES, the resistance
values will INCREASE. As the sensor
Emissions and engine control systems 6•3
6
3.5 To access the self-diagnosis system
fault codes, locate the VCM button on the
dash and with the ignition key ON (engine
not running) press it to display the codes
3261 Jaguar XJ6
Fault code chart for 1988 and 1989 models
Code System affected Probable cause
1 Oxygen sensor Open oxygen sensor circuit
2 Airflow sensor Not in operating range
3 Coolant temperature sensor Not in operating range
4 Oxygen sensor System indicates full rich
5 Throttle potentiometer/airflow sensor Low throttle potentiometer signal
with high airflow sensor signal
6 Throttle potentiometer/airflow sensor High throttle potentiometer signal
with low airflow sensor signal
7 Throttle potentiometer Idle fuel adjustment failure
8 Intake air temperature sensor Open or shorted circuit in IAT sensor
harness
Fault code chart for 1990 to 1994 models
Code System affected Probable cause
11 Idle potentiometer Not in operating range
12 Airflow sensor Not in operating range
14 Coolant temperature sensor Not in operating range
16 Air temperature sensor Not in operating range
17 Throttle potentiometer Not in operating range
18 Throttle potentiometer/airflow sensor Signal resistance low
at wide open throttle
19 Throttle potentiometer/airflow sensor Signal resistance high at idle
22 Heated oxygen sensor Open or short circuit
22 Fuel pump circuit Open or short circuit
23 Fuel supply Rich exhaust Indicated
24 Ignition amplifier circuit Open or short circuit
26 Oxygen sensor circuit Lean exhaust/vacuum leak
29 ECU Self check
33 Fuel injector circuit Open or short circuit
34 Fuel injector circuit Faulty injector indicated
37 EGR solenoid circuit Short or open circuit
39 EGR circuit Faulty system operation
44 Oxygen sensor circuit Rich or lean condition
46 Idle speed control valve - (coil 1) Open or short circuit
47 Idle speed control valve - (coil 2) Open or short circuit
48 Idle speed control valve Not within specification
68 Road speed sensor Incorrect signal voltage
69 Neutral safety switch circuit Engine cranks in Drive
(adjust or renew switch)
89 Purge control valve circuit Open or short circuit
Page 174 of 227

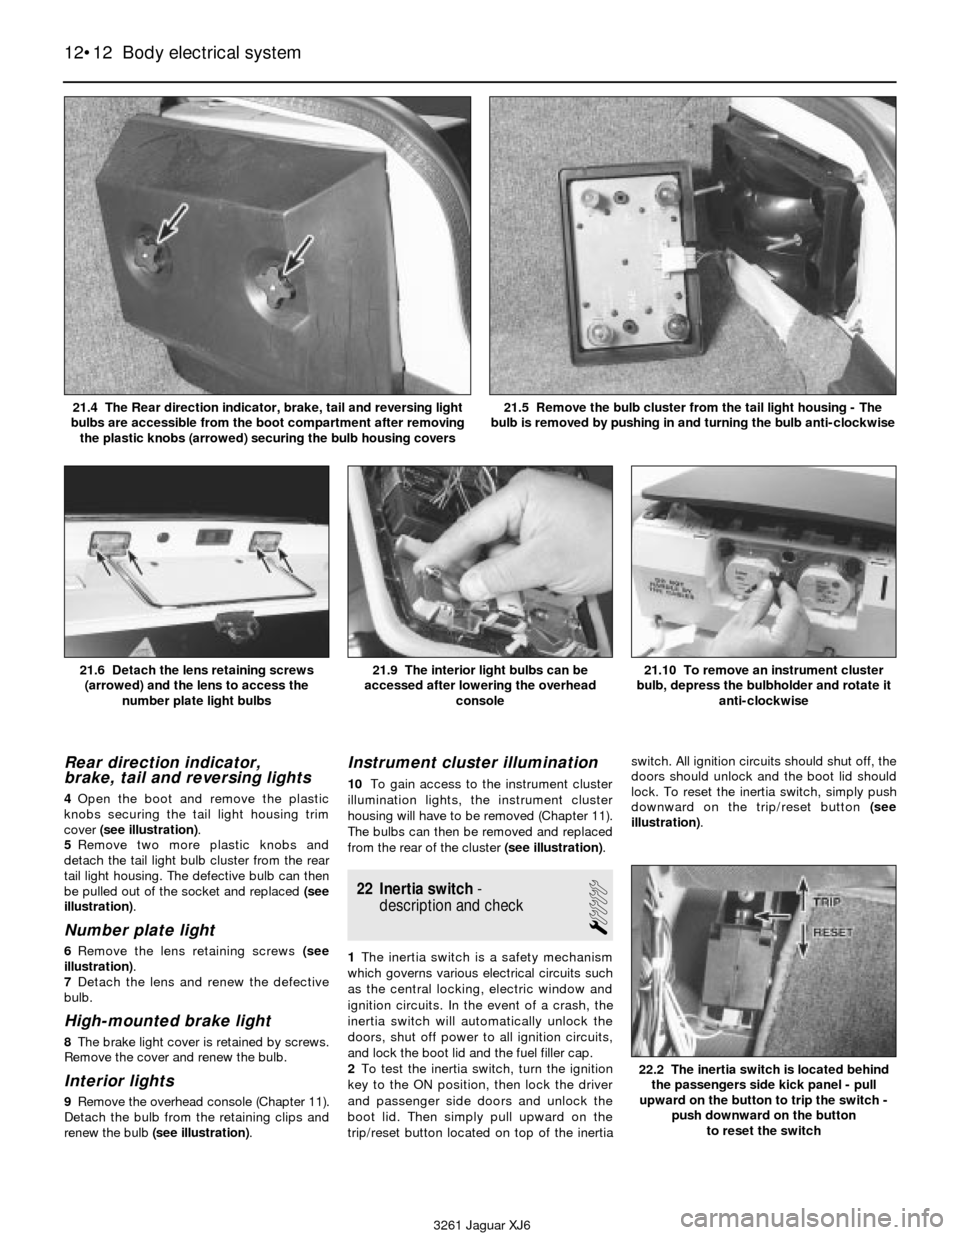
Rear direction indicator,
brake, tail and reversing lights
4Open the boot and remove the plastic
knobs securing the tail light housing trim
cover (see illustration).
5Remove two more plastic knobs and
detach the tail light bulb cluster from the rear
tail light housing. The defective bulb can then
be pulled out of the socket and replaced (see
illustration).
Number plate light
6Remove the lens retaining screws (see
illustration).
7Detach the lens and renew the defective
bulb.
High-mounted brake light
8The brake light cover is retained by screws.
Remove the cover and renew the bulb.
Interior lights
9Remove the overhead console (Chapter 11).
Detach the bulb from the retaining clips and
renew the bulb (see illustration).
Instrument cluster illumination
10To gain access to the instrument cluster
illumination lights, the instrument cluster
housing will have to be removed (Chapter 11).
The bulbs can then be removed and replaced
from the rear of the cluster (see illustration).
22 Inertia switch-
description and check
1
1The inertia switch is a safety mechanism
which governs various electrical circuits such
as the central locking, electric window and
ignition circuits. In the event of a crash, the
inertia switch will automatically unlock the
doors, shut off power to all ignition circuits,
and lock the boot lid and the fuel filler cap.
2To test the inertia switch, turn the ignition
key to the ON position, then lock the driver
and passenger side doors and unlock the
boot lid. Then simply pull upward on the
trip/reset button located on top of the inertiaswitch. All ignition circuits should shut off, the
doors should unlock and the boot lid should
lock. To reset the inertia switch, simply push
downward on the trip/reset button (see
illustration).
12•12 Body electrical system
21.6 Detach the lens retaining screws
(arrowed) and the lens to access the
number plate light bulbs21.9 The interior light bulbs can be
accessed after lowering the overhead
console21.10 To remove an instrument cluster
bulb, depress the bulbholder and rotate it
anti-clockwise
3261 Jaguar XJ6 21.4 The Rear direction indicator, brake, tail and reversing light
bulbs are accessible from the boot compartment after removing
the plastic knobs (arrowed) securing the bulb housing covers
21.5 Remove the bulb cluster from the tail light housing - The
bulb is removed by pushing in and turning the bulb anti-clockwise
22.2 The inertia switch is located behind
the passengers side kick panel - pull
upward on the button to trip the switch -
push downward on the button
to reset the switch