key JEEP CHEROKEE 2018 Owner handbook (in English)
[x] Cancel search | Manufacturer: JEEP, Model Year: 2018, Model line: CHEROKEE, Model: JEEP CHEROKEE 2018Pages: 312, PDF Size: 4.91 MB
Page 110 of 312
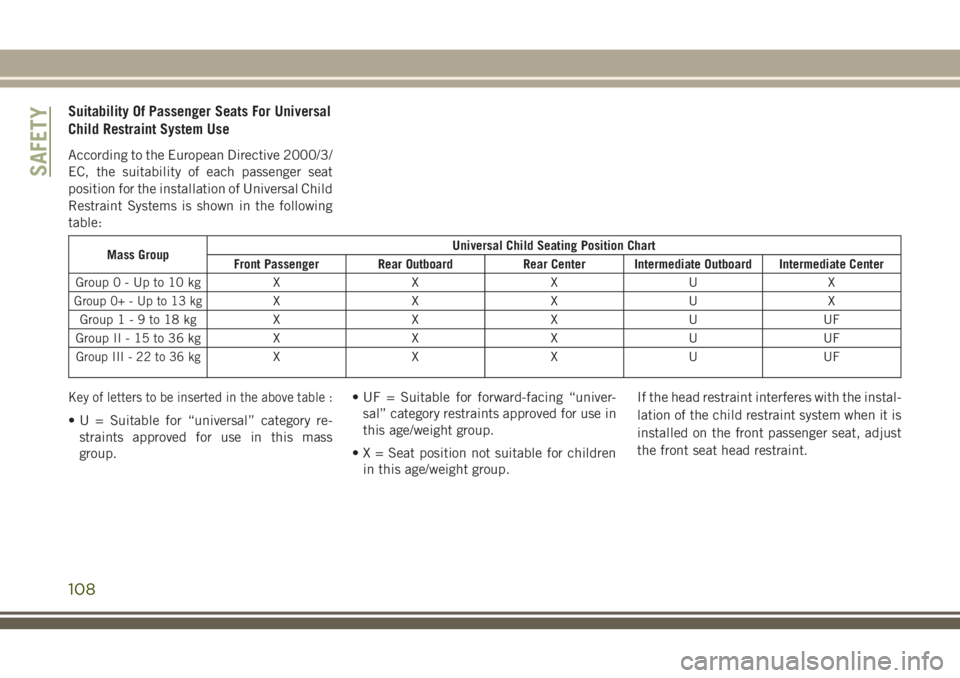
Suitability Of Passenger Seats For Universal
Child Restraint System Use
According to the European Directive 2000/3/
EC, the suitability of each passenger seat
position for the installation of Universal Child
Restraint Systems is shown in the following
table:
Mass GroupUniversal Child Seating Position Chart
Front Passenger Rear Outboard Rear Center Intermediate Outboard Intermediate Center
Group0-Upto10kg XXXU X
Group 0+ - Up to 13 kgXXXUX
Group1-9to18kg XXXUUF
Group II - 15 to 36 kg XXXUUF
Group III - 22 to 36 kgXXXUU F
Key of letters to be inserted in the above table :
• U = Suitable for “universal” category re-
straints approved for use in this mass
group. • UF = Suitable for forward-facing “univer-
sal” category restraints approved for use in
this age/weight group.
• X = Seat position not suitable for children in this age/weight group. If the head restraint interferes with the instal-
lation of the child restraint system when it is
installed on the front passenger seat, adjust
the front seat head restraint.
SAFETY
108
Page 114 of 312
Vehicle ISOFIX Positions Table
Mass Group Size Class Fixture Front
Passenger Rear Outboard
Rt./Lt. Rear Center Intermediate
Outboard Intermediate
Center Other Sites
I–9to18kg D ISO/R2 X IUF/IUF X N/A N/A N/A
C ISO/R3 X IUF/IUF X N/A N/A N/A
B ISO/F2 X IUF/IUF X N/A N/A N/A
B1 ISO/F2X X IUF/IUF X N/A N/A N/A
A ISO/F3 X IUF/IUF X N/A N/A N/A (1) X N/A X N/A N/A N/A
II–15to 25 kg (1) X N/A X N/A N/A N/A
III–22to 36 kg (1) X N/A X N/A N/A N/A
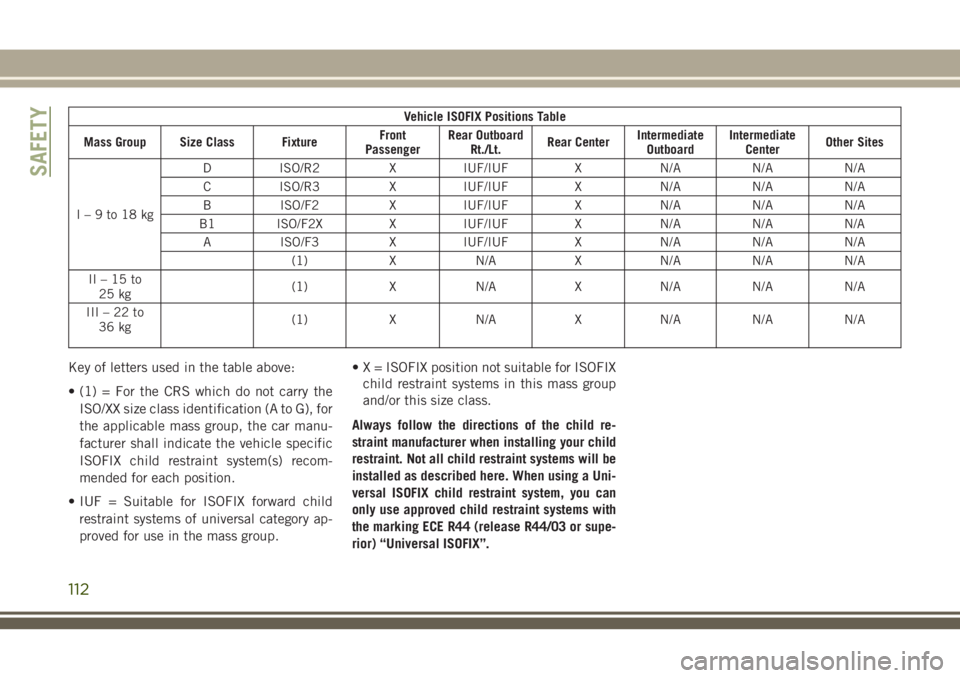
Key of letters used in the table above:
• (1) = For the CRS which do not carry the
ISO/XX size class identification (A to G), for
the applicable mass group, the car manu-
facturer shall indicate the vehicle specific
ISOFIX child restraint system(s) recom-
mended for each position.
• IUF = Suitable for ISOFIX forward child restraint systems of universal category ap-
proved for use in the mass group. • X = ISOFIX position not suitable for ISOFIX
child restraint systems in this mass group
and/or this size class.
Always follow the directions of the child re-
straint manufacturer when installing your child
restraint. Not all child restraint systems will be
installed as described here. When using a Uni-
versal ISOFIX child restraint system, you can
only use approved child restraint systems with
the marking ECE R44 (release R44/03 or supe-
rior) “Universal ISOFIX”.
SAFETY
112
Page 120 of 312
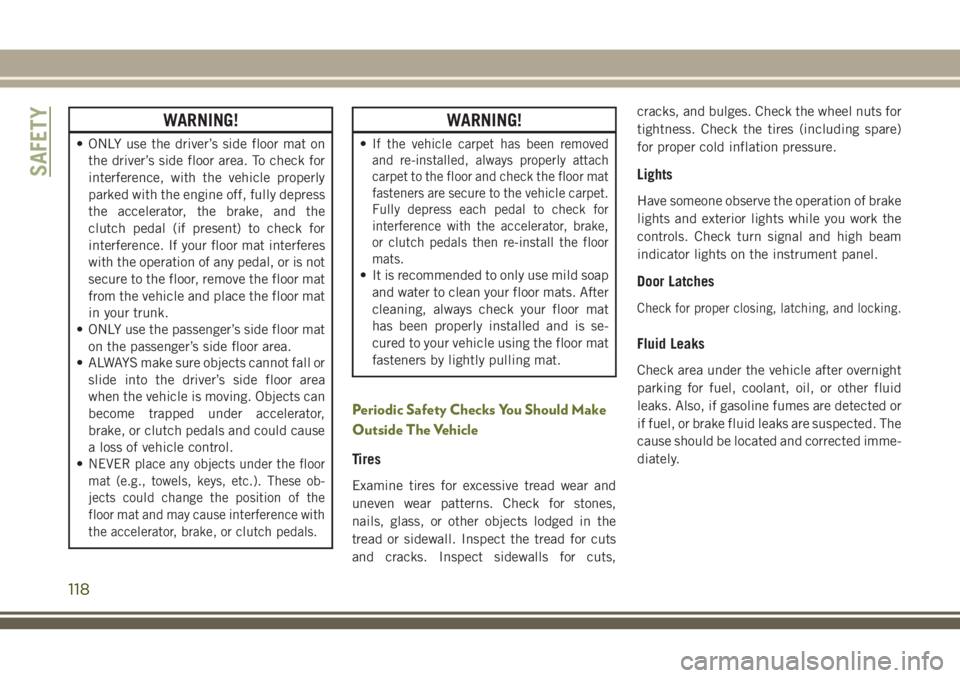
WARNING!
• ONLY use the driver’s side floor mat onthe driver’s side floor area. To check for
interference, with the vehicle properly
parked with the engine off, fully depress
the accelerator, the brake, and the
clutch pedal (if present) to check for
interference. If your floor mat interferes
with the operation of any pedal, or is not
secure to the floor, remove the floor mat
from the vehicle and place the floor mat
in your trunk.
• ONLY use the passenger’s side floor mat
on the passenger’s side floor area.
• ALWAYS make sure objects cannot fall or
slide into the driver’s side floor area
when the vehicle is moving. Objects can
become trapped under accelerator,
brake, or clutch pedals and could cause
a loss of vehicle control.
•
NEVER place any objects under the floor
mat (e.g., towels, keys, etc.). These ob-
jects could change the position of the
floor mat and may cause interference with
the accelerator, brake, or clutch pedals.
WARNING!
•If the vehicle carpet has been removed
and re-installed, always properly attach
carpet to the floor and check the floor mat
fasteners are secure to the vehicle carpet.
Fully depress each pedal to check for
interference with the accelerator, brake,
or clutch pedals then re-install the floor
mats.
• It is recommended to only use mild soap
and water to clean your floor mats. After
cleaning, always check your floor mat
has been properly installed and is se-
cured to your vehicle using the floor mat
fasteners by lightly pulling mat.
Periodic Safety Checks You Should Make
Outside The Vehicle
Tires
Examine tires for excessive tread wear and
uneven wear patterns. Check for stones,
nails, glass, or other objects lodged in the
tread or sidewall. Inspect the tread for cuts
and cracks. Inspect sidewalls for cuts, cracks, and bulges. Check the wheel nuts for
tightness. Check the tires (including spare)
for proper cold inflation pressure.
Lights
Have someone observe the operation of brake
lights and exterior lights while you work the
controls. Check turn signal and high beam
indicator lights on the instrument panel.
Door Latches
Check for proper closing, latching, and locking.
Fluid Leaks
Check area under the vehicle after overnight
parking for fuel, coolant, oil, or other fluid
leaks. Also, if gasoline fumes are detected or
if fuel, or brake fluid leaks are suspected. The
cause should be located and corrected imme-
diately.
SAFETY
118
Page 121 of 312
STARTING AND OPERATING
STARTING THE ENGINE.......121
Normal Starting — Gasoline Engine . . .121
Extreme Cold Weather (Below –22°F
Or −30°C)..................121
Normal Starting — Diesel Engine . . . .121
ENGINE BREAK-IN
RECOMMENDATIONS ........123
PARKING BRAKE ............124
Electric Park Brake (EPB) .........124
MANUAL TRANSMISSION —
IF EQUIPPED...............126
Shifting................... .126
Downshifting .................127
AUTOMATIC TRANSMISSION —
IF EQUIPPED ...............128
Key Ignition Park Interlock ........129
Brake/Transmission Shift Interlock
System ....................129
Nine-Speed Automatic Transmission . .129
FOUR-WHEEL DRIVE OPERA-
TION .....................130
1-Speed Four-Wheel Drive (4X4) —
If Equipped .................130
2-Speed Four-Wheel Drive (4x4) —
If Equipped ..................131
Shift Positions ................132
Shifting Procedures .............132
Rear Electronic Locker (E-Locker)
System — If Equipped ...........134
SELEC-TERRAIN............135
Description..................135
STOP/START SYSTEM —
IF EQUIPPED ...............136
Automatic Mode ...............136
Possible Reasons The Engine Does
Not Autostop .................137
To Start The Engine While In Autostop
Mode .....................137
To Manually Turn Off The Stop/Start
System ....................138
To Manually Turn On The Stop/Start
System ....................138
STOP/START SYSTEM — DIESEL
MODELS ONLY ..............138
Automatic Mode...............139
Possible Reasons The Engine Does
Not Autostop .................139
To Start The Engine While In Autostop
Mode .....................140
To Manually Turn Off The Stop/Start
System ....................140
To Manually Turn On The Stop/Start
System ....................141
SPEED CONTROL ............141
Activation...................141
Setting A Desired Speed .........141
Varying The Speed .............142
Resume ...................142
Accelerating For Passing .........143
Deactivation .................143
ADAPTIVE CRUISE CONTROL
(ACC) ................... .143
Activation..................143
Setting A Desired ACC Speed .......143
Varying The Speed .............144
Resume ....................145
STARTING AND OPERATING
119
Page 123 of 312
STARTING THE ENGINE
Before starting your vehicle, adjust your seat,
adjust both inside and outside mirrors, and
fasten your seat belts.
WARNING!
• When leaving the vehicle, always removethe key fob from the ignition and lock
your vehicle. If equipped with Keyless
Enter-N-Go, always make sure the key-
less ignition node is in “OFF” mode,
remove the key fob from the vehicle and
lock the vehicle.
• Never leave children alone in a vehicle,
or with access to an unlocked vehicle.
• Allowing children to be in a vehicle un-
attended is dangerous for a number of
reasons. A child or others could be seri-
ously or fatally injured. Children should
be warned not to touch the parking
brake, brake pedal or the gear selector.
• Do not leave the key fob in or near the
vehicle, or in a location accessible to
children, and do not leave the ignition of
a vehicle equipped with Keyless Enter-
WARNING!
N-Go in the ACC or ON/RUN mode. A
child could operate power windows,
other controls, or move the vehicle.
Start the engine with the gear selector in the
NEUTRAL or PARK position. Apply the brake
before shifting to any driving range.
Normal Starting — Gasoline Engine
NOTE:
Normal starting of either a cold or a warm
engine is obtained without pumping or push-
ing the accelerator pedal.
Place your foot on the brake and place the
ignition to the START mode and release when
the engine starts. If the engine fails to start
within 10 seconds:
1. Place the ignition in the OFF mode.
2. Wait 10 to 15 seconds.
3. Repeat the “Normal Starting” procedure.
Tip Start Feature
Place the ignition in the START mode and
release it as the starter engages. The starter
motor will automatically disengage itself
once engine is running. If the engine fails to
start, the starter will disengage automatically
in 10 seconds. If this occurs:
1. Place the ignition in the OFF mode.
2. Wait 10 to 15 seconds.
3. Repeat the “Normal Starting” procedure.
Extreme Cold Weather (Below –22°F Or
−30°C)
To ensure reliable starting at these tempera-
tures, use of an externally powered electric
engine block heater (available from an autho-
rized dealer) is recommended.
Normal Starting — Diesel Engine
Before starting your vehicle, adjust your seat,
both inside and outside mirrors, and fasten
your seat belts.
121
Page 124 of 312
The starter is allowed to crank for up to
30-second intervals. Waiting a few minutes
between such intervals will protect the starter
from overheating.
WARNING!
• Before exiting a vehicle, always come toa complete stop, then shift the auto-
matic transmission into PARK and apply
the parking brake.
• Always make sure the keyless ignition
node is in the OFF mode, key fob is
removed from the vehicle and vehicle is
locked.
• Never leave children alone in a vehicle,
or with access to an unlocked vehicle.
Leaving children in a vehicle unattended
is dangerous for a number of reasons. A
child or others could be seriously or
fatally injured. Children should be
warned not to touch the parking brake,
brake pedal or the gear selector.
• Do not leave the key fob in or near the
vehicle, or in a location accessible to
children, and do not leave the ignition of
a vehicle equipped with Keyless Enter-
WARNING!
N-Go in the ACC or ON/RUN mode. A
child could operate power windows,
other controls, or move the vehicle.
• Do not leave children or animals inside
parked vehicles in hot weather. Interior
heat build-up may cause serious injury
or death.
NOTE:
Engine start up in very low ambient tempera-
ture could result in evident white smoke. This
condition will disappear as the engine warms
up.
CAUTION!
The engine is allowed to crank as long as
30 seconds. If the engine fails to start
during this period, please wait at least two
minutes for the starter to cool before re-
peating start procedure.
Battery Blanket Usage
A battery loses 60% of its cranking power as
the battery temperature decreases to 0°F
(-18°C). For the same decrease in tempera-
ture, the engine requires twice as much
power to crank at the same RPM. The use of
battery blankets will greatly increase starting
capability at low temperatures. Suitable bat-
tery blankets are available from your autho-
rized Mopar dealer.
Normal Starting Procedure — Keyless
Enter-N-Go
Observe the instrument panel cluster lights
when starting the engine.
NOTE:
Normal starting of either a cold or a warm
engine is obtained without pumping or press-
ing the accelerator pedal.
1. Always apply the parking brake.
2. Press and hold the brake pedal while pushing the ENGINE START/STOP button
once.STARTING AND OPERATING
122
Page 127 of 312
WARNING!
• Never use the PARK position as a sub-stitute for the parking brake. Always ap-
ply the parking brake fully when exiting
the vehicle to guard against vehicle
movement and possible injury or dam-
age.
• When exiting the vehicle, always make
sure the ignition is in the OFF mode,
remove the key fob from the vehicle, and
lock your vehicle.
• Never leave children alone in a vehicle,
or with access to an unlocked vehicle.
Allowing children to be in a vehicle un-
attended is dangerous for a number of
reasons. A child or others could be seri-
ously or fatally injured. Children should
be warned not to touch the parking
brake, brake pedal or the transmission
gear selector.
• Do not leave the key fob in or near the
vehicle, (or in a location accessible to
children), and do not leave the ignition
in the ACC or ON/RUN mode. A child
WARNING!
could operate power windows, other con-
trols, or move the vehicle.
• Be sure the parking brake is fully disen-
gaged before driving; failure to do so can
lead to brake failure and a collision.
• Always fully apply the parking brake
when leaving your vehicle, or it may roll
and cause damage or injury. Also be
certain to leave the transmission in
PARK. Failure to do so may allow the
vehicle to roll and cause damage or in-
jury.
• Driving the vehicle with the parking
brake engaged, or repeated use of the
parking brake to slow the vehicle may
cause serious damage to the brake sys-
tem.
Auto Park Brake
The electric park brake can be programmed
to be applied automatically whenever the
vehicle is at a standstill and the automatic
transmission is placed in PARK, or with a
manual transmission, whenever the ignition
is turned “OFF”. Auto Park Brake is enabled and disabled by customer selection through
the customer programmable features section
of the Uconnect Settings.
Any single auto park brake application can be
bypassed by pushing the EPB switch to the
release position while the transmission is
placed in PARK.
SafeHold
SafeHold is a safety feature of the Electric
Park Brake System that will engage the park
brake automatically if the vehicle is left un-
secured while the ignition is in ON/RUN.
For automatic transmissions, the park brake
will automatically engage if all of the follow-
ing conditions are met:
• The vehicle is at a standstill.
• There is no attempt to depress the brake
pedal or accelerator pedal.
• The seat belt is unbuckled.
• The driver door is open.
125
Page 130 of 312
CAUTION!
If you skip a gear while downshifting or
downshift at too high of a vehicle speed,
these conditions may cause the engine to
overspeed if too low of a gear is selected
and the clutch pedal is released. Damage
to the clutch and the transmission can
result from skipping a gear while down-
shifting or downshifting at too high of a
vehicle speed even if the clutch pedal is
held pressed (i.e., not released).
AUTOMATIC
TRANSMISSION —
IF EQUIPPED
WARNING!
• It is dangerous to shift out of PARK orNEUTRAL if the engine speed is higher
than idle speed. If your foot is not firmly
pressing the brake pedal, the vehicle
could accelerate quickly forward or in
reverse. You could lose control of the
WARNING!
vehicle and hit someone or something.
Only shift into gear when the engine is
idling normally and your foot is firmly
pressing the brake pedal.
• Unintended movement of a vehicle
could injure those in or near the vehicle.
As with all vehicles, you should never
exit a vehicle while the engine is run-
ning. Before exiting a vehicle, always
come to a complete stop, then apply the
parking brake, shift the transmission
into PARK, turn the engine OFF, and
remove the key fob. When the ignition is
in the LOCK/OFF (key removal) position,
(or, with Keyless Enter-N-Go, when the
ignition is in the OFF mode) the trans-
mission is locked in PARK, securing the
vehicle against unwanted movement.
• When leaving the vehicle, always make
sure the ignition is in the OFF mode,
remove the key fob from the vehicle, and
lock the vehicle.
•
Never use the PARK position as a substi-
tute for the parking brake. Always apply the
parking brake fully when exiting the ve-
WARNING!
hicle to guard against vehicle movement
and possible injury or damage.
• Your vehicle could move and injure you
and others if it is not in PARK. Check by
trying to move the gear selector out of
PARK with the brake pedal released.
Make sure the transmission is in PARK
before exiting the vehicle.
• Never leave children alone in a vehicle,
or with access to an unlocked vehicle.
Allowing children to be in a vehicle un-
attended is dangerous for a number of
reasons. A child or others could be seri-
ously or fatally injured. Children should
be warned not to touch the parking
brake, brake pedal or the transmission
gear selector.
• Do not leave the key fob in or near the
vehicle (or in a location accessible to
children), and do not leave the ignition
(in a vehicle equipped with Keyless
Enter-N-Go) in the ACC or ON/RUN
mode. A child could operate power win-
dows, other controls, or move the ve-
hicle.
STARTING AND OPERATING
128
Page 131 of 312
CAUTION!
Damage to the transmission may occur if
the following precautions are not ob-
served:
• Shift into or out of PARK or REVERSEonly after the vehicle has come to a
complete stop.
• Do not shift between PARK, REVERSE,
NEUTRAL, or DRIVE when the engine is
above idle speed.
• Before shifting into any gear, make sure
your foot is firmly pressing the brake
pedal.
NOTE:
You must press and hold the brake pedal
while shifting out of PARK.
Key Ignition Park Interlock
This vehicle is equipped with a Key Ignition
Park Interlock which requires the transmis-
sion to be in PARK before the ignition can be
turned to the LOCK/OFF (key removal) posi-
tion. The key fob can only be removed from the ignition when the ignition is in the LOCK/
OFF position, and the transmission is locked
in PARK whenever the ignition is in the
LOCK/OFF position.
Brake/Transmission Shift Interlock
System
This vehicle is equipped with a Brake Trans-
mission Shift Interlock system (BTSI) that
holds the transmission gear selector in PARK
unless the brakes are applied. To shift the
transmission out of PARK, the ignition must
be in the ON/RUN mode (engine running or
not) and the brake pedal must be pressed.
The brake pedal must also be pressed to shift
from NEUTRAL into DRIVE or REVERSE
when the vehicle is stopped or moving at low
speeds.
Nine-Speed Automatic Transmission
The transmission gear range (PRND) is dis-
played both beside the gear selector and in
the instrument cluster. To select a gear range,
press the lock button on the gear selector and
move the selector rearward or forward. You
must also press the brake pedal to shift thetransmission out of PARK (or NEUTRAL,
when the vehicle is stopped or moving at low
speeds). Select the DRIVE range for normal
driving.
NOTE:
In the event of a mismatch between the gear
selector position and the actual transmission
gear (for example, driver selects REVERSE
while driving forward), the position indicator
will blink continuously until the selector is
returned to the proper position, or the re-
quested shift can be completed.
The electronically-controlled transmission
adapts its shift schedule based on driver
inputs, along with environmental and road
conditions. The transmission electronics are
self-calibrating; therefore, the first few shifts
on a new vehicle may be somewhat abrupt.
This is a normal condition, and precision
shifts will develop within a few hundred miles
(kilometers).
The nine-speed transmission has been devel-
oped to meet the needs of current and future
FWD/AWD vehicles. Software and calibration
is refined to optimize the customer’s driving
experience and fuel economy. By design,
129
Page 136 of 312
5. Shift the transmission into NEUTRAL.
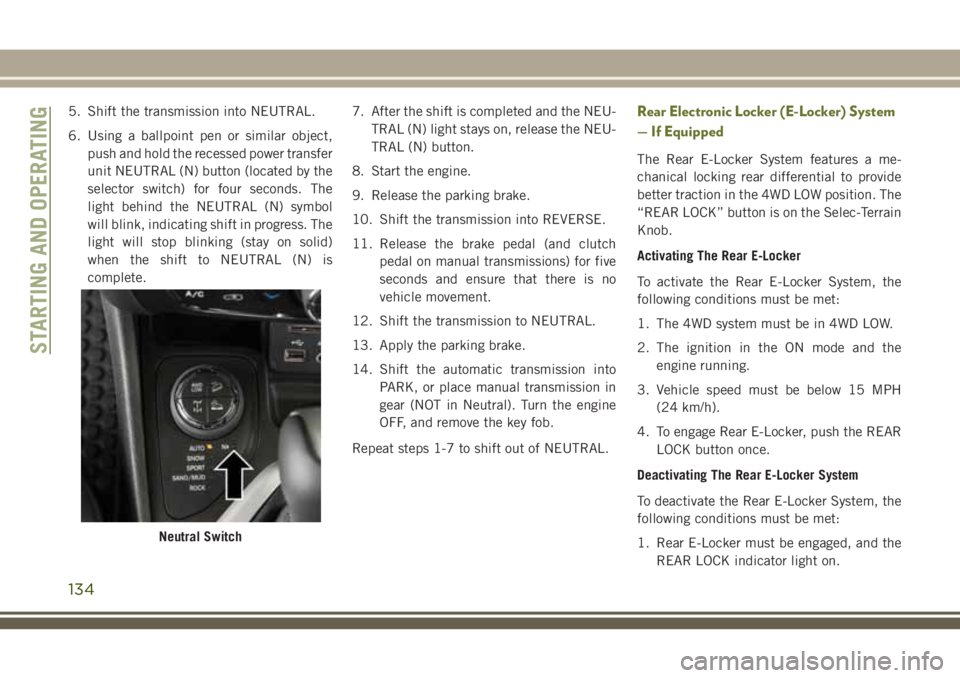
6. Using a ballpoint pen or similar object,push and hold the recessed power transfer
unit NEUTRAL (N) button (located by the
selector switch) for four seconds. The
light behind the NEUTRAL (N) symbol
will blink, indicating shift in progress. The
light will stop blinking (stay on solid)
when the shift to NEUTRAL (N) is
complete. 7. After the shift is completed and the NEU-
TRAL (N) light stays on, release the NEU-
TRAL (N) button.
8. Start the engine.
9. Release the parking brake.
10. Shift the transmission into REVERSE.
11. Release the brake pedal (and clutch pedal on manual transmissions) for five
seconds and ensure that there is no
vehicle movement.
12. Shift the transmission to NEUTRAL.
13. Apply the parking brake.
14. Shift the automatic transmission into PARK, or place manual transmission in
gear (NOT in Neutral). Turn the engine
OFF, and remove the key fob.
Repeat steps 1-7 to shift out of NEUTRAL.Rear Electronic Locker (E-Locker) System
— If Equipped
The Rear E-Locker System features a me-
chanical locking rear differential to provide
better traction in the 4WD LOW position. The
“REAR LOCK” button is on the Selec-Terrain
Knob.
Activating The Rear E-Locker
To activate the Rear E-Locker System, the
following conditions must be met:
1. The 4WD system must be in 4WD LOW.
2. The ignition in the ON mode and the engine running.
3. Vehicle speed must be below 15 MPH (24 km/h).
4. To engage Rear E-Locker, push the REAR LOCK button once.
Deactivating The Rear E-Locker System
To deactivate the Rear E-Locker System, the
following conditions must be met:
1. Rear E-Locker must be engaged, and the REAR LOCK indicator light on.
Neutral Switch
STARTING AND OPERATING
134