tow JEEP CHEROKEE 2019 Owner handbook (in English)
[x] Cancel search | Manufacturer: JEEP, Model Year: 2019, Model line: CHEROKEE, Model: JEEP CHEROKEE 2019Pages: 344, PDF Size: 6.35 MB
Page 184 of 344
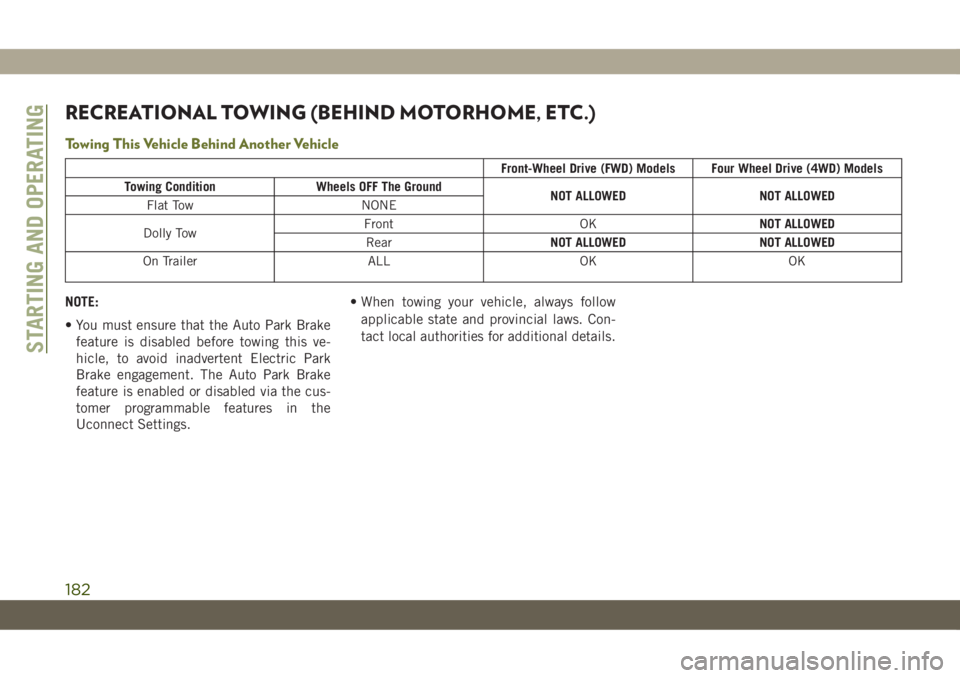
RECREATIONAL TOWING (BEHIND MOTORHOME, ETC.)
Towing This Vehicle Behind Another Vehicle
Front-Wheel Drive (FWD) Models Four Wheel Drive (4WD) Models
Towing Condition Wheels OFF The Ground
NOT ALLOWED NOT ALLOWED
Flat Tow NONE
Dolly TowFront OKNOT ALLOWED
RearNOT ALLOWED NOT ALLOWED
On Trailer ALL OK OK
NOTE:
• You must ensure that the Auto Park Brake
feature is disabled before towing this ve-
hicle, to avoid inadvertent Electric Park
Brake engagement. The Auto Park Brake
feature is enabled or disabled via the cus-
tomer programmable features in the
Uconnect Settings.• When towing your vehicle, always follow
applicable state and provincial laws. Con-
tact local authorities for additional details.
STARTING AND OPERATING
182
Page 185 of 344
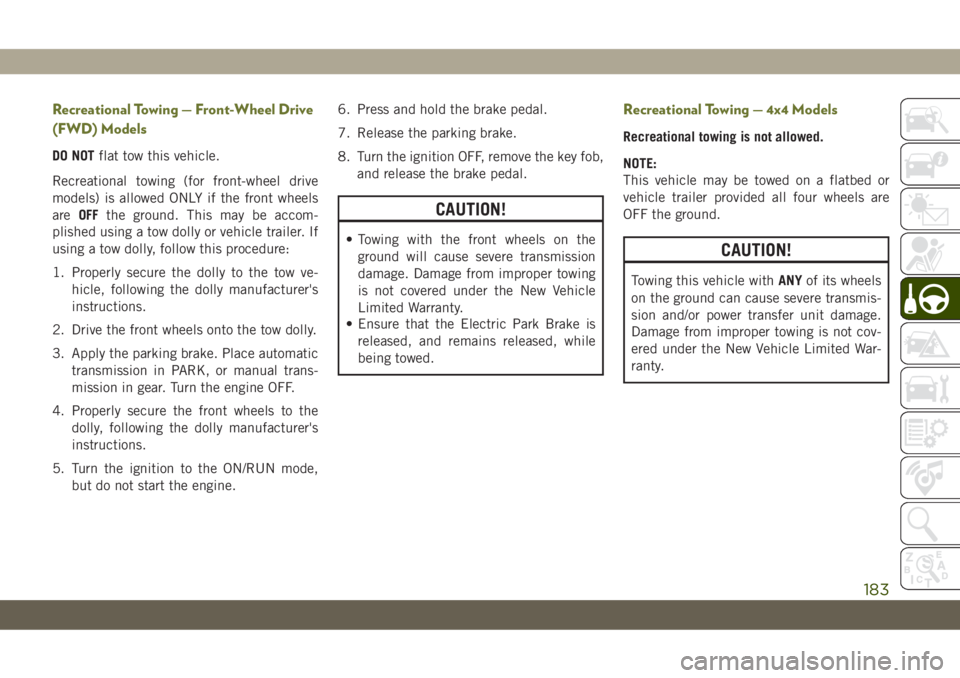
Recreational Towing — Front-Wheel Drive
(FWD) Models
DO NOTflat tow this vehicle.
Recreational towing (for front-wheel drive
models) is allowed ONLY if the front wheels
areOFFthe ground. This may be accom-
plished using a tow dolly or vehicle trailer. If
using a tow dolly, follow this procedure:
1. Properly secure the dolly to the tow ve-
hicle, following the dolly manufacturer's
instructions.
2. Drive the front wheels onto the tow dolly.
3. Apply the parking brake. Place automatic
transmission in PARK, or manual trans-
mission in gear. Turn the engine OFF.
4. Properly secure the front wheels to the
dolly, following the dolly manufacturer's
instructions.
5. Turn the ignition to the ON/RUN mode,
but do not start the engine.6. Press and hold the brake pedal.
7. Release the parking brake.
8. Turn the ignition OFF, remove the key fob,
and release the brake pedal.
CAUTION!
• Towing with the front wheels on the
ground will cause severe transmission
damage. Damage from improper towing
is not covered under the New Vehicle
Limited Warranty.
• Ensure that the Electric Park Brake is
released, and remains released, while
being towed.
Recreational Towing — 4x4 Models
Recreational towing is not allowed.
NOTE:
This vehicle may be towed on a flatbed or
vehicle trailer provided all four wheels are
OFF the ground.
CAUTION!
Towing this vehicle withANYof its wheels
on the ground can cause severe transmis-
sion and/or power transfer unit damage.
Damage from improper towing is not cov-
ered under the New Vehicle Limited War-
ranty.
183
Page 191 of 344
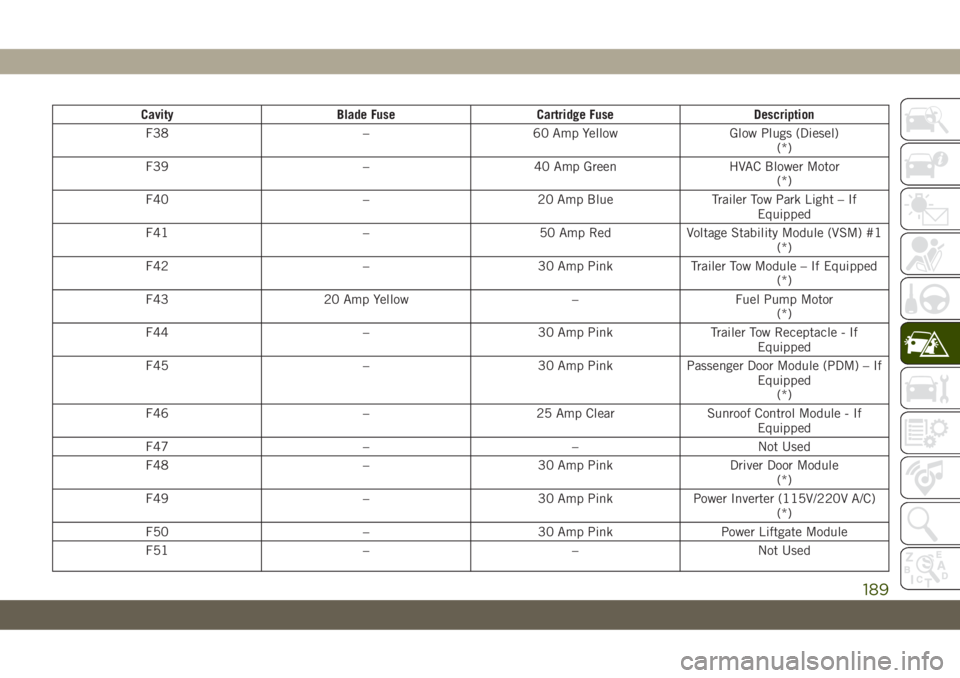
Cavity Blade Fuse Cartridge Fuse Description
F38 – 60 Amp Yellow Glow Plugs (Diesel)
(*)
F39 – 40 Amp Green HVAC Blower Motor
(*)
F40 – 20 Amp Blue Trailer Tow Park Light – If
Equipped
F41 – 50 Amp Red Voltage Stability Module (VSM) #1
(*)
F42 – 30 Amp Pink Trailer Tow Module – If Equipped
(*)
F43 20 Amp Yellow – Fuel Pump Motor
(*)
F44 – 30 Amp Pink Trailer Tow Receptacle - If
Equipped
F45 – 30 Amp Pink Passenger Door Module (PDM) – If
Equipped
(*)
F46 – 25 Amp Clear Sunroof Control Module - If
Equipped
F47 – – Not Used
F48 – 30 Amp Pink Driver Door Module
(*)
F49 – 30 Amp Pink Power Inverter (115V/220V A/C)
(*)
F50 – 30 Amp Pink Power Liftgate Module
F51 – – Not Used
189
Page 192 of 344
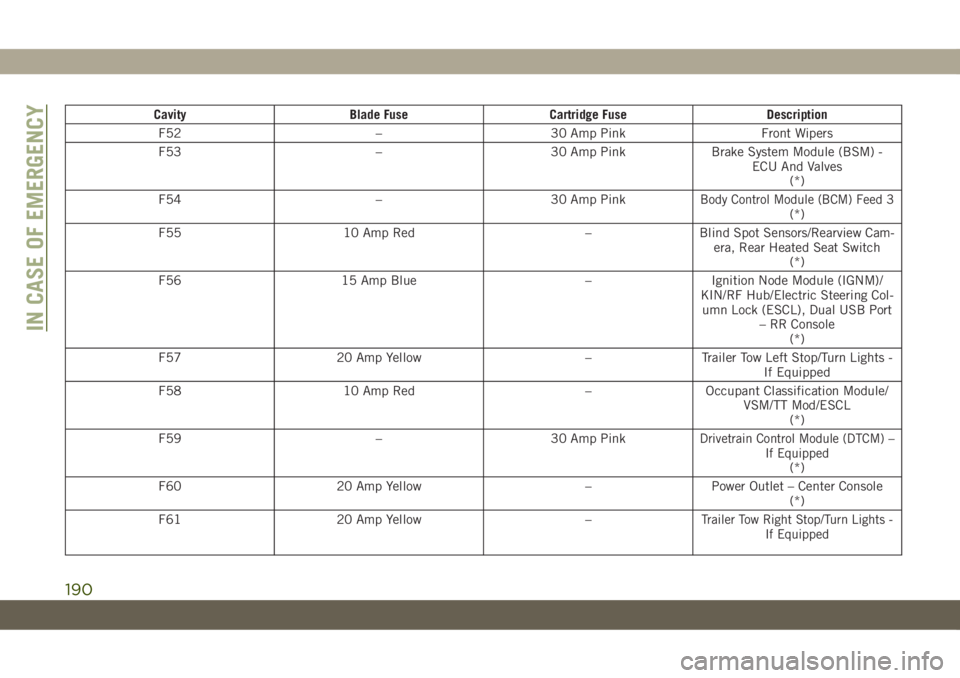
Cavity Blade Fuse Cartridge Fuse Description
F52 – 30 Amp Pink Front Wipers
F53 – 30 Amp Pink Brake System Module (BSM) -
ECU And Valves
(*)
F54 – 30 Amp Pink
Body Control Module (BCM) Feed 3(*)
F55 10 Amp Red – Blind Spot Sensors/Rearview Cam-
era, Rear Heated Seat Switch
(*)
F56 15 Amp Blue – Ignition Node Module (IGNM)/
KIN/RF Hub/Electric Steering Col-
umn Lock (ESCL), Dual USB Port
– RR Console
(*)
F57 20 Amp Yellow – Trailer Tow Left Stop/Turn Lights -
If Equipped
F58 10 Amp Red – Occupant Classification Module/
VSM/TT Mod/ESCL
(*)
F59 – 30 Amp Pink
Drivetrain Control Module (DTCM) –
If Equipped
(*)
F60 20 Amp Yellow – Power Outlet – Center Console
(*)
F61 20 Amp Yellow –
Trailer Tow Right Stop/Turn Lights -
If Equipped
IN CASE OF EMERGENCY
190
Page 193 of 344
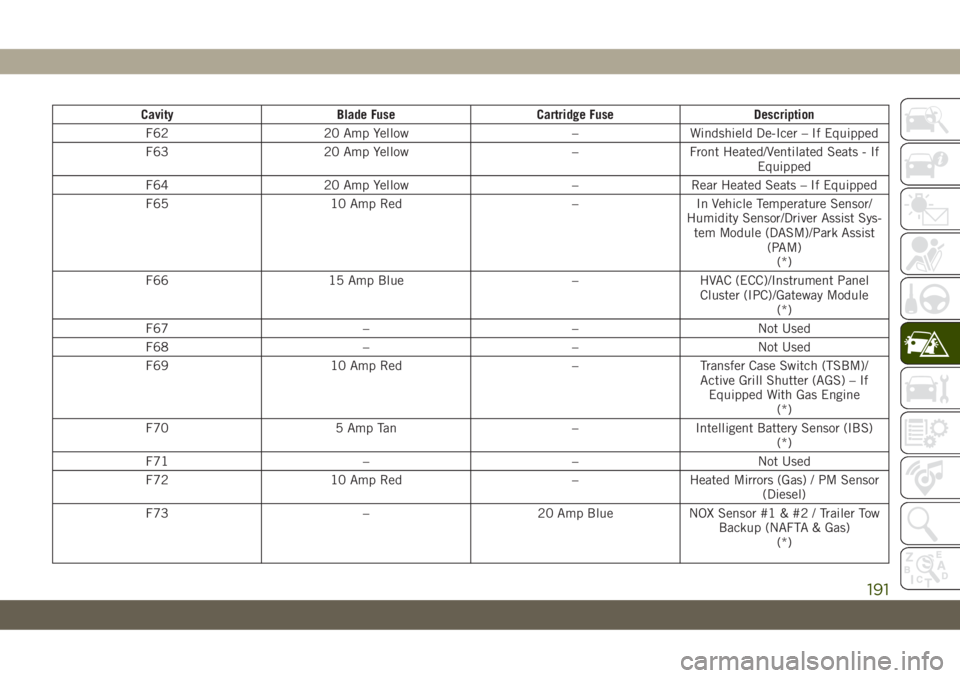
Cavity Blade Fuse Cartridge Fuse Description
F62 20 Amp Yellow – Windshield De-Icer – If Equipped
F63 20 Amp Yellow – Front Heated/Ventilated Seats - If
Equipped
F64 20 Amp Yellow – Rear Heated Seats – If Equipped
F65 10 Amp Red – In Vehicle Temperature Sensor/
Humidity Sensor/Driver Assist Sys-
tem Module (DASM)/Park Assist
(PAM)
(*)
F66 15 Amp Blue – HVAC (ECC)/Instrument Panel
Cluster (IPC)/Gateway Module
(*)
F67 – – Not Used
F68 – – Not Used
F69 10 Amp Red – Transfer Case Switch (TSBM)/
Active Grill Shutter (AGS) – If
Equipped With Gas Engine
(*)
F70 5 Amp Tan – Intelligent Battery Sensor (IBS)
(*)
F71 – – Not Used
F72 10 Amp Red – Heated Mirrors (Gas) / PM Sensor
(Diesel)
F73 – 20 Amp Blue NOX Sensor #1 & #2 / Trailer Tow
Backup (NAFTA & Gas)
(*)
191
Page 198 of 344
JACKING AND TIRE
CHANGING
WARNING!
• Do not attempt to change a tire on the
side of the vehicle close to moving traf-
fic. Pull far enough off the road to avoid
the danger of being hit when operating
the jack or changing the wheel.
• Being under a jacked-up vehicle is dan-
gerous. The vehicle could slip off the
jack and fall on you. You could be
crushed. Never put any part of your body
under a vehicle that is on a jack. If you
need to get under a raised vehicle, take
it to a service center where it can be
raised on a lift.
• Never start or run the engine while the
vehicle is on a jack.
• The jack is designed to be used as a tool
for changing tires only. The jack should
not be used to lift the vehicle for service
purposes. The vehicle should be jacked
on a firm level surface only. Avoid ice or
slippery areas.
Jack Location/Spare Tire Stowage
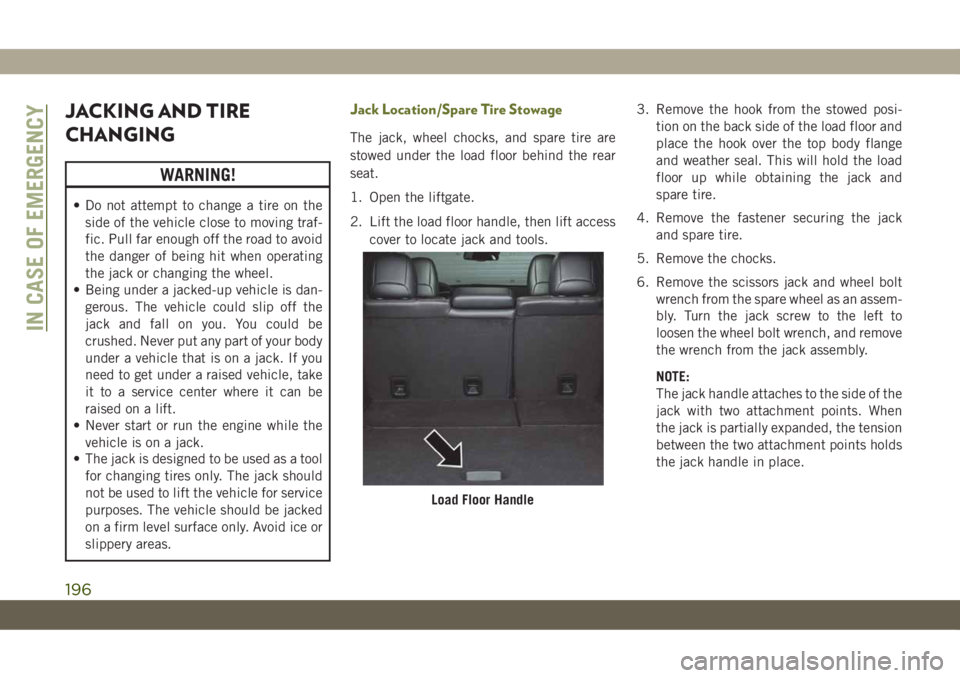
The jack, wheel chocks, and spare tire are
stowed under the load floor behind the rear
seat.
1. Open the liftgate.
2. Lift the load floor handle, then lift access
cover to locate jack and tools.3. Remove the hook from the stowed posi-
tion on the back side of the load floor and
place the hook over the top body flange
and weather seal. This will hold the load
floor up while obtaining the jack and
spare tire.
4. Remove the fastener securing the jack
and spare tire.
5. Remove the chocks.
6. Remove the scissors jack and wheel bolt
wrench from the spare wheel as an assem-
bly. Turn the jack screw to the left to
loosen the wheel bolt wrench, and remove
the wrench from the jack assembly.
NOTE:
The jack handle attaches to the side of the
jack with two attachment points. When
the jack is partially expanded, the tension
between the two attachment points holds
the jack handle in place.
Load Floor Handle
IN CASE OF EMERGENCY
196
Page 199 of 344
7. Remove the spare tire.
WARNING!
A loose tire or jack thrown forward in a
collision or hard stop could endanger the
occupants of the vehicle. Always stow the
jack parts and the spare tire in the places
provided. Have the deflated (flat) tire re-
paired or replaced immediately.
Preparations For Jacking
1. Park the vehicle on a firm level surface as
far from the edge of the roadway as pos-
sible. Avoid icy or slippery areas.
WARNING!
Do not attempt to change a tire on the side
of the vehicle close to moving traffic. Pull
far enough off the road to avoid being hit
when operating the jack or changing the
wheel.
2. Turn on the Hazard Warning flasher.
3. Apply the parking brake.4. Place the gear selector into PARK (auto-
matic transmission) or REVERSE (manual
transmission).
5. Turn the ignition OFF.
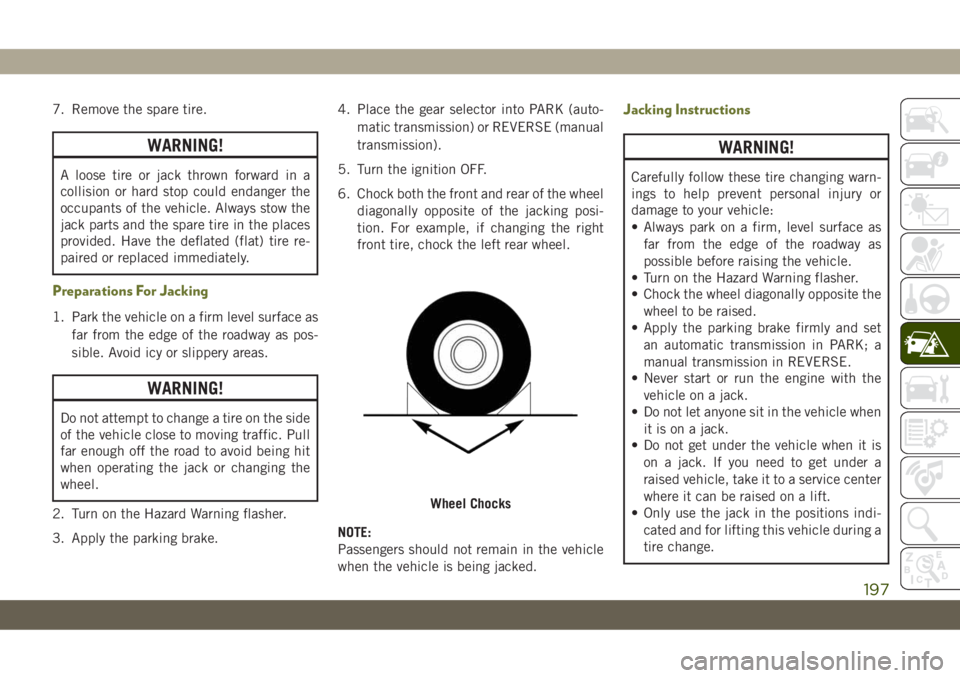
6. Chock both the front and rear of the wheel
diagonally opposite of the jacking posi-
tion. For example, if changing the right
front tire, chock the left rear wheel.
NOTE:
Passengers should not remain in the vehicle
when the vehicle is being jacked.
Jacking Instructions
WARNING!
Carefully follow these tire changing warn-
ings to help prevent personal injury or
damage to your vehicle:
• Always park on a firm, level surface as
far from the edge of the roadway as
possible before raising the vehicle.
• Turn on the Hazard Warning flasher.
• Chock the wheel diagonally opposite the
wheel to be raised.
• Apply the parking brake firmly and set
an automatic transmission in PARK; a
manual transmission in REVERSE.
• Never start or run the engine with the
vehicle on a jack.
• Do not let anyone sit in the vehicle when
it is on a jack.
• Do not get under the vehicle when it is
on a jack. If you need to get under a
raised vehicle, take it to a service center
where it can be raised on a lift.
• Only use the jack in the positions indi-
cated and for lifting this vehicle during a
tire change.
Wheel Chocks
197
Page 200 of 344
WARNING!
• If working on or near a roadway, be
extremely careful of motor traffic.
• To assure that spare tires, flat or in-
flated, are securely stowed, spares must
be stowed with the valve stem facing the
ground.
CAUTION!
Do not attempt to raise the vehicle by
jacking on locations other than those indi-
cated in the Jacking Instructions for this
vehicle.
1. Remove the spare tire, jack, wheel
chocks, and wheel bolt wrench.
2. If equipped with aluminum wheels where
the center cap covers the wheel bolts, use
the wheel bolt wrench to pry the center
cap off carefully before raising the
vehicle.
3. Before raising the vehicle, use the wheel
bolt wrench to loosen, but not remove, the
wheel bolts on the wheel with the flat tire.
Turn the wheel bolts counterclockwise
one turn while the wheel is still on the
ground.
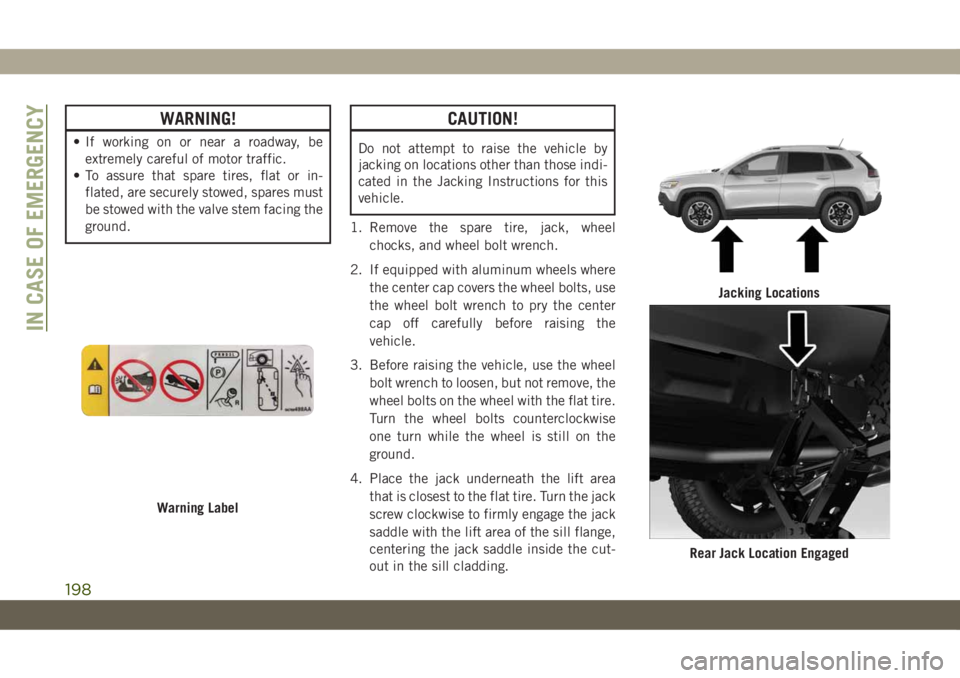
4. Place the jack underneath the lift area
that is closest to the flat tire. Turn the jack
screw clockwise to firmly engage the jack
saddle with the lift area of the sill flange,
centering the jack saddle inside the cut-
out in the sill cladding.
Warning Label
Jacking Locations
Rear Jack Location Engaged
IN CASE OF EMERGENCY
198
Page 201 of 344
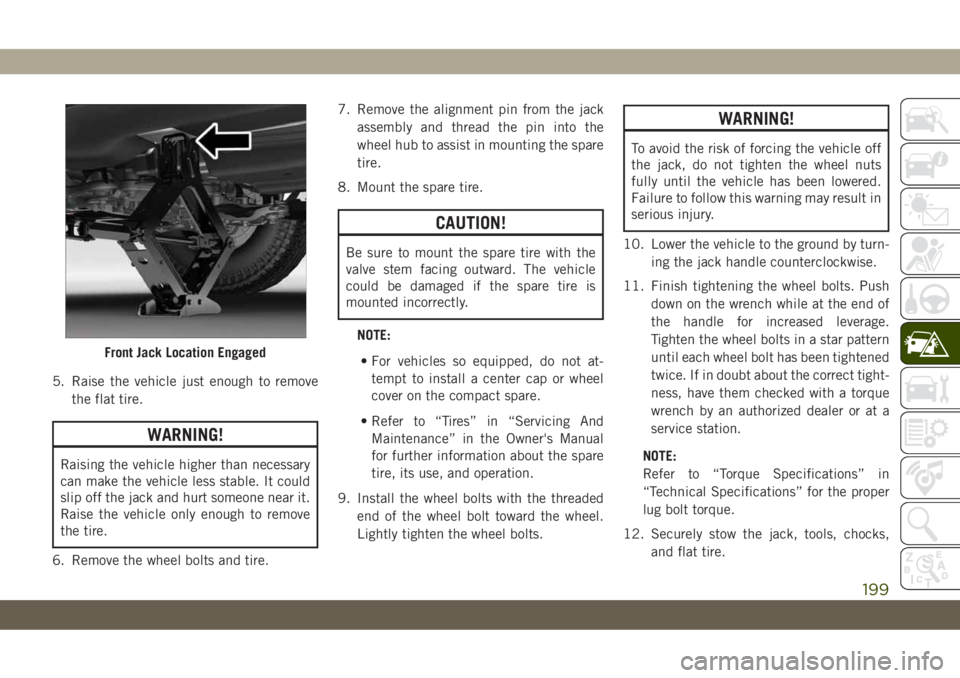
5. Raise the vehicle just enough to remove
the flat tire.
WARNING!
Raising the vehicle higher than necessary
can make the vehicle less stable. It could
slip off the jack and hurt someone near it.
Raise the vehicle only enough to remove
the tire.
6. Remove the wheel bolts and tire.7. Remove the alignment pin from the jack
assembly and thread the pin into the
wheel hub to assist in mounting the spare
tire.
8. Mount the spare tire.
CAUTION!
Be sure to mount the spare tire with the
valve stem facing outward. The vehicle
could be damaged if the spare tire is
mounted incorrectly.
NOTE:
• For vehicles so equipped, do not at-
tempt to install a center cap or wheel
cover on the compact spare.
• Refer to “Tires” in “Servicing And
Maintenance” in the Owner's Manual
for further information about the spare
tire, its use, and operation.
9. Install the wheel bolts with the threaded
end of the wheel bolt toward the wheel.
Lightly tighten the wheel bolts.
WARNING!
To avoid the risk of forcing the vehicle off
the jack, do not tighten the wheel nuts
fully until the vehicle has been lowered.
Failure to follow this warning may result in
serious injury.
10. Lower the vehicle to the ground by turn-
ing the jack handle counterclockwise.
11. Finish tightening the wheel bolts. Push
down on the wrench while at the end of
the handle for increased leverage.
Tighten the wheel bolts in a star pattern
until each wheel bolt has been tightened
twice. If in doubt about the correct tight-
ness, have them checked with a torque
wrench by an authorized dealer or at a
service station.
NOTE:
Refer to “Torque Specifications” in
“Technical Specifications” for the proper
lug bolt torque.
12. Securely stow the jack, tools, chocks,
and flat tire.
Front Jack Location Engaged
199
Page 202 of 344
WARNING!
A loose tire or jack thrown forward in a
collision or hard stop could endanger the
occupants of the vehicle. Always stow the
jack parts and the spare tire in the places
provided. Have the deflated (flat) tire re-
paired or replaced immediately.
Road Tire Installation
1. Mount the road tire on the axle.
2. Install the remaining wheel bolts with the
threaded end of the wheel bolt toward the
wheel. Lightly tighten the wheel bolts.
WARNING!
To avoid the risk of forcing the vehicle off
the jack, do not tighten the wheel nuts
fully until the vehicle has been lowered.
Failure to follow this warning may result in
serious injury.
3. Lower the vehicle to the ground by turning
the jack handle counterclockwise.4. Finish tightening the wheel bolts. Push
down on the wrench while at the end of
the handle for increased leverage. Tighten
the wheel bolts in a star pattern until each
wheel bolt has been tightened twice. If in
doubt about the correct tightness, have
them checked with a torque wrench by an
authorized dealer or service station.
Refer to “Torque Specifications” in
“Technical Specifications” for the proper
lug bolt torque.
5. Lower the jack until it is free. Remove the
wheel chocks. Reassemble the lug wrench
to the jack assembly and stow it in the
spare tire area. Secure the assembly using
the means provided. Release the parking
brake before driving the vehicle.
6. After 25 miles (40 km), check the wheel
bolt torque with a torque wrench to ensure
that all wheel bolts are properly seated
against the wheel.
Declaration Of Conformance
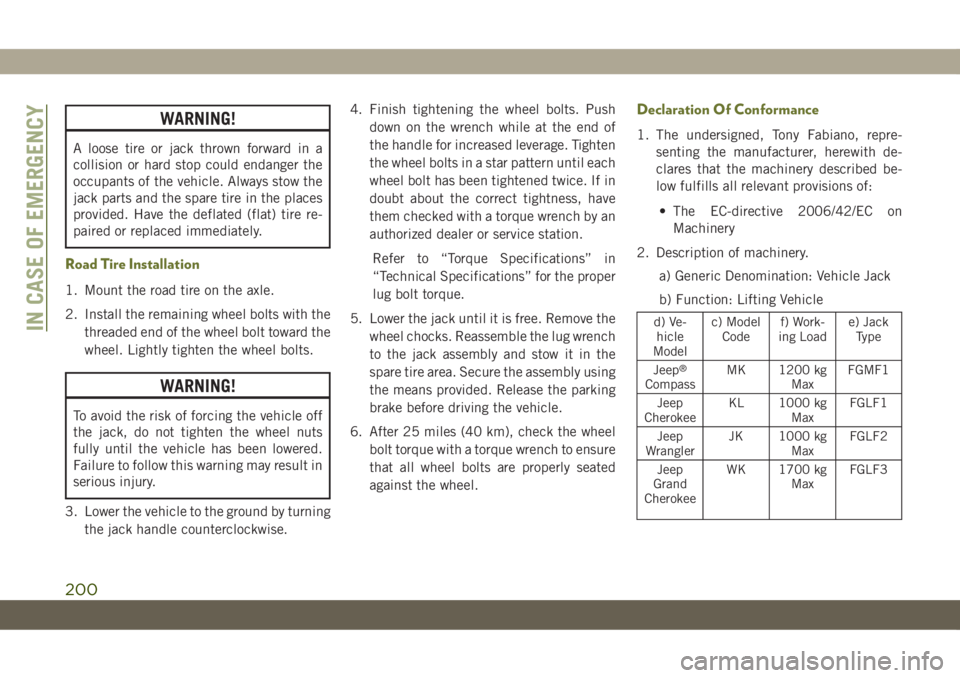
1. The undersigned, Tony Fabiano, repre-
senting the manufacturer, herewith de-
clares that the machinery described be-
low fulfills all relevant provisions of:
• The EC-directive 2006/42/EC on
Machinery
2. Description of machinery.
a) Generic Denomination: Vehicle Jack
b) Function: Lifting Vehicle
d) Ve-
hicle
Modelc) Model
Codef) Work-
ing Loade) Jack
Type
Jeep
®
CompassMK 1200 kg
MaxFGMF1
Jeep
CherokeeKL 1000 kg
MaxFGLF1
Jeep
WranglerJK 1000 kg
MaxFGLF2
Jeep
Grand
CherokeeWK 1700 kg
MaxFGLF3
IN CASE OF EMERGENCY
200