tow bar JEEP CHEROKEE 2023 Owners Manual
[x] Cancel search | Manufacturer: JEEP, Model Year: 2023, Model line: CHEROKEE, Model: JEEP CHEROKEE 2023Pages: 276, PDF Size: 12.55 MB
Page 6 of 276
4
CRUISE CONTROL SYSTEMS — IF EQUIPPED .................90
Cruise Control.............................................................. 90
Adaptive Cruise Control (ACC) ................................... 92
PARKSENSE FRONT/REAR PARK ASSIST
SYSTEM — IF EQUIPPED.....................................................99 ParkSense Sensors ................................................... 100
ParkSense Display .................................................... 100
ParkSense Warning Display ..................................... 103
Enabling And Disabling ParkSense.......................... 103Service The ParkSense Park Assist System ............ 103Cleaning The ParkSense System ............................. 103
ParkSense System Usage Precautions ................... 103Side Distance Warning System ................................ 104
PARKSENSE ACTIVE PARK ASSIST
SYSTEM — IF EQUIPPED.................................................. 106 Enabling And Disabling The ParkSense Active
Park Assist System.................................................... 106
Parallel/Perpendicular Parking Space Assistance
Operation ................................................................... 107
Exiting The Parking Space ........................................ 109
LANESENSE — IF EQUIPPED .......................................... 109 LaneSense Operation ............................................... 109Turning LaneSense On Or Off................................... 110
LaneSense Warning Message.................................. 110Changing LaneSense Settings ................................. 112
PARKVIEW REAR BACK UP CAMERA ........................... 112
REFUELING THE VEHICLE .............................................. 113
VEHICLE LOADING ........................................................... 113 Certification Label ..................................................... 113 TRAILER TOWING ............................................................ 114
Common Towing Definitions .................................... 114Trailer Hitch Classification ....................................... 116
Trailer Towing Weights (Maximum Trailer Weight
Ratings) ..................................................................... 116
Trailer And Tongue Weight ...................................... 117
Towing Requirements............................................... 117
Towing Tips ............................................................... 119
RECREATIONAL TOWING (BEHIND MOTORHOME) .... 120 Towing This Vehicle Behind Another Vehicle .......... 120
Recreational Towing — Front-Wheel Drive (FWD)
Models ....................................................................... 121Recreational Towing — 4x4 Models With 1-Speed
Power Transfer Unit .................................................. 121Recreational Towing — 4x4 Models With 2-Speed
Power Transfer Unit .................................................. 121
DRIVING TIPS ................................................................... 123 On-Road Driving Tips ................................................ 123
Off-Road Driving Tips ................................................ 123
MULTIMEDIA
UCONNECT SYSTEMS ..................................................... 126
CYBERSECURITY ............................................................. 126
UCONNECT SETTINGS ..................................................... 126 Customer Programmable Features ......................... 127
STEERING WHEEL AUDIO CONTROLS —
IF EQUIPPED ..................................................................... 140 Radio Operation ........................................................ 140Media Mode .............................................................. 140
RADIO OPERATION AND MOBILE PHONES.................. 140 Regulatory And Safety Information.......................... 140 OFF-ROAD PAGES — IF EQUIPPED .................................141
Off-Road Pages Status Bar ...................................... 141Drivetrain .................................................................. 141
Pitch & Roll ............................................................... 142
Accessory Gauges .................................................... 142
Selec-Terrain — If Equipped ..................................... 142
SAFETY
SAFETY FEATURES ...........................................................143 Anti-Lock Brake System (ABS) ................................. 143
Electronic Brake Control (EBC) System ................... 143
AUXILIARY DRIVING SYSTEMS .......................................150 Blind Spot Monitoring (BSM) — If Equipped ............ 150
Forward Collision Warning (FCW) With
Mitigation — If Equipped ........................................... 154
Tire Pressure Monitoring System (TPMS) ................ 155
OCCUPANT RESTRAINT SYSTEMS ................................159 Occupant Restraint Systems Features ................... 159
Important Safety Precautions................................... 159
Seat Belt Systems .................................................... 159
Supplemental Restraint Systems (SRS) .................. 166Child Restraints ......................................................... 176
SAFETY TIPS......................................................................186 Transporting Passengers .......................................... 186
Transporting Pets ...................................................... 186Connected Vehicles................................................... 186
Safety Checks You Should Make Inside The
Vehicle ....................................................................... 187
Periodic Safety Checks You Should Make
Outside The Vehicle .................................................. 188
Exhaust Gas ............................................................... 188
Carbon Monoxide Warnings ..................................... 188
23_KL_OM_EN_USC_t.book Page 4
Page 49 of 276
GETTING TO KNOW YOUR VEHICLE47
Driver And Passenger Temperature Up And
Down Buttons
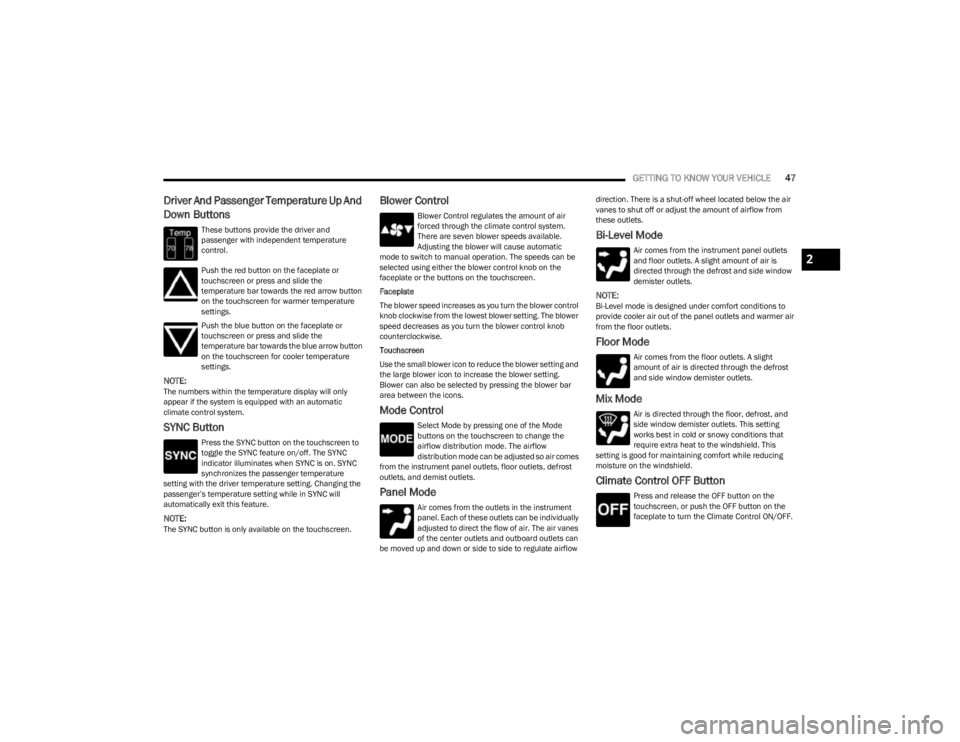
These buttons provide the driver and
passenger with independent temperature
control.
Push the red button on the faceplate or
touchscreen or press and slide the
temperature bar towards the red arrow button
on the touchscreen for warmer temperature
settings.
Push the blue button on the faceplate or
touchscreen or press and slide the
temperature bar towards the blue arrow button
on the touchscreen for cooler temperature
settings.
NOTE:The numbers within the temperature display will only
appear if the system is equipped with an automatic
climate control system.
SYNC Button
Press the SYNC button on the touchscreen to
toggle the SYNC feature on/off. The SYNC
indicator illuminates when SYNC is on. SYNC
synchronizes the passenger temperature
setting with the driver temperature setting. Changing the
passenger’s temperature setting while in SYNC will
automatically exit this feature.
NOTE:The SYNC button is only available on the touchscreen.
Blower Control
Blower Control regulates the amount of air
forced through the climate control system.
There are seven blower speeds available.
Adjusting the blower will cause automatic
mode to switch to manual operation. The speeds can be
selected using either the blower control knob on the
faceplate or the buttons on the touchscreen.
Faceplate
The blower speed increases as you turn the blower control
knob clockwise from the lowest blower setting. The blower
speed decreases as you turn the blower control knob
counterclockwise.
Touchscreen
Use the small blower icon to reduce the blower setting and
the large blower icon to increase the blower setting.
Blower can also be selected by pressing the blower bar
area between the icons.
Mode Control
Select Mode by pressing one of the Mode
buttons on the touchscreen to change the
airflow distribution mode. The airflow
distribution mode can be adjusted so air comes
from the instrument panel outlets, floor outlets, defrost
outlets, and demist outlets.
Panel Mode
Air comes from the outlets in the instrument
panel. Each of these outlets can be individually
adjusted to direct the flow of air. The air vanes
of the center outlets and outboard outlets can
be moved up and down or side to side to regulate airflow direction. There is a shut-off wheel located below the air
vanes to shut off or adjust the amount of airflow from
these outlets.
Bi-Level Mode
Air comes from the instrument panel outlets
and floor outlets. A slight amount of air is
directed through the defrost and side window
demister outlets.
NOTE:Bi-Level mode is designed under comfort conditions to
provide cooler air out of the panel outlets and warmer air
from the floor outlets.
Floor Mode
Air comes from the floor outlets. A slight
amount of air is directed through the defrost
and side window demister outlets.
Mix Mode
Air is directed through the floor, defrost, and
side window demister outlets. This setting
works best in cold or snowy conditions that
require extra heat to the windshield. This
setting is good for maintaining comfort while reducing
moisture on the windshield.
Climate Control OFF Button
Press and release the OFF button on the
touchscreen, or push the OFF button on the
faceplate to turn the Climate Control ON/OFF.
2
23_KL_OM_EN_USC_t.book Page 47
Page 117 of 276
STARTING AND OPERATING115
Gross Trailer Weight (GTW)
The GTW is the weight of the trailer plus the weight of all
cargo, consumables, and equipment (permanent or
temporary) loaded in or on the trailer in its “loaded and
ready for operation” condition.
The recommended way to measure GTW is to put your fully
loaded trailer on a vehicle scale. The entire weight of the
trailer must be supported by the scale.
Gross Combination Weight Rating (GCWR)
The GCWR is the total allowable weight of your vehicle and
trailer when weighed in combination.
Gross Axle Weight Rating (GAWR)
The GAWR is the maximum capacity of the front and rear
axles. Distribute the load over the front and rear axles
evenly. Make sure that you do not exceed either front or
rear GAWR. Refer to “Vehicle Loading”
Úpage 113 for
further information.
Tongue Weight (TW)
The TW is the downward force exerted on the hitch ball by
the trailer. You must consider this as part of the load on
your vehicle.
Trailer Frontal Area
The frontal area is the maximum height multiplied by the
maximum width of the front of a trailer.
Trailer Sway Control (TSC)
The TSC can be a mechanical telescoping link that can be
installed between the hitch receiver and the trailer tongue
that typically provides adjustable friction associated with
the telescoping motion to dampen any unwanted trailer
swaying motions while traveling.
The electronic TSC (if equipped) recognizes a swaying
trailer and automatically applies individual wheel brakes
and/or reduces engine power to attempt to eliminate the
trailer sway.
Weight-Carrying Hitch
A weight-carrying hitch supports the trailer tongue weight,
just as if it were luggage located at a hitch ball or some
other connecting point of the vehicle. These kinds of
hitches are commonly used to tow small and medium
sized trailers.
Weight-Distributing Hitch
A weight-distributing hitch system works by applying
leverage through spring (load) bars. They are typically
used for heavier loads to distribute trailer tongue weight to
the tow vehicle's front axle and the trailer axle(s). When
used in accordance with the manufacturer's directions, it
provides for a more level ride, offering more consistent
steering and brake control thereby enhancing towing
safety. The addition of a friction/hydraulic sway control
also dampens sway caused by traffic and crosswinds and
contributes positively to tow vehicle and trailer stability.
Trailer sway control and a weight-distributing (load
equalizing) hitch are recommended for heavier Tongue
Weights (TW) and may be required depending on vehicle
and trailer configuration/loading to comply with Gross Axle
Weight Rating (GAWR) requirements.
WARNING!
If the Gross Trailer Weight (GTW) is 3,500 lb (1,587 kg)
or more, it is mandatory to use a weight-distributing
hitch to ensure stable handling of your vehicle. If you
use a standard weight-carrying hitch, you could lose
control of your vehicle and cause a collision.
WARNING!
It is important that you do not exceed the maximum
front or rear GAWR. A dangerous driving condition can
result if either rating is exceeded. You could lose control
of the vehicle and have a collision.
WARNING!
An improperly adjusted weight-distributing hitch
system may reduce handling, stability, braking
performance, and could result in a collision.
Weight-distributing hitch systems may not be
compatible with surge brake couplers. Consult with
your hitch and trailer manufacturer or a reputable
Recreational Vehicle dealer for additional informa -
tion.
4
23_KL_OM_EN_USC_t.book Page 115
Page 123 of 276
STARTING AND OPERATING121
RECREATIONAL TOWING —
F
RONT-WHEEL DRIVE (FWD) MODELS
DO NOT flat tow this vehicle. Damage to the drivetrain will
result.
Recreational towing (for front-wheel drive models) is
allowed ONLY if the front wheels are OFF the ground. This
may be accomplished using a tow dolly or vehicle trailer. If
using a tow dolly, follow this procedure:
1. Properly secure the dolly to the tow vehicle, following the dolly manufacturer's instructions.
2. Drive the front wheels onto the tow dolly.
3. Apply the parking brake. Place transmission in PARK. Turn the engine off.
4. Properly secure the front wheels to the dolly, following the dolly manufacturer's instructions.
5. Turn the ignition to the ON/RUN mode, but do not start the engine.
6. Press and hold the brake pedal.
7. Release the parking brake.
8. Turn the ignition OFF, remove the key fob, and release the brake pedal.
RECREATIONAL TOWING — 4X4
M
ODELS WITH 1-SPEED POWER
T
RANSFER UNIT
Recreational towing is not allowed. These models do not
have a N (NEUTRAL) position in the power transfer unit.
NOTE:This vehicle may be towed on a flatbed or vehicle trailer
provided all four wheels are OFF the ground.
RECREATIONAL TOWING — 4X4
M
ODELS WITH 2-SPEED POWER
T
RANSFER UNIT
The power transfer unit must be shifted into N (NEUTRAL)
and the transmission must be in PARK for recreational
towing. The N (NEUTRAL) selection button is adjacent to
the 4WD selector switch. Shifts into and out of N
(NEUTRAL) can take place with the selector switch in any
mode position.
CAUTION!
Towing with the front wheels on the ground will cause
severe transmission damage. Damage from
improper towing is not covered under the New
Vehicle Limited Warranty.
Ensure that the Electric Park Brake is released, and
remains released, while being towed.
CAUTION!
Towing this vehicle with ANY of its wheels on the ground
can cause severe transmission and/or power transfer
unit damage. Damage from improper towing is not
covered under the New Vehicle Limited Warranty.
CAUTION!
DO NOT dolly tow any 4x4 vehicle. Towing with only
one set of wheels on the ground (front or rear) will
cause severe transmission and/or power transfer
unit damage. Tow with all four wheels either ON the
ground, or OFF the ground (using a vehicle trailer).
Tow only in a forward direction. Towing this vehicle
backwards can cause severe damage to the power
transfer unit.
The transmission must be in PARK for recreational
towing.
Before recreational towing, perform the procedure
outlined under “Shifting into N (NEUTRAL)” to be
certain that the power transfer unit is fully in N
(NEUTRAL). Otherwise, internal damage will result.
Towing this vehicle in violation of the previous
requirements can cause severe transmission and/or
power transfer unit damage. Damage from improper
towing is not covered under the New Vehicle Limited
Warranty.
Ensure that the Electric Park Brake is released, and
remains released, while being towed.
Do not use a bumper-mounted clamp-on tow bar on
your vehicle. The fascia/bumper face bar will be
damaged.
4
23_KL_OM_EN_USC_t.book Page 121
Page 124 of 276
122STARTING AND OPERATING
Shifting Into N (NEUTRAL)
Use the following procedure to shift the 4WD system into
N (NEUTRAL).
1. Bring the vehicle to a complete stop on level ground,
and shift the transmission to PARK.
2. Turn the engine off.
3. Turn the ignition to the ON/RUN position, but do not start the engine.
4. Press and hold the brake pedal.
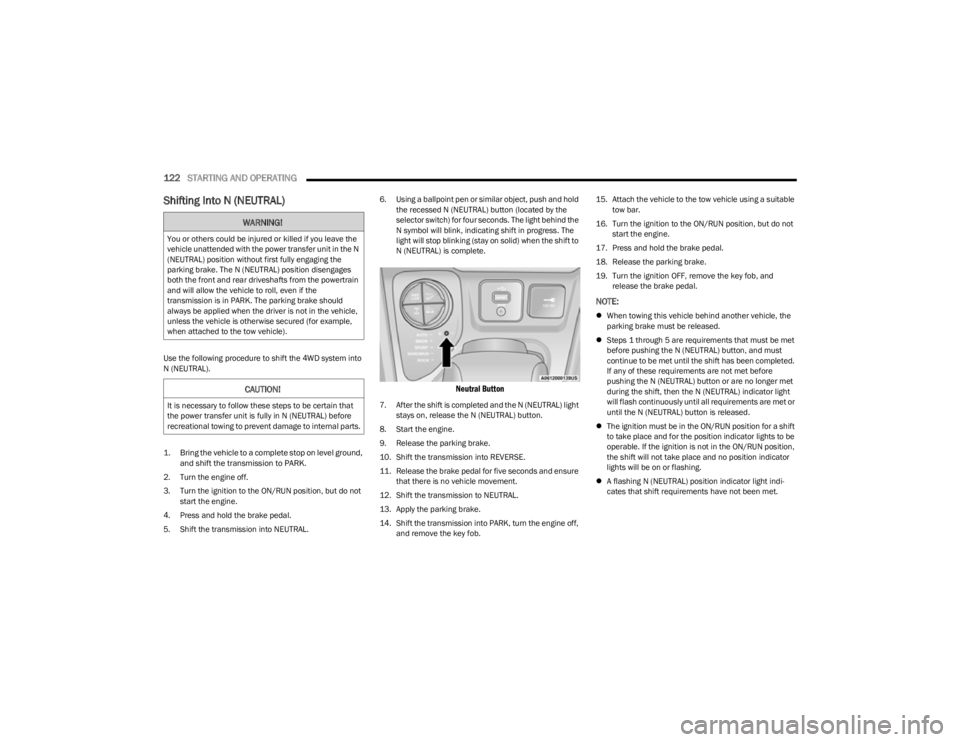
5. Shift the transmission into NEUTRAL. 6. Using a ballpoint pen or similar object, push and hold
the recessed N (NEUTRAL) button (located by the
selector switch) for four seconds. The light behind the
N symbol will blink, indicating shift in progress. The
light will stop blinking (stay on solid) when the shift to
N (NEUTRAL) is complete.
Neutral Button
7. After the shift is completed and the N (NEUTRAL) light stays on, release the N (NEUTRAL) button.
8. Start the engine.
9. Release the parking brake.
10. Shift the transmission into REVERSE.
11. Release the brake pedal for five seconds and ensure that there is no vehicle movement.
12. Shift the transmission to NEUTRAL.
13. Apply the parking brake.
14. Shift the transmission into PARK, turn the engine off, and remove the key fob. 15. Attach the vehicle to the tow vehicle using a suitable
tow bar.
16. Turn the ignition to the ON/RUN position, but do not start the engine.
17. Press and hold the brake pedal.
18. Release the parking brake.
19. Turn the ignition OFF, remove the key fob, and release the brake pedal.
NOTE:
When towing this vehicle behind another vehicle, the
parking brake must be released.
Steps 1 through 5 are requirements that must be met
before pushing the N (NEUTRAL) button, and must
continue to be met until the shift has been completed.
If any of these requirements are not met before
pushing the N (NEUTRAL) button or are no longer met
during the shift, then the N (NEUTRAL) indicator light
will flash continuously until all requirements are met or
until the N (NEUTRAL) button is released.
The ignition must be in the ON/RUN position for a shift
to take place and for the position indicator lights to be
operable. If the ignition is not in the ON/RUN position,
the shift will not take place and no position indicator
lights will be on or flashing.
A flashing N (NEUTRAL) position indicator light indi -
cates that shift requirements have not been met.
WARNING!
You or others could be injured or killed if you leave the
vehicle unattended with the power transfer unit in the N
(NEUTRAL) position without first fully engaging the
parking brake. The N (NEUTRAL) position disengages
both the front and rear driveshafts from the powertrain
and will allow the vehicle to roll, even if the
transmission is in PARK. The parking brake should
always be applied when the driver is not in the vehicle,
unless the vehicle is otherwise secured (for example,
when attached to the tow vehicle).
CAUTION!
It is necessary to follow these steps to be certain that
the power transfer unit is fully in N (NEUTRAL) before
recreational towing to prevent damage to internal parts.
23_KL_OM_EN_USC_t.book Page 122
Page 207 of 276
IN CASE OF EMERGENCY205
TOWING A DISABLED VEHICLE
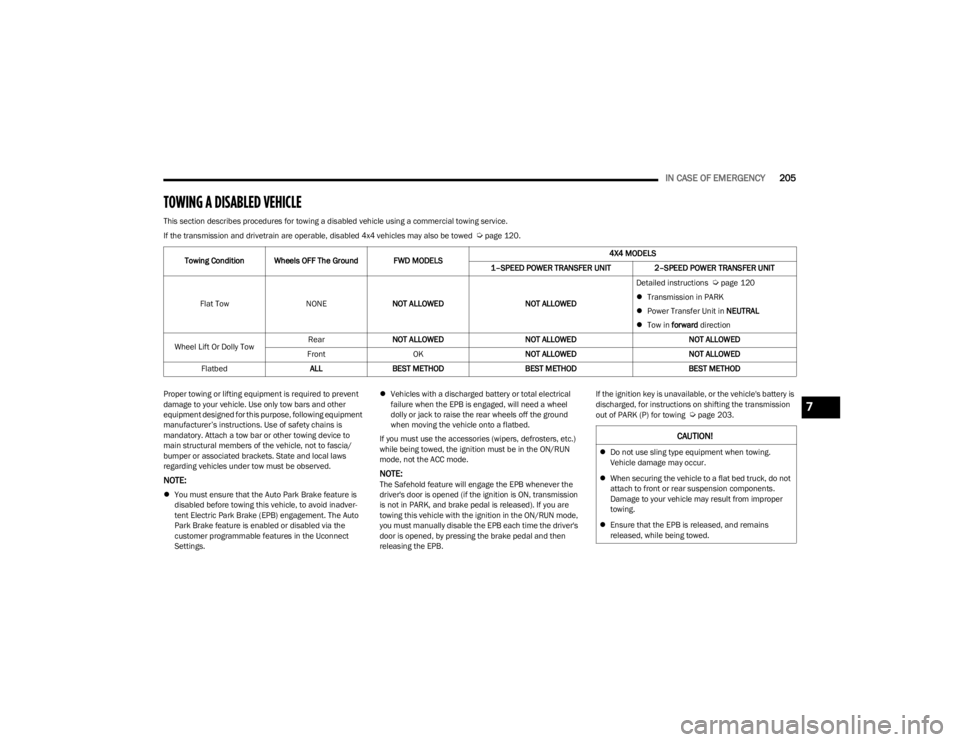
This section describes procedures for towing a disabled vehicle using a commercial towing service.
If the transmission and drivetrain are operable, disabled 4x4 vehicles may also be towed
Úpage 120.
Proper towing or lifting equipment is required to prevent
damage to your vehicle. Use only tow bars and other
equipment designed for this purpose, following equipment
manufacturer’s instructions. Use of safety chains is
mandatory. Attach a tow bar or other towing device to
main structural members of the vehicle, not to fascia/
bumper or associated brackets. State and local laws
regarding vehicles under tow must be observed.
NOTE:
You must ensure that the Auto Park Brake feature is
disabled before towing this vehicle, to avoid inadver -
tent Electric Park Brake (EPB) engagement. The Auto
Park Brake feature is enabled or disabled via the
customer programmable features in the Uconnect
Settings.
Vehicles with a discharged battery or total electrical
failure when the EPB is engaged, will need a wheel
dolly or jack to raise the rear wheels off the ground
when moving the vehicle onto a flatbed.
If you must use the accessories (wipers, defrosters, etc.)
while being towed, the ignition must be in the ON/RUN
mode, not the ACC mode.
NOTE:The Safehold feature will engage the EPB whenever the
driver's door is opened (if the ignition is ON, transmission
is not in PARK, and brake pedal is released). If you are
towing this vehicle with the ignition in the ON/RUN mode,
you must manually disable the EPB each time the driver's
door is opened, by pressing the brake pedal and then
releasing the EPB. If the ignition key is unavailable, or the vehicle's battery is
discharged, for instructions on shifting the transmission
out of PARK (P) for towing
Úpage 203.
Towing Condition Wheels OFF The Ground FWD MODELS
4X4 MODELS
1–SPEED POWER TRANSFER UNIT 2–SPEED POWER TRANSFER UNIT
Flat Tow NONENOT ALLOWED NOT ALLOWEDDetailed instructions
Úpage 120
Transmission in PARK
Power Transfer Unit in NEUTRAL
Tow in forward direction
Wheel Lift Or Dolly Tow Rear
NOT ALLOWED NOT ALLOWED NOT ALLOWED
Front OK NOT ALLOWED NOT ALLOWED
Flatbed ALLBEST METHOD BEST METHOD BEST METHOD
CAUTION!
Do not use sling type equipment when towing.
Vehicle damage may occur.
When securing the vehicle to a flat bed truck, do not
attach to front or rear suspension components.
Damage to your vehicle may result from improper
towing.
Ensure that the EPB is released, and remains
released, while being towed.
7
23_KL_OM_EN_USC_t.book Page 205
Page 269 of 276

267
Modifications/AlterationsVehicle .......................................................................... 8
Monitor, Tire Pressure System .................................... 155
Mopar Parts .................................................................. 260
MP3 Control ....................................................................50
Multi-Function Control Lever ..........................................39
NNew Vehicle Break-In Period ..........................................78
OOccupant Restraints .................................................... 159
Off Road Pages ............................................................ 141 Accessory Gauges................................................... 142
Drivetrain................................................................. 141
Pitch And Roll .......................................................... 142
Status Bar ............................................................... 141
Off-Road Pages Selec-Terrain ........................................................... 142
Oil Filter, Change .......................................................... 216
Oil Filter, Selection ....................................................... 216
Oil Life Reset — If Equipped
S
..................................... 64
Oil Pressure Light ............................................................69
Oil Reset ..........................................................................64
Oil, Engine..................................................................... 215 Capacity ................................................................... 256
Checking .................................................................. 214
Dipstick.................................................................... 214
Disposal................................................................... 215
Filter......................................................................... 216
Filter Disposal ......................................................... 215Identification Logo .................................................. 215Materials Added To................................................. 215Pressure Warning Light ............................................. 69 Recommendation ....................................................215
Synthetic .................................................................. 215
Onboard Diagnostic System........................................... 75
Operating Precautions.................................................... 75 Operator Manual Owner's Manual ....................................................... 261
Outside Rearview Mirrors............................................... 34
Overheating, Engine ..................................................... 203
PPaddle Shifters ............................................................... 84
Paint Care...................................................................... 250
Parking Brake ................................................................. 78
ParkSense Front And Rear........................................................... 99
ParkSense Active Park Assist ...................................... 106
ParkSense System, Rear................................................ 99
Passive Entry................................................................... 22 Pets ................................................................................ 186
Pinch Protection.............................................................. 56
Placard, Tire And Loading Information ........................ 238
Power Brakes ...................................................................... 253
Door Locks ................................................................. 21
Inverter ....................................................................... 52
Mirrors ........................................................................ 35
Outlet (Auxiliary Electrical Outlet) ............................. 51
Windows..................................................................... 53
Power Seats Down .......................................................................... 30
Forward ...................................................................... 30
Rearward.................................................................... 30
Up ............................................................................... 30
Pregnant Women And Seat Belts ................................ 165 Preparation For Jacking ............................................... 191
Pressure Washing ........................................................ 215
Pretensioners
Seat Belts ................................................................ 165
RRadial Ply Tires ............................................................. 242
Radiator Cap (Coolant Pressure Cap) ......................... 224
RadioOff-Road Pages ....................................................... 141
Radio Operation ........................................................... 140
Radio Remote Controls ................................................ 140
Rain Sensitive Wiper System......................................... 44 Rear Camera................................................................. 112
Rear Cross Path............................................................ 153
Rear ParkSense System ................................................ 99Rear Seats, Folding ........................................................ 29Rear Wiper/Washer ....................................................... 45Recreational Towing ..................................................... 120 Shifting Into Power Transfer Unit Neutral (N)........ 122
Shifting Into Transfer Case Neutral (N) ................. 122
Shifting Out Of Power Transfer Unit Neutral (N) ... 123
Shifting Out Of Transfer Case Neutral (N) ............. 123
Reformulated Gasoline ................................................ 254
Refrigerant .................................................................... 218
Release, Hood ................................................................ 56
Reminder, Lights On....................................................... 41 Reminder, Seat Belt ..................................................... 159
Remote Control Starting System ......................................................... 18
Remote Keyless Entry .................................................... 14 Arm The Alarm ........................................................... 20
Disarm The Alarm ..................................................... 20
Programming Additional Key Fobs ........................... 15
11
23_KL_OM_EN_USC_t.book Page 267