Wheel bearing JEEP CJ 1953 User Guide
[x] Cancel search | Manufacturer: JEEP, Model Year: 1953, Model line: CJ, Model: JEEP CJ 1953Pages: 376, PDF Size: 19.96 MB
Page 45 of 376
'Jeep'
UNIVERSAL SERIES SERVICE
MANUAL
D
Remove the screws and lockwashers that attach
the main bearing caps to the cylinder block. Use
a
lifting bar beneath the ends of each bearing cap.
Be
careful not to exert too much pressure to cause
damage to the cap or
dowels
and pry the caps free.
CAUTION:
If main bearing caps are not removed
carefully
by raising both sides of each cap evenly
until
free of the dowels, the
dowels
may be bent.
A
bent main bearing cap dowel can cause misalign ment of the cap and resultant
rapid
bearing wear
necessitating replacement. Therefore, remove each
main
bearing cap carefully. If there is reason to
believe any of the
dowels
have been bent during
the bearing cap removal, remove them and install
new
dowels
as detailed in Par. D-34c.
Remove the upper
half
of the
rear
main bearing
oil
seal from the cylinder block and the lower
half
from
the oil seal
groove
in the
rear
main bearing
cap.
Install
the main bearing caps and bearings on
the cylinder block in their original positions.
Note;
Removal of the crankshaft may be ac
complished only with the
engine
out of the vehicle.
D-27.
Remove
Exhaust
Valves and Springs
Access to the valve chamber is obtained by re moving the attaching parts and the valve spring
cover and gasket from the cylinder block. Use cloths
to block off the three
holes
in the exhaust valve
chamber to prevent the valve retaining locks falling
into the crankcase, should they be accidentally dropped.
With
a valve
/
spring compressor, compress the valve springs on
those
valves which are in the
closed position (valve seated against cylinder
block).
Remove the exhaust valve spring retainer
locks,
the exhaust valve spring retainer, and the exhaust valve spring. Close the other valves by
rotating the camshaft and repeat the above opera
tion for the other valves in the same manner.
Lift
out all the exhaust valves and tag or place them in
a
rack
to indicate the location where each was removed from the cylinder block. If a valve sticks in
the guide and cannot be easily lifted out,
pull
the valve upward as far as possible and remove the
spring.
Lower
the valve and remove any carbon
deposits
from the valve stem.
This
will
permit re moval of the valve.
For
intake valve and spring removal, see
Par.
D-l7.
D-28.
Remove Camshaft
a.
Push the intake and exhaust valve tappets into the cylinder block as far as possible so the ends of
the tappets are not in contact with the camshaft. b. Secure each tappet in the raised position by in
stalling a common clip-type clothes pin on the
shank
of each tappet or tie them up in the valve
chamber.
c. Remove the camshaft thrust plate attaching
screws.
Remove the camshaft thrust plate and
spacer.
d.
Pull
the camshaft forward out of the cylinder
block using care to prevent damage to the cam
shaft bearing surfaces.
D-29.
Remove Valve Tappets
Remove the intake and exhaust valve tappets from
the
bottom
or crankshaft side of the cylinder block
after the camshaft has been removed. Tag each
tappet or place them in a marked
rack
so they may be reassembled in their original positions.
D-30.
Remove Oil
Gallery
Plugs
Remove the plug at each end of the oil gallery in the cylinder block.
This
operation is only applicable
when the
engine
is out of the vehicle and
will
allow access to the oil gallery so it may be cleaned.
D-31. ENGINE INSPECTION
AND
REPAIR
The
inspection and repair procedures detailed here
in
are recommended to be followed when a com
plete
engine
overhaul is to be made with the
engine
out of the vehicle. These instructions can generally be applied individually with the
engine
in the
vehicle. Wherever the procedure differs due to
the
engine
being in the vehicle, the necessary
special
instructions are provided. Inspection and
repair
instructions are included to cover the
cylinder
block, cylinder head, crankshaft and bearings, connecting rods and bearings, oil pump, valves and tappets, pistons and rings, flywheel,
timing gears, and the camshaft and bearings. In addition, fitting operations for
these
engine
com
ponents
are included.
Important:
Before the inspection and repair pro
cedures listed below are begun, the
engine
serial
number must be checked for the presence of
code
letters denoting undersize bearings or oversize
pistons. Refer to Par. D-2.
D-32.
Cylinder
Block
The
cylinder block must be thoroughly cleaned, inspected and repaired as detailed in the following
paragraphs.
D-33.
Cleaning
The
cylinder block may be steam cleaned or cleaned
with
a suitable solvent. A scraper is recommended
to remove
hard
deposits, except on highly finished surfaces. Special attention must be directed to the
cleaning of the oil passages, valve chamber,
crank
case, and cylinder walls to remove all sludge,
dirt
and
carbon deposits. After cleaning, use air pressure to dry the block thoroughly.
D-34. Inspection
Examine
the cylinder block for minute cracks and
fractures.
Rusted valve springs or evidence of rust
in
the valve chamber or the cylinder walls is a
good
indication of a possible
crack
in the block,
a.
Examine all machined surfaces of the cylinder block for
burrs
and scores.
Check
for cylinder block
distortion by placing a straight
edge
along the
length of the cylinder head surface of the block.
With
a feeler
gauge,
check for clearance
between
the straight
edge
and the block, particularly be
tween adjacent cylinders. Maximum permissible
out of line for service is .010"
[0,254
mm.] over the
full
length of the block. 45
Page 54 of 376
D
HURRICANE
F4
ENGINE
against the hub of the crankshaft pulley.
Timing
gears are accessible for inspection or replacement
with
the
engine
installed in the vehicle after re moving the radiator, belt drive pulley, and timing
cover.
Should
it be necessary to replace the timing gears, attention must be given to the end float of both
the camshaft and crankshaft and to the running
clearance
of both gears. It is also advisable to
check
both the oil jet and oil passage to the
crank
shaft front bearing to be sure that they are clear.
D-55.
Inspection and
Repair
Check
the general condition of both gears and
inspect for evidence of excessive wear. Replace
excessively worn or damaged gears. Inspect the
cover and replace if bent or damaged. It is recom mended that the crankshaft oil seal in the cover
be replaced when the cover is removed to ensure a
good
seal around the crankshaft. To replace this
seal
with the
engine
in the vehicle
requires
removing
the radiator and water pump.
D-56.
Valves, Springs, and Guides
The
exhaust valves seat on the top of the cylinder
block
with the
stems
extending down through
replaceable valve guides. The exhaust valves are actuated by the camshaft through exhaust valve
tappets. The exhaust valve springs are assembled
and
locked on the lower end of the exhaust valve
stems. The retaining locks are the split type, which
fit in a recess on the valve
stems
and into the taper
in
the valve spring retainers.
Adjustment
of exhaust valves is by means of the
adjusting
screw threaded into the upper end of the
exhaust valve tappets. An exhaust valve rotator used as a valve spring retainer is installed on the
lower end of the exhaust valve.
This
valve rotator,
known
as "Roto Cap", is a spring-loaded
ball
bearing
device. On each lift, or opening stroke of
a
valve, the rotator
gives
the valve a slight positive
clockwise rotation.
The
intake valves operate in valve
guides
in the
cylinder
head and are actuated by rocker arms.
The
rocker arms are actuated by valve push rods
and
the intake valve tappets. The intake valve
springs,
the intake valve spring retainers, and the
intake
valve spring retainer locks make up the
remainder
of the valve operating parts. An intake
valve spring retainer oil seal which encircles the
upper
end of the intake valve
between
the valve
locks and the upper end of the valve spring re
tainer,
controls the passage of oil along the valve
stem and guide.
Note:
When
engine
trouble indicates defective
valves as a possible source of trouble, also check
all
vacuum line connections for possible leaks.
D-57.
Inspection of Valves, Springs,
and
Guides
Clean
the valves on a wire wheel, making sure that
all
carbon is removed from the top and the under
side of the heads and that all gum and varnish
deposits
are removed from the stems.
Polish
the valve
stems
with steel wool or crocus
cloth.
Visually
inspect all valves for warpage,
cracks,
or excessive burning and discard if one of
these
conditions exists. Replace any worn, pitted,
or
corroded valves that cannot be cleaned with a
wire
brush.
Replace any valves when
seats
are pitted, burned, or corroded so badly that they
cannot be cleaned up with a light refacing on a valve refacing machine.
Replace
valves with marks of scoring or abrasion visible on the stem. Replace any valves with bent
stems
which
will
be apparent when the valve is
mounted in the valve refacing machine.
Note:
Use only hard-face exhaust valves for
replacement.
Examine
the
stems
of valves which employ the
ball
bearing rotators.
Wear
marks around the
cir
cumference of the
stems
indicates that the valve is
rotating satisfactorily.
Vertical
heavy pressure
areas
indicate that the valve is not rotating and the valve spring retainer (Roto
Cap)
should be replaced
if
at fault.
Check
the diameter of the valve stem at two or three places along the length of the stem
with
a micrometer. The intake valve stem diameter is .3733" to .3738" [9,482 a
9,495
mm.]. The
exhaust valve stem diameter is .371" to .372"
[9,423
a
9,449
mm.].
Note:
Exhaust
and intake valve springs are
similar
in appearance. They must not be inter
changed as they have different spring
charac
teristics.
Wash
the valve springs thoroughly in solvent.
Visually
examine the springs and replace any that
are
deformed or obviously damaged. Examine for
corrosion
from moisture or acid etching which might
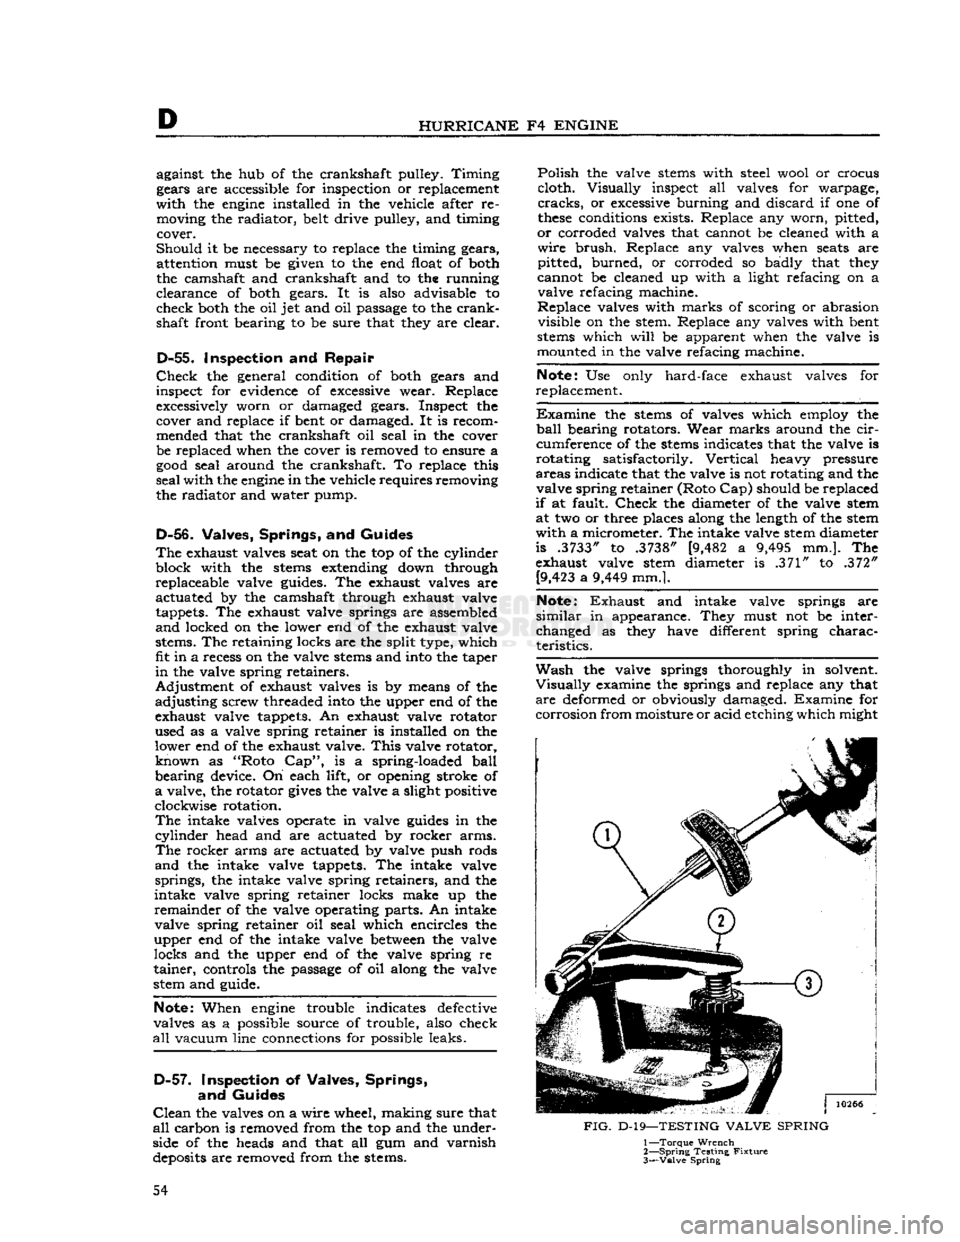
FIG.
D-19—TESTING
VALVE
SPRING
1—
Torque
Wrench
2—
Spring
Testing
Fixture
3—
Valve
Spring
54
Page 64 of 376
D
HURRICANE
F4
ENGINE
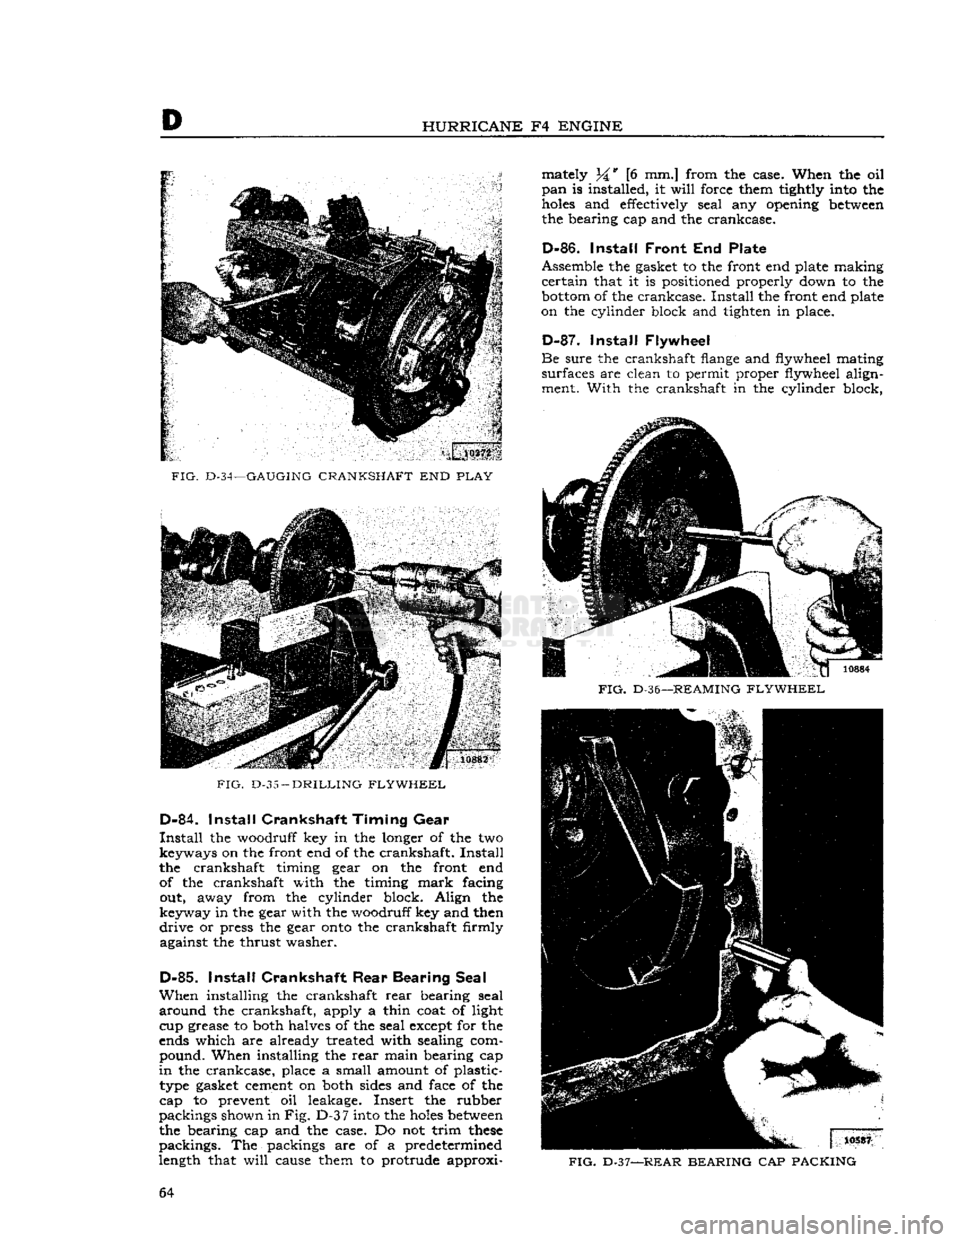
FIG.
D-34—GAUGING
CRANKSHAFT
END
PLAY
FIG.
D-35
—
DRILLING FLYWHEEL
D-84.
Install
Crankshaft Timing
Gear
Install
the woodruff key in the longer of the two keyways on the front end of the crankshaft.
Install
the crankshaft timing gear on the front end of the crankshaft with the timing
mark
facing out, away from the cylinder block. Align the
keyway in the gear with the woodruff key and then
drive
or press the gear
onto
the crankshaft firmly against the thrust washer.
D-85.
Install
Crankshaft
Rear
Bearing Seal
When
installing the crankshaft
rear
bearing seal
around
the crankshaft, apply a thin coat of light cup grease to both halves of the seal except for the
ends which are already treated with sealing com pound. When installing the
rear
main bearing cap
in
the crankcase, place a small amount of plastic- type gasket cement on both sides and face of the
cap to prevent oil leakage. Insert the rubber
packings shown in
Fig. D-3
7
into the
holes
between
the bearing cap and the case. Do not trim
these
packings. The packings are of a predetermined
length that
will
cause them to protrude approxi mately 34* [6 mm.] from the case. When the oil
pan
is installed, it
will
force them tightly into the
holes
and effectively seal any opening
between
the bearing cap and the crankcase.
D-86.
Install
Front
End Plate
Assemble the gasket to the front end plate making
certain
that it is positioned properly down to the
bottom
of the crankcase.
Install
the front end plate
on the cylinder block and tighten in place.
D-87.
Install
Flywheel
Be
sure the crankshaft flange and flywheel mating
surfaces are clean to permit proper flywheel align ment. With the crankshaft in the cylinder block,
FIG.
D-36—
REAMING FLYWHEEL
FIG.
D-37—REAR
BEARING
CAP
PACKING
64
Page 68 of 376
D
HURRICANE
F4
ENGINE
D-101.
Install
Manifold
If
manifold studs were removed for replacement,
apply sealer on the stud threads
before
installing
a
new stud.
See Section Fl for exhaust emission controlled
engines.
Make
certain that no foreign objects are inside the manifold and that all
passages
are clear. Place a
new set of manifold
gaskets
in position on the side
of the cylinder block.
Then,
carefully slide the manifold
onto
the studs and against the cylinder block being careful not to damage the gaskets.
Torque
all manifold attaching nuts evenly 29 to
35 lb-ft. [4,0 a 4,8 kg-m.].
D-102.
Install
Oil
Filler
Tube
When
installing the oil filler tube, be sure that the
beveled lower end is away from the crankshaft.
Place a
piece
of
hard
wood
over the top of the
tube
to prevent damage to the cap gasket seat.
D-103.
Install
Water Pump
Make
certain that the mating surfaces of the water pump and the cylinder block are clean and smooth.
Install
the gasket on the
flange
of the pump and
install
the pump in position on the cylinder block.
Torque
the water pump attaching
bolts
alternately
and
evenly 12 to 17 lb-ft. [1,7 a 2,3 kg-m.].
D-104.
Install
Water Outlet Fitting
Install
the thermostat and the water
outlet
fitting.
Torque
the water
outlet
fitting attaching
bolts
20
to 25 lb-ft. [2,8 a 3,4 kg-m.].
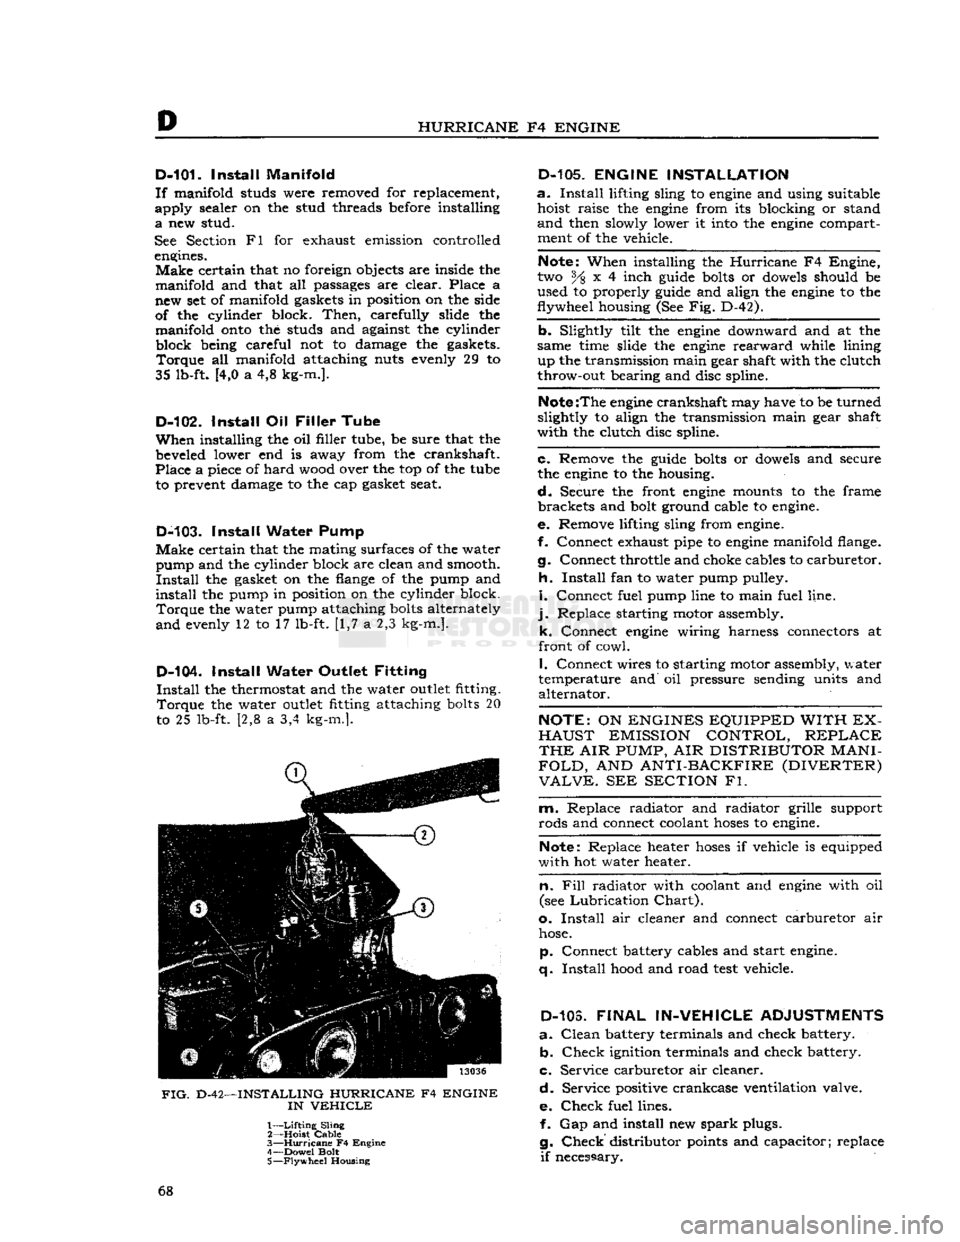
FIG.
D-42—INSTALLING HURRICANE F4 ENGINE
IN
VEHICLE
1—
Lifting
Sling
2— Hoist
Cable
3—
Hurricane
F4 Engine
4— Dowel Bolt
5—
Flywheel
Housing
D-105.
ENGINE INSTALLATION
a.
Install
lifting sling to
engine
and using suitable hoist raise the
engine
from its blocking or stand
and
then slowly lower it
into
the
engine
compartment of the vehicle.
Note:
When installing the
Hurricane
F4 Engine,
two % x 4 inch
guide
bolts
or
dowels
should be
used to properly
guide
and align the
engine
to the
flywheel housing (See Fig. D-42).
b. Slightly tilt the
engine
downward and at the
same time slide the
engine
rearward
while lining up the transmission main gear shaft with the clutch
throw-out bearing and disc spline.
Note
:The
engine
crankshaft may have to be turned
slightly to align the transmission main gear shaft
with the clutch disc spline.
c. Remove the
guide
bolts
or
dowels
and secure
the
engine
to the housing.
d.
Secure the front
engine
mounts to the frame brackets and
bolt
ground cable to
engine.
e. Remove lifting sling from
engine.
f. Connect exhaust pipe to
engine
manifold flange.
g. Connect throttle and choke cables to carburetor.
h.
Install
fan to water pump pulley.
i.
Connect fuel pump line to main fuel line,
j.
Replace starting motor assembly. k. Connect
engine
wiring harness connectors at
front of cowl.
I.
Connect wires to starting motor assembly, water
temperature and oil pressure sending units and alternator.
NOTE:
ON
ENGINES EQUIPPED WITH EX
HAUST
EMISSION CONTROL,
REPLACE
THE
AIR
PUMP,
AIR
DISTRIBUTOR
MANI
FOLD,
AND
ANTI-BACKFIRE (DIVERTER)
VALVE.
SEE
SECTION
Fl.
m. Replace radiator and radiator grille support
rods and connect coolant
hoses
to
engine.
Note:
Replace heater
hoses
if vehicle is equipped
with hot water heater.
n. Fill
radiator with coolant and
engine
with oil
(see
Lubrication
Chart).
o.
Install
air cleaner and connect carburetor air
hose.
p. Connect battery cables and start
engine,
q.
Install
hood
and road
test
vehicle.
D-103.
FINAL
IN-VEHICLE
ADJUSTMENTS
a.
Clean
battery terminals and check battery. b.
Check
ignition terminals and check battery.
c. Service carburetor air cleaner.
d.
Service positive crankcase ventilation valve.
e.
Check
fuel lines. f. Gap and install new
spark
plugs.
g.
Check
distributor
points
and capacitor; replace
if
necessary. 68
Page 70 of 376
D
HURRICANE
F4
ENGINE
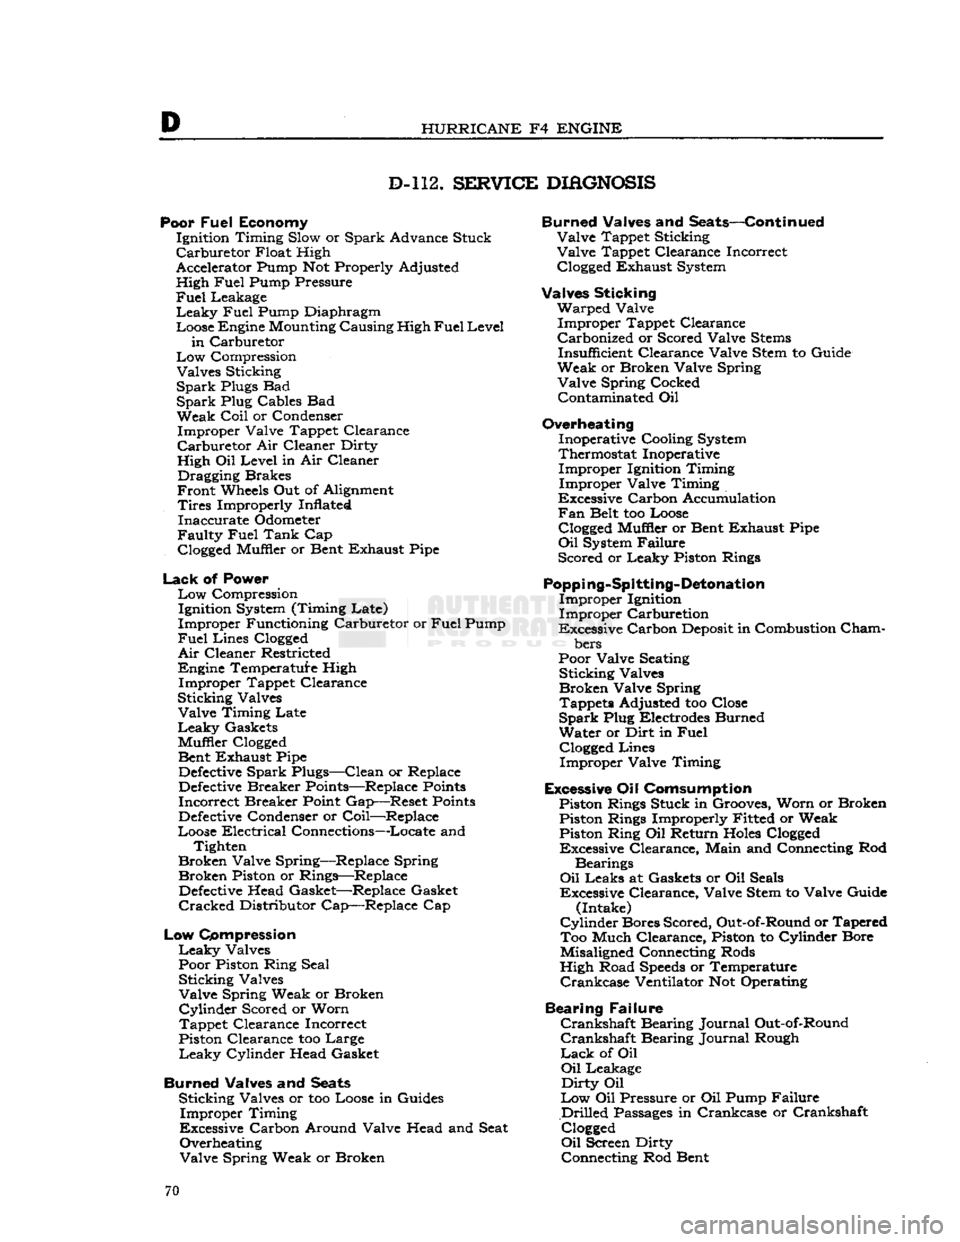
D-112.
SERVICE
DIAGNOSIS
Poor
Fuel
Economy Ignition Timing Slow or Spark Advance Stuck
Carburetor
Float High
Accelerator Pump Not Properly Adjusted
High
Fuel
Pump Pressure
Fuel
Leakage
Leaky
Fuel
Pump Diaphragm
Loose Engine Mounting Causing High
Fuel
Level
in
Carburetor
Low
Compression Valves Sticking
Spark
Plugs Bad
Spark
Plug Cables Bad Weak
Coil
or Condenser Improper Valve Tappet Clearance
Carburetor
Air Cleaner Dirty
High Oil Level in Air Cleaner Dragging Brakes
Front
Wheels Out of Alignment
Tires
Improperly Inflated Inaccurate Odometer
Faulty
Fuel
Tank
Cap
Clogged
Muffler or Bent Exhaust Pipe
Lack
of Power
Low
Compression Ignition System (Timing Late)
Improper Functioning Carburetor or
Fuel
Pump
Fuel
Lines
Clogged
Air
Cleaner Restricted
Engine Temperature High Improper Tappet Clearance
Sticking Valves Valve Timing Late
Leaky
Gaskets
Muffler
Clogged
Bent Exhaust Pipe
Defective
Spark Plugs—Clean or Replace
Defective
Breaker Points—Replace
Points
Incorrect Breaker Point Gap—Reset
Points
Defective
Condenser or Coil—Replace
Loose Electrical Connections—Locate and Tighten
Broken Valve Spring—Replace Spring Broken Piston or Rings—Replace
Defective
Head Gasket—Replace Gasket
Cracked
Distributor Cap—Replace Cap
Low
Compression
Leaky
Valves
Poor Piston Ring Seal Sticking Valves
Valve Spring Weak or Broken
Cylinder
Scored or Worn
Tappet Clearance Incorrect
Piston Clearance too Large
Leaky
Cylinder Head Gasket
Burned Valves and
Seats
Sticking Valves or too Loose in Guides Improper Timing
Excessive Carbon Around Valve Head and Seat Overheating
Valve Spring Weak or Broken Burned Valves and Seats—Continued
Valve Tappet Sticking
Valve Tappet Clearance Incorrect
Clogged
Exhaust System
Valves Sticking Warped Valve Improper Tappet Clearance
Carbonized or Scored Valve
Stems
Insufficient Clearance Valve Stem to Guide
Weak or Broken Valve Spring Valve Spring Cocked Contaminated Oil
Overheating Inoperative Cooling System
Thermostat Inoperative Improper Ignition Timing
Improper Valve Timing
Excessive Carbon Accumulation
Fan
Belt too Loose
Clogged
Muffler or Bent Exhaust Pipe
Oil
System Failure
Scored or Leaky Piston Rings
Popping-Spitting-Detonation
Improper Ignition
Improper Carburetion
Excessive Carbon
Deposit
in Combustion
Cham
bers
Poor Valve Seating Sticking Valves
Broken Valve Spring Tappets Adjusted too Close
Spark
Plug Electrodes Burned
Water or Dirt in
Fuel
Clogged
Lines Improper Valve Timing
Excessive Oil Comsumption Piston Rings Stuck in Grooves, Worn or Broken Piston Rings Improperly Fitted or Weak Piston Ring Oil Return
Holes
Clogged
Excessive Clearance, Main and Connecting Rod
Bearings
Oil
Leaks at Gaskets or Oil Seals
Excessive Clearance, Valve Stem to Valve Guide (Intake)
Cylinder
Bores Scored, Out-of-Round or Tapered Too Much Clearance, Piston to Cylinder Bore
Misaligned Connecting Rods
High Road
Speeds
or Temperature
Crankcase
Ventilator Not Operating
Bearing Failure
Crankshaft
Bearing Journal Out-of-Round
Crankshaft
Bearing Journal Rough
Lack
of Oil
Oil
Leakage
Dirty
Oil
Low
Oil Pressure or Oil Pump Failure
Drilled
Passages
in Crankcase or Crankshaft
Clogged
Oil
Screen Dirty Connecting Rod Bent 70
Page 72 of 376
D
HURRICANE
F4
ENGINE
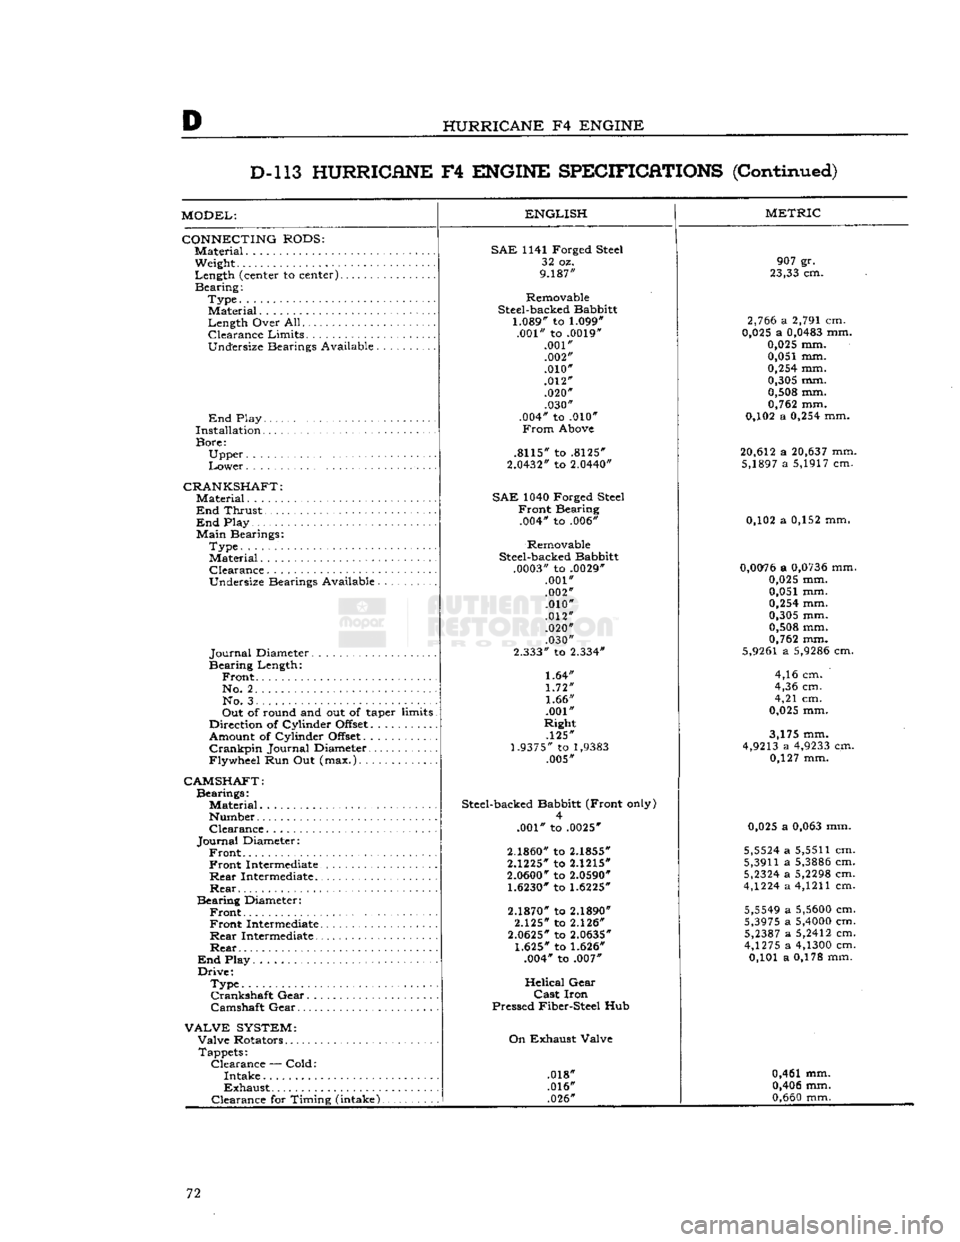
D-l
13
HURRICHNE
F4
ENGINE
SPECIFICATIONS
(Continued)
MODEL:
CONNECTING
RODS:
Material.
Weight
Length
(center to
center)......
Bearing:
Type.
Material
Length
Over
All
Clearance
Limits.
..........
Undersize
Bearings
Available
End
Play
Installation
Bore:
Upper
Lower
CRANKSHAFT:
Material....................
End
Thrust
End
Play
Main
Bearings:
Type.
Material
Clearance
Undersize
Bearings
Available
Journal
Diameter
Bearing
Length:
Front.
No.
2. . .
No.
3
Out
of
round
and out of taper
limits
Direction
of
Cylinder
Offset..........
Amount
of
Cylinder
Offset
Crankpin
Journal
Diameter
Flywheel
Run Out
(max.)
ENGLISH
CAMSHAFT:
Bearings:
Material..........
Number
Clearance.
Journal
Diameter:
Front Front
Intermediate.
Rear
Intermediate..
Rear
Bearing
Diameter:
Front Front
Intermediate.
Rear
Intermediate..
Rear
End
Play
Drive:
Type.............
Crankshaft
Gear.
. .
Camshaft
Gear
VALVE
SYSTEM:
Valve
Rotators
Tappets:
Clearance
—
Cold:
Intake
Exhaust
Clearance
for
Timing
(intake).
SAE
1141
Forged
Steel
32 oz.
9.187"
Removable
Steel-backed
Babbitt
1.089" to 1.099"
.001"
to .0019"
.001" .002"
.010"
.012" .020" .030"
.004"
to .010"
From
Above
.8115"
to .8125"
2.0432"
to 2.0440"
SAE
1040
Forged
Steel
Front
Bearing
.004*
to .006*
Removable
Steel-backed
Babbitt
.0003"
to .0029*
.001"
.002" .010"
.012" .020"
.030"
2.333"
to 2.334"
1.64"
1.72"
1.66"
.001"
Right
.125"
1.9375" to
1,9383
.005"
Steel-backed
Babbitt
(Front
only) 4
.001"
to .0025"
2.1860" to 2.1855"
2.1225"
to 2.1215"
2.0600" to 2.0590" 1.6230" to 1.6225"
2.1870" to 2.1890"
2.125"
to 2.126"
2.0625"
to 2.0635"
1.625" to 1.626"
.004*
to .007"
Helical
Gear
Cast
Iron
Pressed
Fiber-Steel
Hub
On
Exhaust
Valve
.018*
.016* .026"
METRIC
907
gr.
23,33 cm.
2,766 a 2,791 cm.
0,025 a 0,0483 mm.
0,025 mm. 0,051 mm.
0,254
mm.
0,305 mm. 0,508 mm.
0,762 mm.
0,102 a
0,254
mm.
20,612 a 20,637 mm. 5,1897 a 5,1917 cm.
0,102 a 0,152 mm,
0,0076 a 0,0736 mm. 0,025 mm.
0,051 mm.
0,254
mm.
0,305 mm.
0,508 mm.
0,762 mm.
5,9261
a 5,9286 cm.
4,16 cm.
4,36 cm.
4,21 cm.
0,025 mm.
3,175 mm.
4,9213 a 4,9233 cm. 0,127 mm.
0,025 a
0,063
mm.
5,5524 a
5,5511
cm.
5,3911
a 5,3886 cm.
5,2324 a 5,2298 cm.
4,1224 a
4,1211
cm.
5,5549 a 5,5600 cm.
5,3975 a 5,4000 cm. 5,2387 a 5,2412 cm.
4,1275 a 4,1300 cm. 0,101 a 0,178 mm.
0,461 mm. 0,406 mm.
0,660
mm. 72
Page 75 of 376
'Jeep'
UNIVERSAL SERIES
SERVICE
MANUAL
Dl
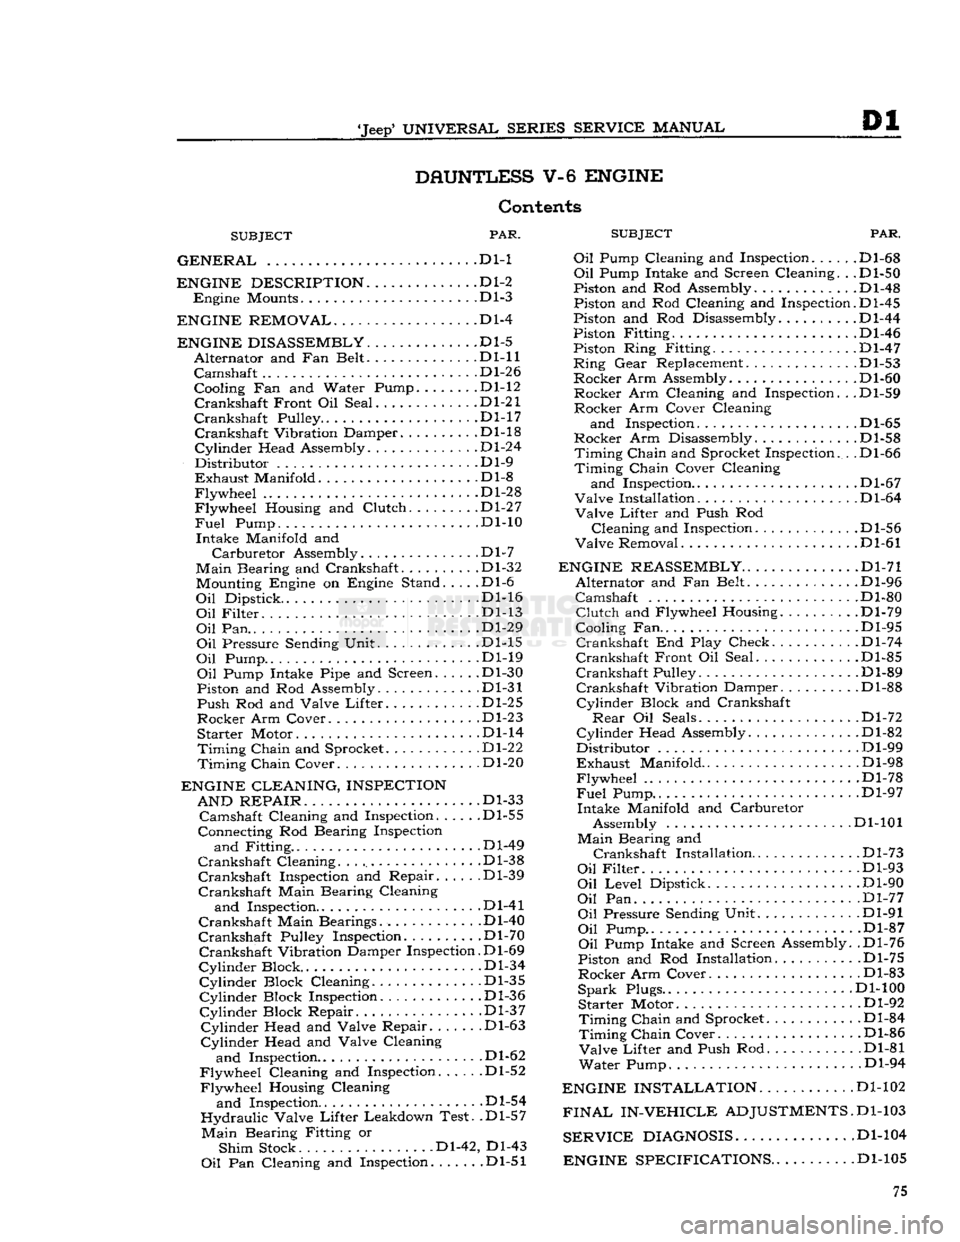
DAUNTLESS
V-6
ENGINE
Contents
SUBJECT
PAR.
SUBJEC
GENERAL
.... . . Dl-1 Oil Pump Cl(
ENGINE DESCRIPTION
D1-2
Engine
Mounts Dl-3
ENGINE REMOVAL
Dl-4
ENGINE DISASSEMBLY
Dl-5
Alternator
and Fan Belt Dl-11
Camshaft
.... Dl-26
Cooling Fan and Water Pump.
......
.Dl-12
Crankshaft
Front Oil Seal .Dl-21
Crankshaft
Pulley D1-17
Crankshaft
Vibration Damper Dl-18
Cylinder
Head Assembly Dl-24
Distributor
Dl-9
Exhaust
Manifold .Dl-8
Flywheel
Dl-28
Flywheel
Housing and
Clutch
Dl-27
Fuel
Pump. ... . .Dl-10
Intake
Manifold and
Carburetor
Assembly.
.............
.Dl-7
Main
Bearing and Crankshaft. Dl-32 Mounting Engine on Engine Stand. . . . .Dl-6
Oil
Dipstick. Dl-16
Oil
Filter
Dl-13
Oil
Pan.. ...
.......
.Dl-29
Oil
Pressure Sending Unit Dl-15
Oil
Pump Dl-19
Oil
Pump Intake Pipe and Screen Dl-30
Piston and Rod Assembly. Dl-31
Push
Rod and Valve
Lifter.
.Dl-25
Rocker
Arm Cover Dl-23
Starter
Motor Dl-14
Timing
Chain
and Sprocket Dl-22
Timing
Chain
Cover Dl-20
ENGINE CLEANING, INSPECTION AND REPAIR
. . ... .Dl-33
Camshaft
Cleaning and Inspection Dl-55
Connecting Rod Bearing Inspection
and
Fitting .Dl-49
Crankshaft
Cleaning Dl-38
Crankshaft
Inspection and Repair Dl-39
Crankshaft
Main Bearing Cleaning
and
Inspection Dl-41
Crankshaft
Main Bearings. Dl-40
Crankshaft
Pulley Inspection. Dl-70
Crankshaft
Vibration Damper Inspection. D1-69
Cylinder
Block .Dl-34
Cylinder
Block Cleaning Dl-35
Cylinder
Block Inspection Dl-36
Cylinder
Block Repair. .Dl-37
Cylinder
Head and Valve Repair .Dl-63
Cylinder
Head and Valve Cleaning
and
Inspection.. . .Dl-62
Flywheel
Cleaning and Inspection Dl-52
Flywheel
Housing Cleaning
and
Inspection Dl-54
Hydraulic
Valve
Lifter
Leakdown Test. .Dl-57
Main
Bearing Fitting or
Shim
Stock Dl-42, Dl-43
Oil
Pan Cleaning and Inspection .Dl-51
PAR.
and
Inspection. .... .Dl-68
Oil
Pump Intake and Screen Cleaning. . .Dl-50
Piston and Rod Assembly.
...........
.Dl-48
Piston and Rod Cleaning and Inspection.D1-45
Piston and Rod Disassembly Dl-44
Piston Fitting Dl-46
Piston Ring Fitting. .Dl-47
Ring
Gear
Replacement. .Dl-53
Rocker
Arm Assembly. Dl-60
Rocker
Arm Cleaning and Inspection. . .Dl-59
Rocker
Arm Cover Cleaning
and
Inspection D1-65
Rocker
Arm Disassembly .Dl-58
Timing
Chain
and Sprocket Inspection. . .Dl-66
Timing
Chain
Cover Cleaning
and
Inspection.. . Dl-67
Valve
Installation D1-64
Valve
Lifter
and Push Rod
Cleaning
and Inspection. . Dl-56
Valve
Removal Dl-61
ENGINE REASSEMBLY
Dl-71
Alternator
and Fan Belt Dl-96
Camshaft
Dl-80
Clutch
and Flywheel Housing Dl-79
Cooling Fan.. . .Dl-95
Crankshaft
End Play Check. . Dl-74
Crankshaft
Front Oil Seal Dl-85
Crankshaft
Pulley Dl-89
Crankshaft
Vibration Damper Dl-88
Cylinder
Block and Crankshaft
Rear
Oil Seals Dl-72
Cylinder
Head Assembly .Dl-82
Distributor
Dl-99
Exhaust
Manifold Dl-98
Flywheel
.Dl-78
Fuel
Pump.. .. . Dl-97
Intake
Manifold and Carburetor Assembly Dl-101
Main
Bearing and
Crankshaft
Installation
.
Dl-73
Oil
Filter
Dl-93
Oil
Level
Dipstick Dl-90
Oil
Pan Dl-77
Oil
Pressure Sending Unit Dl-91
Oil
Pump.. .Dl-87
Oil
Pump Intake and Screen Assembly. .Dl-76
Piston and Rod Installation Dl-75
Rocker
Arm Cover. Dl-83
Spark
Plugs.. Dl-100
Starter
Motor Dl-92
Timing
Chain
and Sprocket.
..........
.Dl-84
Timing
Chain
Cover Dl-86
Valve
Lifter
and Push Rod Dl-81
Water
Pump. Dl-94
ENGINE INSTALLATION
Dl-102
FINAL
IN-VEHICLE
ADJUSTMENTS.
D1-103
SERVICE
DIAGNOSIS
Dl-104
ENGINE SPECIFICATIONS
. .Dl-105 75
Page 77 of 376
'Jeep'
UNIVERSAL SERIES SERVICE
MANUAL
Dl
©©©©©©©©©
12697
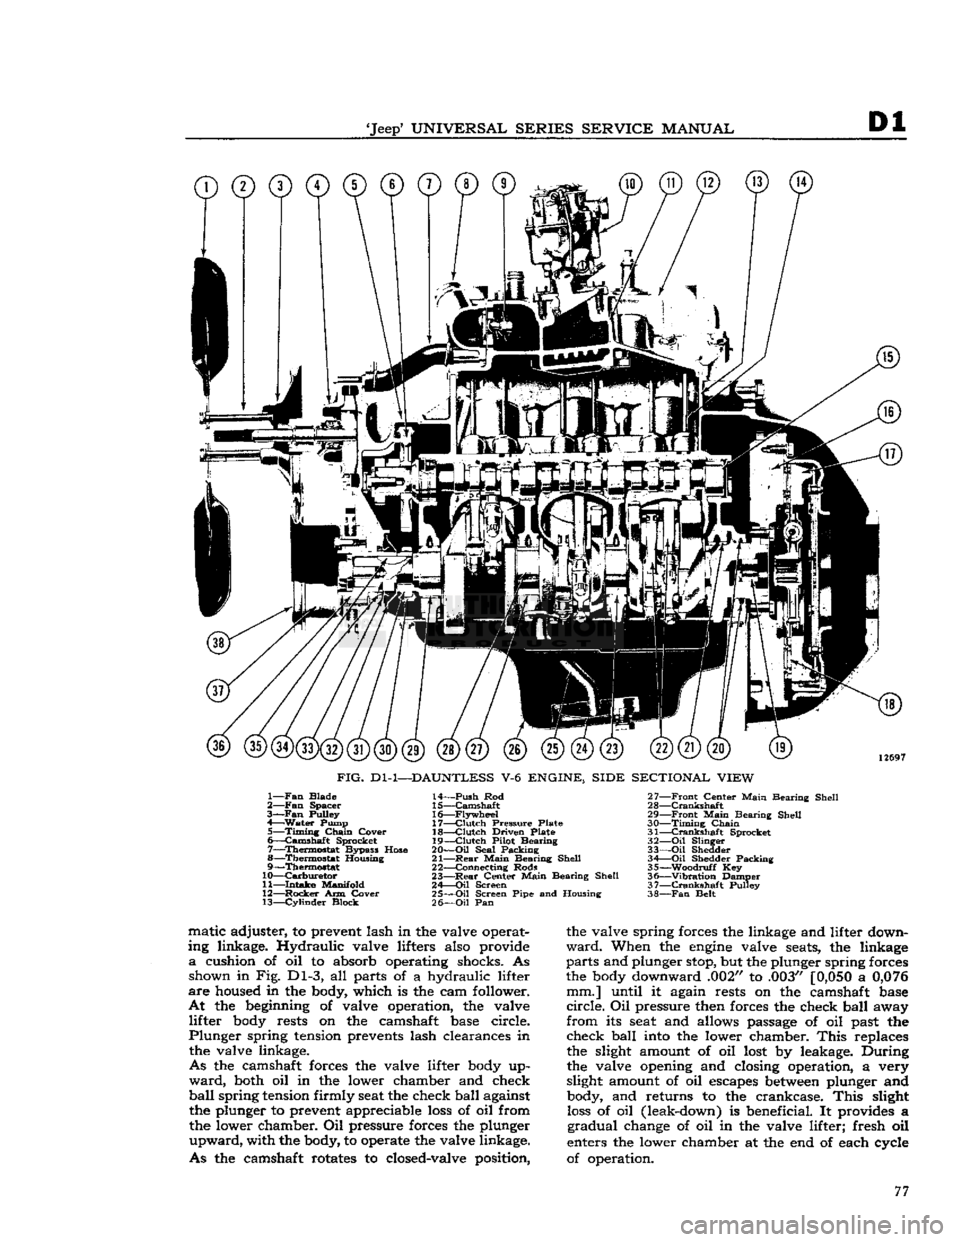
FIG.
Dl-1—DAUNTLESS
V-6
ENGINE, SIDE SECTIONAL VIEW
1—
Fan
Blade
2—
Fan
Spacer
3—Fan
Pulley
4—
Water
Pump 5—
Timing
Chain
Cover
6—
Camshaft
Sprocket
7—
Thermostat
Bypass Hose
8—
Thermostat
Housing
9—
Thermostat
10—
Carburetor
11—
Intake
Manifold
12—
Rocker
Arm Cover 13—
Cylinder
Block 14—
Push
Rod
15—
Camshaft
16—
Flywheel
17—
Clutch
Pressure Plate
18—
Clutch
Driven Plate
19—
Clutch
Pilot Bearing
20—
Oil
Seal Packing
21—
Rear
Main
Bearing Shell
22— Connecting Rods
23—
Rear
Center
Main
Bearing Shell
24—
Oil
Screen
25—
Oil
Screen Pipe and Housing
26—
Oil
Pan 27—
Front
Center
Main
Bearing Shell
28—
Crankshaft
29—
Front
Main
Bearing Shell
30—
Timing
Chain
31—
Crankshaft
Sprocket
32—
Oil
Slinger
33—
Oil
Shedder 34 Oil Shedder Packing
35—
-Woodruff
Key
36—
"Vibration
Damper
37—
Crankshaft
Pulley
38—
Fan
Belt matic adjuster, to prevent lash in the valve operat
ing linkage. Hydraulic valve lifters also provide
a
cushion of oil to absorb operating shocks. As shown in Fig. Dl-3, all parts of a hydraulic lifter
are
housed in the body, which is the cam follower.
At
the beginning of valve operation, the valve lifter body rests on the camshaft base circle.
Plunger
spring tension prevents lash clearances in the valve linkage.
As
the camshaft forces the valve lifter body up
ward,
both oil in the lower chamber and check
ball
spring
tension firmly seat the check ball against the plunger to prevent appreciable
loss
of oil from
the lower chamber. Oil pressure forces the plunger
upward,
with the body, to operate the valve linkage.
As
the camshaft rotates to closed-valve position, the valve spring forces the linkage and lifter down
ward.
When the
engine
valve seats, the linkage
parts
and plunger stop, but the plunger spring forces
the body downward .002" to .003"
[0,050
a
0,076
mm.] until it again rests on the camshaft base
circle.
Oil pressure then forces the check ball away
from
its seat and allows passage of oil past the check ball into the lower chamber.
This
replaces
the slight amount of oil lost by leakage. During
the valve opening and closing operation, a very
slight amount of oil escapes
between
plunger and body, and returns to the crankcase.
This
slight
loss
of oil (leak-down) is beneficial. It provides a
gradual
change of oil in the valve lifter; fresh oil
enters the lower chamber at the end of each cycle
of operation. 77
Page 82 of 376
Dl
DAUNTLESS
V-6
ENGINE
d.
Use two large screwdrivers to alternately pry
forward the camshaft sprocket and
then
the crank
shaft sprocket, until the camshaft sprocket is pried
from the camshaft. Remove the camshaft sprocket, sprocket key, and timing chain from the
engine;
then
pry the crankshaft sprocket from the crankshaft.
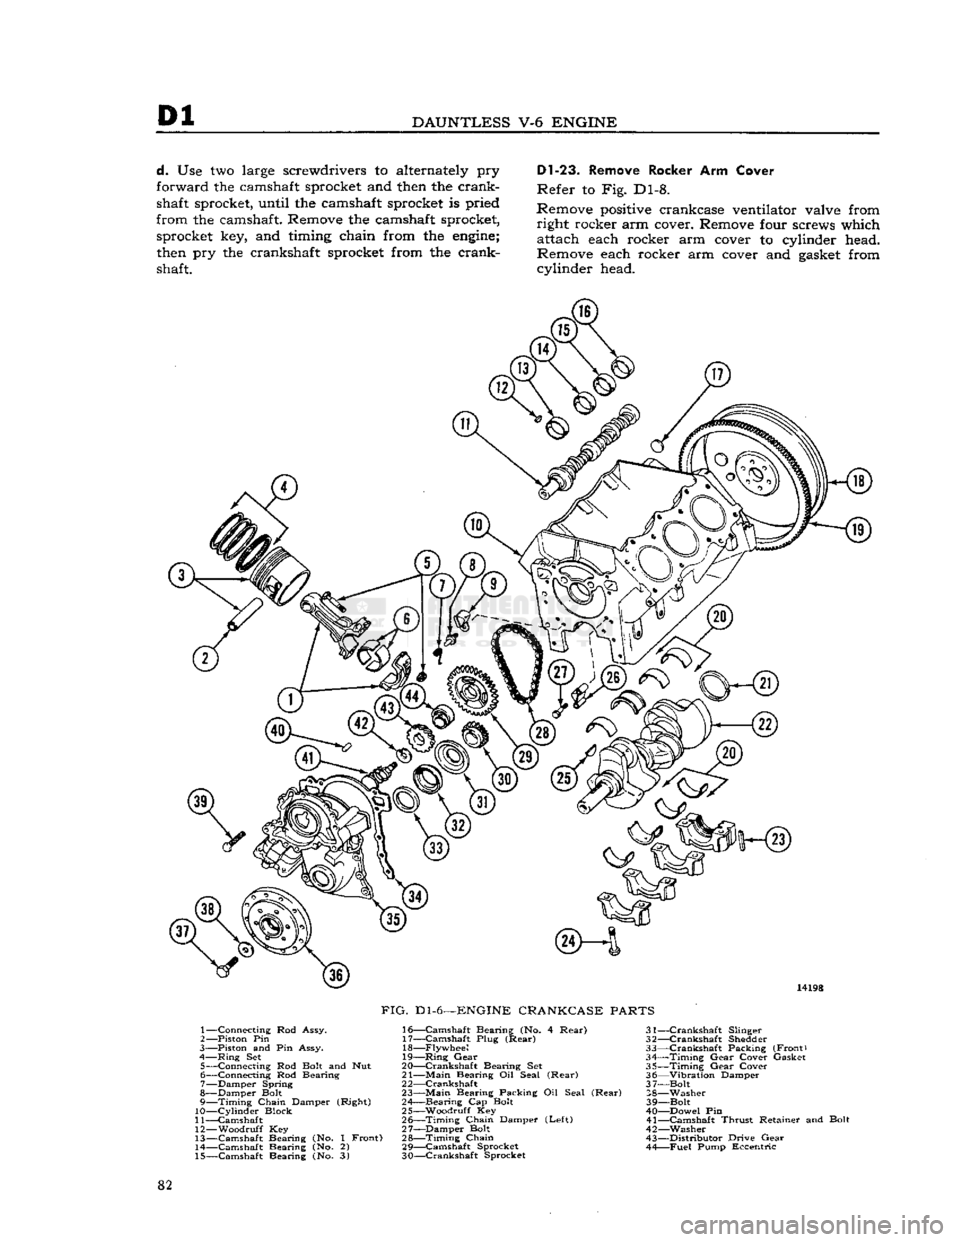
Dl-23.
Remove Rocker Arm Cover
Refer to Fig. Dl-8.
Remove
positive
crankcase ventilator valve from right rocker arm cover. Remove four screws which attach each rocker arm cover to cylinder head.
Remove each rocker arm cover and
gasket
from cylinder head. 14198
FIG.
Dl-6—ENGINE
CRANKCASE
PARTS
1— Connecting Rod Assy.
2— —Piston Pin
3—
Piston and Pin Assy.
4—
Ring
Set 5— Connecting Rod
Bolt
and Nut
6— Connecting Rod Bearing
7— Damper Spring
8— Damper
Bolt
9—
Timing
Chain Damper (Right)
10—
Cylinder
Block
11— Camshaft
12—
Woodruff
Key
13— Camshaft Bearing (No. 1 Front) 14— Camshaft Bearing (No. 2)
15— Camshaft Bearing (No. 3) 16—
Camshaft
Bearing (No. 4
Rear)
31-
17—
Camshaft
Plug
(Rear)
32-18—
Flywheel
33-
19—
Ring
Gear
34-
20— Crankshaft Bearing Set 35-
21—
Main
Bearing Oil Seal
(Rear)
36-
2 2—Crankshaft 3 7-
23—
Main
Bearing Packing Oil Seal
(Rear)
28-
24— Bearing Cap
Bolt
39-
25— Woodruff Key 40-
26—
Timing
Chain Damper
(Left)
41-
27— Damper Bolt 42- 28—
Timing
Chain
43-
29—
Camshaft
Sprocket 44-
30— Crankshaft Sprocket
—Crankshaft
Slinger
—Crankshaft
Shedder
—Crankshaft
Packing (Front)
—Timing
Gear
Cover Gasket
—Timing
Gear
Cover
—Vibration
Damper
-Bolt
-Washer
-Bolt
—Dowel Pin
-Camshaft
Thrust
Retainer and Bolt
—Washer
-Distributor
Drive
Gear
—Fuel
Pump Eccentric
82
Page 83 of 376
'Jeep'
UNIVERSAL
SERIES SERVICE
MANUAL
Dl
14028
j
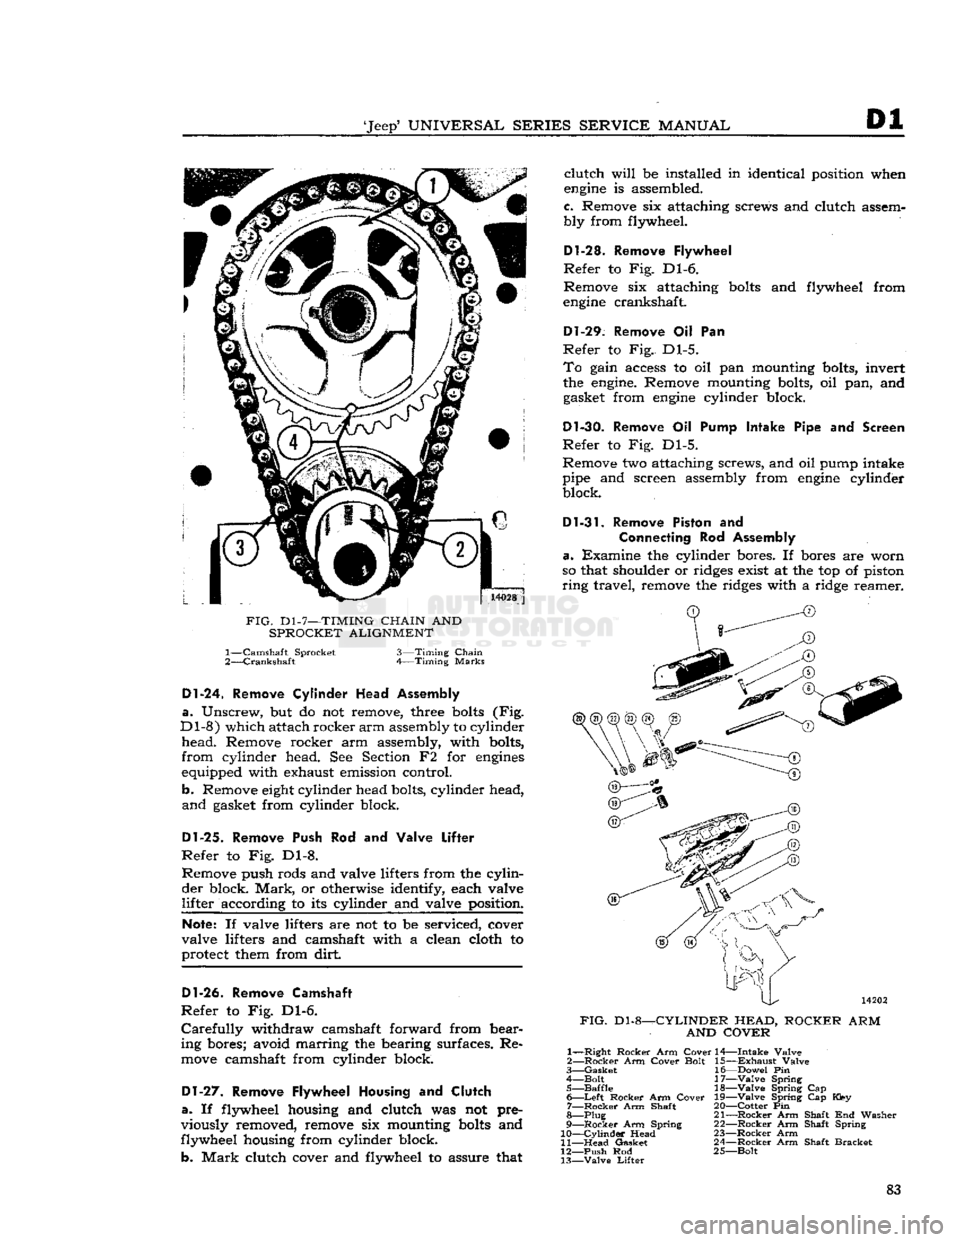
FIG.
D1-7—TIMING
CHAIN
AND
SPROCKET ALIGNMENT 1—
Camshaft Sprocket
2—
Crankshaft
3—Timing
Chain
Timing
Marks
Dl-24.
Remove
Cylinder
Head Assembly
a.
Unscrew, but do not remove, three
bolts
(Fig.
Dl-8)
which attach rocker
arm
assembly to cylinder
head.
Remove rocker arm assembly, with bolts,
from
cylinder head. See Section F2 for
engines
equipped with exhaust emission control.
b. Remove
eight
cylinder head bolts, cylinder head,
and
gasket from cylinder block.
Dl-25.
Remove Push Rod and Valve
Lifter
Refer
to Fig. Dl-8. Remove push rods and valve lifters from the
cylin
der
block.
Mark,
or otherwise identify, each valve
lifter
according to its cylinder and valve position.
Note:
If valve lifters are not to be serviced, cover
valve lifters and camshaft with a clean cloth to
protect them from dirt
Dl-26.
Remove Camshaft
Refer
to Fig. Dl-6.
Carefully
withdraw camshaft forward from bear
ing bores; avoid marring the bearing surfaces. Re
move
camshaft from cylinder block.
Dl-27.
Remove Flywheel Housing and
Clutch
a.
If flywheel housing and clutch was not pre
viously removed, remove six mounting
bolts
and
flywheel housing from cylinder block.
b.
Mark
clutch cover and flywheel to assure that
clutch
will
be installed in identical position when
engine
is assembled.
c. Remove six attaching screws and clutch assem
bly from flywheel.
D1-28. Remove Flywheel
Refer
to Fig. Dl-6.
Remove six attaching
bolts
and flywheel from
engine
crankshaft.
Dl-29.
Remove Oil Pan
Refer
to Fig. Dl-5.
To
gain access to oil pan mounting bolts, invert
the
engine.
Remove mounting bolts, oil pan, and gasket from
engine
cylinder block.
Dl-30.
Remove Oil Pump Intake Pipe and Screen
Refer
to Fig. Dl-5.
Remove two attaching screws, and oil pump intake
pipe and screen assembly from
engine
cylinder block.
Dl-31.
Remove Piston and
Connecting
Rod Assembly
a.
Examine the cylinder bores. If bores are worn
so that shoulder or ridges exist at the top of piston
ring
travel, remove the ridges with a ridge reamer.
FIG.
Dl-8-
-CYLINDER HEAD,
AND COVER
ROCKER
ARM
1—
—Right
Rocker
Arm
Cover
2—
Rocker
Arm
Cover
Bolt
3—
Gasket
4—
Bolt
5—
Baffle
6—
Left
Rocker
Arm
Cover
7—
Rocker
Arm Shaft
8—Plug
9—
Rocker
Arm Spring
10—
Cylinder
Head
11—
Head
Gasket
12—
Push
Rod
13—
Valve
Lifter
14—
Intake
Valve
15—
Exhaust
Valve
16—
Dowel
Pin
17—
Valve
Spring 18—
Valve
Spring Cap
19—
Valve
Spring Cap Key
20—
Cotter
Pin
21—
Rocker
Arm Shaft End Washer
22—
Rocker
Arm Shaft Spring
23—
Rocker
Arm
24—
Rocker
Arm Shaft
Bracket
25—
Bolt
83