tow JEEP CJ 1953 Service Manual
[x] Cancel search | Manufacturer: JEEP, Model Year: 1953, Model line: CJ, Model: JEEP CJ 1953Pages: 376, PDF Size: 19.96 MB
Page 30 of 376
c
TUNE-UP
meter during this
test
Connect the red lead
tc*
dis
tributor
primary
lead at the coil as shown in Fig.
C-21.
Connect black lead to the ground.
Turn
ignition switch on; with
engine
stopped, observe
dwell
meter. If the meter reads zero,
crank
the
engine
a fraction of a revolution to
close
the
breaker
points.
Distributor
resistance is normal, if dwell meter
pointer is within range of
black
bar. Distributor resistance is high, if
dwell
meter pointer is not
within
the black bar.
Remove test lead from
distri
butor terminal of coil and
connect
to
each
of the
following points to determine
where
the excessive resistance is:
Distributor
primary
terminal
Distributor
primary
terminal in the distributor
Breaker
point bracket
Ground
side of points
Distributor
housing
Where
a noticeable change occurs in the meter
reading
in
these
steps, make the necessary correc
tion and repeat the
test.
C-l 7. Distributor
Point
Dwell
Using
a dwell tester, connect red
lead
to the
distri
butor terminal at coil. Connect black lead to
ground.
Set selector switch to the number of
cylin
ders in the
engine
being tested. Operate
engine
speed at specified rpm. and
note
readings. Cam
dwell
angle must be 30° for the Dauntless V-6
Delco equipped engine, 29° ±: 3° Prestolite equipped
engine
and 42° for the
Hurricane
F4 engine. If the dwell reading is not to specifications,
trouble could be improper point spacing, point
rubbing,
defective block or breaker arm, or mis
aligned and worn distributor cam.
Adjust
dwell
as shown in Fig. C-14 for the Delco equipped
Dauntless V-6 engine. For cam dwell adjustment
of the Prestolite equipped V6 and
Hurricane
F4 engine, refer to Par. C-10,
step
a.
Dwell
variation is determined by noting any
dwell
change as the
engine
is operated at different
speeds.
Excessive
variation indicates a change in point opening that can result from shaft or bushing wear,
or
from the distributor plate shifting because of
wear
or
looseness.
Measure
dwell variation at idle speed, using same
test
hookup for checking dwell. Increase speed to 1750 rpm.;
note
dwell reading.
Then
slowly reduce
speed to idle while observing dwell meter. Dwell
variation
should not exceed 3°. If dwell variation
exceeds
3°
between
idle speed and 1750 rpm.,
probable wear in the distributor shaft, bushings, or
breaker
plate is indicated. Distributor should then be checked more thoroughly.
C-l8. Check Ignition Wires
and
Connections
Examine
and clean the insulation on all ignition
wires
and check all connections. Wires should be
firm,
flexible, and free from roughness and minute
cracks.
Bend wires to check for brittle,
cracked,
or
loose
insulation. Since defective insulation
will
per
mit
crossfiring or missing of the engine, defective
wires
should be replaced.
C-l9. Test Ignition
Cables
To
remove cables from
spark
plugs, use
Spark
Plug
Cable
Remover
Tool
W-274.
Twist
the
boot
slightly to break the seal and, grasping the rubber
protector
boot,
lift straight up with a steady even
pull.
Do not grasp the cable and
jerk
the cable off; this
will
damage the cables. Do not use a probe
on
these
wires; puncturing them may cause a
separation in the conductor. To remove ignition cables from the distributor cap or coil tower,
loosen
the nipple first, then grasp the upper part of the nipple and the cable and gently
pull
straight up.
Test
the cable with an ohmmeter. Resistance value
per
foot
is
3000-7000
ohms. The ignition cables
can
be checked for
circuit
continuity by removing
the cable from the
spark
plug and holding the cable
end Vi" [6,35 mm.] from the engine. A strong
spark
indicates
good
conductor continuity.
When
connecting the cable to the
spark
plug, be
certain
a
good
connection is made and that the
protector
boot
fits tight on the
spark
plug. A
partially
seated cable creates an additional gap in
the
circuit
and the resulting
spark
jump
will
cause
terminal
corrosion and cable damage.
C-20. Coil
When
an ignition coil is suspected of being defec tive, it should be checked on the car. A coil may
break
down after it has reached operating tempera
ture.
It is important that the coil be at operating
temperature when
tests
are made.
Note:
The ignition coil and ballast resistor for the
V-6
engine
must be of the same manufacturer.
Ballast
resistors and ignition coils of one manufac
turer
are interchangeable with both units of the
other.
C-21.
Service Air
Cleaner
Refer
to Par.
B-2 2
for the correct service of the
air
cleaner.
C-22.
Check Fuel Lines and
Screens
Check
all fuel line connections to guard against
leakage.
Check
fuel pump filter F4
engine
and
fuel
line filter V-6 engine. Replace fuel filter if
necessary.
C-23. Check Fuel Pump a.
Fuel
pump pressure is important, for low pres
sure
will
seriously affect
engine
operation and high
pressure
will
cause excessive fuel consumption and
possibly flood the carburetor. Should there be any doubt of normal operation, check the pressure with
a
gauge
as shown in Fig.
C-2 2.
The minimum and
maximum
allowable pressures are 2% to 3% lbs. [0,176 a
0,264
kg-cm2], for the
Hurricane
F4 en
gine.
Fuel
pump pressure at carburetor (inlet) on
the Dauntless V6-225
engine
should be 3% lbs.
[0,264
kg-cm2] minimum at specified
R.P.M.
idle
with
the vapor
return
hose
squeezed off.
With
the
vapor
return
hose
open pump pressure should be
2
V2
lbs. [0,176 kg-cm2] minimum.
b.
Test for volume, as a pump may build up suffi
cient pressure but
fail
to produce sufficient volume.
Turn
down the carburetor fuel line fitting on the
pump and with the tank line connected, pump out
30
Page 42 of 376
D
HURRICANE
F4
ENGINE
D-7.
Remove Water Pump
Remove the
bolts
and lockwashers that attach the
water pump to the cylinder block. Remove the water pump.
D-8.
Remove
Exhaust
Manifold
Remove the five nuts from the manifold studs.
Pull
the manifold off the mounting studs. Remove the center and two end gaskets from the cylinder
block. See Section Fl for exhaust emission con trolled engines.
D-9.
Remove Oil
Filler
Tube
Loop
a piece of wire several times around the tube
below the top and make a
loop
through which a
pry
bar may be used to pry over the top of the
engine
water
outlet
fitting.
Pull
on the tube, tapping it just above where it enters the crankcase.
D-10.
Remove Water Outlet Fitting
Remove the nuts and lockwashers that attach the
water
outlet
fitting to the cylinder head.
Lift
the
outlet
fitting from the cylinder head.
D-11.
Remove Thermostat
With
the water
outlet
fitting removed, the thermo
stat can be lifted from the water
outlet
elbow on the cylinder head.
D-12.
Remove
Crankshaft
Pulley
Remove the crankshaft nut.
Install
a puller and
pull
the pulley from the crankshaft.
D-13.
Remove Distributor
a.
Remove
spark
plug cables from the distributor
cap,
noting the order in which they are assembled to ensure correct reassembly. No. 1
spark
plug
terminal
is in the 5 o'clock position. Starting with this tower the cables are installed in a counterclockwise direction in
1-3-4-2
firing order.
b.
Remove the
primary
lead from the terminal
post
at the side of the distributor.
c. Remove the screw holding the distributor to the crankcase and lift the assembly from the engine.
D-14. Remove Oil Pump
The
oil pump is located externally on the left side
of the engine. If only the oil pump is being removed
with
the
engine
in the vehicle, set No. 1 piston at
TDC
for reference for reinstalling the oil pump
without greatly disturbing the ignition timing.
First
remove the distributor cover and
note
the
position of the distributor rotor.
If
the distributor is already removed, sight through
the distributor
hole
before removing the oil pump.
The
slot should be near vertical. Remove the capscrews and lockwashers attaching the oil pump
to the cylinder block.
Carefully
slide the oil pump
and
its drive shaft out of the cylinder block.
D-1S.
Remove
Crankcase
Ventilation Valve
To
remove the crankcase ventilation valve from
the elbow fitting screwed into the inlet manifold of the cylinder head, first remove the
hose
and
clamp from the valve (Fig. D-32), then using a
wrench
carefully unscrew the valve from the
elbow.
D-l6.
Remove Rooker Arm Assemblies
The
rocker arm cover was previously removed as
a
step
of the
engine
removal (Par. D-5).
Remove the nuts from the rocker arm shaft support
studs, and lift the rocker arm assembly off the studs.
Lift
the intake valve push rods out of the
cylinder
block.
D-17.
Remove
Cylinder
Head
a.
Removal.
Disconnect the oil line from the flared tube con
nector and remove the rocker arm attaching stud nuts, and rocker arm shaft assembly if not pre
viously removed. Two end head
bolts
cannot be removed until the rocker arm shaft is removed.
Remove the cylinder head bolts.
There
is one
cylinder
head bolt located below the carburetor
mounting, inside the intake manifold, that must
not be overlooked.
Carefully
lift the cylinder head off the block.
Remove the valve push rods and the valve lifters.
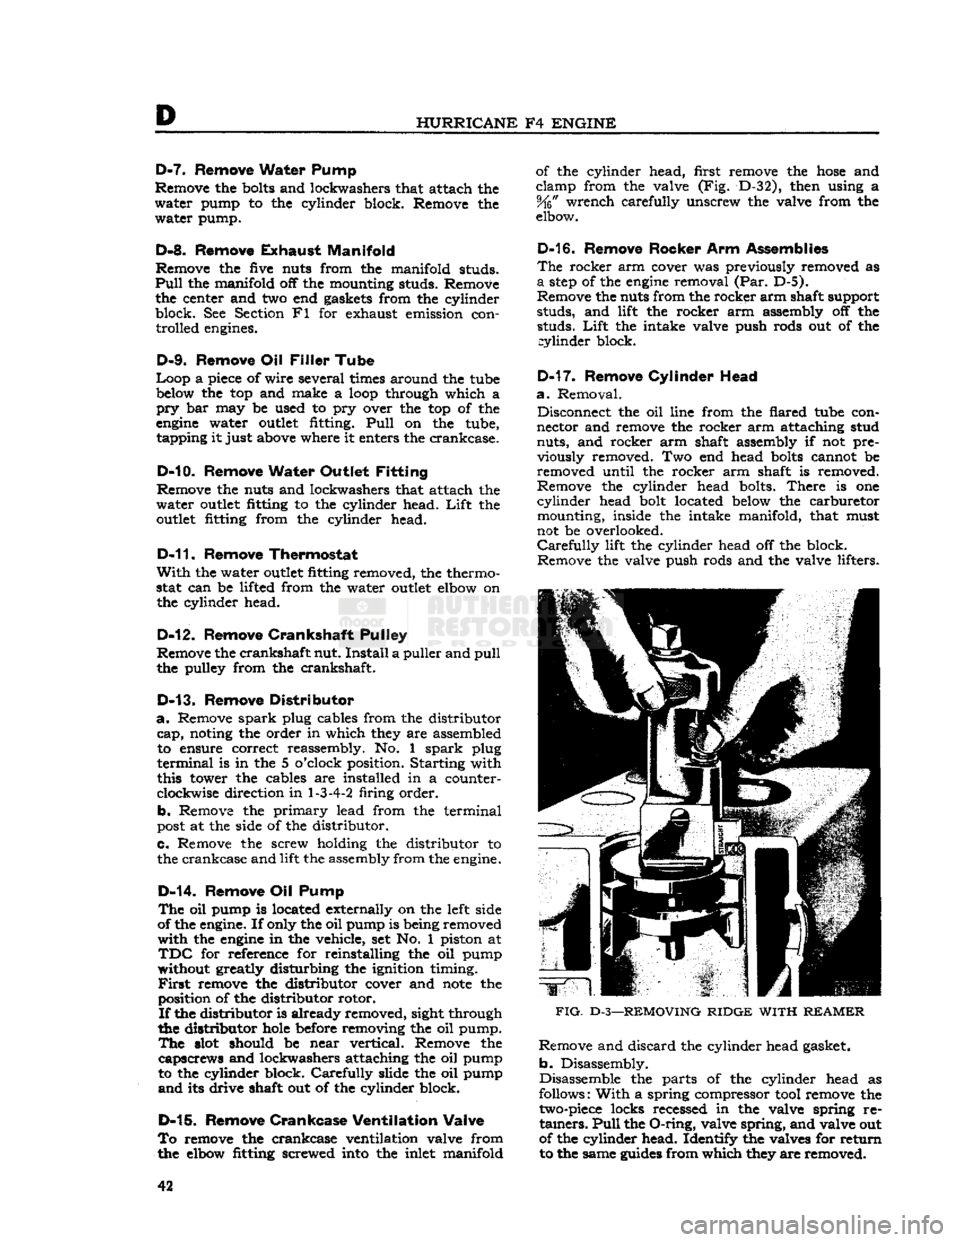
FIG.
D-3—REMOVING
RIDGE
WITH
REAMER
Remove and discard the cylinder head gasket,
b. Disassembly.
Disassemble the parts of the cylinder head as
follows:
With
a spring compressor tool remove the
two-piece
locks recessed in the valve spring re
tainers.
Pull
the
O-ring,
valve spring, and valve out
of the cylinder head. Identify the valves for return to the same
guides
from which they are removed.
42
Page 49 of 376
'Jeep'
UNIVERSAL SERIES
SERVICE
MANUAL
D
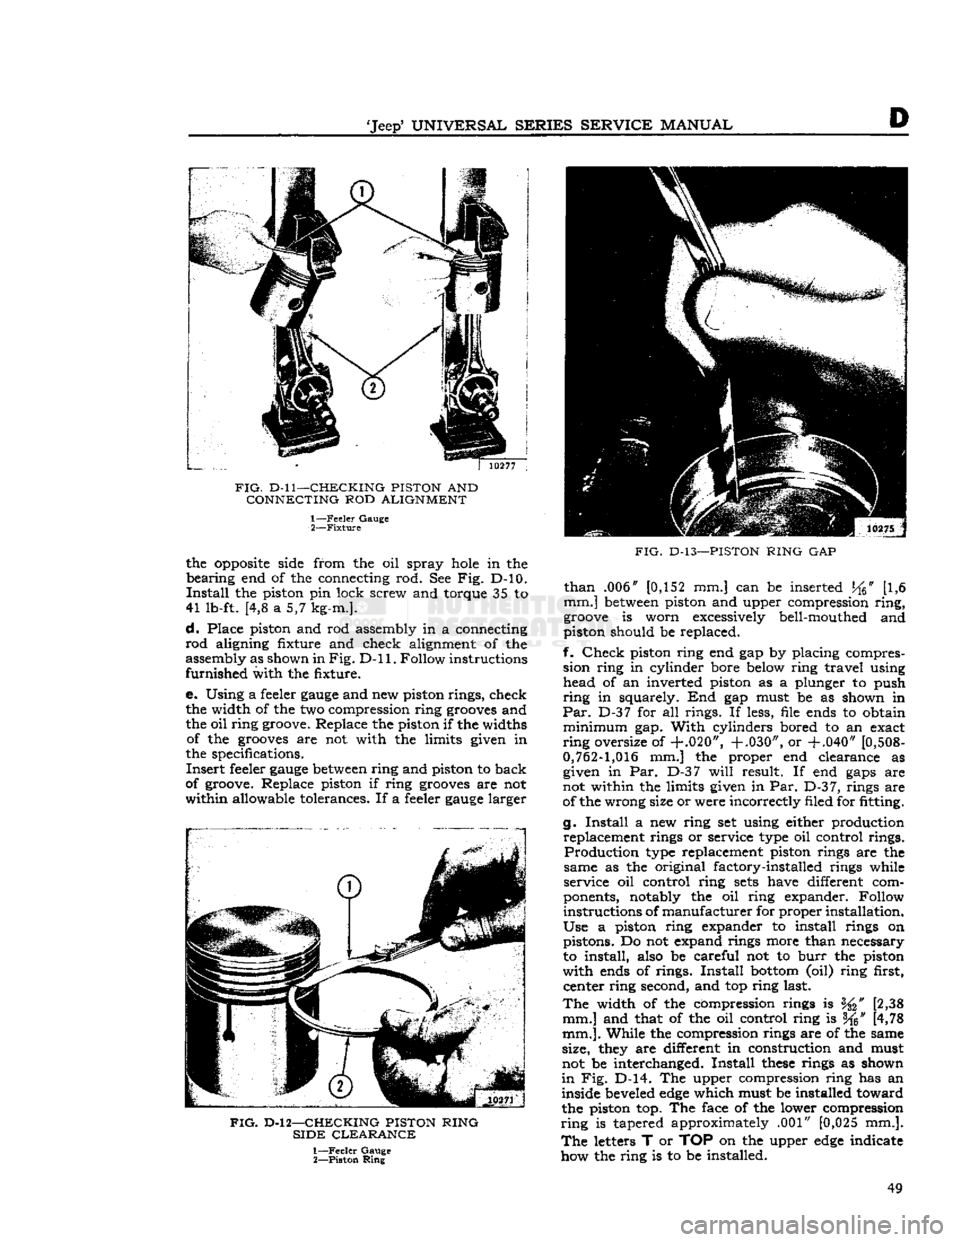
FIG.
D-ll—CHECKING PISTON
AND
CONNECTING
ROD
ALIGNMENT 1—
Feeler
Gauge
2—
Fixture
the
opposite
side from the oil spray
hole
in the
bearing
end of the connecting rod. See Fig. D-10.
Install
the piston pin lock screw and torque 35 to
41 lb-ft. [4,8 a 5,7 kg-m.].
d.
Place piston and rod assembly in a connecting
rod
aligning fixture and check alignment of the
assembly as shown in
Fig. D-ll.
Follow instructions
furnished
with the fixture.
e. Using a feeler
gauge
and new piston rings, check the width of the two compression ring
grooves
and
the oil ring groove. Replace the piston if the widths of the
grooves
are not with the limits given in
the specifications.
Insert
feeler
gauge
between
ring and piston to back
of groove. Replace piston if ring
grooves
are not
within
allowable tolerances. If a feeler
gauge
larger
FIG.
D-l 2—CHECKING PISTON RING
SIDE
CLEARANCE
1—
Feeler
Gauge
2—
Piston
Ring
FIG.
D-13—PISTON
RING
GAP
than
.006" [0,152 mm.] can be inserted
J^6"
[1,6
mm.]
between
piston and upper compression
ring,
groove
is worn excessively bell-mouthed and
piston should be replaced.
f.
Check
piston ring end gap by placing compres sion ring in cylinder bore below ring travel using head of an inverted piston as a plunger to push
ring
in squarely. End gap must be as shown in
Par.
D-37 for all rings. If less, file ends to obtain
minimum
gap.
With
cylinders bored to an exact
ring
oversize of
+.020", +.030",
or
+.040"
[0,508-
0,762-1,016
mm.] the proper end clearance as given in Par. D-37
will
result. If end
gaps
are
not within the limits given in Par.
D-3
7, rings are
of the wrong size or were incorrectly filed for fitting.
g.
Install
a new ring set using either production replacement rings or service type oil control rings.
Production
type replacement piston rings are the
same as the original factory-installed rings while
service oil control ring
sets
have different com
ponents, notably the oil ring expander. Follow
instructions of
manufacturer
for proper installation.
Use
a piston ring expander to install rings on pistons. Do not expand rings more than necessary
to install, also be careful not to
burr
the piston
with
ends of rings.
Install
bottom
(oil) ring first, center ring second, and top ring last.
The
width of the compression rings is [2,38
mm.] and that of the oil control ring is f^" [4,78
mm.].
While the compression rings are of the same
size, they are different in construction and must
not be interchanged.
Install
these
rings as shown
in
Fig. D-14. The upper compression ring has an
inside beveled
edge
which must be installed toward
the piston top. The face of the lower compression
ring
is tapered approximately .001" [0,025 mm.].
The
letters T or TOP on the upper
edge
indicate
how the ring is to be installed. 49
Page 51 of 376
![JEEP CJ 1953 Service Manual
-Jeep*
UNIVERSAL
SERIES SERVICE
MANUAL
E>
[5,928 a
5,926
cm.] for all main bearings. Allowable
taper or out-of-round of the journals is .001"
[0,0254
mm.].
D-42.
Checking Connecting Ro JEEP CJ 1953 Service Manual
-Jeep*
UNIVERSAL
SERIES SERVICE
MANUAL
E>
[5,928 a
5,926
cm.] for all main bearings. Allowable
taper or out-of-round of the journals is .001"
[0,0254
mm.].
D-42.
Checking Connecting Ro](/img/16/57040/w960_57040-50.png)
-Jeep*
UNIVERSAL
SERIES SERVICE
MANUAL
E>
[5,928 a
5,926
cm.] for all main bearings. Allowable
taper or out-of-round of the journals is .001"
[0,0254
mm.].
D-42.
Checking Connecting Rod
Crankpins
Check
the crankpin diameters with a micrometer
to ensure that they are not out-of-round or tapered more than .001"
[0,0254
mm.] The standard
crank-
pin
diameter is
1.9383*
to
1.9375"
[4,9233
a
4,9213
cm.].
D-43.
Crankshaft
Main
Bearings
The
crankshaft rotates on three main bearings
with
a running clearance of .0003" to .0029"
[0,0076
a
0,0736
mm.].
These
bearings are positioned and prevented from
rotating in their supports in the cylinder block by
dowel pins. Dowel pins are used in both the center
and
the
rear
bearing caps. No dowel pins are used
in
the front bearing cap because the bearing has
a
flange. The front main bearing takes the end
thrust
of the crankshaft. The main bearings are of premium type which provides long bearing life.
They
are replaceable and when correctly installed, provide proper clearance without filing, boring,
scraping,
or shimming. Crankshaft bearings can
be removed from this
engine
only with the
engine
out of the vehicle. Crankshaft bearings must be replaced as a complete set of three bearings, each
bearing consisting of two halves.
Main
bearings
are
available in the standard size and the following
undersizes:
.001" [0,025mm.] .012" [0,305 mm.] .002" [0,051mm.] .020" [0,508 mm.] .010" [0,254mm.] .030" [0,762 mm.]
The
.001" and .002" undersize main bearings are
for use with standard size crankshafts having
slightly worn
journals.
The .010", .020", and .030" undersize bearings are for use with undersize
crankshafts
in
those
sizes. The .012" undersize
bearings are for use with .010" undersize
crank
shafts having slightly worn journals. Bearing sizes
are
rubber stamped on the reverse side of each
bearing half.
D-44. Crankshaft
Main
Bearing Inspection
The
crankshaft
journals
must be carefully inspected
as detailed previously in Par. D-41. Worn journals
will
require undersize bearings. Scored, flaked, or
worn
bearings must be replaced. Measure the main
bearing bores in the cylinder block using a
telescope
gauge
and micrometer. Measure the bores at right
angles to the split line and at 45° to the split line.
The
bores should not be over .001"
[0,0254
mm.]
out-of-round or .001" in taper from end to end.
Also,
the bores should not be more then .001"
oversize, considering the average diameter of the
bore.
D-45.
Fitting Crankshaft
Main
Bearings
Using
Plastigage
After
wiping and carefully inspecting the bearing bore, install the proper bearing. See that the oil
hole
in the bearing upper half registers properly
with
the oil
hole
in the block, and that the bearing
lock fits properly in the notch in the block.
Install
the crankshaft if replacing bearings with the
engine
out of the vehicle. The desired running fit (dif
ference
between
the diameter of the crankshaft
journal
and the inside diameter of the fitted bear ing) for a main bearing is .0003" to .0029"
[0,0076
a
0,0736
mm.]. With a dimension in
excess
of this
standard
running fit, a satisfactory bearing replacement cannot be made and it
will
be necessary to
regrind
the crankshaft.
Install
the bearing lower
half
and the bearing cap and draw the nuts down
equally and only slightly tight. Rotate the
crank
shaft by hand to be sure it turns freely without
drag.
Pull
the nuts tighter, first one then the other,
a
little at a time, intermittently rotating the
crank
shaft by hand until the recommended torque of
35 to 45 lb-ft. [4,8 a 6,2 kg-m.] is reached. If the
bearings are of the correct size, and lubricated with
light oil before installation, the crankshaft should
turn
freely in the bearings. If the crankshaft cannot
be turned, a larger bearing is
required.
If there is no binding or tightness, it is still necessary to check
clearance to guard against too
loose
a fit. Never file
either the bearing cap or the bearing to compensate
for too much clearance. Do not use shims under a
bearing cap or behind a bearing shell. Do not run a
new bearing half with a worn bearing half. The use
of "Plastigage" of the proper size to measure .001" [0,025 mm.] clearance is recommended for check
ing crankshaft main bearing clearance. The method
of checking clearance is as follows:
a.
Remove the bearing cap and carefully wipe
all
oil from the bearing and the
journal.
b.
Lay a piece of "Plastigage" y%" [3 mm.]
shorter than the width of the bearing across the
journal
(lengthwise of the crankshaft).
c.
Install
the bearing and cap and tighten first
one nut, then the other, a little at a time to the specified torque. As the bearing
tightens
down
around
the
journal,
the "Plastigage" flattens to a
width that indicates the bearing clearance.
d.
Remove the cap and measure the width of
the flattened "Plastigage," using the scale printed
on the
edge
of the envelope. The proper size "Plasti
gage"
will
accurately measure clearance down to .001".
e. If the flattened "Plastigage" tapers toward the middle, or toward the end, or both ends, there
is a difference in clearance, indicating a taper, a
low
spot,
or other irregularity of the bearing or
journal.
D-46.
Fitting Crankshaft
Main
Bearings
Using
Shim Stock
Thin
feeler or shim stock may be used instead of "Plastigage" to check bearing clearances. The
method is simple, but care must be taken to protect
the bearing metal surface from
injury
by too much pressure against the feeler stock,
a.
Cut a piece of .001" [0,025 mm.] thick, by Yl [12,7 mm.] wide, feeler stock }4" [3 mm.]
shorter than the width of the bearing. Coat this 51
Page 52 of 376
D
HURRICANE
F4
ENGINE
10442
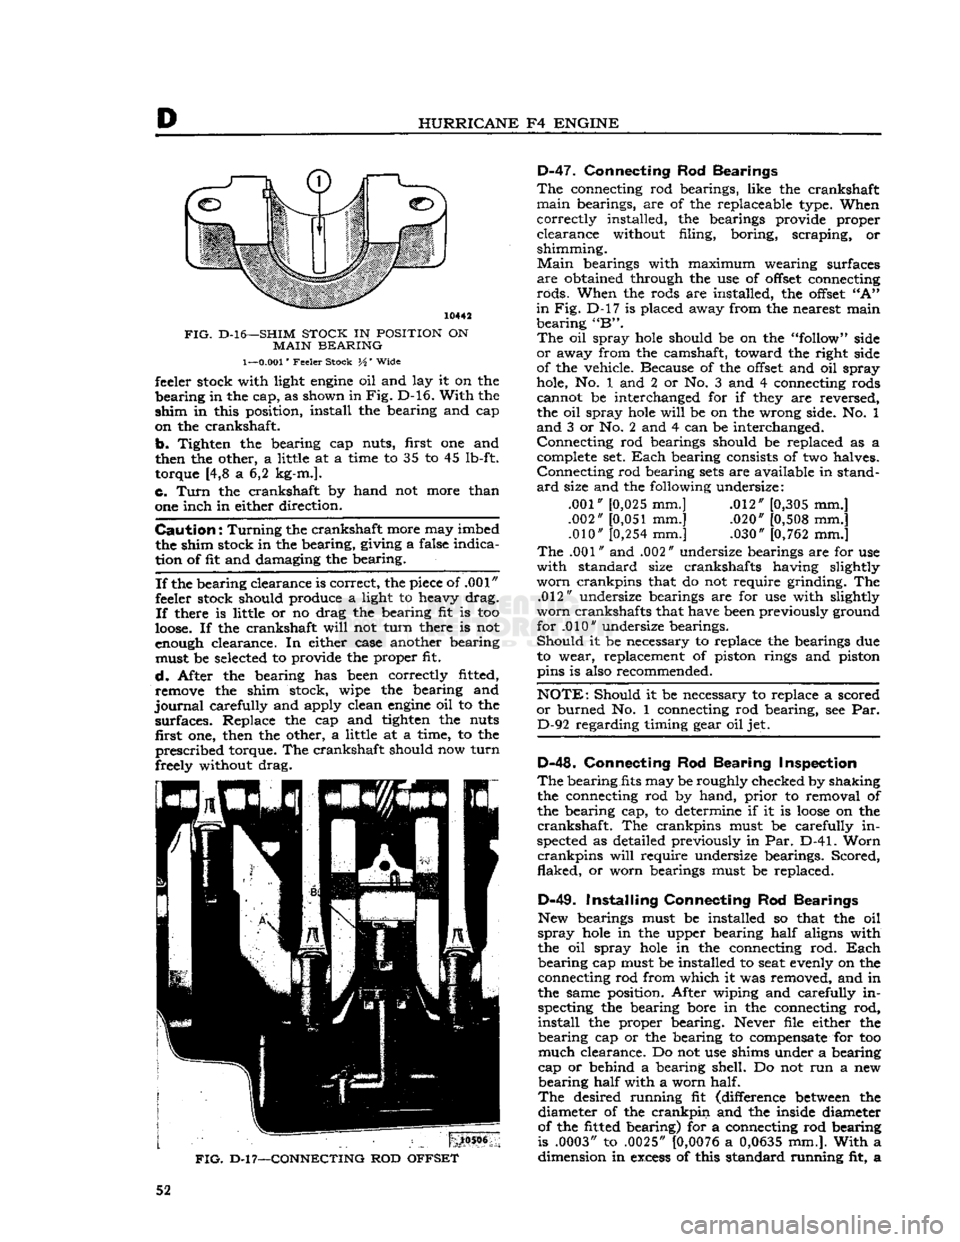
FIG.
D-l6—SHIM
STOCK
IN
POSITION
ON
MAIN
BEARING
1—0.001"
Feeler Stock H' Wide feeler stock with light
engine
oil and lay it on the
bearing
in the cap, as shown in
Fig.
D-16.
With
the
shim
in this position, install the bearing and cap
on the crankshaft.
b.
Tighten the bearing cap nuts, first one and
then the other, a little at a time to 35 to 45 lb-ft. torque [4,8 a 6,2 kg-m.].
c.
Turn
the crankshaft by hand not more than
one inch in either direction.
Caution:
Turning
the crankshaft more may imbed the shim stock in the bearing, giving a false indica
tion of fit and damaging the bearing.
If
the bearing clearance is correct, the piece of .001"
feeler stock should produce a light to heavy drag.
If
there is little or no drag the bearing fit is too
loose.
If the crankshaft
will
not
turn
there is not
enough clearance. In either case another bearing must be selected to provide the proper fit.
d.
After the bearing has been correctly fitted, remove the shim stock, wipe the bearing and
journal
carefully and apply clean
engine
oil to the
surfaces.
Replace the cap and tighten the nuts first one, then the other, a little at a time, to the
prescribed
torque. The crankshaft should now
turn
freely without drag.
FIG.
D-l
7—CONNECTING
ROD
OFFSET
D-47.
Connecting Rod Bearings
The
connecting rod bearings, like the crankshaft
main
bearings, are of the replaceable type. When
correctly
installed, the bearings provide proper
clearance
without filing, boring, scraping, or
shimming.
Main
bearings with maximum wearing surfaces
are
obtained through the use of
offset
connecting
rods.
When the rods are installed, the
offset
"A"
in
Fig. D-l7 is placed away from the nearest main
bearing
"B".
The
oil spray
hole
should be on the "follow" side
or
away from the camshaft, toward the right side
of the vehicle. Because of the
offset
and oil spray
hole, No. 1 and 2 or No. 3 and 4 connecting rods cannot be interchanged for if they are reversed,
the oil spray
hole
will
be on the wrong side. No. 1
and
3 or No. 2 and 4 can be interchanged.
Connecting
rod bearings should be replaced as a complete set.
Each
bearing consists of two halves.
Connecting
rod bearing
sets
are available in stand
ard
size and the following undersize:
.001" [0,025 mm.] .012" [0,305 mm.]
.002"
[0,051
mm.] .020" [0,508 mm.] .010"
[0,254
mm.] .030" [0,762 mm.]
The
.001" and .002" undersize bearings are for use
with
standard size crankshafts having slightly
worn
crankpins that do not require grinding. The .012" undersize bearings are for use with slightly
worn
crankshafts that have been previously ground for .010" undersize bearings.
Should
it be necessary to replace the bearings due to wear, replacement of piston rings and piston
pins is also recommended.
NOTE:
Should it be necessary to replace a scored
or
burned No. 1 connecting rod bearing, see Par. D-92 regarding timing gear oil jet.
D-48.
Connecting Rod Bearing Inspection
The
bearing fits may be roughly checked by shaking the connecting rod by hand,
prior
to removal of
the bearing cap, to determine if it is
loose
on the
crankshaft.
The crankpins must be carefully in
spected as detailed previously in Par. D-41.
Worn
crankpins
will
require undersize bearings. Scored,
flaked,
or
worn bearings must be replaced.
D-49.
Installing Connecting Rod Bearings
New bearings must be installed so that the oil
spray
hole
in the upper bearing
half
aligns with
the oil spray
hole
in the connecting rod.
Each
bearing
cap must be installed to seat evenly on the connecting rod from which it was removed, and in
the same position. After wiping and carefully in specting the bearing bore in the connecting rod,
install
the proper bearing. Never file either the
bearing
cap or the bearing to compensate for too
much
clearance. Do not use shims under a bearing
cap or behind a bearing shell. Do not run a new
bearing
half
with a worn half.
The
desired running fit (difference
between
the diameter of the
crankpin
and the inside diameter
of the fitted bearing) for a connecting rod bearing
is .0003" to .0025"
[0,0076
a
0,0635
mm.].
With
a dimension in
excess
of this standard running fit, a 52
Page 63 of 376
![JEEP CJ 1953 Service Manual
Jeep
UNIVERSAL SERIES SERVICE
MANUAL
D
is .004" to .007"
[0,102
a 0,178 mm.] as measured
by a dial indicator. Should a check
show
too little
end play, place a shim of suitable thickness
JEEP CJ 1953 Service Manual
Jeep
UNIVERSAL SERIES SERVICE
MANUAL
D
is .004" to .007"
[0,102
a 0,178 mm.] as measured
by a dial indicator. Should a check
show
too little
end play, place a shim of suitable thickness](/img/16/57040/w960_57040-62.png)
'Jeep'
UNIVERSAL SERIES SERVICE
MANUAL
D
is .004" to .007"
[0,102
a 0,178 mm.] as measured
by a dial indicator. Should a check
show
too little
end play, place a shim of suitable thickness
between
the camshaft shoulder and the spacer. Too much
end play may be corrected by removing shims or
dressing off the spacer a slight amount. See Fig. D-33.
D-82. Install Crankshaft and Bearings
Fit
the three upper main bearings
into
their
respective
locations
in the cylinder block. Fit the
three lower main bearings
into
their respective
bearing caps.
NOTE:
It is
possible
to incorrectly install the front main bearing. The bearing is properly installed in
the cap with the narrower of the two radial oil
grooves
toward the front
edge
of the cap. If this
bearing is not properly installed, the oil
grooves
in
the two halves of the bearing will not match at the
parting line and premature failure of the bearing
will
result.
Lubricate
all bearing surfaces
generously
with
clean, light
engine
oil. Place the crankshaft in
position
in the cylinder block and install the main
bearing caps. Torque the
bolts
65 to 75 lb-ft.
[9,0 a 10,4 kg-m.] rotating the crankshaft after
each bearing cap is
tightened
D-83. Check Crankshaft End-Play
End
play of the crankshaft is set by the running
clearance
between
the crankshaft thrust washer
and the front
face
of the front main bearing. The
standard end play is .004" to .006"
[0,102
a 0,152
mm.] which is controlled by .002"
[0,051
mm.]
shims placed
between
the thrust washer and the
shoulder on the crankshaft. Check the end play
with a dial indicator as shown in
Fig.
D-34. If clear ance is incorrect, adjustment is made by adding or
removing shims.
Install
the thrust washer with the
beveled
inner
edge
toward the front bearing.
10668
FIG.
D-33—VALVES, CAMSHAFT,
AND
TIMING GEARS
1— Nut
2—
Left
Rocker Arm
3—
Rocker
Arm Shaft Spring
4—
Rocker
Shaft
Lock
Screw 5—
Rocker
Shaft
6— Nut 7—
Right
Rocker Arm
8—
Rocker
Arm Shaft Bracket
9—
Intake
Valve Tappet Adjusting Screw
10—
Intake
Valve Upper Retainer
Lock
11—
Oil
Seal
12—
Intake
Valve Spring Upper Retainer 13—
Intake
Valve Spring
14—
Intake
Valve Push Rod 15—
Intake
Valve
16—
Intake
Valve Tappet
17—
Camshaft
18—
Camshaft
Front Bearing
19—
Camshaft
Thrust Plate Spacer
20—
Camshaft
Thrust Plate
21— Bolt and Lockwasher
22— Bolt 13—Lockwasher
24—Camshaft
Gear
Washer 25—
Crankshaft
Gear
26—
Camshaft
Gear
27— Woodruff Key No. 9
28—
Exhaust
Valve Tappet
29— Tappet Adjusting Screw
30—
Spring
Retainer
Lock
31— Roto Cap Assembly
32—
Exhaust
Valve Spring
33—
Exhaust
Valve
34—
Rocker
Shaft Support Stud
35—
Washer
36—
Rocker
Arm Cover Stud 63
Page 66 of 376
D
HURRICANE
F4
ENGINE
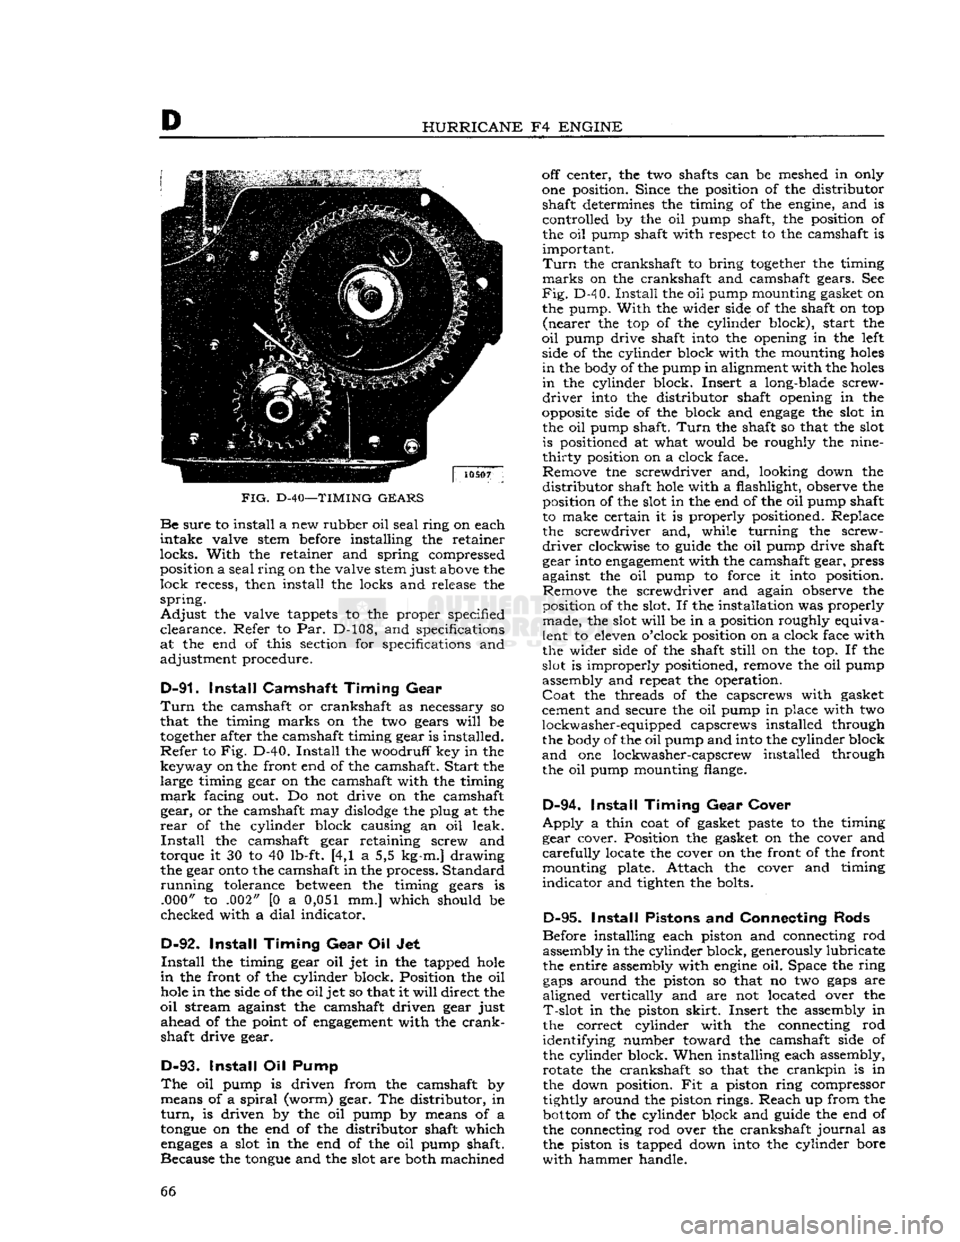
FIG.
D-40—TIMING
GEARS Be
sure
to install a new rubber oil
seal
ring on each
intake
valve stem before installing the retainer
locks.
With
the retainer and spring compressed position a
seal
ring
on the valve stem just above the
lock
recess, then install the locks and release the
spring.
Adjust
the valve tappets to the proper specified
clearance.
Refer to Par. D-108, and specifications
at the end of this section for specifications and
adjustment procedure.
D-91.
Install
Camshaft
Timing
Gear
Turn
the camshaft or crankshaft as necessary so
that the timing marks on the two gears
will
be
together
after the camshaft timing gear is installed.
Refer
to Fig. D-40.
Install
the woodruff key in the key way on the front end of the camshaft.
Start
the large timing gear on the camshaft with the timing
mark
facing out. Do not drive on the camshaft gear, or the camshaft may
dislodge
the plug at the
rear
of the cylinder block causing an oil leak.
Install
the camshaft gear retaining screw and
torque it 30 to 40 lb-ft. [4,1 a 5,5 kg-m.] drawing
the gear
onto
the camshaft in the process. Standard
running
tolerance
between
the timing gears is .000" to .002" [0 a 0,051 mm.] which should be
checked with a
dial
indicator.
D-92.
Install
Timing
Gear
Oil Jet
Install
the timing gear oil jet in the tapped
hole
in
the front of the cylinder block. Position the oil
hole
in the side of the oil jet so that it
will
direct the
oil
stream against the camshaft driven gear just
ahead
of the point of
engagement
with the
crank
shaft drive gear.
D-93.
Install
Oil Pump
The
oil pump is driven from the camshaft by means of a
spiral
(worm) gear. The distributor, in
turn,
is driven by the oil pump by means of a
tongue
on the end of the distributor shaft which
engages
a slot in the end of the oil pump shaft.
Because the
tongue
and the slot are both machined off center, the two shafts can be meshed in only
one position. Since the position of the distributor shaft determines the timing of the engine, and is
controlled by the oil pump shaft, the position of the oil pump shaft with respect to the camshaft is
important.
Turn
the crankshaft to bring
together
the timing
marks
on the crankshaft and camshaft gears. See
Fig.
D-4 0.
Install
the oil pump mounting gasket on
the pump.
With
the wider side of the shaft on top
(nearer
the top of the cylinder block), start the
oil
pump drive shaft into the opening in the left side of the cylinder block with the mounting
holes
in
the body of the pump in alignment with the
holes
in
the cylinder block. Insert a long-blade screw
driver
into the distributor shaft opening in the
opposite
side of the block and
engage
the slot in the oil pump shaft.
Turn
the shaft so that the slot is positioned at what would be roughly the nine-
thirty
position on a clock face. Remove tne screwdriver and, looking down the
distributor
shaft
hole
with a flashlight, observe the position of the slot in the end of the oil pump shaft
to make certain it is properly positioned. Replace the screwdriver and, while turning the screw
driver
clockwise to guide the oil pump drive shaft
gear into
engagement
with the camshaft gear, press
against the oil pump to force it into position. Remove the screwdriver and again observe the
position of the slot. If the installation was properly made, the slot
will
be in a position roughly equiva
lent to eleven o'clock position on a clock face with
the wider side of the shaft
still
on the top. If the
slot is improperly positioned, remove the oil pump
assembly and repeat the operation.
Coat
the threads of the capscrews with gasket
cement and secure the oil pump in place with two
lockwasher-equipped capscrews installed through the body of the oil pump and into the cylinder block
and
one lockwasher-capscrew installed through
the oil pump mounting flange.
D-94.
Install
Timing
Gear
Cover
Apply
a thin coat of gasket paste to the timing
gear cover. Position the gasket on the cover and
carefully
locate the cover on the front of the front mounting plate. Attach the cover and timing
indicator
and tighten the bolts.
D-95.
Install
Pistons and Connecting Rods
Before installing each piston and connecting rod assembly in the cylinder block, generously lubricate
the entire assembly with
engine
oil. Space the ring
gaps
around the piston so that no two
gaps
are
aligned vertically and are not located over the
T-slot
in the piston
skirt.
Insert the assembly in
the correct cylinder with the connecting rod
identifying number toward the camshaft side of
the cylinder block. When installing each assembly, rotate the crankshaft so that the
crankpin
is in
the down position. Fit a piston ring compressor
tightly around the piston rings. Reach up from the
bottom
of the cylinder block and guide the end of
the connecting rod over the crankshaft
journal
as
the piston is tapped down into the cylinder bore
with
hammer handle. 66
Page 67 of 376
'Jeep'
UNIVERSAL
SERIES SERVICE
MANUAL
D
Lubricate
the connecting rod bearing surfaces
generously with
engine
oil and install the bearing
cap with the numbered side matched to the num
bered side of the connecting rod. Torque the nuts
evenly 35 to 45 lb-ft. [4,8 a 6,2 kg-m.]. The con
necting rod cap nuts are locked with stamped nuts.
Used
stamped nuts should be discarded and re
placed with new
ones.
These locking stamped nuts
should be installed with the flat face toward the
connecting rod nut.
Turn
the locking nut finger
tight and then 34
turn
more with a wrench. Refer
to Par. D-36 for detailed information on fitting pistons and rings in the cylinder bores.
D-96.
Install
Crankshaft
Pulley
Align
the keyway in the pulley with the woodruff key installed in the crankshaft. Drive the pulley
onto
the crankshaft and secure it in place with
the crankshaft pulley nut. Insert a block of wood
between
one of the counterweights on the
crank
shaft and the side of the cylinder block to prevent the crankshaft from turning, then tighten the nut.
D-97.
Install
Oil Pan
Before installing the oil pan, make a final internal
inspection particularly making certain that the
inside of the cylinder block is clean. Apply a thin
coat of gasket paste on the oil pan. Place the new
oil
pan gasket in position. Set the oil pan in posi
tion on the cylinder block and install the oil pan.
Torque
the attaching
bolts
12 to 15 lb-ft. [1,7 a 2,1
kg-m.].
Install
the oil pan
drain
plug and gasket
and
tighten the plug securely.
D-98.
Install
Cylinder
Head
Make
certain that the entire top of the cylinder
block
assembly, the lower surface of the cylinder
head,
and the cylinder head gasket are clean. Blow
all
dirt
or carbon out of the blind tapped bolt
holes
in
the cylinder block before the cylinder head and gasket are installed. Using aerosol spray sealer
Part
No. 994757, spray a thincoat on both surfaces
of the head gasket, position the new cylinder head gasket with the crimped
edges
of the gasket metal down (See Fig. D-31).
This
gasket position allows a
positive seal along the narrow surfaces of the
cylin
der
head
between
the combustion chambers and
eliminates the possibility of burning combustion
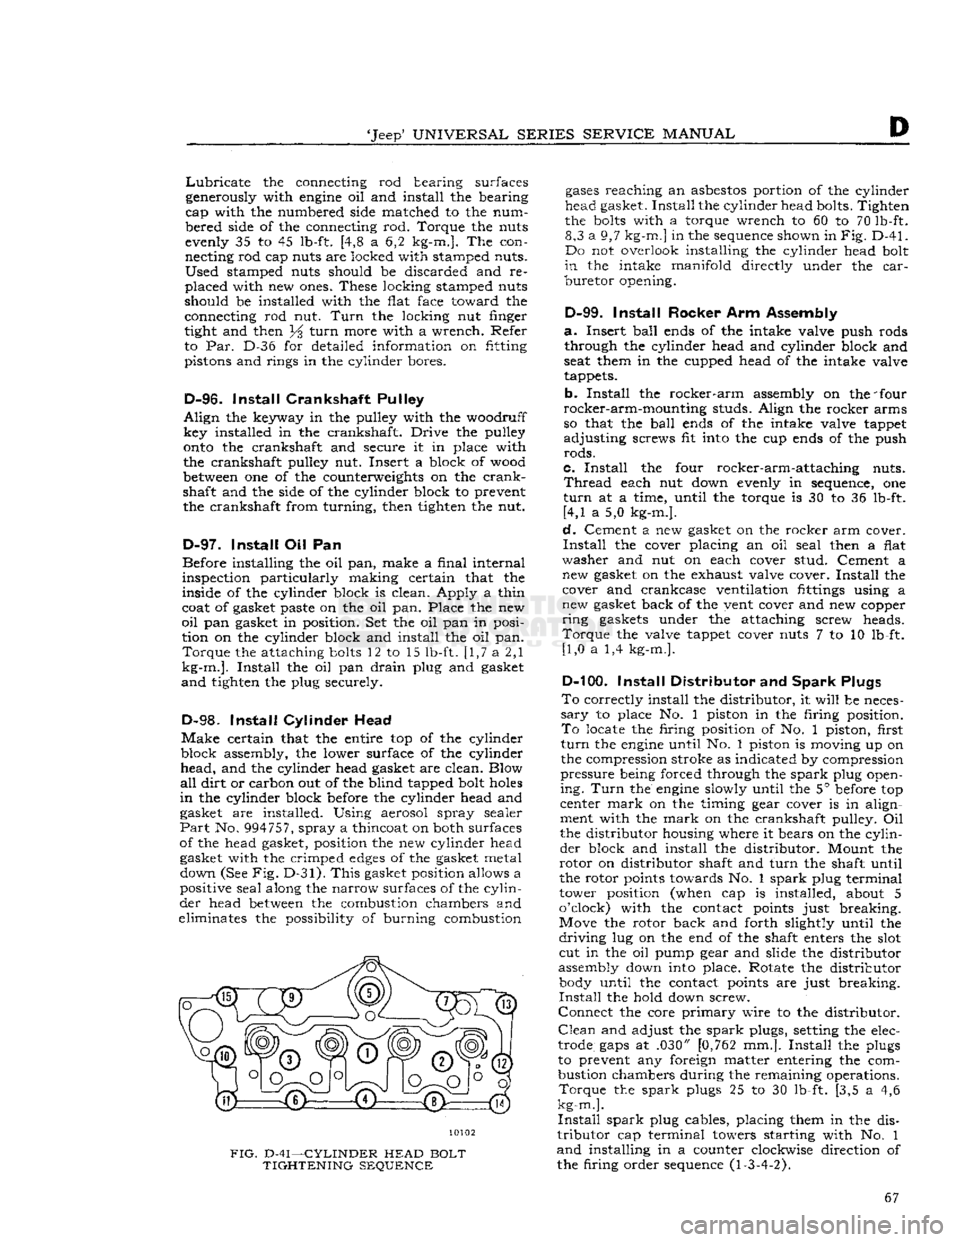
10102
FIG.
D-41—CYLINDER
HEAD
BOLT
TIGHTENING
SEQUENCE
gases
reaching
an
asbestos
portion of the cylinder
head gasket.
Install
the cylinder head bolts. Tighten
the
bolts
with a torque wrench to 60 to 70 lb-ft. 8,3 a 9,7
kg-m.]
in the sequence shown in
Fig.
D-41.
Do not overlook installing the cylinder head bolt
in
the intake
manifold
directly under the
car
buretor
opening.
D-99.
Install
Rocker Arm Assembly
a.
Insert
ball
ends of the intake valve push rods through the cylinder head and cylinder block and
seat them in the cupped head of the intake valve
tappets.
b.
Install
the
rocker-arm
assembly on the 'four
rocker-arm-mounting
studs. Align the rocker arms
so that the
ball
ends of the intake valve tappet
adjusting
screws fit into the cup ends of the push
rods.
c.
Install
the four rocker-arm-attaching nuts.
Thread
each nut down evenly in sequence, one
turn
at a time, until the torque is 30 to 36 lb-ft. [4,1 a 5,0 kg-m.].
d.
Cement a new gasket on the rocker arm cover.
Install
the cover placing an oil seal then a flat
washer
and nut on each cover stud. Cement a new gasket on the exhaust valve cover.
Install
the cover and crankcase ventilation fittings using a
new gasket back of the vent cover and new copper
ring
gaskets under the attaching screw heads.
Torque
the valve tappet cover nuts 7 to 10 lb-ft. [1,0 a 1,4 kg-m.].
D-100.
Install
Distributor and
Spark
Plugs
To
correctly install the distributor, it
will
be neces
sary
to place No. 1 piston in the firing position.
To
locate the firing position of No. 1 piston, first
turn
the
engine
until No. 1 piston is moving up on
the compression stroke as indicated by compression
pressure
being forced through the
spark
plug open
ing.
Turn
the
engine
slowly until the 5° before top
center
mark
on the timing gear cover is in align
ment with the
mark
on the crankshaft pulley. Oil
the distributor housing where it bears on the
cylin
der
block and install the distributor. Mount the
rotor
on distributor shaft and
turn
the shaft until
the rotor points towards No. 1
spark
plug terminal
tower position (when cap is installed, about 5
o'clock) with the contact points just breaking.
Move the rotor back and forth slightly until the
driving
lug on the end of the shaft enters the slot cut in the oil pump gear and slide the distributor
assembly down into place. Rotate the distributor body until the contact points are just breaking.
Install
the hold down screw.
Connect
the core
primary
wire to the distributor.
Clean
and adjust the
spark
plugs, setting the elec
trode
gaps
at .030" [0,762 mm.].
Install
the plugs
to prevent any foreign matter entering the com
bustion chambers during the remaining operations.
Torque
the
spark
plugs 25 to 30 lb-ft. [3,5 a 4,6
kg-m.].
Install
spark
plug cables, placing them in the dis
tributor
cap terminal towers starting with No. 1
and
installing in a counter clockwise direction of
the firing order sequence (1-3-4-2). 67
Page 89 of 376
Dl
'Jeep5
UNIVERSAL
SERIES
SERVICE
MANUAL
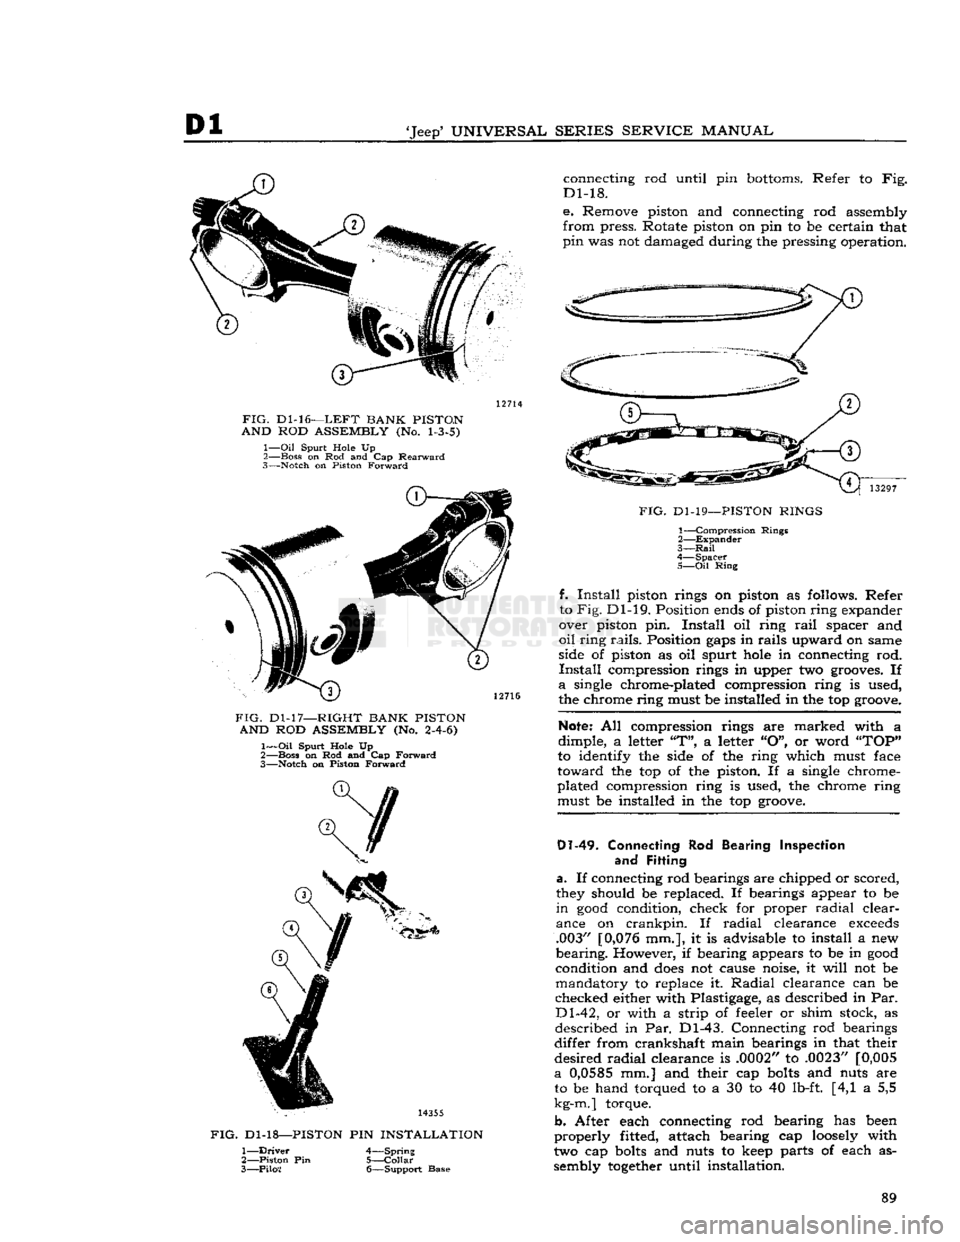
FIG.
Dl-16—LEFT
BANK
PISTON
AND
ROD
ASSEMBLY
(No.
1-3-5)
1—
Oil
Spurt Hole Up
2— Boss on Rod and Cap
Rearward
3—
Notch on Piston
Forward
12716
FIG.
Dl-17—RIGHT
BANK
PISTON
AND
ROD
ASSEMBLY
(No. 2-4-6)
1—
Oil
Spurt Hole Up
2— Boss on Rod and Cap
Forward
3—
Notch on Piston
Forward
14355
FIG.
Dl-18—-PISTON
PIN
INSTALLATION
connecting rod until pin
bottoms.
Refer to Fig.
Dl-18.
e.
Remove piston and connecting rod assembly
from
press. Rotate piston on pin to be certain that
pin
was not damaged during the pressing operation. 13297
1—
Driver
2— Piston Pin
3—
Piloi
4—
Spring
5—
Collar
6—
Support
Base
FIG.
Dl-19—PISTON
RINGS
1—
Compression
Rings
2—
Expander
3—
Rail
4—
Spacer
5—
Oil
Ring
f.
Install
piston rings on piston as follows. Refer
to Fig. Dl-19. Position ends of piston ring expander
over piston pin.
Install
oil ring
rail
spacer and
oil
ring
rails.
Position
gaps
in rails upward on same
side of piston as oil spurt
hole
in connecting rod.
Install
compression rings in upper two grooves. If
a
single chrome-plated compression ring is used,
the chrome ring must be installed in the top groove.
Note:
All compression rings are marked with a
dimple, a letter
"T",
a letter
"O",
or word
"TOP"
to identify the side of the ring which must face
toward
the top of the piston. If a single chrome-
plated compression ring is used, the chrome ring must be installed in the top groove.
Dl-49.
Connecting
Rod
Bearing Inspection and Fitting
a.
If connecting rod bearings are chipped or scored,
they should be replaced. If bearings appear to be
in
good
condition, check for proper
radial
clear
ance on crankpin. If
radial
clearance
exceeds
.003" [0,076 mm.], it is advisable to install a new
bearing.
However, if bearing appears to be in
good
condition and
does
not cause noise, it
will
not be mandatory to replace it.
Radial
clearance can be
checked either with Plastigage, as described in Par.
Dl-42,
or with a strip of feeler or shim stock, as
described in Par. Dl-43. Connecting rod bearings
differ from crankshaft main bearings in that their
desired
radial
clearance is .0002" to .0023" [0,005
a
0,0585
mm.] and their cap
bolts
and nuts are to be hand torqued to a 30 to 40 lb-ft. [4,1 a 5,5
kg-m.] torque.
b. After each connecting rod bearing has been
properly
fitted, attach bearing cap
loosely
with
two cap
bolts
and nuts to keep parts of each as
sembly
together
until installation. 89
Page 90 of 376
DAUNTLESS
V-6
ENGINE
Note:
The rib on
edge
of cap and the conical
boss
on web of connecting rod must be toward
rear
of
engine
in all connecting rod assemblies of left
cyl
inder
bank and toward front of
engine
in all connecting rod assemblies of right cylinder bank.
Dl-50.
Oil
Pump Intake
and
Screen Cleaning
a.
Pry screen from housing and examine for clog
ging due to deposit of sludge or other foreign
material.
b.
Clean
the screen and housing thoroughly in sol
vent; dry with compressed air.
c.
Install
screen in housing.
Dl-51.
Oil Pan Cleaning and Inspection
Inspect
the oil pan for corrosion, dents, leaks, and
other damage. Inspect its mounting flange carefully
for damage or distortion to be certain that it
will
give
a
good
seal.
Dl-52.
Flywheel Cleaning
and
Inspection
Clean
the flywheel with suitable cleaning solvent;
dry
with compressed air. Inspect clutch face for
burned
or scuffed condition and for rivet grooves.
Inspection
for run out or improper mounting is de
scribed
in installation procedure.
Inspect
teeth
of the flywheel
ring
gear for
burrs,
nicks,
and minor distortion. If necessary and pos
sible, use a small emery wheel to remove
burrs
and
reshape teeth. If gear
teeth
are broken,
cracked,
seriously
burred
or deformed, the
ring
gear must be replaced.
Dl-53.
Ring Gear Replacement
a.
Drill
a
hole
between
two
ring
gear teeth; then
split
the gear with a cold chisel. Be careful not to
damage
ring
gear shoulder or seat surfaces of fly
wheel.
b.
Polish several
spots
on the new
ring
gear to be
installed.
With
a hot plate or slowly moving torch,
heat the new
ring
gear until polished
spots
become
blue, about
600°F.
[312°C.].
Caution:
Do not heat the
ring
gear to a temperature
greater than
800°F.
[424°C.].
Excessive heat
will
destroy heat treatment given to
ring
gear during
manufacture.
c.
Quickly
install
ring
gear on flywheel. Chamfered
edge
of
ring
gear must be toward
ring
gear shoulder
of flywheel. Be certain that
ring
gear is seated prop
erly.
Allow
ring
gear to cool slowly, so that it
will
be held tightly in place.
Dl-54.
Flywheel Housing Cleaning and Inspection
Both
flywheel and clutch are enclosed by a fly
wheel housing. Its front surface is bolted to the
engine
cylinder block, and its
rear
surface acts as
front
support to the transmission.
Clean
the fly wheel housing with a suitable cleaning solvent; dry
with
compressed air. Inspect front and
rear
surfaces
for distortion and improper alignment with each
other;
these
planes must be
parallel
to assure
proper
alignment
between
engine
and transmission.
Dl-55.
Camshaft Cleaning
and
Inspection
Clean
both camshaft and camshaft bearing surfaces
with
a suitable cleaning solvent; dry with com
pressed air.
Note:
The steel-backed babbitt-lined camshaft
bearings are pressed into the crankcase.
From
front
to
rear,
each bearing is .030" [0,76 mm.] smaller
in
diameter than the preceding bearing.
From
front
to
rear,
each camshaft
journal
is correspondingly
smaller
in diameter.
The
camshaft bearings must be line reamed to
proper
diameter after being pressed into crankcase.
Since
this operation requires special reaming equip
ment, the original bearings should be retained un
less
they are severly damaged. Slightly scored cam
shaft bearings are satisfactory if the surfaces of camshaft journals are polished, bearings are
polished to remove
burrs,
and
radial
clearance
between
camshaft and bearings is within .0015"
to .004" [0,038 a 0,102 mm.].
Dl-56.
Valve Lifter
and
Push
Rod
Cleaning and Inspection
a.
Examine the cam contact surface at lower end of each valve lifter body. If surface is excessively
worn,
galled, or otherwise damaged, discard the
valve lifter. Also examine the mating camshaft
lobe
for excessive wear or damage.
b.
Disassemble one or two valve lifters, as de
scribed
below, and inspect them for
dirt
or
varnish.
If
they are dirty or have a varnish deposit, clean
and
inspect all twelve valve lifters. Otherwise,
service
only
those
valve lifters which do not operate
properly.
c.
To disassemble each valve lifter, depress the
push
rod seat with a push rod, and remove the
plunger retainer from the valve lifter body with
a
retainer remover. Remove push rod seat and
plunger from valve lifter body. If plunger sticks
in
valve lifter body, place body in large end of
a
plunger remover tool, with plunger downward.
While
holding lifter with thumb, rap the open end
of remover against a block of wood with just enough force to jar the plunger from body. Refer to
Figs.
Dl-20, Dl-22 and Dl-23.
d.
Drain
oil from valve lifter and remove the check
valve retainer,
ball,
valve spring, and plunger
spring.
e. Keep all parts of each valve lifter separated
during
part cleaning and inspection. The valve
lifter
body and plunger are selectively fitted to each other and must not be interchanged with parts
of other valve lifters.
f. Rinse all valve lifter parts in kerosene to remove as much oil as possible.
This
will
reduce contamina
tion of the cleaning solvent. Immerse all parts in cleaning solvent for approximately one hour. The
time required
will
depend on varnish
deposits
and
effectiveness
of the solvent. After the varnish has
dissolved or has
softened
sufficiently to permit re
moval
by wiping, allow parts to
drain.
Varnish
can
then be cleaned from the valve lifter body
with
a
brush.
Rinse the parts in kerosene to dissolve 90