Electrical JEEP CJ 1953 Owner's Manual
[x] Cancel search | Manufacturer: JEEP, Model Year: 1953, Model line: CJ, Model: JEEP CJ 1953Pages: 376, PDF Size: 19.96 MB
Page 184 of 376
H
ELECTRICAL
SYSTEM
14237
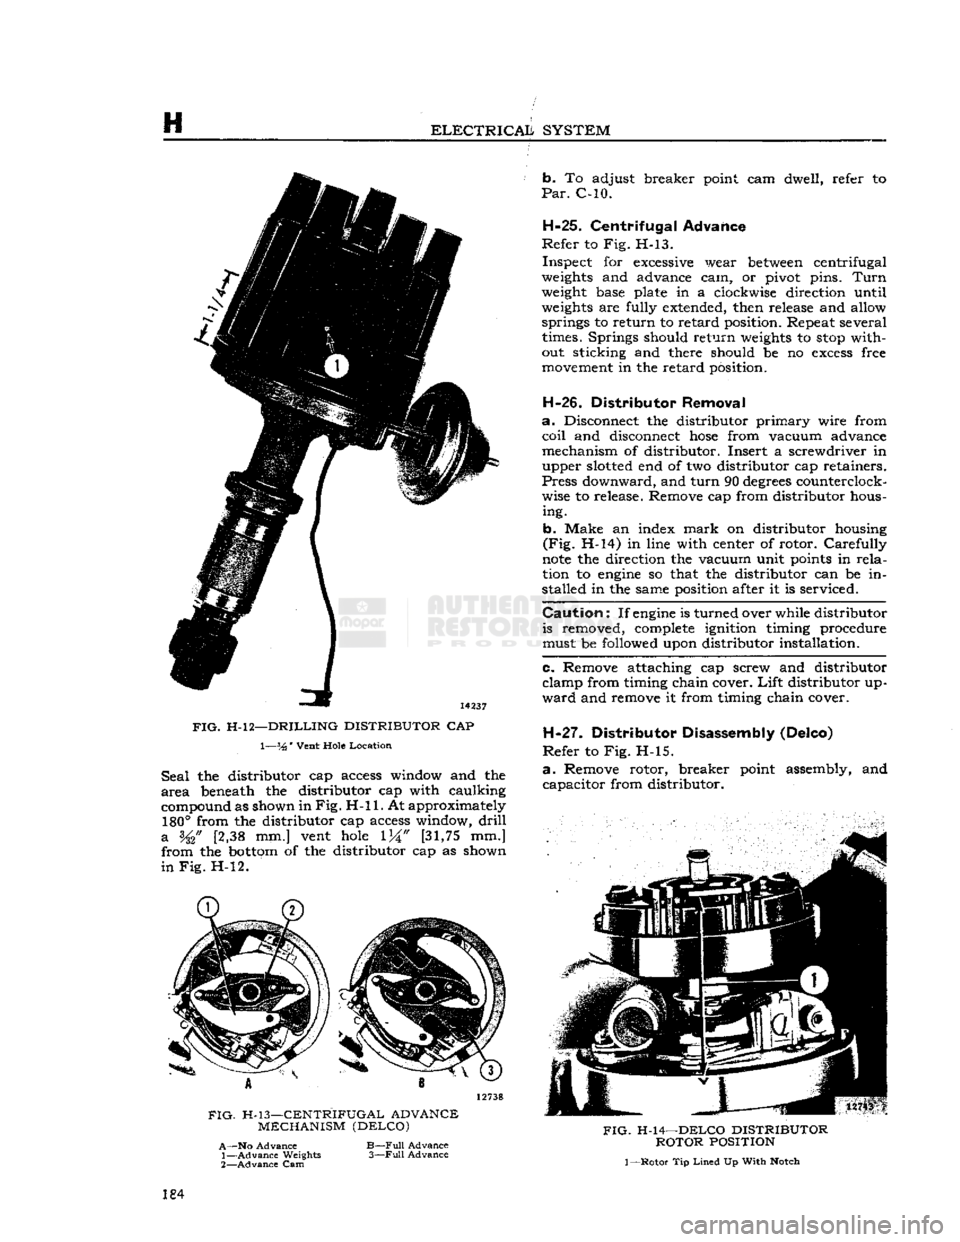
FIG.
H-l2—DRILLING DISTRIBUTOR
CAP 1—%'
Vent
Hole
Location
Seal
the distributor cap access window and the
area
beneath the distributor cap with caulking
compound as shown in
Fig. H-ll.
At approximately
180°
from the distributor cap access window,
drill
a
[2,38 mm.] vent
hole
[31,75
mm.]
from the
bottom
of the distributor cap as shown
in
Fig. H-l2. b. To adjust breaker point cam dwell, refer to
Par.
C-10.
H-25.
Centrifugal Advance
Refer
to Fig. H-13.
Inspect for
excessive
wear
between
centrifugal
weights
and advance cam, or pivot pins.
Turn
weight
base plate in a clockwise direction until
weights
are fully extended, then release and allow springs to return to retard position. Repeat several times. Springs should return
weights
to
stop
without sticking and there should be no
excess
free
movement
in the retard position.
H-26.
Distributor Removal
a.
Disconnect the distributor primary wire from
coil
and disconnect
hose
from vacuum advance
mechanism of distributor. Insert a screwdriver in upper
slotted
end of two distributor cap retainers.
Press
downward, and turn 90
degrees
counterclock
wise to release. Remove cap from distributor hous ing.
b. Make an index
mark
on distributor housing
(Fig.
H-14) in line with center of rotor. Carefully
note
the direction the vacuum unit
points
in
rela
tion to
engine
so that the distributor can be in
stalled in the same position after it is serviced.
Caution:
If
engine
is turned over while distributor is removed,
complete
ignition timing procedure
must be followed upon distributor installation.
c. Remove attaching cap screw and distributor
clamp from timing chain cover.
Lift
distributor up
ward
and remove it from timing chain cover.
H-27.
Distributor Disassembly (Delco)
Refer
to Fig. H-l5.
a.
Remove rotor, breaker point assembly, and capacitor from distributor.
FIG.
H-13—CENTRIFUGAL ADVANCE
MECHANISM (DELCO)
A—No
Advance
1—
Advance
Weights
2—
Advance
Cam
B—Full
Advance
3—Full
Advance
FIG.
H-14—DELCO DISTRIBUTOR
ROTOR
POSITION
1
—Rotor
Tip
Lined
Up
With
Notch
184
Page 186 of 376
ELECTRICALJ
SYSTEM
d.
Inspect for
excessive
wear
between
centrifugal
weights
and advance cam and pivot pins.
Turn
weight
base plate in a clockwise direction until
weights
are fully extended. Release and allow
springs to return
weights
to
retard
position. Repeat several times. Springs should return
weights
to
stop
without sticking and there should be no
excessive
free
movement
in the
retard
position. Inspect
springs for distortion and fatigue.
e. Inspect cam
lobes
for scoring or
excessive
wear.
Check
weight
base plate for binding or
excessive
looseness
on distributor shaft.
f.
Check
breaker plate for
excessive
looseness
on
outside
diameter of upper distributor shaft bushing.
Check
breaker plate ground lead for poor
spot
we
Id
at plate end and for
loose
or frayed terminal con
nections.
g.
Check
for
excessive
wear
between
distributor
shaft and bushings in housing. Inspect shaft for distortion. Inspect gear for scoring of
teeth
or
excessive
wear.
h.
Inspect rod end of vacuum advance mechanism
for
excessive
wear. Push rod
into
unit as far as
possible, hold finger tightly over nipple, then re
lease
rod. After about 15 seconds, remove finger
from nipple, and
notice
if air is drawn
into
unit.
If
not, diaphragm is leaking and unit must be
replaced.
H-29.
Distributor Reassembly
Refer
to Fig. H-l5.
a.
Install
distributor
primary
lead and rubber grommet in distributor housing. Mount vacuum
advance unit on housing with two
slotted
attaching
screws; insert ground lead terminal of breaker plate under outer mounting screw.
b.
Install
felt
washer over upper shaft bushing of
distributor housing and apply a few drops of light
oil.
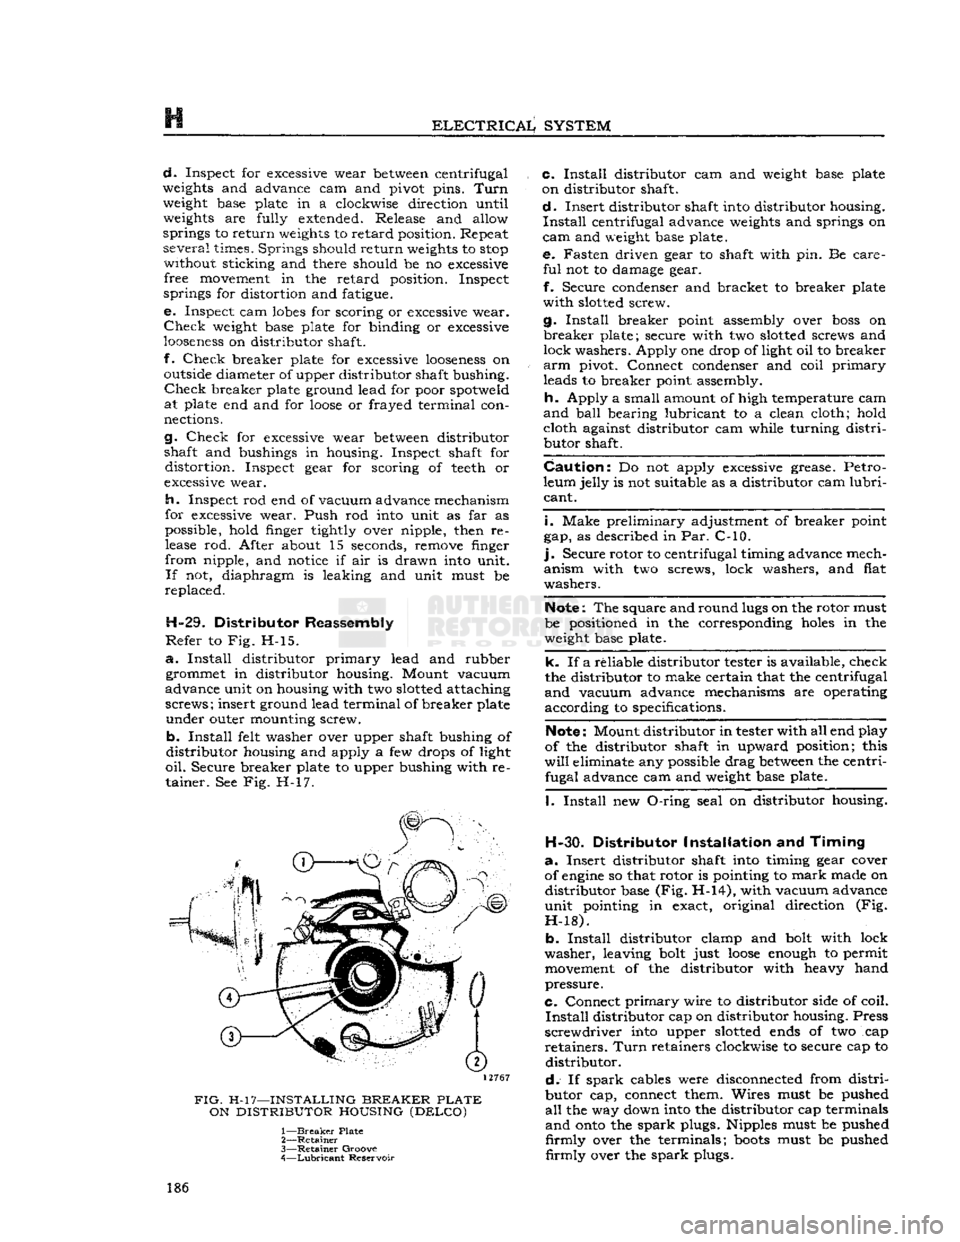
Secure breaker plate to upper bushing with re tainer. See Fig. H-17.
12767
FIG.
H-17—INSTALLING
BREAKER
PLATE
ON
DISTRIBUTOR
HOUSING
(DELCO)
1—
Breaker
Plate
2—
Retainer
3—
Retainer
Groove
4—
Lubricant
Reservoir c.
Install
distributor cam and
weight
base plate
on distributor shaft.
d.
Insert distributor shaft
into
distributor housing.
Install
centrifugal advance
weights
and springs on
cam
and
weight
base plate. e. Fasten driven gear to shaft with pin. Be care
ful
not to damage gear.
f.
Secure condenser and bracket to breaker plate
with
slotted
screw.
g.
Install
breaker point assembly over
boss
on
breaker
plate; secure with two
slotted
screws and
lock washers. Apply one drop of light oil to breaker
arm
pivot. Connect condenser and coil
primary
leads to breaker point assembly.
h.
Apply a small amount of high temperature cam
and
ball
bearing lubricant to a clean cloth; hold cloth against distributor cam while turning
distri
butor shaft.
Caution:
Do not apply
excessive
grease. Petro
leum jelly is not suitable as a distributor cam
lubri
cant.
i.
Make preliminary adjustment of breaker point
gap, as described in Par. C-10.
].
Secure rotor to centrifugal timing advance mech
anism with two screws, lock washers, and flat
washers.
Note:
The square and round
lugs
on the rotor must
be positioned in the corresponding
holes
in the
weight
base plate.
k. If a reliable distributor tester is available, check
the distributor to make certain that the centrifugal
and
vacuum advance mechanisms are operating
according to specifications.
Note:
Mount distributor in tester with all end play
of the distributor shaft in upward position; this
will
eliminate any possible drag
between
the centri fugal advance cam and
weight
base plate.
I.
Install
new
O-ring
seal on distributor housing.
H-30.
Distributor
Installation
and
Timing
a.
Insert distributor shaft
into
timing gear cover
of
engine
so that rotor is pointing to
mark
made on distributor base (Fig. H-14), with vacuum advance
unit pointing in exact, original direction (Fig.
H-18).
b.
Install
distributor clamp and
bolt
with lock
washer, leaving
bolt
just
loose
enough
to permit
movement
of the distributor with heavy hand
pressure.
C.
Connect
primary
wire to distributor side of coil.
Install
distributor cap on distributor housing. Press
screwdriver
into
upper
slotted
ends
of two cap
retainers.
Turn
retainers clockwise to secure cap to distributor.
d.
If
spark
cables were disconnected from
distri
butor cap, connect them. Wires must be pushed
all
the way down
into
the distributor cap terminals
and
onto
the
spark
plugs. Nipples must be pushed
firmly
over the terminals;
boots
must be pushed
firmly
over the
spark
plugs. 186
Page 188 of 376
H
ELECTRICAL
SYSTEM
colder plug may be desirable. However, under- or
over-heating is usually caused by factors other than the type of
spark
plugs and the cause should be determined before changing plugs. The design of the
engine
calls for plugs equivalent to Champion
J-8
for F4
engines
and
A.C.
44S or
UJ12Y
Champ
ion for the V6 engines, (as installed in production)
though any factor that consistently affects
engine
operating temperature may cause this requirement
to change. Overheating may be caused by in sufficient tightening of the plug in the head, which interferes with the flow of heat away from the firing
tip.
If this is the case, the plug gasket
will
show very
little flattening. Over-tightening, in
turn,
will
pro duce too easy a heat flow path and result in cold
plug operation.
This
will
be evident by excessive
flattening
and
deformation of the gasket.
Prevailing
temperatures, condition of the cooling system, and
air-fuel
mixture can affect the
engine
operating temperature and should be taken into consideration.
H-34.
GENERATOR
— F4
ENGINE
The
generator is an air-cooled, two-brush unit
which
cannot be adjusted to increase or decrease output. For replacement,
voltage
regulator and generator must be matched for
voltage
and capa
city,
polarity, and common source of manufacture.
Otherwise,
either a
loss
of ampere capacity or a
burned
out generator
will
result. Generators for
these
vehicles are 12-volt. Par. H-l explains the 12-volt system. Refer to the specifications at the
end of this section for information on correct generator rating for a specific model series.
The
circuit
breaker,
voltage
regulator, and current-
limiting
regulator are built into one combination
unit.
Because the regulator and battery are part
of the generator
circuit,
the output of the generator
depends upon the
state
of charge and temperature
of the battery.
With
a discharged battery, the
output
will
be high, decreasing proportionally as the battery
becomes
charged. For service informa
tion covering current regulator see Par. H-41.
H-36.
Generator
Maintenance
A
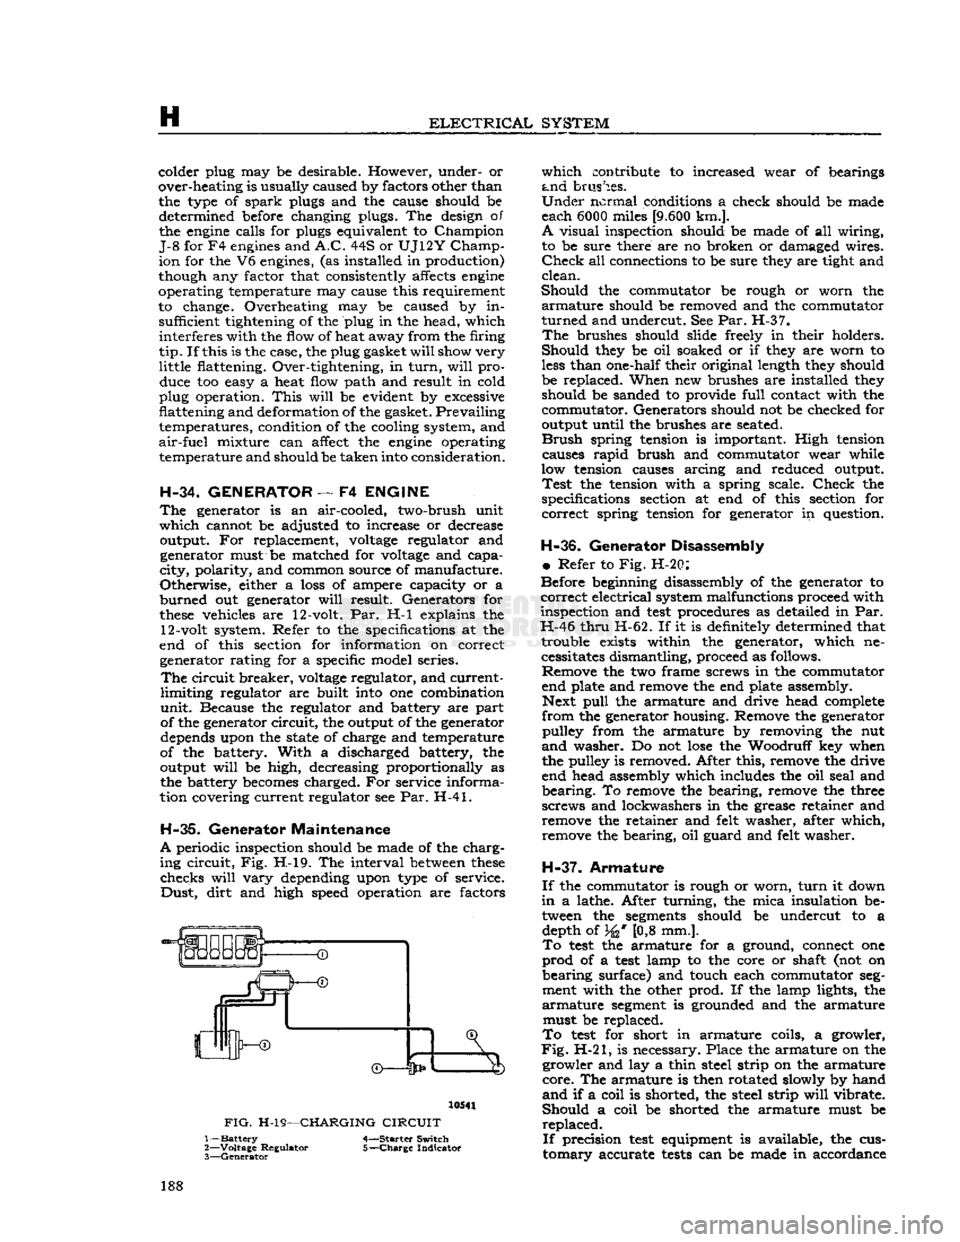
periodic inspection should be made of the charg
ing
circuit,
Fig. H-l9. The interval
between
these
checks
will
vary
depending upon type of service.
Dust,
dirt
and high speed operation are factors 10541
FIG.
H-19—CHARGING
CIRCUIT
1—
Battery
4-—Starter Switch
2—
Voltage
Regulator 5-—Charge Indicator
3—
Generator
which
contribute to increased wear of bearings
and
brushes.
Under
normal conditions a check should be made
each 6000 miles
[9.600
km.].
A
visual inspection should be made of all wiring,
to be sure there are no broken or damaged wires.
Check
all connections to be sure they are tight and
clean.
Should
the commutator be rough or worn the
armature
should be removed and the commutator
turned
and undercut. See Par. H-37.
The
brushes should slide freely in their holders.
Should
they be oil soaked or if they are worn to
less
than one-half their original length they should
be replaced. When new brushes are installed they should be sanded to provide
full
contact with the
commutator. Generators should not be checked for
output until the brushes are seated.
Brush
spring tension is important. High tension causes
rapid
brush and commutator wear while
low tension causes arcing and reduced output.
Test
the tension with a spring scale.
Check
the
specifications section at end of this section for
correct
spring tension for generator in question.
H-36.
Generator Disassembly
•
Refer to Fig. H-20:
Before beginning disassembly of the generator to
correct
electrical system malfunctions proceed with
inspection and
test
procedures as detailed in Par.
H-46
thru
H-62. If it is definitely determined that trouble exists within the generator, which necessitates dismantling, proceed as follows. Remove the two frame screws in the commutator
end plate and remove the end plate assembly. Next
pull
the armature and drive head complete
from
the generator housing. Remove the generator pulley from the armature by removing the nut
and
washer. Do not
lose
the Woodruff key when
the pulley is removed. After this, remove the drive
end head assembly which includes the oil seal and
bearing.
To remove the bearing, remove the three
screws and lockwashers in the grease retainer and remove the retainer and felt washer, after which,
remove the bearing, oil guard and felt washer.
H-37.
Armature
If
the commutator is rough or worn,
turn
it down
in
a lathe. After turning, the mica insulation be tween the
segments
should be undercut to a depth of 34* [0,8 mm.].
To
test
the armature for a ground, connect one
prod
of a
test
lamp to the core or shaft (not on
bearing
surface) and touch each commutator
seg
ment with the other prod. If the lamp lights, the
armature
segment
is grounded and the armature must be replaced.
To
test
for short in armature coils, a growler,
Fig.
H-21, is necessary. Place the armature on the growler and lay a thin steel strip on the armature
core.
The armature is then rotated slowly by hand
and
if a coil is shorted, the steel strip
will
vibrate.
Should
a coil be shorted the armature must be
replaced.
If
precision
test
equipment is available, the cus
tomary
accurate
tests
can be made in accordance 188
Page 190 of 376
H
ELECTRICAL
SYSTEM
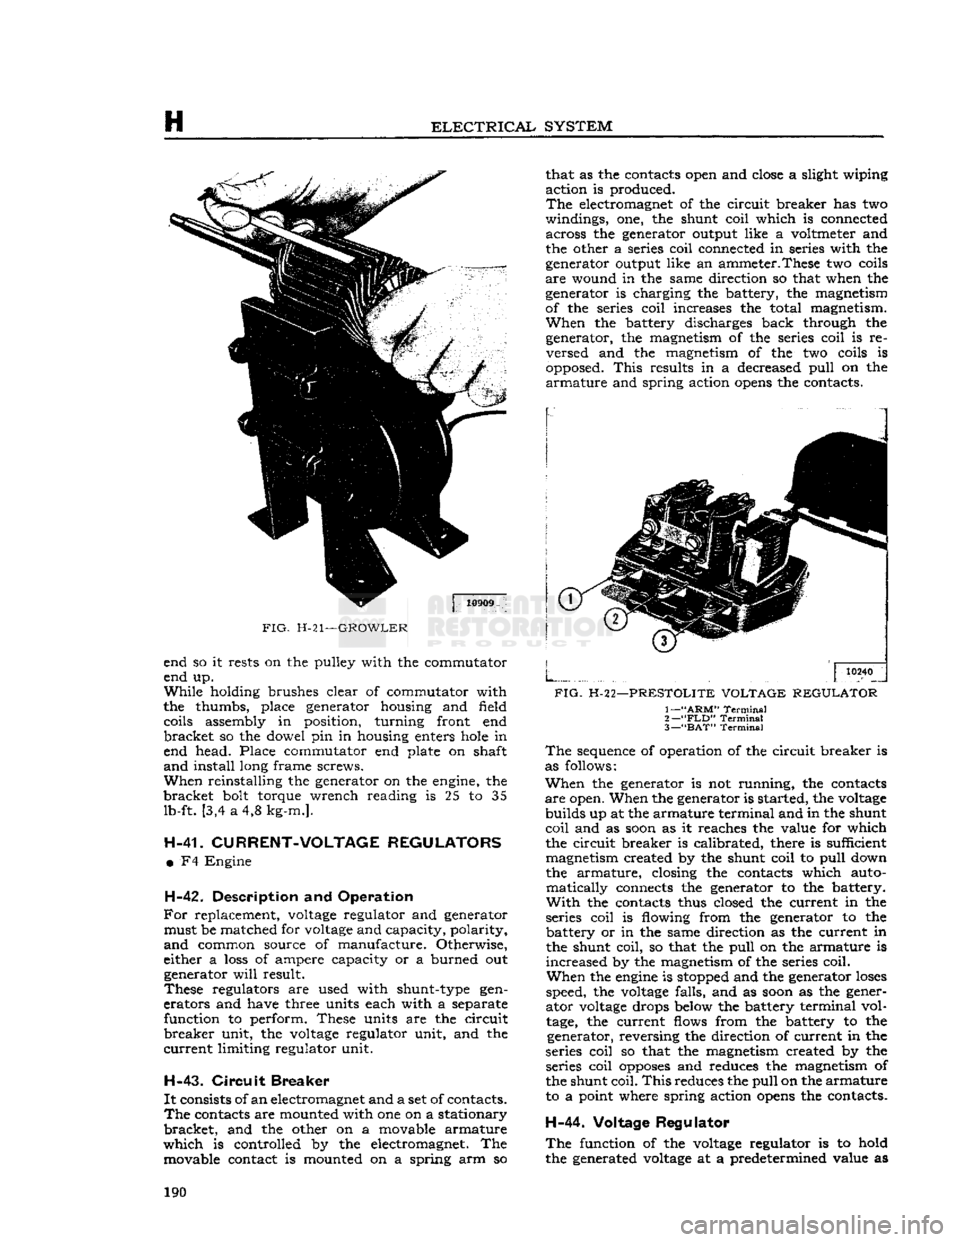
FIG.
H-21—GROWLER
end so it rests on the pulley with the commutator
end up.
While
holding brushes clear of commutator with
the thumbs, place generator housing and field coils assembly in position, turning front end
bracket
so the dowel pin in housing enters
hole
in
end head. Place commutator end plate on shaft
and
install long frame screws.
When
reinstalling the generator on the engine, the
bracket
bolt torque wrench reading is 25 to 35 lb-ft. [3,4 a 4,8 kg-m.].
H-41.
CURRENT-VOLTAGE REGULATORS •
F4 Engine
H-42.
Description and
Operation
For
replacement,
voltage
regulator and generator must be matched for
voltage
and capacity, polarity,
and
common source of manufacture. Otherwise,
either a
loss
of ampere capacity or a burned out generator
will
result.
These
regulators are used with shunt-type gen
erators
and have three units each with a separate function to perform. These units are the circuit
breaker
unit, the
voltage
regulator unit, and the
current
limiting regulator unit.
H-43.
Circuit
Breaker
It
consists of
an
electromagnet and a set of contacts.
The
contacts are mounted with one on a stationary
bracket,
and the other on a movable armature
which
is controlled by the electromagnet. The movable contact is mounted on a spring arm so that as the contacts open and
close
a slight wiping
action is produced.
The
electromagnet of the circuit breaker has two
windings, one, the shunt coil which is connected across the generator output like a voltmeter and
the other a series coil connected in series with the
generator output like an ammeter.These two coils
are
wound in the same direction so that when the
generator is charging the battery, the magnetism
of the series coil increases the total magnetism.
When
the battery discharges back through the generator, the magnetism of the series coil is re versed and the magnetism of the two coils is
opposed.
This
results in a decreased
pull
on the
armature
and spring action
opens
the contacts.
10240
FIG.
H-22—PRESTOLITE VOLTAGE REGULATOR
1—
"ARM"
Terminal
2—
"FLD"
Terminal
3— "BAT"
Terminal
The
sequence of operation of the circuit breaker is
as follows:
When
the generator is not running, the contacts
are
open. When the generator is started, the
voltage
builds up at the armature terminal and in the shunt
coil
and as
soon
as it reaches the value for which
the circuit breaker is calibrated, there is sufficient magnetism created by the shunt coil to
pull
down
the armature, closing the contacts which auto
matically
connects the generator to the battery.
With
the contacts thus closed the current in the
series coil is flowing from the generator to the battery or in the same direction as the current in
the shunt coil, so that the
pull
on the armature is
increased
by the magnetism of the series coil.
When
the
engine
is stopped and the generator
loses
speed, the
voltage
falls, and as
soon
as the gener
ator
voltage
drops below the battery terminal vol
tage,
the current flows from the battery to the generator, reversing the direction of current in the
series coil so that the magnetism created by the series coil
opposes
and reduces the magnetism of
the shunt
coil.
This
reduces the
pull
on the
armature
to a point where spring action
opens
the contacts.
H-44.
Voltage
Regulator
The
function of the
voltage
regulator is to hold
the generated
voltage
at a predetermined value as 190
Page 192 of 376
H
ELECTRICAL
SYSTEM
Regulator
ground screw to battery ground post
—.03-volt maximum.
Generator
frame to battery ground post—.03-volt
maximum.
H-47.
Test Procedure
a.
Circuit
Breaker—Connect
an ammeter in series between the regulator B-terminal and the lead
wire
removed from that terminal. Connect a
voltmeter between the regulator
A-terminal
and the regulator mounting base. Disconnect the field lead
from
the regulator
F-terminal
and insert a variable resistance (3 amp., 50 ohm capacity) between the
lead
and the regulator terminal. Run the generator
at about 1000 generator rpm. Insert all the re
sistance in the field
circuit,
then slowly reduce the
resistance noting the voltage reading just before the change caused by the closing of the circuit
breaker.
Increase the charging rate to the figure
specified for the regulator being tested then reduce
the charging rate by inserting resistance in the
field
circuit.
Note
the voltmeter and ammeter
reading
just before the circuit breaker
opens
and
the ammeter reading drops to zero. The closing voltage and the opening voltage or current should
be within the limits specified. An accurate method
for noting the exact instant of the opening or closing
of the circuit breaker is to connect a headphone (2000 ohms or higher) to the battery and armature
terminals
of the regulator. When the contacts
open or close a
click
will
be
heard
in the headphones.
To
adjust the closing voltage change the armature
spring
tension by bending the hanger at the lower end of the spring. Increase the spring tension to
raise
the closing voltage or decrease the tension
to lower the closing voltage. To adjust the opening voltage raise or lower the stationary contact
keeping the contacts perfectly aligned. Increasing
the contact gap lowers the opening
'
voltage.
Change
the contact gap by expanding or contract
ing the stationary contact bracket, keeping the
contacts aligned. Do not adjust the gap between
the contacts to less than the specified minimum.
b.
Voltage Regulator—Connect the ammeter as in
step
a. Connect the voltmeter between the regulator
B-terminal
and the regulator base. Remove the
variable
resistance from the field
circuit.
Run the
generator at
half
output for 15 minutes to bring
the regulator to normal operating temperature.
Keep
the cover on the regulator during the
warm-
up period and also when taking readings.
Stop the engine then bring it up to approximately 2500 generator rpm. Adjust the amperage to
half
maximum
output by turning on lights or accessor
ies and then
note
the voltmeter reading.
This
read
ing should be within the limits specified for the voltage regulator operation. To adjust the oper
ating voltage change the
armature
spring tension by
bending the hanger at the lower end of the
arma
ture
spring. After each adjustment
stop
the engine then restart it.
Bring
it up to speed and adjust the
current
before taking a reading. In order to obtain
an
accurate indication of the operation of the volt
age regulator unit connect a headphone (2000 ohm
or
higher) between the
F-terminal
and ground to
pick
up the sound of the opening and closing of the
contacts. The clicks should be regular and clear without irregularities or missing. If the
tone
is not
clear
and regular remove the regulator cover and
inspect the contacts. The contacts should be flat
and
not burned excessively and should be aligned
to make
full
face contact. If the contacts need
cleaning refer to paragraph d for the method.
c.
Current
Regulator—Connect the regulator and the
test
equipment as in
step
b. Running the generator at approximately 3000 generator rpm.,
turn
on lights and accessories so that the generator must charge at maximum rate. The ammeter should give a reading within the limits specified.
To
adjust opening amperage, change the armature
spring
tension by bending the hanger at the lower
end of the armature spring. After each adjustment,
stop
the engine, then restart it.
Bring
the engine up to speed and take an ammeter reading. Keep
the cover on the regulator when taking
these
readings.
Connect
a headphone (2000 ohms or higher) be
tween the regulator
F-terminal
and ground to pick
up the sound of opening and closing of the contacts.
Clear,
regular clicks should be heard over the
headphones; they should not be
irregular
or missing.
If
the
tone
is not clear and regular remove the
regulator cover and inspect the contacts. The
contacts should be flat and not burned excessively
and
should be aligned to make
full
face contact. If
the contacts need cleaning refer to paragraph d.
below for the method.
d.
Contacts—Inspect the contacts on all three
units.
In normal use the contacts
will
become
grayed.
If the contacts are burned or dirty or if they are not smooth, file the contacts with a #6
American,
Swiss cut, equalling file. Move the file
parallel
and lengthwise to the armature.
File
just
enough so that the contacts present a smooth
sur
face toward each other. It is not necessary to remove every trace of pitting. After filing, dampen
a
piece of linen or lintless bond tape in refined
carbon
tetrachloride and draw the tape between
the contacts. Repeat with a dry piece of tape. Use
clean
tape for each set of contacts.
e. Recheck—Operate the unit at
half
maximum
output for five minutes with the cover on the regu
lator.
Repeat the testing procedure for all units as described in a, b, c above. Be sure cover is on regu
lator
when taking readings.
H-48.
Quick
Checks
H-49.
Low Charging Rate with a
Fully
Charged
Battery
A
fully charged battery and a low charging rate
indicates normal regulator operation.
A
further check of the regulator operation can be
made by using the starting motor for 5 to 10
seconds with the ignition switch in the "off" posi tion.
Then
start the engine and operate at a genera
tor speed of 2500 to 3000 rpm. The charging rate should rise to its maximum value then taper off to
a
minimum charge as the battery becomes charged.
H-50.
High Charging Rate with a
Fully
Charged
Battery
This
is usually an indication that the voltage regu
lator
is not operating correctly. The high voltage 192
Page 194 of 376
H
ELECTRICAL
SYSTEM H-61.
Test Nine
Operate
at a medium speed with the jumper re moved. Remove the regulator cover and hold the
voltage
regulator contacts closed.
a.
Voltage builds up—voltage regulator contacts
burned
or dirty or incorrect regulator setting.
Clean
the contacts and adjust the regulator as in
Par.
H-47d.
b.
Voltage
does
not build up—clean contacts and
repeat
test.
If the
voltage
still
does
not build up, see
test
10.
H-62.
Test Ten
Remove the regulator cover and hold the current
regulator contacts closed.
a.
Voltage builds up—current regulator contacts
burned
or dirty or incorrect regulator setting.
Clean
the contacts and adjust the regulator as in
Par.
H-47d.
b.
Voltage
does
not build up—clean the contacts
and
repeat the
test.
If the
voltage
still
does
not
build
up remove the regulator for an overhaul.
H-63. ALTERNATOR CHARGING SYSTEM
Most vehicles have, as standard equipment, a 35-
amp.,
12-volt, negative ground alternator and a
transistorized
voltage
regulator.
The
alternator charging circuit consists of the
battery, alternator,
voltage
regulator, ignition
switch,
and charge indicator light.
An
alternator differs from a conventional DC
shunt generator in that the armature is stationary,
and
is called the stator, while the field rotates,
and
is called the rotor.
With
the alternator con
struction,
the higher current values involved in
the stator may be conducted to the external circuit through fixed leads and connections, rather than
through a rotating commutator and brushes, as in the DC generator.
The
alternator employs a three-phase stator
winding. The rotor consists of a field coil encased
between
six poled interleaved sections, producing
a
twelve
pole
magnetic field with alternator north
and
south poles. By rotating the rotor inside the stator, an alternating current is induced in the stator windings.
This
alternating current is
changed to direct current by
diodes
and conducted
to the output terminal of the alternator.
Six
silicon
diode
rectifiers act as electrical one-way valves.
Three
of the
diodes
have negative polarity
and
are grounded. The other three
diodes
have
positive polarity and connected to the output
terminal.
In all alternators discussed in this
manual,
the
diodes
are pressed into heat sinks.
There
are two heat sinks, one positive and the
other negative.
Since
the
diodes
have a high resistance to the
flow of
current
in one direction and a low resistance
in
the
opposite
direction, they are connected in a
manner
which allows current to flow from the
alternator to the battery in the low resistance
direction.
The high resistance in the
opposite
direction prevents the flow of current from the
battery to the alternator. Because of this feature,
no
circuit
breaker
is
required
between
the alternator
and
the battery.
Residual
magnetism in the rotor field
poles
is
negligible. Therefore the starting field current must be supplied by the battery. It is connected
to the field winding through the ignition switch
and
charge indicator lamp.
As
in the DC shunt generator, the alternator
voltage
is regulated by varying the field current.
In
these
alternator systems, this is accomplished
electronically in the transistorized
voltage
reg
ulator.
No current regulator is required since all
alternators have self-limiting current character
istics.
The
entire DC output of the alternator has to pass
through the isolation diode. The isolation
diode
is
not essential for rectification. Its purpose is threefold.
It
provides automatic solid
state
switch for
illumi
nating the alternator charge
-
discharge indicator
light when the alternator is not charging properly.
It
automatically connects the
voltage
regulator to
the alternator and battery when the alternator is
operating.
It
eliminates electrical leakage across the alternator
diodes
so that leakage is negligible when the vehicle
is not in use.
The
isolation
diode
is mounted in a separate alumi
num
heat sink. The 35-amp. alternator has a single
silicon diode. The alternator is designed to supply the electrical demands of the battery and the
accessory circuits through a wide range of
engine
speeds. The alternator is lighter and more compact
than
a conventional DC shunt generator of com
parable
electrical size.
The
principal
components of the alternator are
the stator, the rotor, the slip ring end head, the
drive
end head, the
diode
rectifiers, and the isolation diode.
a.
The stator consists of a laminated iron core on
which
the three-phase windings are wound in
slots
around
the inside circumference. A
pair
of leads
are
connected to each of the three points of the
winding. One of each
pair
of leads connects to a
negative
diode
rectifier and one to a positive
diode
rectifier.
b.
The rotor consists of a single field coil encased
between
two six-fingered, interleaved iron sections assembled to the shaft. The two ends of the field
coil
are connected to two slip rings which are in
sulated from each other and from the shaft.
c. The slip ring end head supports the rectifier heat sinks; a prelubricated sealed
ball
bearing, in
which
the rotor shaft rotates; and the brush holders
and
brushes.
d.
The drive end head supports a prelubricated
sealed
ball
bearing in which the drive end of the rotor shaft rotates.
e. The
diode
rectifiers are pressed in the rectifier brackets or heat sinks and are connected to the
stator leads.
f. The isolation
diode
is pressed in the aluminum heat sink mounted to the
rear
of the alternator. The
complete assembly is covered with a red insulating coating.
For
repairing the alternator, many of its major components are furnished as complete assemblies
including:
complete brush assembly which requires 194
Page 195 of 376
'Jeep*
UNIVERSAL
SERIES SERVICE
MANUAL
H
no soldering or unsoldering of leads; two complete
rectifying
diode assemblies
which
eliminate the need
for removing and replacing individual diodes; a
corpplete isolation diode assembly; and a rotor
assembly complete with shaft,
pole
pieces, field
coil,
and slip rings.
The
transistorized
voltage
regulator is an electronic
switching device. It
senses
the
voltage
appearing
at the auxiliary terminal of the alternator and
supplies the necessary field current for maintaining
the system
voltage
at the output terminal. The
output current is determined by the battery electri
cal
load; such as headlights, heater, etc.
The
transistorized
voltage
regulator is a sealed
unit,
has no adjustments, and must be replaced
as a complete unit.
H-64. ALTERNATOR
PRECAUTIONS
The
following precautions must be observed to
prevent damage to the alternator and regulator.
a.
Never reverse battery connections. Always
check
the battery polarity with a voltmeter before
any
connections are made to be sure that all con
nections correspond to the battery ground polarity of the vehicle.
b.
Booster batteries for starting must be properly
connected. Make sure that the negative cable of
the booster battery is connected to the negative
terminal
of the battery in the vehicle. The positive
cable of the booster battery should be connected
to the positive terminal of the battery in the
vehicle.
c.
Disconnect the battery cables before using a fast charger.
d.
Never use a fast charger as a booster for
starting
the vehicle.
e.
Never disconnect the
voltage
regulator while
the
engine
is running.
f.
Do not ground the alternator output terminal.
g.
Do not operate the alternator on an open
circuit
with
the field energized.
h.
Do not attempt to polarize an alternator.
These
precautions are stated here as an aid to
service
personnel. They are also restated at appro
priate
places in the
text
of this section of the
manual.
H-65. ALTERNATOR
CHARGING
SYSTEM SERVICE
Important:
All alternator
tests
for the 35, 40 and
55 amp alternator are the same, however, there is a
difference
between
the location of the various ter
minals
and field current specifications. The field
current
of the 35 amp alternator should be 1.7 to 2.3 amps, 40 and 55 amp alternators should be 1.8
to 2.4 amps, with
full
battery
voltage
applied to
the filed coil. Disassembly and assembly procedures
are
the same for all three alternators.
Terminal
locations and wire harness color
codes
for the 35,
40 and 55 amp alternator are shown in Fig. H-38.
H-66.
Service Diagnosis
In
diagnosing a suspected malfunction of the
alternator
charging system, consideration must
be given to the complete electrical power plant of the vehicle; including the alternator, regulator,
ignition switch, charge indicator lamp, battery,
and
all associated wiring. If it is suspected that the
alternator
is not fully charging the battery and
fulfilling
the electrical requirements of the electrical
system, several checks should be made before
checking
the alternator itself:
Note:
Whenever service is required in connection
with
an alternator problem, the first
step
should be to verify that the wiring harness hook-up is correct
as indicated in Fig. H-38.
a.
Test the condition of the battery and
state
of
charge
(Par. H-2).
If the battery is not fully charged
and
in
good
condition, use a replacement battery
for making alternator system
tests.
Caution:
Make certain that the negative battery
post
is connected to ground when making the
battery installation. Serious damage to the alter
nator
can result if battery polarity is reversed.
b.
Check
fan belt for proper tension (Par.
C-27).
Caution:
To increase belt tension, apply pressure
to alternator front housing only as permanent damage can result if pressure is applied to
rear
housing.
H-67.
Alternator In Vehicle Tests
The
following
tests
are made with the alternator
in
the vehicle with output and regulator connec
tions maintained to the alternator except as noted
in
Fig. H-27 and H-28. The field plug and
voltage
regulator are disconnected for
these
tests.
The
tests
are given in proper order and detail in the
following paragraphs.
a.
Isolation Diode Test: To determine if the isola
tion diode is open or shorted, refer to Par. H-69.
b.
Alternator Output Test: To isolate the trouble
to the alternator or regulator, refer to Par. H-70.
c.
Alternator
Field
Circuit
Test: To determine the condition of the field
circuit
(brushes and rotor),
refer
to Par. H-73.
d.
Brush
Insulation
and Continuity
Test:
To deter
mine the condition of the
brush,
refer to
Par.
H-75.
e.
Rotor In-Vehicle Test: To determine whether
the rotor coil is open or shorted, refer to
Par.
H-73.
f. Any further
tests
must be conducted with the
alternator
removed and disassembled. When this
is done, the condition of the rotor, the rectifying
and
isolation diodes, and the stator can be further
tested.
A
commercial alternator tester Sun
Electric
Model
VAT-20
or equivalent can be used to make all
necessary
tests
on the alternator system. If a com
mercial
tester is used, follow the recommended
testing procedure outlined by the tester manu
facturer.
If
a commercial tester is not available, follow the
testing procedure as outlined in this manual.
H-68.
Test Equipment
a.
Volt Ampere Tester such as Sun
Electric
Model
VAT-20
or equivalent with meter ranges as shown
in
the following list can be used. 195
Page 196 of 376
H
ELECTRICAL
SYSTEM DC
ammeter — 0 to 60 ampere
DC
ammeter — 0 to 5 ampere
DC
voltmeter — 0 to 16 volt
Rheostat — 40 ohm capable of
handling
3 amps.
Carbon
Pile — 45 amperes
b.
Diode Rectifier Tester C-3829.
c.
12-volt DC
test
lamp.
d.
Ohmmeter of any commercial type is not absolutely necessary but can be helpful.
H-69.
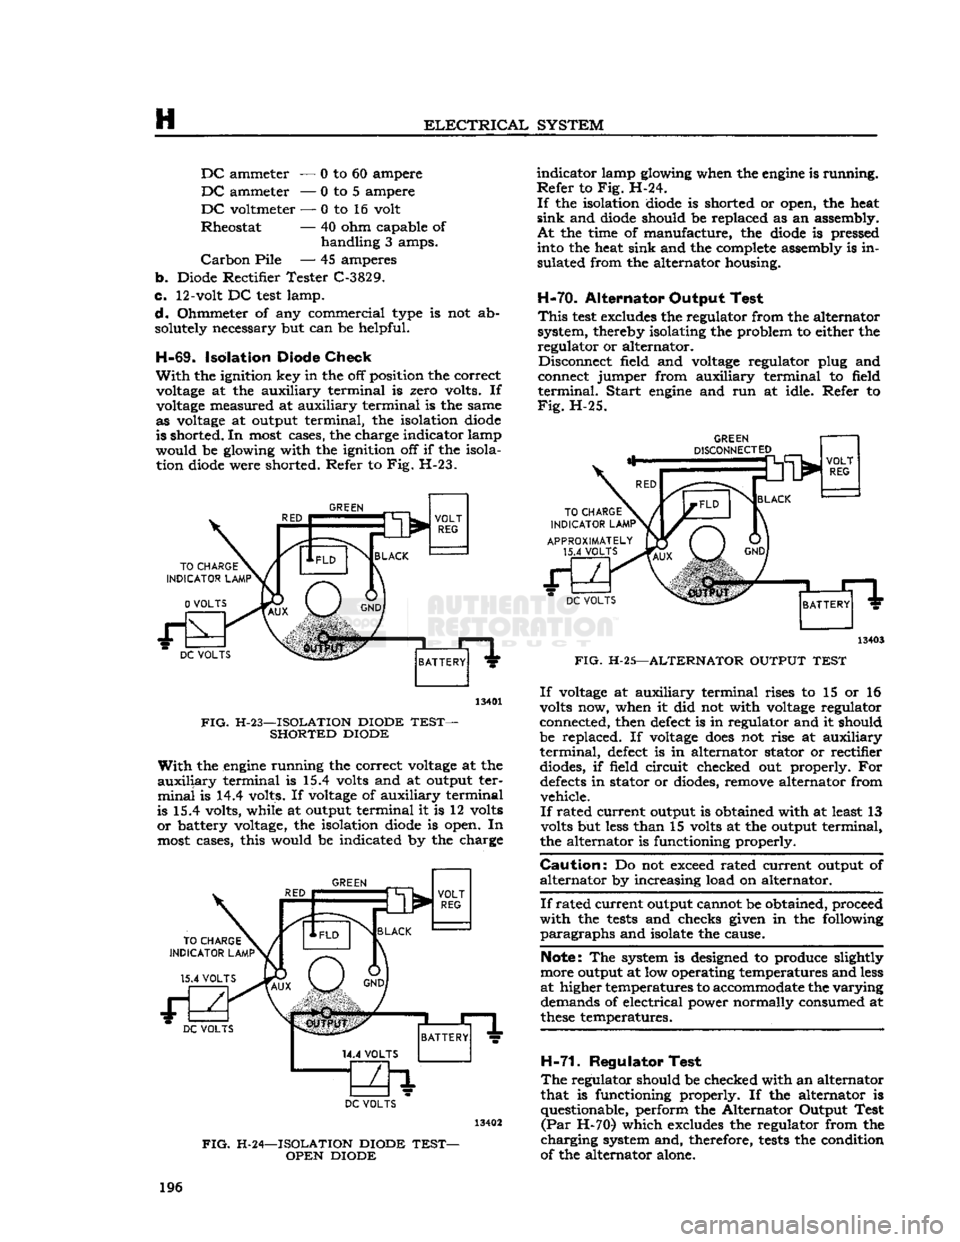
Isolation Diode
Check
With
the ignition key in the off position the correct voltage at the auxiliary terminal is zero volts. If
voltage measured at auxiliary terminal is the same as voltage at output terminal, the isolation diode
is shorted. In most cases, the charge indicator lamp
would be glowing with the ignition off if the isola tion diode were shorted. Refer to Fig. H-23.
GREEN
DC
VOLTS
13401
FIG.
H-23—ISOLATION DIODE
TEST-
SHORTED DIODE
With
the engine running the correct voltage at the
auxiliary
terminal is 15.4 volts and at output ter
minal
is 14.4 volts. If voltage of auxiliary terminal
is 15.4 volts, while at output terminal it is 12 volts
or
battery voltage, the isolation diode is open. In
most cases, this would be indicated by the charge
GREEN
TO
CHARGE
INDICATOR
LAMP1
15.4
VOLTS BLACK
VOLT
REG DC
VOLTS
BATTERY
DC
VOLTS
FIG.
H-24—ISOLATION DIODE
TEST-
OPEN DIODE
indicator
lamp glowing when the engine is running.
Refer
to Fig. H-24.
If
the isolation diode is shorted or open, the heat
sink
and diode should be replaced as an assembly.
At
the time of manufacture, the diode is pressed into the heat sink and the complete assembly is in
sulated from the alternator housing.
H-70.
Alternator Output Test
This
test
excludes the regulator from the alternator
system, thereby isolating the problem to either the regulator or alternator. Disconnect field and voltage regulator plug and
connect jumper from auxiliary terminal to field
terminal.
Start
engine and run at idle. Refer to
Fig.
H-25.
DC
VOLTS
13403
FIG.
H-25—ALTERNATOR OUTPUT
TEST
If
voltage at auxiliary terminal rises to 15 or 16
volts now, when it did not with voltage regulator
connected, then defect is in regulator and it should
be replaced. If voltage
does
not rise at auxiliary
terminal,
defect is in alternator stator or rectifier diodes, if field circuit checked out properly. For
defects
in stator or diodes, remove alternator from vehicle.
If
rated current output is obtained with at least 13
volts but less than 15 volts at the output terminal,
the alternator is functioning properly.
Caution:
Do not exceed rated current output of
alternator
by increasing load on alternator.
If
rated
current
output cannot be obtained, proceed
with
the
tests
and checks given in the following
paragraphs
and isolate the cause.
Note: The system is designed to produce slightly
more output at low operating temperatures and less
at higher temperatures to accommodate the
varying
demands of electrical power normally consumed at
these
temperatures.
H-71.
Regulator Test
The
regulator should be checked with an alternator
that is functioning properly. If the alternator is questionable, perform the Alternator Output Test
(Par
H-70) which excludes the regulator from the
charging
system and, therefore,
tests
the condition
of the alternator alone. 196
Page 198 of 376
H
ELECTRICAL
SYSTEM
terminal
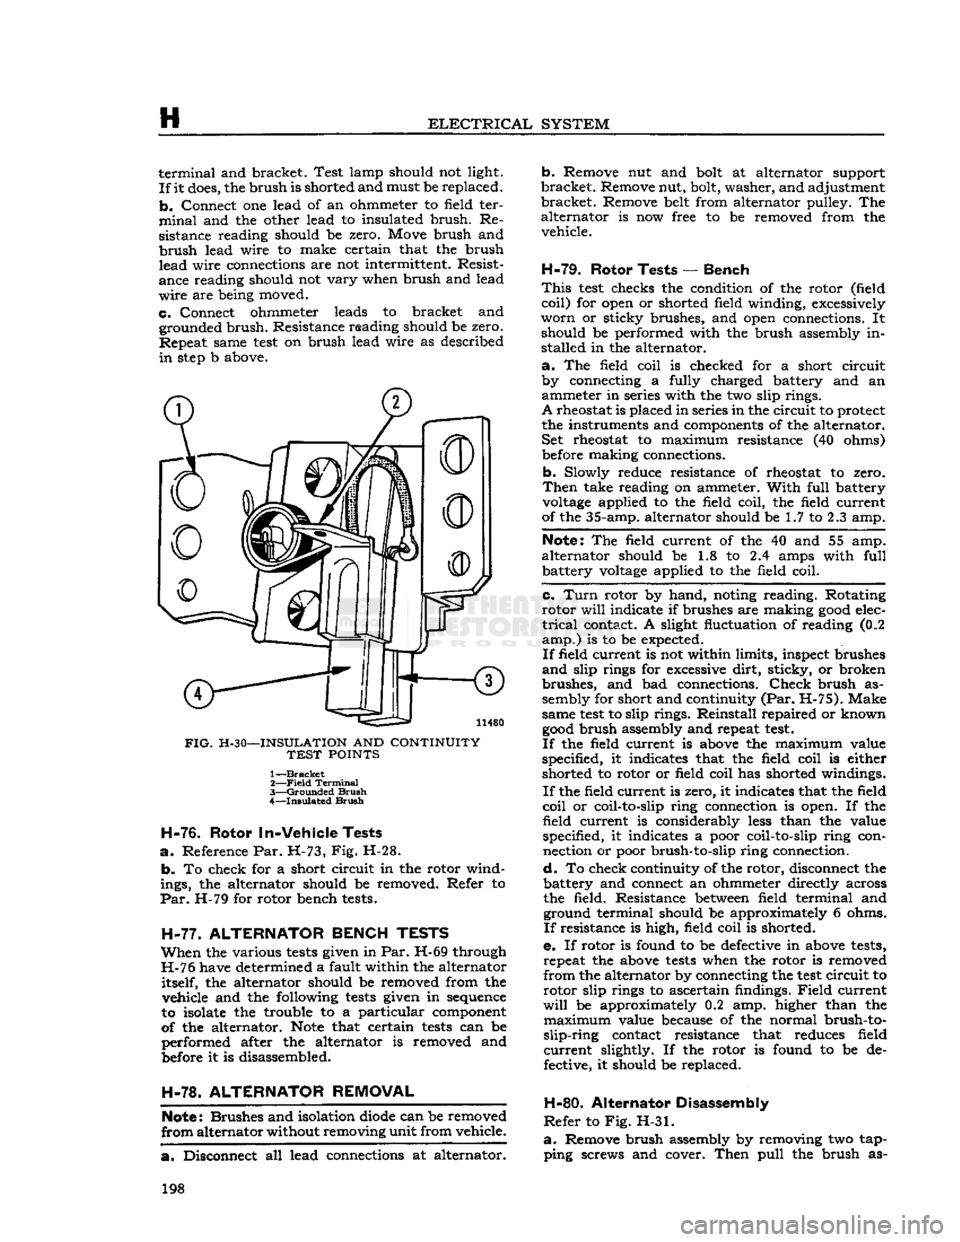
and bracket. Test lamp should not light.
If
it
does,
the
brush
is shorted and must be replaced,
b.
Connect one lead of an ohmmeter to field ter
minal
and the other lead to insulated brush. Re
sistance reading should be zero. Move brush and
brush
lead wire to make certain that the brush lead wire connections are not intermittent. Resist
ance reading should not vary when brush and lead
wire
are being moved.
C.
Connect ohmmeter leads to bracket and grounded brush. Resistance reading should be zero.
Repeat same
test
on brush lead wire as described
in
step
b above.
FIG.
H-30—INSULATION
AND
CONTINUITY
TEST
POINTS
1^-Brackct
2—
Field
Terminal
3—
Grounded
Brush
4—
Insulated
Brush
H-76.
Rotor
In-Vehicle
Tests
a.
Reference Par. H-73, Fig. H-28.
b.
To check for a short circuit in the rotor wind
ings, the alternator should be removed. Refer to
Par.
H-79 for rotor bench
tests.
H-77.
ALTERNATOR
BENCH
TESTS
When
the various
tests
given in
Par.
H-69 through
H-76 have determined a fault within the alternator itself, the alternator should be removed from the vehicle and the following
tests
given in
sequence
to isolate the trouble to a particular
component
of the alternator.
Note
that certain
tests
can be
performed after the alternator is removed and
before
it is disassembled.
H-78.
ALTERNATOR
REMOVAL
Note:
Brushes and isolation
diode
can be removed
from
alternator without removing unit from vehicle.
a.
Disconnect all lead connections at alternator.
b.
Remove nut and
bolt
at alternator support
bracket.
Remove nut, bolt, washer, and adjustment
bracket.
Remove belt from alternator pulley. The alternator is now free to be removed from the
vehicle.
H-79.
Rotor Tests
—
Bench
This
test
checks the condition of the rotor (field coil) for
open
or shorted field winding, excessively
worn
or sticky brushes, and
open
connections. It should be performed with the brush assembly in
stalled in the alternator.
a.
The field coil is checked for a short circuit
by connecting a fully charged battery and an ammeter in series with the two slip rings.
A
rheostat is placed in series in the
circuit
to protect
the instruments and
components
of the alternator. Set rheostat to maximum resistance (40 ohms)
before
making connections.
b.
Slowly reduce resistance of rheostat to zero.
Then
take reading on ammeter. With full battery
voltage
applied to the field coil, the field current
of the 35-amp. alternator should be 1.7 to 2.3 amp.
Note:
The field current of the 40 and 55 amp.
alternator should be 1.8 to 2.4 amps with full battery
voltage
applied to the field coil.
c.
Turn
rotor by hand, noting reading. Rotating
rotor
will
indicate if brushes are making
good
elec
trical
contact. A slight fluctuation of reading (0.2
amp.)
is to be expected.
If
field current is not within limits, inspect brushes
and
slip rings for
excessive
dirt, sticky, or broken
brushes, and bad connections.
Check
brush as sembly for short and continuity (Par. H-75). Make
same
test
to slip rings. Reinstall repaired or known
good
brush assembly and repeat
test.
If
the field current is
above
the maximum value
specified, it indicates that the field coil is either
shorted to rotor or field coil has shorted windings.
If
the field current is zero, it indicates that the field
coil
or coil-to-slip ring connection is open. If the field
current
is considerably
less
than the value
specified, it indicates a poor coil-to-slip ring con nection or poor brush-to-slip ring connection.
d.
To check continuity of the rotor, disconnect the
battery and connect an ohmmeter directly across
the field. Resistance
between
field terminal and ground terminal should be approximately 6 ohms.
If
resistance is high, field coil is shorted.
e.
If rotor is found to be
defective
in
above
tests,
repeat the
above
tests
when the rotor is removed
from
the alternator by connecting the
test
circuit
to rotor slip rings to ascertain findings.
Field
current
will
be approximately 0.2 amp. higher than the
maximum
value because of the normal brush-to-
slip-ring
contact resistance that reduces field
current
slightly. If the rotor is found to be de
fective, it should be replaced.
H-80.
Alternator Disassembly
Refer
to Fig. H-31.
a.
Remove brush assembly by removing two tap ping screws and cover. Then pull the brush as- 198
Page 200 of 376
H
ELECTRICAL
SYSTEM
|
lists
>
FIG.
H-33—REMOVING
REAR
BEARING
1—
Rear
Bearing
2—
Rear
Bearing
Remover C-3936
The
alternator end housing may be
wiped
clean
with
a
cloth
dampened in solvent if excessively
dirty
but should not be
buffed
as this
will
destroy
special treatment given to
inhibit
corrosion.
H-82.
Out-Of-Circuit
Rotor Test
Refer
to
Pars.
H-76 and H-79 for
tests
to be per formed on the rotor. If
these
tests
were not performed while the alternator was assembled, they
can
be performed with the alternator removed by following the procedure given in
these
paragraphs.
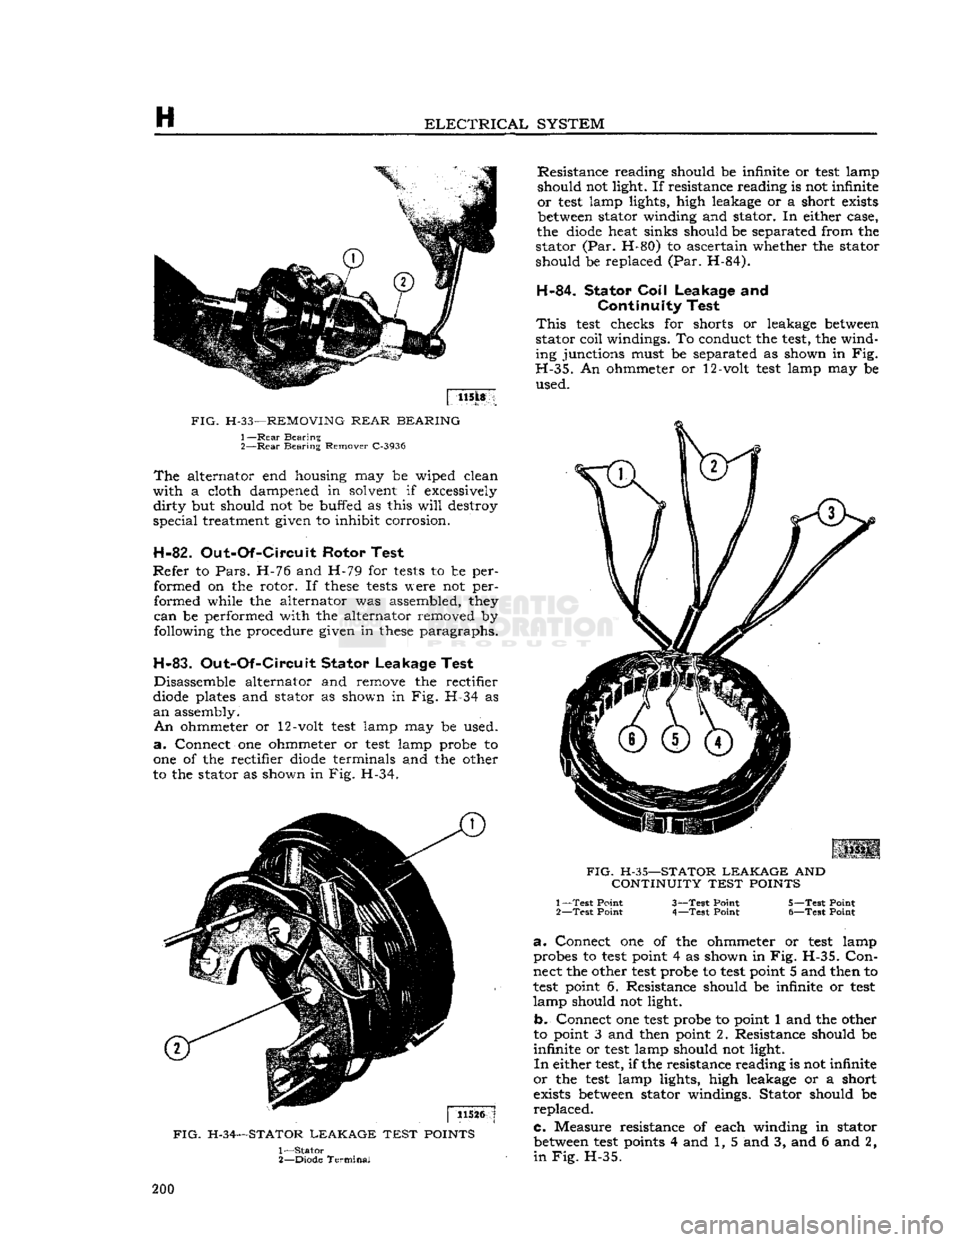
H-83.
Out-Of-Circuit
Stator Leakage Test Disassemble alternator and remove the rectifier
diode plates and stator as shown in Fig. H-34 as
an
assembly.
An
ohmmeter or 12-volt
test
lamp may be used,
a.
Connect one ohmmeter or
test
lamp probe to
one of the rectifier diode terminals and the other
to the stator as shown in Fig. H-34.
FIG.
H-34—STATOR
LEAKAGE
TEST
POINTS
1—
Stator
2—
Diode
Terminal
Resistance
reading should be infinite or
test
lamp
should not light. If resistance reading is not infinite
or
test
lamp lights, high leakage or a short exists between stator winding and stator. In either case,
the diode heat sinks should be separated from the
stator (Par. H-80) to ascertain whether the stator
should be replaced (Par. H-84).
H-84.
Stator
Coil
Leakage and
Continuity
Test
This
test
checks for shorts or leakage between
stator coil windings. To conduct the
test,
the wind
ing junctions must be separated as shown in Fig.
H-35.
An ohmmeter or 12-volt
test
lamp may be used.
|
.11521 •
FIG.
H-35—STATOR
LEAKAGE
AND
CONTINUITY
TEST
POINTS 1—
Test
Point 3—Test Point 5—Test Point
2—
Test
Point 4—Test Point 6—Test Point
a.
Connect one of the ohmmeter or
test
lamp probes to
test
point 4 as shown in Fig. H-35.
Con
nect the other
test
probe to
test
point 5 and then to
test
point 6. Resistance should be infinite or
test
lamp
should not light.
b.
Connect one
test
probe to point 1 and the other
to point 3 and then point 2. Resistance should be infinite or
test
lamp should not light.
In
either
test,
if the resistance reading is not infinite
or
the
test
lamp lights, high leakage or a short
exists between stator windings. Stator should be
replaced.
c.
Measure resistance of each winding in stator between
test
points 4 and 1, 5 and 3, and 6 and 2,
in Fig.
H-35. 200