clock JEEP CJ 1953 Service Manual
[x] Cancel search | Manufacturer: JEEP, Model Year: 1953, Model line: CJ, Model: JEEP CJ 1953Pages: 376, PDF Size: 19.96 MB
Page 24 of 376
c
TUNE-UP
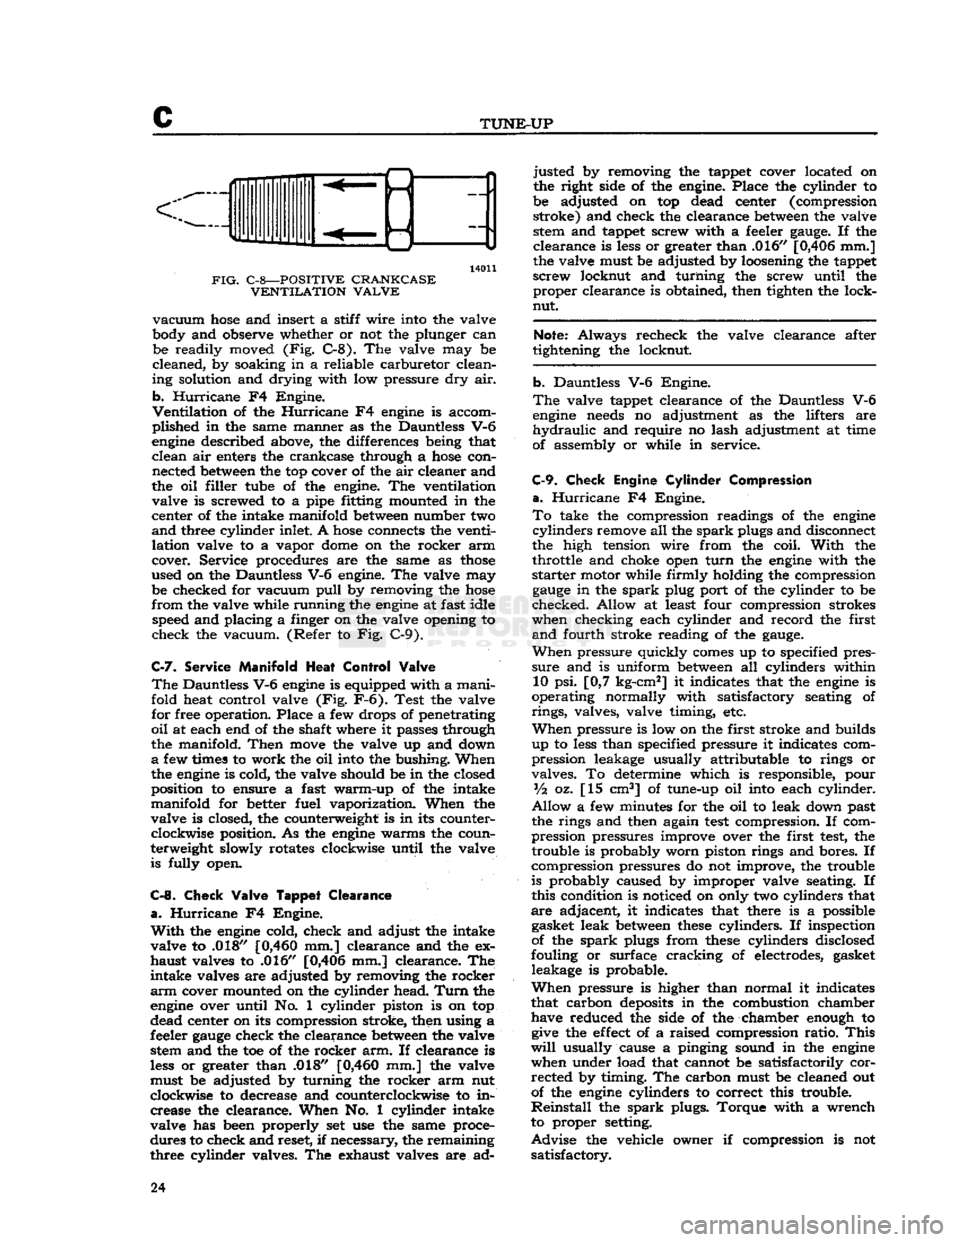
14011
FIG.
C-8—POSITIVE CRANKCASE VENTILATION VALVE
vacuum
hose
and insert a stiff wire into the valve
body and observe whether or not the plunger can be readily moved (Fig. C-8). The valve may be
cleaned, by soaking in a reliable carburetor clean
ing solution and drying with low pressure dry air.
b.
Hurricane
F4 Engine.
Ventilation
of the
Hurricane
F4
engine
is accom
plished in the same manner as the Dauntless V-6
engine
described above, the differences being that clean air enters the crankcase through a
hose
con nected
between
the top cover of the air cleaner and
the oil filler tube of the engine. The ventilation valve is screwed to a pipe fitting mounted in the
center of the intake manifold
between
number two
and
three cylinder inlet. A
hose
connects the venti
lation valve to a vapor
dome
on the rocker arm
cover. Service procedures are the same as
those
used on the Dauntless V-6 engine. The valve may be checked for vacuum
pull
by removing the
hose
from
the valve while running the
engine
at fast idle speed and placing a finger on the valve opening to
check the vacuum. (Refer to Fig. C-9).
C-7.
Service
Manifold
Heat
Control
Valve
The
Dauntless V-6
engine
is equipped with a manifold heat control valve (Fig. F-6). Test the valve
for free operation. Place a few drops of penetrating
oil
at each end of the shaft where it passes through
the manifold.
Then
move
the valve up and down
a
few times to work the oil into the bushing. When
the
engine
is cold, the valve should be in the closed
position to ensure a fast warm-up of the intake
manifold for better fuel vaporization. When the
valve is closed, the counterweight is in its counter clockwise position. As the
engine
warms the coun
terweight slowly rotates clockwise until the valve is fully open.
C-8.
Check
Valve
Tappet
Clearance
a.
Hurricane
F4 Engine.
With
the
engine
cold, check and adjust the intake
valve to .018"
[0,460
mm.] clearance and the ex
haust valves to .016" [0,406 mm.] clearance. The
intake valves are adjusted by removing the rocker
arm
cover mounted on the cylinder head.
Turn
the
engine
over until No. 1 cylinder piston is on top
dead center on its compression stroke, then using a
feeler
gauge
check the clearance
between
the valve stem and the toe of the rocker arm. If clearance is
less
or greater than .018"
[0,460
mm.] the valve
must be adjusted by turning the rocker arm nut
clockwise to decrease and counterclockwise to in crease the clearance. When No. 1 cylinder intake
valve has been properly set use the same proce
dures to check and reset, if necessary, the remaining
three cylinder valves. The exhaust valves are ad justed by removing the tappet cover located on
the right side of the engine. Place the cylinder to
be adjusted on top dead center (compression stroke) and check the clearance
between
the valve stem and tappet screw with a feeler
gauge.
If the
clearance is
less
or greater than .016" [0,406 mm.]
the valve must be adjusted by loosening the tappet
screw locknut and turning the screw until the proper clearance is obtained, then tighten the lock-
nut.
Note:
Always recheck the valve clearance after
tightening the locknut.
b. Dauntless V-6 Engine.
The
valve tappet clearance of the Dauntless V-6
engine
needs
no adjustment as the lifters are
hydraulic
and require no lash adjustment at time
of assembly or while in service.
C-9.
Check
Engine
Cylinder
Compression
a.
Hurricane
F4 Engine.
To
take the compression readings of the
engine
cylinders
remove all the
spark
plugs and disconnect
the high tension wire from the coil.
With
the throttle and choke open
turn
the
engine
with the
starter
motor while firmly holding the compression
gauge
in the
spark
plug port of the cylinder to be
checked. Allow at least four compression strokes
when checking each cylinder and record the first
and
fourth stroke reading of the
gauge.
When
pressure quickly
comes
up to specified pres
sure
and is uniform
between
all cylinders within 10 psi. [0,7 kg-cm2] it indicates that the
engine
is
operating normally with satisfactory seating of
rings,
valves, valve timing, etc.
When
pressure is low on the first stroke and builds
up to
less
than specified pressure it indicates com
pression leakage usually attributable to rings or
valves. To determine which is responsible, pour
Vz
oz. [15 cm3] of tune-up oil into each cylinder.
Allow
a few minutes for the oil to leak down past
the rings and then again
test
compression. If com
pression pressures improve over the first
test,
the trouble is probably worn piston rings and bores. If
compression pressures do not improve, the trouble
is probably caused by improper valve seating. If
this condition is noticed on only two cylinders that
are adjacent, it indicates that there is a possible gasket leak
between
these
cylinders. If inspection
of the
spark
plugs from
these
cylinders disclosed
fouling or surface cracking of electrodes, gasket leakage is probable.
When
pressure is higher than normal it indicates
that carbon
deposits
in the combustion chamber have reduced the side of the chamber enough to
give
the
effect
of a raised compression ratio.
This
will
usually cause a pinging sound in the
engine
when under load that cannot be satisfactorily corrected by timing. The carbon must be cleaned out
of the
engine
cylinders to correct this trouble.
Reinstall
the
spark
plugs. Torque with a wrench
to proper setting.
Advise
the vehicle owner if compression is not satisfactory. 24
Page 26 of 376
c
TUNE-UP
C-10.
Distributor
Service
The
distributor cap should be inspected for
cracks,
carbon runners and evidence of arcing. If any
of
these
conditions exists, the cap should be re
placed.
Clean
any corroded high tension terminals. Inspect the rotor for cracks or evidence of
exces
sive burning at the end of the metal strip. After
a
distributor rotor has had normal use the end
of the rotor
will
become
burned. If burning is found
on top of the rotor it indicates the rotor is too
short and
needs
replacing. Usually when this con
dition is found the distributor cap
segment
will
be burned on the horizontal face and the cap
will
also need replacing.
Check
the condenser lead for broken wires or
frayed
insulation.
Clean
and tighten the connec
tions
on the terminal
posts.
Be sure the condenser
is mounted firmly on the distributor for a
good
ground connection. Should a condenser tester be available the capacity
should be checked. In the absence of a tester check
by substituting a new condenser.
Examine
the distributor
points
(Fig.
C-ll).
If
they
show wear, poor mating, transferred metal, or pitting, then new
ones
should be installed.
Clean
the
points
with a suitable solvent and a stiff
bristled brush.
Check
the alignment of the point for a
full,
square
contact. If not correctly aligned, bend the station
ary
contact bracket slightly to provide alignment,
a.
Hurricane F4 Engine (Prestolite).
The
contact gap of the distributor point on the
Hurricane
F4
engine
should be set at .020"
[0,508
mm.],
measured with a wire
gauge.
Adjustment of
the gap is accomplished by
loosening
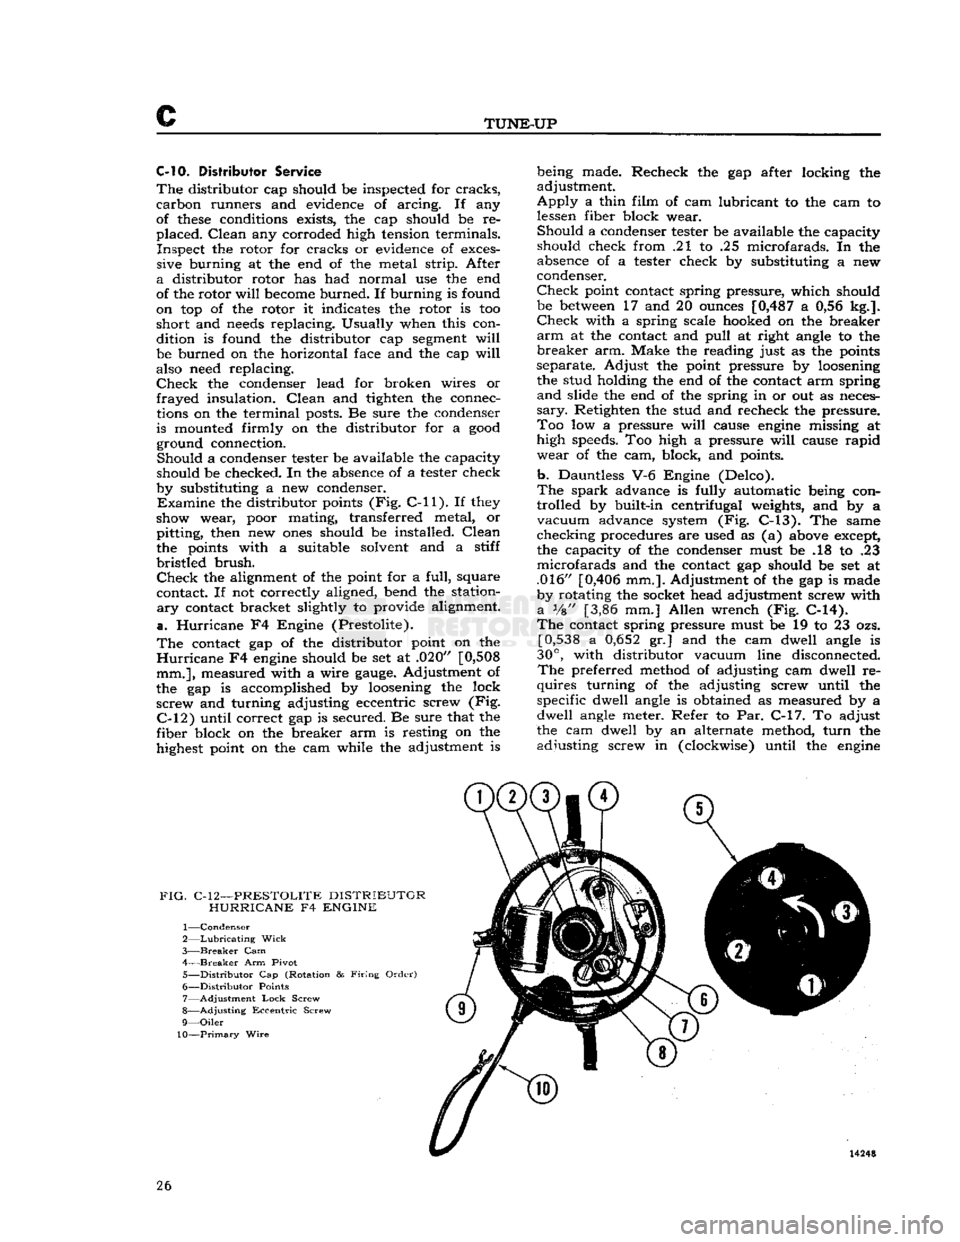
the lock screw and turning adjusting eccentric screw (Fig.
C-12)
until correct gap is secured. Be sure that the
fiber block on the breaker arm is resting on the
highest point on the cam while the adjustment is being made. Recheck the gap after locking the
adjustment.
Apply
a thin film of cam lubricant to the cam to
lessen fiber block wear. Should a condenser tester be available the capacity
should check from .21 to .25 microfarads. In the
absence of a tester check by substituting a new
condenser.
Check
point contact spring pressure, which should
be
between
17 and 20
ounces
[0,487
a 0,56 kg.].
Check
with a spring scale hooked on the breaker
arm
at the contact and pull at right
angle
to the
breaker
arm. Make the reading just as the
points
separate. Adjust the point pressure by
loosening
the stud holding the end of the contact arm spring
and
slide the end of the spring in or out as neces
sary.
Retighten the stud and recheck the pressure. Too low a pressure
will
cause
engine
missing at
high
speeds.
Too high a pressure
will
cause rapid wear of the cam, block, and points.
b. Dauntless V-6 Engine (Delco).
The
spark advance is fully automatic being con
trolled by built-in centrifugal weights, and by a vacuum advance system (Fig.
C-13).
The same
checking procedures are used as (a)
above
except,
the capacity of the condenser must be .18 to .23 microfarads and the contact gap should be set at
.016"
[0,406
mm.]. Adjustment of the gap is made
by rotating the socket head adjustment screw with
a
Vs" [3,86 mm.] Allen wrench (Fig.
C-14).
The
contact spring pressure must be 19 to 23 ozs.
[0,538
a
0,652
gr.] and the cam dwell
angle
is
30°,
with distributor vacuum line disconnected.
The
preferred method of adjusting cam dwell re
quires turning of the adjusting screw until the specific dwell
angle
is obtained as measured by a
dwell
angle
meter. Refer to Par. C-l7. To adjust
the cam dwell by an alternate method, turn the adjusting screw in (clockwise) until the
engine
FIG.
C-12—PRESTOLITE DISTRIBUTOR HURRICANE F4 ENGINE
1— Condenser
2—
Lubricating
Wick
3—
Breaker
Cam
4—
Breaker
Arm Pivot 5—
Distributor
Cap (Rotation &
Firing
Order)
6—
Distributor
Points 7— Adjustment
Lock
Screw
8—
Adjusting
Eccentric
Screw
9—
Oiler
10—Primary
Wire
26
Page 27 of 376
'Jeep*
UNIVERSAL
SERIES SERVICE
MANUAL
C
12763
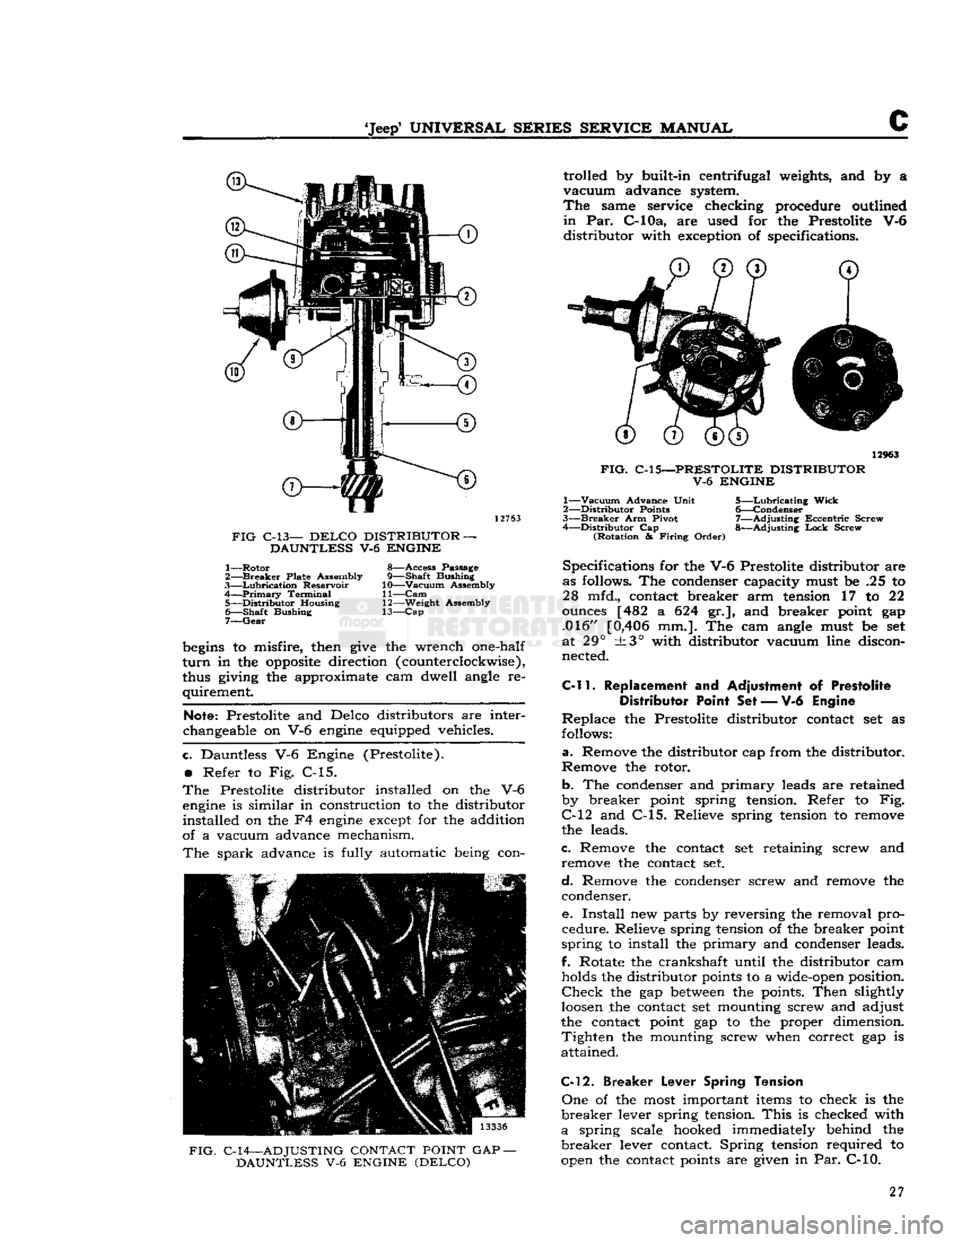
FIG
C-13—
DELCO
DISTRIBUTOR —
DAUNTLESS V-6 ENGINE
1—
Rotor
8—Access Passage
2—
Breaker
Plate Assembly 9—Shaft Bushing
3—
Lubrication
Reservoir 10—Vacuum Assembly
4—
Primary
Terminal
11—Cam
5—
Distributor
Housing 12—Weight Assembly 6—
Shaft
Bushing 13—Cap
7—
Gear
begins
to misfire, then
give
the wrench one-half
turn
in the
opposite
direction (counterclockwise),
thus giving the approximate cam dwell angle re
quirement
Note:
Prestolite and Delco distributors are inter
changeable on V-6
engine
equipped vehicles.
c.
Dauntless V-6 Engine (Prestolite).
•
Refer to Fig. C-l5.
The
Prestolite distributor installed on the V-6
engine
is similar in construction to the distributor
installed on the F4
engine
except for the addition
of a vacuum advance mechanism.
The
spark advance is fully automatic being con-
FIG.
C-14—ADJUSTING CONTACT POINT GAP —
DAUNTLESS V-6 ENGINE (DELCO) trolled by built-in centrifugal weights, and by a
vacuum
advance system.
The
same service checking procedure outlined
in
Par.
C-lOa,
are used for the Prestolite V-6
distributor
with exception of specifications. 12963
FIG.
C-15—-PRESTOLITE DISTRIBUTOR V-6 ENGINE
1—
Vacuum
Advance Unit
5—Lubricating
Wick
2—
Distributor
Points 6—Condenser
3—
Breaker
Arm Pivot 7—Adjusting
Eccentric
Screw
4—
Distributor
Cap 8—Adjusting
Lock
Screw
(Rotation
&
Firing
Order)
Specifications for the V-6 Prestolite distributor are
as follows. The condenser capacity must be .25 to 28 mfd., contact breaker arm tension 17 to 22
ounces [482 a 624 gr.], and breaker point gap .016" [0,406 mm.]. The cam angle must be set
at 29° ±3° with distributor vacuum line discon
nected.
C-11.
Replacement and Adjustment of Prestolite
Distributor Point
Set — V-6
Engine
Replace
the Prestolite distributor contact set as
follows:
a.
Remove the distributor cap from the distributor.
Remove the rotor.
b. The condenser and primary leads are retained
by breaker point spring tension. Refer to Fig.
C-12
and C-15. Relieve spring tension to remove
the leads.
c. Remove the contact set retaining screw and remove the contact set.
d.
Remove the condenser screw and remove the condenser.
e.
Install
new parts by reversing the removal pro
cedure. Relieve spring tension of the breaker point
spring
to install the primary and condenser leads.
f.
Rotate the crankshaft until the distributor cam
holds the distributor points to a wide-open position.
Check
the gap
between
the points. Then slightly
loosen
the contact set mounting screw and adjust
the contact point gap to the proper dimension.
Tighten
the mounting screw when correct gap is attained.
C-12. Breaker
Lever
Spring Tension
One
of the most important items to check is the
breaker
lever spring tension.
This
is checked with
a
spring scale hooked immediately behind the
breaker
lever contact. Spring tension required to
open the contact points are given in Par. C-10. 27
Page 28 of 376
c
TUNE-UP
C-13. Replacement and Adjustment of
Delco
Distributor Point Set
When
inspection of the contact points show re placement to be advisable, the following procedure
should be used. See Fig. C-13.
Note:
The service replacement contact point set
has the breaker spring tension and point alignment
adjusted at the factory.
Removal
of
Contact Point
Set
a.
Remove distributor cap by inserting a screw
driver
in upper slotted end of cap retainers,
press
down and turn 90° counterclockwise. Push distri
butor cap aside and remove rotor. Disconnect the condenser and primary leads from their terminal
by loosening the retaining screw. If there is no
retaining
screw, simply slip leads out.
b. Loosen two screws and lock
washers
which hold
the contact point set in place. Then remove point
set.
Installation
of
Contact Point
Set.
a.
Slide contact point set over
boss
on breaker
plate and under the two screw heads. Tighten two
screws and lock washers.
b.
Install
condenser and primary leads.
Note:
Leads must be properly positioned so they
will
not
come
in contact with
bottom
of weight
base or rotor.
c.
If
engine
does
not start readily, position contact
arm
rubbing block on peak of cam lobe, insert
V%"
[3,86 mm.] Allen wrench in adjusting screw and
turn
screw in (clockwise) until contact points
just
close. Then back screw out (counterclockwise)
V2
turn
(180°)
to obtain a point gap of approxi
mately .016" [0,406 mm.] for a preliminary setting.
Adjustment
of
Contact Points
—
Engine Running
Note:
When adjusting contact point dwell angle,
always follow the instructions which
come
with the
dwell
meter.
a.
Connect dwell tester leads: red to distributor
side of coil, black to ground.
b. Turn
selector switch to position for
6-lobe
cam.
Turn
ignition switch on.
c.
Start engine.
Lift
adjustment window and insert
Vs"
[3,86 mm.] Allen wrench in adjusting screw.
Set dwell angle at 30 degrees. See Fig. C-14.
d.
After adjusting dwell angle, always check
ignition timing.
C-14.
Check
Ignition
Timing
a.
Hurricane F4 Engine.
If
a neon timing light is available, use it to check
igntion timing following the instructions of the
timing light manufacturer.
In
the absence of a timing light, remove No. 1
spark
plug and turn the
engine
over until No. 1
piston is on compression stroke as indicated by
air
being forced from No. 1 spark plug opening.
Turn
the
engine
slowly until the specified
degree
mark
on the timing gear cover is in alignment with
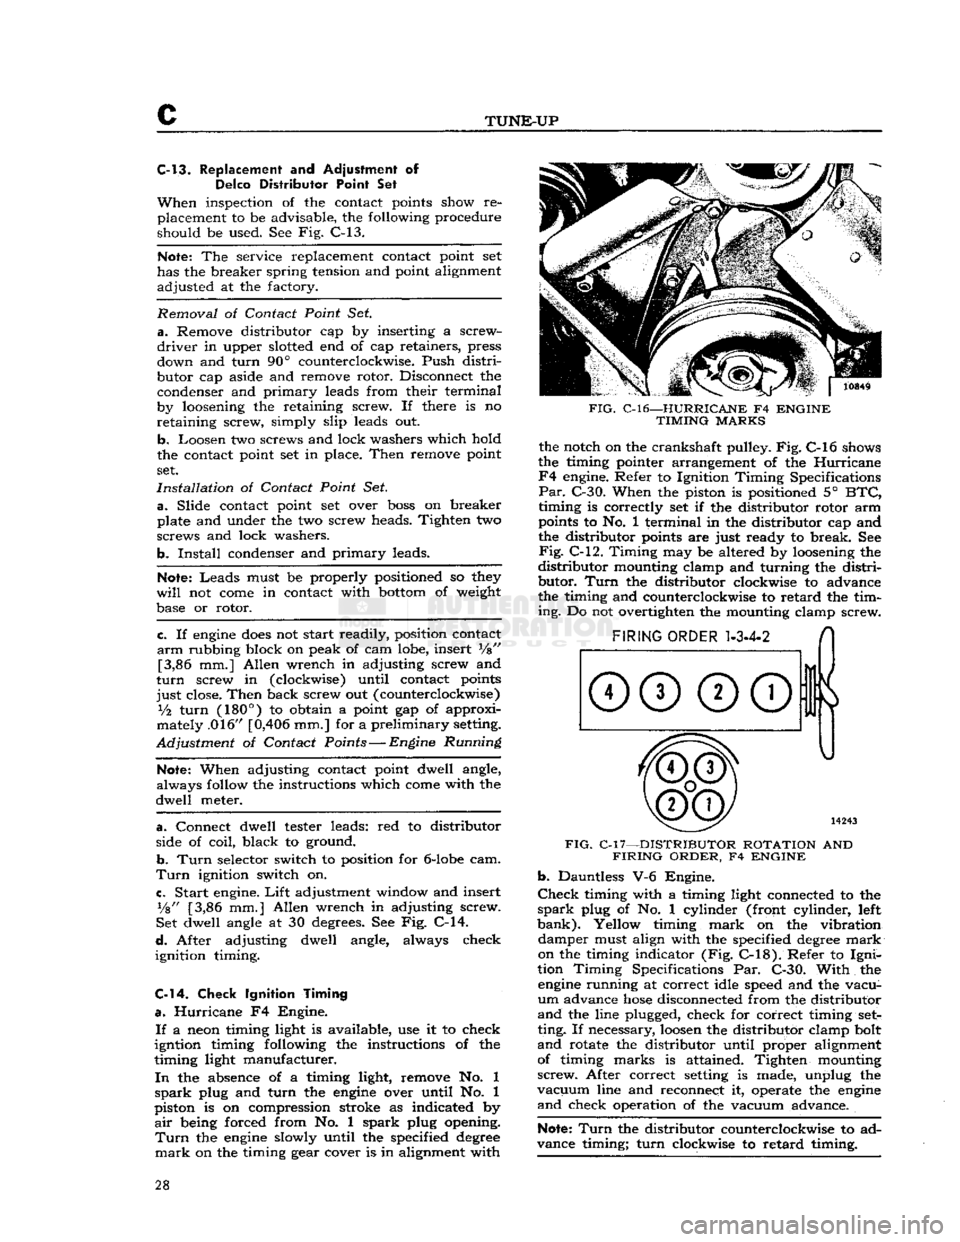
FIG.
C-l6—HURRICANE
F4
ENGINE
TIMING
MARKS
the notch on the crankshaft pulley. Fig. C-l6 shows
the timing pointer arrangement of the Hurricane
F4
engine. Refer to Ignition Timing Specifications
Par.
C-30. When the piston is positioned 5°
BTC,
timing is correctly set if the distributor rotor arm
points to No. 1 terminal in the distributor cap and
the distributor points are just ready to break. See
Fig.
C-12. Timing may be altered by loosening the
distributor
mounting clamp and turning the distri
butor.
Turn
the distributor clockwise to advance
the timing and counterclockwise to retard the tim
ing.
Do not overtighten the mounting clamp screw.
FIG.
C-l7—DISTRIBUTOR ROTATION
AND
FIRING
ORDER,
F4
ENGINE b.
Dauntless V-6 Engine.
Check
timing with a timing light connected to the
spark
plug of No. 1 cylinder (front cylinder, left
bank).
Yellow timing
mark
on the vibration damper must align with the specified
degree
mark
on the timing indicator (Fig.
C-18).
Refer to
Igni
tion Timing Specifications Par. C-30. With the
engine
running at correct idle speed and the vacu
um
advance
hose
disconnected from the distributor
and
the line plugged, check for correct timing
set
ting. If necessary,
loosen
the distributor clamp bolt
and
rotate the distributor until proper alignment of timing marks is attained. Tighten mounting
screw.
After correct setting is made, unplug the
vacuum
line and reconnect it, operate the
engine
and
check operation of the vacuum advance.
Note:
Turn
the distributor counterclockwise to ad
vance timing; turn clockwise to retard timing. 28
Page 32 of 376
c
TUNE-UP
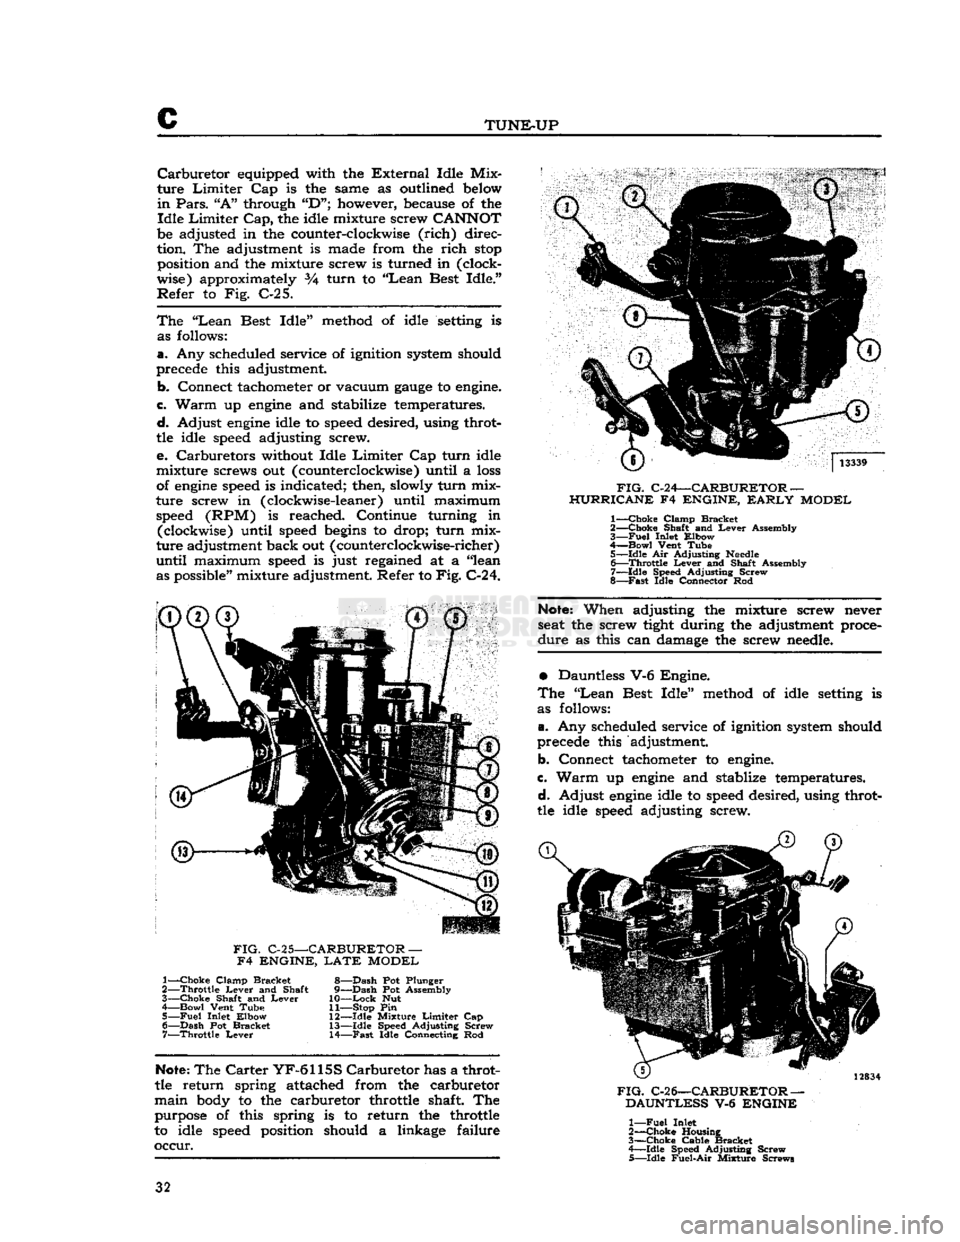
Carburetor
equipped with the
External
Idle Mix
ture
Limiter
Cap is the same as outlined below
in
Pars.
"A"
through
"D";
however, because of the
Idle
Limiter
Cap,
the idle mixture screw
CANNOT
be adjusted in the counter-clockwise
(rich)
direc
tion. The adjustment is made from the
rich
stop
position and the mixture screw is turned in (clock
wise) approximately 3A turn to
"Lean
Best Idle."
Refer
to Fig. C-25.
The
"Lean
Best Idle" method of idle setting is as follows:
a.
Any scheduled service of ignition system should
precede this adjustment.
b.
Connect tachometer or vacuum
gauge
to engine.
c.
Warm
up
engine
and stabilize temperatures.
d.
Adjust
engine
idle to speed desired, using throt
tle idle speed adjusting screw.
e.
Carburetors without Idle
Limiter
Cap turn idle
mixture screws out (counterclockwise) until a
loss
of
engine
speed is indicated; then, slowly turn mix
ture screw in (clockwise-leaner) until maximum speed (RPM) is reached. Continue turning in (clockwise) until speed
begins
to drop; turn mix
ture adjustment back out (counterclockwise-richer)
until
maximum speed is just regained at a "lean as possible" mixture adjustment. Refer to
Fig.
C-24.
FIG.
C-24—CARBURETOR —
HURRICANE F4 ENGINE,
EARLY
MODEL 1—
Choke
Clamp Bracket
2—
Choke
Shaft and
Lever
Assembly
3—
Fuel
Inlet Elbow
4—
Bowl
Vent Tube 5— idle Air Adjusting
Needle
6—
Throttle
Lever
and Shalt Assembly
7—
Idle
Speed Adjusting Screw
8—
Fast
Idle Connector Rod
FIG.
C-25—CARBURETOR —
F4 ENGINE,
LATE
MODEL 1—
Choke
Clamp Bracket
2—
Throttle
Lever
and Shaft
3—
Choke
Shaft and
Lever
4 Bowl Vent Tube 5—
Fuel
Inlet Elbow 6—
Dash
Pot Bracket 7—
Throttle
Lever
8—
Dash
Pot Plunger
9—
Dash
Pot Assembly
10—
Lock
Nut
11— Stop Pin
12—
Idle
Mixture
Limiter
Cap 13—
Idle
Speed Adjusting Screw
14—
Fast
Idle Connecting Rod
Note:
When adjusting the mixture screw never
seat the screw tight during the adjustment proce
dure
as this can damage the screw needle.
•
Dauntless V-6 Engine.
The
"Lean
Best Idle" method of idle setting is
as follows:
a.
Any scheduled service of ignition system should
precede this adjustment.
b. Connect tachometer to engine.
c.
Warm
up
engine
and stablize temperatures.
d.
Adjust
engine
idle to speed desired, using throt
tle idle speed adjusting screw.
Note:
The
Carter
YF-6115S
Carburetor
has a throt
tle return spring attached from the carburetor
main
body to the carburetor throttle shaft The purpose of this spring is to return the throttle
to idle speed position should a linkage failure
occur.
FIG.
C-26—CARBURETOR —
DAUNTLESS V-6 ENGINE 1—
Fuel
Inlet
2—
-Choke
Housing
3—
Choke
Cable Bracket
4—
Idle
Speed Adjusting Screw
5—
Idle
Fuel-Air
Mixture Screws 32
Page 33 of 376
'Jeep*
UNIVERSAL
SERIES
SERVICE
MANUAL
C
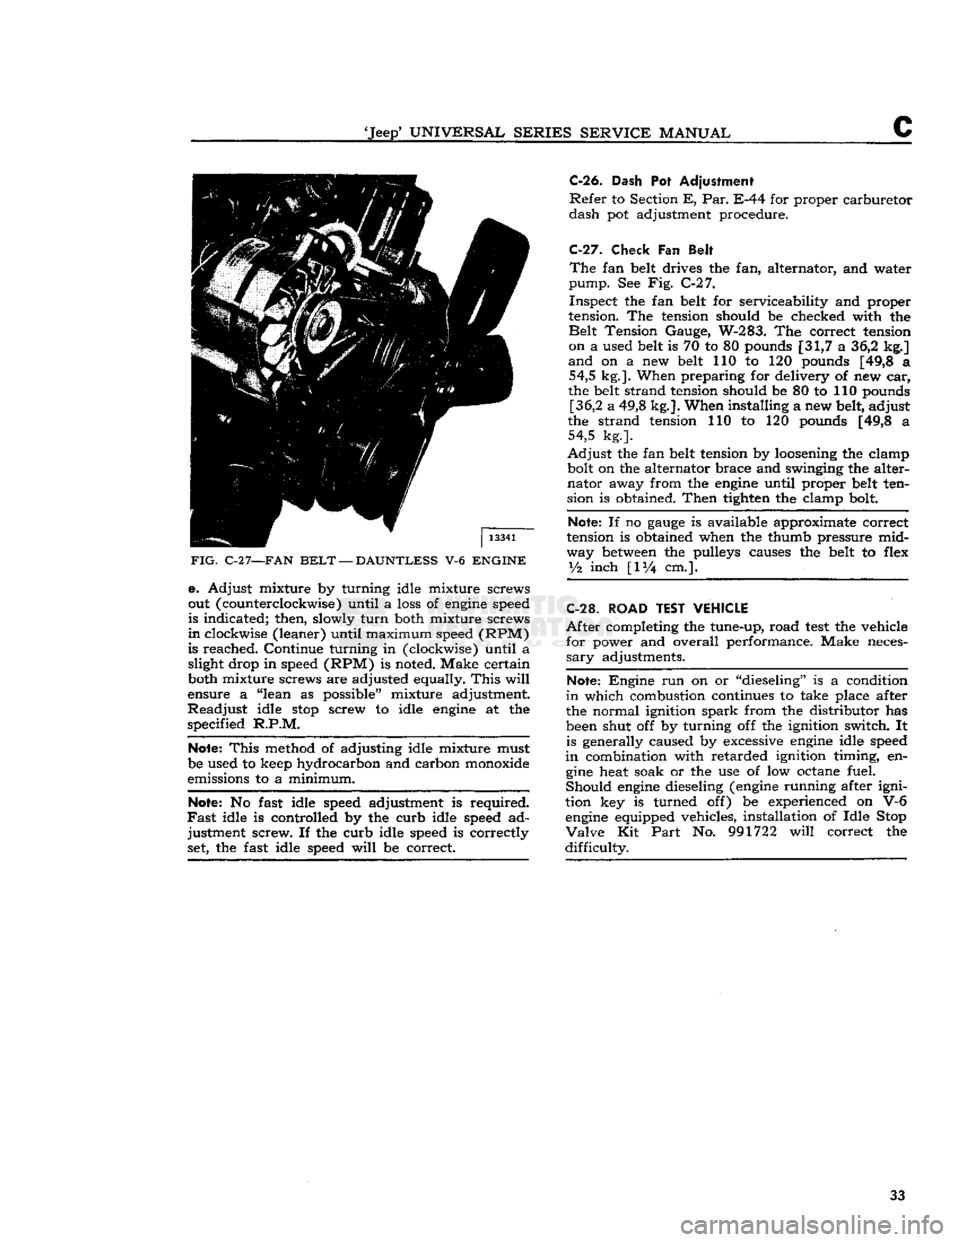
FIG.
C-2
7—FAN
BELT
—
DAUNTLESS
V-6
ENGINE
e. Adjust mixture by turning idle mixture screws
out (counterclockwise) until a loss of engine speed
is indicated; then, slowly
turn
both mixture screws
in
clockwise (leaner) until maximum speed (RPM)
is reached. Continue turning in (clockwise) until a slight drop in speed (RPM) is noted. Make certain
both mixture screws are adjusted equally.
This
will
ensure a "lean as possible" mixture adjustment.
Readjust
idle
stop
screw to idle engine at the
specified
R.P.M.
Note:
This
method of adjusting idle mixture must
be used to keep hydrocarbon and carbon monoxide
emissions to a minimum.
Note:
No fast idle speed adjustment is required.
Fast
idle is controlled by the curb idle speed ad justment screw. If the curb idle speed is correctly set, the fast idle speed
will
be correct.
C-26.
Dash
Pot
Adjustment
Refer
to Section
E, Par.
E-44 for proper carburetor
dash
pot adjustment procedure.
C-27.
Check
Fan
Belt
The
fan belt drives the fan, alternator, and water
pump.
See Fig. C-27.
Inspect
the fan belt for serviceability and proper
tension. The tension should be checked with the
Belt
Tension Gauge, W-283. The correct tension on a used belt is 70 to 80 pounds [31,7 a 36,2 kg.]
and
on a new belt 110 to 120 pounds [49,8 a 54,5 kg.]. When preparing for delivery of new car,
the belt strand tension should be 80 to 110 pounds [36,2 a 49,8 kg.]. When installing a new belt, adjust
the strand tension 110 to 120 pounds [49,8 a 54,5 kg.].
Adjust
the fan belt tension by loosening the clamp
bolt on the alternator brace and swinging the alter
nator
away from the engine until proper belt ten
sion is obtained.
Then
tighten the clamp bolt.
Note:
If no
gauge
is available approximate correct
tension is obtained when the thumb pressure mid
way between the pulleys causes the belt to flex
y%
inch
[IV4
cm.].
C-28.
ROAD TEST VEHICLE
After
completing the tune-up, road
test
the vehicle for power and overall performance. Make neces
sary
adjustments.
Note:
Engine run on or "dieseling" is a condition
in
which combustion continues to take place after
the normal ignition
spark
from the distributor has
been shut off by turning off the ignition switch. It is generally caused by excessive engine idle speed
in
combination with retarded ignition timing, en gine heat soak or the use of low octane fuel.
Should
engine dieseling (engine running after igni
tion key is turned off) be experienced on V-6 engine equipped vehicles, installation of Idle Stop
Valve
Kit
Part
No. 991722
will
correct the
difficulty.
33
Page 35 of 376
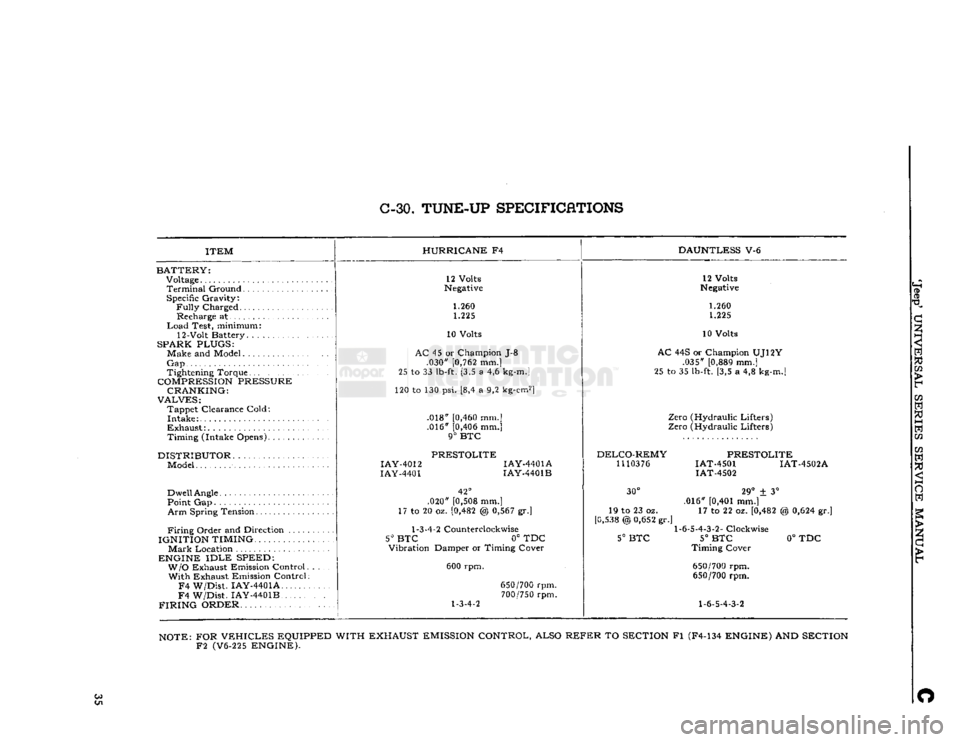
C-30.
TUNE-UP
SPECIFICATIONS
ITEM
BATTERY:
Voltage
Terminal
Ground Specific Gravity:
Fully
Charged Recharge at
Load
Test, minimum:
12-Volt Battery. .
SPARK PLUGS:
Make and Model
Gap
Tightening Torque
COMPRESSION
PRESSURE CRANKING:
VALVES:
Tappet Clearance Cold:
Intake
Exhaust:
Timing (Intake Opens)
DISTRIBUTOR
Model
Dwell
Angle
Point Gap
Arm
Spring Tension
Firing
Order and Direction ....
IGNITION TIMING.
Mark
Location
ENGINE
IDLE
SPEED: W/O
Exhaust Emission Control With Exhaust Emission Control
F4
W/Dist. IAY-4401A
F4
W/Dist. IAY-4401B
FIRING
ORDER HURRICANE
F4
DAUNTLESS
V-6
12 Volts
Negative
1.260 1.225
10 Volts
AC
45 or Champion J-8 .030"
[0,762
mm.]
25 to 33
lb-ft.
[3,5 a 4,6
kg-m.]
120 to 130 psi. [8,4 a 9,2
kg-cm2]
.018"
[0,460
mm.] .016"
[0,406
mm.]
9°
BTC
PRESTOLITE
IAY-4012
IAY-4401A
IAY-4401
IAY-4401B
42°
.020"
[0,508
mm.]
17 to 20 oz.
[0,482
@
0,567
gr.]
1-3-4-2
Counterclockwise
5° BTC
0° TDC
Vibration Damper or Timing Cover
600 rpm.
1-3-4-2
650/700
rpm.
700/750
rpm. 12 Volts
Negative
1.260 1.225
10 Volts
AC
44S or Champion UJ12Y .035"
[0,889
mm.]
25 to 35
lb-ft.
[3,5 a 4,8
kg-m.]
Zero (Hydraulic Lifters)
Zero (Hydraulic Lifters)
DELCO-REMY
1110376
PRESTOLITE
IAT-4501 IAT-4502A
IAT-4502
30°
19 to 23 oz.
[0,538
@
0,652
gr.'
5°
BTC
29°
± 3°
.016"
[0,401
mm.] 17 to 22 oz.
[0,482
1-6-5-4-3-2-
Clockwise
5°
BTC
Timing Cover
650/700
rpm.
650/700
rpm.
1-6-5-4-3-2
%
0,624
gr.]
0°
TDC
NOTE:
FOR
VEHICLES
EQUIPPED WITH EXHAUST
EMISSION
CONTROL, ALSO
REFER
TO
SECTION
Fl (F4-134
ENGINE)
AND
SECTION
F2
(V6-225
ENGINE).
Co O
Page 42 of 376
D
HURRICANE
F4
ENGINE
D-7.
Remove Water Pump
Remove the
bolts
and lockwashers that attach the
water pump to the cylinder block. Remove the water pump.
D-8.
Remove
Exhaust
Manifold
Remove the five nuts from the manifold studs.
Pull
the manifold off the mounting studs. Remove the center and two end gaskets from the cylinder
block. See Section Fl for exhaust emission con trolled engines.
D-9.
Remove Oil
Filler
Tube
Loop
a piece of wire several times around the tube
below the top and make a
loop
through which a
pry
bar may be used to pry over the top of the
engine
water
outlet
fitting.
Pull
on the tube, tapping it just above where it enters the crankcase.
D-10.
Remove Water Outlet Fitting
Remove the nuts and lockwashers that attach the
water
outlet
fitting to the cylinder head.
Lift
the
outlet
fitting from the cylinder head.
D-11.
Remove Thermostat
With
the water
outlet
fitting removed, the thermo
stat can be lifted from the water
outlet
elbow on the cylinder head.
D-12.
Remove
Crankshaft
Pulley
Remove the crankshaft nut.
Install
a puller and
pull
the pulley from the crankshaft.
D-13.
Remove Distributor
a.
Remove
spark
plug cables from the distributor
cap,
noting the order in which they are assembled to ensure correct reassembly. No. 1
spark
plug
terminal
is in the 5 o'clock position. Starting with this tower the cables are installed in a counterclockwise direction in
1-3-4-2
firing order.
b.
Remove the
primary
lead from the terminal
post
at the side of the distributor.
c. Remove the screw holding the distributor to the crankcase and lift the assembly from the engine.
D-14. Remove Oil Pump
The
oil pump is located externally on the left side
of the engine. If only the oil pump is being removed
with
the
engine
in the vehicle, set No. 1 piston at
TDC
for reference for reinstalling the oil pump
without greatly disturbing the ignition timing.
First
remove the distributor cover and
note
the
position of the distributor rotor.
If
the distributor is already removed, sight through
the distributor
hole
before removing the oil pump.
The
slot should be near vertical. Remove the capscrews and lockwashers attaching the oil pump
to the cylinder block.
Carefully
slide the oil pump
and
its drive shaft out of the cylinder block.
D-1S.
Remove
Crankcase
Ventilation Valve
To
remove the crankcase ventilation valve from
the elbow fitting screwed into the inlet manifold of the cylinder head, first remove the
hose
and
clamp from the valve (Fig. D-32), then using a
wrench
carefully unscrew the valve from the
elbow.
D-l6.
Remove Rooker Arm Assemblies
The
rocker arm cover was previously removed as
a
step
of the
engine
removal (Par. D-5).
Remove the nuts from the rocker arm shaft support
studs, and lift the rocker arm assembly off the studs.
Lift
the intake valve push rods out of the
cylinder
block.
D-17.
Remove
Cylinder
Head
a.
Removal.
Disconnect the oil line from the flared tube con
nector and remove the rocker arm attaching stud nuts, and rocker arm shaft assembly if not pre
viously removed. Two end head
bolts
cannot be removed until the rocker arm shaft is removed.
Remove the cylinder head bolts.
There
is one
cylinder
head bolt located below the carburetor
mounting, inside the intake manifold, that must
not be overlooked.
Carefully
lift the cylinder head off the block.
Remove the valve push rods and the valve lifters.
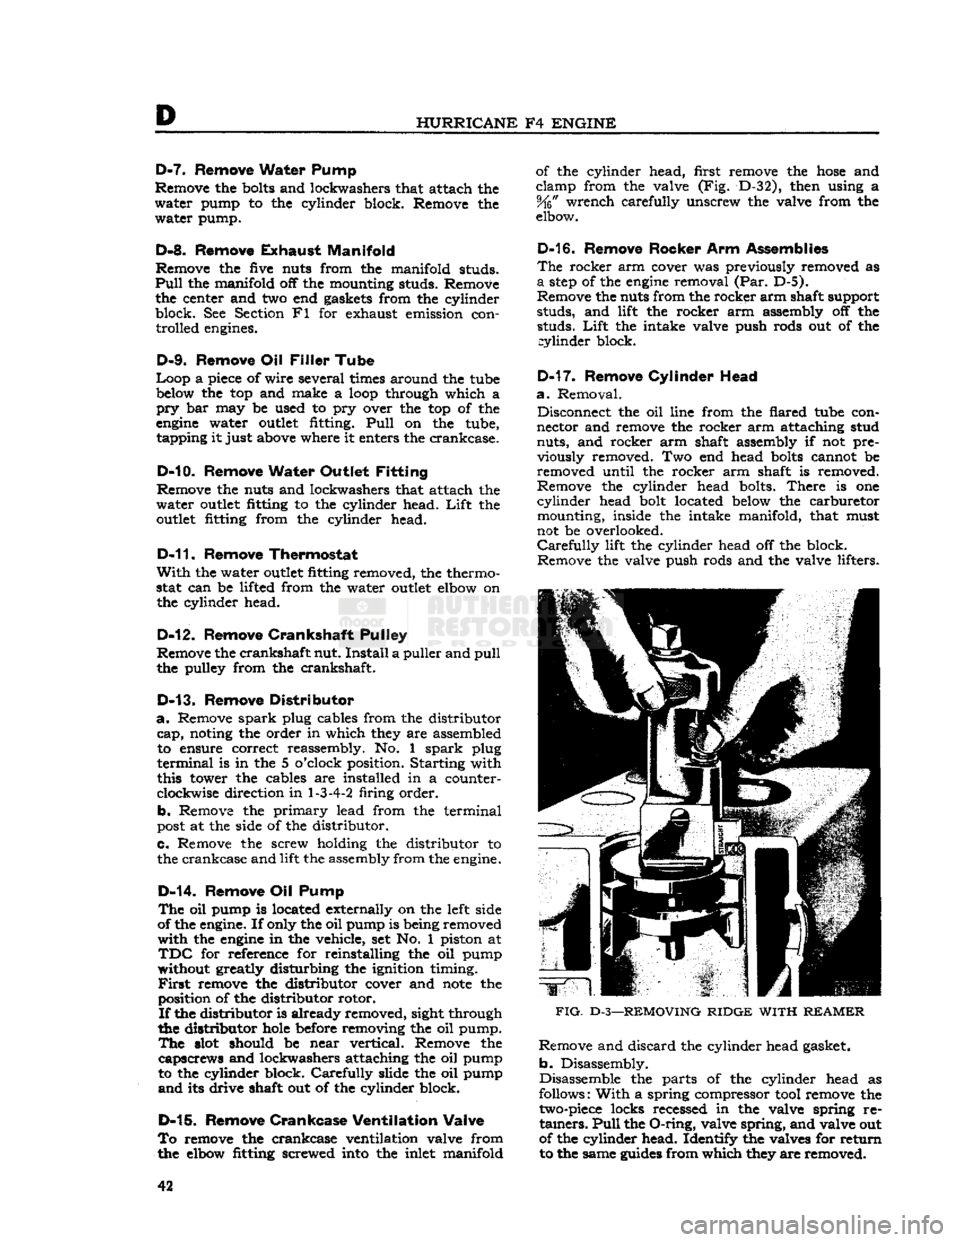
FIG.
D-3—REMOVING
RIDGE
WITH
REAMER
Remove and discard the cylinder head gasket,
b. Disassembly.
Disassemble the parts of the cylinder head as
follows:
With
a spring compressor tool remove the
two-piece
locks recessed in the valve spring re
tainers.
Pull
the
O-ring,
valve spring, and valve out
of the cylinder head. Identify the valves for return to the same
guides
from which they are removed.
42
Page 54 of 376
D
HURRICANE
F4
ENGINE
against the hub of the crankshaft pulley.
Timing
gears are accessible for inspection or replacement
with
the
engine
installed in the vehicle after re moving the radiator, belt drive pulley, and timing
cover.
Should
it be necessary to replace the timing gears, attention must be given to the end float of both
the camshaft and crankshaft and to the running
clearance
of both gears. It is also advisable to
check
both the oil jet and oil passage to the
crank
shaft front bearing to be sure that they are clear.
D-55.
Inspection and
Repair
Check
the general condition of both gears and
inspect for evidence of excessive wear. Replace
excessively worn or damaged gears. Inspect the
cover and replace if bent or damaged. It is recom mended that the crankshaft oil seal in the cover
be replaced when the cover is removed to ensure a
good
seal around the crankshaft. To replace this
seal
with the
engine
in the vehicle
requires
removing
the radiator and water pump.
D-56.
Valves, Springs, and Guides
The
exhaust valves seat on the top of the cylinder
block
with the
stems
extending down through
replaceable valve guides. The exhaust valves are actuated by the camshaft through exhaust valve
tappets. The exhaust valve springs are assembled
and
locked on the lower end of the exhaust valve
stems. The retaining locks are the split type, which
fit in a recess on the valve
stems
and into the taper
in
the valve spring retainers.
Adjustment
of exhaust valves is by means of the
adjusting
screw threaded into the upper end of the
exhaust valve tappets. An exhaust valve rotator used as a valve spring retainer is installed on the
lower end of the exhaust valve.
This
valve rotator,
known
as "Roto Cap", is a spring-loaded
ball
bearing
device. On each lift, or opening stroke of
a
valve, the rotator
gives
the valve a slight positive
clockwise rotation.
The
intake valves operate in valve
guides
in the
cylinder
head and are actuated by rocker arms.
The
rocker arms are actuated by valve push rods
and
the intake valve tappets. The intake valve
springs,
the intake valve spring retainers, and the
intake
valve spring retainer locks make up the
remainder
of the valve operating parts. An intake
valve spring retainer oil seal which encircles the
upper
end of the intake valve
between
the valve
locks and the upper end of the valve spring re
tainer,
controls the passage of oil along the valve
stem and guide.
Note:
When
engine
trouble indicates defective
valves as a possible source of trouble, also check
all
vacuum line connections for possible leaks.
D-57.
Inspection of Valves, Springs,
and
Guides
Clean
the valves on a wire wheel, making sure that
all
carbon is removed from the top and the under
side of the heads and that all gum and varnish
deposits
are removed from the stems.
Polish
the valve
stems
with steel wool or crocus
cloth.
Visually
inspect all valves for warpage,
cracks,
or excessive burning and discard if one of
these
conditions exists. Replace any worn, pitted,
or
corroded valves that cannot be cleaned with a
wire
brush.
Replace any valves when
seats
are pitted, burned, or corroded so badly that they
cannot be cleaned up with a light refacing on a valve refacing machine.
Replace
valves with marks of scoring or abrasion visible on the stem. Replace any valves with bent
stems
which
will
be apparent when the valve is
mounted in the valve refacing machine.
Note:
Use only hard-face exhaust valves for
replacement.
Examine
the
stems
of valves which employ the
ball
bearing rotators.
Wear
marks around the
cir
cumference of the
stems
indicates that the valve is
rotating satisfactorily.
Vertical
heavy pressure
areas
indicate that the valve is not rotating and the valve spring retainer (Roto
Cap)
should be replaced
if
at fault.
Check
the diameter of the valve stem at two or three places along the length of the stem
with
a micrometer. The intake valve stem diameter is .3733" to .3738" [9,482 a
9,495
mm.]. The
exhaust valve stem diameter is .371" to .372"
[9,423
a
9,449
mm.].
Note:
Exhaust
and intake valve springs are
similar
in appearance. They must not be inter
changed as they have different spring
charac
teristics.
Wash
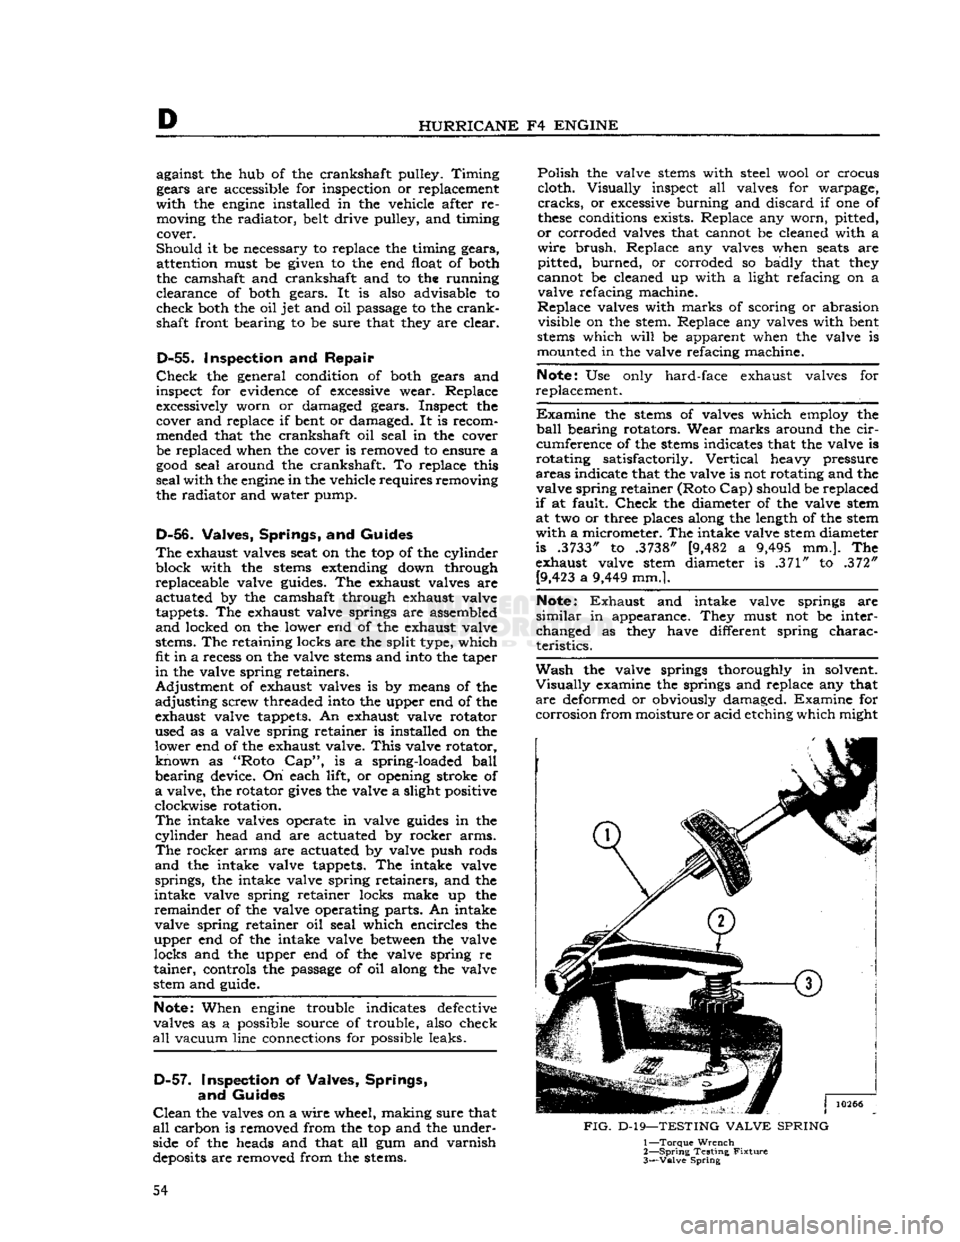
the valve springs thoroughly in solvent.
Visually
examine the springs and replace any that
are
deformed or obviously damaged. Examine for
corrosion
from moisture or acid etching which might
FIG.
D-19—TESTING
VALVE
SPRING
1—
Torque
Wrench
2—
Spring
Testing
Fixture
3—
Valve
Spring
54
Page 66 of 376
D
HURRICANE
F4
ENGINE
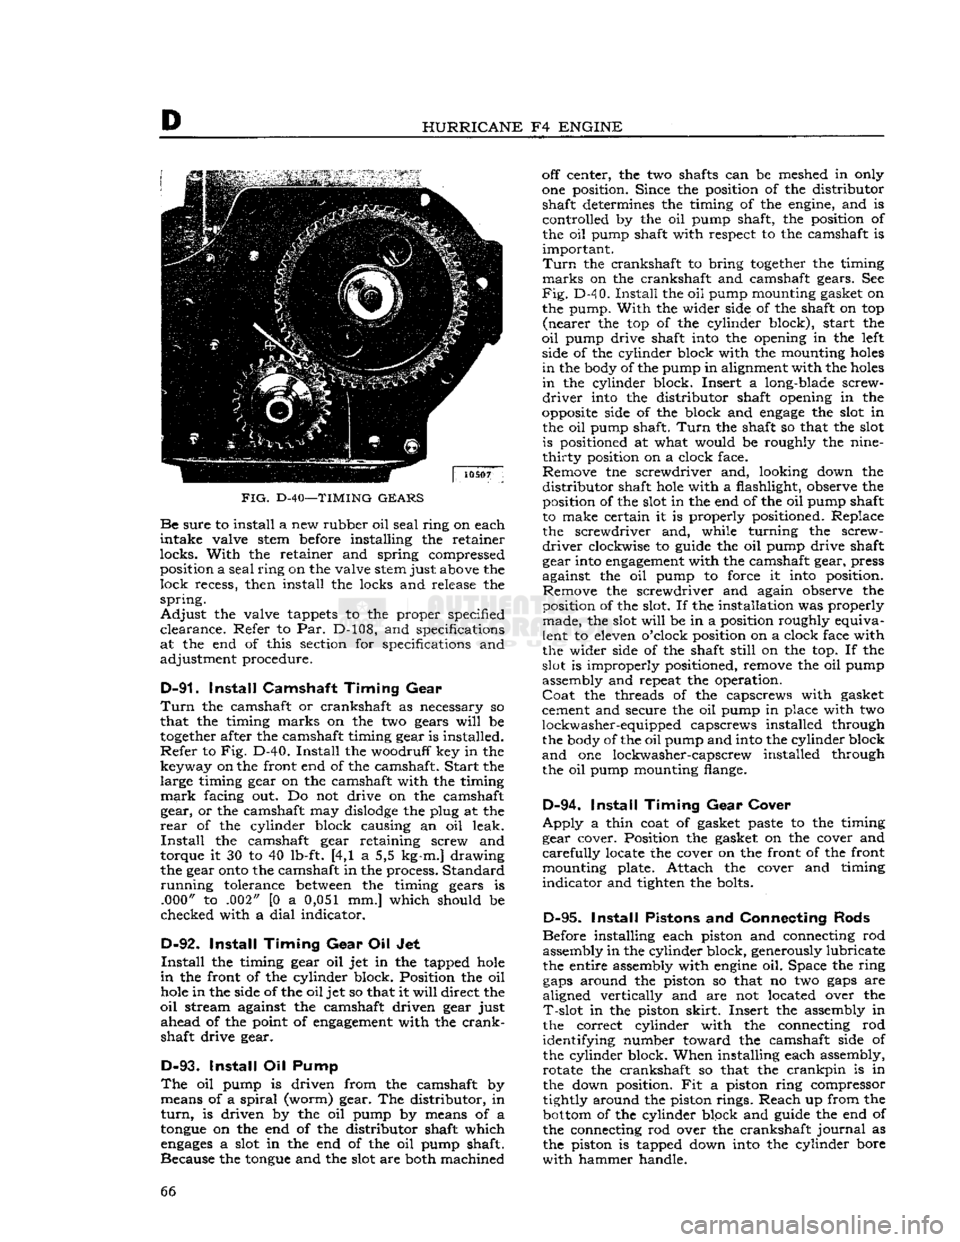
FIG.
D-40—TIMING
GEARS Be
sure
to install a new rubber oil
seal
ring on each
intake
valve stem before installing the retainer
locks.
With
the retainer and spring compressed position a
seal
ring
on the valve stem just above the
lock
recess, then install the locks and release the
spring.
Adjust
the valve tappets to the proper specified
clearance.
Refer to Par. D-108, and specifications
at the end of this section for specifications and
adjustment procedure.
D-91.
Install
Camshaft
Timing
Gear
Turn
the camshaft or crankshaft as necessary so
that the timing marks on the two gears
will
be
together
after the camshaft timing gear is installed.
Refer
to Fig. D-40.
Install
the woodruff key in the key way on the front end of the camshaft.
Start
the large timing gear on the camshaft with the timing
mark
facing out. Do not drive on the camshaft gear, or the camshaft may
dislodge
the plug at the
rear
of the cylinder block causing an oil leak.
Install
the camshaft gear retaining screw and
torque it 30 to 40 lb-ft. [4,1 a 5,5 kg-m.] drawing
the gear
onto
the camshaft in the process. Standard
running
tolerance
between
the timing gears is .000" to .002" [0 a 0,051 mm.] which should be
checked with a
dial
indicator.
D-92.
Install
Timing
Gear
Oil Jet
Install
the timing gear oil jet in the tapped
hole
in
the front of the cylinder block. Position the oil
hole
in the side of the oil jet so that it
will
direct the
oil
stream against the camshaft driven gear just
ahead
of the point of
engagement
with the
crank
shaft drive gear.
D-93.
Install
Oil Pump
The
oil pump is driven from the camshaft by means of a
spiral
(worm) gear. The distributor, in
turn,
is driven by the oil pump by means of a
tongue
on the end of the distributor shaft which
engages
a slot in the end of the oil pump shaft.
Because the
tongue
and the slot are both machined off center, the two shafts can be meshed in only
one position. Since the position of the distributor shaft determines the timing of the engine, and is
controlled by the oil pump shaft, the position of the oil pump shaft with respect to the camshaft is
important.
Turn
the crankshaft to bring
together
the timing
marks
on the crankshaft and camshaft gears. See
Fig.
D-4 0.
Install
the oil pump mounting gasket on
the pump.
With
the wider side of the shaft on top
(nearer
the top of the cylinder block), start the
oil
pump drive shaft into the opening in the left side of the cylinder block with the mounting
holes
in
the body of the pump in alignment with the
holes
in
the cylinder block. Insert a long-blade screw
driver
into the distributor shaft opening in the
opposite
side of the block and
engage
the slot in the oil pump shaft.
Turn
the shaft so that the slot is positioned at what would be roughly the nine-
thirty
position on a clock face. Remove tne screwdriver and, looking down the
distributor
shaft
hole
with a flashlight, observe the position of the slot in the end of the oil pump shaft
to make certain it is properly positioned. Replace the screwdriver and, while turning the screw
driver
clockwise to guide the oil pump drive shaft
gear into
engagement
with the camshaft gear, press
against the oil pump to force it into position. Remove the screwdriver and again observe the
position of the slot. If the installation was properly made, the slot
will
be in a position roughly equiva
lent to eleven o'clock position on a clock face with
the wider side of the shaft
still
on the top. If the
slot is improperly positioned, remove the oil pump
assembly and repeat the operation.
Coat
the threads of the capscrews with gasket
cement and secure the oil pump in place with two
lockwasher-equipped capscrews installed through the body of the oil pump and into the cylinder block
and
one lockwasher-capscrew installed through
the oil pump mounting flange.
D-94.
Install
Timing
Gear
Cover
Apply
a thin coat of gasket paste to the timing
gear cover. Position the gasket on the cover and
carefully
locate the cover on the front of the front mounting plate. Attach the cover and timing
indicator
and tighten the bolts.
D-95.
Install
Pistons and Connecting Rods
Before installing each piston and connecting rod assembly in the cylinder block, generously lubricate
the entire assembly with
engine
oil. Space the ring
gaps
around the piston so that no two
gaps
are
aligned vertically and are not located over the
T-slot
in the piston
skirt.
Insert the assembly in
the correct cylinder with the connecting rod
identifying number toward the camshaft side of
the cylinder block. When installing each assembly, rotate the crankshaft so that the
crankpin
is in
the down position. Fit a piston ring compressor
tightly around the piston rings. Reach up from the
bottom
of the cylinder block and guide the end of
the connecting rod over the crankshaft
journal
as
the piston is tapped down into the cylinder bore
with
hammer handle. 66