JEEP COMPASS 2018 Owner handbook (in English)
Manufacturer: JEEP, Model Year: 2018, Model line: COMPASS, Model: JEEP COMPASS 2018Pages: 348, PDF Size: 6.03 MB
Page 111 of 348
bags fully inflate in less time than it takes to
blink your eyes. The front air bags then
quickly deflate while helping to restrain the
driver and front passenger.
Passenger Air Bag Disable Feature — If
Equipped
This system allows the driver to DISABLE
(OFF) the Passenger Advanced Front Air Bag
if a child restraintmustbe installed in the
front seat. Only DISABLE (OFF) the Passen-
ger Advanced Front Air Bag if it is absolutely
necessary to install a child restraint in the
front seat. Children 12 years or younger
should ride properly buckled up in a rear seat,
if available. According to crash statistics,
children are safer when properly restrained in
the rear seats rather than in the front. (Refer
to “Child Restraints” in this section for fur-
ther information.)
WARNING!
• A DISABLED (OFF) Passenger Advanced
Front Air Bag is deactivated and will not
deploy in a collision.
WARNING!
• A DISABLED (OFF) Passenger Advanced
Front Air Bag will not provide a front
passenger additional protection by
supplementing the seat belts.
• Do not install a child restraint in the
front seat unless the Passenger Air Bag
DISABLE (OFF) Indicator light
on
the center stack is illuminated to show
that the Passenger Advanced Front Air
Bag is DISABLED (OFF).
• In a collision, you and your passengers
can suffer much greater injuries if you
are not properly buckled up. You can
strike the interior of your vehicle or other
passengers, or you can be thrown out of
the vehicle. Always be sure you and
others in your vehicle are buckled up
properly.
The Passenger Advanced Front Air Bag can
be ENABLED (ON) or DISABLED (OFF) by
selecting the desired setting in the instru-
ment cluster display menu. For more infor-
mation on how to access the instrument clus-ter display, refer to “Instrument Cluster
Display” in “Getting To Know You Instrument
Panel” for further information.
The Passenger Air Bag DISABLE Feature con-
sists of the following:
• Occupant Restraint Controller (ORC)
•Passenger Air Bag DISABLE (OFF)
Indicator Light — an amber light located in
the center stack
•
Passenger Air Bag ENABLE (ON) Indi-
cator Light — an amber light located in the
center stack
•
Air Bag Warning Light — an amber
light located in the instrument cluster
display
The Occupant Restraint Controller (ORC)
monitors the readiness of the electronic parts
of the air bag system whenever the ignition
switch is in the START or ON/RUN position.
The ORC illuminates the Passenger Air Bag
DISABLE (OFF) Indicator Light and the Pas-
senger Air Bag ENABLE (ON) Indicator Light
in the center stack for approximately five to
eight seconds for a self-check when the igni-
tion switch is first in the START or ON/RUN
109
Page 112 of 348
position. After the self-check, the indicator
light that is illuminated tells the driver and
passenger the status of the Passenger Ad-
vanced Front Air Bag. If any of the following
occurs, have an authorized dealer service the
air bag system immediately:
• Both indicator lights do not come on as a
self-check when the ignition is first in the
START or ON/RUN position.
• Both indicator lights stay on after you start
the vehicle.
• Both indicator lights stay off after you start
the vehicle.
• Both indicator lights come on as you drive.
• Both indicator lights turn off as you drive
Once the self-check is complete, only one
Passenger Air Bag Indicator Light should be
illuminated at a time.
WARNING!
If any of the above conditions occur, indi-
cating there is an issue with the Passenger
Air Bag Indicator Light, the Passenger
WARNING!
Advanced Front Air Bag will remain in the
last selected state (DISABLED or EN-
ABLED).
Passenger Air Bag DISABLE (OFF) Indicator
Light
The Passenger Air Bag DISABLE (OFF) Indi-
cator Light (an amber light located in the
center stack) tells the driver and front pas-
senger when the Passenger Advanced Front
Air Bag is deactivated. The Passenger Air Bag
DISABLE (OFF) Indicator Light on the center
stack will illuminate
to show that the
Passenger Advanced Front Air Bag will not
deploy during a collision. NEVER assume the
Passenger Advanced Front Air Bag is deacti-
vated unless the Passenger Air Bag DISABLE
(OFF) Indicator Light
on the center stack
is illuminated.
Passenger Air Bag ENABLE (ON) Indicator
Light
The Passenger Air Bag ENABLE (ON) Indica-
tor Light (an amber light located in the center
stack) tells the driver and front passengerwhen the Passenger Advanced Front Air Bag
is activated. The Passenger Air Bag ENABLE
(ON) Indicator Light on the center stack will
illuminate
to show that the Passenger
Advanced Front Air Bag will deploy during an
impact that requires air bag deployment.
NEVER assume the Passenger Advanced
Front Air Bag is activated unless the Passen-
ger Air Bag ENABLE (ON) Indicator Light
on the center stack is illuminated.
WARNING!
• Never place a rear-facing child restraint
in front of an air bag. A deploying pas-
senger front air bag can cause death or
serious injury to a child 12 years or
younger, including a child in a rear-
facing child restraint.
• Only use a rear-facing child restraint in a
vehicle with a rear seat.
• Children 12 years or younger should
always ride buckled up in a vehicle with
a rear seat.
SAFETY
110
Page 113 of 348
DISABLING (OFF) the Passenger Advanced Front
Air Bag
To DISABLE (OFF) the Passenger Advanced
Front Air Bag, access the instrument cluster
display main menu located in the instrument
cluster by pushing the Up or Down arrow
button located on the steering wheel, then
complete the following actions:
Action Information
Scroll Up or Down to
“Vehicle Set-Up”
Press the “OK” on
the vehicle steering
wheel to enter “Ve-
hicle Settings”
Scroll Up or Down
using the arrow but-
tons on the steering
wheel to select “Se-
curity”
Press the “OK” but-
ton on the steering
wheel to select “Se-
curity”
Action Information
Press the “OK” but-
ton on the steering
wheel to select “Pas-
senger AIRBAG”
Scroll Up or Down to
Passenger AIRBAG
OFF “
OFF”NOTE:
If the Passenger Ad-
vanced Front Air Bag
was previously EN-
ABLED (ON) it will
default to ON and
user will have to
scroll down to select
OFF.
Press the “OK” but-
ton on the steering
wheel to select Pas-
senger AIRBAG OFF
“
OFF”
Scroll Up or Down to
select “YES” to con-
firm
Action Information
Press the “OK” but-
ton on the steering
wheel to select
“YES”NOTE:
If this step is not
completed within
1 minute this option
will timeout and this
process will have to
be repeated.
A single chime will
sound with the Pas-
senger AIRBAG OFF
indicator light
illuminated for 4 to
5 seconds confirming
the disabling of the
Passenger Advanced
Front Air Bag.
The Passenger AIR-
BAG OFF
indica-
tor light will remain
continuously illumi-
nated in the center
stack telling the
driver and front pas-
senger that the Pas-
senger Advanced
Front Air Bag is DIS-
ABLED (OFF).
111
Page 114 of 348
Following the actions listed in the table
above will DISABLE (OFF) the Passenger
Advanced Front Air Bag. The Passenger Air
Bag DISABLE (OFF) Indicator light on the
center stack will illuminate
to show that
the Passenger Advanced Front Air Bag will
not deploy during a collision.
ENABLING (ON) The Passenger Advanced Front
Air Bag
Access the instrument cluster display main
menu located in the instrument cluster by
pushing the Up or Down arrow button located
on the steering wheel, then complete the
following actions:
Action Information
Scroll Up or Down to
“Vehicle Set-Up”
Press the “OK” on
the vehicle steering
wheel to enter “Ve-
hicle Settings”
Scroll Up or Down
using the arrow but-
tons on the steering
wheel to select “Se-
curity”
Action Information
Press the “OK” but-
ton on the steering
wheel to select “Se-
curity”
Press the “OK” but-
ton on the steering
wheel to select “Pas-
senger AIRBAG”
Scroll Up or Down to
Passenger AIRBAG
ON “
ON”NOTE:
If the Passenger Ad-
vanced Front Air Bag
was previously DIS-
ABLED (OFF) it will
default to OFF and
user will have to
scroll down to select
ON.
Press the “OK” but-
ton on the steering
wheel to select Pas-
senger AIRBAG ON “
ON”
Action Information
Press the “OK” but-
ton on the steering
wheel to select “Yes”NOTE:
If this step is not
completed within
1 minute this option
will timeout and this
process will have to
be repeated.
A single chime will
sound with the Pas-
senger AIRBAG ON
indicator light
illuminated for 4 to
5 seconds confirming
the enabling of the
Passenger Advanced
Front Air Bag.
The Passenger AIR-
BAG ON
indica-
tor light will remain
continuously illumi-
nated in the center
stack telling the
driver and front pas-
senger that the Pas-
senger Advanced
Front Air Bag is EN-
ABLED (ON).
SAFETY
112
Page 115 of 348
Following the actions in the table above will
ENABLE (ON) the Passenger Advanced Front
Air Bag. The Passenger Air Bag ENABLE (ON)
Indicator Light
on the center stack will
illuminate to show that the Passenger Ad-
vanced Front Air Bag will deploy during an
impact that requires air bag deployment.
WARNING!
• Never place a rear-facing child restraint
in front of an air bag. A deploying pas-
senger front air bag can cause death or
serious injury to a child 12 years or
younger, including a child in a rear-
facing child restraint.
• Only use a rear-facing child restraint in a
vehicle with a rear seat.
• Children 12 years or younger should al-
ways ride buckled up in a vehicle with a
rear seat.
Knee Impact Bolsters
The Knee Impact Bolsters help protect the
knees of the driver and front passenger, and
position the front occupants for improved
interaction with the front air bags.
WARNING!
• Do not drill, cut, or tamper with the knee
impact bolsters in any way.
• Do not mount any accessories to the
knee impact bolsters such as alarm
lights, stereos, citizen band radios, etc.
Supplemental Seat-Mounted Side Air Bags
(SABs) (If Equipped)
Your vehicle may be equipped with Supple-
mental Seat-Mounted Side Air Bags (SABs).
If your vehicle is equipped with Supplemen-
tal Seat-Mounted Side Air Bags (SABs),
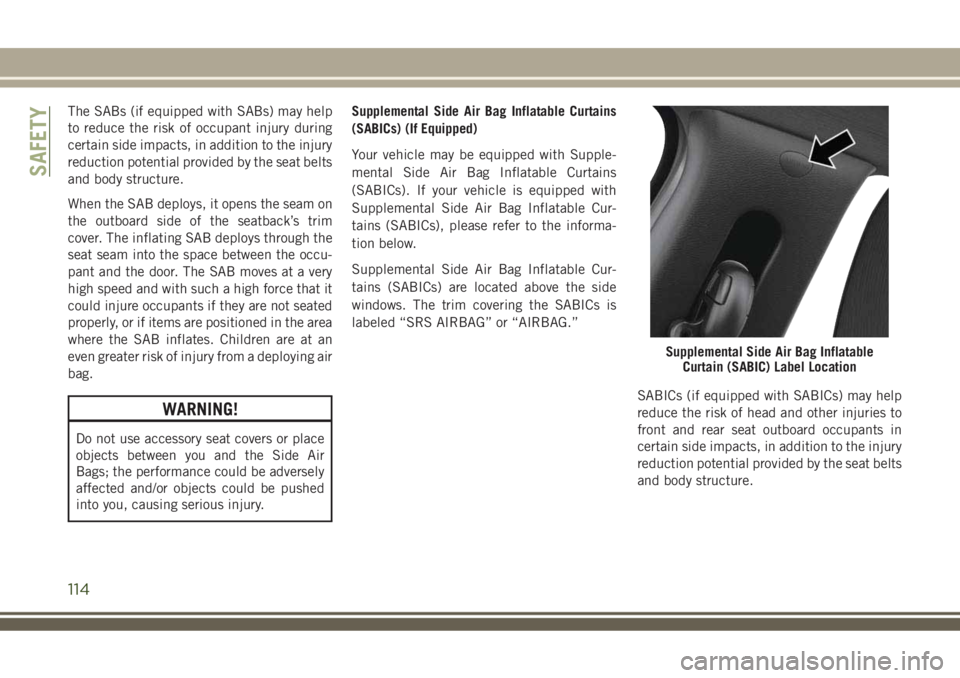
please refer to the information below.Supplemental Seat-Mounted Side Air Bags
(SABs) are located in the outboard side of the
front seats. The SABs are marked with a
“SRS AIRBAG” or “AIRBAG” label sewn into
the outboard side of the seats.
Front Supplemental Seat-Mounted Side
Air Bag
113
Page 116 of 348
The SABs (if equipped with SABs) may help
to reduce the risk of occupant injury during
certain side impacts, in addition to the injury
reduction potential provided by the seat belts
and body structure.
When the SAB deploys, it opens the seam on
the outboard side of the seatback’s trim
cover. The inflating SAB deploys through the
seat seam into the space between the occu-
pant and the door. The SAB moves at a very
high speed and with such a high force that it
could injure occupants if they are not seated
properly, or if items are positioned in the area
where the SAB inflates. Children are at an
even greater risk of injury from a deploying air
bag.
WARNING!
Do not use accessory seat covers or place
objects between you and the Side Air
Bags; the performance could be adversely
affected and/or objects could be pushed
into you, causing serious injury.Supplemental Side Air Bag Inflatable Curtains
(SABICs) (If Equipped)
Your vehicle may be equipped with Supple-
mental Side Air Bag Inflatable Curtains
(SABICs). If your vehicle is equipped with
Supplemental Side Air Bag Inflatable Cur-
tains (SABICs), please refer to the informa-
tion below.
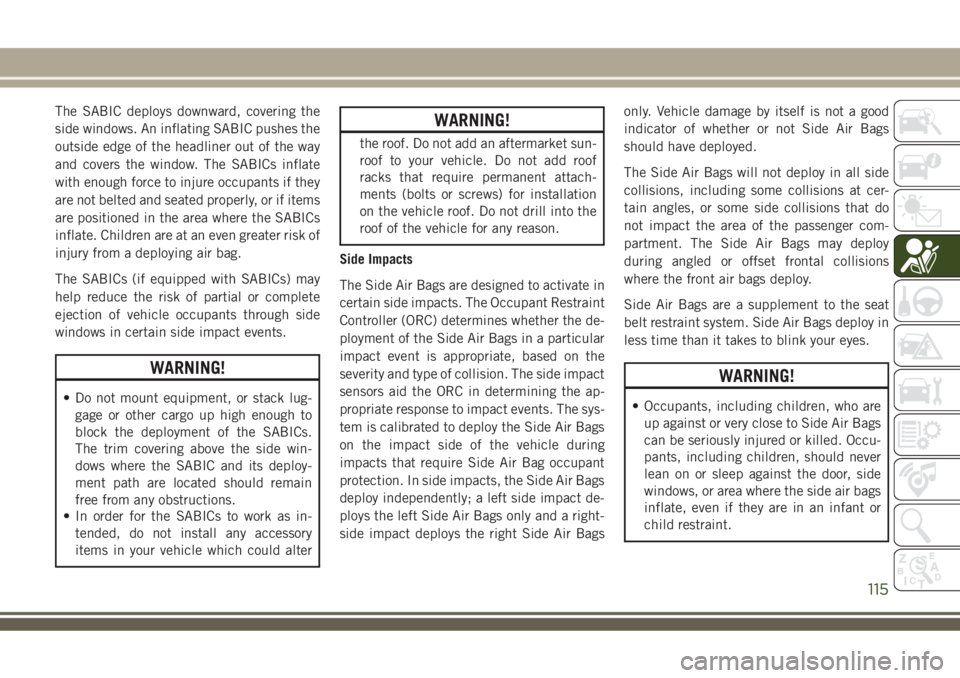
Supplemental Side Air Bag Inflatable Cur-
tains (SABICs) are located above the side
windows. The trim covering the SABICs is
labeled “SRS AIRBAG” or “AIRBAG.”
SABICs (if equipped with SABICs) may help
reduce the risk of head and other injuries to
front and rear seat outboard occupants in
certain side impacts, in addition to the injury
reduction potential provided by the seat belts
and body structure.
Supplemental Side Air Bag Inflatable
Curtain (SABIC) Label Location
SAFETY
114
Page 117 of 348
The SABIC deploys downward, covering the
side windows. An inflating SABIC pushes the
outside edge of the headliner out of the way
and covers the window. The SABICs inflate
with enough force to injure occupants if they
are not belted and seated properly, or if items
are positioned in the area where the SABICs
inflate. Children are at an even greater risk of
injury from a deploying air bag.
The SABICs (if equipped with SABICs) may
help reduce the risk of partial or complete
ejection of vehicle occupants through side
windows in certain side impact events.
WARNING!
• Do not mount equipment, or stack lug-
gage or other cargo up high enough to
block the deployment of the SABICs.
The trim covering above the side win-
dows where the SABIC and its deploy-
ment path are located should remain
free from any obstructions.
• In order for the SABICs to work as in-
tended, do not install any accessory
items in your vehicle which could alter
WARNING!
the roof. Do not add an aftermarket sun-
roof to your vehicle. Do not add roof
racks that require permanent attach-
ments (bolts or screws) for installation
on the vehicle roof. Do not drill into the
roof of the vehicle for any reason.
Side Impacts
The Side Air Bags are designed to activate in
certain side impacts. The Occupant Restraint
Controller (ORC) determines whether the de-
ployment of the Side Air Bags in a particular
impact event is appropriate, based on the
severity and type of collision. The side impact
sensors aid the ORC in determining the ap-
propriate response to impact events. The sys-
tem is calibrated to deploy the Side Air Bags
on the impact side of the vehicle during
impacts that require Side Air Bag occupant
protection. In side impacts, the Side Air Bags
deploy independently; a left side impact de-
ploys the left Side Air Bags only and a right-
side impact deploys the right Side Air Bagsonly. Vehicle damage by itself is not a good
indicator of whether or not Side Air Bags
should have deployed.
The Side Air Bags will not deploy in all side
collisions, including some collisions at cer-
tain angles, or some side collisions that do
not impact the area of the passenger com-
partment. The Side Air Bags may deploy
during angled or offset frontal collisions
where the front air bags deploy.
Side Air Bags are a supplement to the seat
belt restraint system. Side Air Bags deploy in
less time than it takes to blink your eyes.
WARNING!
• Occupants, including children, who are
up against or very close to Side Air Bags
can be seriously injured or killed. Occu-
pants, including children, should never
lean on or sleep against the door, side
windows, or area where the side air bags
inflate, even if they are in an infant or
child restraint.
115
Page 118 of 348
WARNING!
• Seat belts (and child restraints where
appropriate) are necessary for your pro-
tection in all collisions. They also help
keep you in position, away from an in-
flating Side Air Bag. To get the best
protection from the Side Air Bags, occu-
pants must wear their seat belts properly
and sit upright with their backs against
the seats. Children must be properly
restrained in a child restraint or booster
seat that is appropriate for the size of the
child.
WARNING!
• Side Air Bags need room to inflate. Do
not lean against the door or window. Sit
upright in the center of the seat.
• Being too close to the Side Air Bags
during deployment could cause you to
be severely injured or killed.
• Relying on the Side Air Bags alone could
lead to more severe injuries in a colli-
sion. The Side Air Bags work with your
seat belt to restrain you properly. In
WARNING!
some collisions, Side Air Bags won’t
deploy at all. Always wear your seat belt
even though you have Side Air Bags.
NOTE:
Air bag covers may not be obvious in the
interior trim, but they will open during air bag
deployment.
Rollover Events (If Equipped With Rollover
Sensing)
Side Air Bags are designed to activate in
certain rollover events. The ORC determines
whether the deployment of the Side Air Bags
in a particular rollover event is appropriate,
based on the severity and type of collision.
Vehicle damage by itself is not a good indi-
cator of whether or not Side Air Bags should
have deployed.
The Side Air Bags will not deploy in all
rollover events. The rollover sensing system
determines if a rollover event may be in
progress and whether deployment is appro-
priate. In the event the vehicle experiences a
rollover or near rollover event, and deploy-ment of the Side Air Bags is appropriate, the
rollover sensing system will also deploy the
seat belt pretensioners on both sides of the
vehicle.
The SABICs may help reduce the risk of
partial or complete ejection of vehicle occu-
pants through side windows in certain roll-
over or side impact events.
Air Bag System Components
NOTE:
The Occupant Restraint Controller (ORC)
monitors the internal circuits and intercon-
necting wiring associated with electrical Air
Bag System Components listed below:
• Occupant Restraint Controller (ORC)
• Air Bag Warning Light
• Steering Wheel and Column
• Instrument Panel
• Knee Impact Bolsters
• Driver and Front Passenger Air Bags
• Seat Belt Buckle Switch
• Supplemental Side Air Bags
• Front and Side Impact Sensors
SAFETY
116
Page 119 of 348
• Seat Belt Pretensioners
• Seat Track Position Sensors
If A Deployment Occurs
The front air bags are designed to deflate
immediately after deployment.
NOTE:
Front and/or side air bags will not deploy in all
collisions. This does not mean something is
wrong with the air bag system.
If you do have a collision which deploys the
air bags, any or all of the following may occur:
• The air bag material may sometimes cause
abrasions and/or skin reddening to the oc-
cupants as the air bags deploy and unfold.
The abrasions are similar to friction rope
burns or those you might get sliding along a
carpet or gymnasium floor. They are not
caused by contact with chemicals. They are
not permanent and normally heal quickly.
However, if you haven’t healed significantly
within a few days, or if you have any blis-
tering, see your doctor immediately.
• As the air bags deflate, you may see some
smoke-like particles. The particles are a
normal by-product of the process that gen-erates the non-toxic gas used for air bag
inflation. These airborne particles may irri-
tate the skin, eyes, nose, or throat. If you
have skin or eye irritation, rinse the area
with cool water. For nose or throat irritation,
move to fresh air. If the irritation continues,
see your doctor. If these particles settle on
your clothing, follow the garment manufac-
turer’s instructions for cleaning.
Do not drive your vehicle after the air bags
have deployed. If you are involved in another
collision, the air bags will not be in place to
protect you.
WARNING!
Deployed air bags and seat belt preten-
sioners cannot protect you in another col-
lision. Have the air bags, seat belt preten-
sioners, and the seat belt retractor
assemblies replaced by an authorized
dealer immediately. Also, have the Occu-
pant Restraint Controller System serviced
as well.NOTE:
• Air bag covers may not be obvious in the
interior trim, but they will open during air
bag deployment.
• After any collision, the vehicle should be
taken to an authorized dealer immediately.
Enhanced Accident Response System
In the event of an impact, if the communica-
tion network remains intact, and the power
remains intact, depending on the nature of
the event, the ORC will determine whether to
have the Enhanced Accident Response Sys-
tem perform the following functions:
• Cut off fuel to the engine.
• Flash hazard lights as long as the battery
has power or until the hazard light button is
pressed. The hazard lights can be deacti-
vated by pressing the hazard light button.
• Turn on the interior lights, which remain on
as long as the battery has power or for 15
minutes from the intervention of the En-
hanced Accident Response System.
• Unlock the power door locks.
117
Page 120 of 348
• Turn off the Gasoline Fuel Pump Heater (if
equipped) or the Diesel Fuel Filter Heater
(if equipped).
• Turn off the HVAC Blower Motor.
• Close the HVAC Circulation Door.
Enhanced Accident Response System Reset
Procedure
After the event occurs, when the system is
active, a message regarding fuel cutoff is
displayed. Turn the ignition switch from igni-
tion AVV/START or MAR/ACC/ON/RUN to ig-
nition STOP/OFF/LOCK. Carefully check the
vehicle for fuel leaks in the engine compart-
ment and on the ground near the engine
compartment and fuel tank before resetting
the system and starting the engine.
Depending on the nature of the event the left
and right turn signal lights, located in the
instrument panel, may both be blinking and
will continue to blink. In order to move your
vehicle to the side of the road, you must
follow the system reset procedure.
Customer Action Customer Will See
NOTE:
Each step MUST BE held for at least two
seconds
1. Turn ignition
STOP/OFF/LOCK.
(Turn Signal Must be
placed in Neutral
State).
2. Turn ignition MAR/
ACC/ON/RUN.Right turn light
BLINKS.
Left turn light is OFF.
3. Turn right turn
signal switch ON.Right turn light is ON
SOLID.
Left turn light
BLINKS.
4. Place turn signal
in neutral state.Right turn light is
OFF.
Left turn light
BLINKS.
5. Turn left turn sig-
nal switch ON.Right turn light
BLINKS.
Left turn light is ON
SOLID.
6. Place turn signal
in neutral state.Right turn light
BLINKS.
Left turn light is OFF.Customer Action Customer Will See
NOTE:
Each step MUST BE held for at least two
seconds
7. Turn right turn
signal switch ON.Right turn light is ON
SOLID.
Left turn light
BLINKS.
8. Place turn signal
in neutral state.Right turn light is
OFF.
Left turn light
BLINKS.
9. Turn left turn sig-
nal switch ON.Right turn light is ON
SOLID.
Left turn light is ON
SOLID.
10. Turn left turn
signal switch OFF.
(Turn Signal Switch
Must be placed in
Neutral State).Right turn light is
OFF.
Left turn light is OFF.
11. Turn ignition
STOP/OFF/LOCK.
SAFETY
118