warning JEEP COMPASS 2018 Owner handbook (in English)
[x] Cancel search | Manufacturer: JEEP, Model Year: 2018, Model line: COMPASS, Model: JEEP COMPASS 2018Pages: 348, PDF Size: 6.03 MB
Page 220 of 348
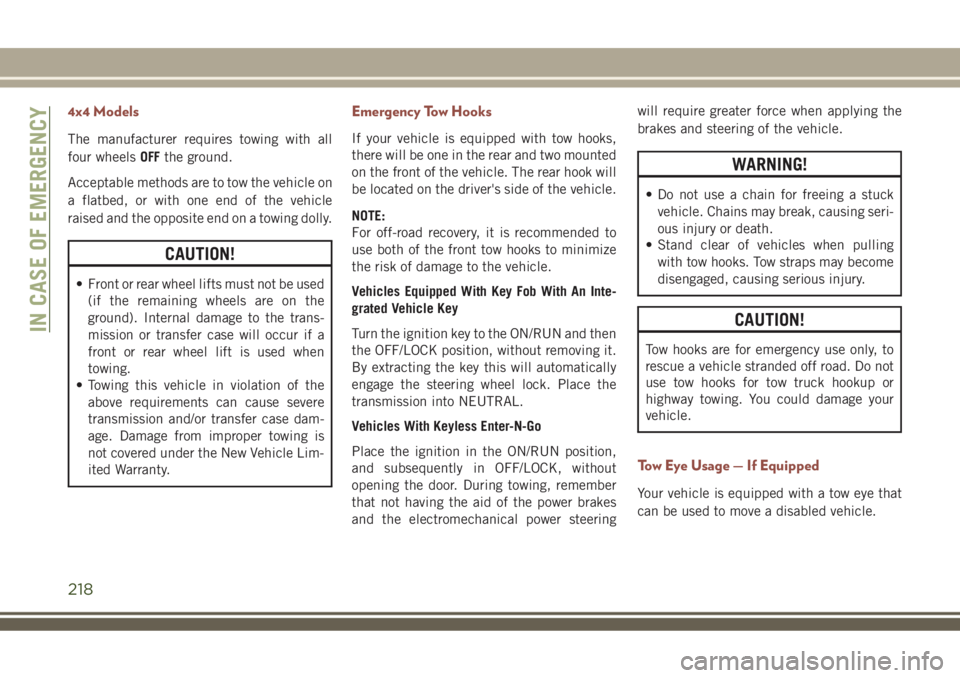
4x4 Models
The manufacturer requires towing with all
four wheelsOFFthe ground.
Acceptable methods are to tow the vehicle on
a flatbed, or with one end of the vehicle
raised and the opposite end on a towing dolly.
CAUTION!
• Front or rear wheel lifts must not be used
(if the remaining wheels are on the
ground). Internal damage to the trans-
mission or transfer case will occur if a
front or rear wheel lift is used when
towing.
• Towing this vehicle in violation of the
above requirements can cause severe
transmission and/or transfer case dam-
age. Damage from improper towing is
not covered under the New Vehicle Lim-
ited Warranty.
Emergency Tow Hooks
If your vehicle is equipped with tow hooks,
there will be one in the rear and two mounted
on the front of the vehicle. The rear hook will
be located on the driver's side of the vehicle.
NOTE:
For off-road recovery, it is recommended to
use both of the front tow hooks to minimize
the risk of damage to the vehicle.
Vehicles Equipped With Key Fob With An Inte-
grated Vehicle Key
Turn the ignition key to the ON/RUN and then
the OFF/LOCK position, without removing it.
By extracting the key this will automatically
engage the steering wheel lock. Place the
transmission into NEUTRAL.
Vehicles With Keyless Enter-N-Go
Place the ignition in the ON/RUN position,
and subsequently in OFF/LOCK, without
opening the door. During towing, remember
that not having the aid of the power brakes
and the electromechanical power steeringwill require greater force when applying the
brakes and steering of the vehicle.
WARNING!
• Do not use a chain for freeing a stuck
vehicle. Chains may break, causing seri-
ous injury or death.
• Stand clear of vehicles when pulling
with tow hooks. Tow straps may become
disengaged, causing serious injury.
CAUTION!
Tow hooks are for emergency use only, to
rescue a vehicle stranded off road. Do not
use tow hooks for tow truck hookup or
highway towing. You could damage your
vehicle.
Tow Eye Usage — If Equipped
Your vehicle is equipped with a tow eye that
can be used to move a disabled vehicle.
IN CASE OF EMERGENCY
218
Page 221 of 348
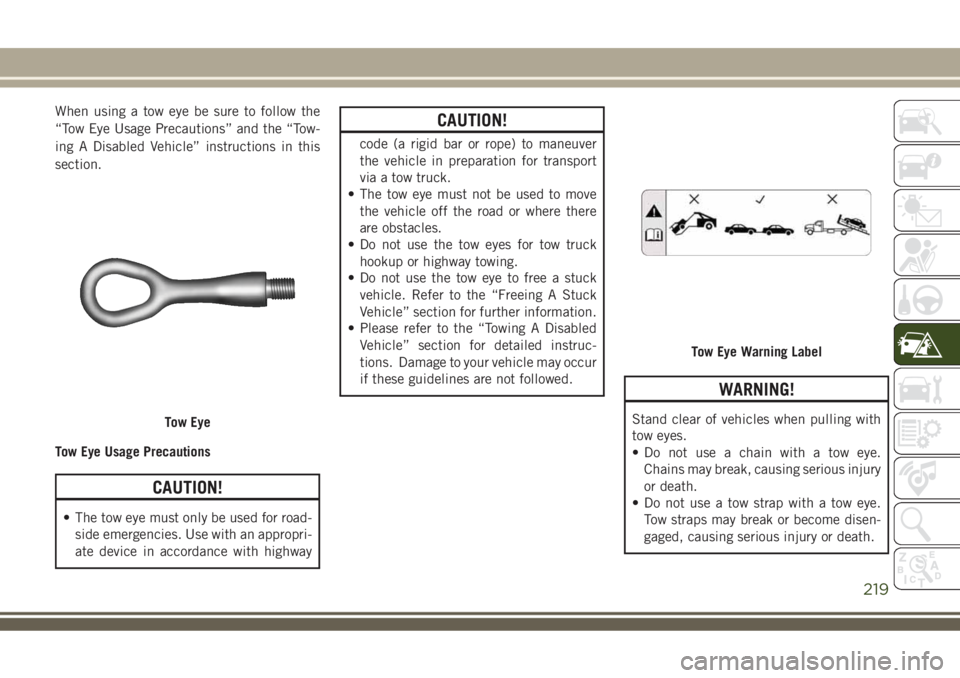
When using a tow eye be sure to follow the
“Tow Eye Usage Precautions” and the “Tow-
ing A Disabled Vehicle” instructions in this
section.
Tow Eye Usage Precautions
CAUTION!
• The tow eye must only be used for road-
side emergencies. Use with an appropri-
ate device in accordance with highway
CAUTION!
code (a rigid bar or rope) to maneuver
the vehicle in preparation for transport
via a tow truck.
• The tow eye must not be used to move
the vehicle off the road or where there
are obstacles.
• Do not use the tow eyes for tow truck
hookup or highway towing.
• Do not use the tow eye to free a stuck
vehicle. Refer to the “Freeing A Stuck
Vehicle” section for further information.
• Please refer to the “Towing A Disabled
Vehicle” section for detailed instruc-
tions. Damage to your vehicle may occur
if these guidelines are not followed.
WARNING!
Stand clear of vehicles when pulling with
tow eyes.
• Do not use a chain with a tow eye.
Chains may break, causing serious injury
or death.
• Do not use a tow strap with a tow eye.
Tow straps may break or become disen-
gaged, causing serious injury or death.Tow Eye
Tow Eye Warning Label
219
Page 222 of 348
WARNING!
• Failure to follow proper tow eye usage
may cause components to break result-
ing in serious injury or death.
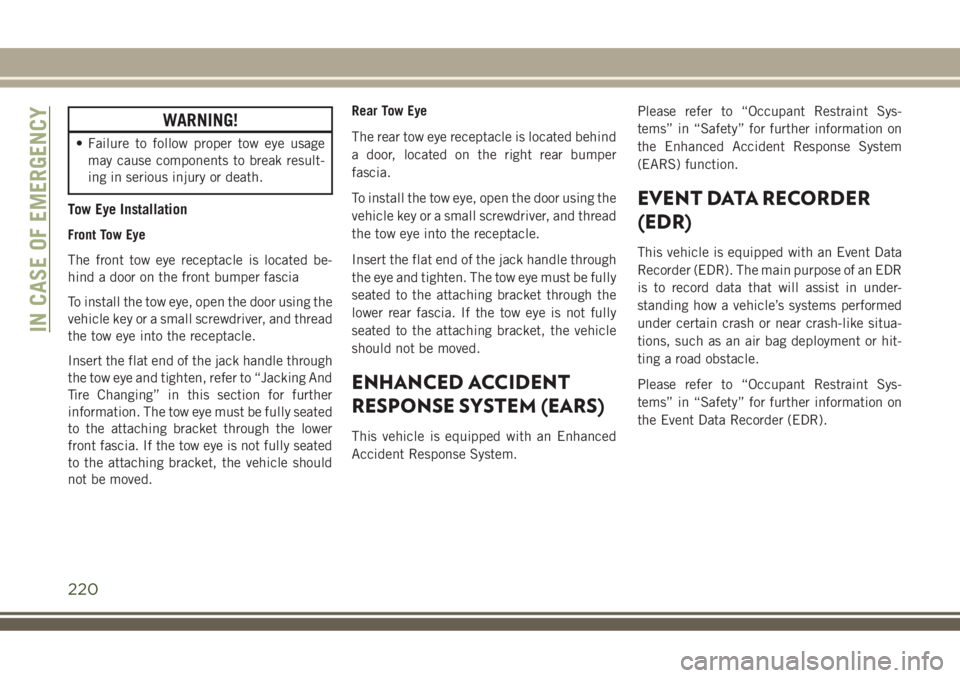
Tow Eye Installation
Front Tow Eye
The front tow eye receptacle is located be-
hind a door on the front bumper fascia
To install the tow eye, open the door using the
vehicle key or a small screwdriver, and thread
the tow eye into the receptacle.
Insert the flat end of the jack handle through
the tow eye and tighten, refer to “Jacking And
Tire Changing” in this section for further
information. The tow eye must be fully seated
to the attaching bracket through the lower
front fascia. If the tow eye is not fully seated
to the attaching bracket, the vehicle should
not be moved.Rear Tow Eye
The rear tow eye receptacle is located behind
a door, located on the right rear bumper
fascia.
To install the tow eye, open the door using the
vehicle key or a small screwdriver, and thread
the tow eye into the receptacle.
Insert the flat end of the jack handle through
the eye and tighten. The tow eye must be fully
seated to the attaching bracket through the
lower rear fascia. If the tow eye is not fully
seated to the attaching bracket, the vehicle
should not be moved.
ENHANCED ACCIDENT
RESPONSE SYSTEM (EARS)
This vehicle is equipped with an Enhanced
Accident Response System.Please refer to “Occupant Restraint Sys-
tems” in “Safety” for further information on
the Enhanced Accident Response System
(EARS) function.
EVENT DATA RECORDER
(EDR)
This vehicle is equipped with an Event Data
Recorder (EDR). The main purpose of an EDR
is to record data that will assist in under-
standing how a vehicle’s systems performed
under certain crash or near crash-like situa-
tions, such as an air bag deployment or hit-
ting a road obstacle.
Please refer to “Occupant Restraint Sys-
tems” in “Safety” for further information on
the Event Data Recorder (EDR).
IN CASE OF EMERGENCY
220
Page 227 of 348
Mileage or time passed (which-
ever comes first)
7,500
15,000
22,500
30,000
37,500
45,000
52,500
60,000
67,500
75,000
82,500
90,000
97,500
105,000
112,500
120,000
127,500
135,000
142,500
150,000
Or Months: 12 24 36 48 60 72 84 96 108 120 132 144 156 168 180 192 204 216 228 240
Or Kilometers:
12,000
24,000
36,000
48,000
60,000
72,000
84,000
96,000
108,000
120,000
132,000
144,000
156,000
168,000
180,000
192,000
204,000
216,000
228,000
240,000
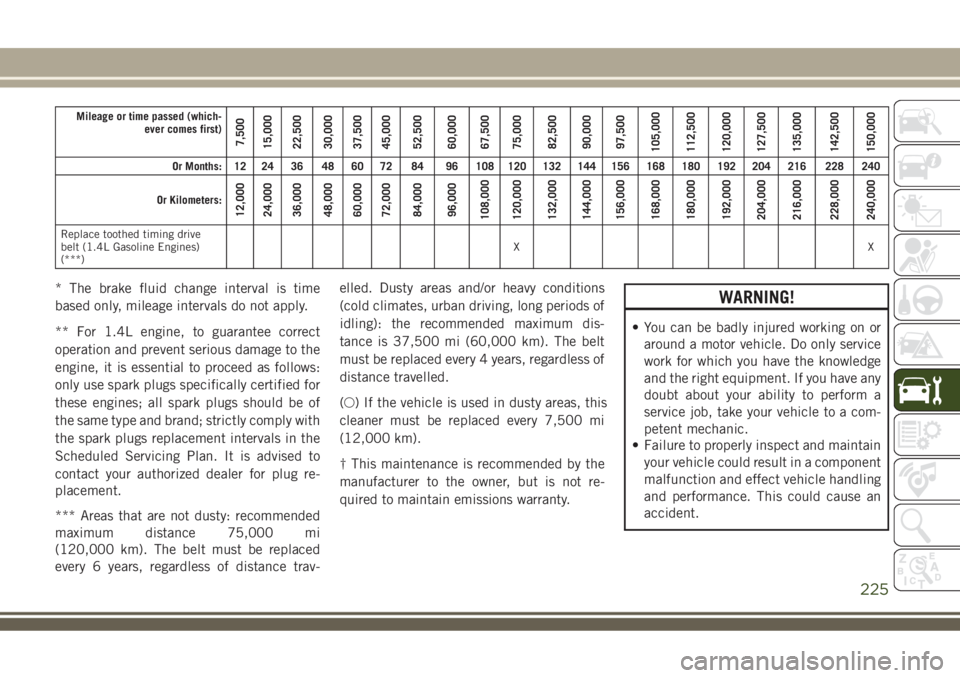
Replace toothed timing drive
belt (1.4L Gasoline Engines)
(***)XX
* The brake fluid change interval is time
based only, mileage intervals do not apply.
** For 1.4L engine, to guarantee correct
operation and prevent serious damage to the
engine, it is essential to proceed as follows:
only use spark plugs specifically certified for
these engines; all spark plugs should be of
the same type and brand; strictly comply with
the spark plugs replacement intervals in the
Scheduled Servicing Plan. It is advised to
contact your authorized dealer for plug re-
placement.
*** Areas that are not dusty: recommended
maximum distance 75,000 mi
(120,000 km). The belt must be replaced
every 6 years, regardless of distance trav-elled. Dusty areas and/or heavy conditions
(cold climates, urban driving, long periods of
idling): the recommended maximum dis-
tance is 37,500 mi (60,000 km). The belt
must be replaced every 4 years, regardless of
distance travelled.
(○) If the vehicle is used in dusty areas, this
cleaner must be replaced every 7,500 mi
(12,000 km).
† This maintenance is recommended by the
manufacturer to the owner, but is not re-
quired to maintain emissions warranty.WARNING!
• You can be badly injured working on or
around a motor vehicle. Do only service
work for which you have the knowledge
and the right equipment. If you have any
doubt about your ability to perform a
service job, take your vehicle to a com-
petent mechanic.
• Failure to properly inspect and maintain
your vehicle could result in a component
malfunction and effect vehicle handling
and performance. This could cause an
accident.
225
Page 228 of 348
Heavy Duty Use Of Vehicle
†† Change the engine oil and engine oil filter
at every 4500 miles (7,500 km) or
12 months if using your vehicle under any of
the following severe duty conditions:
• Stop and go driving.
• Driving in dusty conditions.
• Short trips of less than 10 miles (16 km).
• Trailer towing.
• Taxi, police, or delivery service (commercial
service).
• Off-road or desert operation.
Diesel Engines
Your vehicle is equipped with an automatic
oil change indicator system. The oil change
indicator system will remind you that it is
time to take your vehicle in for scheduled
maintenance.
Based on engine operation conditions, the oil
change indicator message will illuminate.
This means that service is required for yourvehicle. Operating conditions such as fre-
quent short-trips, trailer tow, extremely hot or
cold ambient temperatures will influence
when the “Oil Change Required” message is
displayed. Severe Operating Conditions can
cause the change oil message to illuminate
as earlier than specified. Have your vehicle
serviced as soon as possible, within the next
500 miles (805 km).
To help you have the best driving experience
possible, the manufacturer has identified the
specific vehicle maintenance service inter-
vals that are required to keep your vehicle
operating properly and safely.
The manufacturer recommends that these
maintenance intervals be performed at your
selling dealer. The technicians at your deal-
ership know your vehicle best, and have ac-
cess to factory trained information, genuine
Mopar parts, and specially designed elec-
tronic and mechanical tools that can help
prevent future costly repairs.
The maintenance intervals shown should be
performed as indicated in this section.NOTE:
•The actual interval for changing engine oil
and replacing the engine oil filter depends on
the vehicle usage conditions, and is signaled
by the warning light or message in the instru-
ment panel. In any case, it must never exceed
two years. If the vehicle is used mainly for
urban driving, change the engine oil and filter
every year.
•Flush and replace the engine coolant at
120 months or 150,000 miles (240,000 km)
whichever comes first.
•Regardless of the distance covered, the tim-
ing and accessory belts must be changed
every 4 years for particularly demanding use
(cold climates, city driving, long periods of
idling) or at least every 6 years. Under no
circumstances should these intervals be
exceeded.SERVICING AND MAINTENANCE
226
Page 231 of 348
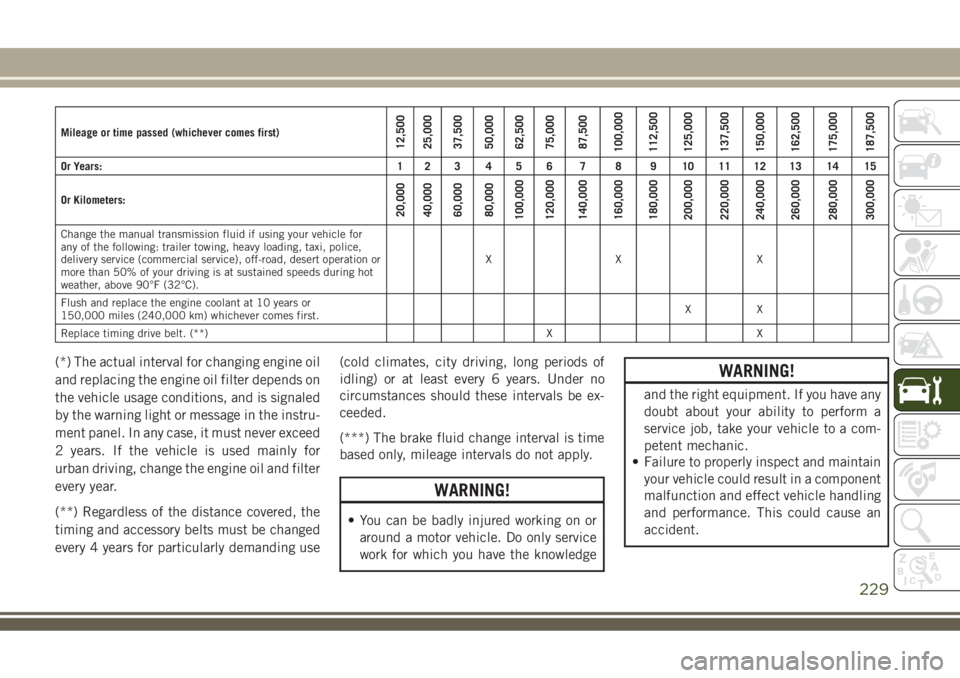
Mileage or time passed (whichever comes first)12,500
25,000
37,500
50,000
62,500
75,000
87,500
100,000
112,500
125,000
137,500
150,000
162,500
175,000
187,500
Or Years: 1 2 3 4 5 6 7 8 9 10 11 12 13 14 15
Or Kilometers:
20,000
40,000
60,000
80,000
100,000
120,000
140,000
160,000
180,000
200,000
220,000
240,000
260,000
280,000
300,000
Change the manual transmission fluid if using your vehicle for
any of the following: trailer towing, heavy loading, taxi, police,
delivery service (commercial service), off-road, desert operation or
more than 50% of your driving is at sustained speeds during hot
weather, above 90°F (32°C).XX X
Flush and replace the engine coolant at 10 years or
150,000 miles (240,000 km) whichever comes first.XX
Replace timing drive belt. (**) X X
(*) The actual interval for changing engine oil
and replacing the engine oil filter depends on
the vehicle usage conditions, and is signaled
by the warning light or message in the instru-
ment panel. In any case, it must never exceed
2 years. If the vehicle is used mainly for
urban driving, change the engine oil and filter
every year.
(**) Regardless of the distance covered, the
timing and accessory belts must be changed
every 4 years for particularly demanding use(cold climates, city driving, long periods of
idling) or at least every 6 years. Under no
circumstances should these intervals be ex-
ceeded.
(***) The brake fluid change interval is time
based only, mileage intervals do not apply.
WARNING!
• You can be badly injured working on or
around a motor vehicle. Do only service
work for which you have the knowledge
WARNING!
and the right equipment. If you have any
doubt about your ability to perform a
service job, take your vehicle to a com-
petent mechanic.
• Failure to properly inspect and maintain
your vehicle could result in a component
malfunction and effect vehicle handling
and performance. This could cause an
accident.
229
Page 235 of 348
Checking Oil Level
To assure proper engine lubrication, the en-
gine oil must be maintained at the correct
level. Check the oil level at regular intervals,
such as once a month or before a long trip.
The best time to check the engine oil level is
approximately five minutes after a fully
warmed engine is shut off. Do not check oil
level before starting the engine after it has sat
overnight. Checking engine oil level when the
engine is cold will give you an incorrect read-
ing.
Checking the oil while the vehicle is on level
ground, and approximately five minutes after
a fully warmed engine is shut off, will improve
the accuracy of the oil level readings. Main-
tain the oil level between the range markings
on the dipstick. The safe range is indicated
by a crosshatch zone. Adding 1 quart (0.9 Li-
ters) of oil when the reading is at the low end
of the indicated range will result in the oil
level at the full end of the indicator range.
CAUTION!
• Overfilling or underfilling will cause oil
aeration, or loss of oil pressure. This
could damage your engine.
• Never use Non-Detergent Oil or Straight
Mineral Oil in the engine or damage may
result.
Adding Washer Fluid
The fluid reservoir is located in the front of
the engine compartment. Be sure to check
the fluid level in the reservoir at regular
intervals. Fill the reservoir with windshield
washer solvent (not radiator antifreeze) and
operate the system for a few seconds to flush
out the residual washer fluid.
When refilling the washer fluid reservoir, take
some washer fluid, apply it to a cloth or towel,
and wipe clean the wiper blades; this will
help blade performance.To prevent freeze-up of your windshield
washer system in cold weather, select a solu-
tion or mixture that meets or exceeds the
temperature range of your climate. This rat-
ing information can be found on most washer
fluid containers.
WARNING!
Commercially available windshield washer
solvents are flammable. They could ignite
and burn you. Care must be exercised
when filling or working around the washer
solution.
Maintenance-Free Battery
Your vehicle is equipped with a maintenance-
free battery. You will never have to add water,
nor is periodic maintenance required.
WARNING!
• Battery fluid is a corrosive acid solution
and can burn or even blind you. Do not
allow battery fluid to contact your eyes,
skin, or clothing. Do not lean over a
battery when attaching clamps. If acid
233
Page 236 of 348
WARNING!
splashes in eyes or on skin, flush the
area immediately with large amounts of
water. Refer to “Jump Starting Proce-
dure” in “In Case Of Emergency” for
further information.
• Battery gas is flammable and explosive.
Keep flame or sparks away from the
battery. Do not use a booster battery or
any other booster source with an output
greater than 12 Volts. Do not allow cable
clamps to touch each other.
• Battery posts, terminals, and related ac-
cessories contain lead and lead com-
pounds. Wash hands after handling.
CAUTION!
• It is essential when replacing the cables
on the battery that the positive cable is
attached to the positive post and the
negative cable is attached to the nega-
tive post. Battery posts are marked posi-
tive (+) and negative (-) and are identi-
fied on the battery case. Cable clamps
CAUTION!
should be tight on the terminal posts
and free of corrosion.
• If a “fast charger” is used while the
battery is in the vehicle, disconnect both
vehicle battery cables before connecting
the charger to the battery. Do not use a
“fast charger” to provide starting volt-
age.
DEALER SERVICE
An authorized dealer has the qualified ser-
vice personnel, special tools, and equipment
to perform all service operations in an expert
manner. Service Manuals are available which
include detailed service information for your
vehicle. Refer to these Service Manuals be-
fore attempting any procedure yourself.
NOTE:
Intentional tampering with emissions control
systems may void your warranty and could
result in civil penalties being assessed
against you.
WARNING!
You can be badly injured working on or
around a motor vehicle. Only do service
work for which you have the knowledge
and the proper equipment. If you have any
doubt about your ability to perform a ser-
vice job, take your vehicle to a competent
mechanic.
Air Conditioner Maintenance
For best possible performance, your air con-
ditioner should be checked and serviced by
an authorized dealer at the start of each warm
season. This service should include cleaning
of the condenser fins and a performance test.
Drive belt tension should also be checked at
this time.
WARNING!
• Use only refrigerants and compressor
lubricants approved by the manufac-
turer for your air conditioning system.
Some unapproved refrigerants are flam-
SERVICING AND MAINTENANCE
234
Page 237 of 348
WARNING!
mable and can explode, injuring you.
Other unapproved refrigerants or lubri-
cants can cause the system to fail, re-
quiring costly repairs. Refer to Warranty
Information Book, located in your own-
er’s information kit, for further warranty
information.
• The air conditioning system contains re-
frigerant under high pressure. To avoid
risk of personal injury or damage to the
system, adding refrigerant or any repair
requiring lines to be disconnected
should be done by an experienced tech-
nician.
CAUTION!
Do not use chemical flushes in your air
conditioning system as the chemicals can
damage your air conditioning components.
Such damage is not covered by the New
Vehicle Limited Warranty.
A/C Air Filter
See your authorized dealer for service.
Wiper Blades
Clean the rubber edges of the wiper blades
and the windshield and rear window periodi-
cally with a sponge or soft cloth and a mild
nonabrasive cleaner. This will remove accu-
mulations of salt, waxes, or road film, and
help reduce streaking and smearing.
Operation of the wipers on dry glass for long
periods may cause deterioration of the wiper
blades. Always use washer fluid when using
the wipers to remove salt or dirt from a dry
windshield or rear window.
Avoid using the wiper blades to remove frost
or ice from the windshield or rear window.
Make sure that they are not frozen to the glass
before turning them on to avoid damaging the
blade. Keep the wiper blade out of contact
with petroleum products such as engine oil,
gasoline, etc.NOTE:
Life expectancy of wiper blades varies de-
pending on geographical area and frequency
of use. Poor performance of blades may be
present with chattering, marks, water lines or
wet spots. If any of these conditions are
present, clean the wiper blades or replace as
necessary.
Cooling System
WARNING!
• You or others can be badly burned by hot
engine coolant (antifreeze) or steam
from your radiator. If you see or hear
steam coming from under the hood, do
not open the hood until the radiator has
had time to cool. Never open a cooling
system pressure cap when the radiator or
coolant bottle is hot.
• Keep hands, tools, clothing, and jewelry
away from the radiator cooling fan when
the hood is raised. The fan starts auto-
matically and may start at any time,
whether the engine is running or not.
235
Page 238 of 348
WARNING!
• When working near the radiator cooling
fan, disconnect the fan motor lead or
turn the ignition to the OFF mode. The
fan is temperature controlled and can
start at any time the ignition is in the ON
mode.
Coolant Checks
Check engine coolant (antifreeze) protection
every 12 months (before the onset of freezing
weather, where applicable). If the engine
coolant (antifreeze) is dirty or rusty in appear-
ance, the system should be drained, flushed
and refilled with fresh engine coolant (anti-
freeze). Check the front of the A/C condenser
for any accumulation of bugs, leaves, etc. If
dirty, clean by gently spraying water from a
garden hose vertically down the face of the
condenser.
Brake System
In order to assure brake system performance,
all brake system components should be in-
spected periodically. Refer to the “Mainte-
nance Plan” in this section for the proper
maintenance intervals.
WARNING!
Riding the brakes can lead to brake failure
and possibly a collision. Driving with your
foot resting or riding on the brake pedal
can result in abnormally high brake tem-
peratures, excessive lining wear, and pos-
sible brake damage. You would not have
your full braking capacity in an emergency.
Brake Master Cylinder
The fluid in the master cylinder should be
checked when performing under hood ser-
vices or immediately if the “Brake Warning
Light” is illuminated.
Be sure to clean the top of the master cylin-
der area before removing the cap. If neces-
sary, add fluid to bring the fluid level up to
the requirements described on the brakefluid reservoir. With disc brakes, fluid level
can be expected to fall as the brake pads
wear. Brake fluid level should be checked
when pads are replaced. However, low fluid
level may be caused by a leak and a checkup
may be needed.
Use only manufacturer's recommended
brake fluid. Refer to “Fluids And Lubricants”
in “Technical Specifications” for further
information.
WARNING!
• Use only manufacturer's recommended
brake fluid. Refer to “Fluids And Lubri-
cants” in “Technical Specifications” for
further information. Using the wrong
type of brake fluid can severely damage
your brake system and/or impair its per-
formance. The proper type of brake fluid
for your vehicle is also identified on the
original factory installed hydraulic mas-
ter cylinder reservoir.
• To avoid contamination from foreign
matter or moisture, use only new brake
fluid or fluid that has been in a tightly
SERVICING AND MAINTENANCE
236