JEEP COMPASS 2018 Owner handbook (in English)
Manufacturer: JEEP, Model Year: 2018, Model line: COMPASS, Model: JEEP COMPASS 2018Pages: 348, PDF Size: 6.03 MB
Page 261 of 348
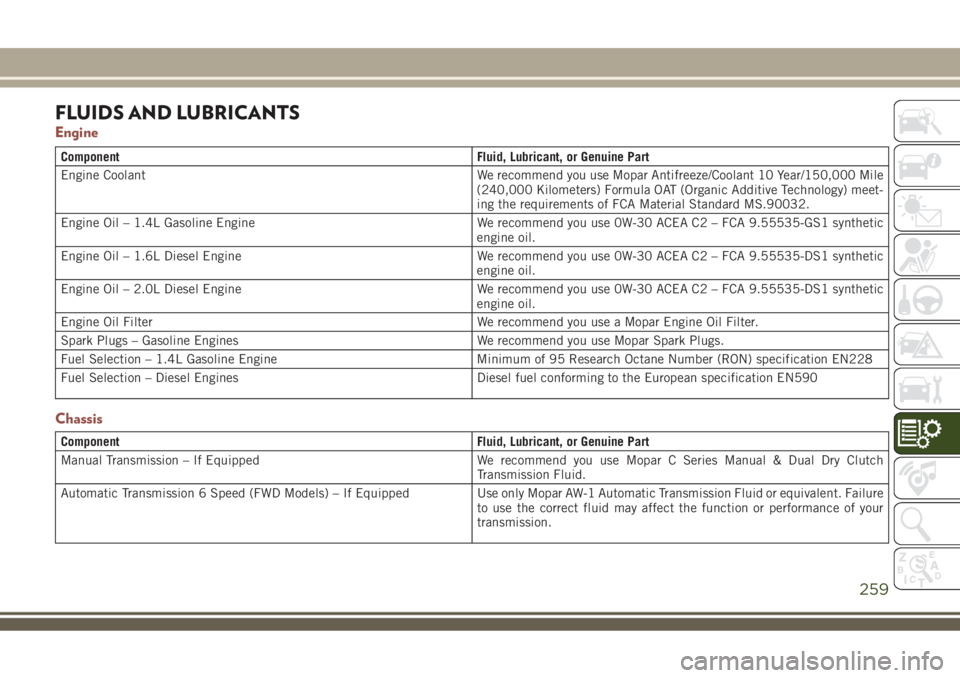
FLUIDS AND LUBRICANTS
Engine
Component Fluid, Lubricant, or Genuine Part
Engine Coolant We recommend you use Mopar Antifreeze/Coolant 10 Year/150,000 Mile
(240,000 Kilometers) Formula OAT (Organic Additive Technology) meet-
ing the requirements of FCA Material Standard MS.90032.
Engine Oil – 1.4L Gasoline Engine We recommend you use 0W-30 ACEA C2 – FCA 9.55535-GS1 synthetic
engine oil.
Engine Oil – 1.6L Diesel Engine We recommend you use 0W-30 ACEA C2 – FCA 9.55535-DS1 synthetic
engine oil.
Engine Oil – 2.0L Diesel Engine We recommend you use 0W-30 ACEA C2 – FCA 9.55535-DS1 synthetic
engine oil.
Engine Oil Filter We recommend you use a Mopar Engine Oil Filter.
Spark Plugs – Gasoline Engines We recommend you use Mopar Spark Plugs.
Fuel Selection – 1.4L Gasoline Engine Minimum of 95 Research Octane Number (RON) specification EN228
Fuel Selection – Diesel Engines Diesel fuel conforming to the European specification EN590
Chassis
Component Fluid, Lubricant, or Genuine Part
Manual Transmission – If Equipped We recommend you use Mopar C Series Manual & Dual Dry Clutch
Transmission Fluid.
Automatic Transmission 6 Speed (FWD Models) – If Equipped Use only Mopar AW-1 Automatic Transmission Fluid or equivalent. Failure
to use the correct fluid may affect the function or performance of your
transmission.
259
Page 262 of 348
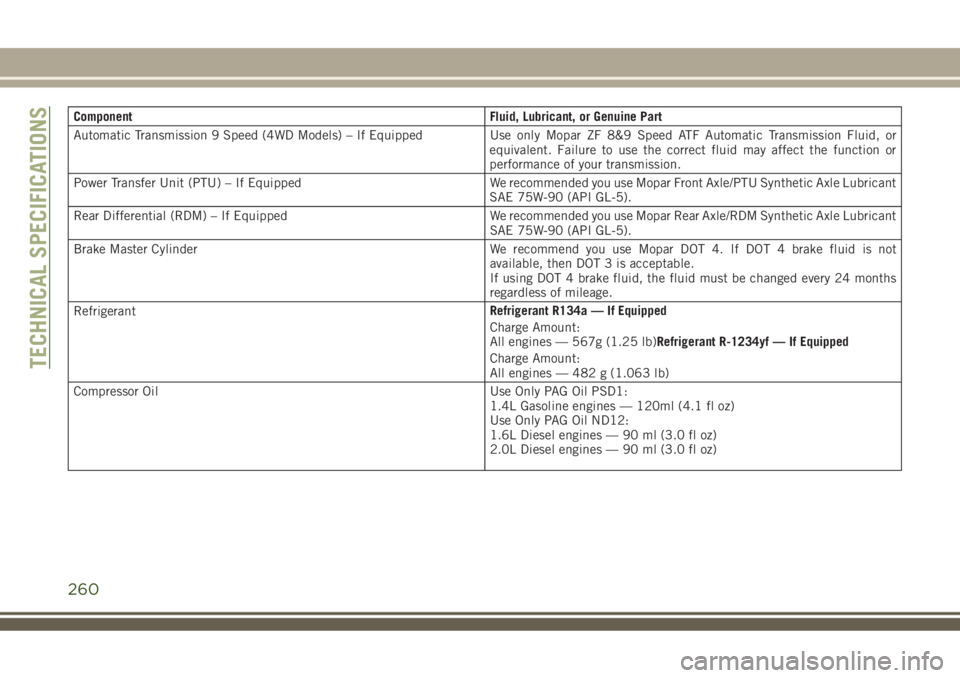
Component Fluid, Lubricant, or Genuine Part
Automatic Transmission 9 Speed (4WD Models) – If Equipped Use only Mopar ZF 8&9 Speed ATF Automatic Transmission Fluid, or
equivalent. Failure to use the correct fluid may affect the function or
performance of your transmission.
Power Transfer Unit (PTU) – If Equipped We recommended you use Mopar Front Axle/PTU Synthetic Axle Lubricant
SAE 75W-90 (API GL-5).
Rear Differential (RDM) – If Equipped We recommended you use Mopar Rear Axle/RDM Synthetic Axle Lubricant
SAE 75W-90 (API GL-5).
Brake Master Cylinder We recommend you use Mopar DOT 4. If DOT 4 brake fluid is not
available, then DOT 3 is acceptable.
If using DOT 4 brake fluid, the fluid must be changed every 24 months
regardless of mileage.
RefrigerantRefrigerant R134a — If Equipped
Charge Amount:
All engines — 567g (1.25 lb)Refrigerant R-1234yf — If Equipped
Charge Amount:
All engines — 482 g (1.063 lb)
Compressor Oil Use Only PAG Oil PSD1:
1.4L Gasoline engines — 120ml (4.1 fl oz)
Use Only PAG Oil ND12:
1.6L Diesel engines — 90 ml (3.0 fl oz)
2.0L Diesel engines — 90 ml (3.0 fl oz)
TECHNICAL SPECIFICATIONS
260
Page 263 of 348
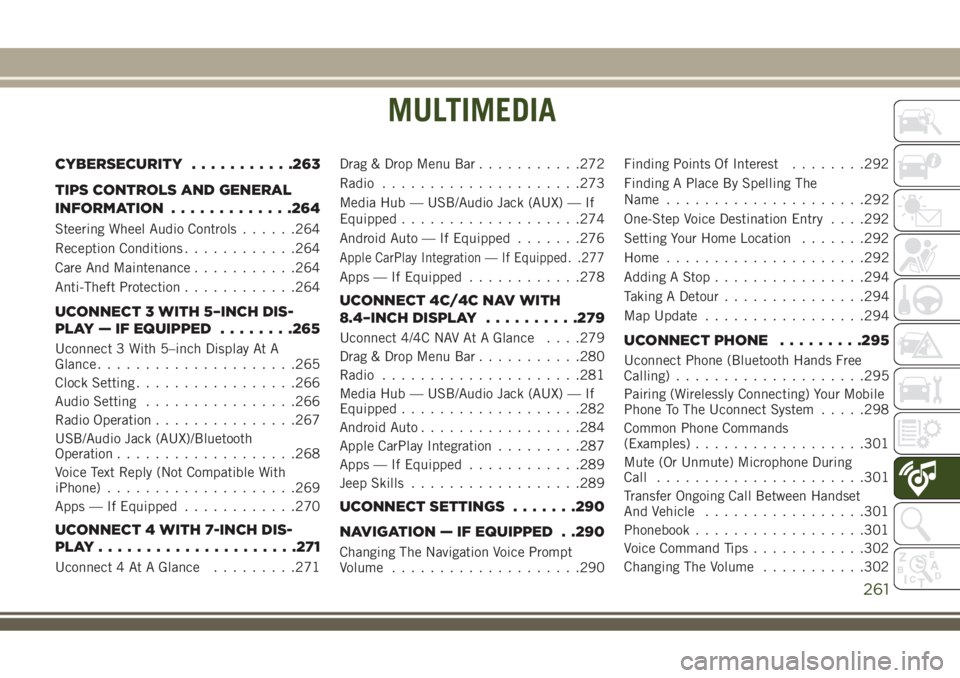
MULTIMEDIA
CYBERSECURITY...........263
TIPS CONTROLS AND GENERAL
INFORMATION.............264
Steering Wheel Audio Controls......264
Reception Conditions............264
Care And Maintenance...........264
Anti-Theft Protection............264
UCONNECT 3 WITH 5–INCH DIS-
PLAY — IF EQUIPPED........265
Uconnect 3 With 5–inch Display At A
Glance.....................265
Clock Setting.................266
Audio Setting................266
Radio Operation...............267
USB/Audio Jack (AUX)/Bluetooth
Operation...................268
Voice Text Reply (Not Compatible With
iPhone)....................269
Apps — If Equipped............270
UCONNECT 4 WITH 7-INCH DIS-
PLAY.....................271
Uconnect 4 At A Glance.........271Drag & Drop Menu Bar...........272
Radio.....................273
Media Hub — USB/Audio Jack (AUX) — If
Equipped...................274
Android Auto — If Equipped.......276
Apple CarPlay Integration — If Equipped. .277
Apps — If Equipped............278
UCONNECT 4C/4C NAV WITH
8.4–INCH DISPLAY..........279
Uconnect 4/4C NAV At A Glance. . . .279
Drag & Drop Menu Bar...........280
Radio.....................281
Media Hub — USB/Audio Jack (AUX) — If
Equipped...................282
Android Auto.................284
Apple CarPlay Integration.........287
Apps — If Equipped............289
Jeep Skills..................289
UCONNECT SETTINGS.......290
NAVIGATION — IF EQUIPPED . .290
Changing The Navigation Voice Prompt
Volume....................290Finding Points Of Interest........292
Finding A Place By Spelling The
Name.....................292
One-Step Voice Destination Entry. . . .292
Setting Your Home Location.......292
Home.....................292
Adding A Stop................294
Taking A Detour...............294
Map Update.................294
UCONNECT PHONE.........295
Uconnect Phone (Bluetooth Hands Free
Calling)....................295
Pairing (Wirelessly Connecting) Your Mobile
Phone To The Uconnect System.....298
Common Phone Commands
(Examples)..................301
Mute (Or Unmute) Microphone During
Call......................301
Transfer Ongoing Call Between Handset
And Vehicle.................301
Phonebook..................301
Voice Command Tips............302
Changing The Volume...........302
MULTIMEDIA
261
Page 264 of 348
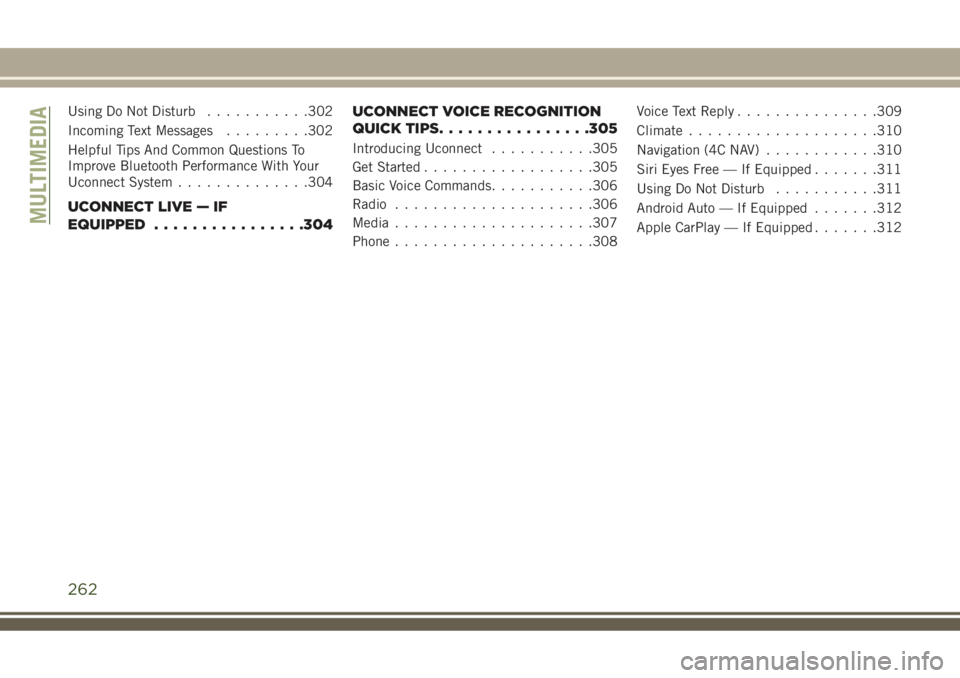
Using Do Not Disturb...........302
Incoming Text Messages.........302
Helpful Tips And Common Questions To
Improve Bluetooth Performance With Your
Uconnect System..............304
UCONNECT LIVE — IF
EQUIPPED................304UCONNECT VOICE RECOGNITION
QUICK TIPS................305
Introducing Uconnect...........305
Get Started..................305
Basic Voice Commands...........306
Radio.....................306
Media.....................307
Phone.....................308Voice Text Reply...............309
Climate....................310
Navigation (4C NAV)............310
Siri Eyes Free — If Equipped.......311
Using Do Not Disturb...........311
Android Auto — If Equipped.......312
Apple CarPlay — If Equipped.......312
MULTIMEDIA
262
Page 265 of 348
CYBERSECURITY
Your vehicle may be a connected vehicle and
may be equipped with both wired and wire-
less networks. These networks allow your ve-
hicle to send and receive information. This
information allows systems and features in
your vehicle to function properly.
Your vehicle may be equipped with certain
security features to reduce the risk of unau-
thorized and unlawful access to vehicle sys-
tems and wireless communications. Vehicle
software technology continues to evolve over
time and FCA, working with its suppliers,
evaluates and takes appropriate steps as
needed. Similar to a computer or other de-
vices, your vehicle may require software up-
dates to improve the usability and perfor-
mance of your systems or to reduce the
potential risk of unauthorized and unlawful
access to your vehicle systems.
The risk of unauthorized and unlawful access
to your vehicle systems may still exist, even if
the most recent version of vehicle software
(such as Uconnect software) is installed.
WARNING!
• It is not possible to know or to predict all
of the possible outcomes if your vehi-
cle’s systems are breached. It may be
possible that vehicle systems, including
safety related systems, could be im-
paired or a loss of vehicle control could
occur that may result in an accident
involving serious injury or death.
• ONLY insert media (e.g., USB, SD card,
or CD) into your vehicle if it came from a
trusted source. Media of unknown origin
could possibly contain malicious soft-
ware, and if installed in your vehicle, it
may increase the possibility for vehicle
systems to be breached.
• As always, if you experience unusual
vehicle behavior, take your vehicle to
your nearest authorized dealer immedi-
ately.
NOTE:
• FCA or your dealer may contact you directly
regarding software updates.• To help further improve vehicle security and
minimize the potential risk of a security
breach, vehicle owners should:
– Routinely check
www.driveuconnect.com/support/
software-update.html to learn about
available Uconnect software updates.
– Only connect and use trusted media
devices (e.g. personal mobile phones,
USBs, CDs).
Privacy of any wireless and wired communi-
cations cannot be assured. Third parties may
unlawfully intercept information and private
communications without your consent. For
further information, refer to “Data Collection
& Privacy” in “Onboard Diagnostic System
(OBD II) Cybersecurity” in “Getting To Know
Your Instrument Panel” in your Owner’s
Manual ).
263
Page 266 of 348
TIPS CONTROLS AND
GENERAL INFORMATION
Steering Wheel Audio Controls
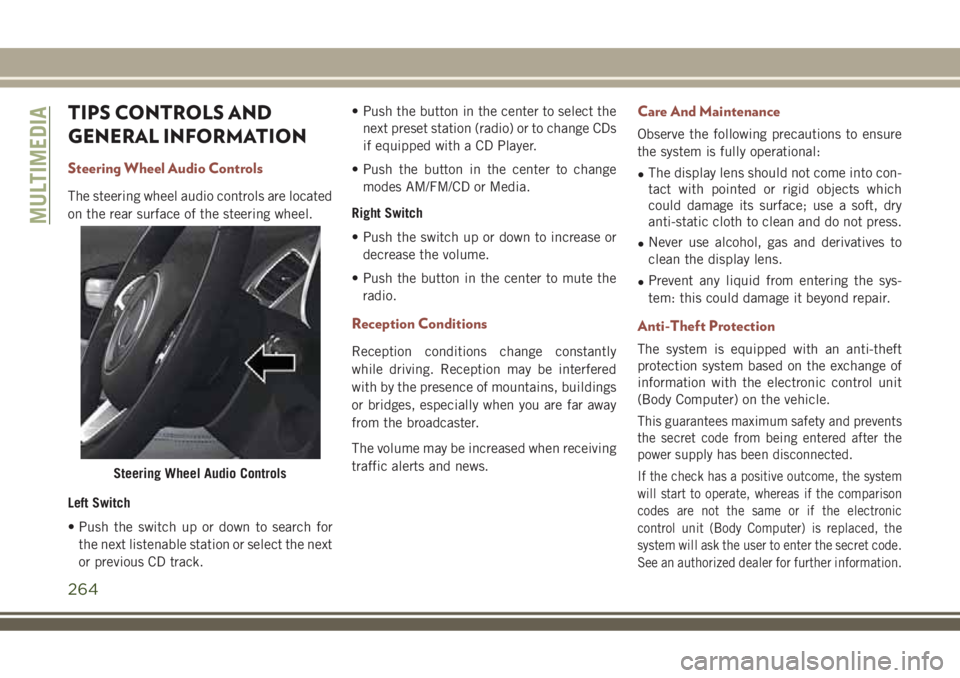
The steering wheel audio controls are located
on the rear surface of the steering wheel.
Left Switch
• Push the switch up or down to search for
the next listenable station or select the next
or previous CD track.• Push the button in the center to select the
next preset station (radio) or to change CDs
if equipped with a CD Player.
• Push the button in the center to change
modes AM/FM/CD or Media.
Right Switch
• Push the switch up or down to increase or
decrease the volume.
• Push the button in the center to mute the
radio.
Reception Conditions
Reception conditions change constantly
while driving. Reception may be interfered
with by the presence of mountains, buildings
or bridges, especially when you are far away
from the broadcaster.
The volume may be increased when receiving
traffic alerts and news.
Care And Maintenance
Observe the following precautions to ensure
the system is fully operational:
•The display lens should not come into con-
tact with pointed or rigid objects which
could damage its surface; use a soft, dry
anti-static cloth to clean and do not press.
•Never use alcohol, gas and derivatives to
clean the display lens.
•Prevent any liquid from entering the sys-
tem: this could damage it beyond repair.
Anti-Theft Protection
The system is equipped with an anti-theft
protection system based on the exchange of
information with the electronic control unit
(Body Computer) on the vehicle.
This guarantees maximum safety and prevents
the secret code from being entered after the
power supply has been disconnected.
If the check has a positive outcome, the system
will start to operate, whereas if the comparison
codes are not the same or if the electronic
control unit (Body Computer) is replaced, the
system will ask the user to enter the secret code.
See an authorized dealer for further information.Steering Wheel Audio Controls
MULTIMEDIA
264
Page 267 of 348
UCONNECT 3 WITH 5–INCH DISPLAY — IF EQUIPPED
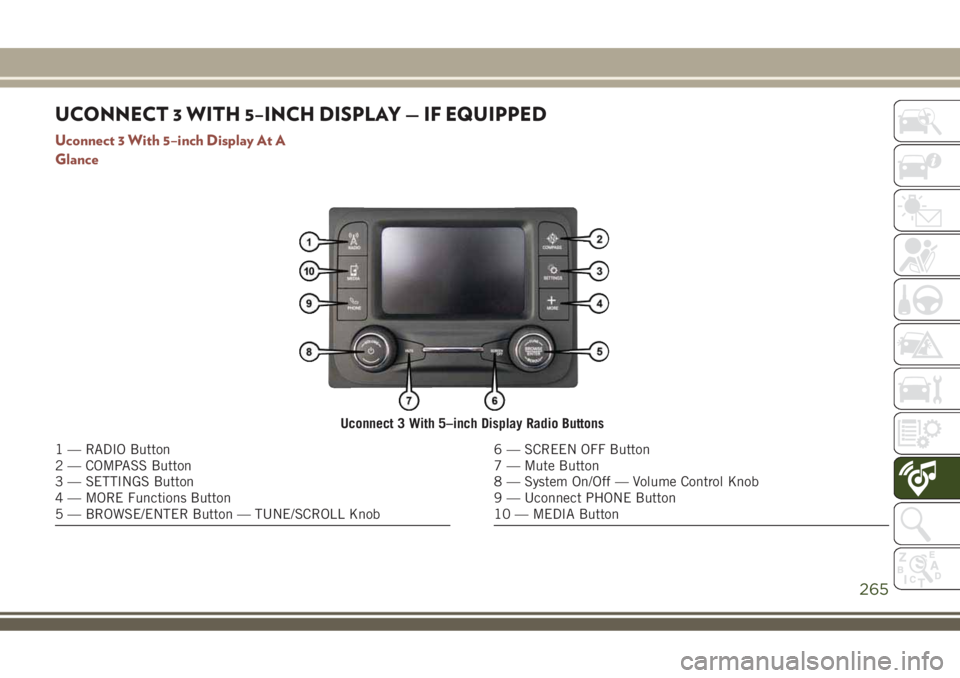
Uconnect 3 With 5–inch Display At A
Glance
Uconnect 3 With 5–inch Display Radio Buttons
1 — RADIO Button
2 — COMPASS Button
3 — SETTINGS Button
4 — MORE Functions Button
5 — BROWSE/ENTER Button — TUNE/SCROLL Knob6 — SCREEN OFF Button
7 — Mute Button
8 — System On/Off — Volume Control Knob
9 — Uconnect PHONE Button
10 — MEDIA Button
265
Page 268 of 348
CAUTION!
Do NOT attach any object to the touchscreen,
doing so can result in damage to the touch-
screen.
Clock Setting
To start the clock setting procedure:
1. Push the MORE button on the faceplate.
2. Press the Settings button on the touch-
screen, then press the “Clock and Date”
button.
3. Press the “Set Time” button on the
touchscreen.
4. Press the “Up” or “Down” arrows to ad-
just the hours or minutes, then select the
“AM” or “PM” button on the touchscreen.
You can also select 12hr or 24hr format
by pressing the desired button on the
touchscreen.
5. Once the time is set press the “Done”
button on the touchscreen to exit the time
screen.NOTE:
In the Clock Setting Menu you can also select
Display Clock. Display Clock turns the clock
display in the status bar on or off.
Audio Setting
1. Push the MORE button on the faceplate.
2. Press the “Settings” button on the
touchscreen.
3. Scroll down and press the “Audio” button
on the touchscreen to open the Audio
menu.
4. The Audio Menu shows the following op-
tions for you to customize your audio
settings.
Equalizer
Press the “Equalizer” button on the touch-
screen to adjust the Bass, Mid and Treble.
Use the “+” or “-” button on the touchscreen
to adjust the equalizer to your desired set-
tings.Balance/Fade
Press the “Balance/Fade” button on the touch-
screen to adjust the sound from the speakers.
Use the arrow buttons on the touchscreen to
adjust the sound level from the front and rear or
right and left side speakers. Press the Center
“C” button on the touchscreen to reset the
balance and fade to the factory setting.
Speed Adjusted Volume — If Equipped
Press the “Speed Adjusted Volume” button
on the touchscreen to select between OFF, 1,
2 or 3. This will decrease the radio volume
relative to a decrease in vehicle speed.
Loudness — If Equipped
Press the “Loudness” button on the touch-
screen to select the Loudness feature. When
this feature is activated it improves sound
quality at lower volumes.
Surround Sound — If Equipped
Press the “Surround Sound” button on the
touchscreen, select On or Off followed by
pressing the back arrow button on the touch-
screen. When this feature is activated, it
provides simulated surround sound mode.
MULTIMEDIA
266
Page 269 of 348
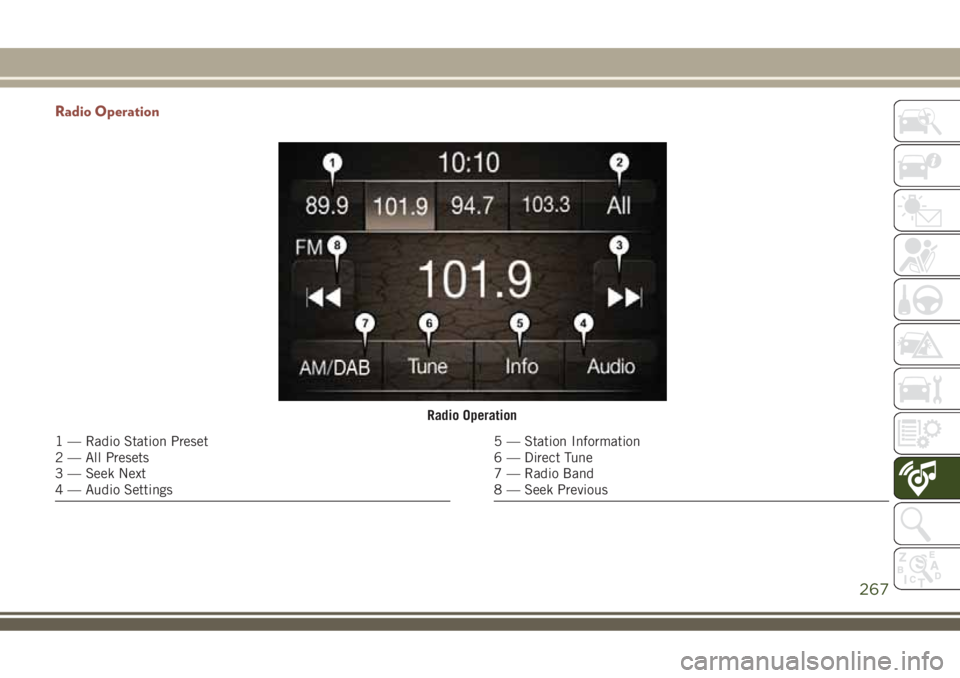
Radio Operation
Radio Operation
1 — Radio Station Preset
2 — All Presets
3 — Seek Next
4 — Audio Settings5 — Station Information
6 — Direct Tune
7 — Radio Band
8 — Seek Previous
267
Page 270 of 348
Store Radio Presets Manually
The Radio stores up to 12 presets in each of
the Radio modes. There are four visible pre-
sets at the top of the radio screen. Pressing
the “All” button on the touchscreen on the
radio home screen displays all of the preset
stations for that mode.
To store a radio preset manually, follow the
steps below:
1. Tune to the desired station.
2. Press and hold the desired numbered but-
ton on the touchscreen for more than two
seconds, or until you hear a confirmation
beep.
Seek Next/Previous Buttons
• Press the Seek up or Seek down button to
seek through radio stations in AM, FM or
DAB bands.
• Hold either button to bypass stations with-
out stopping.USB/Audio Jack (AUX)/Bluetooth
Operation
USB/AUX
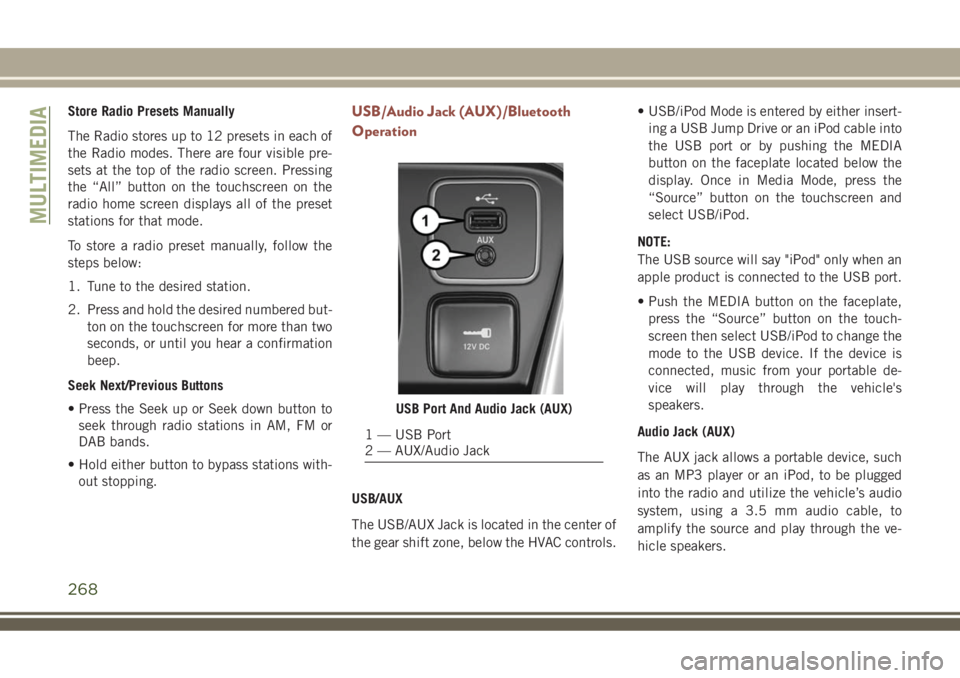
The USB/AUX Jack is located in the center of
the gear shift zone, below the HVAC controls.• USB/iPod Mode is entered by either insert-
ing a USB Jump Drive or an iPod cable into
the USB port or by pushing the MEDIA
button on the faceplate located below the
display. Once in Media Mode, press the
“Source” button on the touchscreen and
select USB/iPod.
NOTE:
The USB source will say "iPod" only when an
apple product is connected to the USB port.
• Push the MEDIA button on the faceplate,
press the “Source” button on the touch-
screen then select USB/iPod to change the
mode to the USB device. If the device is
connected, music from your portable de-
vice will play through the vehicle's
speakers.
Audio Jack (AUX)
The AUX jack allows a portable device, such
as an MP3 player or an iPod, to be plugged
into the radio and utilize the vehicle’s audio
system, using a 3.5 mm audio cable, to
amplify the source and play through the ve-
hicle speakers.
USB Port And Audio Jack (AUX)
1 — USB Port
2 — AUX/Audio Jack
MULTIMEDIA
268