key JEEP COMPASS 2019 Owner handbook (in English)
[x] Cancel search | Manufacturer: JEEP, Model Year: 2019, Model line: COMPASS, Model: JEEP COMPASS 2019Pages: 362, PDF Size: 6.23 MB
Page 21 of 362
To Disarm The System
The vehicle security alarm can be disarmed
using any of the following methods:
• Push the unlock button on the key fob.
• Grasp the passive entry door handle to
unlock the door, refer to "Doors" in "Getting
To Know Your Vehicle" in the Owner’s
Manual at for further information.
• Cycle the ignition out of the off mode to
disarm the system.
NOTE:
• The driver's door key cylinder and the lift-
gate button on the key fob cannot arm or
disarm the vehicle security alarm.
• The vehicle security alarm remains armed
during power liftgate entry. Pushing the
liftgate button will not disarm the vehicle
security alarm. If someone enters the ve-
hicle through the liftgate and opens any
door, the alarm will sound.
• When the vehicle security alarm is armed,
the interior power door lock switches will
not unlock the doors.The vehicle security alarm is designed to
protect your vehicle. However, you can create
conditions where the system will give you a
false alarm. If one of the previously described
arming sequences has occurred, the vehicle
security alarm will arm regardless of whether
you are in the vehicle or not. If you remain in
the vehicle and open a door, the alarm will
sound. If this occurs, disarm the vehicle
security alarm.
If the vehicle security alarm is armed and the
battery becomes disconnected, the vehicle
security alarm will remain armed when the
battery is reconnected; the exterior lights will
flash, and the horn will sound. If this occurs,
disarm the vehicle security alarm.
Security System Manual Override
The vehicle security alarm will not arm if you
lock the doors using the manual door lock
plunger.
PREMIUM VEHICLE
SECURITY ALARM —
IF EQUIPPED
The premium vehicle security alarm system
monitors the doors, hood latch, and liftgate
for unauthorized entry and the ignition switch
for unauthorized operation. The system also
includes a dual function intrusion sensor and
vehicle tilt sensor. The intrusion sensor moni-
tors the vehicle interior for motion. The ve-
hicle tilt sensor monitors the vehicle for any
tilting actions (tow away, tire removal, ferry
transport, etc). A siren with battery backup
which senses interruptions of power and
communications is also included.
If a perimeter violation triggers the security
system, the siren will sound for 29 seconds
and the exterior lights will flash followed by
approximately five seconds of no activity.
This will continue for eight cycles if no action
is taken to disarm the system.
19
Page 22 of 362
To Arm The System
Follow these steps to arm the security alarm:
1. Remove the key from the ignition system,
refer to "Starting The Engine" in "Starting
And Operating" in your Owner’s manual
for further information.
• For vehicles equipped with Keyless
Enter-N-Go — Passive Entry, make
sure the vehicle ignition system is
"OFF."
• For vehicles not equipped with Keyless
Enter-N-Go — Passive Entry, make
sure the vehicle ignition system is
"OFF" and the key is physically re-
moved from the ignition.
2. Perform one of the following methods to
lock the vehicle:
• Push lock on the interior power door
lock switch with the driver and/or pas-
senger door open.
• Push the lock button on the exterior
passive entry door handle with a key
fob available in the same exterior zone,refer to "Doors" in "Getting To Know
Your Vehicle" in your Owner’s Manua
for further information.
• Push the lock button on the key fob.
3. If any doors are open, close them.
NOTE:
• Once the security system is armed, it re-
mains in that state until you disarm it by
following either of the disarming proce-
dures described. If a power loss occurs
after arming the system, you must disarm
the system after restoring power to prevent
alarm activation.
• The ultrasonic intrusion sensor (motion de-
tector) actively monitors your vehicle every
time you arm the security system. If you
prefer, you can turn off the ultrasonic intru-
sion sensor when arming the security sys-
tem. To do so, push the lock button on the
key fob five times within five seconds of
arming the system (while the Vehicle Secu-
rity Light is flashing rapidly).
To Disarm The System
The vehicle security alarm can be disarmed
using any of the following methods:
• Push the unlock button on the key fob.
• Grasp the passive entry door handle to
unlock the door, refer to "Doors" in "Getting
To Know Your Vehicle" in your Owner’s
Manual for further information).
• Cycle the vehicle ignition system out of the
OFF position.
– For vehicles equipped with Keyless
Enter-N-Go — Passive Entry, push the
Start/Stop ignition button (requires at
least one valid key fob in the vehicle).
– For vehicles not equipped with Keyless
Enter-N-Go — Passive Entry, insert a
valid Integrated Vehicle Key into the
ignition switch and turn the key to the
ON position.
NOTE:
• The driver's door key cylinder and the lift-
gate button on the key fob cannot arm or
disarm the vehicle security alarm.
• The vehicle security alarm remains armed
during power liftgate entry. Pushing the
GETTING TO KNOW YOUR VEHICLE
20
Page 23 of 362
liftgate button will not disarm the vehicle
security alarm. If someone enters the ve-
hicle through the liftgate and opens any
door the alarm will sound.
• When the vehicle security alarm is armed,
the interior power door lock switches will
not unlock the doors.
• The ultrasonic intrusion sensor (motion de-
tector) actively monitors your vehicle every
time you arm the security system. If you
prefer, you can turn off the ultrasonic intru-
sion sensor when arming the security sys-
tem. To do so, push the lock button on the
key fob five times within five seconds of
arming the system (while the vehicle secu-
rity light is flashing rapidly).
The vehicle security alarm is designed to
protect your vehicle; however, you can create
conditions where the system will give you a
false alarm. If one of the previously described
arming sequences has occurred, the vehicle
security alarm will arm regardless of whether
you are in the vehicle or not. If you remain in
the vehicle and open a door, the alarm will
sound. If this occurs, disarm the vehicle
security alarm.If the vehicle security alarm is armed and the
battery becomes disconnected, the vehicle
security alarm will remain armed when the
battery is reconnected; the exterior lights will
flash, the horn will sound. If this occurs,
disarm the vehicle security alarm.
Security System Manual Override
The system will not arm if you lock the doors
using the manual door lock plunger.
DOORS
Keyless Enter-N-Go — Passive Entry
The Passive Entry system is an enhancement
to the vehicle’s Remote Keyless Entry system
and a feature of Keyless Enter-N-Go — Pas-
sive Entry. This feature allows you to lock and
unlock the vehicle’s door(s) and fuel door
without having to push the key fob lock or
unlock buttons.
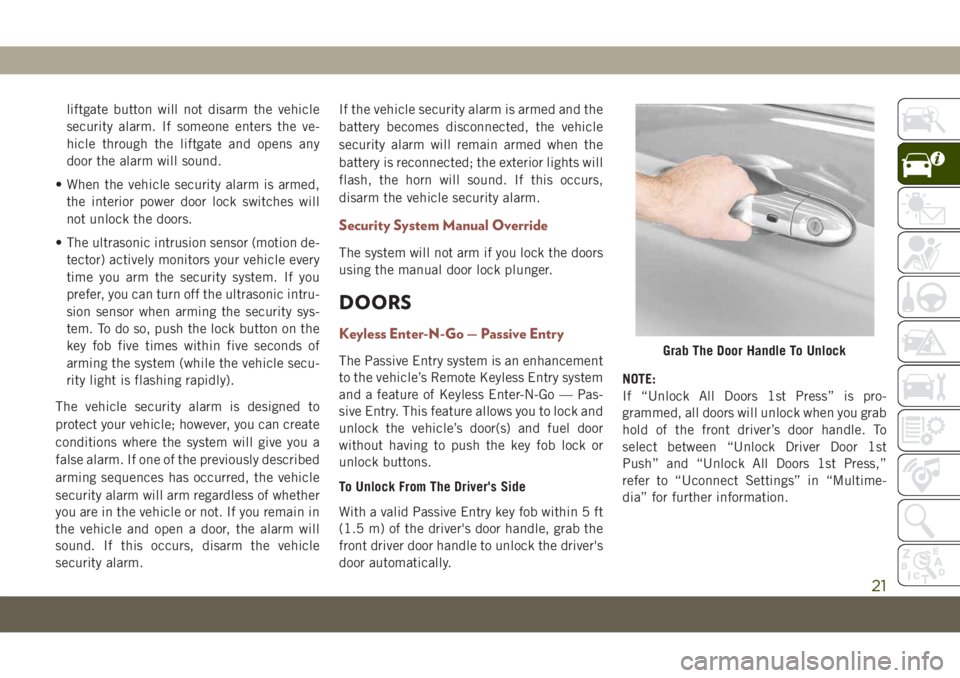
To Unlock From The Driver's Side
With a valid Passive Entry key fob within 5 ft
(1.5 m) of the driver's door handle, grab the
front driver door handle to unlock the driver's
door automatically.NOTE:
If “Unlock All Doors 1st Press” is pro-
grammed, all doors will unlock when you grab
hold of the front driver’s door handle. To
select between “Unlock Driver Door 1st
Push” and “Unlock All Doors 1st Press,”
refer to “Uconnect Settings” in “Multime-
dia” for further information.Grab The Door Handle To Unlock
21
Page 24 of 362
To Unlock From The Passenger Side
With a valid Passive Entry key fob within 5 ft
(1.5 m) of the passenger door handle, grab
the front passenger door handle to unlock all
four doors and the liftgate automatically.
NOTE:
All doors will unlock when the front passen-
ger door handle is grabbed regardless of the
driver’s door unlock preference setting (“Un-
lock Driver Door 1st Press” or “Unlock All
Doors 1st Press”).
Preventing Inadvertent Locking Of Passive Entry
Key Fob In Vehicle (FOBIK-Safe)
To minimize the possibility of unintentionally
locking a Passive Entry key fob inside your
vehicle, the Passive Entry system is equipped
with an automatic door unlock feature which
will function if the ignition switch is in the
OFF position.
FOBIK-Safe only executes in vehicles with
passive entry. There are three situations that
trigger a FOBIK-Safe search in any passive
entry vehicle:
• A lock request is made by a valid Passive
Entry key fob while a door is open.• A lock request is made by the Passive Entry
door handle while a door is open.
• A lock request is made by the door panel
switch while the door is open.
When any of these situations occur, after all
open doors are shut, the FOBIK-Safe search
will be executed. If it finds a Passive Entry
key fob inside the vehicle and it does not find
any Passive Entry key fobs outside the ve-
hicle, then the vehicle will unlock and alert
the customer.
NOTE:
The vehicle will only unlock the doors when a
valid Passive Entry key fob is detected inside
the vehicle. The vehicle will not unlock the
doors when any of the following conditions
are true:
• The doors are manually locked using the
door lock knobs.
• There is a valid Passive Entry key fob out-
side the vehicle and within 5 ft (1.5m) of
either Passive Entry door handle.
• Three attempts are made to lock the doors
using the door panel switch and then close
the doors.To Unlock/Enter The Liftgate
The liftgate passive entry unlock feature is
built into liftgate handle release. With a valid
Passive Entry key fob within 5 ft (1.5 m) of
the liftgate, push the electronic liftgate re-
lease to open with one fluid motion.
To Lock The Liftgate
With a valid Passive Entry key fob within 5 ft
(1.5 m) of the liftgate, push the passive entry
lock button located to the right of liftgate
handle release.
NOTE:
The liftgate passive entry lock button will lock
all doors and the liftgate. The liftgate unlock
feature is built into the electronic liftgate
release.
NOTE:
Always take the key with you once a door or
the liftgate is locked to prevent locking the
key fob inside of the vehicle. If the key has
been locked inside of the vehicle, it can be
recovered using the second provided key fob.
GETTING TO KNOW YOUR VEHICLE
22
Page 25 of 362
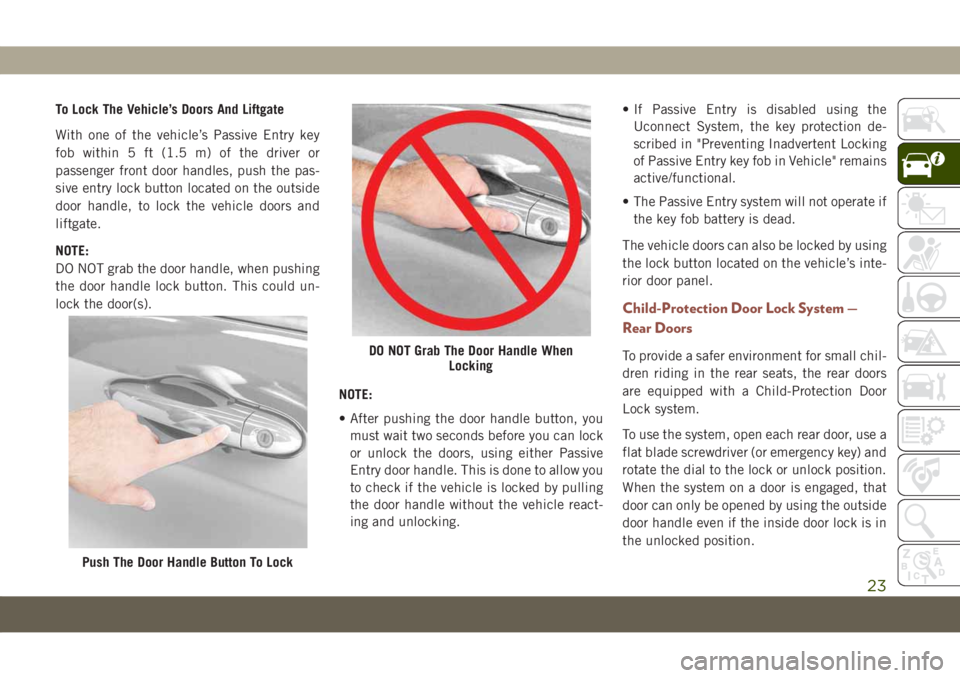
To Lock The Vehicle’s Doors And Liftgate
With one of the vehicle’s Passive Entry key
fob within 5 ft (1.5 m) of the driver or
passenger front door handles, push the pas-
sive entry lock button located on the outside
door handle, to lock the vehicle doors and
liftgate.
NOTE:
DO NOT grab the door handle, when pushing
the door handle lock button. This could un-
lock the door(s).
NOTE:
• After pushing the door handle button, you
must wait two seconds before you can lock
or unlock the doors, using either Passive
Entry door handle. This is done to allow you
to check if the vehicle is locked by pulling
the door handle without the vehicle react-
ing and unlocking.• If Passive Entry is disabled using the
Uconnect System, the key protection de-
scribed in "Preventing Inadvertent Locking
of Passive Entry key fob in Vehicle" remains
active/functional.
• The Passive Entry system will not operate if
the key fob battery is dead.
The vehicle doors can also be locked by using
the lock button located on the vehicle’s inte-
rior door panel.
Child-Protection Door Lock System —
Rear Doors
To provide a safer environment for small chil-
dren riding in the rear seats, the rear doors
are equipped with a Child-Protection Door
Lock system.
To use the system, open each rear door, use a
flat blade screwdriver (or emergency key) and
rotate the dial to the lock or unlock position.
When the system on a door is engaged, that
door can only be opened by using the outside
door handle even if the inside door lock is in
the unlocked position.
Push The Door Handle Button To Lock
DO NOT Grab The Door Handle When
Locking
23
Page 29 of 362
• To set a memory profile to your key fob,
refer to “Linking And Unlinking The Re-
mote Keyless Entry Key Fob To Memory” in
this section.
Linking And Unlinking The Remote Keyless
Entry Key Fob To Memory
Your remote keyless entry key fob can be
programmed to recall one of two pre-
programmed memory profiles with a push of
the unlock button on the key fob.
NOTE:
Before programming your key fob you must
select the “Memory Linked To FOB” feature
through the Uconnect system screen. Refer
to “Uconnect Settings” in “Multimedia” in
the Owner’s Manual for further information.
To program your key fob, perform the follow-
ing:
1. Cycle the vehicle’s ignition to the OFF
position.
2. Select the desired memory profile (1) or
(2).NOTE:
If a memory profile has not already been
set, refer to "Programming The Memory
Feature" in this section for instructions on
how to set a memory profile.
3. Push and release the set (S) button on the
memory switch, then within five seconds
push and release the button labeled (1) or
(2) accordingly. “Memory Profile Set”
(1 or 2) will display in the instrument
cluster display.
4. Push and release the lock button on the
key fob within 10 seconds.
NOTE:
Your key fob can be unlinked to your memory
settings by pushing the set (S) button, fol-
lowed by pushing the unlock button on the
key fob within 10 seconds.
Memory Position Recall
NOTE:
The vehicle must be in PARK to recall
memory positions. If a recall is attempted
when the vehicle is not in PARK, a message
will display in the instrument cluster display.• To recall the memory settings for driver one,
push memory button (1) or the unlock but-
ton on the key fob linked to memory posi-
tion 1.
• To recall the memory settings for driver two,
push memory button (2) or the unlock but-
ton on the key fob linked to memory posi-
tion 2.
A recall can be canceled by pushing any of the
memory buttons (S, 1, or 2) during a recall.
When a recall is canceled, the driver seat will
stop moving. A delay of one second will occur
before another recall can be selected.
Easy Entry/Exit Seat — If Equipped
This feature provides automatic driver seat
positioning to enhance driver mobility when
entering and exiting the vehicle.
The distance the driver seat moves depends
on where you have the driver seat positioned
when you cycle the vehicle’s ignition to the
OFF position.
Each stored memory setting will have an
associated Easy Entry and Easy Exit position.
27
Page 50 of 362
CAUTION!
Failure to follow these cautions can cause
damage to the heating elements:
• Use care when washing the inside of
the rear window. Do not use abrasive
window cleaners on the interior surface
of the window. Use a soft cloth and a
mild washing solution, wiping parallel
to the heating elements. Labels can be
peeled off after soaking with warm
water.
• Do not use scrapers, sharp instru-
ments, or abrasive window cleaners on
the interior surface of the window.
• Keep all objects a safe distance from
the window.
Outside Air Intake
Make sure the air intake, located directly in
front of the windshield, is free of obstruc-
tions, such as leaves. Leaves collected in the
air intake may reduce airflow, and if they
enter the plenum, they could plug the water
drains. In Winter months, make sure the air
intake is clear of ice, slush, and snow.
Cabin Air Filter
The climate control system filters out dust
and pollen from the air. Contact an autho-
rized dealer to service your cabin air filter,
and to have it replaced when needed.
WINDOWS
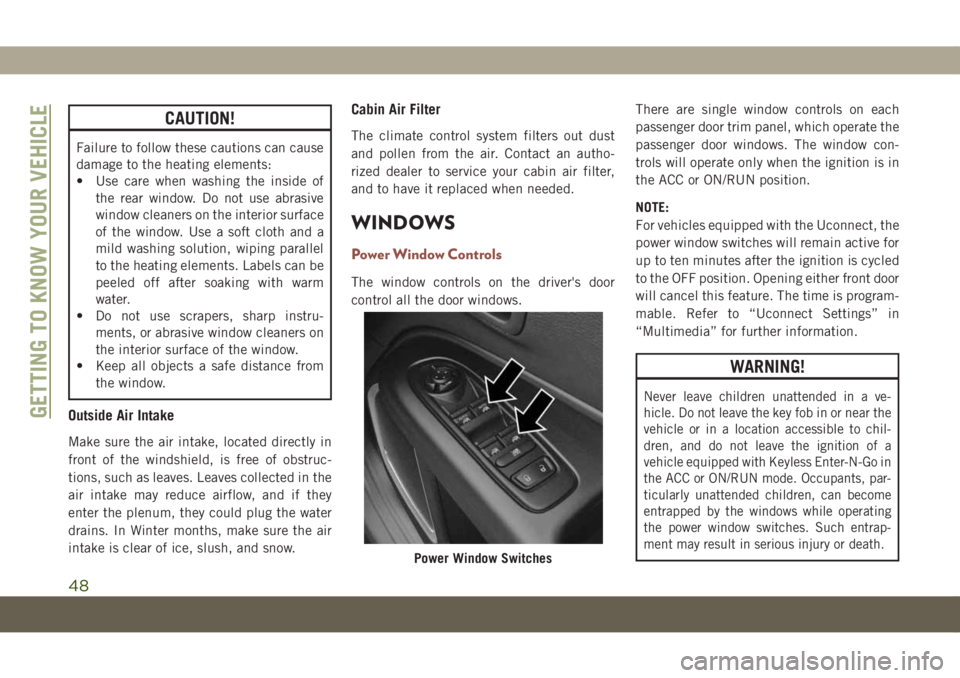
Power Window Controls
The window controls on the driver's door
control all the door windows.There are single window controls on each
passenger door trim panel, which operate the
passenger door windows. The window con-
trols will operate only when the ignition is in
the ACC or ON/RUN position.
NOTE:
For vehicles equipped with the Uconnect, the
power window switches will remain active for
up to ten minutes after the ignition is cycled
to the OFF position. Opening either front door
will cancel this feature. The time is program-
mable. Refer to “Uconnect Settings” in
“Multimedia” for further information.
WARNING!
Never leave children unattended in a ve-
hicle. Do not leave the key fob in or near the
vehicle or in a location accessible to chil-
dren, and do not leave the ignition of a
vehicle equipped with Keyless Enter-N-Go in
the ACC or ON/RUN mode. Occupants, par-
ticularly unattended children, can become
entrapped by the windows while operating
the power window switches. Such entrap-
ment may result in serious injury or death.
Power Window Switches
GETTING TO KNOW YOUR VEHICLE
48
Page 52 of 362
Wind Buffeting
Wind buffeting can be described as the per-
ception of pressure on the ears or a
helicopter-type sound in the ears. Your ve-
hicle may exhibit wind buffeting with the
windows down, or the sunroof (if equipped) in
certain open or partially open positions. This
is a normal occurrence and can be mini-
mized. If the buffeting occurs with the rear
windows open, open the front and rear win-
dows together to minimize the buffeting. If
the buffeting occurs with the sunroof open,
adjust the sunroof opening to minimize the
buffeting or open any window.
POWER SUNROOF
WITH POWER SHADE —
IF EQUIPPED
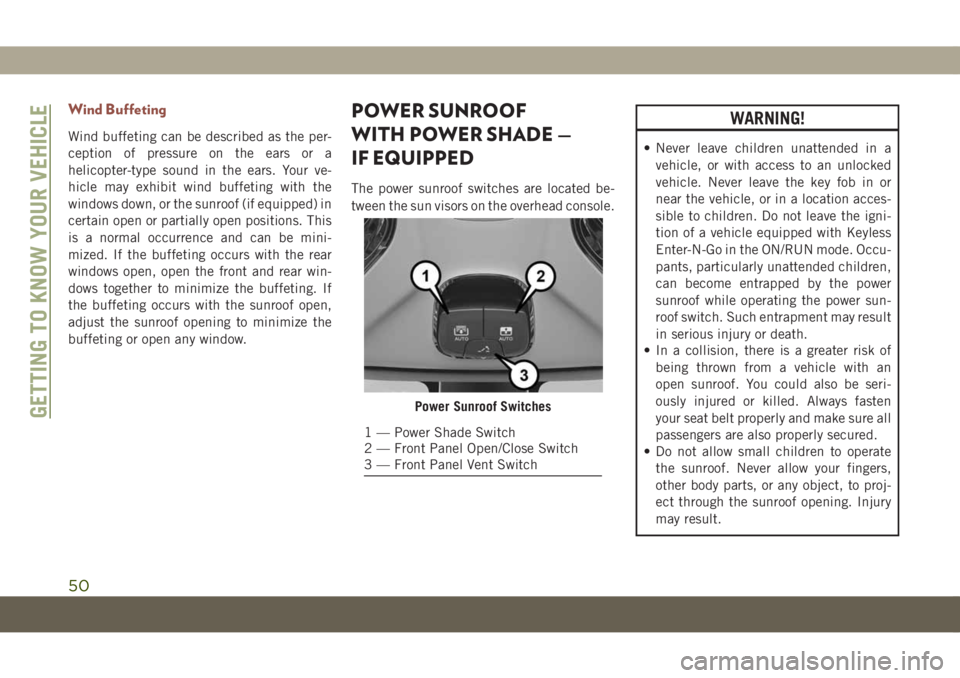
The power sunroof switches are located be-
tween the sun visors on the overhead console.
WARNING!
• Never leave children unattended in a
vehicle, or with access to an unlocked
vehicle. Never leave the key fob in or
near the vehicle, or in a location acces-
sible to children. Do not leave the igni-
tion of a vehicle equipped with Keyless
Enter-N-Go in the ON/RUN mode. Occu-
pants, particularly unattended children,
can become entrapped by the power
sunroof while operating the power sun-
roof switch. Such entrapment may result
in serious injury or death.
• In a collision, there is a greater risk of
being thrown from a vehicle with an
open sunroof. You could also be seri-
ously injured or killed. Always fasten
your seat belt properly and make sure all
passengers are also properly secured.
• Do not allow small children to operate
the sunroof. Never allow your fingers,
other body parts, or any object, to proj-
ect through the sunroof opening. Injury
may result.
Power Sunroof Switches
1 — Power Shade Switch
2 — Front Panel Open/Close Switch
3 — Front Panel Vent Switch
GETTING TO KNOW YOUR VEHICLE
50
Page 56 of 362
CAUTION!
To prevent possible damage, do not slam
the hood to close it. Lower hood to approxi-
mately 12 inches (30 cm) and drop the
hood to close. Make sure hood is fully
closed for both latches. Never drive ve-
hicle unless hood is fully closed, with both
latches engaged.
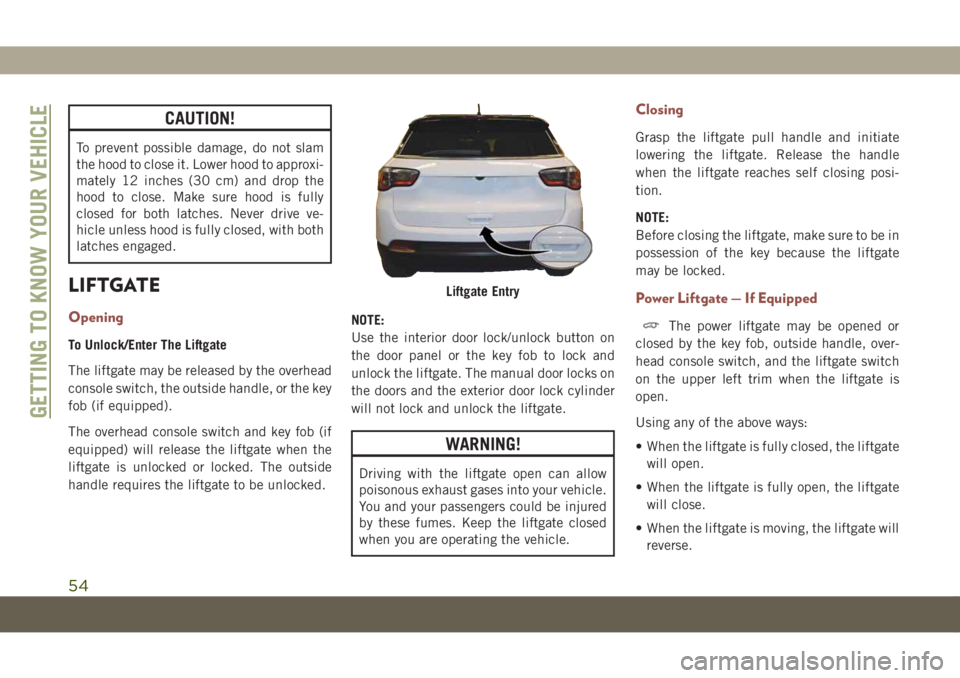
LIFTGATE
Opening
To Unlock/Enter The Liftgate
The liftgate may be released by the overhead
console switch, the outside handle, or the key
fob (if equipped).
The overhead console switch and key fob (if
equipped) will release the liftgate when the
liftgate is unlocked or locked. The outside
handle requires the liftgate to be unlocked.NOTE:
Use the interior door lock/unlock button on
the door panel or the key fob to lock and
unlock the liftgate. The manual door locks on
the doors and the exterior door lock cylinder
will not lock and unlock the liftgate.
WARNING!
Driving with the liftgate open can allow
poisonous exhaust gases into your vehicle.
You and your passengers could be injured
by these fumes. Keep the liftgate closed
when you are operating the vehicle.
Closing
Grasp the liftgate pull handle and initiate
lowering the liftgate. Release the handle
when the liftgate reaches self closing posi-
tion.
NOTE:
Before closing the liftgate, make sure to be in
possession of the key because the liftgate
may be locked.
Power Liftgate — If Equipped
The power liftgate may be opened or
closed by the key fob, outside handle, over-
head console switch, and the liftgate switch
on the upper left trim when the liftgate is
open.
Using any of the above ways:
• When the liftgate is fully closed, the liftgate
will open.
• When the liftgate is fully open, the liftgate
will close.
• When the liftgate is moving, the liftgate will
reverse.
Liftgate Entry
GETTING TO KNOW YOUR VEHICLE
54
Page 57 of 362
The key fob and the overhead console switch
will open the liftgate when the liftgate is
locked. The outside handle requires the lift-
gate to be unlocked. Push the button on the
key fob twice within five seconds to open or
close the liftgate.
When the liftgate button on the key fob is
pushed two times, the turn signals will flash
twice to signal that the liftgate is opening or
closing (if Flash Lamps with Lock is enabled
in the Uconnect settings), and the liftgate
chime will be audible. Refer to “Uconnect
Settings” in “Multimedia” in the Owner’s
Manual for further information.
NOTE:
• Before closing the liftgate, make sure to be
in possession of the key because the lift-
gate may be locked.
• Use the interior door lock/unlock button on
the door panel or the key fob to lock and
unlock the liftgate. The manual door locks
on the doors and the exterior door lock
cylinder will not lock and unlock the
liftgate.Lock The Vehicle
WARNING!
During power operation, personal injury or
cargo damage may occur. Ensure the lift-
gate travel path is clear. Make sure the
liftgate is closed and latched before driv-
ing away.
NOTE:
• The liftgate will not power open or close if
the gear selector is in gear or the vehicle
speed is above 0 mph (0 km/h).
• If anything obstructs the power liftgate
while it is closing or opening, the liftgate
will automatically reverse to the closed or
open position, provided it meets sufficient
resistance.
• There are pinch sensors attached to the
side of the liftgate opening. Light pressure
anywhere along these strips will cause the
liftgate to return to the open position.• If the power liftgate encounters multiple
obstructions within the same cycle, the
system will automatically stop. If this oc-
curs, the liftgate must be opened or closed
manually.
• The power liftgate will not operate in tem-
peratures below −22° F (−30° C) or tem-
peratures above 150° F (65° C). Be sure to
remove any buildup of snow or ice from the
liftgate before pushing any of the power
liftgate switches.
• If the liftgate is left open for an extended
period of time, the liftgate may need to be
closed manually to reset power liftgate
functionality.
• Gas props support the liftgate in the open
position. However, because the gas pres-
sure drops with temperature, it may be
necessary to assist the props when opening
the liftgate in cold weather.
• Before driving off, check the instrument
cluster for a liftgate or door open message
or warning indicator. Failure to do this
could result in unintentionally leaving the
liftgate open while driving.
55