JEEP COMPASS 2019 Owner handbook (in English)
Manufacturer: JEEP, Model Year: 2019, Model line: COMPASS, Model: JEEP COMPASS 2019Pages: 362, PDF Size: 6.23 MB
Page 21 of 362
To Disarm The System
The vehicle security alarm can be disarmed
using any of the following methods:
• Push the unlock button on the key fob.
• Grasp the passive entry door handle to
unlock the door, refer to "Doors" in "Getting
To Know Your Vehicle" in the Owner’s
Manual at for further information.
• Cycle the ignition out of the off mode to
disarm the system.
NOTE:
• The driver's door key cylinder and the lift-
gate button on the key fob cannot arm or
disarm the vehicle security alarm.
• The vehicle security alarm remains armed
during power liftgate entry. Pushing the
liftgate button will not disarm the vehicle
security alarm. If someone enters the ve-
hicle through the liftgate and opens any
door, the alarm will sound.
• When the vehicle security alarm is armed,
the interior power door lock switches will
not unlock the doors.The vehicle security alarm is designed to
protect your vehicle. However, you can create
conditions where the system will give you a
false alarm. If one of the previously described
arming sequences has occurred, the vehicle
security alarm will arm regardless of whether
you are in the vehicle or not. If you remain in
the vehicle and open a door, the alarm will
sound. If this occurs, disarm the vehicle
security alarm.
If the vehicle security alarm is armed and the
battery becomes disconnected, the vehicle
security alarm will remain armed when the
battery is reconnected; the exterior lights will
flash, and the horn will sound. If this occurs,
disarm the vehicle security alarm.
Security System Manual Override
The vehicle security alarm will not arm if you
lock the doors using the manual door lock
plunger.
PREMIUM VEHICLE
SECURITY ALARM —
IF EQUIPPED
The premium vehicle security alarm system
monitors the doors, hood latch, and liftgate
for unauthorized entry and the ignition switch
for unauthorized operation. The system also
includes a dual function intrusion sensor and
vehicle tilt sensor. The intrusion sensor moni-
tors the vehicle interior for motion. The ve-
hicle tilt sensor monitors the vehicle for any
tilting actions (tow away, tire removal, ferry
transport, etc). A siren with battery backup
which senses interruptions of power and
communications is also included.
If a perimeter violation triggers the security
system, the siren will sound for 29 seconds
and the exterior lights will flash followed by
approximately five seconds of no activity.
This will continue for eight cycles if no action
is taken to disarm the system.
19
Page 22 of 362
To Arm The System
Follow these steps to arm the security alarm:
1. Remove the key from the ignition system,
refer to "Starting The Engine" in "Starting
And Operating" in your Owner’s manual
for further information.
• For vehicles equipped with Keyless
Enter-N-Go — Passive Entry, make
sure the vehicle ignition system is
"OFF."
• For vehicles not equipped with Keyless
Enter-N-Go — Passive Entry, make
sure the vehicle ignition system is
"OFF" and the key is physically re-
moved from the ignition.
2. Perform one of the following methods to
lock the vehicle:
• Push lock on the interior power door
lock switch with the driver and/or pas-
senger door open.
• Push the lock button on the exterior
passive entry door handle with a key
fob available in the same exterior zone,refer to "Doors" in "Getting To Know
Your Vehicle" in your Owner’s Manua
for further information.
• Push the lock button on the key fob.
3. If any doors are open, close them.
NOTE:
• Once the security system is armed, it re-
mains in that state until you disarm it by
following either of the disarming proce-
dures described. If a power loss occurs
after arming the system, you must disarm
the system after restoring power to prevent
alarm activation.
• The ultrasonic intrusion sensor (motion de-
tector) actively monitors your vehicle every
time you arm the security system. If you
prefer, you can turn off the ultrasonic intru-
sion sensor when arming the security sys-
tem. To do so, push the lock button on the
key fob five times within five seconds of
arming the system (while the Vehicle Secu-
rity Light is flashing rapidly).
To Disarm The System
The vehicle security alarm can be disarmed
using any of the following methods:
• Push the unlock button on the key fob.
• Grasp the passive entry door handle to
unlock the door, refer to "Doors" in "Getting
To Know Your Vehicle" in your Owner’s
Manual for further information).
• Cycle the vehicle ignition system out of the
OFF position.
– For vehicles equipped with Keyless
Enter-N-Go — Passive Entry, push the
Start/Stop ignition button (requires at
least one valid key fob in the vehicle).
– For vehicles not equipped with Keyless
Enter-N-Go — Passive Entry, insert a
valid Integrated Vehicle Key into the
ignition switch and turn the key to the
ON position.
NOTE:
• The driver's door key cylinder and the lift-
gate button on the key fob cannot arm or
disarm the vehicle security alarm.
• The vehicle security alarm remains armed
during power liftgate entry. Pushing the
GETTING TO KNOW YOUR VEHICLE
20
Page 23 of 362
liftgate button will not disarm the vehicle
security alarm. If someone enters the ve-
hicle through the liftgate and opens any
door the alarm will sound.
• When the vehicle security alarm is armed,
the interior power door lock switches will
not unlock the doors.
• The ultrasonic intrusion sensor (motion de-
tector) actively monitors your vehicle every
time you arm the security system. If you
prefer, you can turn off the ultrasonic intru-
sion sensor when arming the security sys-
tem. To do so, push the lock button on the
key fob five times within five seconds of
arming the system (while the vehicle secu-
rity light is flashing rapidly).
The vehicle security alarm is designed to
protect your vehicle; however, you can create
conditions where the system will give you a
false alarm. If one of the previously described
arming sequences has occurred, the vehicle
security alarm will arm regardless of whether
you are in the vehicle or not. If you remain in
the vehicle and open a door, the alarm will
sound. If this occurs, disarm the vehicle
security alarm.If the vehicle security alarm is armed and the
battery becomes disconnected, the vehicle
security alarm will remain armed when the
battery is reconnected; the exterior lights will
flash, the horn will sound. If this occurs,
disarm the vehicle security alarm.
Security System Manual Override
The system will not arm if you lock the doors
using the manual door lock plunger.
DOORS
Keyless Enter-N-Go — Passive Entry
The Passive Entry system is an enhancement
to the vehicle’s Remote Keyless Entry system
and a feature of Keyless Enter-N-Go — Pas-
sive Entry. This feature allows you to lock and
unlock the vehicle’s door(s) and fuel door
without having to push the key fob lock or
unlock buttons.
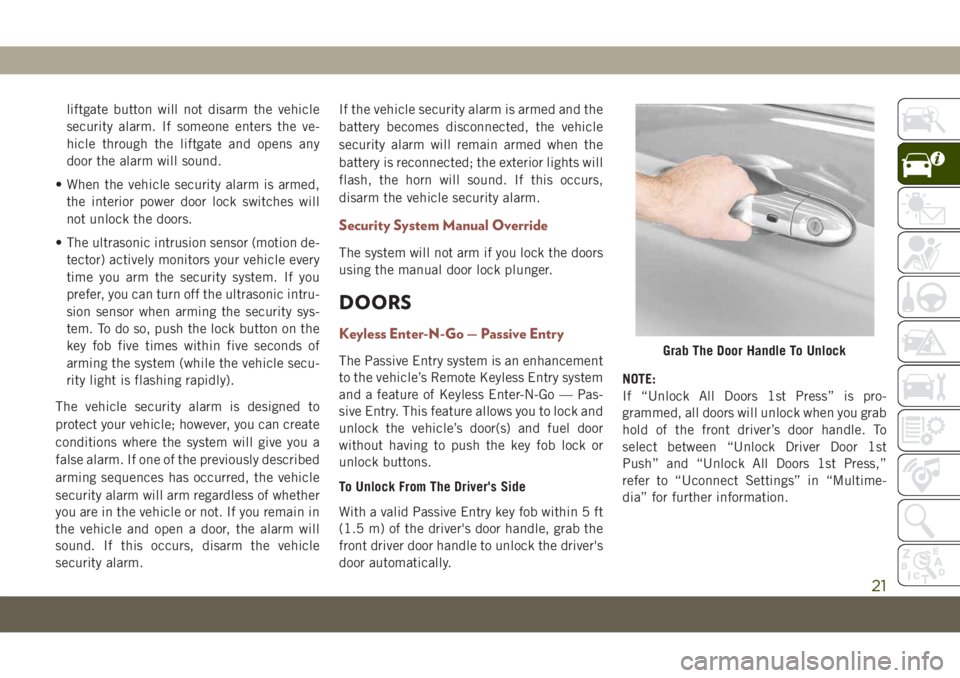
To Unlock From The Driver's Side
With a valid Passive Entry key fob within 5 ft
(1.5 m) of the driver's door handle, grab the
front driver door handle to unlock the driver's
door automatically.NOTE:
If “Unlock All Doors 1st Press” is pro-
grammed, all doors will unlock when you grab
hold of the front driver’s door handle. To
select between “Unlock Driver Door 1st
Push” and “Unlock All Doors 1st Press,”
refer to “Uconnect Settings” in “Multime-
dia” for further information.Grab The Door Handle To Unlock
21
Page 24 of 362
To Unlock From The Passenger Side
With a valid Passive Entry key fob within 5 ft
(1.5 m) of the passenger door handle, grab
the front passenger door handle to unlock all
four doors and the liftgate automatically.
NOTE:
All doors will unlock when the front passen-
ger door handle is grabbed regardless of the
driver’s door unlock preference setting (“Un-
lock Driver Door 1st Press” or “Unlock All
Doors 1st Press”).
Preventing Inadvertent Locking Of Passive Entry
Key Fob In Vehicle (FOBIK-Safe)
To minimize the possibility of unintentionally
locking a Passive Entry key fob inside your
vehicle, the Passive Entry system is equipped
with an automatic door unlock feature which
will function if the ignition switch is in the
OFF position.
FOBIK-Safe only executes in vehicles with
passive entry. There are three situations that
trigger a FOBIK-Safe search in any passive
entry vehicle:
• A lock request is made by a valid Passive
Entry key fob while a door is open.• A lock request is made by the Passive Entry
door handle while a door is open.
• A lock request is made by the door panel
switch while the door is open.
When any of these situations occur, after all
open doors are shut, the FOBIK-Safe search
will be executed. If it finds a Passive Entry
key fob inside the vehicle and it does not find
any Passive Entry key fobs outside the ve-
hicle, then the vehicle will unlock and alert
the customer.
NOTE:
The vehicle will only unlock the doors when a
valid Passive Entry key fob is detected inside
the vehicle. The vehicle will not unlock the
doors when any of the following conditions
are true:
• The doors are manually locked using the
door lock knobs.
• There is a valid Passive Entry key fob out-
side the vehicle and within 5 ft (1.5m) of
either Passive Entry door handle.
• Three attempts are made to lock the doors
using the door panel switch and then close
the doors.To Unlock/Enter The Liftgate
The liftgate passive entry unlock feature is
built into liftgate handle release. With a valid
Passive Entry key fob within 5 ft (1.5 m) of
the liftgate, push the electronic liftgate re-
lease to open with one fluid motion.
To Lock The Liftgate
With a valid Passive Entry key fob within 5 ft
(1.5 m) of the liftgate, push the passive entry
lock button located to the right of liftgate
handle release.
NOTE:
The liftgate passive entry lock button will lock
all doors and the liftgate. The liftgate unlock
feature is built into the electronic liftgate
release.
NOTE:
Always take the key with you once a door or
the liftgate is locked to prevent locking the
key fob inside of the vehicle. If the key has
been locked inside of the vehicle, it can be
recovered using the second provided key fob.
GETTING TO KNOW YOUR VEHICLE
22
Page 25 of 362
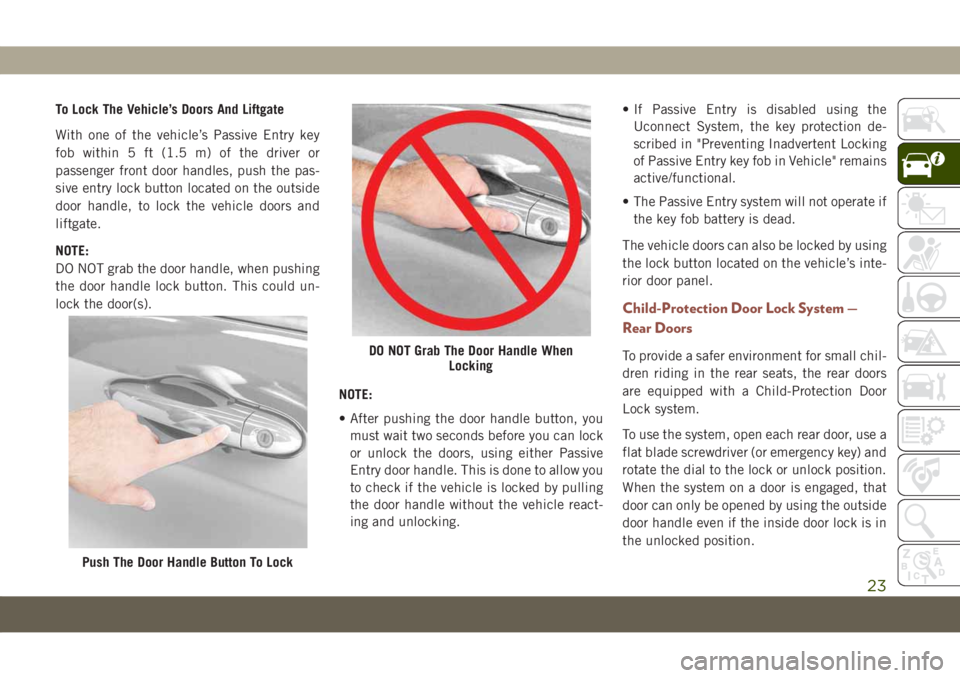
To Lock The Vehicle’s Doors And Liftgate
With one of the vehicle’s Passive Entry key
fob within 5 ft (1.5 m) of the driver or
passenger front door handles, push the pas-
sive entry lock button located on the outside
door handle, to lock the vehicle doors and
liftgate.
NOTE:
DO NOT grab the door handle, when pushing
the door handle lock button. This could un-
lock the door(s).
NOTE:
• After pushing the door handle button, you
must wait two seconds before you can lock
or unlock the doors, using either Passive
Entry door handle. This is done to allow you
to check if the vehicle is locked by pulling
the door handle without the vehicle react-
ing and unlocking.• If Passive Entry is disabled using the
Uconnect System, the key protection de-
scribed in "Preventing Inadvertent Locking
of Passive Entry key fob in Vehicle" remains
active/functional.
• The Passive Entry system will not operate if
the key fob battery is dead.
The vehicle doors can also be locked by using
the lock button located on the vehicle’s inte-
rior door panel.
Child-Protection Door Lock System —
Rear Doors
To provide a safer environment for small chil-
dren riding in the rear seats, the rear doors
are equipped with a Child-Protection Door
Lock system.
To use the system, open each rear door, use a
flat blade screwdriver (or emergency key) and
rotate the dial to the lock or unlock position.
When the system on a door is engaged, that
door can only be opened by using the outside
door handle even if the inside door lock is in
the unlocked position.
Push The Door Handle Button To Lock
DO NOT Grab The Door Handle When
Locking
23
Page 26 of 362
NOTE:
• When the child lock system is engaged, the
door can be opened only by using the out-
side door handle even though the inside
door lock is in the unlocked position.
• After disengaging the Child-Protection
Door Lock system, always test the door from
the inside to make certain it is in the
desired position.
• After engaging the Child-Protection Door
Lock system, always test the door from the
inside to make certain it is in the desired
position.
• For emergency exit with the system en-
gaged, rotate the door lock button until the
lock indicator is hidden (unlocked posi-
tion), roll down the window, and open the
door with the outside door handle.WARNING!
Avoid trapping anyone in a vehicle in a
collision. Remember that the rear doors
can only be opened from the outside when
the Child-Protection locks are engaged
(locked).
NOTE:
Always use this device when carrying chil-
dren. After engaging the child lock on both
rear doors, check for effective engagement by
trying to open a door with the internal handle.
Once the child protection door lock system is
engaged, it is impossible to open the doors
from inside the vehicle. Before getting out of
the car, be sure to check that there is no one
left inside.
SEATS
Seats are a part of the Occupant Restraint
System of the vehicle.
WARNING!
•It is dangerous to ride in a cargo area,
inside or outside of a vehicle. In a collision,
people riding in these areas are more likely
to be seriously injured or killed.
• Do not allow people to ride in any area of
your vehicle that is not equipped with
seats and seat belts. In a collision,
people riding in these areas are more
likely to be seriously injured or killed.
• Be sure everyone in your vehicle is in a
seat and using a seat belt properly.
Manual Adjustment (Rear Seats)
WARNING!
Do not pile luggage or cargo higher than
the top of the seatback. This could impair
visibility or become a dangerous projectile
in a sudden stop or collision.
GETTING TO KNOW YOUR VEHICLE
24
Page 27 of 362
60/40 Split Folding Rear Seat With
Fold-Flat Feature
To provide additional storage area, each rear
seat can be folded flat. This allows for ex-
tended cargo space and still maintains some
rear seating room.NOTE:
Prior to folding the rear seat, it may be
necessary to position the front seat to its
mid-track position. Also, be sure that the
front seats are fully upright and positioned
forward. This will allow the rear seat to fold
down easily.
WARNING!
• It is extremely dangerous to ride in a
cargo area, inside or outside of a vehicle.
In a collision, people riding in these
areas are more likely to be seriously
injured or killed.
• Do not allow people to ride in any area of
your vehicle that is not equipped with
seats and seat belts.
• Be sure everyone in your vehicle is in a
seat and using a seat belt properly.
To Lower The Rear Seat
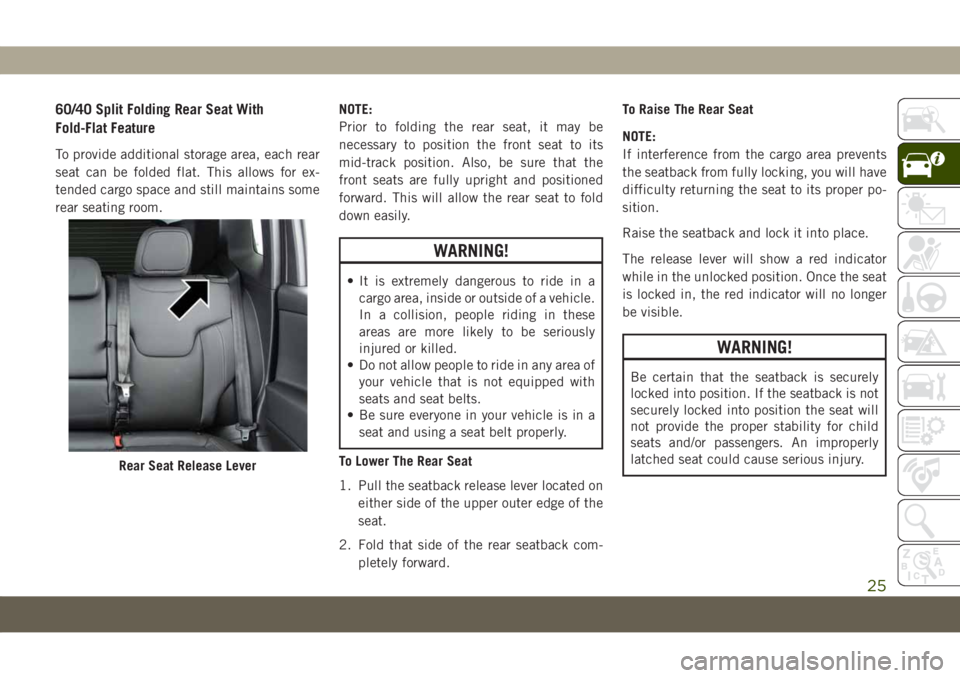
1. Pull the seatback release lever located on
either side of the upper outer edge of the
seat.
2. Fold that side of the rear seatback com-
pletely forward.To Raise The Rear Seat
NOTE:
If interference from the cargo area prevents
the seatback from fully locking, you will have
difficulty returning the seat to its proper po-
sition.
Raise the seatback and lock it into place.
The release lever will show a red indicator
while in the unlocked position. Once the seat
is locked in, the red indicator will no longer
be visible.
WARNING!
Be certain that the seatback is securely
locked into position. If the seatback is not
securely locked into position the seat will
not provide the proper stability for child
seats and/or passengers. An improperly
latched seat could cause serious injury.
Rear Seat Release Lever
25
Page 28 of 362
Driver Memory Seat — If Equipped
This feature allows the driver to store up to
two different memory profiles, for easy recall
through a memory switch. Each memory pro-
file contains desired position settings for the
driver seat and a set of desired radio station
presets.
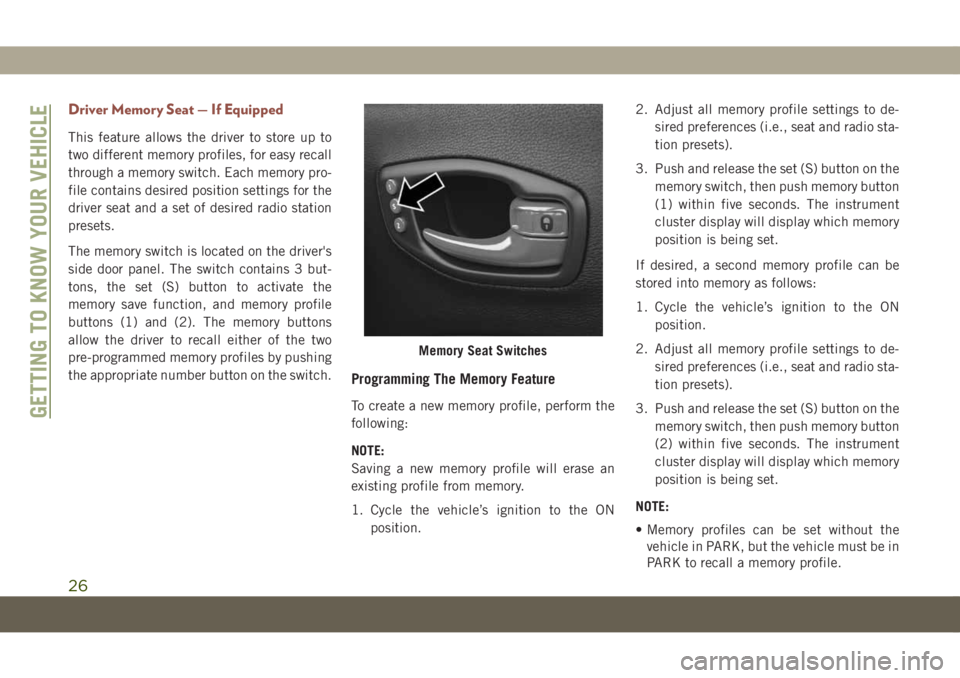
The memory switch is located on the driver's
side door panel. The switch contains 3 but-
tons, the set (S) button to activate the
memory save function, and memory profile
buttons (1) and (2). The memory buttons
allow the driver to recall either of the two
pre-programmed memory profiles by pushing
the appropriate number button on the switch.
Programming The Memory Feature
To create a new memory profile, perform the
following:
NOTE:
Saving a new memory profile will erase an
existing profile from memory.
1. Cycle the vehicle’s ignition to the ON
position.2. Adjust all memory profile settings to de-
sired preferences (i.e., seat and radio sta-
tion presets).
3. Push and release the set (S) button on the
memory switch, then push memory button
(1) within five seconds. The instrument
cluster display will display which memory
position is being set.
If desired, a second memory profile can be
stored into memory as follows:
1. Cycle the vehicle’s ignition to the ON
position.
2. Adjust all memory profile settings to de-
sired preferences (i.e., seat and radio sta-
tion presets).
3. Push and release the set (S) button on the
memory switch, then push memory button
(2) within five seconds. The instrument
cluster display will display which memory
position is being set.
NOTE:
• Memory profiles can be set without the
vehicle in PARK, but the vehicle must be in
PARK to recall a memory profile.
Memory Seat Switches
GETTING TO KNOW YOUR VEHICLE
26
Page 29 of 362
• To set a memory profile to your key fob,
refer to “Linking And Unlinking The Re-
mote Keyless Entry Key Fob To Memory” in
this section.
Linking And Unlinking The Remote Keyless
Entry Key Fob To Memory
Your remote keyless entry key fob can be
programmed to recall one of two pre-
programmed memory profiles with a push of
the unlock button on the key fob.
NOTE:
Before programming your key fob you must
select the “Memory Linked To FOB” feature
through the Uconnect system screen. Refer
to “Uconnect Settings” in “Multimedia” in
the Owner’s Manual for further information.
To program your key fob, perform the follow-
ing:
1. Cycle the vehicle’s ignition to the OFF
position.
2. Select the desired memory profile (1) or
(2).NOTE:
If a memory profile has not already been
set, refer to "Programming The Memory
Feature" in this section for instructions on
how to set a memory profile.
3. Push and release the set (S) button on the
memory switch, then within five seconds
push and release the button labeled (1) or
(2) accordingly. “Memory Profile Set”
(1 or 2) will display in the instrument
cluster display.
4. Push and release the lock button on the
key fob within 10 seconds.
NOTE:
Your key fob can be unlinked to your memory
settings by pushing the set (S) button, fol-
lowed by pushing the unlock button on the
key fob within 10 seconds.
Memory Position Recall
NOTE:
The vehicle must be in PARK to recall
memory positions. If a recall is attempted
when the vehicle is not in PARK, a message
will display in the instrument cluster display.• To recall the memory settings for driver one,
push memory button (1) or the unlock but-
ton on the key fob linked to memory posi-
tion 1.
• To recall the memory settings for driver two,
push memory button (2) or the unlock but-
ton on the key fob linked to memory posi-
tion 2.
A recall can be canceled by pushing any of the
memory buttons (S, 1, or 2) during a recall.
When a recall is canceled, the driver seat will
stop moving. A delay of one second will occur
before another recall can be selected.
Easy Entry/Exit Seat — If Equipped
This feature provides automatic driver seat
positioning to enhance driver mobility when
entering and exiting the vehicle.
The distance the driver seat moves depends
on where you have the driver seat positioned
when you cycle the vehicle’s ignition to the
OFF position.
Each stored memory setting will have an
associated Easy Entry and Easy Exit position.
27
Page 30 of 362
NOTE:
The Easy Entry/Exit feature is not enabled
when the vehicle is delivered from the fac-
tory. The Easy Entry/Exit feature is enabled
(or later disabled) through the programmable
features in the Uconnect system.
Refer to “Uconnect Settings/Customer Pro-
grammable Features” in “Multimedia” in the
Owner’s Manual for further information.
Front Heated Seats — If Equipped
The front heated seats control buttons are
located within the Uconnect system. You can
gain access to the control buttons through
the climate screen or the controls screen.
• Press the heated seat button
once to
turn the HI setting on.
• Press the heated seat button
a second
time to turn the LO setting on.
• Press the heated seat button
a third
time to turn the heating elements off.If your vehicle is equipped with automatic
temperature controls with an integrated cen-
ter stack, or manual temperature controls,
you’ll find the heated seat switches on the
switch bank below the radio screen.
If the HI level setting is selected, the system
will automatically switch to LO level after
approximately 60 minutes of continuous op-
eration. At that time, the display will change
from HI to LO, indicating the change. The LO
level setting will turn off automatically after
approximately 45 minutes.
NOTE:
The engine must be running for the heated
seats to operate.
Vehicles With Remote Start — If Equipped
On models that are equipped with remote
start, the heated seats can be programmed to
come on during a remote start.This feature can be programmed through the
Uconnect system. Refer to “Uconnect Set-
tings” in “Multimedia” in the Owner’s
Manual for further information.
WARNING!
• Persons who are unable to feel pain to
the skin because of advanced age,
chronic illness, diabetes, spinal cord in-
jury, medication, alcohol use, exhaus-
tion or other physical condition must
exercise care when using the seat
heater. It may cause burns even at low
temperatures, especially if used for long
periods of time.
• Do not place anything on the seat or
seatback that insulates against heat,
such as a blanket or cushion. This may
cause the seat heater to overheat. Sit-
ting in a seat that has been overheated
could cause serious burns due to the
increased surface temperature of the
seat.
GETTING TO KNOW YOUR VEHICLE
28