stop start JEEP COMPASS 2019 Owner handbook (in English)
[x] Cancel search | Manufacturer: JEEP, Model Year: 2019, Model line: COMPASS, Model: JEEP COMPASS 2019Pages: 362, PDF Size: 6.23 MB
Page 156 of 362
Gear Ranges
Do not depress the accelerator pedal when
shifting from PARK or NEUTRAL into another
gear range.
NOTE:
After selecting any gear range, wait a moment
to allow the selected gear to engage before
accelerating. This is especially important
when the engine is cold.
PARK (P)
This range supplements the parking brake by
locking the transmission. The engine can be
started in this range. Never attempt to use
PARK while the vehicle is in motion. Apply
the parking brake when exiting the vehicle in
this range.
When parking on a level surface, you may
shift the transmission into PARK first, and
then apply the parking brake.
When parking on a hill, apply the parking
brake before shifting the transmission to
PARK, otherwise the load on the transmission
locking mechanism may make it difficult to
move the gear selector out of PARK. As an
added precaution, turn the front wheels to-ward the curb on a downhill grade and away
from the curb on an uphill grade.
When exiting the vehicle, always:
1. Apply the parking brake.
2. Shift the transmission into PARK.
3. Turn the ignition OFF.
4. Remove the key fob from the vehicle.
NOTE:
Block the wheels with a wedge or a stone if
the vehicle is parked on a steep slope.
WARNING!
• Never use the PARK position as a sub-
stitute for the park brake. Always apply
the park brake fully when exiting the
vehicle to guard against vehicle move-
ment and possible injury or damage.
• Your vehicle could move and injure you
and others if it is not in PARK. Check by
trying to move the gear selector out of
PARK with the brake pedal released.
Make sure the transmission is in PARK
before exiting the vehicle.
WARNING!
• It is dangerous to shift out of PARK or
NEUTRAL if the engine speed is higher
than idle speed. If your foot is not firmly
pressing the brake pedal, the vehicle
could accelerate quickly forward or in
reverse. You could lose control of the
vehicle and hit someone or something.
Only shift into gear when the engine is
idling normally and your foot is firmly
pressing the brake pedal.
• The vehicle may not engage a newly
selected gear when shifting between
PARK, REVERSE, or DRIVE if the ve-
hicle is moving while shifting.
• Unintended movement of a vehicle
could injure those in or near the vehicle.
As with all vehicles, you should never
exit a vehicle while the engine is run-
ning. Before exiting a vehicle always
come to a complete stop, then apply the
park brake, shift the transmission into
PARK, turn the engine OFF, and remove
the key fob. When the ignition is in the
LOCK/OFF (key removal) position (or,
with push button start, when the ignition
STARTING AND OPERATING
154
Page 157 of 362
WARNING!
is in the OFF mode), the transmission is
locked in PARK, securing the vehicle
against unwanted movement.
• When leaving the vehicle, always make
sure the ignition is in the OFF mode,
remove the key fob from the vehicle, and
lock the vehicle.
• Never leave children alone in a vehicle,
or with access to an unlocked vehicle.
Allowing children to be in a vehicle un-
attended is dangerous for a number of
reasons. A child or others could be seri-
ously or fatally injured. Children should
be warned not to touch the park brake,
brake pedal or the transmission gear
selector.
• Do not leave the key fob in or near the
vehicle (or in a location accessible to
children), and do not leave the ignition
(in a vehicle equipped with push button
start) in the ON/RUN mode. A child
could operate power windows, other
controls, or move the vehicle.
CAUTION!
• Before moving the transmission gear se-
lector out of PARK, you must turn the
ignition to the ON/RUN mode, and also
press the brake pedal. Otherwise, dam-
age to the gear selector could result.
• DO NOT race the engine when shifting
from PARK or NEUTRAL into another
gear range, as this can damage the drive-
train.
The following indicators should be used to
ensure that you have properly engaged the
transmission into the PARK position:
• When shifting into PARK, push the lock
button on the gear selector, and firmly
move the selector all the way forward until
it stops and is fully seated.
• Look at the transmission gear position dis-
play and verify that it indicates the PARK
position (P).
• With brake pedal released, verify that the
gear selector will not move out of PARK.REVERSE (R)
This range is for moving the vehicle back-
ward. Shift into REVERSE only after the ve-
hicle has come to a complete stop.
NEUTRAL (N)
Use this range when the vehicle is standing
for prolonged periods with the engine run-
ning. The engine may be started in this range.
Apply the park brake and shift the transmis-
sion into PARK if you must exit the vehicle.
WARNING!
Do not coast in NEUTRAL and never turn
off the ignition to coast down a hill. These
are unsafe practices that limit your re-
sponse to changing traffic or road condi-
tions. You might lose control of the vehicle
and have a collision.
CAUTION!
Towing the vehicle, coasting, or driving for
any other reason with the transmission in
NEUTRAL can cause severe transmission
damage.
155
Page 159 of 362
would result. It will remain in the selected
gear until another upshift or downshift is
chosen, except as described below.
• Six-speed transmissions will automatically
upshift when necessary to prevent engine
over-speed.
• The transmission will automatically down-
shift as the vehicle slows (to prevent engine
lugging) and will display the current gear.
• The transmission will automatically down-
shift to first gear when coming to a stop.
After a stop, the driver should manually
upshift (+) the transmission as the vehicle
is accelerated.
• You can start out, from a stop, in first or
second gear (or third gear, in six-speed
models, or in 4LO range, Snow mode, or
Sand mode, where available). Tapping (+)
(at a stop) will allow starting in second gear.
Starting out in second gear can be helpful
in snowy or icy conditions.
• If a requested downshift would cause the
engine to over-speed, that shift will not
occur.• The system will ignore attempts to upshift
at too low of a vehicle speed.
• Transmission shifting will be more notice-
able when AutoStick is enabled.
• The system may revert to automatic shift
mode if a fault or overheat condition is
detected.
NOTE:
When Selec-Speed or Hill Descent Control is
enabled, AutoStick is not active.
To disengage AutoStick, return the gear se-
lector to the DRIVE position. You can shift in
or out of the AutoStick position at any time
without taking your foot off the accelerator
pedal.
WARNING!
Do not downshift for additional engine
braking on a slippery surface. The drive
wheels could lose their grip and the ve-
hicle could skid, causing a collision or
personal injury.Transmission Limp Home Mode
Transmission function is monitored electroni-
cally for abnormal conditions. If a condition
is detected that could result in transmission
damage, Transmission Limp Home Mode is
activated. In this mode, the transmission may
operate only in a fixed gear, or may remain in
NEUTRAL. The Malfunction Indicator Light
(MIL) may be illuminated. Limp Home Mode
may allow the vehicle to be driven to an
authorized dealer for service without damag-
ing the transmission.
In the event of a momentary problem, the
transmission can be reset to regain all for-
ward gears by performing the following steps:
1. Stop the vehicle.
2. Shift the transmission into PARK, if pos-
sible. If not, shift the transmission to
NEUTRAL.
3. Turn the ignition to the OFF position. On
vehicles with push button start, push and
hold the ignition until the engine turns
OFF.
4. Wait approximately 30 seconds.
5. Restart the engine.
157
Page 163 of 362
NOTE:
• Rock mode is only available on the vehicles
equipped with the Off-Road package.
• Activate the Hill Descent Control for steep
downhill control. See “Electronic Brake
Control System” in “Safety” for further
information.
STOP/START SYSTEM —
IF EQUIPPED
The Stop/Start function is developed to re-
duce fuel consumption. The system will stop
the engine automatically during a vehicle
stop if the required conditions are met. Re-
leasing the brake pedal, clutch pedal or
pressing the accelerator pedal will automati-
cally re-start the engine.
WARNING!
Before opening the hood, make sure that
the engine is off and that the ignition is in
the OFF mode. Follow the indications on
the plate underneath the hood. We recom-
mend that you remove the key fob if other
people remain in the vehicle. The vehicle
should only be exited after the key fob has
been removed and the ignition is on the
OFF mode. During refueling, make sure
that the engine is off (ignition device in the
OFF mode).
CAUTION!
When replacing the battery, always contact
your authorized dealer. Replace the bat-
tery with the same type (HEAVY DUTY) and
with the same specifications.
Operating Modes
Engine Stopping Mode
Models equipped with a manual transmission:
With the vehicle stopped, the engine stops
with transmission in neutral and clutch pedal
released.
Models equipped with an automatic transmission:
With vehicle at a standstill and brake pedal
pressed, the engine switches off if the gear
selector is in a position other than REVERSE.
In the event of stops uphill, the engine
switching will be disabled to activate the "Hill
Start Assist" function (works only with the
engine running).
The warning light on the instrument panel
switches on to signal that the engine was
stopped.
Engine Restarting Mode
Models equipped with manual transmission:
To restart the engine, press the clutch pedal.
161
Page 164 of 362
If the vehicle does not start pressing the
clutch, place the gear selector in neutral and
repeat the procedure. If the problem persists,
contact your authorized dealer.
Models equipped with an automatic transmission:
To restart the engine, release the brake pedal.
With brake pressed, if the gear selector is in
DRIVE the engine can be restarted moving
the selector to REVERSE or NEUTRAL or
“AutoStick”.
With brake pedal pressed, if the gear selector
is in "AutoStick" mode, the engine can be
restarted moving the selector to "+" or "–", or
REVERSE or NEUTRAL.
When the engine has been stopped automati-
cally, keeping the brake pedal pressed, the
brake can be released keeping the engine off
by quickly shifting the gear selector to PARK.
To restart the engine, just move the selector
out of PARK.
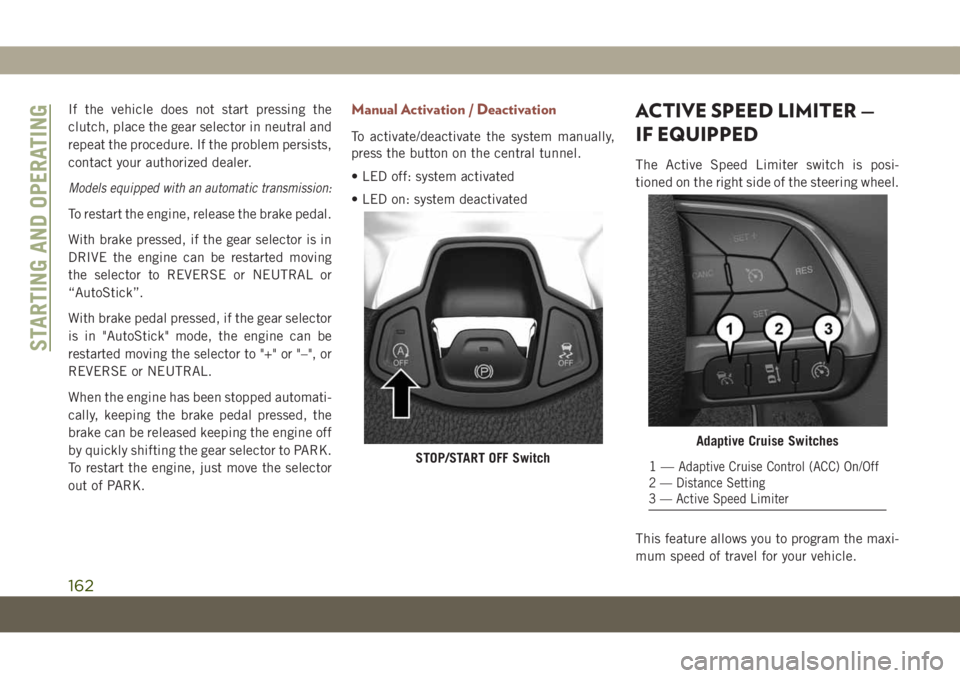
Manual Activation / Deactivation
To activate/deactivate the system manually,
press the button on the central tunnel.
• LED off: system activated
• LED on: system deactivated
ACTIVE SPEED LIMITER —
IF EQUIPPED
The Active Speed Limiter switch is posi-
tioned on the right side of the steering wheel.
This feature allows you to program the maxi-
mum speed of travel for your vehicle.
STOP/START OFF Switch
Adaptive Cruise Switches
1—Adaptive Cruise Control (ACC) On/Off
2 — Distance Setting
3 — Active Speed Limiter
STARTING AND OPERATING
162
Page 172 of 362
CAUTION!
• ParkSense is only a parking aid and it is
unable to recognize every obstacle, in-
cluding small obstacles. Parking curbs
might be temporarily detected or not
detected at all. Obstacles located above
or below the sensors will not be detected
when they are in close proximity.
• The vehicle must be driven slowly when
using ParkSense in order to be able to
stop in time when an obstacle is de-
tected. It is recommended that the
driver looks over his/her shoulder when
using ParkSense.
PARKSENSE FRONT AND
REAR PARK ASSIST —
IF EQUIPPED
The ParkSense Park Assist system provides
visual and audible indications of the distance
between the rear and/or front fascia and a
detected obstacle when backing up or mov-
ing forward, e.g. during a parking maneuver.Refer to “ParkSense System Usage Precau-
tions” in “Starting And Operating” in your
Owner’s Manual for limitations of this system
and recommendations.
ParkSense will retain the last system state
(enabled or disabled) from the last ignition
cycle when the ignition is changed to the
ON/RUN position.
ParkSense is active in all gear selector posi-
tions (including PARK), as long as the system
is on. The system will remain active until the
vehicle speed is increased to approximately
7 mph (11 km/h) or above. While in RE-
VERSE and above the system's operating
speed, a warning will appear in the instru-
ment cluster display indicating the vehicle
speed is too fast. The system will become
active again if the vehicle speed is decreased
to speeds less than approximately 6 mph
(9 km/h).
ParkSense Sensors
The six ParkSense sensors, located in the
rear fascia/bumper, monitor the area behind
the vehicle that is within the sensors’ field of
view. The sensors can detect obstacles from
approximately 12 inches (30 cm) up to
79 inches (200 cm) from the rear fascia/
bumper in the horizontal direction, depend-
ing on the location, type and orientation of
the obstacle.
NOTE:
For further information on Active Park Assist,
refer to the “ParkSense Active Park Assist
System” section.
The six ParkSense sensors, located in the
front fascia/bumper, monitor the area in front
of the vehicle that is within the sensors’ field
of view. The sensors can detect obstacles
from approximately 12 inches (30 cm) up to
47 inches (120 cm) from the front fascia/
bumper in the horizontal direction, depend-
ing on the location, type and orientation of
the obstacle.
STARTING AND OPERATING
170
Page 181 of 362
stays solid yellow. At this time torque is
applied to the steering wheel in the oppo-
site direction of the lane boundary.
For example: if approaching the left side of
the lane the steering wheel will turn to the
right.
NOTE:
The LaneSense system operates with the
similar behavior for a right lane departure.
Changing LaneSense Status
The LaneSense system has settings to adjust
the intensity of the torque warning (Low/
Medium/High) and the warning zone sensitiv-
ity (Early/Medium/Late) that you can config-
ure through the Uconnect system screen.
Refer to “Uconnect Settings” in “Multime-
dia” in the Owner’s Manual for further de-
tails.NOTE:
• The system will not apply torque to the
steering wheel whenever a safety system
engages (anti-lock brakes, traction control
system, electronic stability control, forward
collision warning, etc.).
• Use of the turn signals and Hazard Warning
flashers also suppresses the warnings.
PARKVIEW REAR BACK UP
CAMERA — IF EQUIPPED
You can see an on-screen image of the rear of
your vehicle whenever the transmission is
shifted into REVERSE. The ParkView Rear
Back-Up Camera image will be displayed on
the Uconnect Display, located on the center
stack of the instrument panel.
If the Uconnect Display appears foggy, clean
the camera lens located on the rear of the
vehicle above the rear license plate
Refer to “ParkView Back-Up Camera” in
“Starting And Operating” in your Owner's
Manual for further information.
WARNING!
Drivers must be careful when backing up
even when using the ParkView Rear Back
Up Camera. Always check carefully behind
your vehicle, and be sure to check for
pedestrians, animals, other vehicles, ob-
structions, or blind spots before backing
up. You are responsible for the safety of
your surroundings and must continue to
pay attention while backing up. Failure to
do so can result in serious injury or death.
CAUTION!
• To avoid vehicle damage, ParkView
should only be used as a parking aid.
The ParkView camera is unable to view
every obstacle or object in your drive
path.
• To avoid vehicle damage, the vehicle
must be driven slowly when using
ParkView to be able to stop in time when
an obstacle is seen. It is recommended
that the driver look frequently over his/
her shoulder when using ParkView.
179
Page 188 of 362
Proceed as follows:
• Insert the AdBlue (UREA) nozzle in the
filler, start refilling and stop refilling at the
first shut-off (the shut-off indicates that the
AdBlue (UREA) tank is full). Do not pro-
ceed with the refilling, to prevent spillage
of AdBlue (UREA).
• Extract the nozzle.
Refilling With Containers
Proceed as follows:
• Check the expiration date.
• Read the advice for use on the label before
pouring the content of the bottle into the
AdBlue (UREA) tank.
• If systems which cannot be screwed in (e.g.
tanks) are used for refilling, after the indi-
cation appears on the instrument panel
display refer to “Warning lights And Mes-
sages" in the “Getting To Know Your Instru-
ment Panel” for further information, fill the
AdBlue (UREA) tank with no more than
2 Gallons (8 liters).• If containers which can be screwed to the
filler are used, the reservoir is full when the
AdBlue (UREA) level in the container stops
pouring out. Do not proceed further.
Operations After Refilling
Proceed as follows:
• Fit the cap back on the AdBlue (UREA)
filler by turning it clockwise and screwing it
completely.
• Cycle the ignition to RUN (it is not neces-
sary to start the engine).
• Wait for the indication on the instrument
panel to switch off before moving the car.
The indication may stay on for a few sec-
onds to approximately half a minute. If the
engine is started and the car is moved, the
indication will remain on for longer. This
will not compromise engine operation.
• If the AdBlue (UREA) was topped up when
the tank was empty, wait for 2 minutes
before starting the engine.NOTE:
• If AdBlue (UREA) is spilled out of the filler
neck, clean up well the area and proceed to
filling up again. If the liquid crystallizes,
eliminate it with a sponge and warm water.
• DO NOT EXCEED THE MAXIMUM LEVEL:
this could cause damage to the reservoir.
AdBlue (UREA) freezes at under 12° F
(-11° C). Although the system is designed
to operate below the freezing point of the
UREA, it is advisable not to fill the tank
beyond the maximum level because if the
UREA freezes the system can be damaged.
Follow the instructions in this section.
• If the AdBlue (UREA) is spilled on painted
surfaces or aluminium, immediately clean
the area with water and use absorbent ma-
terial to collect the fluid that has been
spilled on the ground.
•
Do not try to start the engine if AdBlue
(UREA) was accidentally added to the diesel
fuel tank, this can result in serious engine
damage, contact an authorized dealer.
•Do not add additives or other fluids to AdBlue
(UREA), doing so could damage the system.
STARTING AND OPERATING
186
Page 207 of 362
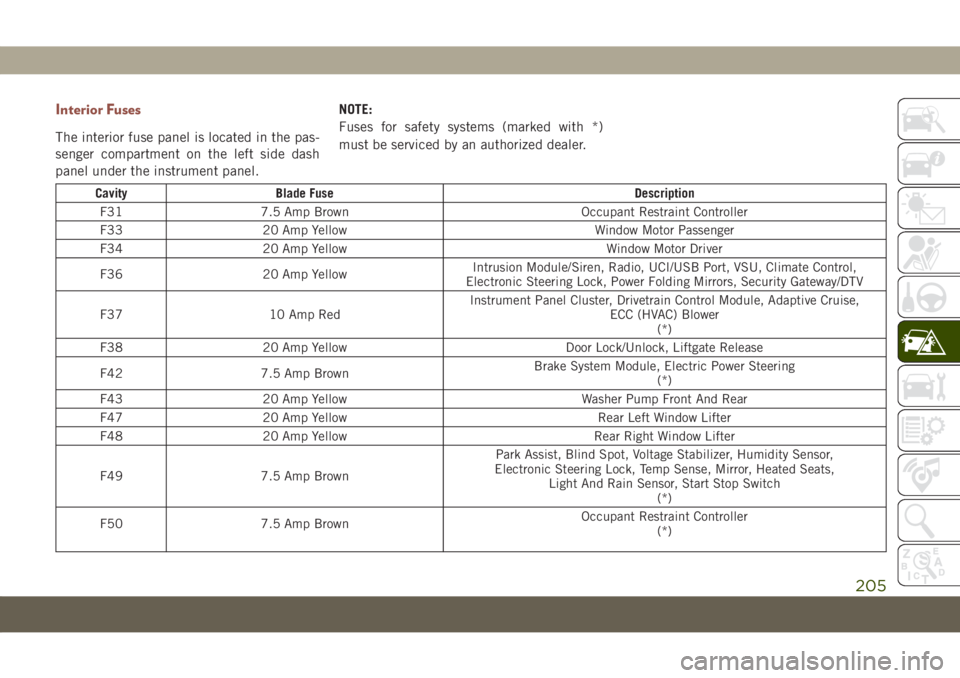
Interior Fuses
The interior fuse panel is located in the pas-
senger compartment on the left side dash
panel under the instrument panel.NOTE:
Fuses for safety systems (marked with *)
must be serviced by an authorized dealer.
Cavity Blade Fuse Description
F31 7.5 Amp Brown Occupant Restraint Controller
F33 20 Amp Yellow Window Motor Passenger
F34 20 Amp Yellow Window Motor Driver
F36 20 Amp YellowIntrusion Module/Siren, Radio, UCI/USB Port, VSU, Climate Control,
Electronic Steering Lock, Power Folding Mirrors, Security Gateway/DTV
F37 10 Amp RedInstrument Panel Cluster, Drivetrain Control Module, Adaptive Cruise,
ECC (HVAC) Blower
(*)
F38 20 Amp Yellow Door Lock/Unlock, Liftgate Release
F42 7.5 Amp BrownBrake System Module, Electric Power Steering
(*)
F43 20 Amp Yellow Washer Pump Front And Rear
F47 20 Amp Yellow Rear Left Window Lifter
F48 20 Amp Yellow Rear Right Window Lifter
F49 7.5 Amp BrownPark Assist, Blind Spot, Voltage Stabilizer, Humidity Sensor,
Electronic Steering Lock, Temp Sense, Mirror, Heated Seats,
Light And Rain Sensor, Start Stop Switch
(*)
F50 7.5 Amp BrownOccupant Restraint Controller
(*)
205
Page 225 of 362
5. Start the engine in the vehicle that has the
booster battery, let the engine idle for a
few minutes, and then start the engine in
the vehicle with the discharged battery.
6. Once the engine is started, remove the
jumper cables in the reverse sequence:
Disconnecting The Jumper Cables
1. Disconnect the negative(-)end of the
jumper cable from the engine ground of
the vehicle with the discharged battery.
2. Disconnect the opposite end of the nega-
tive(-)jumper cable from the negative(-)
post of the booster battery.
3. Disconnect the positive(+)end of the
jumper cable from the positive(+)post of
the booster battery.
4. Disconnect the opposite end of the posi-
tive(+)jumper cable from the positive(+)
post of the vehicle with the discharged
battery.If frequent jump starting is required to start
your vehicle, you should have the battery and
charging system inspected at your authorized
dealer.
CAUTION!
Accessories plugged into the vehicle
power outlets draw power from the vehi-
cle’s battery, even when not in use (i.e.,
cellular devices, etc.). Eventually, if
plugged in long enough without engine
operation, the vehicle’s battery will dis-
charge sufficiently to degrade battery life
and/or prevent the engine from starting.
REFUELING IN EMERGENCY
The fuel filling procedure in case of emer-
gency is described in the “Emergency Gas
Can Refueling”. Refer to “Refueling The Ve-
hicle” in “Starting And Operating” for further
information.
IF YOUR ENGINE
OVERHEATS
In any of the following situations, you can
reduce the potential for overheating your en-
gine by taking the appropriate action.
• On the highways — slow down.
• In city traffic — while stopped, place the
transmission in NEUTRAL, but do not in-
crease engine idle speed.
CAUTION!
Driving with a hot cooling system could
damage your vehicle. If the temperature
gauge reads “H,” pull over and stop the
vehicle. Idle the vehicle with the air con-
ditioner turned off until the pointer drops
back into the normal range. If the pointer
remains on the “H” and you hear continu-
ous chimes, turn the engine off immedi-
ately and call for service.
223