tow JEEP COMPASS 2019 Owner handbook (in English)
[x] Cancel search | Manufacturer: JEEP, Model Year: 2019, Model line: COMPASS, Model: JEEP COMPASS 2019Pages: 362, PDF Size: 6.23 MB
Page 245 of 362
Checking Oil Level
WARNING!
• Never smoke while working in the engine
compartment: gas and inflammable va-
pors may be present, with the risk of fire.
• Be very careful when working in the
engine compartment when the engine is
hot: you may get burned. Do not get too
close to the radiator cooling fan: the
electric fan may start; danger of injury.
Scarves, ties and other loose clothing
might be pulled by moving parts.
CAUTION!
• Be careful not to confuse the various
types of fluids while topping up: they are
not compatible with each other! Topping
up with an unsuitable fluid could se-
verely damage your car.
• The oil level must never exceed the MAX
mark.
• Always top up using engine oil of the
same specifications as that already in
the engine.
CAUTION!
• If the engine oil is being topped up, wait
for the engine to cool down before loos-
ening the filler cap, particularly for ve-
hicles with aluminium cap (if equipped).
WARNING: risk of burns!
• Overfilling or underfilling the crankcase
will cause aeration or loss of oil pressure.
This could damage your engine.
To assure proper engine lubrication, the en-
gine oil must be maintained at the correct
level. Check the oil level at regular intervals,
such as every fuel stop. The best time to
check the engine oil level is about five min-
utes after a fully warmed up engine is shut
off.
Checking the oil while the vehicle is on level
ground will improve the accuracy of the oil
level readings.
There are three possible dipstick types,
• Crosshatched zone.
• Crosshatched zone marked SAFE.• Crosshatched zone marked with MIN at the
low end of the range and MAX at the high
end of the range.
• Crosshatched zone marked with dimples at
the MIN and the MAX ends of the range.
NOTE:
Always maintain the oil level within the cross-
hatch markings on the dipstick.
Adding 1 quart (1.0 liters) of oil when the
reading is at the low end of the dipstick range
will raise the oil level to the high end of the
range marking.
Adding Washer Fluid
The fluid reservoir is located in the front of
the engine compartment. Be sure to check
the fluid level in the reservoir at regular
intervals. Fill the reservoir with windshield
washer solvent (not radiator antifreeze) and
operate the system for a few seconds to flush
out the residual washer fluid.
When refilling the washer fluid reservoir, take
some washer fluid, apply it to a cloth or towel,
and wipe clean the wiper blades; this will
help blade performance.
243
Page 249 of 362
Under normal operating conditions, the cata-
lytic converter will not require maintenance.
However, it is important to keep the engine
properly tuned to assure proper catalyst opera-
tion and prevent possible catalyst damage.
NOTE:
Intentional tampering with emissions control
systems can result in civil penalties being
assessed against you.
In unusual situations involving grossly mal-
functioning engine operation, a scorching
odor may suggest severe and abnormal cata-
lyst overheating. If this occurs, stop the ve-
hicle, turn off the engine and allow it to cool.
Service, including a tune-up to manufactur-
er's specifications, should be obtained imme-
diately.
To minimize the possibility of catalytic con-
verter damage:
• Do not interrupt the ignition when the
transmission is in gear and the vehicle is in
motion.
• Do not try to start the vehicle by pushing or
towing the vehicle.• Do not idle the engine with any ignition
components disconnected or removed,
such as when diagnostic testing, or for
prolonged periods during very rough idle or
malfunctioning operating conditions.Cooling System
WARNING!
• You or others can be badly burned by hot
engine coolant (antifreeze) or steam
from your radiator. If you see or hear
steam coming from under the hood, do
not open the hood until the radiator has
had time to cool. Never open a cooling
system pressure cap when the radiator or
coolant bottle is hot.
• Keep hands, tools, clothing, and jewelry
away from the radiator cooling fan when
the hood is raised. The fan starts auto-
matically and may start at any time,
whether the engine is running or not.
• When working near the radiator cooling
fan, turn the ignition to the OFF mode.
The fan is temperature controlled and
can start at any time the ignition is in the
ON mode.
Coolant Checks
Check engine coolant (antifreeze) protection
every 12 months (before the onset of freezing
weather, where applicable). If the engine
coolant (antifreeze) is dirty or rusty in appear-
ance, the system should be drained, flushed
and refilled with fresh engine coolant (anti-
freeze). Check the front of the A/C condenser
for any accumulation of bugs, leaves, etc. If
dirty, clean by gently spraying water from a
garden hose vertically down the face of the
condenser.
Cooling System Pressure Cap
The cap must be fully tightened to prevent
loss of engine coolant (antifreeze), and to
ensure that engine coolant (antifreeze) will
return to the radiator from the coolant expan-
sion bottle/recovery tank if so equipped.
The cap should be inspected and cleaned if
there is any accumulation of foreign material
on the sealing surfaces.
247
Page 255 of 362
tire of identical size and service description
(Load Index and Speed Symbol). Replace the
tire pressure sensor as well as it is not de-
signed to be reused.
Run Flat Tires — If Equipped
Run Flat tires allow you the capability to drive
50 miles (80 km) at 50 mph (80 km/h) after
a rapid loss of inflation pressure. This rapid
loss of inflation is referred to as the Run Flat
mode. A Run Flat mode occurs when the tire
inflation pressure is of/or below 14 psi
(96 kPa). Once a Run Flat tire reaches the
run flat mode it has limited driving capabili-
ties and needs to be replaced immediately. A
Run Flat tire is not repairable. When a run flat
tire is changed after driving with underin-
flated tire condition, please replace the TPM
sensor as it is not designed to be reused when
driven under run flat mode (14 psi (96 kPa))
condition.
NOTE:
TPM Sensor must be replaced after driving
the vehicle on a flat tire condition.It is not recommended driving a vehicle
loaded at full capacity or to tow a trailer while
a tire is in the run flat mode.
See the tire pressure monitoring section for
more information.Tire Spinning
When stuck in mud, sand, snow, or ice con-
ditions, do not spin your vehicle's wheels
above 30 mph (48 km/h) or for longer than
30 seconds continuously without stopping.
Refer to “Freeing A Stuck Vehicle” in “In
Case Of Emergency” for further information.
WARNING!
Fast spinning tires can be dangerous.
Forces generated by excessive wheel
speeds may cause tire damage or failure. A
tire could explode and injure someone. Do
not spin your vehicle's wheels faster than
30 mph (48 km/h) for more than 30 sec-
onds continuously when you are stuck, and
do not let anyone near a spinning wheel,
no matter what the speed.
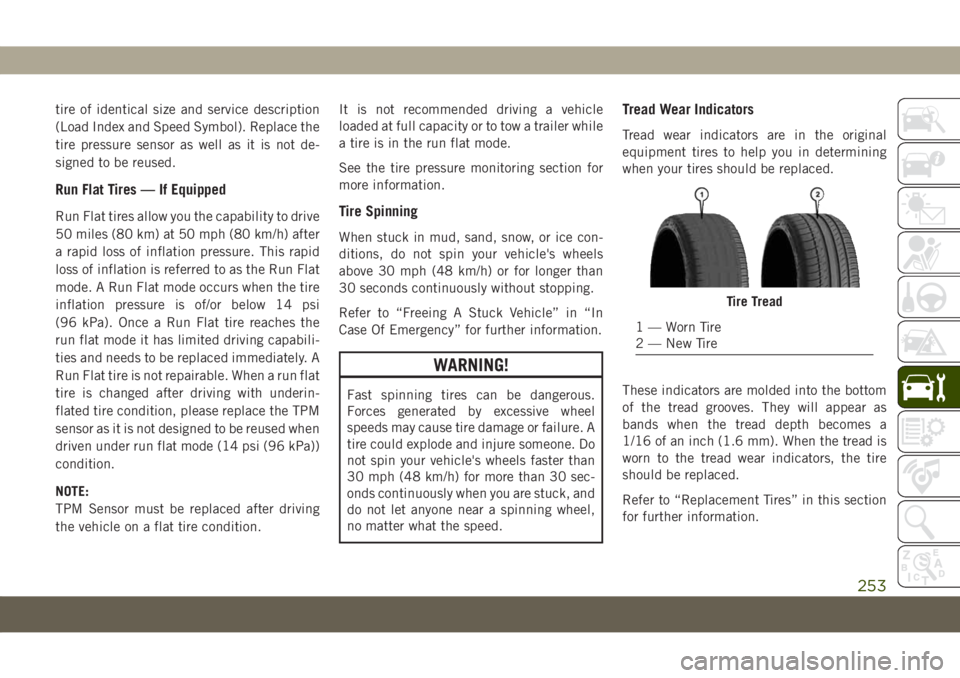
Tread Wear Indicators
Tread wear indicators are in the original
equipment tires to help you in determining
when your tires should be replaced.
These indicators are molded into the bottom
of the tread grooves. They will appear as
bands when the tread depth becomes a
1/16 of an inch (1.6 mm). When the tread is
worn to the tread wear indicators, the tire
should be replaced.
Refer to “Replacement Tires” in this section
for further information.
Tire Tread
1 — Worn Tire
2 — New Tire
253
Page 258 of 362
Snow tires generally have lower speed ratings
than what was originally equipped with your
vehicle and should not be operated at sus-
tained speeds over 75 mph (120 km/h). For
speeds above 75 mph (120 km/h) refer to
original equipment or an authorized tire
dealer for recommended safe operating
speeds, loading and cold tire inflation pres-
sures.
While studded tires improve performance on
ice, skid and traction capability on wet or dry
surfaces may be poorer than that of non-
studded tires. Some states prohibit studded
tires; therefore, local laws should be checked
before using these tire types.
Spare Tires — If Equipped
NOTE:
For vehicles equipped with Tire Service Kit
instead of a spare tire, please refer to “Tire
Service Kit” in “In Case Of Emergency” in
the Owner’s Manual for further information.
CAUTION!
Because of the reduced ground clearance,
do not take your vehicle through an auto-
matic car wash with a compact or limited
use temporary spare installed. Damage to
the vehicle may result.
Refer to the “Towing Requirements - Tires” in
“Starting And Operating” in the Owner’s
Manual for restrictions when towing with a
spare tire designated for temporary emer-
gency use.
Spare Tire Matching Original Equipped Tire
And Wheel — If Equipped
Your vehicle may be equipped with a spare
tire and wheel equivalent in look and func-
tion to the original equipment tire and wheel
found on the front or rear axle of your vehicle.
This spare tire may be used in the tire rota-
tion for your vehicle. If your vehicle has this
option, refer to an authorized tire dealer for
the recommended tire rotation pattern.
Compact Spare Tire — If Equipped
The compact spare is for temporary emer-
gency use only. You can identify if your ve-
hicle is equipped with a compact spare by
looking at the spare tire description on the
Tire and Loading Information Placard located
on the driver’s side door opening or on the
sidewall of the tire. Compact spare tire de-
scriptions begin with the letter “T” or “S”
preceding the size designation. Example:
T145/80D18 103M.
T,S=Temporary Spare Tire
Since this tire has limited tread life, the
original equipment tire should be repaired (or
replaced) and reinstalled on your vehicle at
the first opportunity.
Do not install a wheel cover or attempt to
mount a conventional tire on the compact
spare wheel, since the wheel is designed
specifically for the compact spare tire. Do not
install more than one compact spare tire and
wheel on the vehicle at any given time.
SERVICING AND MAINTENANCE
256
Page 263 of 362
CAUTION!
Avoid washing with rollers and/or brushes
in washing stations. Wash the vehicle only
by hand using neutral pH detergents; dry it
with a wet chamois leather. Abrasive prod-
ucts and/or polishes should not be used for
cleaning the car. Bird droppings must be
washed off immediately and thoroughly as
the acid they contain is particularly ag-
gressive. Avoid (if at all possible) parking
the vehicle under trees; remove vegetable
resins immediately as, when dried, it may
only be possible to remove them with abra-
sive products and/or polishes, which is
highly inadvisable as they could alter the
typical opaqueness of the paint. Do not
use pure windshield washer fluid for clean-
ing the front windshield and rear window;
dilute it min. 50% with water. Only use
pure windshield washer fluid when strictly
necessary due to outside temperature con-
ditions.
INTERIORS
Seats And Fabric Parts
Use a specific product to clean fabric uphol-
stery and carpeting.
WARNING!
Do not use volatile solvents for cleaning
purposes. Many are potentially flammable,
and if used in closed areas they may cause
respiratory harm.
Stain Repel Fabric Cleaning Procedure —
If Equipped
Stain Repel seats may be cleaned in the
following manner:
• Remove as much of the stain as possible by
blotting with a clean, dry towel.
• Blot any remaining stain with a clean,
damp towel.
• For tough stains, apply a mild soap solution
to a clean, damp cloth and remove stain.
Use a fresh, damp towel to remove soap
residue.• For grease stains, apply a specific product
to a clean, damp cloth and remove stain.
Use a fresh, damp towel to remove soap
residue.
• Do not use any harsh solvents or any other
form of protectants on Stain Repel
products.
Seat Belt Maintenance
Do not bleach, dye or clean the belts with
chemical solvents or abrasive cleaners. This
will weaken the fabric. Sun damage can also
weaken the fabric.
If the belts need cleaning, use a mild soap
solution or lukewarm water. Do not remove
the belts from the vehicle to wash them. Dry
with a soft cloth.
Replace the belts if they appear frayed or
worn or if the buckles do not work properly.
WARNING!
A frayed or torn belt could rip apart in a
collision and leave you with no protection.
Inspect the belt system periodically,
checking for cuts, frays, or loose parts.
261
Page 264 of 362
WARNING!
Damaged parts must be replaced immedi-
ately. Do not disassemble or modify the
system. Seat belt assemblies must be re-
placed after a collision if they have been
damaged (i.e., bent retractor, torn web-
bing, etc.).
Plastic And Coated Parts
Use a specific product to clean vinyl
upholstery.
CAUTION!
• Direct contact of air fresheners, insect
repellents, suntan lotions, or hand sani-
tizers to the plastic, painted, or deco-
rated surfaces of the interior may cause
permanent damage. Wipe away immedi-
ately.
• Damage caused by these type of prod-
ucts may not be covered by your New
Vehicle Limited Warranty.
Cleaning Plastic Instrument Cluster Lenses
The lenses in front of the instruments in this
vehicle are molded in clear plastic. When
cleaning the lenses, care must be taken to
avoid scratching the plastic.
1. Clean with a wet soft cloth. A mild soap
solution may be used, but do not use high
alcohol content or abrasive cleaners. If
soap is used, wipe clean with a clean
damp cloth.
2. Dry with a soft cloth.
Leather Parts
Your leather upholstery can be best preserved
by regular cleaning with a damp soft cloth.
Small particles of dirt can act as an abrasive
and damage the leather upholstery and
should be removed promptly with a damp
cloth. Care should be taken to avoid soaking
your leather upholstery with any liquid.
Please do not use polishes, oils, cleaning
fluids, solvents, detergents, or ammonia-
based cleaners to clean your leather uphol-
stery. Application of a leather conditioner is
not required to maintain the original condi-
tion.NOTE:
If equipped with light colored leather, it
tends to show any foreign material, dirt, and
fabric dye transfer more so than darker col-
ors. The leather is designed for easy cleaning.
CAUTION!
Do not use Alcohol and Alcohol-based
and/or Ketone based cleaning products to
clean leather upholstery, as damage to the
upholstery may result.
Glass Surfaces
All glass surfaces should be cleaned on a
regular basis with any commercial
household-type glass cleaner. Never use an
abrasive type cleaner. Use caution when
cleaning the inside rear window equipped
with electric defrosters or windows equipped
with radio antennas. Do not use scrapers or
other sharp instruments that may scratch the
elements.
When cleaning the rear view mirror, spray
cleaner on the towel or cloth that you are
using. Do not spray cleaner directly on the
mirror.
SERVICING AND MAINTENANCE
262
Page 271 of 362
CAUTION!
Do not load your vehicle any heavier than
the GVWR or the maximum front and rear
GAWR. If you do, parts on your vehicle can
break, or it can change the way your ve-
hicle handles. This could cause you to lose
control. Also overloading can shorten the
life of your vehicle. Never exceed the maxi-
mum combined vehicle load value: the
maximum towable load is only allowed if it
does not exceed the maximum combined
vehicle load.
FUEL REQUIREMENTS —
GASOLINE ENGINE
1.4L Turbo Gasoline Engine
This engine is designed to meet all emission
regulations and provide satisfactory fuel
economy and performance when using high-
quality unleaded gasoline having a minimum
research octane rating (RON) of 95. For op-
timum performance and fuel economy the
use of minimum research octane rating
(RON) of 98 or higher is recommended.Light spark knock at low engine speeds is not
harmful to your engine. However, continued
heavy spark knock at high speeds can cause
damage, and immediate service is required.
Poor quality gasoline can cause problems
such as hard starting, stalling, and hesita-
tions. If you experience these symptoms, try
another brand of gasoline before considering
service for the vehicle.
Poor quality gasoline can cause problems
such as hard starting, stalling, and hesita-
tions. If you experience these symptoms, try
another brand of gasoline before considering
service for the vehicle.
Ethanol
The manufacturer recommends that your ve-
hicle be operated on fuel containing no more
than 10% ethanol. Purchasing your fuel from
a reputable supplier may reduce the risk of
exceeding this 10% limit and/or of receiving
fuel with abnormal properties.
CAUTION!
Use of fuel with Ethanol content higher
than 10% may result in engine malfunc-
tion, starting and operating difficulties,
and materials degradation. These adverse
effects could result in permanent damage
to your vehicle.
Materials Added To Fuel
Indiscriminate use of fuel system cleaning
agents should be avoided. Many of these
materials intended for gum and varnish re-
moval may contain active solvents or similar
ingredients. These can harm fuel system gas-
ket and diaphragm materials.
Fuel Icon Identification Compliant To
EN16942
The following symbols make it easier to rec-
ognize the correct type of fuel to be used on
your vehicle. Before proceeding with the sup-
ply, check the symbols placed inside the fuel
filler flap (if present) and compare them with
the symbol on the fuel pump (if present).
269
Page 282 of 362
FUEL CONSUMPTION
AND CO2 EMISSIONS
The fuel consumption and CO2emission fig-
ures declared by the manufacturer are deter-
mined on the basis of the type-approval tests
laid down by the applicable standards in the
country where the vehicle is registered.
The type of route, traffic conditions, weather
conditions, driving style, general condition of
the vehicle, trim level/equipment/ accesso-
ries, use of the climate control system, ve-
hicle load, presence of roof racks and other
situations that adversely affect the aerody-
namics or wind resistance lead to different
fuel consumption values than those mea-
sured.The fuel consumption will only become more
regular after driving the first 1,864 miles
(3000 km).
To find the specific fuel consumption and
CO
2emission figures for this vehicle, please
refer to the data in the Certificate of Confor-
mity, and the related documentation that
accompanies the vehicle.
MOPAR ACCESSORIES
Authentic Accessories By Mopar
• The following highlights just some of the
many Authentic Jeep Accessories by Mopar
featuring a fit, finish, and functionality
specifically for your Jeep Vehicle.• In choosing Authentic Accessories you gain
far more than expressive style, premium
protection, or extreme entertainment, you
also benefit from enhancing your vehicle
with accessories that have been thoroughly
tested and factory-approved.
• For the full line of Authentic Jeep Accesso-
ries by Mopar, visit your local dealership.
NOTE:
All parts are subject to availability.
EXTERIOR:
• Rock Rails • Front End Cover • Hood And Bodyside Decals
• Wheels • Splash Guards • Air Deflectors
• Wheel Locks • Locking Gas Cap • Hitch Receiver
• License Plate Frames • Valve Stem Covers
• Towing Accessories
TECHNICAL SPECIFICATIONS
280
Page 352 of 362
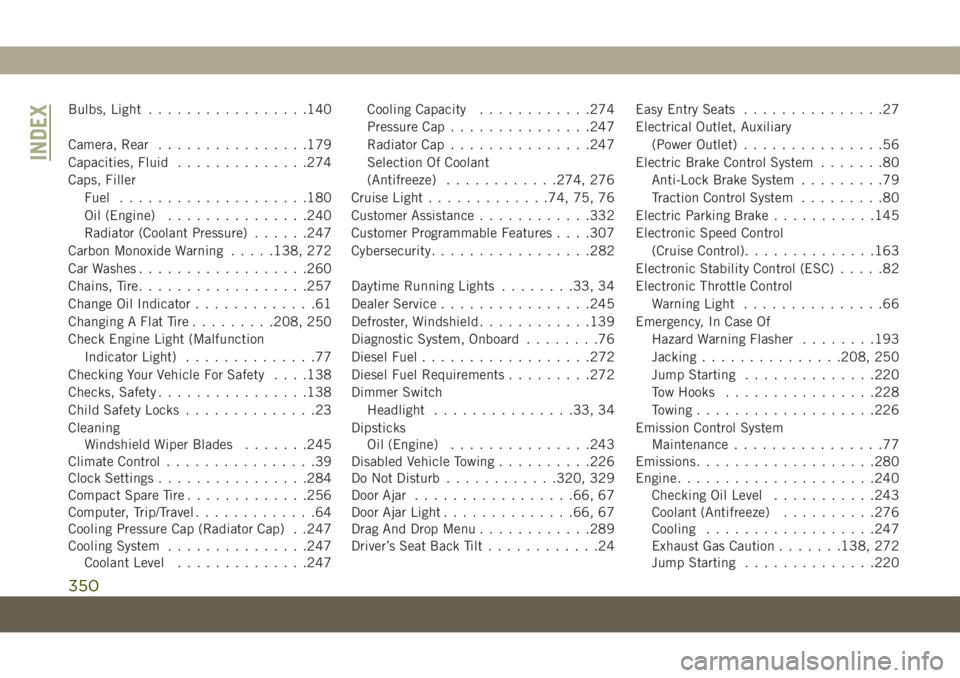
Bulbs, Light.................140
Camera, Rear................179
Capacities, Fluid..............274
Caps, Filler
Fuel....................180
Oil (Engine)...............240
Radiator (Coolant Pressure)......247
Carbon Monoxide Warning.....138, 272
Car Washes..................260
Chains, Tire..................257
Change Oil Indicator.............61
Changing A Flat Tire.........208, 250
Check Engine Light (Malfunction
Indicator Light)..............77
Checking Your Vehicle For Safety. . . .138
Checks, Safety................138
Child Safety Locks..............23
Cleaning
Windshield Wiper Blades.......245
Climate Control................39
Clock Settings................284
Compact Spare Tire.............256
Computer, Trip/Travel.............64
Cooling Pressure Cap (Radiator Cap) . .247
Cooling System...............247
Coolant Level..............247Cooling Capacity............274
Pressure Cap...............247
Radiator Cap...............247
Selection Of Coolant
(Antifreeze)............274, 276
Cruise Light.............74, 75, 76
Customer Assistance............332
Customer Programmable Features. . . .307
Cybersecurity.................282
Daytime Running Lights........33, 34
Dealer Service................245
Defroster, Windshield............139
Diagnostic System, Onboard........76
Diesel Fuel.................
.272
Diesel Fuel Requirements
.........272
Dimmer Switch
Headlight...............33, 34
Dipsticks
Oil (Engine)...............243
Disabled Vehicle Towing..........226
Do Not Disturb............320, 329
Door Ajar.................66, 67
Door Ajar Light..............66, 67
Drag And Drop Menu............289
Driver’s Seat Back Tilt............24Easy Entry Seats...............27
Electrical Outlet, Auxiliary
(Power Outlet)...............56
Electric Brake Control System.......80
Anti-Lock Brake System.........79
Traction Control System.........80
Electric Parking Brake...........145
Electronic Speed Control
(Cruise Control)..............163
Electronic Stability Control (ESC).....82
Electronic Throttle Control
Warning Light...............66
Emergency, In Case Of
Hazard Warning Flasher........193
Jacking...............208, 250
Jump Starting..............220
Tow Hooks................228
Towing...................226
Emission Control System
Maintenance................77
Emissions...................280
Engine.....................240
Checking Oil Level...........243
Coolant (Antifreeze)..........276
Cooling..................247
Exhaust Gas Caution.......138, 272
Jump Starting..............220
INDEX
350
Page 355 of 362
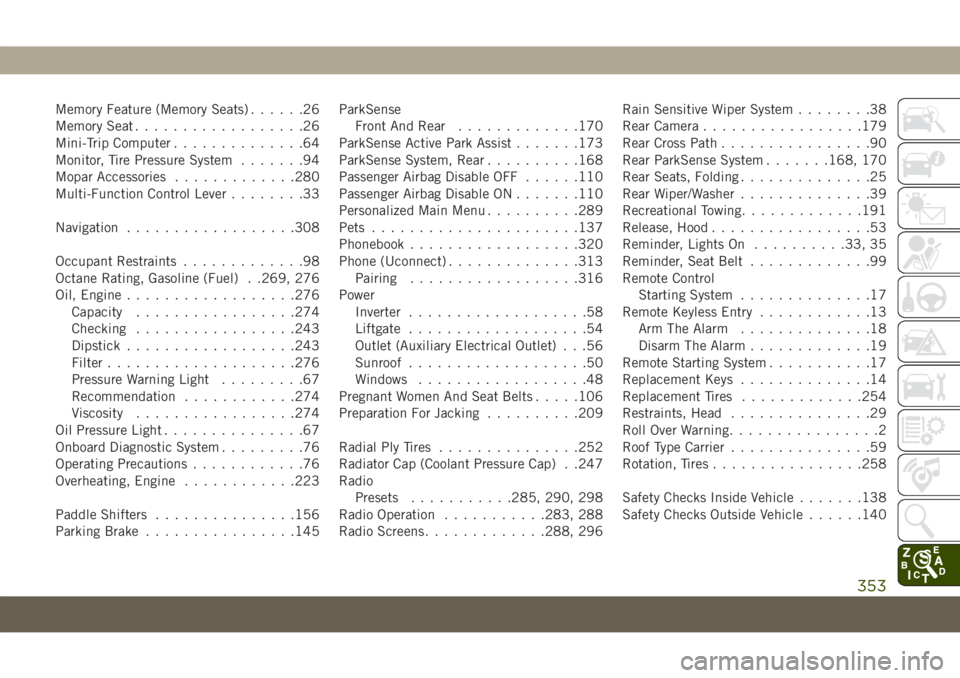
Memory Feature (Memory Seats)......26
Memory Seat..................26
Mini-Trip Computer..............64
Monitor, Tire Pressure System.......94
Mopar Accessories.............280
Multi-Function Control Lever........33
Navigation..................308
Occupant Restraints.............98
Octane Rating, Gasoline (Fuel) . .269, 276
Oil, Engine..................276
Capacity.................274
Checking.................243
Dipstick..................243
Filter....................276
Pressure Warning Light.........67
Recommendation............274
Viscosity.................274
Oil Pressure Light...............67
Onboard Diagnostic System.........76
Operating Precautions............76
Overheating, Engine............223
Paddle Shifters...............156
Parking Brake................145ParkSense
Front And Rear.............170
ParkSense Active Park Assist.......173
ParkSense System, Rear..........168
Passenger Airbag Disable OFF......110
Passenger Airbag Disable ON.......110
Personalized Main Menu..........289
Pets......................137
Phonebook..................320
Phone (Uconnect)..............313
Pairing..................316
Power
Inverter...................58
Liftgate...................54
Outlet (Auxiliary Electrical Outlet) . . .56
Sunroof...................50
Windows..................48
Pregnant Women And Seat Belts.....106
Preparation For Jacking.........
.209
Radial Ply Tires...............252
Radiator Cap (Coolant Pressure Cap) . .247
Radio
Presets...........285, 290, 298
Radio Operation...........283, 288
Radio Screens.............288, 296Rain Sensitive Wiper System........38
Rear Camera.................179
Rear Cross Path................90
Rear ParkSense System.......168, 170
Rear Seats, Folding..............25
Rear Wiper/Washer..............39
Recreational Towing.............191
Release, Hood.................53
Reminder, Lights On..........33, 35
Reminder, Seat Belt.............99
Remote Control
Starting System..............17
Remote Keyless Entry............13
Arm The Alarm..............18
Disarm The Alarm.............19
Remote Starting System...........17
Replacement Keys..............14
Replacement Tires.............254
Restraints, Head...............29
Roll Over Warning................2
Roof Type Carrier...............59
Rotation, Tires................258
Safety Checks Inside Vehicle.......138
Safety Checks Outside Vehicle......140
353