engine JEEP COMPASS 2020 Owner handbook (in English)
[x] Cancel search | Manufacturer: JEEP, Model Year: 2020, Model line: COMPASS, Model: JEEP COMPASS 2020Pages: 328, PDF Size: 8.85 MB
Page 176 of 328
STARTING AND OPERATING
174
(Continued)
(Continued)
WARNING!
Make certain that the load is secured in
the trailer and will not shift during travel.
When trailering cargo that is not fully
secured, dynamic load shifts can occur
that may be difficult for the driver to
control. You could lose control of your
vehicle and have a collision.
When hauling cargo or towing a trailer,
do not overload your vehicle or trailer.
Overloading can cause a loss of control,
poor performance or damage to brakes,
axle, engine, transmission, steering,
suspension, chassis structure or tires.
Safety chains must always be used
between your vehicle and trailer. Always
connect the chains to the hook retainers
of the vehicle hitch. Cross the chains
under the trailer tongue and allow
enough slack for turning corners.
Vehicles with trailers should not be
parked on a grade. When parking, apply
the parking brake on the tow vehicle. Put
the tow vehicle transmission in PARK. For
four-wheel drive vehicles, make sure the
transfer case is not in NEUTRAL. Always,
block or "chock" the trailer wheels.
WARNING! (Continued)
GCWR must not be exceeded.
Total weight must be distributed between
the tow vehicle and the trailer such that the
following four ratings are not exceeded
:
GVWR
GTW
GAWR
Tongue weight rating for the trailer
hitch utilized.
WARNING! (Continued)
2020_JEEP_M6_UG_UK.book Page 174
Page 177 of 328
175
RECREATIONAL TOWING (BEHIND MOTORHOME, ETC.)
Towing This Vehicle Behind Another Vehicle
NOTE:
When towing your vehicle, always follow
applicable state and provincial laws.
Contact state and local authorities offices
for additional details.
You must ensure that the Auto Park Brake
feature is disabled before towing this
vehicle, to avoid inadvertent Electric Park
Brake engagement. The Auto Park Brake
feature is enabled or disabled via the
customer programmable features in the
Uconnect Settings.
Recreational Towing — Front-Wheel Drive
(FWD) Models
Recreational towing is allowed ONLY if the
front wheels are OFF the ground. This may be
accomplished using a tow dolly (front wheels
off the ground) or vehicle trailer (all four
wheels off the ground). If using a tow dolly,
follow this procedure:
1. Properly secure the dolly to the tow vehicle, following the dolly manufac -
turer's instructions.
2. Drive the front wheels onto the tow dolly. 3. Apply the Electric Park Brake (EPB).
Place the transmission in PARK. Turn
the engine OFF.
4. Properly secure the front wheels to the dolly, following the dolly manufacturer's
instructions.
5. Turn the ignition to the ON/RUN posi -
tion, but do not start the engine.
6. Press and hold the brake pedal.
7. Release the Electric Park Brake (EPB).
8. Turn the ignition OFF, remove the key fob, and release the brake pedal.
TOWING CONDITION WHEELS OFF THE GROUND FRONT WHEEL DRIVE (FWD) FOUR-WHEEL DRIVE (4WD)
Flat Tow NONENOT ALLOWED NOT ALLOWED
Dolly Tow REAR
NOT ALLOWED NOT ALLOWED
FRONT OKNOT ALLOWED
On Trailer ALLBEST METHOD OK
2020_JEEP_M6_UG_UK.book Page 175
Page 181 of 328
179
High Intensity Discharge (HID)
Headlamps — If Equipped
The headlamps contain a type of high voltage
discharge light source. High voltage can
remain in the circuit even with the headlamp
switch off. Because of this, you should not
attempt to service a HID headlamp light
source yourself. If an HID headlamp light
source fails, take your vehicle to an autho-
rized dealer for service.
NOTE:
On vehicles equipped with HID headlamps,
when the headlamps are turned on, there is
a blue hue to the lights. This diminishes and
becomes more white after approximately 10
seconds, as the system charges.
Replacing Exterior Bulbs
Headlamps
Hi/Lo Beam Light Halogen
The bulbs can be accessed from the wheel
liner with the following procedure:
1. Turn the front wheels completely.
2. Remove the wheel liner.
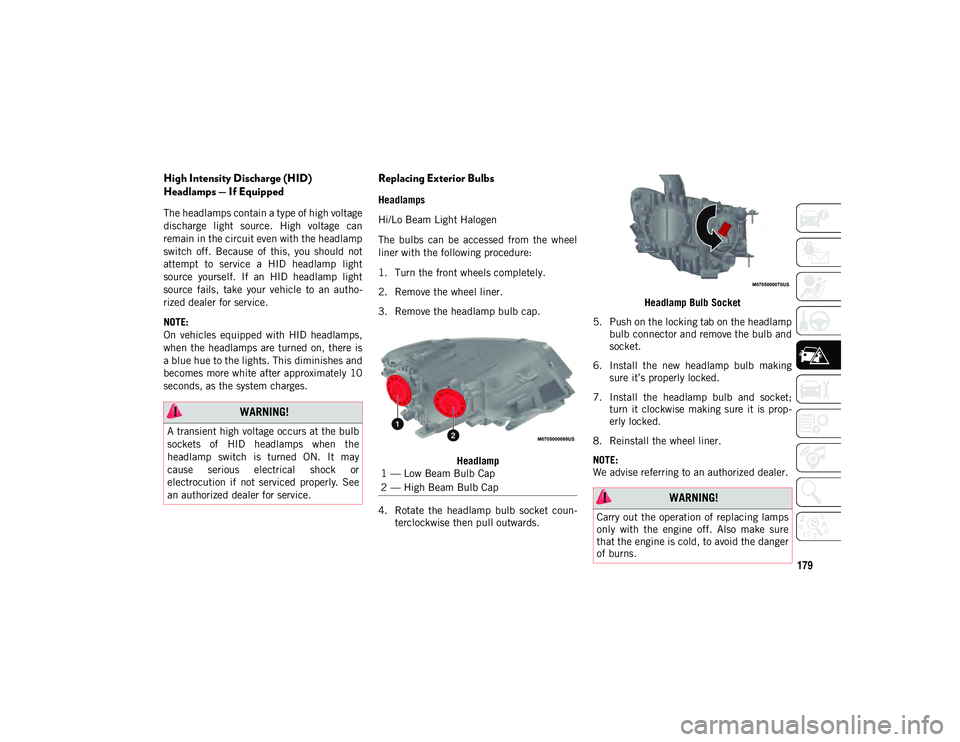
3. Remove the headlamp bulb cap.
Headlamp
4. Rotate the headlamp bulb socket coun -
terclockwise then pull outwards. Headlamp Bulb Socket
5. Push on the locking tab on the headlamp bulb connector and remove the bulb and
socket.
6. Install the new headlamp bulb making sure it’s properly locked.
7. Install the headlamp bulb and socket; turn it clockwise making sure it is prop -
erly locked.
8. Reinstall the wheel liner.
NOTE:
We advise referring to an authorized dealer.
WARNING!
A transient high voltage occurs at the bulb
sockets of HID headlamps when the
headlamp switch is turned ON. It may
cause serious electrical shock or
electrocution if not serviced properly. See
an authorized dealer for service.
1 — Low Beam Bulb Cap
2 — High Beam Bulb Cap
WARNING!
Carry out the operation of replacing lamps
only with the engine off. Also make sure
that the engine is cold, to avoid the danger
of burns.
2020_JEEP_M6_UG_UK.book Page 179
Page 184 of 328
IN CASE OF EMERGENCY
182
FUSES
General Information
The fuses protect electrical systems against
excessive current.
When a device does not work, you must
check the fuse element inside the blade fuse
for a break/melt.
Also, please be aware that when using power
outlets for extended periods of time with the
engine off may result in vehicle battery
discharge.
Fuse Location
The fuses are grouped into controllers
located in the engine compartment.
Engine Compartment Fuses/Distribution
Unit
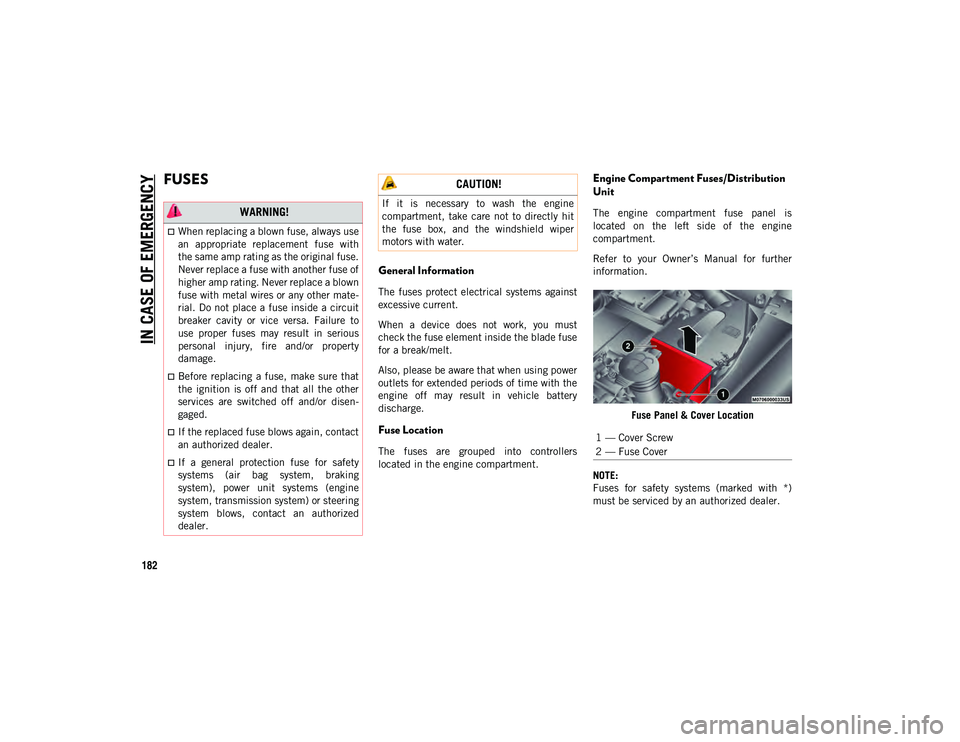
The engine compartment fuse panel is
located on the left side of the engine
compartment.
Refer to your Owner’s Manual for further
information.Fuse Panel & Cover Location
NOTE:
Fuses for safety systems (marked with *)
must be serviced by an authorized dealer. WARNING!
When replacing a blown fuse, always use
an appropriate replacement fuse with
the same amp rating as the original fuse.
Never replace a fuse with another fuse of
higher amp rating. Never replace a blown
fuse with metal wires or any other mate-
rial. Do not place a fuse inside a circuit
breaker cavity or vice versa. Failure to
use proper fuses may result in serious
personal injury, fire and/or property
damage.
Before replacing a fuse, make sure that
the ignition is off and that all the other
services are switched off and/or disen -
gaged.
If the replaced fuse blows again, contact
an authorized dealer.
If a general protection fuse for safety
systems (air bag system, braking
system), power unit systems (engine
system, transmission system) or steering
system blows, contact an authorized
dealer.
CAUTION!
If it is necessary to wash the engine
compartment, take care not to directly hit
the fuse box, and the windshield wiper
motors with water.
1 — Cover Screw
2 — Fuse Cover
2020_JEEP_M6_UG_UK.book Page 182
Page 185 of 328
183
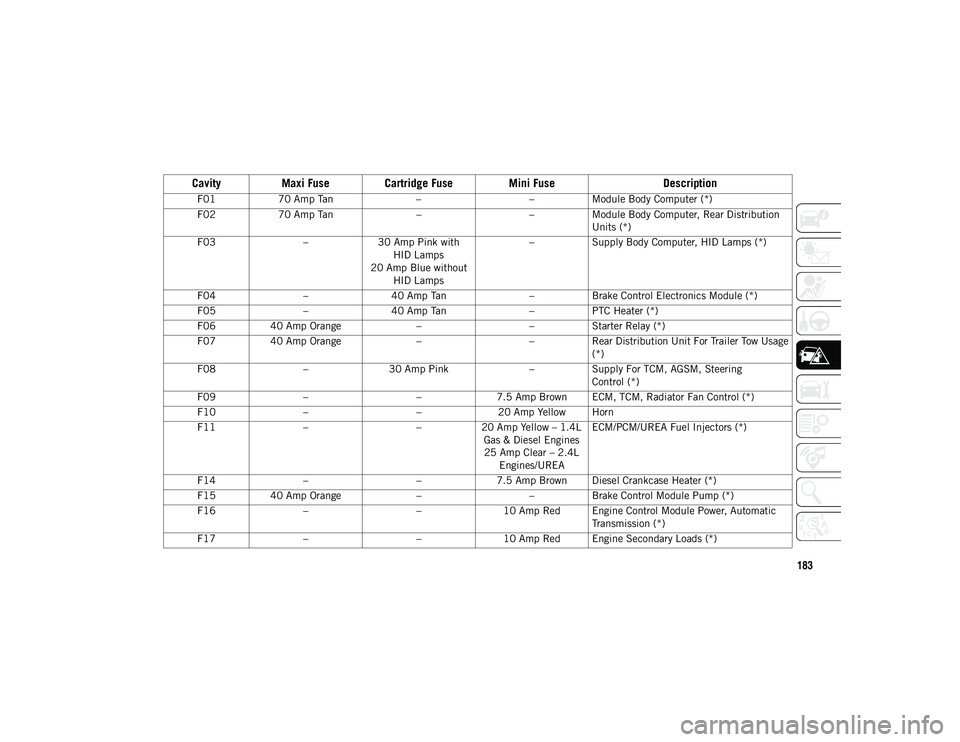
Cavity
Maxi Fuse Cartridge Fuse Mini Fuse Description
F0170 Amp Tan ––Module Body Computer (*)
F02 70 Amp Tan ––Module Body Computer, Rear Distribution
Units (*)
F03 –30 Amp Pink with
HID Lamps
20 Amp Blue without HID Lamps –
Supply Body Computer, HID Lamps (*)
F04 –40 Amp Tan –Brake Control Electronics Module (*)
F05 –40 Amp Tan –PTC Heater (*)
F06 40 Amp Orange ––Starter Relay (*)
F07 40 Amp Orange ––Rear Distribution Unit For Trailer Tow Usage
(*)
F08 –30 Amp Pink –Supply For TCM, AGSM, Steering
Control (*)
F09 – –7.5 Amp Brown ECM, TCM, Radiator Fan Control (*)
F10 – –20 Amp Yellow Horn
F11 – –20 Amp Yellow – 1.4L
Gas & Diesel Engines25 Amp Clear – 2.4L Engines/UREA ECM/PCM/UREA Fuel Injectors (*)
F14 – –7.5 Amp Brown Diesel Crankcase Heater (*)
F15 40 Amp Orange ––Brake Control Module Pump (*)
F16 – –10 Amp Red Engine Control Module Power, Automatic
Transmission (*)
F17 – –10 Amp Red Engine Secondary Loads (*)
2020_JEEP_M6_UG_UK.book Page 183
Page 186 of 328
IN CASE OF EMERGENCY
184
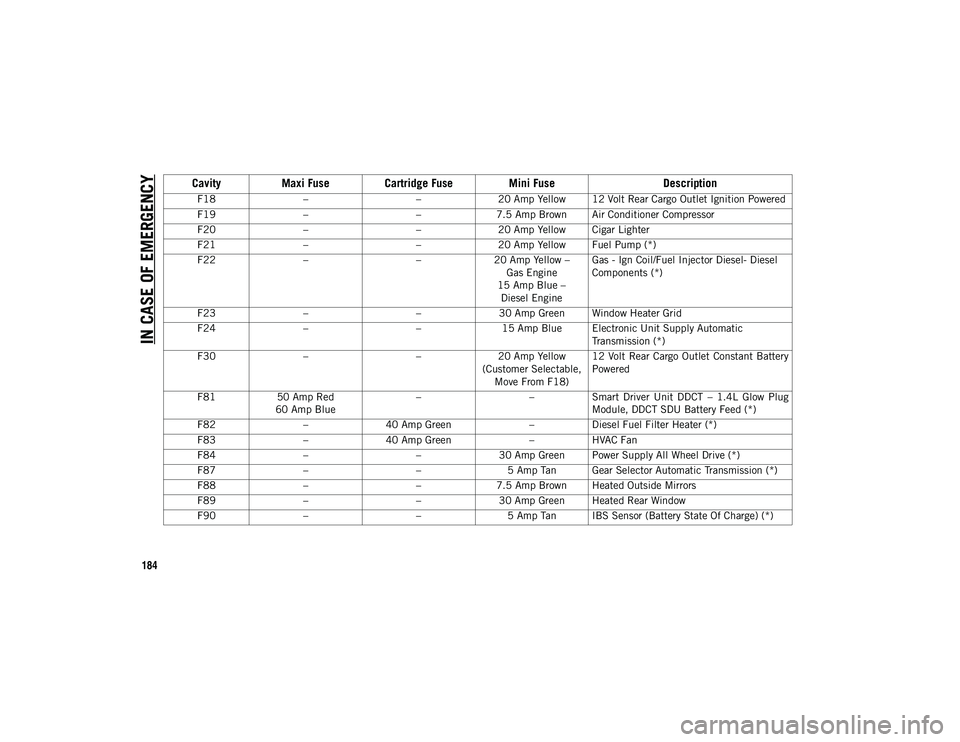
F18– –20 Amp Yellow 12 Volt Rear Cargo Outlet Ignition Powered
F19 – –7.5 Amp Brown Air Conditioner Compressor
F20 – –20 Amp Yellow Cigar Lighter
F21 – –20 Amp Yellow Fuel Pump (*)
F22 – –20 Amp Yellow –
Gas Engine
15 Amp Blue – Diesel Engine Gas - Ign Coil/Fuel Injector Diesel- Diesel
Components (*)
F23 – –30 Amp Green Window Heater Grid
F24 – –15 Amp Blue Electronic Unit Supply Automatic
Transmission (*)
F30 – –20 Amp Yellow
(Customer Selectable, Move From F18) 12 Volt Rear Cargo Outlet Constant Battery
Powered
F81 50 Amp Red
60 Amp Blue –
–Smart Driver Unit DDCT – 1.4L Glow Plug
Module, DDCT SDU Battery Feed (*)
F82 –40 Amp Green –Diesel Fuel Filter Heater (*)
F83 –40 Amp Green –HVAC Fan
F84 – –30 Amp Green Power Supply All Wheel Drive (*)
F87 – –5 Amp Tan Gear Selector Automatic Transmission (*)
F88 – –7.5 Amp Brown Heated Outside Mirrors
F89 – –30 Amp Green Heated Rear Window
F90 – –5 Amp Tan IBS Sensor (Battery State Of Charge) (*)
CavityMaxi Fuse Cartridge Fuse Mini Fuse Description
2020_JEEP_M6_UG_UK.book Page 184
Page 187 of 328
185
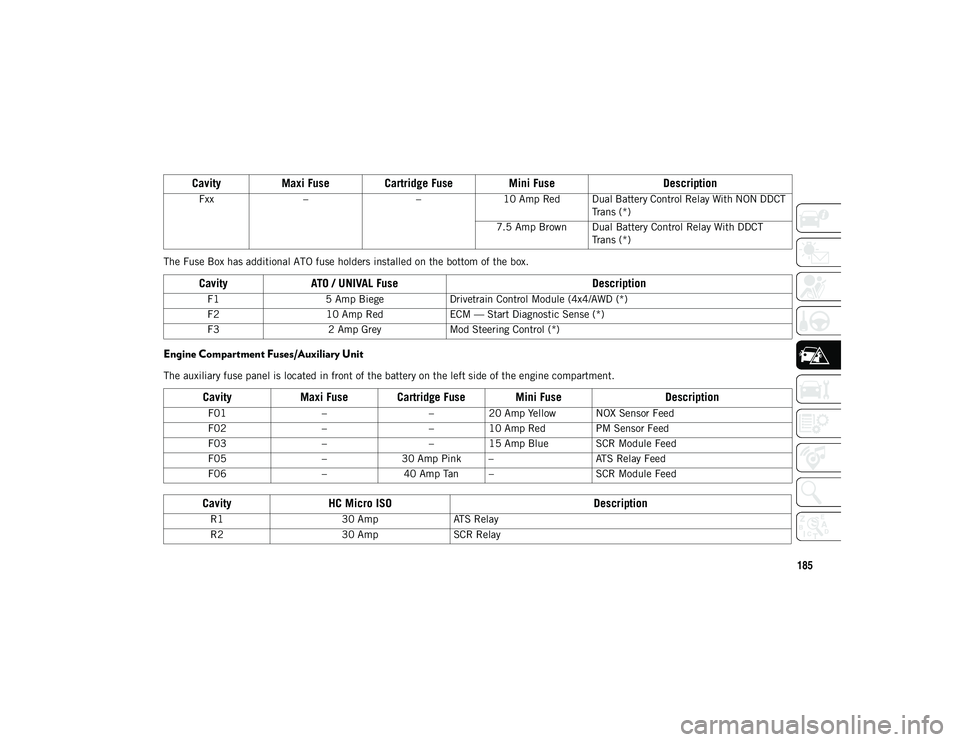
The Fuse Box has additional ATO fuse holders installed on the bottom of the box.
Engine Compartment Fuses/Auxiliary Unit
The auxiliary fuse panel is located in front of the battery on the left side of the engine compartment.Fxx
– –10 Amp Red Dual Battery Control Relay With NON DDCT
Trans (*)
7.5 Amp Brown Dual Battery Control Relay With DDCT Trans (*)
Cavity ATO / UNIVAL Fuse Description
F15 Amp Biege Drivetrain Control Module (4x4/AWD (*)
F2 10 Amp Red ECM — Start Diagnostic Sense (*)
F3 2 Amp Grey Mod Steering Control (*)
CavityMaxi Fuse Cartridge Fuse Mini Fuse Description
F01––20 Amp Yellow NOX Sensor Feed
F02 ––10 Amp Red PM Sensor Feed
F03 ––15 Amp Blue SCR Module Feed
F05 –30 Amp Pink – ATS Relay Feed
F06 –40 Amp Tan – SCR Module Feed
CavityHC Micro ISO Description
R130 AmpATS Relay
R2 30 AmpSCR Relay
CavityMaxi Fuse Cartridge Fuse Mini Fuse Description
2020_JEEP_M6_UG_UK.book Page 185
Page 191 of 328
189
JACKING AND TIRE
CHANGING Jack Location/Spare Tire Stowage
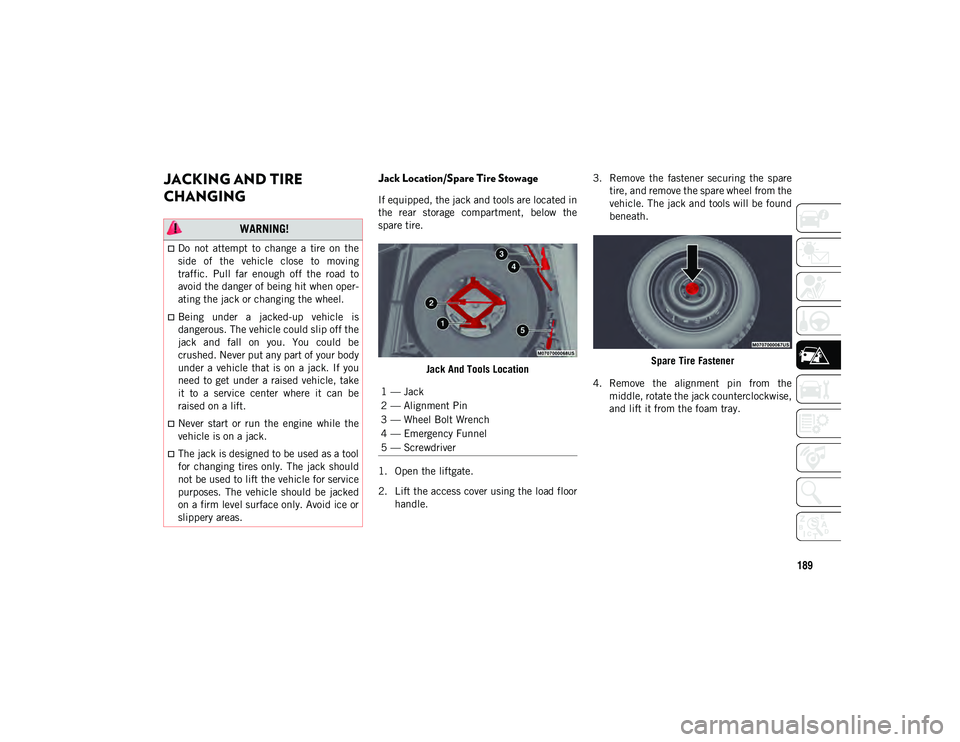
If equipped, the jack and tools are located in
the rear storage compartment, below the
spare tire.Jack And Tools Location
1. Open the liftgate.
2. Lift the access cover using the load floor handle. 3. Remove the fastener securing the spare
tire, and remove the spare wheel from the
vehicle. The jack and tools will be found
beneath.
Spare Tire Fastener
4. Remove the alignment pin from the middle, rotate the jack counterclockwise,
and lift it from the foam tray.
WARNING!
Do not attempt to change a tire on the
side of the vehicle close to moving
traffic. Pull far enough off the road to
avoid the danger of being hit when oper -
ating the jack or changing the wheel.
Being under a jacked-up vehicle is
dangerous. The vehicle could slip off the
jack and fall on you. You could be
crushed. Never put any part of your body
under a vehicle that is on a jack. If you
need to get under a raised vehicle, take
it to a service center where it can be
raised on a lift.
Never start or run the engine while the
vehicle is on a jack.
The jack is designed to be used as a tool
for changing tires only. The jack should
not be used to lift the vehicle for service
purposes. The vehicle should be jacked
on a firm level surface only. Avoid ice or
slippery areas.
1 — Jack
2 — Alignment Pin
3 — Wheel Bolt Wrench
4 — Emergency Funnel
5 — Screwdriver
2020_JEEP_M6_UG_UK.book Page 189
Page 193 of 328
191(Continued)
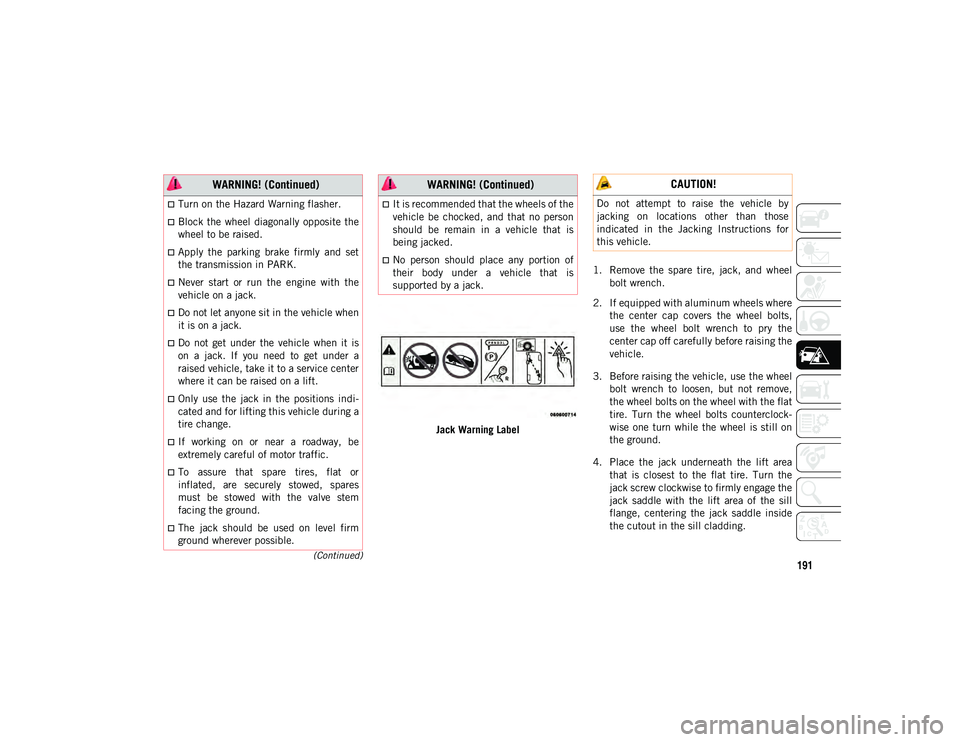
Jack Warning Label1. Remove the spare tire, jack, and wheel
bolt wrench.
2. If equipped with aluminum wheels where the center cap covers the wheel bolts,
use the wheel bolt wrench to pry the
center cap off carefully before raising the
vehicle.
3. Before raising the vehicle, use the wheel bolt wrench to loosen, but not remove,
the wheel bolts on the wheel with the flat
tire. Turn the wheel bolts counterclock -
wise one turn while the wheel is still on
the ground.
4. Place the jack underneath the lift area that is closest to the flat tire. Turn the
jack screw clockwise to firmly engage the
jack saddle with the lift area of the sill
flange, centering the jack saddle inside
the cutout in the sill cladding.
Turn on the Hazard Warning flasher.
Block the wheel diagonally opposite the
wheel to be raised.
Apply the parking brake firmly and set
the transmission in PARK.
Never start or run the engine with the
vehicle on a jack.
Do not let anyone sit in the vehicle when
it is on a jack.
Do not get under the vehicle when it is
on a jack. If you need to get under a
raised vehicle, take it to a service center
where it can be raised on a lift.
Only use the jack in the positions indi -
cated and for lifting this vehicle during a
tire change.
If working on or near a roadway, be
extremely careful of motor traffic.
To assure that spare tires, flat or
inflated, are securely stowed, spares
must be stowed with the valve stem
facing the ground.
The jack should be used on level firm
ground wherever possible.
WARNING! (Continued)
It is recommended that the wheels of the
vehicle be chocked, and that no person
should be remain in a vehicle that is
being jacked.
No person should place any portion of
their body under a vehicle that is
supported by a jack.
WARNING! (Continued) CAUTION!
Do not attempt to raise the vehicle by
jacking on locations other than those
indicated in the Jacking Instructions for
this vehicle.
2020_JEEP_M6_UG_UK.book Page 191
Page 197 of 328
195
Jack Usage Precautions
To complete the Use and Maintenance
Handbook to which this supplement is
attached, given below are some instructions
on the proper use of the jack.MaintenanceMake sure grime does not build up on the
“worm screw.”
Keep the “worm screw” lubricated.
Never modify the jack.
Conditions Of Non-Use:
Temperatures below −40°C.
On sandy or muddy ground.
On uneven ground.
On steep roads.
In extreme weather conditions: thunder -
storms, typhoons, hurricanes, blizzards,
storms, etc.
WARNING!
When using the crank, make sure it turns
freely without the risk of scraping hands
against the ground.
Even the moving parts of the jack, the
“worm screw” and joints can cause
injuries: avoid contact with them. Clean it
thoroughly if dirtied with grease.
CAUTION!
The jack is a tool designed exclusively for
changing a wheel, in case of a puncture or
damage to a tire of the vehicle on which it
is fitted or on vehicles of the same model.
Any other use, e.g. to jack up other vehicle
models or different things, is strictly
prohibited. Never use it to carry out
maintenance or repairs under the vehicle
or to change summer/winter wheels and
vice versa. Never go under the raised
vehicle. If any work under the vehicle is
necessary, contact an authorized dealer.
Incorrect placing of the jack can cause the
vehicle to drop: use it only in the positions
indicated. Do not use the jack for loads
higher than that specified on the label.
Never start the engine with vehicle raised.
If the vehicle is raised more than
necessary, everything can become more
unstable, with the risk of the vehicle
dropping violently. Therefore raise the
vehicle only as much as necessary for the
wheel/spare.
2020_JEEP_M6_UG_UK.book Page 195