engine JEEP COMPASS 2020 Owner handbook (in English)
[x] Cancel search | Manufacturer: JEEP, Model Year: 2020, Model line: COMPASS, Model: JEEP COMPASS 2020Pages: 328, PDF Size: 8.85 MB
Page 150 of 328
STARTING AND OPERATING
148
tions), the transmission may use SECOND
gear (rather than FIRST gear) during
launches, to minimize wheel slippage.
SAND: For off-road driving or use on
surfaces with poor traction, such as dry
sand. The transmission is set to provide
maximum traction.
MUD: For off-road driving or use on
surfaces with poor traction, such as roads
covered by mud or wet grass.
ROCK (Trailhawk only): This mode is only
available in 4WD LOW range. The device
sets the vehicle to maximize traction and
allow the highest steering capacity for
off-road surfaces. This mode gives you the
maximum performance off-road. Use for
low speed obstacles such as large rocks,
deep ruts, etc.
NOTE:
Rock mode is only available on the vehi -
cles equipped with the Off-Road package.
Activate the Hill Descent Control for steep
downhill control. See “Electronic Brake
Control System” in “Safety” for further
information.
STOP/START SYSTEM — IF
EQUIPPED
The Stop/Start function is developed to
reduce fuel consumption. The system will
stop the engine automatically during a
vehicle stop if the required conditions are
met. Releasing the brake pedal, clutch pedal
or pressing the accelerator pedal will auto -
matically re-start the engine.
Operating Modes
Engine Stopping Mode
Models equipped with a manual transmis -
sion:
With the vehicle stopped, the engine stops
with transmission in neutral and clutch
pedal released.
Models equipped with an automatic trans -
mission:
With vehicle at a standstill and brake pedal
pressed, the engine switches off if the gear
selector is in a position other than REVERSE.
In the event of stops uphill, the engine
switching will be disabled to activate the
"Hill Start Assist" function (works only with
the engine running).
The warning light on the instrument panel
switches on to signal that the engine was
stopped.
WARNING!
Before opening the hood, make sure that
the engine is off and that the ignition is in
the OFF mode. Follow the indications on
the plate underneath the hood. We
recommend that you remove the key fob if
other people remain in the vehicle. The
vehicle should only be exited after the key
fob has been removed and the ignition is
in the OFF mode. During refueling, make
sure that the engine is off (ignition device
in the OFF mode).
CAUTION!
When replacing the battery, always contact
your authorized dealer. Replace the battery
with the same type (HEAVY DUTY) and
with the same specifications.
2020_JEEP_M6_UG_UK.book Page 148
Page 151 of 328
149
Engine Restarting Mode
Models equipped with manual transmission:
To restart the engine, press the clutch pedal.
If the vehicle does not start by pressing the
clutch, place the gear selector in neutral and
repeat the procedure. If the problem
persists, contact your authorized dealer.
Models equipped with an automatic trans-
mission:
To restart the engine, release the brake
pedal.
With brake pressed, if the gear selector is in
DRIVE the engine can be restarted moving
the selector to REVERSE or NEUTRAL or
“AutoStick”.
With brake pedal pressed, if the gear selector
is in "AutoStick" mode, the engine can be
restarted moving the selector to "+" or "–", or
REVERSE or NEUTRAL.
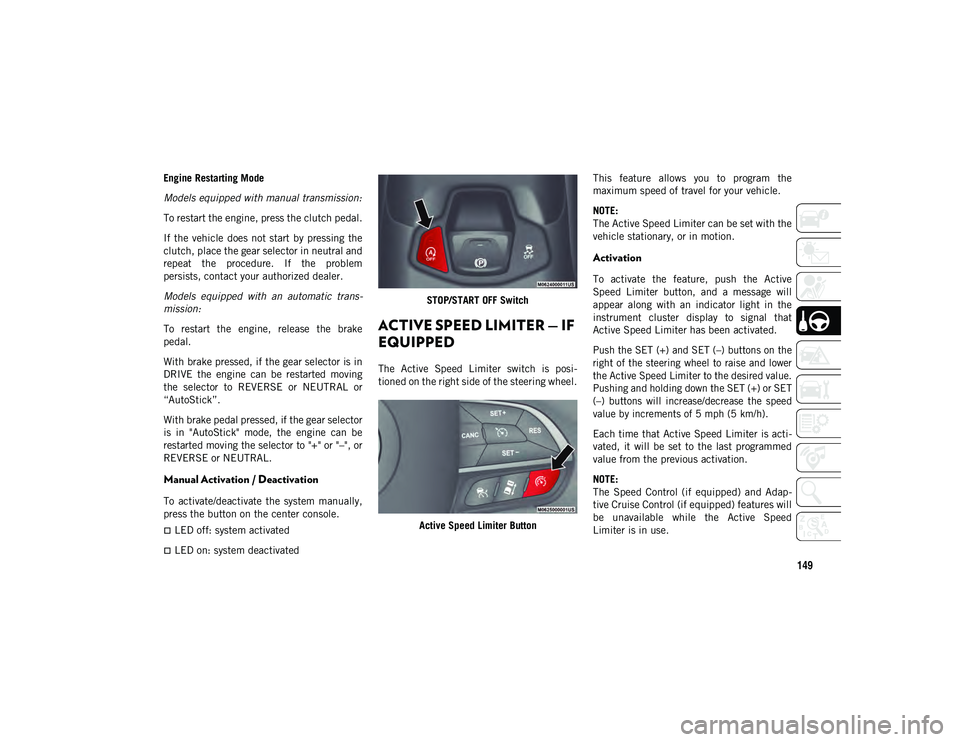
Manual Activation / Deactivation
To activate/deactivate the system manually,
press the button on the center console.
LED off: system activated
LED on: system deactivated STOP/START OFF Switch
ACTIVE SPEED LIMITER — IF
EQUIPPED
The Active Speed Limiter switch is posi
-
tioned on the right side of the steering wheel.
Active Speed Limiter Button This feature allows you to program the
maximum speed of travel for your vehicle.
NOTE:
The Active Speed Limiter can be set with the
vehicle stationary, or in motion.
Activation
To activate the feature, push the Active
Speed Limiter button, and a message will
appear along with an indicator light in the
instrument cluster display to signal that
Active Speed Limiter has been activated.
Push the SET (+) and SET (–) buttons on the
right of the steering wheel to raise and lower
the Active Speed Limiter to the desired value.
Pushing and holding down the SET (+) or SET
(–) buttons will increase/decrease the speed
value by increments of 5 mph (5 km/h).
Each time that Active Speed Limiter is acti
-
vated, it will be set to the last programmed
value from the previous activation.
NOTE:
The Speed Control (if equipped) and Adap -
tive Cruise Control (if equipped) features will
be unavailable while the Active Speed
Limiter is in use.
2020_JEEP_M6_UG_UK.book Page 149
Page 155 of 328
153
To Vary The Speed Setting
To Increase Speed
While ACC is set, you can increase the set
speed by pushing the SET (+) button.
The driver's preferred units can be selected
through the instrument panel settings. Refer
to “Getting To Know Your Instrument Panel”
in your Owner’s Manual for more informa -
tion. The speed increment shown is depen -
dent on the chosen speed unit of U.S. (mph)
or Metric (km/h):
U.S. Speed (mph)
Pushing the SET (+) button once will
result in a 1 mph increase in set speed.
Each subsequent tap of the button results
in an increase of 1 mph.
If the button is continually pushed, the set
speed will continue to increase in 5 mph
increments until the button is released.
The increase in set speed is reflected in
the instrument cluster display.
Metric Speed (km/h)
Pushing the SET (+) button once will
result in a 1 km/h increase in set speed.
Each subsequent tap of the button results
in an increase of 1 km/h.
If the button is continually pushed, the set
speed will continue to increase in 10 km/h
increments until the button is released.
The increase in set speed is reflected in the
instrument cluster display.
To Decrease Speed
While ACC is set, the set speed can be
decreased by pushing the SET (-) button.
The driver's preferred units can be selected
through the instrument panel settings. Refer
to “Getting To Know Your Instrument Panel”
in your Owner’s Manual for more informa -
tion. The speed decrement shown is depen -
dent on the chosen speed unit of U.S. (mph)
or Metric (km/h):
U.S. Speed (mph)
Pushing the SET (-) button once will result
in a 1 mph decrease in set speed. Each
subsequent tap of the button results in a
decrease of 1 mph.
If the button is continually pushed, the set
speed will continue to decrease in 5 mph
decrements until the button is released.
The decrease in set speed is reflected in
the instrument cluster display. Metric Speed (km/h)
Pushing the SET (-) button once will result
in a 1 km/h decrease in set speed. Each
subsequent tap of the button results in a
decrease of 1 km/h.
If the button is continually pushed, the set
speed will continue to decrease in 10 km/h
decrements until the button is released.
The decrease in set speed is reflected in
the instrument cluster display.
NOTE:
When you override and push the SET (+)
button or SET (-) buttons, the new set
speed will be the current speed of the
vehicle.
When you use the SET (-) button to decel -
erate, if the engine’s braking power does
not slow the vehicle sufficiently to reach
the set speed, the brake system will auto-
matically slow the vehicle.
If equipped with a manual transmission,
the ACC system applies the brake down to
15 mph (24 km/h) when following a target
vehicle.
2020_JEEP_M6_UG_UK.book Page 153
Page 168 of 328
STARTING AND OPERATING
166
Emergency Gas Can Refueling
Most gas cans will not open the flapper door.
A funnel is provided to open the flapper door
to allow emergency refueling with a gas can.
1. Retrieve funnel from the spare tirestorage area.
2. Insert funnel into same filler pipe opening as the fuel nozzle.
Filling Procedure
3. Ensure funnel is inserted fully to hold flapper door open.
4. Pour fuel into funnel opening.
5. Remove funnel from filler pipe, clean off prior to putting back in the spare tire
storage area. NOTE:
In certain cold conditions, ice may prevent
the fuel door from opening. If this occurs,
lightly push on the fuel door to break the ice
buildup and re-release the fuel door using
the inside release button. Do not pry on the
door.Emergency Fuel Filler Door Release
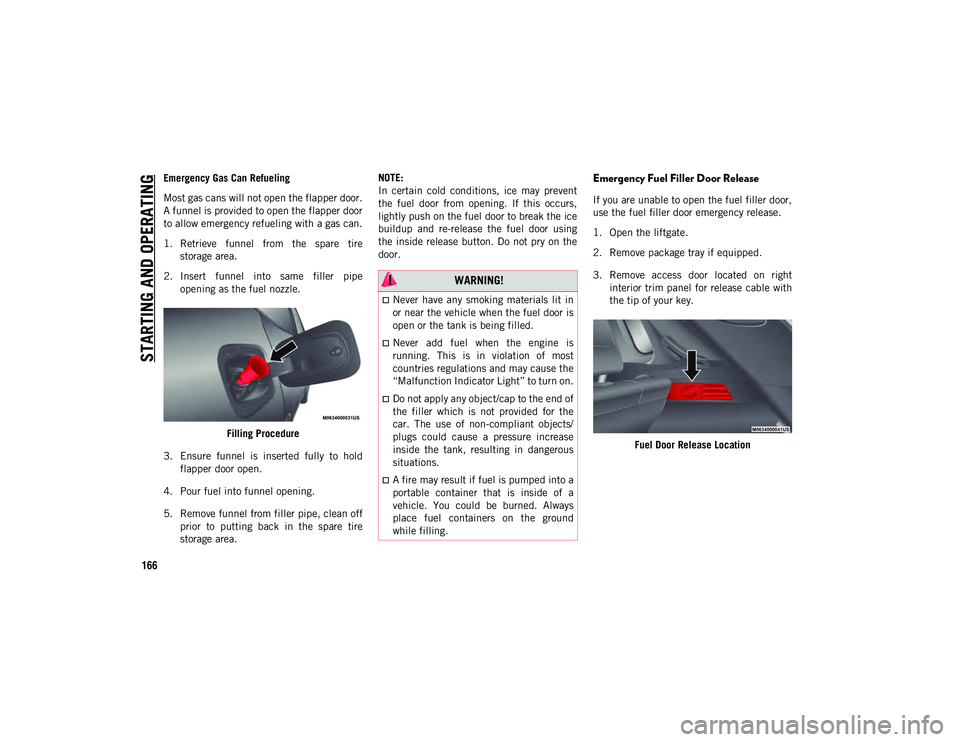
If you are unable to open the fuel filler door,
use the fuel filler door emergency release.
1. Open the liftgate.
2. Remove package tray if equipped.
3. Remove access door located on right
interior trim panel for release cable with
the tip of your key.
Fuel Door Release Location
WARNING!
Never have any smoking materials lit in
or near the vehicle when the fuel door is
open or the tank is being filled.
Never add fuel when the engine is
running. This is in violation of most
countries regulations and may cause the
“Malfunction Indicator Light” to turn on.
Do not apply any object/cap to the end of
the filler which is not provided for the
car. The use of non-compliant objects/
plugs could cause a pressure increase
inside the tank, resulting in dangerous
situations.
A fire may result if fuel is pumped into a
portable container that is inside of a
vehicle. You could be burned. Always
place fuel containers on the ground
while filling.
2020_JEEP_M6_UG_UK.book Page 166
Page 169 of 328
167
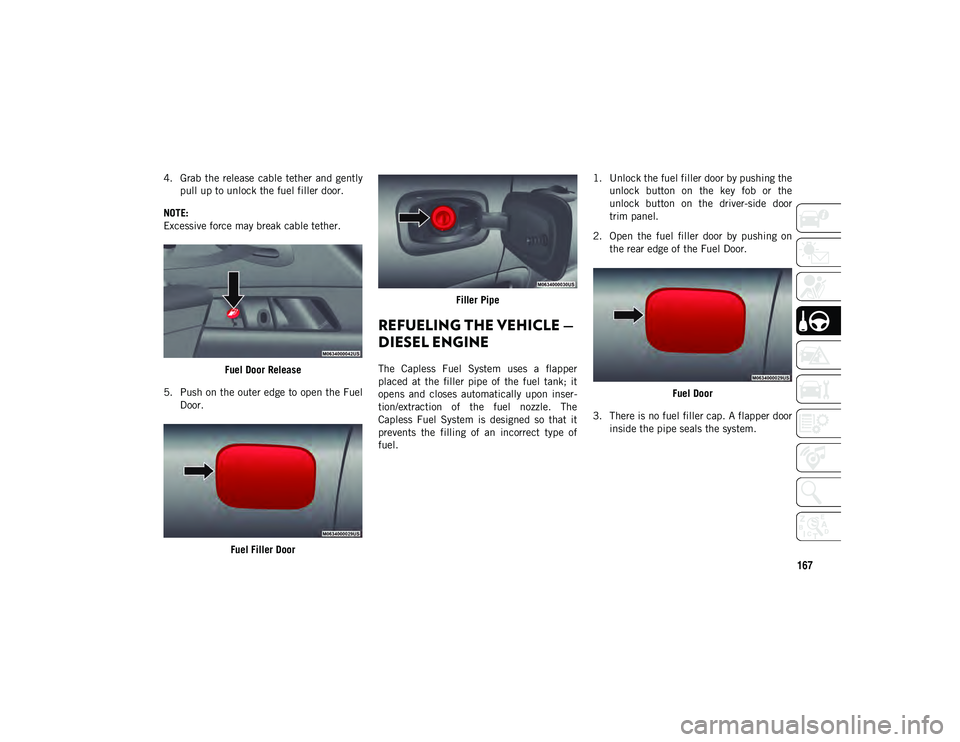
4. Grab the release cable tether and gentlypull up to unlock the fuel filler door.
NOTE:
Excessive force may break cable tether.
Fuel Door Release
5. Push on the outer edge to open the Fuel Door.
Fuel Filler Door Filler Pipe
REFUELING THE VEHICLE —
DIESEL ENGINE
The Capless Fuel System uses a flapper
placed at the filler pipe of the fuel tank; it
opens and closes automatically upon inser
-
tion/extraction of the fuel nozzle. The
Capless Fuel System is designed so that it
prevents the filling of an incorrect type of
fuel. 1. Unlock the fuel filler door by pushing the
unlock button on the key fob or the
unlock button on the driver-side door
trim panel.
2. Open the fuel filler door by pushing on the rear edge of the Fuel Door.
Fuel Door
3. There is no fuel filler cap. A flapper door inside the pipe seals the system.
2020_JEEP_M6_UG_UK.book Page 167
Page 170 of 328
STARTING AND OPERATING
168
(Continued)
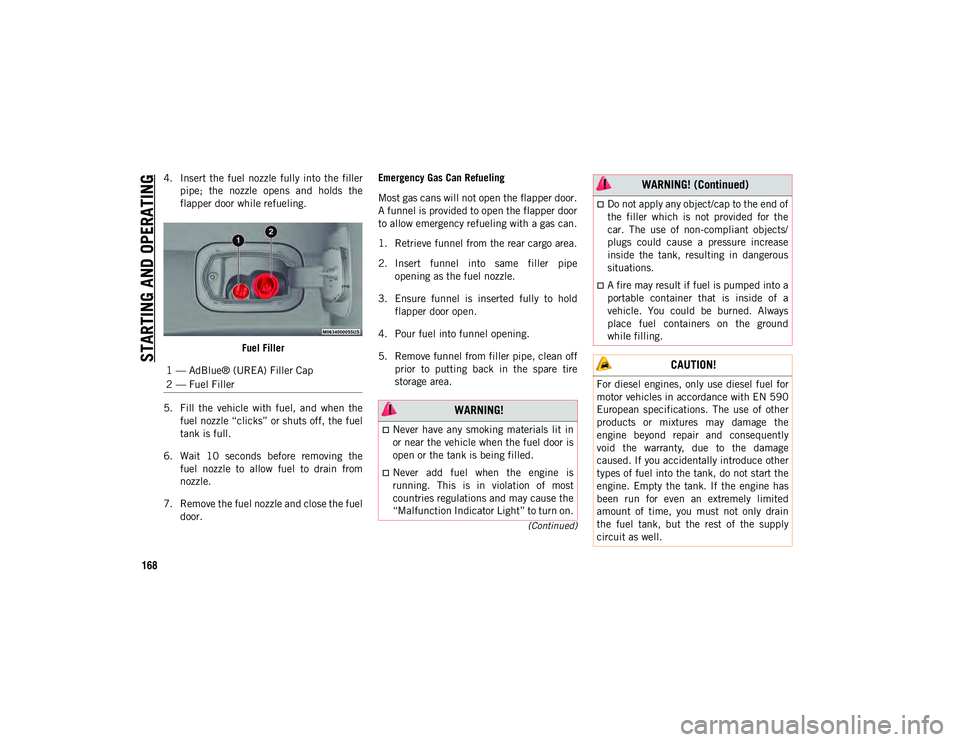
4. Insert the fuel nozzle fully into the fillerpipe; the nozzle opens and holds the
flapper door while refueling.
Fuel Filler
5. Fill the vehicle with fuel, and when the fuel nozzle “clicks” or shuts off, the fuel
tank is full.
6. Wait 10 seconds before removing the fuel nozzle to allow fuel to drain from
nozzle.
7. Remove the fuel nozzle and close the fuel door. Emergency Gas Can Refueling
Most gas cans will not open the flapper door.
A funnel is provided to open the flapper door
to allow emergency refueling with a gas can.
1. Retrieve funnel from the rear cargo area.
2. Insert funnel into same filler pipe
opening as the fuel nozzle.
3. Ensure funnel is inserted fully to hold flapper door open.
4. Pour fuel into funnel opening.
5. Remove funnel from filler pipe, clean off prior to putting back in the spare tire
storage area.
1 — AdBlue® (UREA) Filler Cap
2 — Fuel Filler
WARNING!
Never have any smoking materials lit in
or near the vehicle when the fuel door is
open or the tank is being filled.
Never add fuel when the engine is
running. This is in violation of most
countries regulations and may cause the
“Malfunction Indicator Light” to turn on.
Do not apply any object/cap to the end of
the filler which is not provided for the
car. The use of non-compliant objects/
plugs could cause a pressure increase
inside the tank, resulting in dangerous
situations.
A fire may result if fuel is pumped into a
portable container that is inside of a
vehicle. You could be burned. Always
place fuel containers on the ground
while filling.
CAUTION!
For diesel engines, only use diesel fuel for
motor vehicles in accordance with EN 590
European specifications. The use of other
products or mixtures may damage the
engine beyond repair and consequently
void the warranty, due to the damage
caused. If you accidentally introduce other
types of fuel into the tank, do not start the
engine. Empty the tank. If the engine has
been run for even an extremely limited
amount of time, you must not only drain
the fuel tank, but the rest of the supply
circuit as well.
WARNING! (Continued)
2020_JEEP_M6_UG_UK.book Page 168
Page 171 of 328
169
AdBlue® (UREA) — If Equipped
The vehicle is equipped with an UREA injec -
tion system and Selective Catalytic Reduc -
tion to meet emission standards. These two
systems ensure compliance with the diesel
emissions requirements; at the same time,
they ensure fuel-efficiency, handling, torque
and power. For messages and system warn -
ings, refer to the "Warning Lights And
Messages" in the "Getting To Know Your
Instrument Panel" section. AdBlue® (UREA)
is a very stable product with a long shelf life.
Stored at temperatures LOWER than 90°F
(32°C), it has a shelf life of at least one year.
For more information on the AdBlue® liquid
type, see the “Fluids and lubricants” in the
“Technical specifications” section. The
vehicle is equipped with an automatic
AdBlue® heating system when the engine
starts allowing the system to work correctly
at temperatures lower than 12°F (-11°C).
NOTE:
AdBlue® freezes at temperatures lower than
12 °F (-11 °C).
AdBlue® (UREA) Storage
AdBlue® (UREA) is considered a very stable
product with a long shelf life. If AdBlue®
(UREA) is kept in temperatures between 10°
and 90°F (-12° and 32°C), it will last a
minimum of one year.
AdBlue® (UREA) is subject to freezing at the
lowest temperatures. For example, AdBlue®
(UREA) may freeze at temperatures at or
below 12°F (-11°C). The system has been
designed to operate in this environment.
NOTE:
When working with AdBlue® (UREA), it is
important to know that:
Any containers or parts that come into
contact with AdBlue® (UREA) must be
AdBlue® (UREA) compatible (plastic or
stainless steel). Copper, brass, aluminum,
iron or non-stainless steel should be
avoided as they are subject to corrosion by
AdBlue® (UREA).
If AdBlue® (UREA) is spilled, it should be
wiped up completely.
Adding AdBlue® (UREA)
Preliminary Conditions
AdBlue® (UREA) freezes at temperatures
lower than 12°F (-11°C). If the car stands for
a long time at this temperature refilling
could be difficult. For this reason, it is
advised to park the vehicle in a garage and/
or heated environment and wait for the urea
to return to liquid state before topping up.
Proceed as follows:
Park the car on flat ground and stop the
engine by cycling the ignition to the OFF
position.
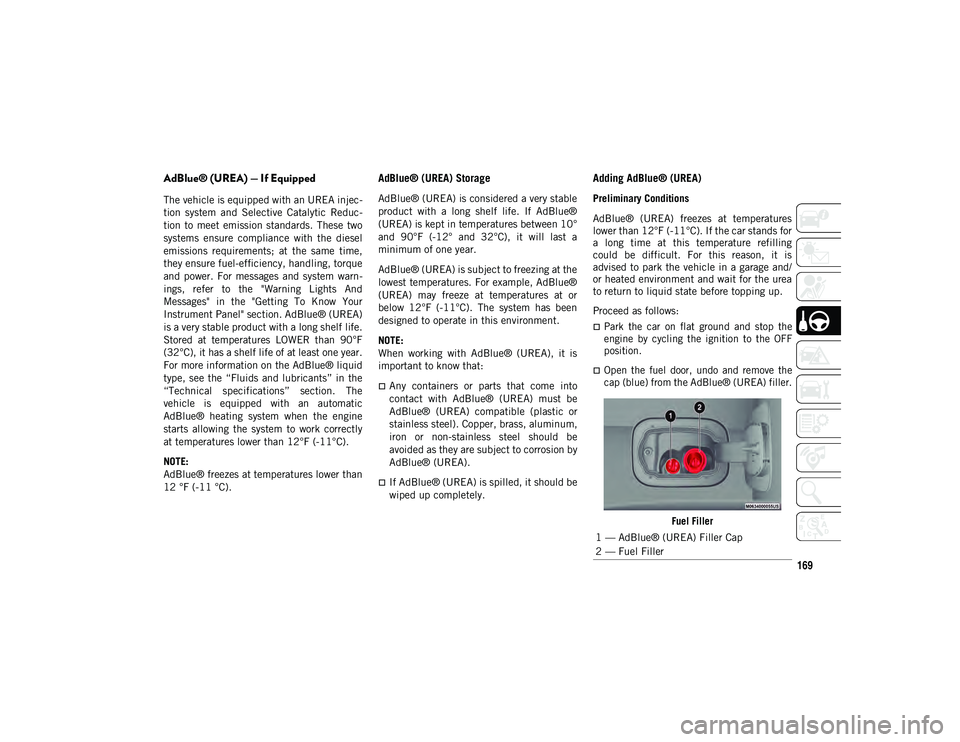
Open the fuel door, undo and remove the
cap (blue) from the AdBlue® (UREA) filler.
Fuel Filler
1 — AdBlue® (UREA) Filler Cap
2 — Fuel Filler
2020_JEEP_M6_UG_UK.book Page 169
Page 172 of 328
STARTING AND OPERATING
170
Refilling With Nozzles
You can fill up at any AdBlue® (UREA)
distributor.
Proceed as follows:
Insert the AdBlue® (UREA) nozzle in the
filler, start refilling and stop refilling at the
first shut-off (the shut-off indicates that
the AdBlue® (UREA) tank is full). Do not
proceed with the refilling, to prevent
spillage of AdBlue® (UREA).
Extract the nozzle.
Refilling With Containers
Proceed as follows:
Check the expiration date.
Read the advice for use on the label before
pouring the content of the bottle into the
AdBlue® (UREA) tank.
If systems which cannot be screwed in
(e.g. tanks) are used for refilling, after the
indication appears on the instrument
panel display refer to “Warning lights And
Messages" in the “Getting To Know Your
Instrument Panel” for further information,
fill the AdBlue® (UREA) tank with no
more than 2 Gallons (8 liters).
If containers which can be screwed to the
filler are used, the reservoir is full when
the AdBlue® (UREA) level in the
container stops pouring out. Do not
proceed further.
Operations After Refilling
Proceed as follows:
Fit the cap back on the AdBlue® (UREA)
filler by turning it clockwise and screwing
it completely.
Cycle the ignition to RUN (it is not neces-
sary to start the engine).
Wait for the indication on the instrument
panel to switch off before moving the car.
The indication may stay on for a few
seconds to approximately half a minute. If
the engine is started and the car is moved,
the indication will remain on for longer.
This will not compromise engine opera-
tion.
If the AdBlue® (UREA) was topped up
when the tank was empty, wait for
2 minutes before starting the engine. NOTE:
If AdBlue® (UREA) is spilled out of the
filler neck, clean up well the area and
proceed to filling up again. If the liquid
crystallizes, eliminate it with a sponge and
warm water.
DO NOT EXCEED THE MAXIMUM LEVEL:
this could cause damage to the reservoir.
AdBlue® (UREA) freezes at under 12°F
(-11°C). Although the system is designed
to operate below the freezing point of the
UREA, it is advisable not to fill the tank
beyond the maximum level because if the
UREA freezes the system can be
damaged. Follow the instructions in this
section.
If the AdBlue® (UREA) is spilled on
painted surfaces or aluminium, immedi
-
ately clean the area with water and use
absorbent material to collect the fluid that
has been spilled on the ground.
Do not try to start the engine if AdBlue®
(UREA) was accidentally added to the
diesel fuel tank, this can result in serious
engine damage, contact an authorized
dealer.
2020_JEEP_M6_UG_UK.book Page 170
Page 174 of 328
STARTING AND OPERATING
172
Tongue Weight (TW)
The tongue weight is the downward force
exerted on the hitch ball by the trailer. You
must consider this as part of the load on your
vehicle.
Trailer Frontal Area
The frontal area is the maximum height
multiplied by the maximum width of the
front of a trailer.
Trailer Sway Control
The trailer sway control can be a mechanical
telescoping link that can be installed
between the hitch receiver and the trailer
tongue that typically provides adjustable fric-
tion associated with the telescoping motion
to dampen any unwanted trailer swaying
motions while traveling.
If equipped, the electronic Trailer Sway
Control (TSC) recognizes a swaying trailer
and automatically applies individual wheel
brakes and/or reduces engine power to
attempt to eliminate the trailer sway.
Weight-Carrying Hitch
A weight-carrying hitch supports the trailer
tongue weight, just as if it were luggage
located at a hitch ball or some other
connecting point of the vehicle. These kinds
of hitches are the most popular on the
market today and they are commonly used to
tow small and medium sized trailers.
Weight-Distributing Hitch
A weight-distributing system works by
applying leverage through spring (load) bars.
They are typically used for heavier loads to
distribute trailer tongue weight to the tow
vehicle's front axle and the trailer axle(s).
When used in accordance with the manufac -
turer's directions, it provides for a more level
ride, offering more consistent steering and
brake control thereby enhancing towing
safety. The addition of a friction/hydraulic
sway control also dampens sway caused by
traffic and crosswinds and contributes posi -
tively to tow vehicle and trailer stability. Trailer sway control and a weight distributing
(load equalizing) hitch are recommended for
heavier Tongue Weights (TW) and may be
required depending on vehicle and trailer
configuration/loading to comply with Gross
Axle Weight Rating (GAWR) requirements.
WARNING!
An improperly adjusted Weight Distrib
-
uting Hitch system may reduce
handling, stability, braking performance,
and could result in a collision.
Weight Distributing Systems may not be
compatible with Surge Brake Couplers.
Consult with your hitch and trailer manu -
facturer or a reputable Recreational
Vehicle dealer for additional informa-
tion.
2020_JEEP_M6_UG_UK.book Page 172
Page 175 of 328
173
(Continued)
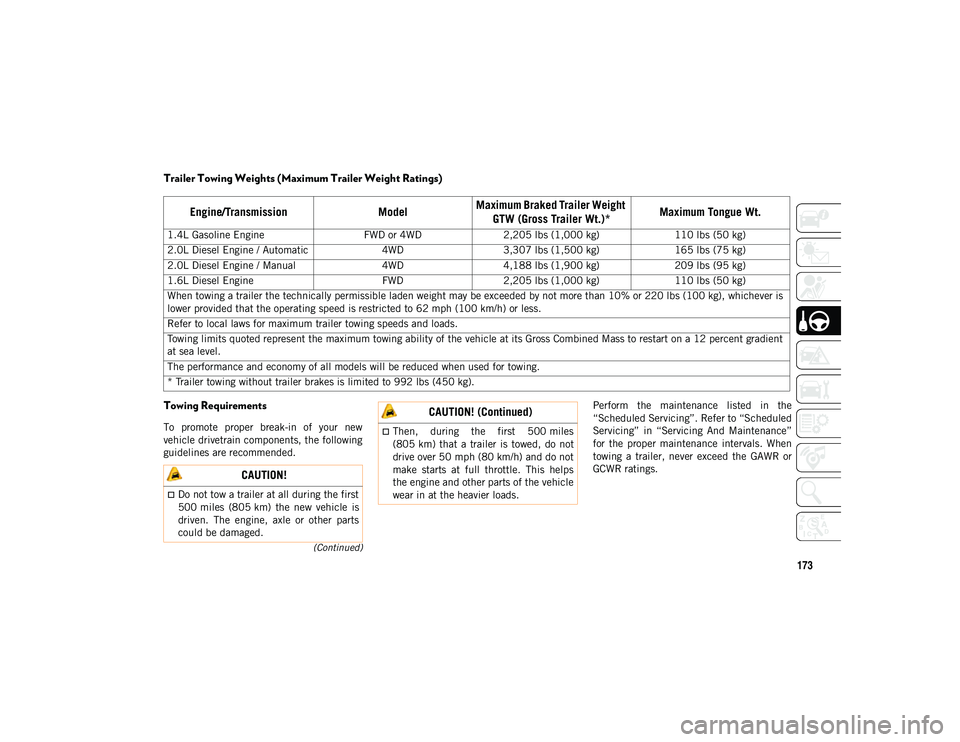
Trailer Towing Weights (Maximum Trailer Weight Ratings)
Towing Requirements
To promote proper break-in of your new
vehicle drivetrain components, the following
guidelines are recommended.Perform the maintenance listed in the
“Scheduled Servicing”. Refer to “Scheduled
Servicing” in “Servicing And Maintenance”
for the proper maintenance intervals. When
towing a trailer, never exceed the GAWR or
GCWR ratings.
Engine/Transmission
ModelMaximum Braked Trailer Weight
GTW (Gross Trailer Wt.)* Maximum Tongue Wt.
1.4L Gasoline Engine
FWD or 4WD2,205 lbs (1,000 kg) 110 lbs (50 kg)
2.0L Diesel Engine / Automatic 4WD3,307 lbs (1,500 kg) 165 lbs (75 kg)
2.0L Diesel Engine / Manual 4WD4,188 lbs (1,900 kg) 209 lbs (95 kg)
1.6L Diesel Engine FWD2,205 lbs (1,000 kg) 110 lbs (50 kg)
When towing a trailer the technically permissible laden weight may be exceeded by not more than 10% or 220 lbs (100 kg), whichever is
lower provided that the operating speed is restricted to 62 mph (100 km/h) or less.
Refer to local laws for maximum trailer towing speeds and loads.
Towing limits quoted represent the maximum towing ability of the vehicle at its Gross Combined Mass to restart on a 12 percent gradient
at sea level.
The performance and economy of all models will be reduced when used for towing.
* Trailer towing without trailer brakes is limited to 992 lbs (450 kg).
CAUTION!
Do not tow a trailer at all during the first
500 miles (805 km) the new vehicle is
driven. The engine, axle or other parts
could be damaged.
Then, during the first 500 miles
(805 km) that a trailer is towed, do not
drive over 50 mph (80 km/h) and do not
make starts at full throttle. This helps
the engine and other parts of the vehicle
wear in at the heavier loads.
CAUTION! (Continued)
2020_JEEP_M6_UG_UK.book Page 173