ESP JEEP COMPASS 2020 Owner handbook (in English)
[x] Cancel search | Manufacturer: JEEP, Model Year: 2020, Model line: COMPASS, Model: JEEP COMPASS 2020Pages: 328, PDF Size: 8.85 MB
Page 3 of 328
1
WELCOME FROM FCA
Congratulations on selecting your new FCA
vehicle. Be assured that it represents preci-
sion workmanship, distinctive styling, and
high quality.
ALWAYS drive safely and pay attention to the
road. ALWAYS drive safely with your hands
on the steering wheel. You have full respon -
sibility and assume all risks related to the
use of the features and applications in this
vehicle. Only use the features and applica -
tions when it is safe to do so. Failure to do so
may result in an accident involving serious
injury or death.
This guide illustrates and describes the oper -
ation of features and equipment that are
either standard or optional on this vehicle.
This guide may also include a description of
features and equipment that are no longer
available or were not ordered on this vehicle.
Please disregard any features and equipment
described in this guide that are not available
on this vehicle. FCA reserves the right to
make changes in design and specifications
and/or make additions to or improvements to
its products without imposing any obligation
upon itself to install them on products previ -
ously manufactured. This User Guide has been prepared to help
you quickly become acquainted with the
important features of your vehicle. It
contains most things you will need to operate
and maintain the vehicle, including emer
-
gency information.
When it comes to service, remember that
your authorized dealer knows your Jeep®
vehicle best, has factory-trained technicians
and genuine MOPAR® parts, and cares
about your satisfaction.
HOW TO FIND YOUR
OWNER’S MANUAL ONLINE
This guide has been prepared as a reference
item to help you quickly become acquainted
with the most important features and
processes of your vehicle. It contains most
things you will need to operate and maintain
the vehicle, including emergency informa -
tion and procedures. This User Guide is not a replacement for the full
Owner’s Manual, and does not fully cover every
operation and procedure possible with your
vehicle.
For more detailed descriptions of the topics
discussed in this User Guide, as well as
information covering features and processes
not covered in this User Guide, the full
vehicle Owner’s Manual can be accessed for
free online in a printer-friendly PDF format.
To get the full Owner’s Manual or applicable
supplement for your vehicle, follow the appro
-
priate web address below:
www.mopar.eu/owner or alternatively, to
access this information, go to the Internet
website at http://aftersales.fiat.com/elum/.
FCA is committed to protecting our environ -
ment and natural resources. By converting
from paper to electronic delivery for the
majority of the user information for your
vehicle, together we greatly reduce the
demand for tree-based products and lessen
the stress on our environment.
2020_JEEP_M6_UG_UK.book Page 1
Page 4 of 328
2
HOW TO USE THIS MANUAL
HOW TO USE THIS MANUAL
Essential Information
Each time direction instructions (left/right or
forwards/backwards) about the vehicle are
given, these must be intended as regarding
an occupant in the driver's seat. Special
cases not complying with this rule will be
properly specified in the text.
The figures in this User Guide are provided
by way of example only: this might imply that
some details of the image do not correspond
to the actual arrangement of your vehicle.
In addition, the User Guide has been
conceived considering vehicles with the
steering wheel on the left side; it is therefore
possible that in vehicles with the steering
wheel on the right side, the position or
construction of some controls is not exactly
mirror-like with respect to the figure.
To identify the chapter with the information
needed you can consult the index at the end
of this User Guide.
Chapters can be rapidly identified with dedi-
cated graphic tabs, at the side of each odd
page. A few pages further there is a key for
getting to know the chapter order and the relevant symbols in the tabs. There is always
a textual indication of the current chapter at
the side of each even page.Symbols
Some vehicle components have colored
labels whose symbols indicate precautions to
be observed when using this component.
Refer to “Warning Lights and Messages” in
“Getting To Know Your Instrument Panel”
for further information on the symbols used
in your vehicle.
ROLLOVER WARNING
Utility vehicles have a significantly higher
rollover rate than other types of vehicles.
This vehicle has a higher ground clearance
and a higher center of gravity than many
passenger vehicles. It is capable of
performing better in a wide variety of off-road
applications. Driven in an unsafe manner, all
vehicles can go out of control. Because of the
higher center of gravity, if this vehicle is out
of control it may roll over when some other
vehicles may not.
Do not attempt sharp turns, abrupt maneu
-
vers, or other unsafe driving actions that can
cause loss of vehicle control. Failure to
operate this vehicle safely may result in a
collision, rollover of the vehicle, and severe
or fatal injury. Drive carefully.
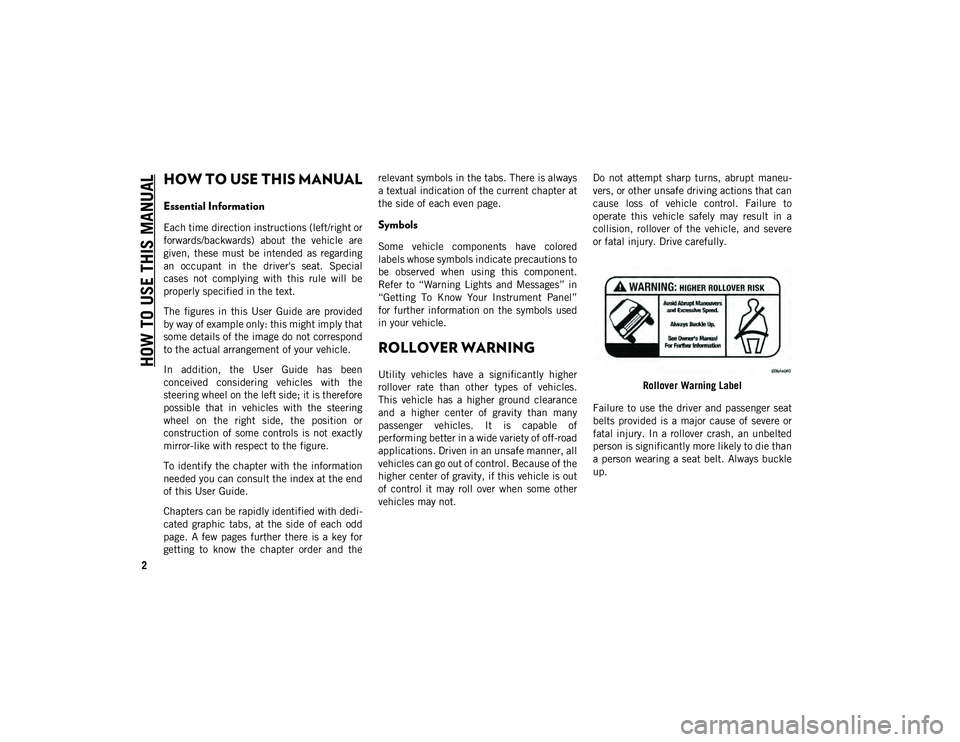
Rollover Warning Label
Failure to use the driver and passenger seat
belts provided is a major cause of severe or
fatal injury. In a rollover crash, an unbelted
person is significantly more likely to die than
a person wearing a seat belt. Always buckle
up.
2020_JEEP_M6_UG_UK.book Page 2
Page 5 of 328
3
IMPORTANT NOTICE
ALL MATERIAL CONTAINED IN THIS
PUBLICATION IS BASED ON THE LATEST
INFORMATION AVAILABLE AT TIME OF
PUBLICATION APPROVAL. THE RIGHT IS
RESERVED TO PUBLISH REVISIONS AT
ANY TIME.
This User Guide has been prepared with the
assistance of service and engineering
specialists to acquaint you with the opera-
tion and maintenance of your new vehicle. It
is supplemented by a Warranty Information
Booklet and various customer-oriented docu -
ments. You are urged to read these publica -
tions carefully. Following the instructions
and recommendations in this User Guide will
help assure safe and enjoyable operation of
your vehicle.
After you have read the User Guide, it should
be stored in the vehicle for convenient refer -
ence and remain with the vehicle when sold.
The manufacturer reserves the right to make
changes in design and specifications, and/or
to make additions to or improvements in its
products without imposing any obligations
upon itself to install them on products previ -
ously manufactured. The User Guide illustrates and describes the
features that are standard or available as
extra cost options. Therefore, some of the
equipment and accessories in this publica
-
tion may not appear on your vehicle.
NOTE:
Be sure to read the User Guide first before
driving your vehicle and before attaching or
installing parts/accessories or making other
modifications to the vehicle.
In view of the many replacement parts and
accessories from various manufacturers
available on the market, the manufacturer
cannot be certain that the driving safety of
your vehicle will not be impaired by the
attachment or installation of such parts.
Even if such parts are officially-approved (for
example, by a general operating permit for
the part or by constructing the part in an offi -
cially approved design), or if an individual
operating permit was issued for the vehicle
after the attachment or installation of such
parts, it cannot be implicitly assumed that
the driving safety of your vehicle is unim -
paired. Therefore, neither experts nor official
agencies are liable. The manufacturer only
assumes responsibility when parts, which are
expressly authorized or recommended by the
manufacturer, are attached or installed at an authorized dealer. The same applies when
modifications to the original condition are
subsequently made on the manufacturer's
vehicles.
Your warranties do not cover any part that the
manufacturer did not supply. Nor do they
cover the cost of any repairs or adjustments
that might be caused or needed because of
the installation or use of non-manufacturer
parts, components, equipment, materials, or
additives. Nor do your warranties cover the
costs of repairing damage or conditions
caused by any changes to your vehicle that
do not comply with the manufacturers spec
-
ifications.
WARNINGS AND CAUTIONS
This User Guide contains WARNINGS against
operating procedures that could result in a
collision, bodily injury and/or death. It also
contains CAUTIONS against procedures that
could result in damage to your vehicle. If you
do not read this entire guide, you may miss
important information. Observe all Warnings
and Cautions.
2020_JEEP_M6_UG_UK.book Page 3
Page 11 of 328
9
LANESENSE — IF EQUIPPED ................ 162
LaneSense Operation .................... 162
Turning LaneSense On Or Off ........ 162
LaneSense Warning Message ......... 162
Changing LaneSense Status........... 164
PARKVIEW REAR BACK UP CAMERA — IF
EQUIPPED ........................................... 164
REFUELING THE VEHICLE ...................... 165
Emergency Fuel Filler Door
Release ....................................... 166
REFUELING THE VEHICLE — DIESEL
ENGINE ............................................... 167
Adblue (UREA) — If Equipped....... 169
VEHICLE LOADING ............................... 171
Certification Label ........................ 171
TRAILER TOWING ................................. 171
Common Towing Definitions .......... 171
Trailer Towing Weights (Maximum Trailer
Weight Ratings) ........................... 173 Towing Requirements ................... 173
RECREATIONAL TOWING (BEHIND
MOTORHOME, ETC.) ............................ 175
Towing This Vehicle Behind Another
Vehicle ........................................ 175 Recreational Towing — Front-Wheel
Drive (FWD) Models ...................... 175 Recreational Towing — 4X4
Models ........................................ 176
IN CASE OF EMERGENCY
HAZARD WARNING FLASHERS...............177
BULB REPLACEMENT............................177
Replacement Bulbs ...................... 177
High Intensity Discharge (HID)
Headlamps — If Equipped ............ 179 Replacing Exterior Bulbs ............... 179
FUSES.................................................182
General Information...................... 182
Fuse Location .............................. 182
Engine Compartment Fuses/Distribution
Unit ............................................ 182 Engine Compartment Fuses/Auxiliary
Unit ............................................ 185 Interior Fuses............................... 186
Rear Cargo Fuse/Relay Distribution
Unit ............................................ 187
JACKING AND TIRE CHANGING ..............189
Jack Location/Spare Tire Stowage .. 189
Preparations For Jacking .............. 190
Jacking Instructions .................... 190
Road Tire Installation ................... 193
EC Declaration Of Conformance ..... 194
Jack Usage Precautions ................ 195
TIRE SERVICE KIT — IF EQUIPPED ........196
JUMP STARTING .................................202
Preparations For Jump Start .......... 202
Jump Starting Procedure............... 203
REFUELING IN EMERGENCY — IF
EQUIPPED............................................204 IF YOUR ENGINE OVERHEATS ...............204
GEAR SELECTOR OVERRIDE ...................205
FREEING A STUCK VEHICLE...................206
TOWING A DISABLED VEHICLE ..............207
Without The Key Fob .....................208
Front-Wheel Drive (FWD) Models — With
Key Fob .......................................208 4x4 Models ..................................208
Emergency Tow Hooks ..................209
Tow Eye Usage — If Equipped ......209
ENHANCED ACCIDENT RESPONSE SYSTEM
(EARS) ...............................................211 EVENT DATA RECORDER (EDR) ..............211
SERVICING AND MAINTENANCE
SCHEDULED SERVICING ........................212
1.4L Gasoline Engine ...................212
Diesel Engines ..............................217
ENGINE COMPARTMENT .......................222
1.4L Engine .................................222
2.0L Diesel Engine .......................223
1.6L Diesel Engine .......................224
Checking Oil Level ........................225
Adding Washer Fluid ....................225
Maintenance-Free Battery .............226
Pressure Washing..........................227
2020_JEEP_M6_UG_UK.book Page 9
Page 16 of 328
GETTING TO KNOW YOUR VEHICLE
14
The emergency key allows for entry into the
vehicle should the battery in the vehicle or
the key fob become depleted. The emer-
gency key is also for locking the glove
compartment. You can keep the emergency
key with you when valet parking.
To remove the emergency key from the
keyless ignition key fob, slide the mechan -
ical latch at the top of the key fob sideways
with your thumb and then pull the key out
with your other hand.
To Unlock The Doors And Liftgate
Push and release the unlock button on the
key fob once to unlock the driver's door or
twice within five seconds to unlock all doors
and the liftgate.
All doors can be programmed to unlock on
the first push of the unlock button. Refer to
“Uconnect Settings” in “Multimedia” in the
Owner’s Manual for further information.
To Lock The Doors And Liftgate
Push and release the lock button on the key
fob to lock all doors and liftgate.
Request For Additional Key Fobs
NOTE:
Only key fobs that are programmed to the
vehicle electronics can be used to start and
operate the vehicle. Once a key fob is
programmed to a vehicle, it cannot be
programmed to any other vehicle.
NOTE:
Used batteries may be harmful to the envi -
ronment if not disposed of correctly. Always
dispose of used batteries by specialized
battery disposal container, or by taking used
batteries to an authorized dealer. Duplication of key fobs may be performed at
an authorized dealer. This procedure
consists of programming a blank key fob to
the vehicle electronics. A blank key fob is
one that has never been programmed.
NOTE:
When having the Sentry Key Immobilizer
System serviced, bring all vehicle keys with
you to an authorized dealer.
IGNITION SWITCH
Keyless Enter-N-Go — Ignition (If
Equipped)
This feature allows the driver to operate the
ignition with the push of a button as long as
the key fob is in the passenger compartment.
The START/STOP push button ignition has
three operating modes. The three modes are
OFF, ON/RUN, and START.
NOTE:
If the ignition state/mode does not change
with the push of a button, the key fob may
have a low or depleted battery. In this situa
-
tion, a back up method can be used to
operate the ignition switch. Put the nose side
WARNING!
Push the Mechanical Key Release Button
only with the key fob facing away from
your body, especially your eyes and objects
that may be damaged, such as clothing. WARNING!
Always remove the key fobs from the
vehicle and lock all doors when leaving
the vehicle unattended.
For vehicles equipped with Keyless
Enter-N-Go — Ignition, always
remember to place the ignition in the
OFF mode.
2020_JEEP_M6_UG_UK.book Page 14
Page 23 of 328
21
DOORS
Keyless Enter-N-Go — Passive Entry
The Passive Entry system is an enhancement
to the vehicle’s Remote Keyless Entry system
and a feature of Keyless Enter-N-Go —
Passive Entry. This feature allows you to lock
and unlock the vehicle’s door(s) and fuel
door without having to push the key fob lock
or unlock buttons.
NOTE:
Passive Entry may be programmed ON/
OFF. Refer to “Uconnect Settings” in
“Multimedia” in the Owner’s Manual for
further information.
The key fob may not be detected by the
vehicle passive entry system if it is located
next to a mobile phone, laptop, or other
electronic device; these devices may inter-
fere with the key fob’s wireless signal and
prevent the passive entry system from
locking/unlocking the vehicle.
Passive Entry Unlock initiates illuminated
approach (Low Beams, License Plate Lamp,
Position Lamps) for whichever time duration
is set between 0, 30 (default), 60 or 90
seconds. Passive Entry Unlock also initiates
two flashes of the turn signal lamps.
If wearing gloves on your hands, or if it has
been raining/snowing on the Passive Entry
door handle, the unlock sensitivity can be
affected, resulting in a slower response
time.
If the vehicle is unlocked by Passive Entry
and no door is opened within 60 seconds,
the vehicle will re-lock and if equipped
will arm the security alarm.
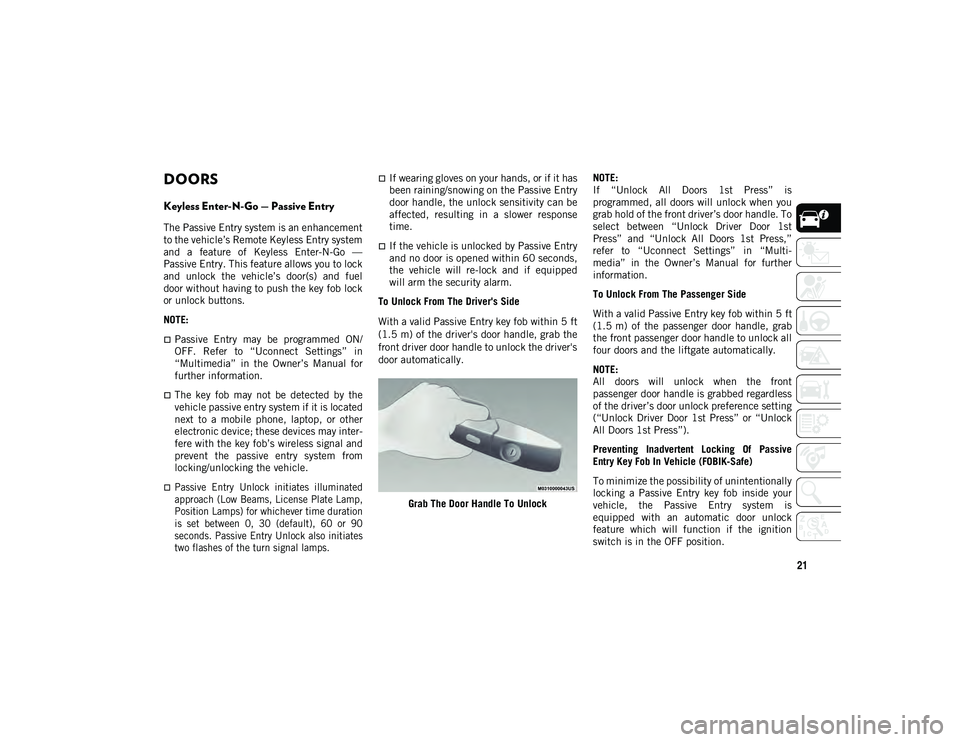
To Unlock From The Driver's Side
With a valid Passive Entry key fob within 5 ft
(1.5 m) of the driver's door handle, grab the
front driver door handle to unlock the driver's
door automatically.
Grab The Door Handle To Unlock NOTE:
If “Unlock All Doors 1st Press” is
programmed, all doors will unlock when you
grab hold of the front driver’s door handle. To
select between “Unlock Driver Door 1st
Press” and “Unlock All Doors 1st Press,”
refer to “Uconnect Settings” in “Multi
-
media” in the Owner’s Manual for further
information.
To Unlock From The Passenger Side
With a valid Passive Entry key fob within 5 ft
(1.5 m) of the passenger door handle, grab
the front passenger door handle to unlock all
four doors and the liftgate automatically.
NOTE:
All doors will unlock when the front
passenger door handle is grabbed regardless
of the driver’s door unlock preference setting
(“Unlock Driver Door 1st Press” or “Unlock
All Doors 1st Press”).
Preventing Inadvertent Locking Of Passive
Entry Key Fob In Vehicle (FOBIK-Safe)
To minimize the possibility of unintentionally
locking a Passive Entry key fob inside your
vehicle, the Passive Entry system is
equipped with an automatic door unlock
feature which will function if the ignition
switch is in the OFF position.
2020_JEEP_M6_UG_UK.book Page 21
Page 29 of 328
27
4. Push and release the lock button on thekey fob within 10 seconds.
NOTE:
Your key fob can be unlinked to your memory
settings by pushing the set (S) button,
followed by pushing the unlock button on the
key fob within 10 seconds.
Memory Position Recall
NOTE:
The vehicle must be in PARK to recall
memory positions. If a recall is attempted
when the vehicle is not in PARK, a message
will display in the instrument cluster display.
To recall the memory settings for driver
one, push memory button (1) or the unlock
button on the key fob linked to memory
position 1.
To recall the memory settings for driver
two, push memory button (2) or the unlock
button on the key fob linked to memory
position 2.
A recall can be canceled by pushing any of
the memory buttons (S, 1, or 2) during a
recall. When a recall is canceled, the driver
seat will stop moving. A delay of one second
will occur before another recall can be
selected.
Front Heated Seats — If Equipped
The front heated seats control buttons are
located within the Uconnect system. You can
gain access to the control buttons through
the climate screen or the controls screen.
Press the heated seat button once to
turn the HI setting on.
Press the heated seat button a second
time to turn the LO setting on.
Press the heated seat button a third
time to turn the heating elements off.
If your vehicle is equipped with automatic
temperature controls with an integrated
center stack, or manual temperature
controls, you’ll find the heated seat switches
on the switch bank below the radio screen.
If the HI level setting is selected, the system
will automatically switch to LO level after
approximately 60 minutes of continuous
operation. At that time, the display will
change from HI to LO, indicating the change.
The LO level setting will turn off automati -
cally after approximately 45 minutes.
NOTE:
The engine must be running for the heated
seats to operate. Vehicles With Remote Start — If Equipped
On models that are equipped with remote
start, the heated seats can be programmed to
come on during a remote start.
This feature can be programmed through the
Uconnect system. Refer to “Uconnect
Settings” in “Multimedia” in the Owner’s
Manual for further information.
WARNING!
Persons who are unable to feel pain to
the skin because of advanced age,
chronic illness, diabetes, spinal cord
injury, medication, alcohol use, exhaus-
tion or other physical condition must
exercise care when using the seat heater.
It may cause burns even at low tempera-
tures, especially if used for long periods
of time.
Do not place anything on the seat or
seatback that insulates against heat,
such as a blanket or cushion. This may
cause the seat heater to overheat. Sitting
in a seat that has been overheated could
cause serious burns due to the increased
surface temperature of the seat.
2020_JEEP_M6_UG_UK.book Page 27
Page 33 of 328
31
EXTERIOR LIGHTS
Multifunction Lever
The multifunction lever controls the opera-
tion of the turn signals, headlight beam
selection and passing lights. The multifunc -
tion lever is located on the left side of the
steering column. Multifunction Lever
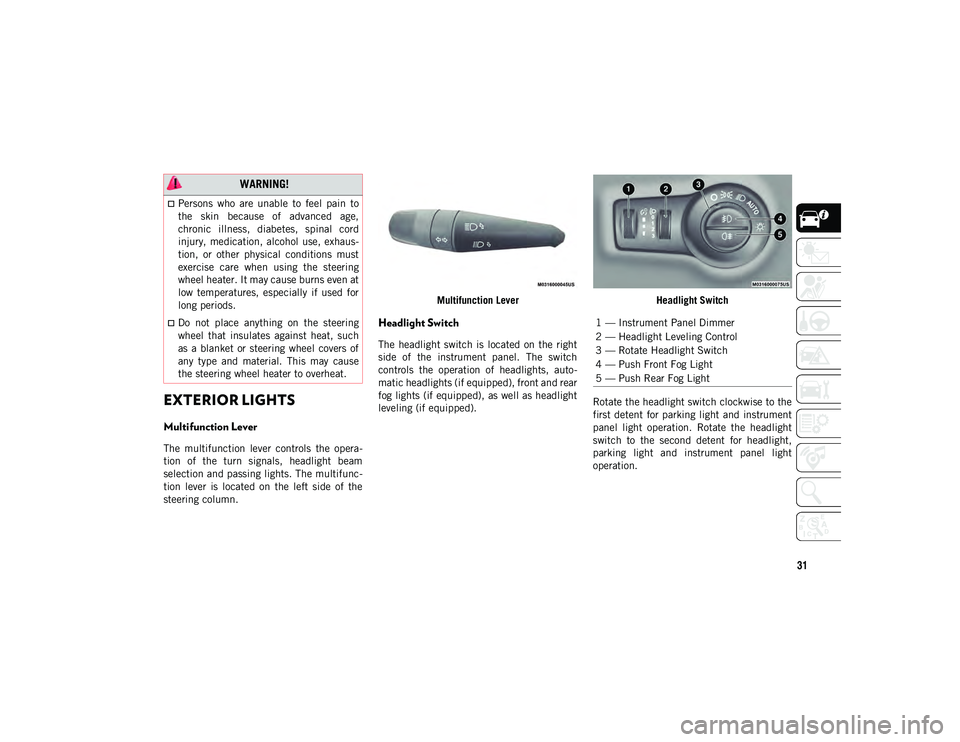
Headlight Switch
The headlight switch is located on the right
side of the instrument panel. The switch
controls the operation of headlights, auto
-
matic headlights (if equipped), front and rear
fog lights (if equipped), as well as headlight
leveling (if equipped). Headlight Switch
Rotate the headlight switch clockwise to the
first detent for parking light and instrument
panel light operation. Rotate the headlight
switch to the second detent for headlight,
parking light and instrument panel light
operation.
WARNING!
Persons who are unable to feel pain to
the skin because of advanced age,
chronic illness, diabetes, spinal cord
injury, medication, alcohol use, exhaus-
tion, or other physical conditions must
exercise care when using the steering
wheel heater. It may cause burns even at
low temperatures, especially if used for
long periods.
Do not place anything on the steering
wheel that insulates against heat, such
as a blanket or steering wheel covers of
any type and material. This may cause
the steering wheel heater to overheat.1 — Instrument Panel Dimmer
2 — Headlight Leveling Control
3 — Rotate Headlight Switch
4 — Push Front Fog Light
5 — Push Rear Fog Light
2020_JEEP_M6_UG_UK.book Page 31
Page 36 of 328
GETTING TO KNOW YOUR VEHICLE
34
NOTE:
If either light remains on and does not
flash, or there is a very fast flash rate,
check for a defective outside light bulb. If
an indicator fails to light when the lever is
moved, it would suggest that the indicator
bulb is defective.
A “Turn Signal On” message will appear in
the instrument cluster display and a
continuous chime will sound if the vehicle
is driven more than 1 mile (1.6 km) witheither turn signal on.
When the Daytime Running Lights are on
and a turn signal is activated, the Daytime
Running Lamp will turn off on the side of
the vehicle in which the turn signal is
flashing. The Daytime Running Lamp will
turn back on when the turn signal is
turned off.
Headlight Leveling System — If Equipped
This system allows the driver to maintain
proper headlight beam position with the road
surface regardless of vehicle load.
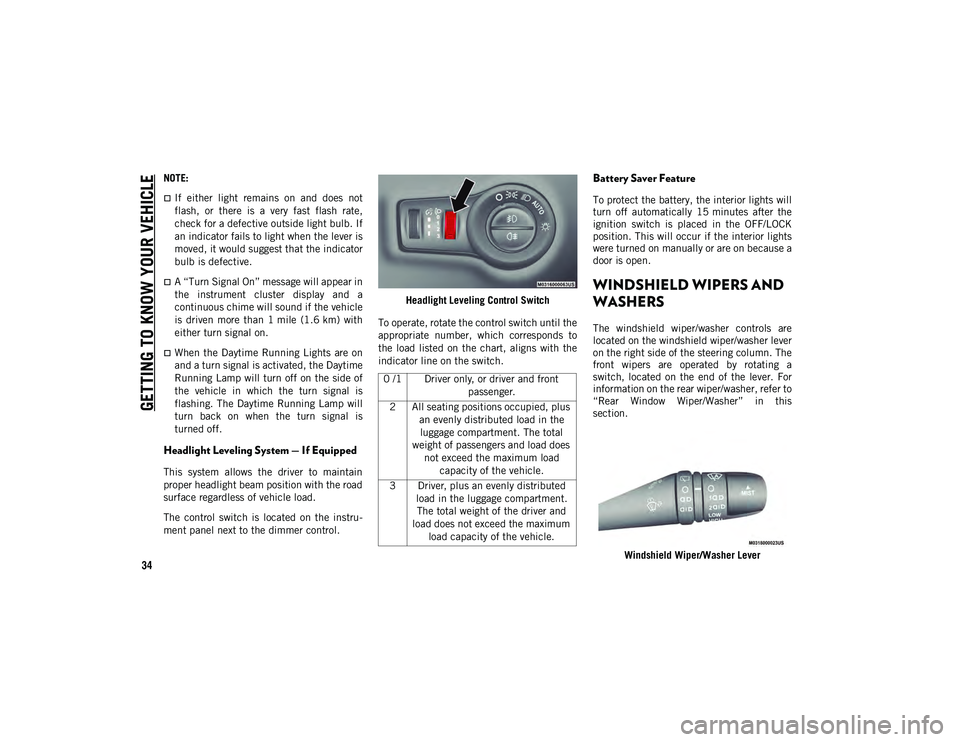
The control switch is located on the instru -
ment panel next to the dimmer control. Headlight Leveling Control Switch
To operate, rotate the control switch until the
appropriate number, which corresponds to
the load listed on the chart, aligns with the
indicator line on the switch.
Battery Saver Feature
To protect the battery, the interior lights will
turn off automatically 15 minutes after the
ignition switch is placed in the OFF/LOCK
position. This will occur if the interior lights
were turned on manually or are on because a
door is open.
WINDSHIELD WIPERS AND
WASHERS
The windshield wiper/washer controls are
located on the windshield wiper/washer lever
on the right side of the steering column. The
front wipers are operated by rotating a
switch, located on the end of the lever. For
information on the rear wiper/washer, refer to
“Rear Window Wiper/Washer” in this
section.
Windshield Wiper/Washer Lever
0 /1 Driver only, or driver and front
passenger.
2 All seating positions occupied, plus an evenly distributed load in the luggage compartment. The total
weight of passengers and load does not exceed the maximum load capacity of the vehicle.
3 Driver, plus an evenly distributed load in the luggage compartment. The total weight of the driver and
load does not exceed the maximum load capacity of the vehicle.
2020_JEEP_M6_UG_UK.book Page 34
Page 37 of 328
35
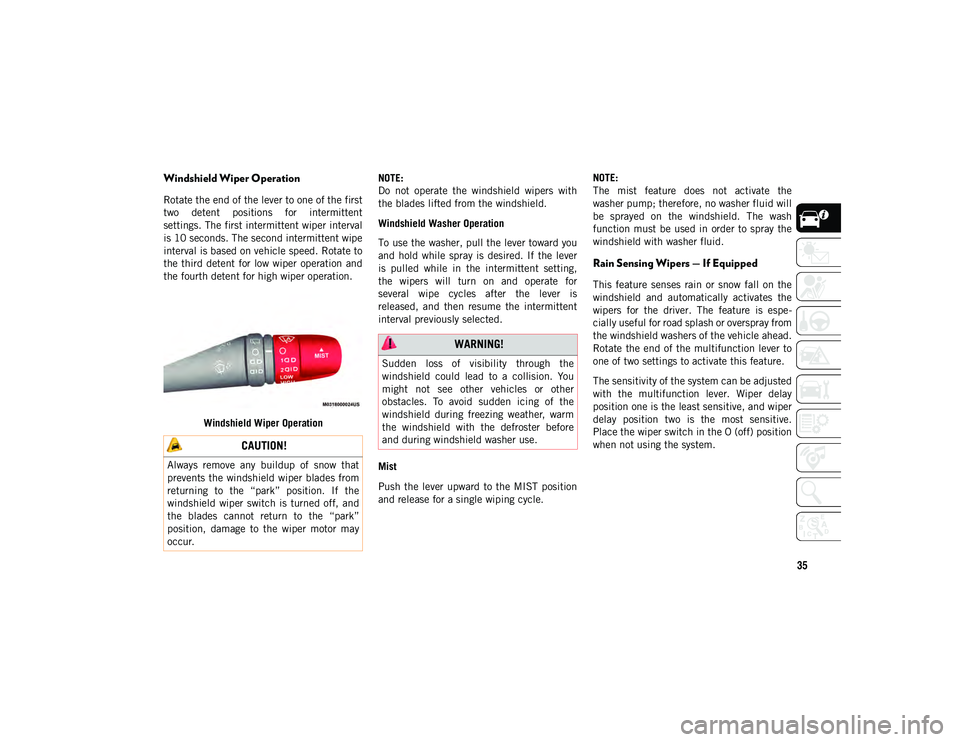
Windshield Wiper Operation
Rotate the end of the lever to one of the first
two detent positions for intermittent
settings. The first intermittent wiper interval
is 10 seconds. The second intermittent wipe
interval is based on vehicle speed. Rotate to
the third detent for low wiper operation and
the fourth detent for high wiper operation.Windshield Wiper Operation NOTE:
Do not operate the windshield wipers with
the blades lifted from the windshield.
Windshield Washer Operation
To use the washer, pull the lever toward you
and hold while spray is desired. If the lever
is pulled while in the intermittent setting,
the wipers will turn on and operate for
several wipe cycles after the lever is
released, and then resume the intermittent
interval previously selected.
Mist
Push the lever upward to the MIST position
and release for a single wiping cycle. NOTE:
The mist feature does not activate the
washer pump; therefore, no washer fluid will
be sprayed on the windshield. The wash
function must be used in order to spray the
windshield with washer fluid.
Rain Sensing Wipers — If Equipped
This feature senses rain or snow fall on the
windshield and automatically activates the
wipers for the driver. The feature is espe
-
cially useful for road splash or overspray from
the windshield washers of the vehicle ahead.
Rotate the end of the multifunction lever to
one of two settings to activate this feature.
The sensitivity of the system can be adjusted
with the multifunction lever. Wiper delay
position one is the least sensitive, and wiper
delay position two is the most sensitive.
Place the wiper switch in the O (off) position
when not using the system.
CAUTION!
Always remove any buildup of snow that
prevents the windshield wiper blades from
returning to the “park” position. If the
windshield wiper switch is turned off, and
the blades cannot return to the “park”
position, damage to the wiper motor may
occur.
WARNING!
Sudden loss of visibility through the
windshield could lead to a collision. You
might not see other vehicles or other
obstacles. To avoid sudden icing of the
windshield during freezing weather, warm
the windshield with the defroster before
and during windshield washer use.
2020_JEEP_M6_UG_UK.book Page 35