recommended oil JEEP COMPASS 2020 Owner handbook (in English)
[x] Cancel search | Manufacturer: JEEP, Model Year: 2020, Model line: COMPASS, Model: JEEP COMPASS 2020Pages: 328, PDF Size: 8.85 MB
Page 58 of 328
GETTING TO KNOW YOUR INSTRUMENT PANEL
56
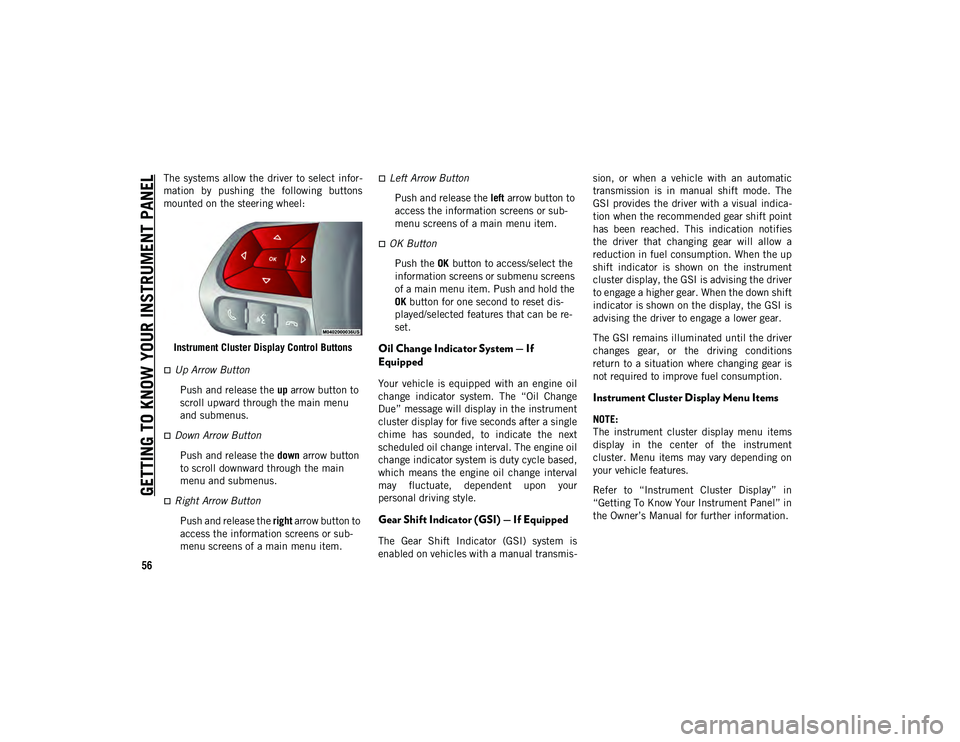
The systems allow the driver to select infor-
mation by pushing the following buttons
mounted on the steering wheel:
Instrument Cluster Display Control Buttons
Up Arrow Button Push and release the up arrow button to
scroll upward through the main menu
and submenus.
Down Arrow Button
Push and release the down arrow button
to scroll downward through the main
menu and submenus.
Right Arrow Button
Push and release the right arrow button to
access the information screens or sub -
menu screens of a main menu item.
Left Arrow Button
Push and release the left arrow button to
access the information screens or sub -
menu screens of a main menu item.
OK Button
Push the OK button to access/select the
information screens or submenu screens
of a main menu item. Push and hold the
OK button for one second to reset dis -
played/selected features that can be re -
set.
Oil Change Indicator System — If
Equipped
Your vehicle is equipped with an engine oil
change indicator system. The “Oil Change
Due” message will display in the instrument
cluster display for five seconds after a single
chime has sounded, to indicate the next
scheduled oil change interval. The engine oil
change indicator system is duty cycle based,
which means the engine oil change interval
may fluctuate, dependent upon your
personal driving style.
Gear Shift Indicator (GSI) — If Equipped
The Gear Shift Indicator (GSI) system is
enabled on vehicles with a manual transmis -sion, or when a vehicle with an automatic
transmission is in manual shift mode. The
GSI provides the driver with a visual indica
-
tion when the recommended gear shift point
has been reached. This indication notifies
the driver that changing gear will allow a
reduction in fuel consumption. When the up
shift indicator is shown on the instrument
cluster display, the GSI is advising the driver
to engage a higher gear. When the down shift
indicator is shown on the display, the GSI is
advising the driver to engage a lower gear.
The GSI remains illuminated until the driver
changes gear, or the driving conditions
return to a situation where changing gear is
not required to improve fuel consumption.
Instrument Cluster Display Menu Items
NOTE:
The instrument cluster display menu items
display in the center of the instrument
cluster. Menu items may vary depending on
your vehicle features.
Refer to “Instrument Cluster Display” in
“Getting To Know Your Instrument Panel” in
the Owner’s Manual for further information.
2020_JEEP_M6_UG_UK.book Page 56
Page 132 of 328
SAFETY
130
Periodic Safety Checks You Should Make
Outside The Vehicle
Tires
Examine tires for excessive tread wear and
uneven wear patterns. Check for stones,
nails, glass, or other objects lodged in the
tread or sidewall. Inspect the tread for cuts
and cracks. Inspect sidewalls for cuts,
cracks, and bulges. Check the wheel nuts for
tightness. Check the tires (including spare)
for proper cold inflation pressure.
Lights
Have someone observe the operation of
brake lights and exterior lights while you
work the controls. Check turn signal and high
beam indicator lights on the instrument
panel.
Door Latches
Check for proper closing, latching, and
locking.
Fluid Leaks
Check area under the vehicle after overnight
parking for fuel, coolant, oil, or other fluid
leaks. Also, if gasoline fumes are detected or
if fuel, or brake fluid leaks are suspected, the
cause should be located and corrected
immediately.
NEVER place any objects under the floor
mat (e.g., towels, keys, etc.). These
objects could change the position of the
floor mat and may cause interference
with the accelerator, brake, or clutch
pedals.
If the vehicle carpet has been removed
and re-installed, always properly attach
carpet to the floor and check the floor
mat fasteners are secure to the vehicle
carpet. Fully depress each pedal to
check for interference with the acceler-
ator, brake, or clutch pedals then
re-install the floor mats.
It is recommended to only use mild soap
and water to clean your floor mats. After
cleaning, always check your floor mat
has been properly installed and is
secured to your vehicle using the floor
mat fasteners by lightly pulling mat.
WARNING! (Continued)
2020_JEEP_M6_UG_UK.book Page 130
Page 202 of 328
IN CASE OF EMERGENCY
200
After Driving:
Pull over to a safe location. Refer to “When-
ever You Stop To Use Tire Service Kit” in this
section before continuing.
1. Uncoil the Sealant Hose, and then remove the cap from the fitting at the end
of the hose.
2. Place the Tire Service Kit flat on the ground next to the deflated tire.
3. Remove the cap from the valve stem, and then screw the fitting at the end of the
Sealant Hose onto the valve stem.
4. Uncoil the power plug and insert the plug into the vehicle's 12 Volt power outlet. 5. Uncoil the Hose and screw the fitting at
the end of the hose onto the valve stem.
6. Turn the Mode Select Knob and turn to the Air Mode position.
7. Check the pressure in the tire by reading the Pressure Gauge.
If tire pressure is less than 19 psi (1.3 Bar):
The tire is too badly damaged. Do not
attempt to drive the vehicle further. Call for
assistance.
If the tire pressure is 19 psi (1.3 Bar) or higher:
1. Push the Power Button to turn on Tire Service Kit and inflate the tire to the cold
tire inflation pressure found on the tire
and loading information label located in
the driver-side door opening.
NOTE:
If the tire becomes over-inflated, push the
Deflation Button to reduce the tire pressure
to the recommended inflation pressure
before continuing.
2. Disconnect the Tire Service Kit from the valve stem, reinstall the cap on the valve
stem and unplug from 12 Volt outlet. 3. Place the Tire Service Kit in its proper
storage area in the vehicle.
4. Have the tire inspected and repaired or replaced at the earliest opportunity at an
authorized dealer or tire service center.
5. Remove the Speed Limit sticker from the steering wheel after the tire has been
repaired.
6. Replace the Sealant Bottle at an autho -
rized dealer as soon as possible. Refer to
“Sealant Bottle Replacement”.
NOTE:
When having the tire serviced, advise the
authorized dealer or service center that the
tire has been sealed using the Tire Service
Kit.
WARNING!
The Tire Service Kit is not a permanent flat
tire repair. Have the tire inspected and
repaired or replaced after using the Tire
Service Kit. Do not exceed 50 mph
(80 km/h) until the tire is repaired or
replaced. Failure to follow this warning
can result in injuries that are serious or
fatal to you, your passengers, and others
around you. Have the tire checked as soon
as possible at an authorized dealer.
WARNING!
You must always indicate that the tire was
repaired using the Tire Service Kit. Give
the booklet to the technicians who will be
handling the tire that was treated using
the Tire Service Kit.
2020_JEEP_M6_UG_UK.book Page 200
Page 219 of 328
217
Heavy Duty Use Of Vehicle
**** Change the engine oil and engine oil
filter at every 4500 miles (7,500 km) or
12 months if using your vehicle under any of
the following severe duty conditions:
Stop and go driving.
Driving in dusty conditions.
Short trips of less than 10 miles (16 km).
Trailer towing.
Taxi, police, or delivery service (commer-
cial service).
Off-road or desert operation.
Diesel Engines
Your vehicle is equipped with an automatic
oil change indicator system. The oil change
indicator system will remind you that it is
time to take your vehicle in for engine oil
replacement.
Based on engine operation conditions, the oil
change indicator message will illuminate.
This means that service is required for your
vehicle. Operating conditions such as
frequent short-trips, trailer tow, extremely
hot or cold ambient temperatures will influ -ence when the “Oil Change Required”
message is displayed. Severe Operating
Conditions can cause the change oil
message to illuminate as earlier than speci
-
fied. Have your vehicle serviced as soon as
possible, within the next 500 miles
(805 km).
To help you have the best driving experience
possible, the manufacturer has identified the
specific vehicle maintenance service inter -
vals that are required to keep your vehicle
operating properly and safely.
The manufacturer recommends that these
maintenance intervals be performed at your
selling dealer. The technicians at your deal -
ership know your vehicle best, and have
access to factory trained information,
genuine Mopar parts, and specially designed
electronic and mechanical tools that can
help prevent future costly repairs.
The maintenance intervals shown should be
performed as indicated in this section. NOTE:
The actual interval for changing engine oil
and replacing the engine oil filter depends
on the vehicle usage conditions, and is
signaled by the warning light or message in
the instrument panel. In any case, it must
never exceed 12,000 miles (20,000km) or 1
year.
Flush and replace the engine coolant at
120 months or 150,000 miles (240,000 km)
whichever comes first.
Areas that are not dusty: recommended
maximum distance 75,000 mi
(120,000 km). The belt must be replaced
every 6 years, regardless of distance trav-
elled. Dusty areas and/or heavy conditions
(severe weather conditions, very low or very
high temperatures for extended periods,
urban driving, long periods of idling): the
recommended maximum distance is
37,500 mi (60,000 km). The belt must be
replaced every 4 years, regardless of
distance travelled.
2020_JEEP_M6_UG_UK.book Page 217
Page 223 of 328
221
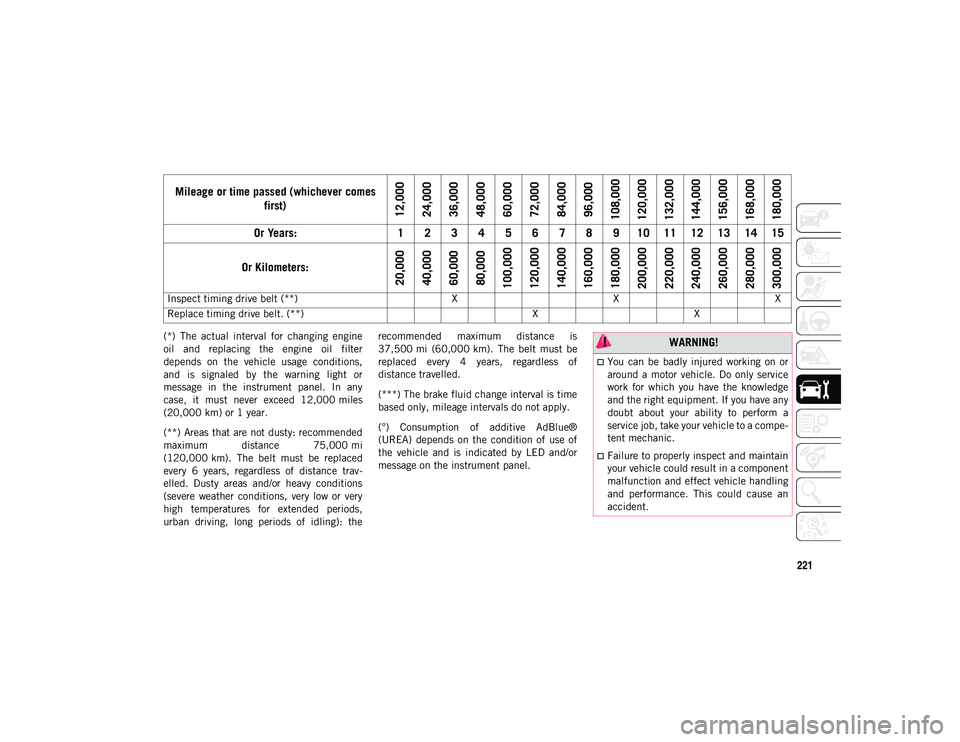
(*) The actual interval for changing engine
oil and replacing the engine oil filter
depends on the vehicle usage conditions,
and is signaled by the warning light or
message in the instrument panel. In any
case, it must never exceed 12,000 miles
(20,000 km) or 1 year.
(**) Areas that are not dusty: recommended
maximum distance 75,000 mi
(120,000 km). The belt must be replaced
every 6 years, regardless of distance trav-
elled. Dusty areas and/or heavy conditions
(severe weather conditions, very low or very
high temperatures for extended periods,
urban driving, long periods of idling): the recommended maximum distance is
37,500 mi (60,000 km). The belt must be
replaced every 4 years, regardless of
distance travelled.
(***) The brake fluid change interval is time
based only, mileage intervals do not apply.
(°) Consumption of additive AdBlue®
(UREA) depends on the condition of use of
the vehicle and is indicated by LED and/or
message on the instrument panel.
Inspect timing drive belt (**)
XXX
Replace timing drive belt. (**) XX
Mileage or time passed (whichever comes
first)
12,000
24,000
36,000
48,000
60,000
72,000
84,000
96,000
108,000
120,000
132,000
144,000
156,000
168,000
180,000
Or Years: 1 2 3 4 5 6 7 8 9 10 11 12 13 14 15
Or Kilometers:
20,000
40,000
60,000
80,000
100,000
120,000
140,000
160,000
180,000
200,000
220,000
240,000
260,000
280,000
300,000
WARNING!
You can be badly injured working on or
around a motor vehicle. Do only service
work for which you have the knowledge
and the right equipment. If you have any
doubt about your ability to perform a
service job, take your vehicle to a compe-
tent mechanic.
Failure to properly inspect and maintain
your vehicle could result in a component
malfunction and effect vehicle handling
and performance. This could cause an
accident.
2020_JEEP_M6_UG_UK.book Page 221
Page 232 of 328
SERVICING AND MAINTENANCE
230
(Continued)
Cooling System Pressure Cap
The cap must be fully tightened to prevent
loss of engine coolant (antifreeze), and to
ensure that engine coolant (antifreeze) will
return to the radiator from the coolant expan-
sion bottle/recovery tank if so equipped.
The cap should be inspected and cleaned if
there is any accumulation of foreign material
on the sealing surfaces.
Brake System
In order to assure brake system performance,
all brake system components should be
inspected periodically. Refer to the “Mainte -nance Plan” in this section for the proper
maintenance intervals.
Brake Master Cylinder
The fluid in the master cylinder should be
checked when performing under hood
services or immediately if the “Brake
Warning Light” is illuminated.
Be sure to clean the top of the master
cylinder area before removing the cap. If
necessary, add fluid to bring the fluid level
up to the requirements described on the
brake fluid reservoir. With disc brakes, fluid
level can be expected to fall as the brake
pads wear. Brake fluid level should be
checked when pads are replaced. However,
low fluid level may be caused by a leak and
a checkup may be needed.
Use only manufacturer's recommended
brake fluid. Refer to “Fluids And Lubricants”
in “Technical Specifications” for further
information.
WARNING!
Do not open hot engine cooling system.
Never add engine coolant (antifreeze)
when the engine is overheated. Do not
loosen or remove the cap to cool an over
-
heated engine. Heat causes pressure to
build up in the cooling system. To
prevent scalding or injury, do not remove
the pressure cap while the system is hot
or under pressure.
Do not use a pressure cap other than the
one specified for your vehicle. Personal
injury or engine damage may result.
WARNING!
Riding the brakes can lead to brake failure
and possibly a collision. Driving with your
foot resting or riding on the brake pedal
can result in abnormally high brake
temperatures, excessive lining wear, and
possible brake damage. You would not
have your full braking capacity in an
emergency. WARNING!
Use only manufacturer's recommended
brake fluid. Refer to “Fluids And Lubri -
cants” in “Technical Specifications” for
further information. Using the wrong
type of brake fluid can severely damage
your brake system and/or impair its
performance. The proper type of brake
fluid for your vehicle is also identified on
the original factory installed hydraulic
master cylinder reservoir.
To avoid contamination from foreign
matter or moisture, use only new brake
fluid or fluid that has been in a tightly
closed container. Keep the master
cylinder reservoir cap secured at all
times. Brake fluid in a open container
absorbs moisture from the air resulting
in a lower boiling point. This may cause
it to boil unexpectedly during hard or
prolonged braking, resulting in sudden
brake failure. This could result in a colli -
sion.
2020_JEEP_M6_UG_UK.book Page 230
Page 238 of 328
SERVICING AND MAINTENANCE
236
(Continued)
NOTE:
Wheel Valve Stem must be replaced as well
when installing new tires due to wear and
tear in existing tires.
Keep dismounted tires in a cool, dry place
with as little exposure to light as possible.
Protect tires from contact with oil, grease,
and gasoline.
Replacement Tires
The tires on your new vehicle provide a
balance of many characteristics. They should
be inspected regularly for wear and correct
cold tire inflation pressures. The manufac-
turer strongly recommends that you use tires
equivalent to the originals in size, quality
and performance when replacement is
needed. Refer to the paragraph on “Tread
Wear Indicators” in this section. Refer to the
Tire and Loading Information placard or the
Vehicle Certification Label for the size desig -
nation of your tire. The Load Index and
Speed Symbol for your tire will be found on
the original equipment tire sidewall.
It is recommended to replace the two front
tires or two rear tires as a pair. Replacing just
one tire can seriously affect your vehicle’s
handling. If you ever replace a wheel, make
sure that the wheel’s specifications match
those of the original wheels. It is recommended you contact an authorized
tire dealer or original equipment dealer with
any questions you may have on tire specifica
-
tions or capability. Failure to use equivalent
replacement tires may adversely affect the
safety, handling, and ride of your vehicle.
Tire Types
All Season Tires — If Equipped
All Season tires provide traction for all
seasons (Spring, Summer, Fall, and Winter).
Traction levels may vary between different all
season tires. All season tires can be identi -
fied by the M+S, M&S, M/S or MS designa -
tion on the tire sidewall. Use all season tires
only in sets of four; failure to do so may
adversely affect the safety and handling of
your vehicle.
WARNING!
Do not use a tire, wheel size, load rating,
or speed rating other than that specified
for your vehicle. Some combinations of
unapproved tires and wheels may change
suspension dimensions and performance
characteristics, resulting in changes to
steering, handling, and braking of your
vehicle. This can cause unpredictable
handling and stress to steering and
suspension components. You could lose
control and have a collision resulting in
serious injury or death. Use only the tire
and wheel sizes with load ratings
approved for your vehicle.
Never use a tire with a smaller load index
or capacity, other than what was origi -
nally equipped on your vehicle. Using a
tire with a smaller load index could result
in tire overloading and failure. You could
lose control and have a collision.
Failure to equip your vehicle with tires
having adequate speed capability can
result in sudden tire failure and loss of
vehicle control.
CAUTION!
Replacing original tires with tires of a
different size may result in false
speedometer and odometer readings.
WARNING! (Continued)
2020_JEEP_M6_UG_UK.book Page 236
Page 246 of 328
244
TECHNICAL SPECIFICATIONS
IDENTIFICATION DATA
Vehicle Identification Number
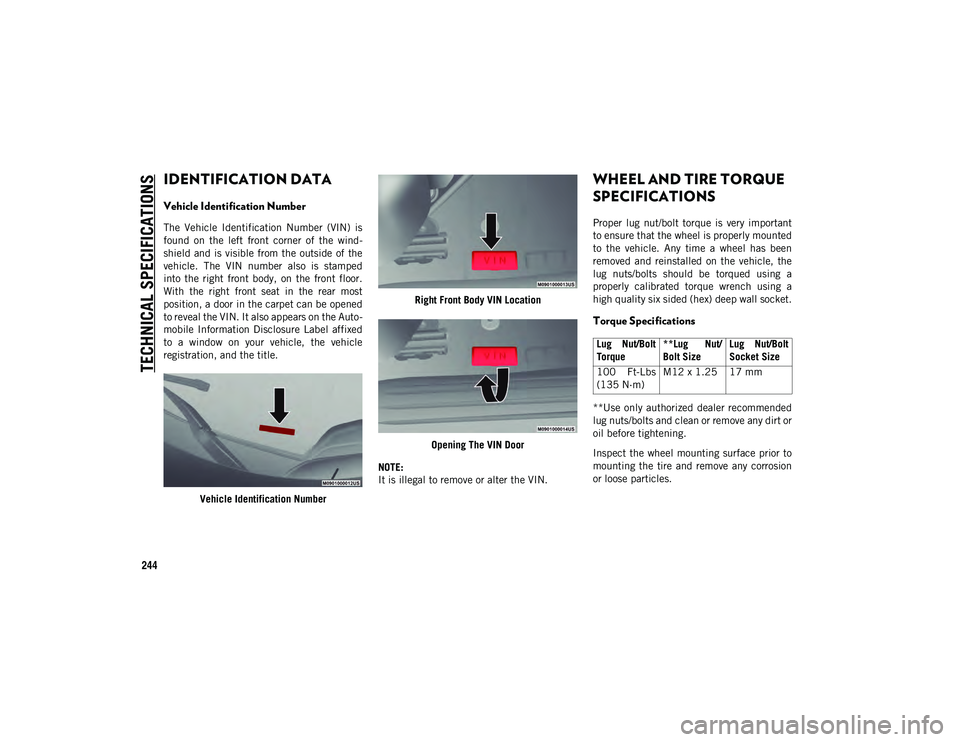
The Vehicle Identification Number (VIN) is
found on the left front corner of the wind-
shield and is visible from the outside of the
vehicle. The VIN number also is stamped
into the right front body, on the front floor.
With the right front seat in the rear most
position, a door in the carpet can be opened
to reveal the VIN. It also appears on the Auto -
mobile Information Disclosure Label affixed
to a window on your vehicle, the vehicle
registration, and the title.
Vehicle Identification Number Right Front Body VIN Location
Opening The VIN Door
NOTE:
It is illegal to remove or alter the VIN.
WHEEL AND TIRE TORQUE
SPECIFICATIONS
Proper lug nut/bolt torque is very important
to ensure that the wheel is properly mounted
to the vehicle. Any time a wheel has been
removed and reinstalled on the vehicle, the
lug nuts/bolts should be torqued using a
properly calibrated torque wrench using a
high quality six sided (hex) deep wall socket.
Torque Specifications
**Use only authorized dealer recommended
lug nuts/bolts and clean or remove any dirt or
oil before tightening.
Inspect the wheel mounting surface prior to
mounting the tire and remove any corrosion
or loose particles.
Lug Nut/Bolt
Torque **Lug Nut/
Bolt SizeLug Nut/Bolt
Socket Size
100 Ft-Lbs
(135 N·m) M12 x 1.25 17 mm
2020_JEEP_M6_UG_UK.book Page 244