change time JEEP COMPASS 2020 Owner handbook (in English)
[x] Cancel search | Manufacturer: JEEP, Model Year: 2020, Model line: COMPASS, Model: JEEP COMPASS 2020Pages: 328, PDF Size: 8.85 MB
Page 5 of 328
3
IMPORTANT NOTICE
ALL MATERIAL CONTAINED IN THIS
PUBLICATION IS BASED ON THE LATEST
INFORMATION AVAILABLE AT TIME OF
PUBLICATION APPROVAL. THE RIGHT IS
RESERVED TO PUBLISH REVISIONS AT
ANY TIME.
This User Guide has been prepared with the
assistance of service and engineering
specialists to acquaint you with the opera-
tion and maintenance of your new vehicle. It
is supplemented by a Warranty Information
Booklet and various customer-oriented docu -
ments. You are urged to read these publica -
tions carefully. Following the instructions
and recommendations in this User Guide will
help assure safe and enjoyable operation of
your vehicle.
After you have read the User Guide, it should
be stored in the vehicle for convenient refer -
ence and remain with the vehicle when sold.
The manufacturer reserves the right to make
changes in design and specifications, and/or
to make additions to or improvements in its
products without imposing any obligations
upon itself to install them on products previ -
ously manufactured. The User Guide illustrates and describes the
features that are standard or available as
extra cost options. Therefore, some of the
equipment and accessories in this publica
-
tion may not appear on your vehicle.
NOTE:
Be sure to read the User Guide first before
driving your vehicle and before attaching or
installing parts/accessories or making other
modifications to the vehicle.
In view of the many replacement parts and
accessories from various manufacturers
available on the market, the manufacturer
cannot be certain that the driving safety of
your vehicle will not be impaired by the
attachment or installation of such parts.
Even if such parts are officially-approved (for
example, by a general operating permit for
the part or by constructing the part in an offi -
cially approved design), or if an individual
operating permit was issued for the vehicle
after the attachment or installation of such
parts, it cannot be implicitly assumed that
the driving safety of your vehicle is unim -
paired. Therefore, neither experts nor official
agencies are liable. The manufacturer only
assumes responsibility when parts, which are
expressly authorized or recommended by the
manufacturer, are attached or installed at an authorized dealer. The same applies when
modifications to the original condition are
subsequently made on the manufacturer's
vehicles.
Your warranties do not cover any part that the
manufacturer did not supply. Nor do they
cover the cost of any repairs or adjustments
that might be caused or needed because of
the installation or use of non-manufacturer
parts, components, equipment, materials, or
additives. Nor do your warranties cover the
costs of repairing damage or conditions
caused by any changes to your vehicle that
do not comply with the manufacturers spec
-
ifications.
WARNINGS AND CAUTIONS
This User Guide contains WARNINGS against
operating procedures that could result in a
collision, bodily injury and/or death. It also
contains CAUTIONS against procedures that
could result in damage to your vehicle. If you
do not read this entire guide, you may miss
important information. Observe all Warnings
and Cautions.
2020_JEEP_M6_UG_UK.book Page 3
Page 8 of 328
6
WELCOME FROM FCA
HOW TO FIND YOUR OWNER’S MANUAL
ONLINE ................................................... 1
HOW TO USE THIS MANUAL
HOW TO USE THIS MANUAL ..................... 2
Essential Information ........................ 2
Symbols .......................................... 2
ROLLOVER WARNING ............................... 2
IMPORTANT NOTICE ................................. 3
WARNINGS AND CAUTIONS ..................... 3
VEHICLE CHANGES/ALTERATIONS ............. 4
GETTING TO KNOW YOUR VEHICLE
KEYS ................................................... 13
Key Fobs ...................................... 13
IGNITION SWITCH .................................. 14
Keyless Enter-N-Go — Ignition (If
Equipped)...................................... 14 Integrated/Manual Ignition — If
Equipped ....................................... 15 Electronic Steering Wheel Lock — If
Equipped ...................................... 16 Mechanical Steering Wheel Lock — If
Equipped ....................................... 16
REMOTE STARTING SYSTEM — IF
EQUIPPED ............................................ 16
How To Use Remote Start — If
Equipped ...................................... 17 To Enter Remote Start Mode ........... 17
VEHICLE SECURITY ALARM — IF
EQUIPPED ............................................ 18
To Arm The System ....................... 18
To Disarm The System ................... 18
Security System Manual Override..... 19
PREMIUM VEHICLE SECURITY ALARM — IF
EQUIPPED .............................................19
To Arm The System ........................ 19
To Disarm The System .................... 20
Security System Manual Override..... 20
DOORS ..................................................21
Keyless Enter-N-Go — Passive
Entry............................................. 21 Child-Protection Door Lock System —
Rear Doors..................................... 23
SEATS................................................... 24
Manual Adjustment (Rear Seats)...... 24
Driver Memory Seat — If
Equipped ..................................... 25 Front Heated Seats — If
Equipped ...................................... 27 Front Ventilated Seats — If
Equipped ...................................... 28 40/20/40 Rear Seat Armrest— If
Equipped ...................................... 28
HEAD RESTRAINTS .................................28
Front Head Restraint Adjustment .....29
Rear Head Restraints ......................29
STEERING WHEEL .................................30
Tilt/Telescoping Steering Column .....30
Heated Steering Wheel — If
Equipped ......................................30
EXTERIOR LIGHTS ..................................31
Multifunction Lever ........................31
Headlight Switch ............................31
Daytime Running Lights (DRL) — If
Equipped .......................................32 High/Low Beam Switch ...................32
Automatic High Beam Headlamp Control
— If Equipped ................................32 Flash-To-Pass .................................32
Automatic Headlights — If
Equipped ......................................32 Headlight Time Delay ......................32
Lights-On Reminder — If
Equipped ......................................33 Front And Rear Fog Lights — If
Equipped .......................................33 Turn Signals ..................................33
Headlight Leveling System — If
Equipped .......................................34 Battery Saver Feature ......................34
2020_JEEP_M6_UG_UK.book Page 6
Page 16 of 328
GETTING TO KNOW YOUR VEHICLE
14
The emergency key allows for entry into the
vehicle should the battery in the vehicle or
the key fob become depleted. The emer-
gency key is also for locking the glove
compartment. You can keep the emergency
key with you when valet parking.
To remove the emergency key from the
keyless ignition key fob, slide the mechan -
ical latch at the top of the key fob sideways
with your thumb and then pull the key out
with your other hand.
To Unlock The Doors And Liftgate
Push and release the unlock button on the
key fob once to unlock the driver's door or
twice within five seconds to unlock all doors
and the liftgate.
All doors can be programmed to unlock on
the first push of the unlock button. Refer to
“Uconnect Settings” in “Multimedia” in the
Owner’s Manual for further information.
To Lock The Doors And Liftgate
Push and release the lock button on the key
fob to lock all doors and liftgate.
Request For Additional Key Fobs
NOTE:
Only key fobs that are programmed to the
vehicle electronics can be used to start and
operate the vehicle. Once a key fob is
programmed to a vehicle, it cannot be
programmed to any other vehicle.
NOTE:
Used batteries may be harmful to the envi -
ronment if not disposed of correctly. Always
dispose of used batteries by specialized
battery disposal container, or by taking used
batteries to an authorized dealer. Duplication of key fobs may be performed at
an authorized dealer. This procedure
consists of programming a blank key fob to
the vehicle electronics. A blank key fob is
one that has never been programmed.
NOTE:
When having the Sentry Key Immobilizer
System serviced, bring all vehicle keys with
you to an authorized dealer.
IGNITION SWITCH
Keyless Enter-N-Go — Ignition (If
Equipped)
This feature allows the driver to operate the
ignition with the push of a button as long as
the key fob is in the passenger compartment.
The START/STOP push button ignition has
three operating modes. The three modes are
OFF, ON/RUN, and START.
NOTE:
If the ignition state/mode does not change
with the push of a button, the key fob may
have a low or depleted battery. In this situa
-
tion, a back up method can be used to
operate the ignition switch. Put the nose side
WARNING!
Push the Mechanical Key Release Button
only with the key fob facing away from
your body, especially your eyes and objects
that may be damaged, such as clothing. WARNING!
Always remove the key fobs from the
vehicle and lock all doors when leaving
the vehicle unattended.
For vehicles equipped with Keyless
Enter-N-Go — Ignition, always
remember to place the ignition in the
OFF mode.
2020_JEEP_M6_UG_UK.book Page 14
Page 29 of 328
27
4. Push and release the lock button on thekey fob within 10 seconds.
NOTE:
Your key fob can be unlinked to your memory
settings by pushing the set (S) button,
followed by pushing the unlock button on the
key fob within 10 seconds.
Memory Position Recall
NOTE:
The vehicle must be in PARK to recall
memory positions. If a recall is attempted
when the vehicle is not in PARK, a message
will display in the instrument cluster display.
To recall the memory settings for driver
one, push memory button (1) or the unlock
button on the key fob linked to memory
position 1.
To recall the memory settings for driver
two, push memory button (2) or the unlock
button on the key fob linked to memory
position 2.
A recall can be canceled by pushing any of
the memory buttons (S, 1, or 2) during a
recall. When a recall is canceled, the driver
seat will stop moving. A delay of one second
will occur before another recall can be
selected.
Front Heated Seats — If Equipped
The front heated seats control buttons are
located within the Uconnect system. You can
gain access to the control buttons through
the climate screen or the controls screen.
Press the heated seat button once to
turn the HI setting on.
Press the heated seat button a second
time to turn the LO setting on.
Press the heated seat button a third
time to turn the heating elements off.
If your vehicle is equipped with automatic
temperature controls with an integrated
center stack, or manual temperature
controls, you’ll find the heated seat switches
on the switch bank below the radio screen.
If the HI level setting is selected, the system
will automatically switch to LO level after
approximately 60 minutes of continuous
operation. At that time, the display will
change from HI to LO, indicating the change.
The LO level setting will turn off automati -
cally after approximately 45 minutes.
NOTE:
The engine must be running for the heated
seats to operate. Vehicles With Remote Start — If Equipped
On models that are equipped with remote
start, the heated seats can be programmed to
come on during a remote start.
This feature can be programmed through the
Uconnect system. Refer to “Uconnect
Settings” in “Multimedia” in the Owner’s
Manual for further information.
WARNING!
Persons who are unable to feel pain to
the skin because of advanced age,
chronic illness, diabetes, spinal cord
injury, medication, alcohol use, exhaus-
tion or other physical condition must
exercise care when using the seat heater.
It may cause burns even at low tempera-
tures, especially if used for long periods
of time.
Do not place anything on the seat or
seatback that insulates against heat,
such as a blanket or cushion. This may
cause the seat heater to overheat. Sitting
in a seat that has been overheated could
cause serious burns due to the increased
surface temperature of the seat.
2020_JEEP_M6_UG_UK.book Page 27
Page 38 of 328
GETTING TO KNOW YOUR VEHICLE
36
NOTE:
The Rain Sensing feature will not operate
when the wiper switch is in the low or
high-speed position.
The Rain Sensing feature may not func-
tion properly when ice, or dried salt water
is present on the windshield.
Use of products containing wax or silicone
may reduce Rain Sensing performance.
The Rain Sensing feature can be turned on
and off using the Uconnect System, refer
to “Uconnect Settings” in “Multimedia”
in the Owner’s Manual for further informa-
tion.
The Rain Sensing system has protection
features for the wiper blades and arms, and
will not operate under the following condi -
tions:
Change In Ignition Position — If the vehicle
is in Rain Sensing mode and the ignition
is cycled from OFF to ON, the auto wiper
will be suppressed until vehicle speed is
greater than 3 mph (5 km/h), or the wiper
switch is moved out of and back into the
Intermittent wipe position.
Transmission In NEUTRAL Position — The
Rain Sensing system will not operate if the
NEUTRAL gear is selected at speeds of
3 mph (5 km/h) or less unless the wiper
switch is moved or the gear selector is
moved out of NEUTRAL.
Remote Start Mode Inhibit — On vehicles
equipped with Remote Starting system,
Rain Sensing wipers are not operational
when the vehicle is in the remote start
mode. Once the operator is in the vehicle
and has placed the ignition switch in the
ON/RUN position, Rain Sensing wiper
operation can resume, if it has been
selected, and no other inhibit conditions
(mentioned previously) exist.
Rear Window Wiper/Washer
The rear wiper/washer controls are located on
the windshield wiper/washer lever on the
right side of the steering column. The rear
wiper/washer is operated by rotating a
switch, located at the middle of the lever. Rotate the center portion of the lever upward
to the first detent for intermittent operation
and to the second detent for continuous rear
wiper operation.
To use the washer, push the lever forward
and hold while spray is desired. If the lever
is pushed while the wiper is in the off posi
-
tion, the wiper will operate for several wipe
cycles, then turn off.
CLIMATE CONTROLS
The Climate Control System allows you to
regulate the temperature, air flow, and direc -
tion of air circulating throughout the vehicle.
The controls are located on the touchscreen
(if equipped) and on the instrument panel
below the radio.
2020_JEEP_M6_UG_UK.book Page 36
Page 45 of 328
43
Climate Control Functions
A/C (Air Conditioning)
The Air Conditioning (A/C) button allows the
operator to manually activate or deactivate
the air conditioning system. When the air
conditioning system is turned on, cool dehu-
midified air will flow through the outlets into
the cabin. For improved fuel economy, press
the A/C button to turn off the air conditioning
and manually adjust the blower and airflow
mode settings. Also, make sure to select only
Panel, Bi-Level, or Floor modes.
NOTE:
For Manual Climate Controls, if the system
is in Mix, Floor or Defrost Mode, the A/C
can be turned off, but the A/C system shall
remain active to prevent fogging of the
windows.
If fog or mist appears on the windshield or
side glass, select Defrost mode, and
increase blower speed if needed.
If your air conditioning performance
seems lower than expected, check the
front of the A/C condenser (located in front
of the radiator), for an accumulation of dirt
or insects. Clean with a gentle water spray
from the front of the radiator and through
the condenser. MAX A/C
MAX A/C sets the control for maximum
cooling performance.
Press and release to toggle between MAX A/
C and the prior settings. The button illumi
-
nates when MAX A/C is on.
In MAX A/C, the blower level and mode posi -
tion can be adjusted to desired user
settings. Pressing other settings will cause
the MAX A/C operation to switch to the
selected setting and MAX A/C to exit.
Recirculation
When outside air contains smoke, odors, or
high humidity, or if rapid cooling is desired,
you may wish to recirculate interior air by
pressing the Recirculation control button.
The Recirculation indicator will illuminate
when this button is selected. Press the
button a second time to turn off the Recircu -
lation mode and allow outside air into the
vehicle.
In cold weather, use of Recirculation mode
may lead to excessive window fogging. The
Recirculation feature may be unavailable
(button on the touchscreen greyed out) if
conditions exist that could create fogging on
the inside of the windshield.
Automatic Temperature Control (ATC)
Automatic Operation
1. Push the AUTO button on the faceplate, or the AUTO button on the touchscreen
(if equipped) on the Automatic Tempera -
ture Control (ATC) Panel.
2. Next, adjust the temperature you would like the system to maintain by adjusting
the temperature control buttons. Once
the desired temperature is displayed, the
system achieves and automatically main -
tains that comfort level.
3. When the system is set up for your comfort level, it is not necessary to
change the settings. You experience the
greatest efficiency by simply allowing the
system to function automatically.
NOTE:
It is not necessary to move the tempera-
ture settings for cold or hot vehicles. The
system automatically adjusts the tempera-
ture, mode, and blower speed to provide
comfort as quickly as possible.
The temperature can be displayed in U.S.
or Metric units by selecting the U.S./
Metric customer-programmable feature.
2020_JEEP_M6_UG_UK.book Page 43
Page 77 of 328
75
(Continued)ESC Operating Modes
NOTE:
Depending upon model and mode of opera-
tion, the ESC system may have multiple
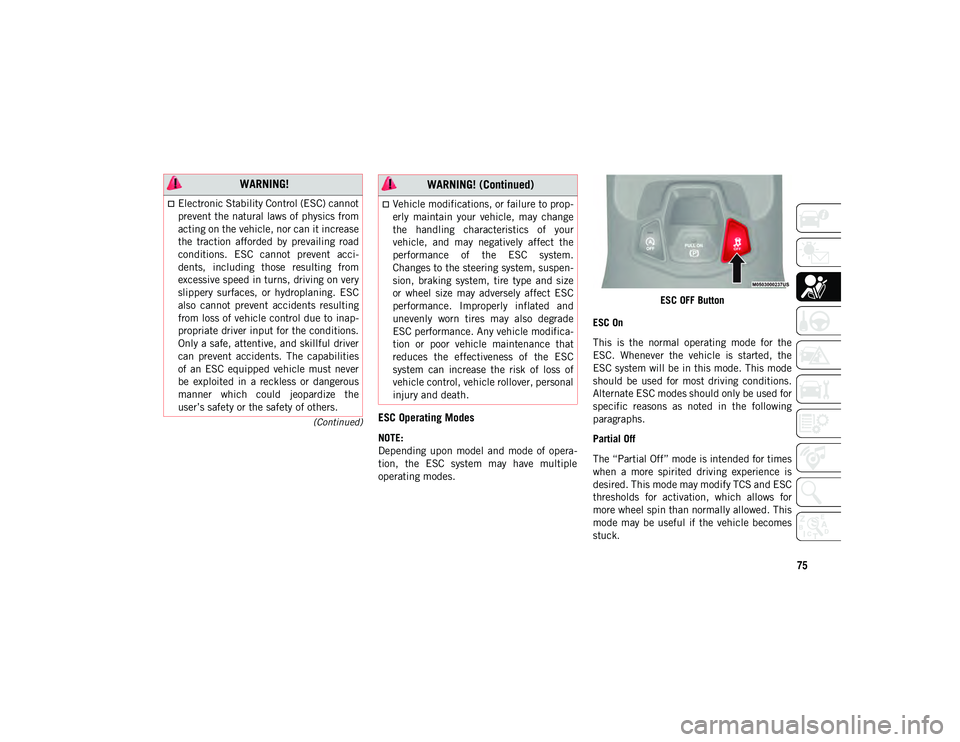
operating modes. ESC OFF Button
ESC On
This is the normal operating mode for the
ESC. Whenever the vehicle is started, the
ESC system will be in this mode. This mode
should be used for most driving conditions.
Alternate ESC modes should only be used for
specific reasons as noted in the following
paragraphs.
Partial Off
The “Partial Off” mode is intended for times
when a more spirited driving experience is
desired. This mode may modify TCS and ESC
thresholds for activation, which allows for
more wheel spin than normally allowed. This
mode may be useful if the vehicle becomes
stuck.
WARNING!
Electronic Stability Control (ESC) cannot
prevent the natural laws of physics from
acting on the vehicle, nor can it increase
the traction afforded by prevailing road
conditions. ESC cannot prevent acci -
dents, including those resulting from
excessive speed in turns, driving on very
slippery surfaces, or hydroplaning. ESC
also cannot prevent accidents resulting
from loss of vehicle control due to inap -
propriate driver input for the conditions.
Only a safe, attentive, and skillful driver
can prevent accidents. The capabilities
of an ESC equipped vehicle must never
be exploited in a reckless or dangerous
manner which could jeopardize the
user’s safety or the safety of others.Vehicle modifications, or failure to prop -
erly maintain your vehicle, may change
the handling characteristics of your
vehicle, and may negatively affect the
performance of the ESC system.
Changes to the steering system, suspen -
sion, braking system, tire type and size
or wheel size may adversely affect ESC
performance. Improperly inflated and
unevenly worn tires may also degrade
ESC performance. Any vehicle modifica-
tion or poor vehicle maintenance that
reduces the effectiveness of the ESC
system can increase the risk of loss of
vehicle control, vehicle rollover, personal
injury and death.
WARNING! (Continued)
2020_JEEP_M6_UG_UK.book Page 75
Page 81 of 328
79
The gear selection must match vehicle
uphill direction (i.e., vehicle facing uphill
is in forward gear; vehicle backing uphill is
in REVERSE gear).
HSA will work in REVERSE gear and all
forward gears. The system will not activate
if the transmission is in PARK or
NEUTRAL. For vehicles equipped with a
manual transmission, if the clutch is
pressed, HSA will remain active.
Towing With HSA
HSA will also provide assistance to mitigate
roll back while towing a trailer.
Disabling And Enabling HSA
This feature can be turned on or turned off.
To change the current setting, proceed as
follows:
If disabling HSA using Uconnect Settings,
refer to “Uconnect Settings” in “Multi-
media” for further information.
Rain Brake Support (RBS)
Rain Brake Support (RBS) may improve
braking performance in wet conditions. It
will periodically apply a small amount of
brake pressure to remove any water buildup
on the front brake rotors. It functions when
the windshield wipers are in LO or HI speed.
When Rain Brake Support is active, there is
no notification to the driver and no driver
interaction is required.
Ready Alert Braking (RAB)
Ready Alert Braking (RAB) may reduce the
time required to reach full braking during
emergency braking situations. It anticipates
when an emergency braking situation may
occur by monitoring how fast the throttle is
released by the driver. The EBC will prepare
the brake system for a panic stop.
WARNING!
There may be situations where the Hill
Start Assist (HSA) will not activate and
slight rolling may occur, such as on minor
hills or with a loaded vehicle, or while
pulling a trailer. HSA is not a substitute for
active driving involvement. It is always the
driver’s responsibility to be attentive to
distance to other vehicles, people, and
objects, and most importantly brake
operation to ensure safe operation of the
vehicle under all road conditions. Your
complete attention is always required
while driving to maintain safe control of
your vehicle. Failure to follow these
warnings can result in a collision or serious
personal injury.
WARNING!
If you use a trailer brake controller with
your trailer, the trailer brakes may be
activated and deactivated with the brake
switch. If so, there may not be enough
brake pressure to hold both the vehicle
and the trailer on a hill when the brake
pedal is released. In order to avoid
rolling down an incline while resuming
acceleration, manually activate the
trailer brake or apply more vehicle brake
pressure prior to releasing the brake
pedal.
HSA is not a parking brake. Always apply
the parking brake fully when exiting your
vehicle. Also, be certain to place the
transmission in PARK.
Failure to follow these warnings can
result in a collision or serious personal
injury.
2020_JEEP_M6_UG_UK.book Page 79
Page 83 of 328
81
NOTE:
The BSM system does NOT alert the driver
about rapidly approaching vehicles that
are outside the detection zones.
The BSM system detection zone DOES
NOT change if your vehicle is towing a
trailer. Therefore, visually verify the adja-
cent lane is clear for both your vehicle and
trailer before making a lane change. If the
trailer or other object (i.e., bicycle, sports
equipment) extends beyond the side of
your vehicle, this may result in the BSM
warning light remaining illuminated the
entire time the vehicle is in a forward gear.
It may be necessary to deactivate the BSM
system manually to avoid miss-detection.
Refer to “Uconnect Settings” in “Multi-
media” in the Owner’s Manual for further
information.
The Blind Spot Monitoring (BSM) system
may experience drop outs (blinking on and
off) of the side mirror Warning Indicator
lamps when a motorcycle or any small
object remains at the side of the vehicle
for extended periods of time (more than a
couple of seconds).
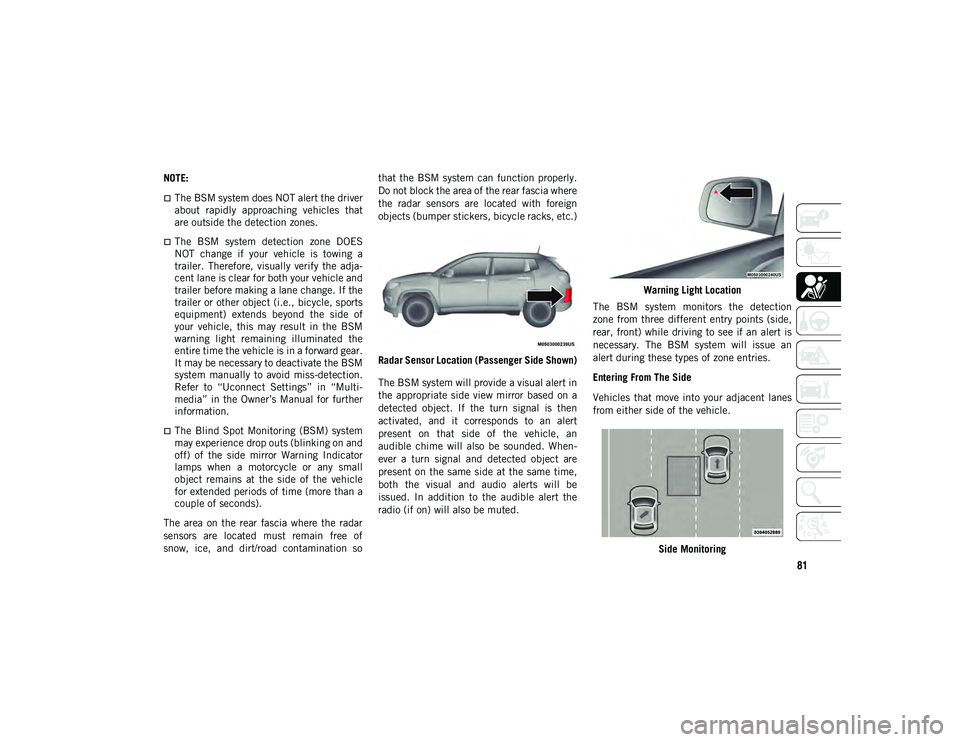
The area on the rear fascia where the radar
sensors are located must remain free of
snow, ice, and dirt/road contamination so that the BSM system can function properly.
Do not block the area of the rear fascia where
the radar sensors are located with foreign
objects (bumper stickers, bicycle racks, etc.)
Radar Sensor Location (Passenger Side Shown)
The BSM system will provide a visual alert in
the appropriate side view mirror based on a
detected object. If the turn signal is then
activated, and it corresponds to an alert
present on that side of the vehicle, an
audible chime will also be sounded. When -
ever a turn signal and detected object are
present on the same side at the same time,
both the visual and audio alerts will be
issued. In addition to the audible alert the
radio (if on) will also be muted. Warning Light Location
The BSM system monitors the detection
zone from three different entry points (side,
rear, front) while driving to see if an alert is
necessary. The BSM system will issue an
alert during these types of zone entries.
Entering From The Side
Vehicles that move into your adjacent lanes
from either side of the vehicle.
Side Monitoring
2020_JEEP_M6_UG_UK.book Page 81
Page 94 of 328
SAFETY
92
Research has shown that seat belts save
lives, and they can reduce the seriousness of
injuries in a collision. Some of the worst inju-
ries happen when people are thrown from the
vehicle. Seat belts reduce the possibility of
ejection and the risk of injury caused by
striking the inside of the vehicle. Everyone in
a motor vehicle should be belted at all times.
Enhanced Seat Belt Use Reminder System
(BeltAlert)
Driver and Passenger BeltAlert (if equipped)
BeltAlert is a feature intended to remind
the driver and outboard front seat passenger
(if equipped with outboard front passenger
seat BeltAlert) to buckle their seat belts. The
Belt Alert feature is active whenever the igni -
tion switch is in the START or ON/RUN posi -
tion.
Initial Indication
If the driver is unbuckled when the ignition
switch is first in the START or ON/RUN posi -
tion, a chime will signal for a few seconds. If
the driver or outboard front seat passenger (if
equipped with outboard front passenger seat
BeltAlert) is unbuckled when the ignition
switch is first in the START or ON/RUN posi -
tion the Seat Belt Reminder Light will turn on and remain on until both outboard front
seat belts are buckled. The outboard front
passenger seat BeltAlert is not active when
an outboard front passenger seat is unoccu
-
pied.
BeltAlert Warning Sequence
The BeltAlert warning sequence is activated
when the vehicle is moving above a specified
vehicle speed range and the driver or
outboard front seat passenger is unbuckled
(if equipped with outboard front passenger
seat BeltAlert) (the outboard front passenger
seat BeltAlert is not active when the
outboard front passenger seat is unoccu -
pied). The BeltAlert warning sequence starts
by blinking the Seat Belt Reminder Light and
sounding an intermittent chime. Once the
BeltAlert warning sequence has completed,
the Seat Belt Reminder Light will remain on
until the seat belts are buckled. The
BeltAlert warning sequence may repeat
based on vehicle speed until the driver and
occupied outboard front seat passenger seat
belts are buckled. The driver should instruct
all occupants to buckle their seat belts. Change of Status
If the driver or outboard front seat passenger
(if equipped with outboard front passenger
seat BeltAlert) unbuckles their seat belt
while the vehicle is traveling, the BeltAlert
warning sequence will begin until the seat
belts are buckled again.
The outboard front passenger seat BeltAlert
is not active when the outboard front
passenger seat is unoccupied. BeltAlert may
be triggered when an animal or other items
are placed on the outboard front passenger
seat or when the seat is folded flat (if
equipped). It is recommended that pets be
restrained in the rear seat (if equipped) in
pet harnesses or pet carriers that are secured
by seat belts, and cargo is properly stowed.
BeltAlert can be activated or deactivated by
an authorized dealer. FCA does not recom
-
mend deactivating BeltAlert.
NOTE:
If BeltAlert has been deactivated and the
driver or outboard front seat passenger (if
equipped with outboard front passenger seat
BeltAlert) is unbuckled the Seat Belt
Reminder Light will turn on and remain on
until the driver and outboard front seat
passenger seat belts are buckled.
2020_JEEP_M6_UG_UK.book Page 92