climate settings JEEP COMPASS 2021 Owner handbook (in English)
[x] Cancel search | Manufacturer: JEEP, Model Year: 2021, Model line: COMPASS, Model: JEEP COMPASS 2021Pages: 328, PDF Size: 8.85 MB
Page 13 of 328
11
UCONNECT 4C/4C NAV WITH 8.4–INCH
DISPLAY ............................................. 274
Uconnect 4C/4C NAV At A
Glance ........................................ 274 Drag & Drop Menu Bar .................. 275
Radio .......................................... 275
Media Hub — USB/Audio Jack (AUX) —
If Equipped.................................. 276 Android Auto™ — If Equipped ...... 278
Apple CarPlay® Integration — If
Equipped ..................................... 282 Apps — If Equipped ..................... 284
UCONNECT SETTINGS .......................... 284STEERING WHEEL AUDIO CONTROLS ..... 285
Radio Operation ........................... 285
Media Mode ................................. 285
NAVIGATION — IF EQUIPPED ................ 285
Changing The Navigation Voice Prompt
Volume ........................................ 285 Finding Points Of Interest.............. 286
Finding A Place By Spelling The
Name .......................................... 286 One-Step Voice Destination Entry ... 286
Setting Your Home Location .......... 286
Home .......................................... 287
Adding A Stop .............................. 287
Taking A Detour ........................... 287
Map Update ................................. 287
UCONNECT PHONE ...............................288
Uconnect Phone (Bluetooth Hands Free
Calling) ....................................... 288 Pairing (Wirelessly Connecting) Your
Mobile Phone To The Uconnect
System ........................................ 289 Common Phone Commands
(Examples) ................................. 292 Mute (Or Unmute) Microphone During
Call............................................. 293 Transfer Ongoing Call Between Handset
And Vehicle ................................. 293 Phonebook ................................. 293
Voice Command Tips .................... 293
Changing The Volume ................... 293
Using Do Not Disturb ................... 293
Incoming Text Messages .............. 294
Helpful Tips And Common Questions To
Improve Bluetooth® Performance With
Your Uconnect System.................. 295
UCONNECT VOICE RECOGNITION QUICK
TIPS ...................................................296
Introducing Uconnect ................... 296
Get Started .................................. 297
Basic Voice Commands ................. 297
Radio .......................................... 297
Media ......................................... 298
Phone ......................................... 299 Voice Text Reply — If Equipped .....300
Climate ........................................301
Navigation (4C NAV) — If
Equipped .....................................301 Siri® Eyes Free — If Equipped .....302
Using Do Not Disturb ...................302
Android Auto™ — If Equipped ......302
Apple CarPlay® — If Equipped .....303
Additional Information...................304
CUSTOMER ASSISTANCE
IF YOU NEED ASSISTANCE ...................305
ARGENTINA .................................305
AUSTRALIA .................................305
AUSTRIA .....................................305
BALANCE OF THE CARIBBEAN .....306
BELGIUM ....................................306
BOLIVIA.......................................306
BRAZIL ........................................306
BULGARIA ...................................306
CHILE .........................................306
CHINA .........................................307
COLOMBIA...................................307
COSTA RICA ................................307
CROATIA .....................................307
CZECH REPUBLIC ........................307
2020_JEEP_M6_UG_UK.book Page 11
Page 29 of 328
27
4. Push and release the lock button on thekey fob within 10 seconds.
NOTE:
Your key fob can be unlinked to your memory
settings by pushing the set (S) button,
followed by pushing the unlock button on the
key fob within 10 seconds.
Memory Position Recall
NOTE:
The vehicle must be in PARK to recall
memory positions. If a recall is attempted
when the vehicle is not in PARK, a message
will display in the instrument cluster display.
To recall the memory settings for driver
one, push memory button (1) or the unlock
button on the key fob linked to memory
position 1.
To recall the memory settings for driver
two, push memory button (2) or the unlock
button on the key fob linked to memory
position 2.
A recall can be canceled by pushing any of
the memory buttons (S, 1, or 2) during a
recall. When a recall is canceled, the driver
seat will stop moving. A delay of one second
will occur before another recall can be
selected.
Front Heated Seats — If Equipped
The front heated seats control buttons are
located within the Uconnect system. You can
gain access to the control buttons through
the climate screen or the controls screen.
Press the heated seat button once to
turn the HI setting on.
Press the heated seat button a second
time to turn the LO setting on.
Press the heated seat button a third
time to turn the heating elements off.
If your vehicle is equipped with automatic
temperature controls with an integrated
center stack, or manual temperature
controls, you’ll find the heated seat switches
on the switch bank below the radio screen.
If the HI level setting is selected, the system
will automatically switch to LO level after
approximately 60 minutes of continuous
operation. At that time, the display will
change from HI to LO, indicating the change.
The LO level setting will turn off automati -
cally after approximately 45 minutes.
NOTE:
The engine must be running for the heated
seats to operate. Vehicles With Remote Start — If Equipped
On models that are equipped with remote
start, the heated seats can be programmed to
come on during a remote start.
This feature can be programmed through the
Uconnect system. Refer to “Uconnect
Settings” in “Multimedia” in the Owner’s
Manual for further information.
WARNING!
Persons who are unable to feel pain to
the skin because of advanced age,
chronic illness, diabetes, spinal cord
injury, medication, alcohol use, exhaus-
tion or other physical condition must
exercise care when using the seat heater.
It may cause burns even at low tempera-
tures, especially if used for long periods
of time.
Do not place anything on the seat or
seatback that insulates against heat,
such as a blanket or cushion. This may
cause the seat heater to overheat. Sitting
in a seat that has been overheated could
cause serious burns due to the increased
surface temperature of the seat.
2020_JEEP_M6_UG_UK.book Page 27
Page 30 of 328
GETTING TO KNOW YOUR VEHICLE
28
Front Ventilated Seats — If Equipped
If your vehicle is equipped with ventilated
seats, the seat cushion and seat back will
have fans that draw the air from the
passenger compartment and move air
through fine perforations in the seat cover to
help keep the driver and front passenger
cooler in higher ambient temperatures. The
fans operate at two speeds, HI and LO.
The front ventilated seats control buttons are
located within the Uconnect system. You can
gain access to the control buttons through
the climate screen or the controls screen.
Press the ventilated seat button once to
choose HI.
Press the ventilated seat button a
second time to choose LO.
Press the ventilated seat button a third
time to turn the ventilated seat off.
NOTE:
The engine must be running for the venti -
lated seats to operate.
Vehicles With Remote Start — If Equipped
On models that are equipped with remote start,
the ventilated seats can be programmed to
come on during a remote start.
This feature can be programmed through the
Uconnect system. Refer to “Uconnect
Settings” in “Multimedia” in the Owner's
Manual for further details.
40/20/40 Rear Seat Armrest— If Equipped
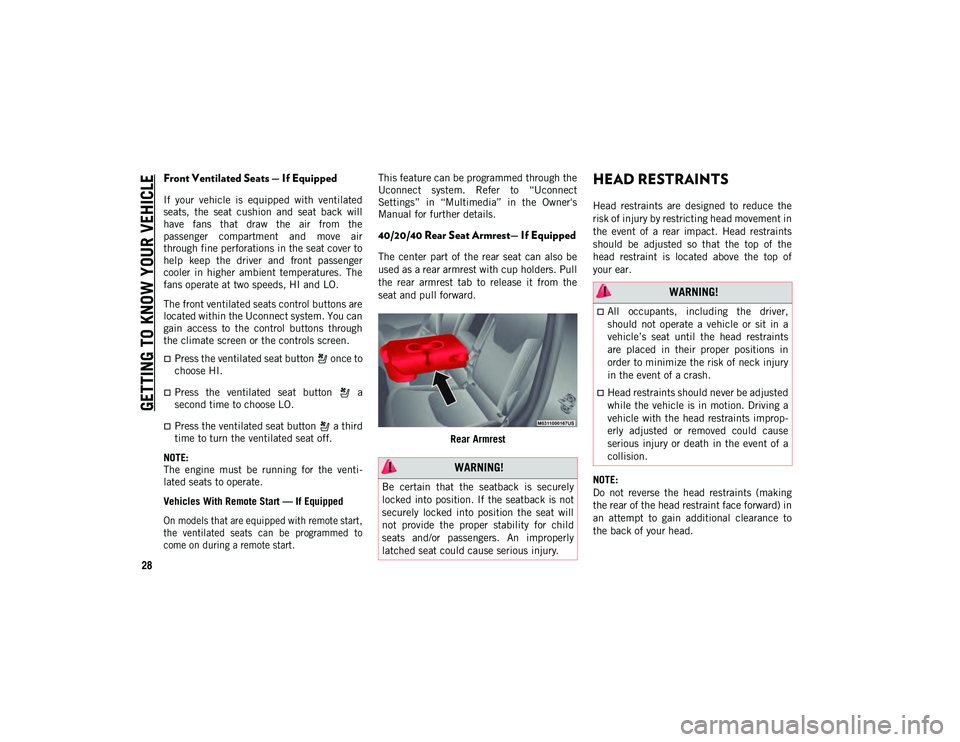
The center part of the rear seat can also be
used as a rear armrest with cup holders. Pull
the rear armrest tab to release it from the
seat and pull forward.
Rear Armrest
HEAD RESTRAINTS
Head restraints are designed to reduce the
risk of injury by restricting head movement in
the event of a rear impact. Head restraints
should be adjusted so that the top of the
head restraint is located above the top of
your ear.
NOTE:
Do not reverse the head restraints (making
the rear of the head restraint face forward) in
an attempt to gain additional clearance to
the back of your head.
WARNING!
Be certain that the seatback is securely
locked into position. If the seatback is not
securely locked into position the seat will
not provide the proper stability for child
seats and/or passengers. An improperly
latched seat could cause serious injury.
WARNING!
All occupants, including the driver,
should not operate a vehicle or sit in a
vehicle’s seat until the head restraints
are placed in their proper positions in
order to minimize the risk of neck injury
in the event of a crash.
Head restraints should never be adjusted
while the vehicle is in motion. Driving a
vehicle with the head restraints improp -
erly adjusted or removed could cause
serious injury or death in the event of a
collision.
2020_JEEP_M6_UG_UK.book Page 28
Page 32 of 328
GETTING TO KNOW YOUR VEHICLE
30
NOTE:
The head restraints should only be removed
by qualified technicians, for service
purposes only. If either of the head restraints
require removal, see an authorized dealer.
STEERING WHEEL
Tilt/Telescoping Steering Column
This feature allows you to tilt the steering
column upward or downward. It also allows
you to lengthen or shorten the steering
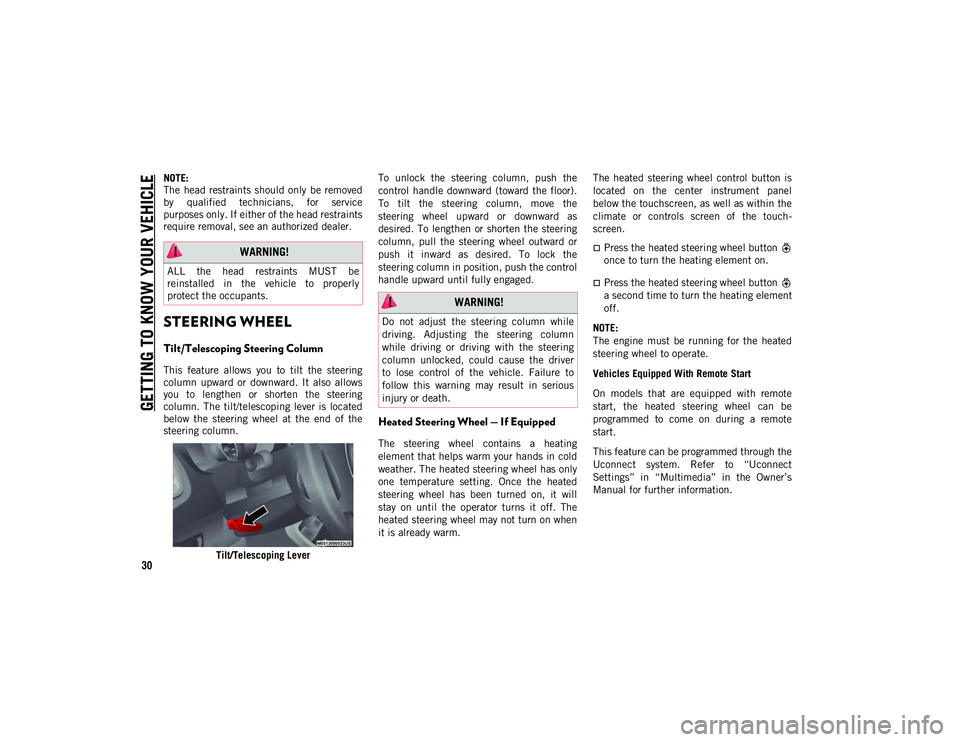
column. The tilt/telescoping lever is located
below the steering wheel at the end of the
steering column.Tilt/Telescoping Lever To unlock the steering column, push the
control handle downward (toward the floor).
To tilt the steering column, move the
steering wheel upward or downward as
desired. To lengthen or shorten the steering
column, pull the steering wheel outward or
push it inward as desired. To lock the
steering column in position, push the control
handle upward until fully engaged.
Heated Steering Wheel — If Equipped
The steering wheel contains a heating
element that helps warm your hands in cold
weather. The heated steering wheel has only
one temperature setting. Once the heated
steering wheel has been turned on, it will
stay on until the operator turns it off. The
heated steering wheel may not turn on when
it is already warm.
The heated steering wheel control button is
located on the center instrument panel
below the touchscreen, as well as within the
climate or controls screen of the touch
-
screen.
Press the heated steering wheel button
once to turn the heating element on.
Press the heated steering wheel button
a second time to turn the heating element
off.
NOTE:
The engine must be running for the heated
steering wheel to operate.
Vehicles Equipped With Remote Start
On models that are equipped with remote
start, the heated steering wheel can be
programmed to come on during a remote
start.
This feature can be programmed through the
Uconnect system. Refer to “Uconnect
Settings” in “Multimedia” in the Owner’s
Manual for further information.
WARNING!
ALL the head restraints MUST be
reinstalled in the vehicle to properly
protect the occupants.
WARNING!
Do not adjust the steering column while
driving. Adjusting the steering column
while driving or driving with the steering
column unlocked, could cause the driver
to lose control of the vehicle. Failure to
follow this warning may result in serious
injury or death.
2020_JEEP_M6_UG_UK.book Page 30
Page 38 of 328
GETTING TO KNOW YOUR VEHICLE
36
NOTE:
The Rain Sensing feature will not operate
when the wiper switch is in the low or
high-speed position.
The Rain Sensing feature may not func-
tion properly when ice, or dried salt water
is present on the windshield.
Use of products containing wax or silicone
may reduce Rain Sensing performance.
The Rain Sensing feature can be turned on
and off using the Uconnect System, refer
to “Uconnect Settings” in “Multimedia”
in the Owner’s Manual for further informa-
tion.
The Rain Sensing system has protection
features for the wiper blades and arms, and
will not operate under the following condi -
tions:
Change In Ignition Position — If the vehicle
is in Rain Sensing mode and the ignition
is cycled from OFF to ON, the auto wiper
will be suppressed until vehicle speed is
greater than 3 mph (5 km/h), or the wiper
switch is moved out of and back into the
Intermittent wipe position.
Transmission In NEUTRAL Position — The
Rain Sensing system will not operate if the
NEUTRAL gear is selected at speeds of
3 mph (5 km/h) or less unless the wiper
switch is moved or the gear selector is
moved out of NEUTRAL.
Remote Start Mode Inhibit — On vehicles
equipped with Remote Starting system,
Rain Sensing wipers are not operational
when the vehicle is in the remote start
mode. Once the operator is in the vehicle
and has placed the ignition switch in the
ON/RUN position, Rain Sensing wiper
operation can resume, if it has been
selected, and no other inhibit conditions
(mentioned previously) exist.
Rear Window Wiper/Washer
The rear wiper/washer controls are located on
the windshield wiper/washer lever on the
right side of the steering column. The rear
wiper/washer is operated by rotating a
switch, located at the middle of the lever. Rotate the center portion of the lever upward
to the first detent for intermittent operation
and to the second detent for continuous rear
wiper operation.
To use the washer, push the lever forward
and hold while spray is desired. If the lever
is pushed while the wiper is in the off posi
-
tion, the wiper will operate for several wipe
cycles, then turn off.
CLIMATE CONTROLS
The Climate Control System allows you to
regulate the temperature, air flow, and direc -
tion of air circulating throughout the vehicle.
The controls are located on the touchscreen
(if equipped) and on the instrument panel
below the radio.
2020_JEEP_M6_UG_UK.book Page 36
Page 42 of 328
GETTING TO KNOW YOUR VEHICLE
40
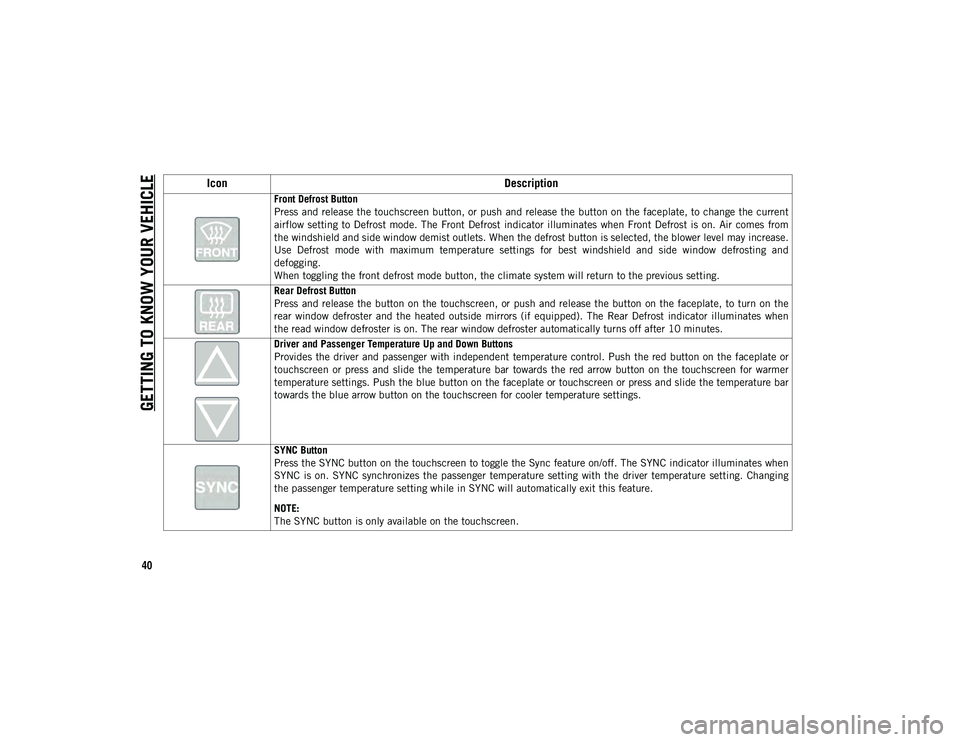
Front Defrost Button
Press and release the touchscreen button, or push and release the button on the faceplate, to change the current
airflow setting to Defrost mode. The Front Defrost indicator illuminates when Front Defrost is on. Air comes from
the windshield and side window demist outlets. When the defrost button is selected, the blower level may increase.
Use Defrost mode with maximum temperature settings for best windshield and side window defrosting and
defogging.
When toggling the front defrost mode button, the climate system will return to the previous setting.
Rear Defrost Button
Press and release the button on the touchscreen, or push and release the button on the faceplate, to turn on the
rear window defroster and the heated outside mirrors (if equipped). The Rear Defrost indicator illuminates when
the read window defroster is on. The rear window defroster automatically turns off after 10 minutes.
Driver and Passenger Temperature Up and Down Buttons
Provides the driver and passenger with independent temperature control. Push the red button on the faceplate or
touchscreen or press and slide the temperature bar towards the red arrow button on the touchscreen for warmer
temperature settings. Push the blue button on the faceplate or touchscreen or press and slide the temperature bar
towards the blue arrow button on the touchscreen for cooler temperature settings.
SYNC Button
Press the SYNC button on the touchscreen to toggle the Sync feature on/off. The SYNC indicator illuminates when
SYNC is on. SYNC synchronizes the passenger temperature setting with the driver temperature setting. Changing
the passenger temperature setting while in SYNC will automatically exit this feature.
NOTE:
The SYNC button is only available on the touchscreen.
Icon Description
2020_JEEP_M6_UG_UK.book Page 40
Page 43 of 328
41
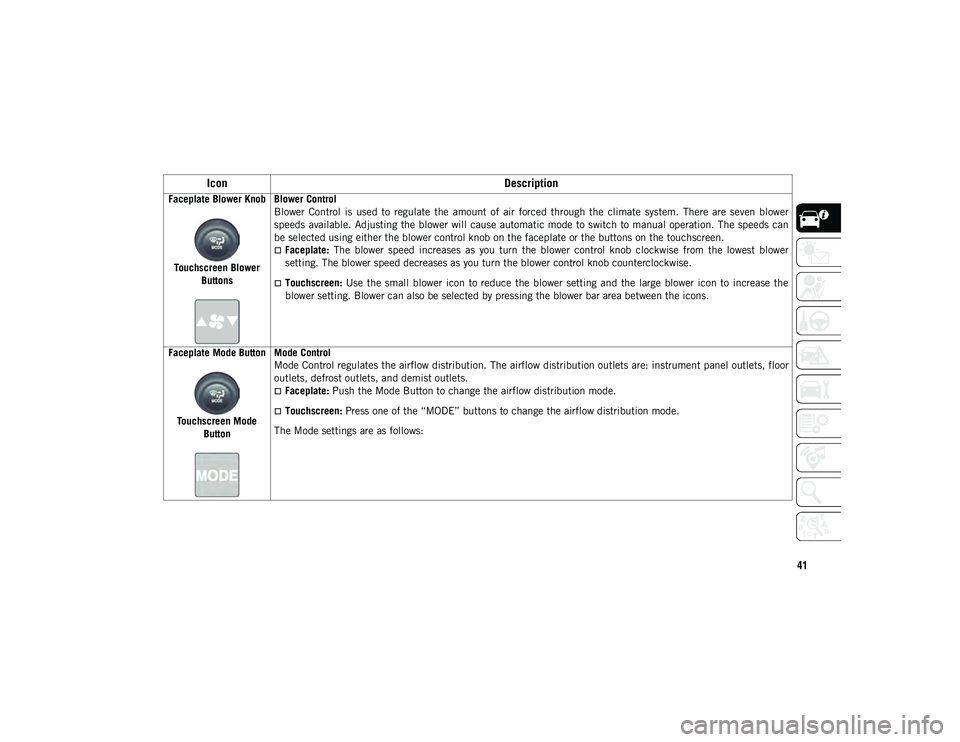
Faceplate Blower KnobTouchscreen Blower Buttons Blower Control
Blower Control is used to regulate the amount of air forced through the climate system. There are seven blower
speeds available. Adjusting the blower will cause automatic mode to switch to manual operation. The speeds can
be selected using either the blower control knob on the faceplate or the buttons on the touchscreen.
Faceplate:
The blower speed increases as you turn the blower control knob clockwise from the lowest blower
setting. The blower speed decreases as you turn the blower control knob counterclockwise.
Touchscreen: Use the small blower icon to reduce the blower setting and the large blower icon to increase the
blower setting. Blower can also be selected by pressing the blower bar area between the icons.
Faceplate Mode Button
Touchscreen Mode Button Mode Control
Mode Control regulates the airflow distribution. The airflow distribution outlets are: instrument panel outlets, floor
outlets, defrost outlets, and demist outlets.
Faceplate:
Push the Mode Button to change the airflow distribution mode.
Touchscreen: Press one of the “MODE” buttons to change the airflow distribution mode.
The Mode settings are as follows:
Icon Description
2020_JEEP_M6_UG_UK.book Page 41
Page 45 of 328
43
Climate Control Functions
A/C (Air Conditioning)
The Air Conditioning (A/C) button allows the
operator to manually activate or deactivate
the air conditioning system. When the air
conditioning system is turned on, cool dehu-
midified air will flow through the outlets into
the cabin. For improved fuel economy, press
the A/C button to turn off the air conditioning
and manually adjust the blower and airflow
mode settings. Also, make sure to select only
Panel, Bi-Level, or Floor modes.
NOTE:
For Manual Climate Controls, if the system
is in Mix, Floor or Defrost Mode, the A/C
can be turned off, but the A/C system shall
remain active to prevent fogging of the
windows.
If fog or mist appears on the windshield or
side glass, select Defrost mode, and
increase blower speed if needed.
If your air conditioning performance
seems lower than expected, check the
front of the A/C condenser (located in front
of the radiator), for an accumulation of dirt
or insects. Clean with a gentle water spray
from the front of the radiator and through
the condenser. MAX A/C
MAX A/C sets the control for maximum
cooling performance.
Press and release to toggle between MAX A/
C and the prior settings. The button illumi
-
nates when MAX A/C is on.
In MAX A/C, the blower level and mode posi -
tion can be adjusted to desired user
settings. Pressing other settings will cause
the MAX A/C operation to switch to the
selected setting and MAX A/C to exit.
Recirculation
When outside air contains smoke, odors, or
high humidity, or if rapid cooling is desired,
you may wish to recirculate interior air by
pressing the Recirculation control button.
The Recirculation indicator will illuminate
when this button is selected. Press the
button a second time to turn off the Recircu -
lation mode and allow outside air into the
vehicle.
In cold weather, use of Recirculation mode
may lead to excessive window fogging. The
Recirculation feature may be unavailable
(button on the touchscreen greyed out) if
conditions exist that could create fogging on
the inside of the windshield.
Automatic Temperature Control (ATC)
Automatic Operation
1. Push the AUTO button on the faceplate, or the AUTO button on the touchscreen
(if equipped) on the Automatic Tempera -
ture Control (ATC) Panel.
2. Next, adjust the temperature you would like the system to maintain by adjusting
the temperature control buttons. Once
the desired temperature is displayed, the
system achieves and automatically main -
tains that comfort level.
3. When the system is set up for your comfort level, it is not necessary to
change the settings. You experience the
greatest efficiency by simply allowing the
system to function automatically.
NOTE:
It is not necessary to move the tempera-
ture settings for cold or hot vehicles. The
system automatically adjusts the tempera-
ture, mode, and blower speed to provide
comfort as quickly as possible.
The temperature can be displayed in U.S.
or Metric units by selecting the U.S./
Metric customer-programmable feature.
2020_JEEP_M6_UG_UK.book Page 43
Page 267 of 328
265
USB/Audio Jack (AUX)/Bluetooth®
Operation
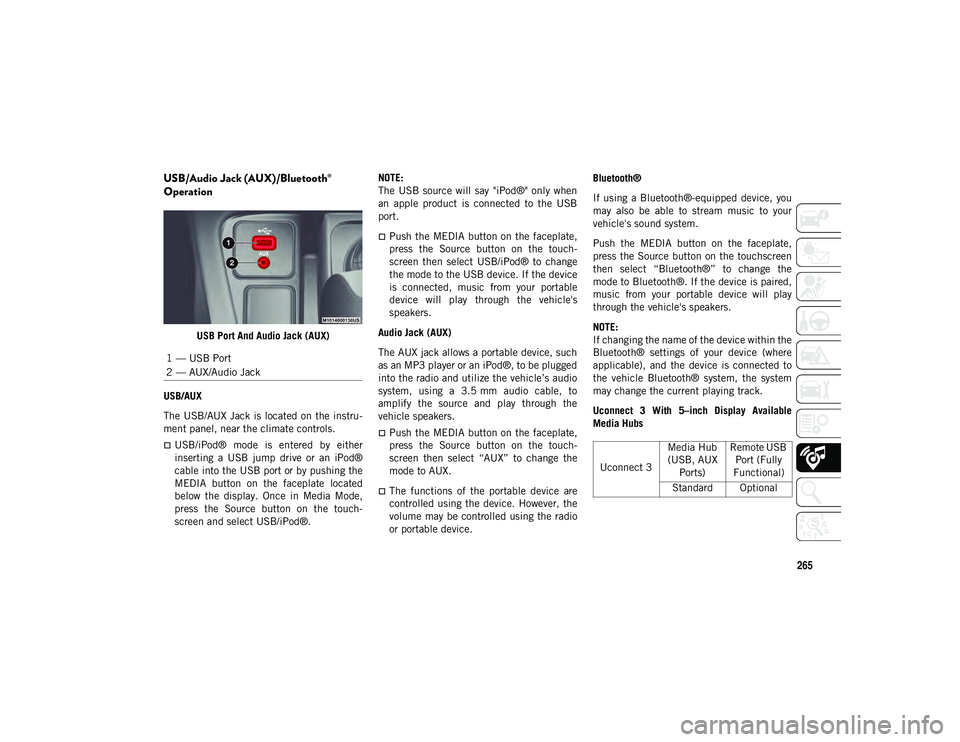
USB Port And Audio Jack (AUX)
USB/AUX
The USB/AUX Jack is located on the instru -
ment panel, near the climate controls.
USB/iPod® mode is entered by either
inserting a USB jump drive or an iPod®
cable into the USB port or by pushing the
MEDIA button on the faceplate located
below the display. Once in Media Mode,
press the Source button on the touch -
screen and select USB/iPod®. NOTE:
The USB source will say "iPod®" only when
an apple product is connected to the USB
port.
Push the MEDIA button on the faceplate,
press the Source button on the touch
-
screen then select USB/iPod® to change
the mode to the USB device. If the device
is connected, music from your portable
device will play through the vehicle's
speakers.
Audio Jack (AUX)
The AUX jack allows a portable device, such
as an MP3 player or an iPod®, to be plugged
into the radio and utilize the vehicle’s audio
system, using a 3.5 mm audio cable, to
amplify the source and play through the
vehicle speakers.
Push the MEDIA button on the faceplate,
press the Source button on the touch -
screen then select “AUX” to change the
mode to AUX.
The functions of the portable device are
controlled using the device. However, the
volume may be controlled using the radio
or portable device. Bluetooth®
If using a Bluetooth®-equipped device, you
may also be able to stream music to your
vehicle's sound system.
Push the MEDIA button on the faceplate,
press the Source button on the touchscreen
then select “Bluetooth®” to change the
mode to Bluetooth®. If the device is paired,
music from your portable device will play
through the vehicle's speakers.
NOTE:
If changing the name of the device within the
Bluetooth® settings of your device (where
applicable), and the device is connected to
the vehicle Bluetooth® system, the system
may change the current playing track.
Uconnect 3 With 5–inch Display Available
Media Hubs
1 — USB Port
2 — AUX/Audio Jack
Uconnect 3
Media Hub
(USB, AUX Ports) Remote USB
Port (Fully
Functional)
Standard Optional
2020_JEEP_M6_UG_UK.book Page 265
Page 320 of 328
318
INDEX
C
Camera, Rear .................................... 164
Capacities, Fluid................................ 254
Caps, FillerFuel .............................................. 165
Oil (Engine) ................................... 222
Radiator (Coolant Pressure) ............. 230
Car Washes ....................................... 241
Carbon Monoxide Warning .......... 128 , 252
Certification Label ............................. 171
Chains, Tire ...................................... 239
Change Oil Indicator ............................ 56
Changing A Flat Tire .................. 189 , 232
Checking Your Vehicle For Safety ........ 128
Checks, Safety .................................. 128
Child Safety Locks ............................... 23
Cleaning Windshield Wiper Blades ................ 228
Climate Control ................................... 36
Clock Settings ................................... 263
Compact Spare Tire ........................... 238
Computer, Trip/Travel ........................... 59
Cooling Pressure Cap (Radiator Cap) .... 230
Cooling System .................................. 229 Coolant Level ................................. 229
Cooling Capacity ............................ 254Pressure Cap ................................. 230
Radiator Cap.................................. 230
Selection Of Coolant (Antifreeze) ........................ 254 , 255 Cruise Light ............................. 69
, 70 , 71
Customer Assistance .......................... 305
Customer Programmable Features ....... 284
Cybersecurity .................................... 262
D
Daytime Running Lights ..................31 , 32
Dealer Service ................................... 227
Defroster, Windshield......................... 129
Diagnostic System, Onboard ................. 71
Diesel Display Messages ............................. 57
Diesel Fuel ....................................... 252
Diesel Fuel Requirements .................. 252
Dimmer Switch Headlight ...................................31 , 32
Dipsticks Oil (Engine) ................................... 225
Disabled Vehicle Towing .................... 207
Do Not Disturb ...........................293 , 302
Door Ajar .......................................60 , 61
Door Ajar Light ...............................60 , 61
Drag And Drop Menu ......................... 268
Driver’s Seat Back Tilt ......................... 24
E
Electric Brake Control System............... 73 Anti-Lock Brake System.................... 72Traction Control System.................... 80
Electric Parking Brake ....................... 134 Electrical Outlet, Auxiliary (Power
Outlet) ................................................52
Electronic Speed Control (Cruise
Control) .............................................150
Electronic Stability Control (ESC) ..........74
Electronic Throttle Control Warning
Light ...................................................61
Emergency Gas Can Refueling .............204
Emergency, In Case Of Hazard Warning Flasher ..................177
Jacking .................................. 189 , 232
Jump Starting ................................202
Tow Hooks .....................................209
Towing ..........................................207
Emissions..........................................260
Engine ..............................................222 Checking Oil Level ..........................225
Coolant (Antifreeze) ........................255
Cooling ..........................................229Exhaust Gas Caution ............... 128 , 252
Jump Starting ................................202
Oil ........................................ 254 , 255
Oil Filler Cap ..................................222
Oil Selection ..................................254
Overheating....................................204
Starting .........................................131
Enhanced Accident Response
Feature ..................................... 111 , 211
Ethanol .............................................250
Exhaust Gas Cautions ................. 128 , 252
2020_JEEP_M6_UG_UK.book Page 318