start stop button JEEP COMPASS 2023 Owner's Manual
[x] Cancel search | Manufacturer: JEEP, Model Year: 2023, Model line: COMPASS, Model: JEEP COMPASS 2023Pages: 344, PDF Size: 18.8 MB
Page 146 of 344

144STARTING AND OPERATING
EXITING THE PARKING SPACE
NOTE:The function does not work for exiting a perpen -
dicular parking space, but only exiting parallel
parking spaces.
Activation
To activate this function, shift to DRIVE, push the
ParkSense Active Park Assist switch, and then use
the steering wheel arrow buttons to select the
Parallel Park Exit feature. After the selection, the
system activates and instructs the driver through
the instrument cluster display about the
operations that have to be carried out to perform
the maneuver correctly.
Start Of Maneuver
During the maneuver, the system asks the driver to
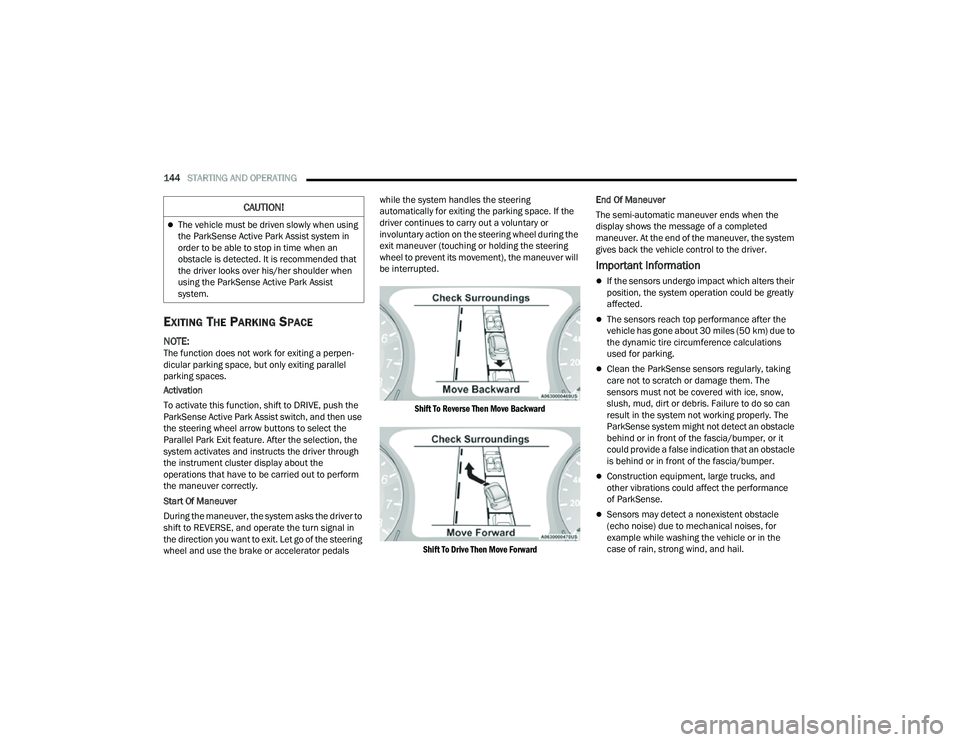
shift to REVERSE, and operate the turn signal in
the direction you want to exit. Let go of the steering
wheel and use the brake or accelerator pedals while the system handles the steering
automatically for exiting the parking space. If the
driver continues to carry out a voluntary or
involuntary action on the steering wheel during the
exit maneuver (touching or holding the steering
wheel to prevent its movement), the maneuver will
be interrupted.
Shift To Reverse Then Move Backward
Shift To Drive Then Move Forward
End Of Maneuver
The semi-automatic maneuver ends when the
display shows the message of a completed
maneuver. At the end of the maneuver, the system
gives back the vehicle control to the driver.
Important Information
If the sensors undergo impact which alters their
position, the system operation could be greatly
affected.
The sensors reach top performance after the
vehicle has gone about 30 miles (50 km) due to
the dynamic tire circumference calculations
used for parking.
Clean the ParkSense sensors regularly, taking
care not to scratch or damage them. The
sensors must not be covered with ice, snow,
slush, mud, dirt or debris. Failure to do so can
result in the system not working properly. The
ParkSense system might not detect an obstacle
behind or in front of the fascia/bumper, or it
could provide a false indication that an obstacle
is behind or in front of the fascia/bumper.
Construction equipment, large trucks, and
other vibrations could affect the performance
of ParkSense.
Sensors may detect a nonexistent obstacle
(echo noise) due to mechanical noises, for
example while washing the vehicle or in the
case of rain, strong wind, and hail.
The vehicle must be driven slowly when using
the ParkSense Active Park Assist system in
order to be able to stop in time when an
obstacle is detected. It is recommended that
the driver looks over his/her shoulder when
using the ParkSense Active Park Assist
system.
CAUTION!
22_MP_OM_EN_USC_t.book Page 144
Page 192 of 344

190SAFETY
(Continued)
ESC Operating Modes
Depending upon model and mode of operation, the
ESC system may have multiple operating modes.
ESC On
This is the normal operating mode for the ESC.
Whenever the vehicle is started, the ESC system
will be in this mode. This mode should be used for
most driving conditions. Alternate ESC modes
should only be used for specific reasons as noted
in the following paragraphs.Partial Off
This mode may be useful if the vehicle becomes
stuck. This mode may modify TCS and ESC
thresholds for activation, which allows for more
wheel spin than normally allowed.
To enter the “Partial Off” mode, momentarily push
the ESC OFF button, located below the radio. The
ESC OFF Indicator Light will illuminate. To turn the
ESC on again, momentarily push the ESC OFF
button and the ESC OFF Indicator Light will turn off.
NOTE:
When driving with snow chains, or when starting off
in deep snow, sand, or gravel, it may be desirable to
allow more wheel spin. This can be accomplished by
momentarily pushing the ESC OFF button to enter
“Partial Off” mode. Once the situation requiring
“Partial Off” mode is overcome, turn ESC back on by
momentarily pushing the ESC OFF button. This may
be done while the vehicle is in motion.
Full Off (Four-Wheel Drive Models Only)
This mode is intended for off-highway or off-road
use when ESC stability features could inhibit
vehicle maneuverability due to trail conditions.
This mode is entered by pushing and holding the
ESC OFF button for five seconds when the vehicle
is stopped and the engine is running. After five
seconds, the ESC OFF Indicator Light will illuminate
and the “ESC OFF” message will appear in the
instrument cluster display.
In this mode, ESC and TCS, except for the “limited
slip” feature described in the TCS section, are
turned off until the vehicle reaches a speed of
40 mph (64 km/h). At 40 mph (64 km/h), the
system returns to “Partial Off” mode, as described
above. TCS remains off. When the vehicle speed
drops below 30 mph (48 km/h), the ESC system
shuts off. ESC is deactivated at low vehicle speeds
so that it will not interfere with off-road driving.
However, ESC function returns to provide the
stability feature at speeds above 40 mph
(64 km/h). The ESC OFF Indicator Light will always
be illuminated when ESC is off.
Vehicle modifications, or failure to properly
maintain your vehicle, may change the
handling characteristics of your vehicle, and
may negatively affect the performance of the
ESC system. Changes to the steering system,
suspension, braking system, tire type and size
or wheel size may adversely affect ESC perfor
-
mance. Improperly inflated and unevenly worn
tires may also degrade ESC performance. Any
vehicle modification or poor vehicle mainte -
nance that reduces the effectiveness of the
ESC system can increase the risk of loss of
vehicle control, vehicle rollover, personal
injury and death.
WARNING!
WARNING!
When in “Partial Off” mode, the TCS function -
ality of ESC, except for the limited slip feature
described in the TCS section, has been
disabled and the ESC OFF Indicator Light will
be illuminated. When in “Partial Off” mode,
the engine power reduction feature of TCS is
disabled, and the enhanced vehicle stability
offered by the ESC system is reduced.
Trailer Sway Control (TSC) is disabled when
the ESC system is in the “Partial Off” mode.
WARNING!
22_MP_OM_EN_USC_t.book Page 190
Page 193 of 344

SAFETY191
To turn ESC on again, momentarily push the ESC
OFF button. This will restore the “ESC On” mode of
operation.
NOTE:The “ESC OFF” message will display and an audible
chime will sound when the gear selector is placed
into the PARK position from any other position, and
then moved out of the PARK position. This will
occur even if the message was previously cleared.
ESC Activation/Malfunction Indicator Light
And ESC OFF Indicator Light
The ESC Activation/Malfunction Indicator
Light in the instrument cluster will come
on when the ignition is placed in the ON
mode. It should go out with the engine
running. If the ESC Activation/Malfunction
Indicator Light comes on continuously with the
engine running, a malfunction has been detected
in the ESC system. If this light remains on after
several ignition cycles, and the vehicle has been driven several miles (km) at speeds greater than
30 mph (48 km/h), see an authorized dealer as
soon as possible to have the problem diagnosed
and corrected.
The ESC Activation/Malfunction Indicator Light
starts to flash as soon as the tires lose traction and
the ESC system becomes active. The ESC
Activation/Malfunction Indicator Light also flashes
when Traction Control System (TCS) is active. If the
ESC Activation/Malfunction Indicator Light begins
to flash during acceleration, ease up on the
accelerator and apply as little throttle as possible.
Be sure to adapt your speed and driving to the
prevailing road conditions.
The ESC OFF Indicator Light indicates the
customer has elected to have the
Electronic Stability Control (ESC) in a
reduced mode.
NOTE:
The ESC Activation/Malfunction Indicator Light
and the ESC OFF Indicator Light come on
momentarily each time the ignition is placed in
the ON/RUN position.
Each time the ignition is placed in the ON/RUN
position, the ESC system will be on even if it was
turned off previously.
The ESC system will make buzzing or clicking
sounds when it is active. This is normal; the
sounds will stop when ESC becomes inactive
following the maneuver that caused the ESC
activation.
Emergency Stop Signal (ESS) —
If Equipped
The ESS activates the hazard lights at a faster than
normal speed when heavy brake pressure is
applied. ESS will only activate when the speed is
above 31 mph (50 km/h). The ESS operates
independently of other lamps, and will turn on and
off automatically. This indicates to others that the
vehicle is stopping quickly.
NOTE:
A warning light will illuminate within the instru -
ment cluster to inform the driver that the ESS
feature has been activated.
When towing a trailer, ESS will also activate the
rear indicator lights of the trailer.
Hill Descent Control (HDC) — If Equipped
Hill Descent Control (HDC) is intended for low
speed off-road driving while in 4WD Low. HDC
maintains vehicle speed while descending hills
during various driving situations. HDC controls
vehicle speed by actively controlling the brakes.
WARNING!
In the "Full Off" mode, the engine torque
reduction and stability features are disabled. In
an emergency evasive maneuver, the ESC
system will not engage to assist in maintaining
stability. “Full Off” mode is intended for
off-highway or off-road use only.
6
22_MP_OM_EN_USC_t.book Page 191
Page 257 of 344

IN CASE OF EMERGENCY255
Sealing A Tire With Tire Service Kit
Whenever You Stop To Use Tire Service Kit:
1. Pull over to a safe location and turn on the vehicle’s Hazard Warning Flashers.
2. Verify that the valve stem (on the wheel with the deflated tire) is in a position that is near to
the ground. This will allow the Tire Service Kit
Hose to reach the valve stem and keep the Tire
Service Kit flat on the ground. This will provide
the best positioning of the kit when injecting
the sealant into the deflated tire and running
the air pump. Move the vehicle as necessary to
place the valve stem in this position before
proceeding.
3. Place the transmission in PARK and cycle the ignition in the OFF position.
4. Apply the parking brake.
Setting Up To Use Tire Service Kit:
1. Uncoil the Sealant Hose and then remove the cap from the fitting at the end of the hose.
2. Place the Tire Service Kit flat on the ground next to the deflated tire. 3. Remove the cap from the valve
stem and then screw the fitting at the
end of the Sealant Hose onto the
valve stem.
4. Uncoil the Power Plug and insert
the plug into the vehicle’s 12 Volt
power outlet.
NOTE:Do not remove foreign objects (e.g., screws or
nails) from the tire.
Injecting Tire Service Kit Sealant Into The Deflated
Tire:
1. Always start the vehicle before
turning the Tire Service Kit on.
2. Ensure the Mode Select Knob is to
the Sealant Mode position.
3. After pushing the Power Button,
the sealant (white fluid) will flow from
the Sealant Bottle through the
Sealant Hose and into the tire.
NOTE:Sealant may leak out through the puncture in
the tire. If the sealant (white fluid) does not flow within
0 – 10 seconds through the Sealant Hose:
1. Push the Power Button to turn the Tire Service
Kit off. Disconnect the Sealant Hose from the
valve stem. Make sure the valve stem is free
of debris. Reconnect the Sealant Hose to the
valve stem. Check that the Mode Select Knob
is in the Sealant Mode position and not Air
Mode. Push the Power Button to turn the Tire
Service Kit on.
2. Connect the Power Plug to a different 12 Volt power outlet in your vehicle or another vehicle,
if available. Make sure the vehicle is running
before turning the Tire Service Kit on.
3. The Sealant Bottle may be empty due to previous use. Call for assistance.
If the sealant (white fluid) does flow through the
Sealant Hose:
1. Continue to operate the pump
until sealant is no longer flowing
through hose (typically takes
30 - 70 seconds). As the sealant
flows through the Sealant Hose, the Pressure
Gauge can read as high as 70 psi (4.8 Bar).
The Pressure Gauge will decrease quickly
from approximately 70 psi (4.8 Bar) to the
actual tire pressure when the Sealant Bottle
is empty.
7
22_MP_OM_EN_USC_t.book Page 255