engine coolant JEEP GLADIATOR 2023 Owners Manual
[x] Cancel search | Manufacturer: JEEP, Model Year: 2023, Model line: GLADIATOR, Model: JEEP GLADIATOR 2023Pages: 448, PDF Size: 17.37 MB
Page 13 of 448
11
CAMPERS
This vehicle is NOT recommended for slide-in camper applications.
VEHICLE MODIFICATIONS/ALTERATIONS
SYMBOL GLOSSARY
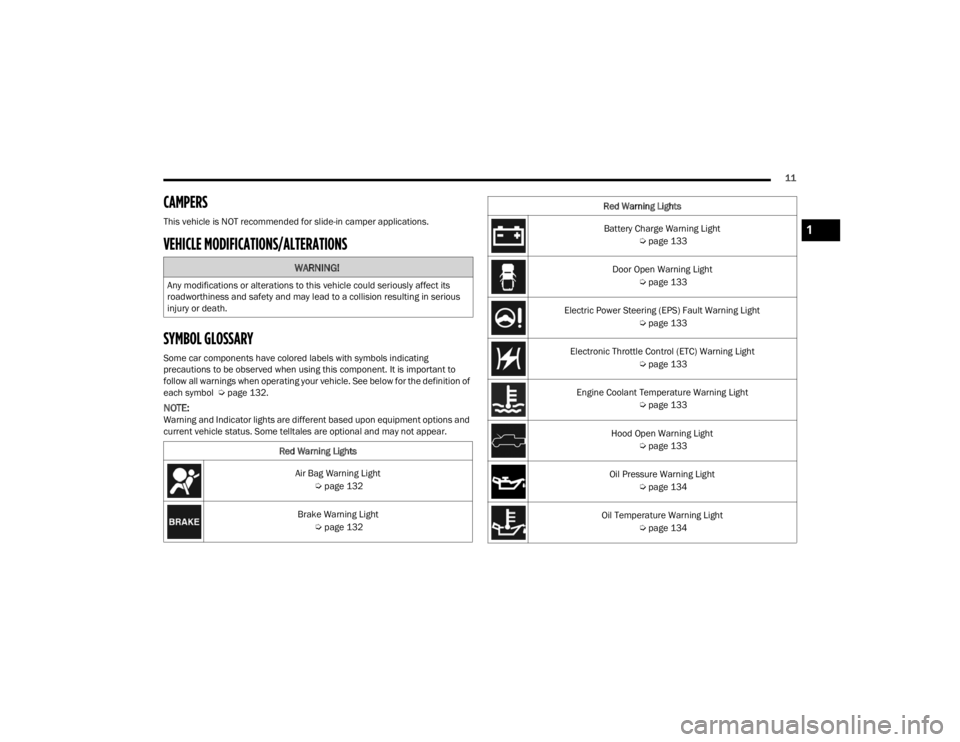
Some car components have colored labels with symbols indicating
precautions to be observed when using this component. It is important to
follow all warnings when operating your vehicle. See below for the definition of
each symbol Úpage 132.
NOTE:Warning and Indicator lights are different based upon equipment options and
current vehicle status. Some telltales are optional and may not appear.
WARNING!
Any modifications or alterations to this vehicle could seriously affect its
roadworthiness and safety and may lead to a collision resulting in serious
injury or death.
Red Warning LightsAir Bag Warning Light Úpage 132
Brake Warning Light Úpage 132
Battery Charge Warning Light
Úpage 133
Door Open Warning Light Úpage 133
Electric Power Steering (EPS) Fault Warning Light Úpage 133
Electronic Throttle Control (ETC) Warning Light Úpage 133
Engine Coolant Temperature Warning Light Úpage 133
Hood Open Warning Light Úpage 133
Oil Pressure Warning Light Úpage 134
Oil Temperature Warning Light Úpage 134
Red Warning Lights1
23_JT_OM_EN_USC_t.book Page 11
Page 69 of 448

GETTING TO KNOW YOUR VEHICLE67
AUTOMATIC TEMPERATURE CONTROL
(ATC) — I
F EQUIPPED
Automatic Operation
1. Push the AUTO button on the faceplate, or the
AUTO button on the touchscreen on the
Automatic Temperature Control (ATC) Panel.
2. Next, adjust the temperature that you would like the system to maintain by adjusting the
driver and passenger temperature control
buttons. Once the desired temperature is
displayed, the system will achieve and
automatically maintain that comfort level.
3. When the system is set up for your comfort level, it is not necessary to change the
settings. You will experience the greatest
efficiency by simply allowing the system to
function automatically.
NOTE:
It is not necessary to move the temperature
settings for cold or hot vehicles. The system
automatically adjusts the temperature, mode,
and blower speed to provide comfort as quickly
as possible.
The temperature can be displayed in U.S. or
Metric units by selecting the U.S./Metric
customer-programmable feature within
Uconnect Settings Ú page 215. To provide you with maximum comfort in the
Automatic mode during cold start-ups, the blower
fan will remain on low until the engine warms up.
The blower will increase in speed and transition
into Auto mode.
Manual Operation Override
This system offers a full complement of manual
override features. The AUTO symbol in the front
ATC display will be turned off when the system is
being used in the manual mode.
CLIMATE VOICE COMMANDS
Adjust vehicle temperatures hands-free and keep
everyone comfortable while you keep moving
ahead.
Push the VR button on the steering wheel. After the
beep, say one of the following commands:
“
Set the driver temperature to 70 degrees ”
“Set the passenger temperature to 70 degrees ”
Did You Know:
Voice Command for Climate may
only be used to adjust the interior temperature of
your vehicle. Voice Command will not work to adjust
the heated seats or steering wheel if equipped.
OPERATING TIPS
NOTE:Refer to the chart at the end of this section for
suggested control settings for various weather
conditions.
Summer Operation
The engine cooling system must be protected with
a high-quality antifreeze coolant to provide proper
corrosion protection and to protect against engine
overheating. OAT coolant (conforming to
MS.90032) is recommended.
Winter Operation
To ensure the best possible heater and defroster
performance, make sure the engine cooling
system is functioning properly and the proper
amount, type, and concentration of coolant is
used. Use of the Air Recirculation mode during
Winter months is not recommended, because it
may cause window fogging.
Vacation/Storage
For information on maintaining the Climate Control
system when the vehicle is being stored for an
extended period of time, see Ú page 411.
2
23_JT_OM_EN_USC_t.book Page 67
Page 120 of 448
118GETTING TO KNOW YOUR INSTRUMENT PANEL
Use this QR code to access your
digital experience.
INSTRUMENT CLUSTER
D
ESCRIPTIONS
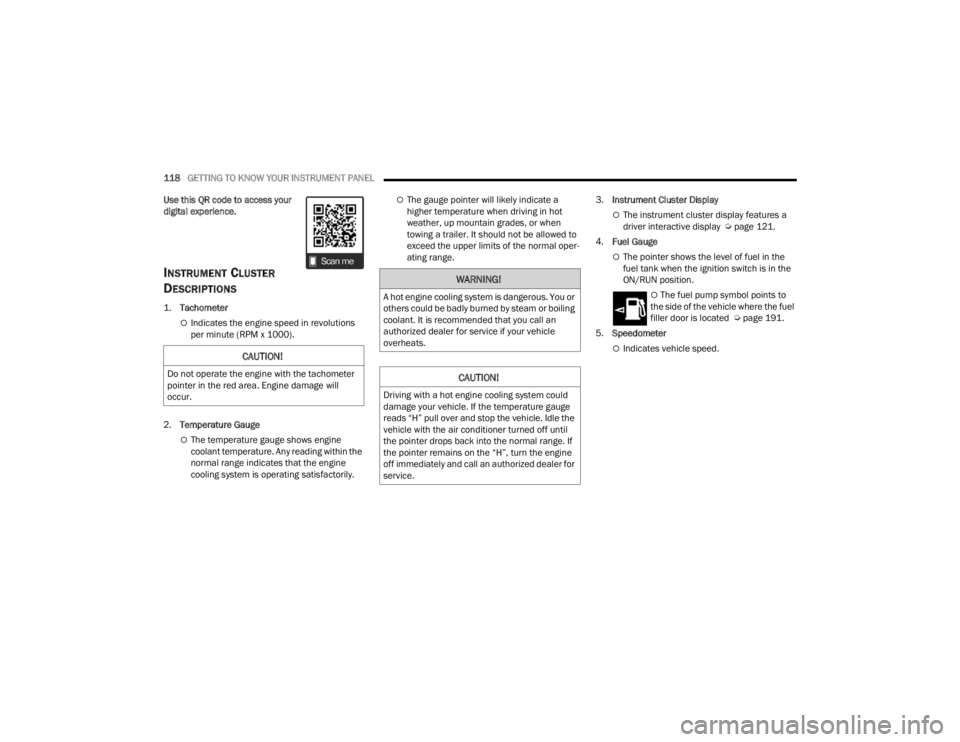
1.
Tachometer
Indicates the engine speed in revolutions
per minute (RPM x 1000).
2. Temperature Gauge
The temperature gauge shows engine
coolant temperature. Any reading within the
normal range indicates that the engine
cooling system is operating satisfactorily.
The gauge pointer will likely indicate a
higher temperature when driving in hot
weather, up mountain grades, or when
towing a trailer. It should not be allowed to
exceed the upper limits of the normal oper -
ating range. 3.
Instrument Cluster Display
The instrument cluster display features a
driver interactive display Ú page 121.
4. Fuel Gauge
The pointer shows the level of fuel in the
fuel tank when the ignition switch is in the
ON/RUN position.
The fuel pump symbol points to
the side of the vehicle where the fuel
filler door is located Ú page 191.
5. Speedometer
Indicates vehicle speed.CAUTION!
Do not operate the engine with the tachometer
pointer in the red area. Engine damage will
occur.
WARNING!
A hot engine cooling system is dangerous. You or
others could be badly burned by steam or boiling
coolant. It is recommended that you call an
authorized dealer for service if your vehicle
overheats.
CAUTION!
Driving with a hot engine cooling system could
damage your vehicle. If the temperature gauge
reads “H” pull over and stop the vehicle. Idle the
vehicle with the air conditioner turned off until
the pointer drops back into the normal range. If
the pointer remains on the “H”, turn the engine
off immediately and call an authorized dealer for
service.
23_JT_OM_EN_USC_t.book Page 118
Page 123 of 448
GETTING TO KNOW YOUR INSTRUMENT PANEL121
INSTRUMENT CLUSTER DESCRIPTIONS
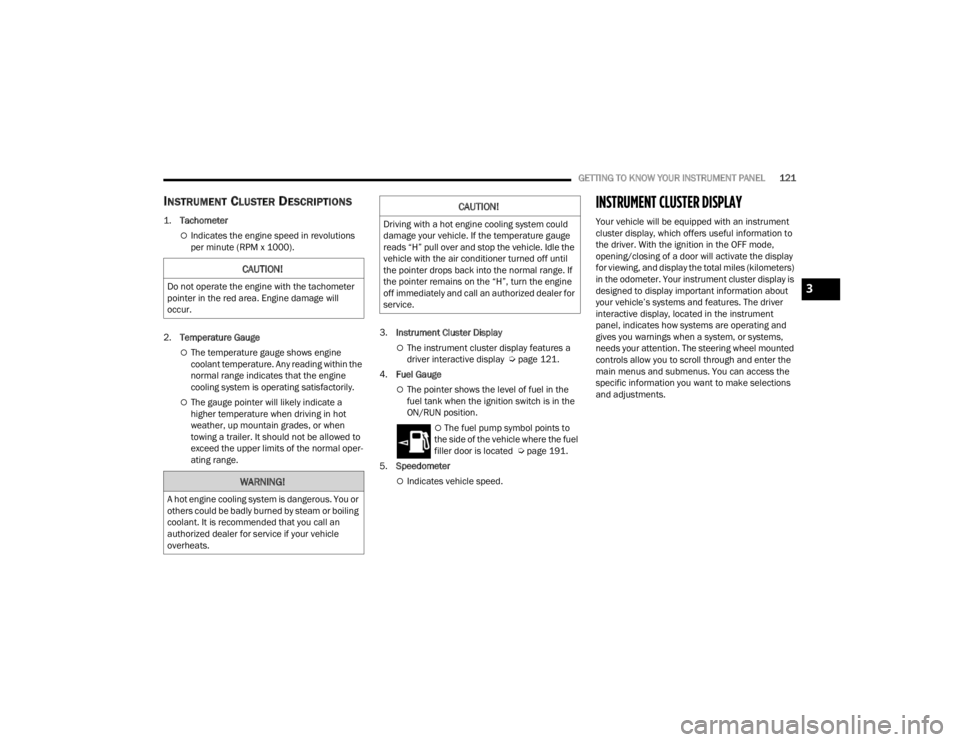
1.
Tachometer
Indicates the engine speed in revolutions
per minute (RPM x 1000).
2. Temperature Gauge
The temperature gauge shows engine
coolant temperature. Any reading within the
normal range indicates that the engine
cooling system is operating satisfactorily.
The gauge pointer will likely indicate a
higher temperature when driving in hot
weather, up mountain grades, or when
towing a trailer. It should not be allowed to
exceed the upper limits of the normal oper -
ating range. 3.
Instrument Cluster Display
The instrument cluster display features a
driver interactive display Ú page 121.
4. Fuel Gauge
The pointer shows the level of fuel in the
fuel tank when the ignition switch is in the
ON/RUN position.
The fuel pump symbol points to
the side of the vehicle where the fuel
filler door is located Ú page 191.
5. Speedometer
Indicates vehicle speed.
INSTRUMENT CLUSTER DISPLAY
Your vehicle will be equipped with an instrument
cluster display, which offers useful information to
the driver. With the ignition in the OFF mode,
opening/closing of a door will activate the display
for viewing, and display the total miles (kilometers)
in the odometer. Your instrument cluster display is
designed to display important information about
your vehicle’s systems and features. The driver
interactive display, located in the instrument
panel, indicates how systems are operating and
gives you warnings when a system, or systems,
needs your attention. The steering wheel mounted
controls allow you to scroll through and enter the
main menus and submenus. You can access the
specific information you want to make selections
and adjustments.
CAUTION!
Do not operate the engine with the tachometer
pointer in the red area. Engine damage will
occur.
WARNING!
A hot engine cooling system is dangerous. You or
others could be badly burned by steam or boiling
coolant. It is recommended that you call an
authorized dealer for service if your vehicle
overheats.
CAUTION!
Driving with a hot engine cooling system could
damage your vehicle. If the temperature gauge
reads “H” pull over and stop the vehicle. Idle the
vehicle with the air conditioner turned off until
the pointer drops back into the normal range. If
the pointer remains on the “H”, turn the engine
off immediately and call an authorized dealer for
service.
3
23_JT_OM_EN_USC_t.book Page 121
Page 135 of 448
GETTING TO KNOW YOUR INSTRUMENT PANEL133
The light also will turn on when the parking brake
is applied with the ignition switch in the ON/RUN
position.
NOTE:This light shows only that the parking brake is
applied. It does not show the degree of brake appli -
cation.
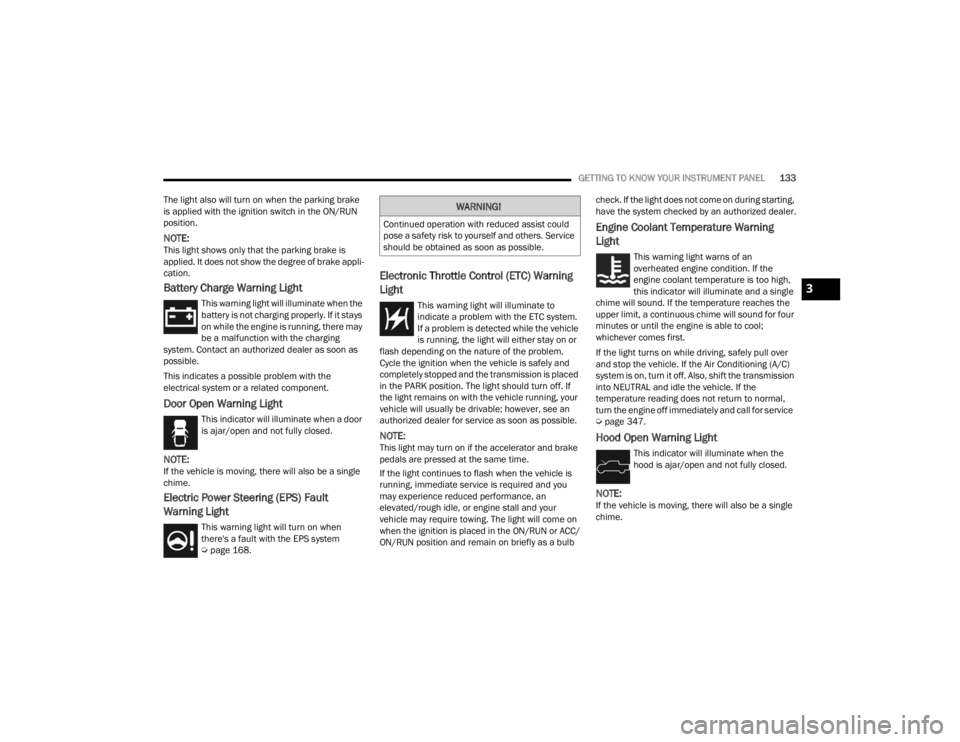
Battery Charge Warning Light
This warning light will illuminate when the
battery is not charging properly. If it stays
on while the engine is running, there may
be a malfunction with the charging
system. Contact an authorized dealer as soon as
possible.
This indicates a possible problem with the
electrical system or a related component.
Door Open Warning Light
This indicator will illuminate when a door
is ajar/open and not fully closed.
NOTE:If the vehicle is moving, there will also be a single
chime.
Electric Power Steering (EPS) Fault
Warning Light
This warning light will turn on when
there's a fault with the EPS system
Ú page 168.
Electronic Throttle Control (ETC) Warning
Light
This warning light will illuminate to
indicate a problem with the ETC system.
If a problem is detected while the vehicle
is running, the light will either stay on or
flash depending on the nature of the problem.
Cycle the ignition when the vehicle is safely and
completely stopped and the transmission is placed
in the PARK position. The light should turn off. If
the light remains on with the vehicle running, your
vehicle will usually be drivable; however, see an
authorized dealer for service as soon as possible.
NOTE:This light may turn on if the accelerator and brake
pedals are pressed at the same time.
If the light continues to flash when the vehicle is
running, immediate service is required and you
may experience reduced performance, an
elevated/rough idle, or engine stall and your
vehicle may require towing. The light will come on
when the ignition is placed in the ON/RUN or ACC/
ON/RUN position and remain on briefly as a bulb check. If the light does not come on during starting,
have the system checked by an authorized dealer.
Engine Coolant Temperature Warning
Light
This warning light warns of an
overheated engine condition. If the
engine coolant temperature is too high,
this indicator will illuminate and a single
chime will sound. If the temperature reaches the
upper limit, a continuous chime will sound for four
minutes or until the engine is able to cool;
whichever comes first.
If the light turns on while driving, safely pull over
and stop the vehicle. If the Air Conditioning (A/C)
system is on, turn it off. Also, shift the transmission
into NEUTRAL and idle the vehicle. If the
temperature reading does not return to normal,
turn the engine off immediately and call for service
Ú page 347.
Hood Open Warning Light
This indicator will illuminate when the
hood is ajar/open and not fully closed.
NOTE:If the vehicle is moving, there will also be a single
chime.
WARNING!
Continued operation with reduced assist could
pose a safety risk to yourself and others. Service
should be obtained as soon as possible.
3
23_JT_OM_EN_USC_t.book Page 133
Page 150 of 448

148STARTING AND OPERATING
NOTE:Engine start-up in very low ambient temperature
could result in evident white smoke. This condition
will disappear as the engine warms up.
AUTOMATIC TRANSMISSION
Start the engine with the transmission gear
selector in the PARK (P) position. Apply the brake
before shifting to any driving range.
EXTREME COLD WEATHER
The cartridge block heater clips into the engine
block near the water jacket and transfers heat to
the coolant. It requires a 110–115 Volt AC
electrical outlet with a grounded, three-wire
extension cord. Its use is recommended for
environments that routinely fall below -10°F
(-23°C). It should be used when the vehicle has not
been running overnight or longer periods and
should be plugged in two hours prior to start. Its
use is required for cold starts with temperatures
under -20°F (-28°C).
NOTE:The engine block heater and heater cord are
factory installed options. If your vehicle is not
equipped, engine block heaters and heater cords
are available from an authorized Mopar® dealer.
A 12 Volt heater built into the fuel filter housing
aids in preventing fuel gelling. It is controlled by
a built-in thermostat.
A Diesel Pre-Heat system both improves engine
starting and reduces the amount of white
smoke generated by a warming engine.
NORMAL STARTING
Observe the instrument cluster lights when
starting the engine.
NOTE:Normal starting of either a cold or a warm engine is
obtained without pumping or pressing the accel -
erator pedal.
1. Always apply the parking brake.
2. Press and hold the brake pedal while pushing the ENGINE START/STOP button once.
NOTE:A delay of the start of up to five seconds is possible
under very cold conditions. The “Wait to Start”
telltale will be illuminated during the preheat
process. When the engine “Wait To Start” telltale
turns off the engine will automatically crank.
Do not leave the key fob in or near the vehicle,
or in a location accessible to children, and do
not leave the ignition of a vehicle equipped
with Keyless Enter ‘n Go™ in the ACC or ON/
RUN position. A child could operate power
windows, other controls, or move the vehicle.
Do not leave children or animals inside parked
vehicles in hot weather. Interior heat build-up
may cause serious injury or death.
CAUTION!
The engine is allowed to crank as long as
25 seconds. If the engine fails to start during
this period, please wait at least two minutes
for the starter to cool before repeating start
procedure.
If the Water in Fuel Indicator Light remains on,
DO NOT START engine before you drain the
water from the fuel filters to avoid engine
damage Ú page 368.
WARNING!
CAUTION!
If the Water in Fuel Indicator Light remains on,
DO NOT START the engine before you drain the
water from the fuel filters to avoid engine
damage Úpage 368.
23_JT_OM_EN_USC_t.book Page 148
Page 152 of 448

150STARTING AND OPERATING
NOTE:
Use of Climatized ULSD Fuel or Number 1 ULSD
fuel results in a noticeable decrease in fuel
economy.
Climatized ULSD fuel is a blend of Number 2
ULSD fuel and Number 1 ULSD fuel which
reduces the temperature at which wax crystals
form in fuel.
The fuel grade should be clearly marked on the
pump at the fuel station.
The engine requires the use of Ultra Low Sulfur
Diesel Fuel . Use of incorrect fuel could result in
engine and exhaust system damage
Ú page 421.
If climatized or Number 1 ULSD fuel is not avail -
able, and you are operating below 20°F (-6°C),
in sustained arctic conditions, Mopar®
Premium Diesel Fuel Treatment (or equivalent) is recommended to avoid gelling (see Fuel Oper
-
ating Range Chart).
Engine Oil Usage
See Engine Fluids and Lubricants for the correct
engine oil viscosity Ú page 424.
Engine Warm-Up
Avoid full throttle operation when the engine is
cold. When starting a cold engine, bring the engine
up to operating speed slowly to allow the oil
pressure to stabilize as the engine warms up.
If temperatures are below 32°F (0°C), operate the
engine at moderate speeds for five minutes before
full loads are applied.
ENGINE IDLING
Avoid prolonged idling. Long periods of idling may
be harmful to your engine because combustion chamber temperatures can drop so low that the
fuel may not burn completely. Incomplete
combustion allows carbon and varnish to form on
piston rings, cylinder head valves, turbocharger,
and injector nozzles. Also, the unburned fuel can
enter the crankcase, diluting the oil and causing
rapid wear to the engine.
STOPPING THE ENGINE
After full load operation, idle the engine for a few
minutes before shutting it down. This idle period
will allow the lubricating oil and coolant to carry
excess heat away from the turbocharger.
NOTE:Refer to the following chart for proper engine
shutdown.
Driving Condition Load Turbocharger Temperature Idle Time (min.) Before Engine
Shutdown
Stop and Go EmptyCoolNone
Stop and Go Medium 0.5
Highway Speeds MediumWarm 1.0
City Traffic Maximum GCWR 1.5
Highway Speeds Maximum GCWR 2.0
Uphill Grade Maximum GCWR Hot2.5
23_JT_OM_EN_USC_t.book Page 150
Page 153 of 448

STARTING AND OPERATING151
NOTE:Under certain conditions the Stop/Start system
may be temporarily disabled and the engine fan
will run after the engine is turned off to protect the
engine. These conditions are under high load and
high temperature conditions.
COOLING SYSTEM TIPS — AUTOMATIC
T
RANSMISSION
To reduce the potential for engine and
transmission overheating in high ambient
temperature conditions, take the following actions:
City Driving — When stopped, shift the transmis -
sion into NEUTRAL (N) and increase engine idle
speed.
Highway Driving — Reduce your speed.
Up Steep Hills — Select a lower transmission
gear.
Air Conditioning — Turn it off temporarily.
NOTE:If the coolant temperature is too high, the A/C will
automatically turn off.
Do Not Operate The Engine With Low Oil
Pressure
If the Low Oil Pressure Warning Light turns on while
driving, stop the vehicle and shut down the engine
as soon as possible. After the vehicle is safely
stopped, restart the engine and monitor the lamp. If the lamp is still illuminated, shut the engine off,
contact an authorized dealer, and do not operate
the vehicle until the cause is corrected. If the lamp
is no longer illuminated, the engine can be
operated, but should be taken to an authorized
dealer as soon as possible for further inspection.
NOTE:Do not operate the vehicle until the cause is
corrected. This light does not show how much oil is
in the engine. The engine oil level must be checked
under the hood.
Do Not Operate The Engine With Failed
Parts
All engine failures give some warning before the
parts fail. Be on the alert for changes in
performance, sounds, and visual evidence that the
engine requires service. Some important clues are:
Engine misfiring or vibrating severely
Sudden loss of power
Unusual engine noises
Fuel, oil or coolant leaks
Sudden change, outside the normal operating
range, in the engine operating temperature
Excessive smoke
Oil pressure drop
ENGINE BREAK-IN RECOMMENDATIONS —
GASOLINE ENGINE (IF EQUIPPED)
A long break-in period is not required for the engine
and drivetrain (transmission and axle) in your
vehicle.
Drive moderately during the first 300 miles
(500 km). After the initial 60 miles (100 km),
speeds up to 50 or 55 mph (80 or 90 km/h) are
desirable.
While cruising, brief full-throttle acceleration within
the limits of local traffic laws contributes to a good
break-in. Wide-open throttle acceleration in low
gear can be detrimental and should be avoided.
The engine oil installed in the engine at the factory
is a high-quality energy conserving type lubricant.
Oil changes should be consistent with anticipated
climate conditions under which vehicle operations
will occur.
For the recommended viscosity and quality grades
see Ú page 424.
CAUTION!
If oil pressure falls to less than normal readings,
shut the engine off immediately. Failure to do so
could result in immediate and severe engine
damage.
4
23_JT_OM_EN_USC_t.book Page 151
Page 154 of 448
152STARTING AND OPERATING
NOTE:A new engine may consume some oil during its first
few thousand miles (kilometers) of operation. This
should be considered a normal part of the break-in
and not interpreted as a problem.
ENGINE BREAK-IN RECOMMENDATIONS —
DIESEL ENGINE (IF EQUIPPED)
The diesel engine does not require a break-in
period due to its construction. Normal operation is
allowed, providing the following recommendations
are followed:
Warm up the engine before placing it under
load.
Do not operate the engine at idle for prolonged
periods.
Use the appropriate transmission gear to
prevent engine lugging.
Observe vehicle oil pressure and temperature
indicators.
Check the coolant and oil levels frequently.
Vary throttle position at highway speeds when
carrying or towing significant weight.
NOTE:Light duty operation such as light trailer towing or
no load operation will extend the time before the
engine is at full efficiency. Reduced fuel economy
and power may be seen at this time.
The engine oil installed in the engine at the factory
is a high-quality energy conserving type lubricant.
Oil changes should be consistent with anticipated
climate conditions under which vehicle operations
will occur. For recommended viscosity and quality
grades Úpage 424. NON-DETERGENT OR
STRAIGHT MINERAL OILS MUST NEVER BE USED.
PARKING BRAKE
Before exiting the vehicle, make sure that the
parking brake is fully applied. Also, be certain to
leave an automatic transmission in PARK, or
manual transmission in REVERSE or FIRST gear.
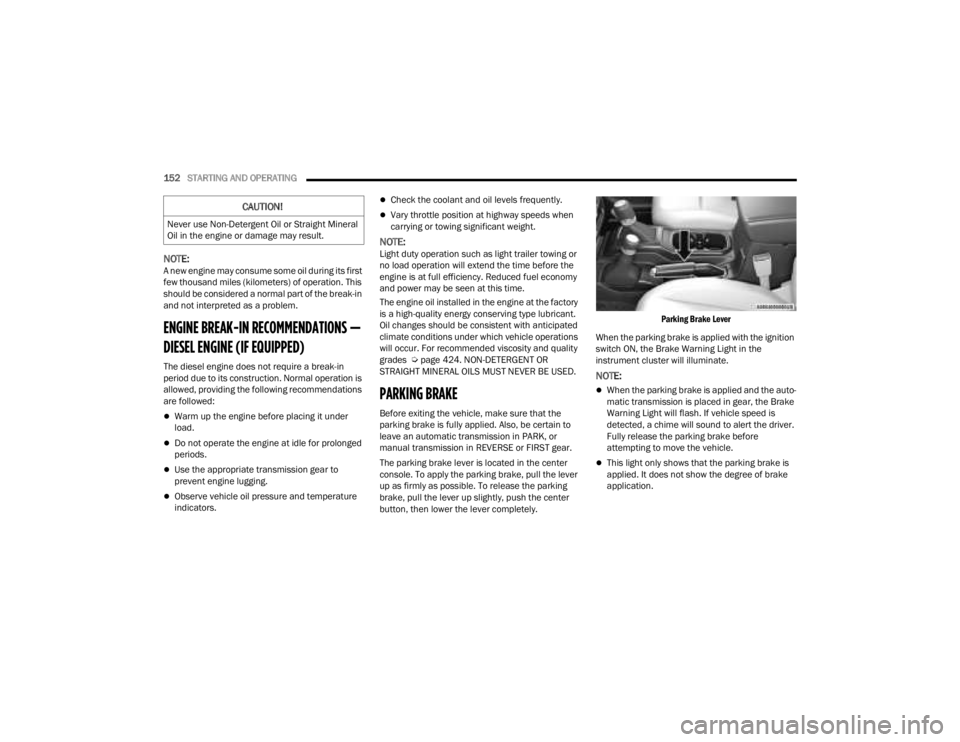
The parking brake lever is located in the center
console. To apply the parking brake, pull the lever
up as firmly as possible. To release the parking
brake, pull the lever up slightly, push the center
button, then lower the lever completely.
Parking Brake Lever
When the parking brake is applied with the ignition
switch ON, the Brake Warning Light in the
instrument cluster will illuminate.
NOTE:
When the parking brake is applied and the auto -
matic transmission is placed in gear, the Brake
Warning Light will flash. If vehicle speed is
detected, a chime will sound to alert the driver.
Fully release the parking brake before
attempting to move the vehicle.
This light only shows that the parking brake is
applied. It does not show the degree of brake
application.
CAUTION!
Never use Non-Detergent Oil or Straight Mineral
Oil in the engine or damage may result.
23_JT_OM_EN_USC_t.book Page 152
Page 332 of 448
330SAFETY
(Continued)
PERIODIC SAFETY CHECKS YOU SHOULD
M
AKE OUTSIDE THE VEHICLE
Tires
Examine tires for excessive tread wear and uneven
wear patterns. Check for stones, nails, glass, or
other objects lodged in the tread or sidewall.
Inspect the tread for cuts and cracks. Inspect
sidewalls for cuts, cracks, and bulges. Check the
lug nut/bolt torque for tightness. Check the tires
(including spare) for proper cold inflation pressure.
Lights
Have someone observe the operation of brake
lights and exterior lights while you work the
controls. Check turn signal and high beam
indicator lights on the instrument panel.
Door Latches
Check for proper closing, latching, and locking.
Fluid Leaks
Check the area under vehicle after overnight
parking for fuel, coolant, oil, or other fluid leaks.
Also, if gasoline fumes are detected or if fuel or
brake fluid leaks are suspected, the cause should
be located and corrected immediately.
ALWAYS REMOVE THE EXISTING
FLOOR MAT FROM THE VEHICLE before
installing any other floor mat. NEVER
install or stack an additional floor mat
on top of an existing floor mat.
ONLY install floor mats designed to fit your
vehicle. NEVER install a floor mat that cannot
be properly attached and secured to your
vehicle. If a floor mat needs to be replaced,
only use a FCA approved floor mat for the
specific make, model, and year of your
vehicle.
ONLY use the driver’s side floor mat on the
driver’s side floor area. To check for interfer -
ence, with the vehicle properly parked with the
engine off, fully press the accelerator, the
brake, and the clutch pedal (if present) to
check for interference. If your floor mat inter -
feres with the operation of any pedal, or is not
secure to the floor, remove the floor mat from
the vehicle and place the floor mat in your
trunk.
ONLY use the passenger’s side floor mat on
the passenger’s side floor area.
WARNING!
ALWAYS make sure objects cannot fall or slide
into the driver’s side floor area when the
vehicle is moving. Objects can become
trapped under accelerator, brake, or clutch
pedals and could cause a loss of vehicle
control.
NEVER place any objects under the floor mat
(e.g., towels, keys, etc.). These objects could
change the position of the floor mat and may
cause interference with the accelerator,
brake, or clutch pedals.
If the vehicle carpet has been removed and
re-installed, always properly attach carpet to
the floor and check the floor mat fasteners are
secure to the vehicle carpet. Fully press each
pedal to check for interference with the accel -
erator, brake, or clutch pedals then re-install
the floor mats.
It is recommended to only use mild soap and
water to clean your floor mats. After cleaning,
always check your floor mat has been properly
installed and is secured to your vehicle using
the floor mat fasteners by lightly pulling mat.
WARNING!
23_JT_OM_EN_USC_t.book Page 330