tow JEEP GLADIATOR 2023 Owners Manual
[x] Cancel search | Manufacturer: JEEP, Model Year: 2023, Model line: GLADIATOR, Model: JEEP GLADIATOR 2023Pages: 448, PDF Size: 17.37 MB
Page 2 of 448

WARNING: Operating, servicing and maintaining a passenger vehicle or off-highway
motor vehicle can expose you to chemicals including engine exhaust, carbon monoxide,
phthalates, and lead, which are known to the State of California to cause cancer and
birth defects or other reproductive harm. To minimize exposure, avoid breathing exhaust,
do not idle the engine except as necessary, service your vehicle in a well-ventilated area
and wear gloves or wash your hands frequently when servicing your vehicle. For more
information go to www.P65Warnings.ca.gov/passenger-vehicle.
The driver’s primary responsibility is the safe operation of the vehicle. Driving while distracted can result in loss of vehicle control, resulting in an accident
and personal injury. FCA US LLC strongly recommends that the driver use extreme caution when using any device or feature that may take their attention
off the road. Use of any electrical devices, such as cellular telephones, computers, portable radios, vehicle navigation or other devices by the driver while
the vehicle is moving is dangerous and could lead to a serious accident. Texting while driving is also dangerous and should never be done while the vehicle
is moving. If you find yourself unable to devote your full attention to vehicle operation, pull off the road to a safe location and stop your vehicle. Some states
or provinces prohibit the use of cellular telephones or texting while driving. It is always the driver’s responsibility to comply with all local laws.
This Owner’s Manual has been prepared to help you get acquainted with your new Jeep
® brand vehicle and to provide a convenient reference source for
common questions.
Not all features shown in this manual may apply to your vehicle. For additional information, visit mopar.com/om (USA), owners.mopar.ca (Canada) or your
local Jeep
® brand dealer.
U.S. Residents: If you are the first registered retail owner of your vehicle, you may obtain a complimentary printed copy of the Warranty Booklet by calling
1-877-426-5337 or by contacting your dealer. Replacement kits can be purchased by visiting www.techauthority.com.
Canadian Residents: If you are the first registered retail owner of your vehicle, you may obtain a complimentary printed copy of the Warranty Booklet or
purchase a replacement kit by calling 1-800-387-1143 or by contacting your dealer.
DRIVING AND ALCOHOL
Drunk driving is one of the most frequent causes of accidents. Your driving ability can be seriously impaired with blood alcohol levels far below the legal
minimum. If you are drinking, don’t drive. Ride with a designated non-drinking driver, call a cab, a rideshare, a friend or use public transportation.
WARNING
Driving after drinking can lead to an accident. Your perceptions are less sharp, your reflexes are slower and your judgment is impaired when you have been
drinking. Never drink and then drive.
This Owner’s Manual illustrates and describes the operation of features and equipment that are either standard or optional on this vehicle. This manual may
also include a description of features and equipment that are no longer available or were not ordered on this vehicle. Please disregard any features and
equipment described in this manual that are not on this vehicle.
FCA US LLC reserves the right to make changes in design and specifications, and/or make
additions to or improvements to its products without imposing any obligation upon itself to install them on products previously manufactured.
With respect to any vehicles sold in Canada, the name FCA US LLC shall be deemed to be deleted and the name FCA Canada Inc. used in substitution
therefore.
This Owner’s Manual is intended to familiarize you with the important features of your vehicle. Your most up-to-date Owner’s Manual, Navigation/Uconnect
manuals and Warranty Booklet can be found by visiting the website on the back cover.
ROADSIDE ASSISTANCE
24 HOURS, 7 DAYS A WEEK AT YOUR SERVICE. CALL 1-800-521-2779 OR VISIT CHRYSLER.RSAHELP.COM (USA)
CALL 1-800-363-4869 OR VISIT FCA.ROADSIDEAID.COM (CANADA) SERVICES: Flat Tire Service, Out Of Gas/Fuel Delivery, Battery Jump Assistance, Lockout Service and Towing Service
Please see the Customer Assistance chapter in this Owner’s Manual for further information.
FCA US LLC reserves the right to modify the terms or discontinue the Roadside Assistance Program at any time. The Roadside Assistance Program is subject to restrictions and
conditions of use, that are determined solely by FCA US LLC.
Page 7 of 448
5
STOP/START SYSTEM — AUTOMATIC
TRANSMISSION (IF EQUIPPED) ........................ 169 Autostop Mode .............................................. 169Possible Reasons The Engine Does Not
Autostop ......................................................... 170
To Start The Engine While In Autostop
Mode .............................................................. 170
To Manually Turn Off The Stop/Start
System ........................................................... 171To Manually Turn On The Stop/Start
System ........................................................... 171System Malfunction ...................................... 171
STOP/START SYSTEM — MANUAL
TRANSMISSION (IF EQUIPPED) .........................171
Autostop Mode .............................................. 172Possible Reasons The Engine Does Not
Autostop ......................................................... 172
To Start The Engine While In Autostop
Mode .............................................................. 172
To Manually Turn Off The Stop/Start
System ........................................................... 173To Manually Turn On The Stop/Start
System ........................................................... 173System Malfunction ...................................... 173
CRUISE CONTROL SYSTEMS —
IF EQUIPPED ........................................................ 173
Cruise Control ............................................... 173
Adaptive Cruise Control (ACC) ...................... 175 PARKSENSE FRONT/REAR PARK ASSIST
SYSTEM — IF EQUIPPED .................................... 184
ParkSense Sensors ....................................... 184
ParkSense Warning Display ......................... 184
ParkSense Display ........................................ 184Enabling And Disabling ParkSense .............. 187Service The ParkSense Park Assist
System ........................................................... 187
Cleaning The ParkSense System ................. 187
ParkSense System Usage Precautions........ 188
PARKVIEW REAR BACK UP CAMERA............... 189
TRAILCAM SYSTEM — IF EQUIPPED ................ 190
REFUELING THE VEHICLE — GASOLINE
ENGINE (IF EQUIPPED) ....................................... 191 Fuel Filler Cap................................................ 191Loose Fuel Filler Cap Message ................... 192
REFUELING THE VEHICLE — DIESEL ENGINE
(IF EQUIPPED) ..................................................... 192
Avoid Using Contaminated Fuel ................... 193Bulk Fuel Storage — Diesel Fuel................... 193Diesel Exhaust Fluid ..................................... 193
VEHICLE LOADING .............................................. 195
Certification Label ......................................... 195
TRAILER TOWING ............................................... 197
Common Towing Definitions......................... 197
Trailer Hitch Classification ............................ 199
Trailer Towing Weights (Maximum Trailer
Weight Ratings) ............................................ 199
Trailer And Tongue Weight............................ 202
Towing Requirements ................................... 202Towing Tips .................................................... 204 RECREATIONAL TOWING (BEHIND
MOTORHOME) ...................................................... 205
Towing This Vehicle Behind Another
Vehicle ........................................................... 205
Recreational Towing — Four-Wheel Drive
Models ........................................................... 205
DRIVING TIPS ....................................................... 207
On-Road Driving Tips..................................... 207Off-Road Driving Tips .................................... 207
MULTIMEDIA
UCONNECT SYSTEMS ......................................... 214
CYBERSECURITY ................................................. 214
UCONNECT SETTINGS ......................................... 215 Customer Programmable Features ............. 215
UCONNECT INTRODUCTION................................ 230
System Overview .......................................... 230Drag & Drop Menu Bar ................................. 232
Safety And General Information................... 232
UCONNECT MODES ............................................. 233
Steering Wheel Audio Controls .................... 233
Radio Mode .................................................. 234Media Mode ................................................. 242
Phone Mode ................................................. 244
ANDROID AUTO™ & APPLE CARPLAY® —
IF EQUIPPED ......................................................... 254
Android Auto™
S
........................................ 254
Apple CarPlay®
S
....................................... 256
Android Auto™ And Apple CarPlay® Tips
And Tricks ...................................................... 258
23_JT_OM_EN_USC_t.book Page 5
Page 8 of 448
6
CONNECTED VEHICLE SERVICES —
IF EQUIPPED ........................................................ 258 Is My Vehicle Connected?............................. 258
Introduction To Connected Vehicle
Services ......................................................... 258
Getting Started With Connected Vehicle
Services ......................................................... 260
Using SiriusXM Guardian™ .......................... 261
Manage My SiriusXM Guardian™ Account .. 272
CONNECTED SERVICES FAQS ........................... 272
Connected Services SOS FAQs —
If Equipped .................................................... 272
Connected Services Remote Door Lock/
Unlock FAQs .................................................. 272
Connected Services Roadside Assistance
FAQs .............................................................. 272
Connected Services Send & Go FAQs —
If Equipped .................................................... 273
Connected Services Vehicle Finder FAQs ... 273
Connected Services Stolen Vehicle
Assistance FAQs — If Equipped ................... 273
Connected Services Remote Vehicle
Start FAQs ..................................................... 274
Connected Services Remote Horn &
Lights FAQs .................................................... 274
Connected Services Account
FAQs — If Equipped ....................................... 274
Data Collection & Privacy.............................. 276 RADIO OPERATION AND MOBILE PHONES ..... 276
Regulatory And Safety Information .............. 277
OFF-ROAD PAGES — IF EQUIPPED.................... 277
Off-Road Pages Status Bar ........................... 277Drivetrain ....................................................... 278
Accessory Gauge ........................................... 278Pitch & Roll ................................................... 278
SAFETY
SAFETY FEATURES .............................................. 279
Anti-Lock Brake System (ABS) ..................... 279
Electronic Brake Control (EBC) System ...... 280
AUXILIARY DRIVING SYSTEMS.......................... 287
Blind Spot Monitoring (BSM) —
If Equipped .................................................... 287
Forward Collision Warning (FCW) With
Mitigation — If Equipped ............................... 291
Tire Pressure Monitoring System (TPMS) .... 294
OCCUPANT RESTRAINT SYSTEMS ................... 299
Occupant Restraint Systems Features ....... 299
Important Safety Precautions ...................... 299Seat Belt Systems ........................................ 300Supplemental Restraint Systems (SRS) ...... 306Child Restraints ............................................. 318 SAFETY TIPS ......................................................... 328
Transporting Passengers.............................. 328
Transporting Pets .......................................... 329Connected Vehicles ...................................... 329
Safety Checks You Should Make Inside
The Vehicle ................................................... 329
Periodic Safety Checks You Should Make
Outside The Vehicle ...................................... 330
Exhaust Gas................................................... 331
Carbon Monoxide Warnings ......................... 331
IN CASE OF EMERGENCY
HAZARD WARNING FLASHERS ......................... 332
ASSIST AND SOS SYSTEM — IF EQUIPPED ...... 332
JACKING AND TIRE CHANGING
S
.................. 335
Preparations For Jacking ............................. 336 Jack Location ................................................ 336
Spare Tire Location And Removal ............... 338
Jacking Instructions ...................................... 339
To Stow The Flat Or Spare ............................ 342
Reinstalling The Jack And Tools ................... 343
JUMP STARTING ................................................. 343
Preparations For Jump Start ........................ 344Jump Starting Procedure .............................. 345
REFUELING IN EMERGENCY – IF EQUIPPED .. 346
IF YOUR ENGINE OVERHEATS ............................ 347
MANUAL PARK RELEASE ................................... 348
FREEING A STUCK VEHICLE .............................. 349
23_JT_OM_EN_USC_t.book Page 6
Page 9 of 448
7
TOWING A DISABLED VEHICLE .......................... 350 Four–Wheel Drive Models ............................ 351
Without The Key Fob ..................................... 351
Emergency Tow Hooks —
If Equipped .................................................... 351
ENHANCED ACCIDENT RESPONSE SYSTEM
(EARS) .................................................................. 352
EVENT DATA RECORDER (EDR) ......................... 352
SERVICING AND MAINTENANCE
SCHEDULED SERVICING — GASOLINE
ENGINE ................................................................. 353
Maintenance Plan ......................................... 354
SCHEDULED SERVICING — DIESEL ENGINE .... 357
Maintenance Plan — Diesel Fuel Up To
B5 Biodiesel................................................... 358Additional Maintenance — B6 To B20
Biodiesel ........................................................ 361
ENGINE COMPARTMENT .................................... 362
3.6L Gasoline Engine ................................... 3623.0L Diesel Engine ........................................ 363
Checking Oil Level ......................................... 364
Adding Washer Fluid ..................................... 364
Maintenance-Free Battery ............................ 364
Pressure Washing ......................................... 365 VEHICLE MAINTENANCE..................................... 365
Engine Oil ....................................................... 365
Engine Oil Filter ............................................. 366Engine Air Cleaner Filter ............................... 366
Draining Fuel/Water Separator Filter —
Diesel Engine ................................................. 368
Fuel Filter Replacement — Diesel Engine .... 369
Priming If The Engine Has Run Out Of
Fuel — Diesel Engine .................................... 370
Intervention Regeneration Strategy —
Message Process Flow ................................ 371Diesel Exhaust Fluid ..................................... 371
Accessory Drive Belt Inspection ................... 372Air Conditioner Maintenance........................ 372
Body Lubrication ........................................... 374Windshield Wiper Blades.............................. 374Exhaust System ............................................ 376
Cooling System .............................................. 377
Charge Air Cooler — Inter-Cooler
(Diesel Engine) .............................................. 379
Brake System ............................................... 380
Front/Rear Axle Fluid ................................... 380Transfer Case ............................................... 381
Manual Transmission — If Equipped............ 381
Automatic Transmission —
If Equipped .................................................... 381
Fuses ............................................................. 382Bulb Replacement ........................................ 392 TIRES ..................................................................... 395
Tire Safety Information ................................. 395
Tires — General Information ......................... 401
Tire Types....................................................... 405Spare Tires — If Equipped ............................ 406
Wheel And Wheel Trim Care......................... 407
Snow Traction Devices ................................. 408
Tire Rotation Recommendations ................. 409
DEPARTMENT OF TRANSPORTATION
UNIFORM TIRE QUALITY GRADES .................... 410
Treadwear...................................................... 410
Traction Grades ............................................. 410Temperature Grades..................................... 410
STORING THE VEHICLE ....................................... 411
BODYWORK .......................................................... 411
Protection From Atmospheric Agents .......... 411
Body And Underbody Maintenance ............. 412
Preserving The Bodywork ............................. 412
INTERIORS ........................................................... 414
Carpet Safety Information ............................ 414
Carpet Removal............................................. 415Seats And Fabric Parts ................................. 416
Plastic And Coated Parts .............................. 417
Leather Surfaces........................................... 417
Glass Surfaces ............................................. 417
23_JT_OM_EN_USC_t.book Page 7
Page 11 of 448
9
INTRODUCTION
Dear Customer,
Congratulations on the purchase of your Jeep® vehicle. Be assured that it represents precision workmanship, distinctive styling, and high quality.
This is a specialized utility vehicle. It can go places and perform tasks that are not intended for conventional passenger vehicles. It handles and maneuvers
differently from many passenger vehicles, both on-road and off-road, so take time to become familiar with your vehicle. If equipped, the two-wheel drive version
of this vehicle is designed for on-road use only. It is not intended for off-road driving or use in other severe conditions suited for a four-wheel drive vehicle. Before
you start to operate this vehicle, read the Owner’s Manual. Be sure you are familiar with all vehicle controls, particularly those used for braking, steering,
transmission, and transfer case operation. Learn how your vehicle handles on different road surfaces. Your driving skills will improve with experience. When
driving off-road, or operating the vehicle, don’t overload the vehicle or expect the vehicle to overcome the natural laws of physics. Always observe federal, state,
provincial and local laws wherever you drive. As with other vehicles of this type, failure to operate this vehicle correctly may result in loss of control or a collision.
See Úpage 207 for further information.
This Owner’s Manual has been prepared with the assistance of service and engineering specialists to acquaint you with the operation and maintenance of your
vehicle. It is supplemented by customer-oriented documents. Within this information, you will find a description of the services that FCA US LLC offers to its
customers as well as the details of the terms and conditions for maintaining its validity. Please take the time to read all of these publications carefully before
driving your vehicle for the first time. Following the instructions, recommendations, tips, and important warnings in this manual will help ensure safe and
enjoyable operation of your vehicle.
This Owner’s Manual describes all versions of this vehicle. Options and equipment dedicated to specific markets or versions are not expressly indicated in the
text. Therefore, you should only consider the information that is related to the trim level, engine, and version that you have purchased. Any content introduced
throughout the Owner’s Information that may or may not be applicable to your vehicle will be identified with the wording “If Equipped”. All information contained
in this publication is intended to help you use your vehicle in the best possible way. FCA US LLC aims towards a constant improvement of the vehicles produced.
For this reason, it reserves the right to make changes to the model described for technical and/or commercial reasons. For further information, contact an
authorized dealer.
When it comes to service, remember that authorized dealers know your Jeep® best, have factory-trained technicians, genuine Mopar® parts, and care about
your satisfaction.1
23_JT_OM_EN_USC_t.book Page 9
Page 31 of 448
GETTING TO KNOW YOUR VEHICLE29
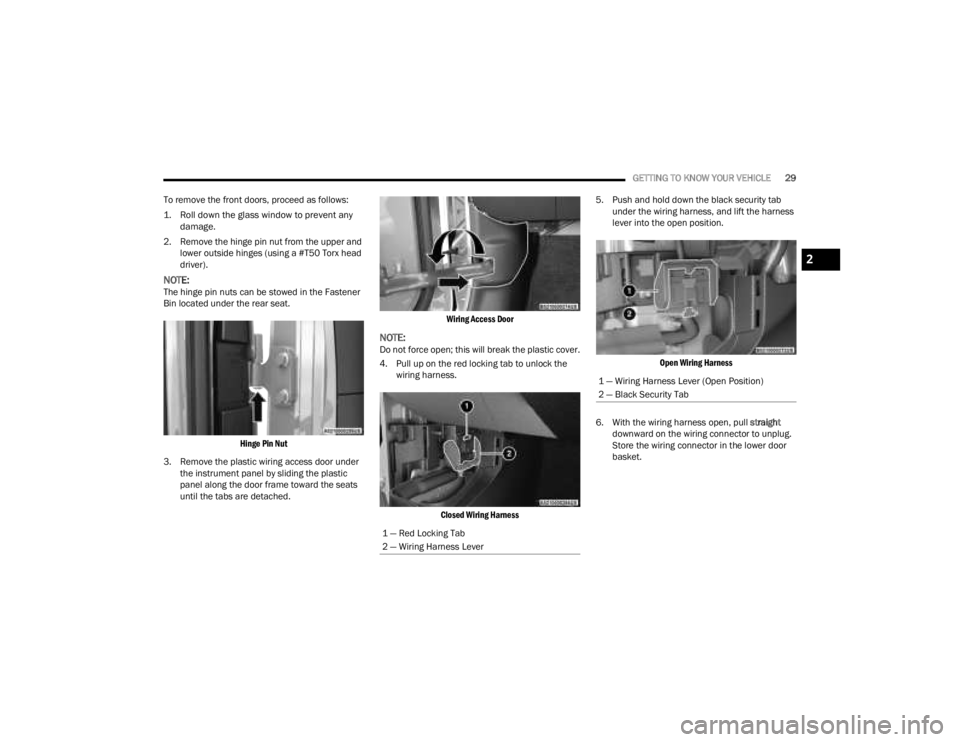
To remove the front doors, proceed as follows:
1. Roll down the glass window to prevent any damage.
2. Remove the hinge pin nut from the upper and lower outside hinges (using a #T50 Torx head
driver).
NOTE:The hinge pin nuts can be stowed in the Fastener
Bin located under the rear seat.
Hinge Pin Nut
3. Remove the plastic wiring access door under the instrument panel by sliding the plastic
panel along the door frame toward the seats
until the tabs are detached.
Wiring Access Door
NOTE:Do not force open; this will break the plastic cover.
4. Pull up on the red locking tab to unlock the
wiring harness.
Closed Wiring Harness
5. Push and hold down the black security tab
under the wiring harness, and lift the harness
lever into the open position.
Open Wiring Harness
6. With the wiring harness open, pull straight
downward on the wiring connector to unplug.
Store the wiring connector in the lower door
basket.
1 — Red Locking Tab
2 — Wiring Harness Lever
1 — Wiring Harness Lever (Open Position)
2 — Black Security Tab
2
23_JT_OM_EN_USC_t.book Page 29
Page 34 of 448
32GETTING TO KNOW YOUR VEHICLE
5. Replace wiring access doors.
NOTE:
When reinstalling the door check arm attachment
screw, screw torque should be between 11.76 ft·lb /
16 N·m and 27.9 ft·lb / 38 N·m.
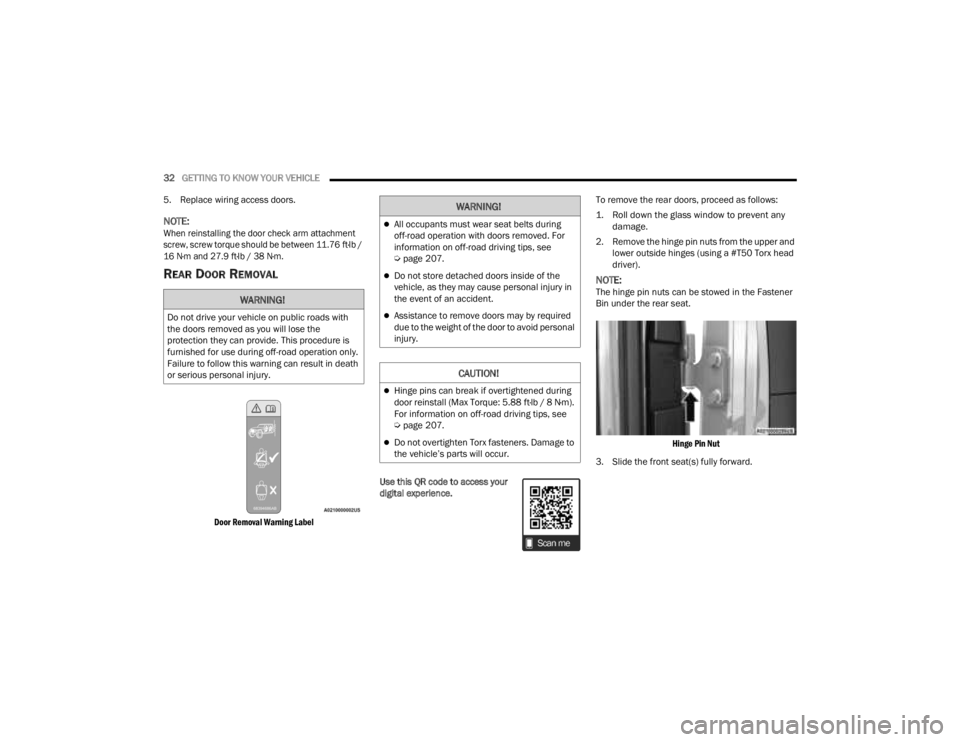
REAR DOOR REMOVAL
Door Removal Warning Label
Use this QR code to access your
digital experience. To remove the rear doors, proceed as follows:
1. Roll down the glass window to prevent any
damage.
2. Remove the hinge pin nuts from the upper and lower outside hinges (using a #T50 Torx head
driver).
NOTE:The hinge pin nuts can be stowed in the Fastener
Bin under the rear seat.
Hinge Pin Nut
3. Slide the front seat(s) fully forward.WARNING!
Do not drive your vehicle on public roads with
the doors removed as you will lose the
protection they can provide. This procedure is
furnished for use during off-road operation only.
Failure to follow this warning can result in death
or serious personal injury.
WARNING!
All occupants must wear seat belts during
off-road operation with doors removed. For
information on off-road driving tips, see
Ú page 207.
Do not store detached doors inside of the
vehicle, as they may cause personal injury in
the event of an accident.
Assistance to remove doors may by required
due to the weight of the door to avoid personal
injury.
CAUTION!
Hinge pins can break if overtightened during
door reinstall (Max Torque: 5.88 ft·lb / 8 N·m).
For information on off-road driving tips, see
Úpage 207.
Do not overtighten Torx fasteners. Damage to
the vehicle’s parts will occur.
23_JT_OM_EN_USC_t.book Page 32
Page 37 of 448
GETTING TO KNOW YOUR VEHICLE35
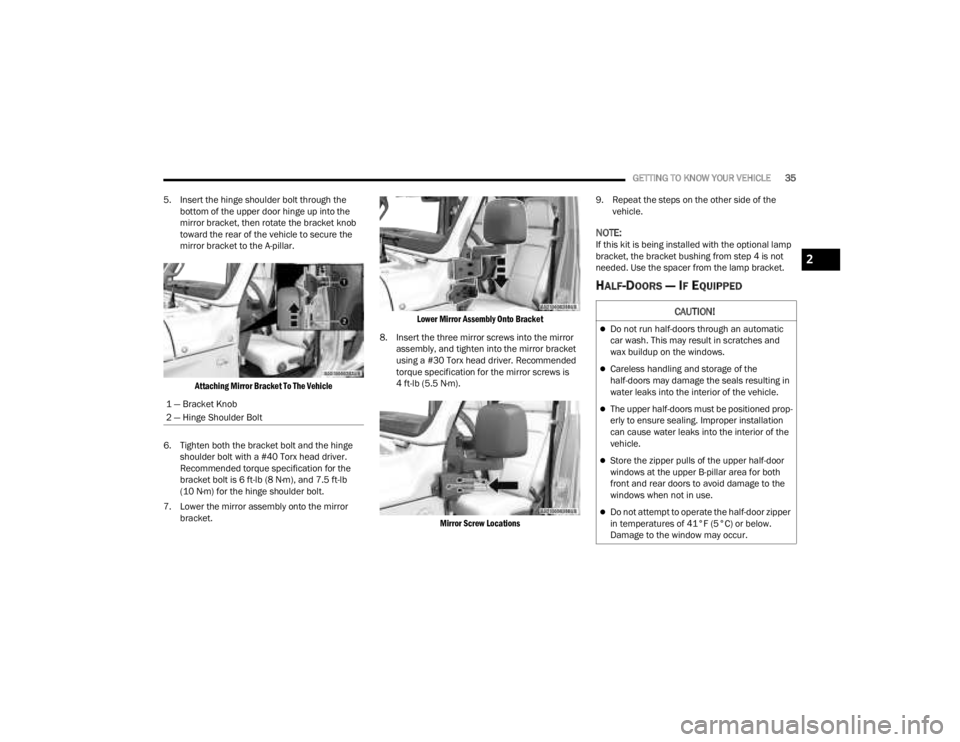
5. Insert the hinge shoulder bolt through the bottom of the upper door hinge up into the
mirror bracket, then rotate the bracket knob
toward the rear of the vehicle to secure the
mirror bracket to the A-pillar.
Attaching Mirror Bracket To The Vehicle
6. Tighten both the bracket bolt and the hinge shoulder bolt with a #40 Torx head driver.
Recommended torque specification for the
bracket bolt is 6 ft-lb (8 N·m), and 7.5 ft-lb
(10 N·m) for the hinge shoulder bolt.
7. Lower the mirror assembly onto the mirror bracket.
Lower Mirror Assembly Onto Bracket
8. Insert the three mirror screws into the mirror assembly, and tighten into the mirror bracket
using a #30 Torx head driver. Recommended
torque specification for the mirror screws is
4 ft-lb (5.5 N·m).
Mirror Screw Locations
9. Repeat the steps on the other side of the
vehicle.
NOTE:If this kit is being installed with the optional lamp
bracket, the bracket bushing from step 4 is not
needed. Use the spacer from the lamp bracket.
HALF-DOORS — IF EQUIPPED
1 — Bracket Knob
2 — Hinge Shoulder Bolt
CAUTION!
Do not run half-doors through an automatic
car wash. This may result in scratches and
wax buildup on the windows.
Careless handling and storage of the
half-doors may damage the seals resulting in
water leaks into the interior of the vehicle.
The upper half-doors must be positioned prop -
erly to ensure sealing. Improper installation
can cause water leaks into the interior of the
vehicle.
Store the zipper pulls of the upper half-door
windows at the upper B-pillar area for both
front and rear doors to avoid damage to the
windows when not in use.
Do not attempt to operate the half-door zipper
in temperatures of 41°F (5°C) or below.
Damage to the window may occur.
2
23_JT_OM_EN_USC_t.book Page 35
Page 41 of 448
GETTING TO KNOW YOUR VEHICLE39
2. With the bolts loose, the door can be moved forward by pushing the door handle toward the
front of the vehicle, and/or upward by grabbing
the door handle and lifting towards the roof.
3. Once the gaps between the door and vehicle body are uniform around the entire door,
tighten the door hinge bolts to 20.3 ft· lb /
27.5 N·m (Max Torque: 27.3 ft· lb / 37 N·m).
Upper Door Adjustment
After installation of the half-doors, if water leaks or
wind noise is observed, the seal of the upper
half-door to the door opening may need to be
adjusted.
To determine if the upper half-door needs to be
adjusted, proceed as follows:
1. Determine which door is affected.
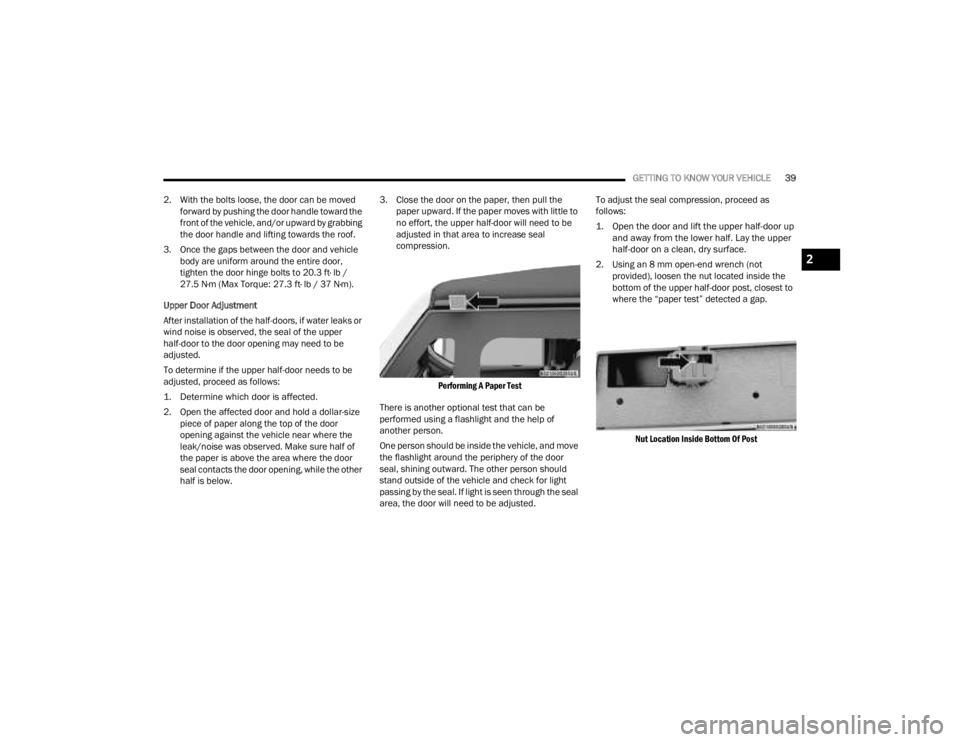
2. Open the affected door and hold a dollar-size piece of paper along the top of the door
opening against the vehicle near where the
leak/noise was observed. Make sure half of
the paper is above the area where the door
seal contacts the door opening, while the other
half is below. 3. Close the door on the paper, then pull the
paper upward. If the paper moves with little to
no effort, the upper half-door will need to be
adjusted in that area to increase seal
compression.
Performing A Paper Test
There is another optional test that can be
performed using a flashlight and the help of
another person.
One person should be inside the vehicle, and move
the flashlight around the periphery of the door
seal, shining outward. The other person should
stand outside of the vehicle and check for light
passing by the seal. If light is seen through the seal
area, the door will need to be adjusted. To adjust the seal compression, proceed as
follows:
1. Open the door and lift the upper half-door up
and away from the lower half. Lay the upper
half-door on a clean, dry surface.
2. Using an 8 mm open-end wrench (not provided), loosen the nut located inside the
bottom of the upper half-door post, closest to
where the “paper test” detected a gap.
Nut Location Inside Bottom Of Post
2
23_JT_OM_EN_USC_t.book Page 39
Page 44 of 448
42GETTING TO KNOW YOUR VEHICLE
Half-Door Removal
To remove the half-doors, repeat the installation
steps in reverse order.
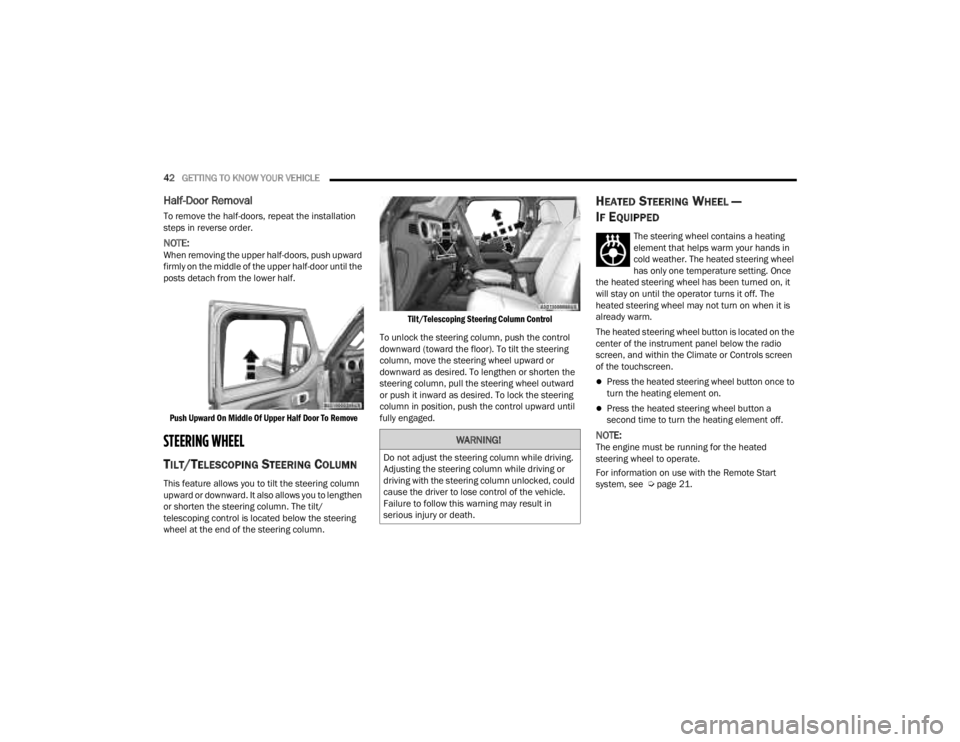
NOTE:When removing the upper half-doors, push upward
firmly on the middle of the upper half-door until the
posts detach from the lower half.
Push Upward On Middle Of Upper Half Door To Remove
STEERING WHEEL
TILT/TELESCOPING STEERING COLUMN
This feature allows you to tilt the steering column
upward or downward. It also allows you to lengthen
or shorten the steering column. The tilt/
telescoping control is located below the steering
wheel at the end of the steering column.
Tilt/Telescoping Steering Column Control
To unlock the steering column, push the control
downward (toward the floor). To tilt the steering
column, move the steering wheel upward or
downward as desired. To lengthen or shorten the
steering column, pull the steering wheel outward
or push it inward as desired. To lock the steering
column in position, push the control upward until
fully engaged.
HEATED STEERING WHEEL —
I
F EQUIPPED
The steering wheel contains a heating
element that helps warm your hands in
cold weather. The heated steering wheel
has only one temperature setting. Once
the heated steering wheel has been turned on, it
will stay on until the operator turns it off. The
heated steering wheel may not turn on when it is
already warm.
The heated steering wheel button is located on the
center of the instrument panel below the radio
screen, and within the Climate or Controls screen
of the touchscreen.
Press the heated steering wheel button once to
turn the heating element on.
Press the heated steering wheel button a
second time to turn the heating element off.
NOTE:The engine must be running for the heated
steering wheel to operate.
For information on use with the Remote Start
system, see Ú page 21.WARNING!
Do not adjust the steering column while driving.
Adjusting the steering column while driving or
driving with the steering column unlocked, could
cause the driver to lose control of the vehicle.
Failure to follow this warning may result in
serious injury or death.
23_JT_OM_EN_USC_t.book Page 42