wind JEEP GRAND CHEROKEE 2002 WJ / 2.G Workshop Manual
[x] Cancel search | Manufacturer: JEEP, Model Year: 2002, Model line: GRAND CHEROKEE, Model: JEEP GRAND CHEROKEE 2002 WJ / 2.GPages: 2199, PDF Size: 76.01 MB
Page 1975 of 2199
(3) Connect express module, drive motor, and con-
trol switch wire connectors.
(4) Set headliner into position.
(5) Test sunroof operation, adjust as necessary.
(Refer to 23 - BODY/SUNROOF/GLASS PANEL -
ADJUSTMENTS)
(6) Finish installing the headliner.
(7) Connect the control switch wire connector.
(8) Install the overhead console. (Refer to 8 -
ELECTRICAL/OVERHEAD CONSOLE - INSTALLA-
TION)
(9) Install the sunvisors. (Refer to 23 - BODY/IN-
TERIOR/SUN VISOR - INSTALLATION)
(10) Install the D-pillar trim. (Refer to 23 - BODY/
INTERIOR/D-PILLAR TRIM - INSTALLATION)
(11) Install the C-pillar trim. (Refer to 23 - BODY/
INTERIOR/C-PILLAR TRIM - INSTALLATION)
(12) Install the B-pillar upper trim. (Refer to 23 -
BODY/INTERIOR/B-PILLAR UPPER TRIM -
INSTALLATION)
(13) Install the A-pillar trim. (Refer to 23 - BODY/
INTERIOR/A-PILLAR TRIM - INSTALLATION)
WIND DEFLECTOR
REMOVAL
(1) Open sunroof glass panel.
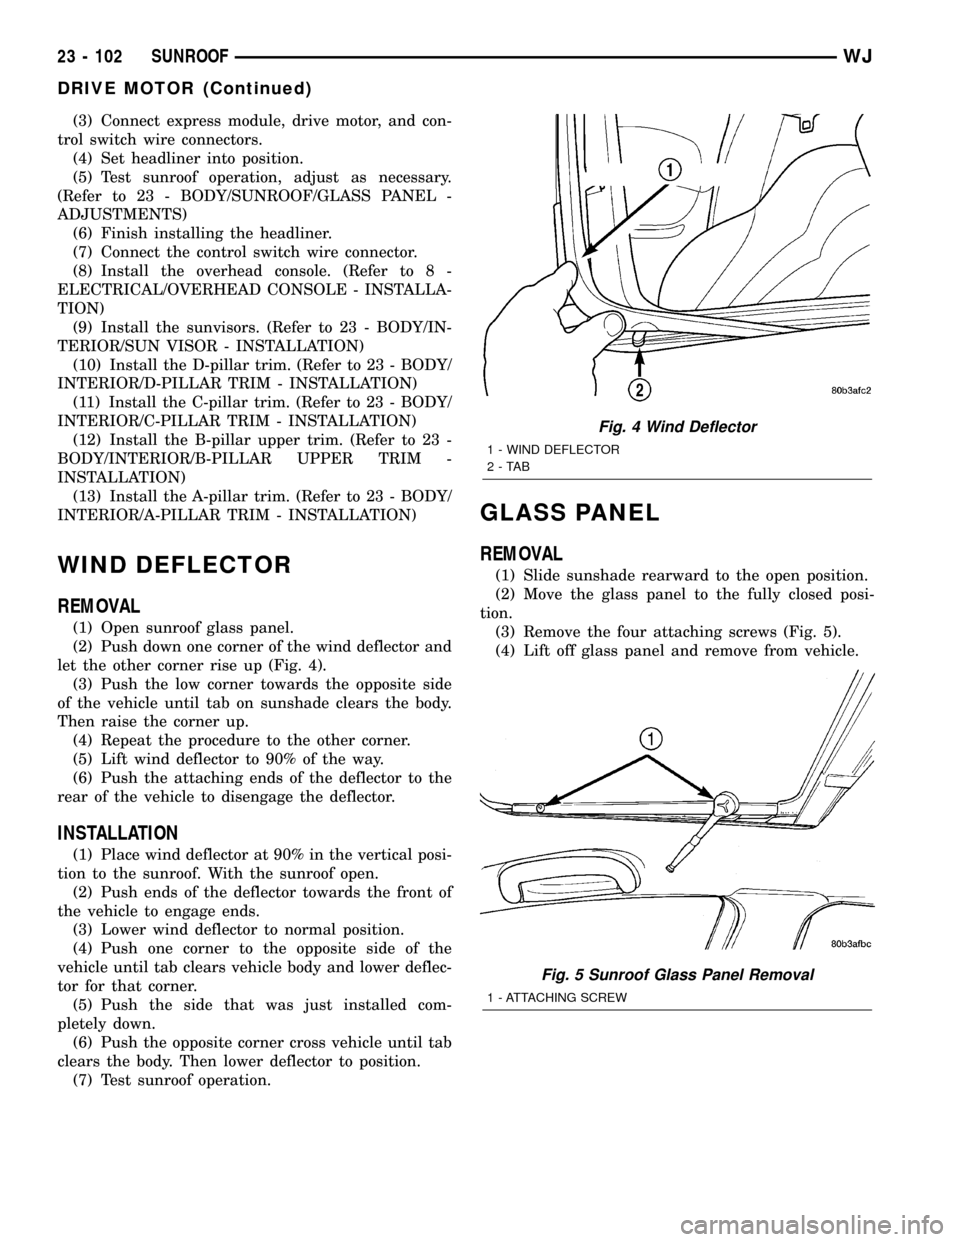
(2) Push down one corner of the wind deflector and
let the other corner rise up (Fig. 4).
(3) Push the low corner towards the opposite side
of the vehicle until tab on sunshade clears the body.
Then raise the corner up.
(4) Repeat the procedure to the other corner.
(5) Lift wind deflector to 90% of the way.
(6) Push the attaching ends of the deflector to the
rear of the vehicle to disengage the deflector.
INSTALLATION
(1) Place wind deflector at 90% in the vertical posi-
tion to the sunroof. With the sunroof open.
(2) Push ends of the deflector towards the front of
the vehicle to engage ends.
(3) Lower wind deflector to normal position.
(4) Push one corner to the opposite side of the
vehicle until tab clears vehicle body and lower deflec-
tor for that corner.
(5) Push the side that was just installed com-
pletely down.
(6) Push the opposite corner cross vehicle until tab
clears the body. Then lower deflector to position.
(7) Test sunroof operation.
GLASS PANEL
REMOVAL
(1) Slide sunshade rearward to the open position.
(2) Move the glass panel to the fully closed posi-
tion.
(3) Remove the four attaching screws (Fig. 5).
(4) Lift off glass panel and remove from vehicle.
Fig. 4 Wind Deflector
1 - WIND DEFLECTOR
2-TAB
Fig. 5 Sunroof Glass Panel Removal
1 - ATTACHING SCREW
23 - 102 SUNROOFWJ
DRIVE MOTOR (Continued)
Page 1976 of 2199
INSTALLATION
NOTE: Sunroof glass must be set in place and
attached as close as possible to flush with the roof
surface. For wind noise reasons, care must be
taken to ensure that the glass is not remounted
either a) Overflush to the roof surface at the front
edge of the glass, or b) Underflush to the roof sur-
face at the rear edge of the glass.
(1) Position glass panel in to opening.
(2) Start the four attaching screws.
(3) Tighten screws.
(4) Verify sunroof operation and alignment. Check
fit and adjust as necessary. (Refer to 23 - BODY/
SUNROOF/GLASS PANEL - ADJUSTMENTS - FIT)
ADJUSTMENTS
ADJUSTMENTS - FIT
(1) Move the sunshade rearward to the open posi-
tion.
(2) Move the sunroof glass panel to the fully closed
position.
(3) Loosen the forward screws on each side enough
to make the front adjustment.
(4) Adjust the front of the sunroof glass panel 1
mm (1/32 inch) below the top surface of the roof
panel.
(5) Tighten the front two screws.
(6) Loosen the rear screws on each side enough to
make the rear adjustment.
(7) Adjust the rear of the sunroof glass panel 1
mm (1/32 inch) above the top surface of the roof
panel.
(8) Tighten the rear two screws.
(9) Check for proper fit. If not OK, repeat glass
panel adjustment.
ADJUSTMENT - TIMING
NOTE: A gage comes with the new motor.
(1) If the glass panel was not in the fully closed
position, when the motor was removed, the sunroof
glass panel needs to be timed, before the new motor
is installed.
(2) Remove sunroof glass panel.
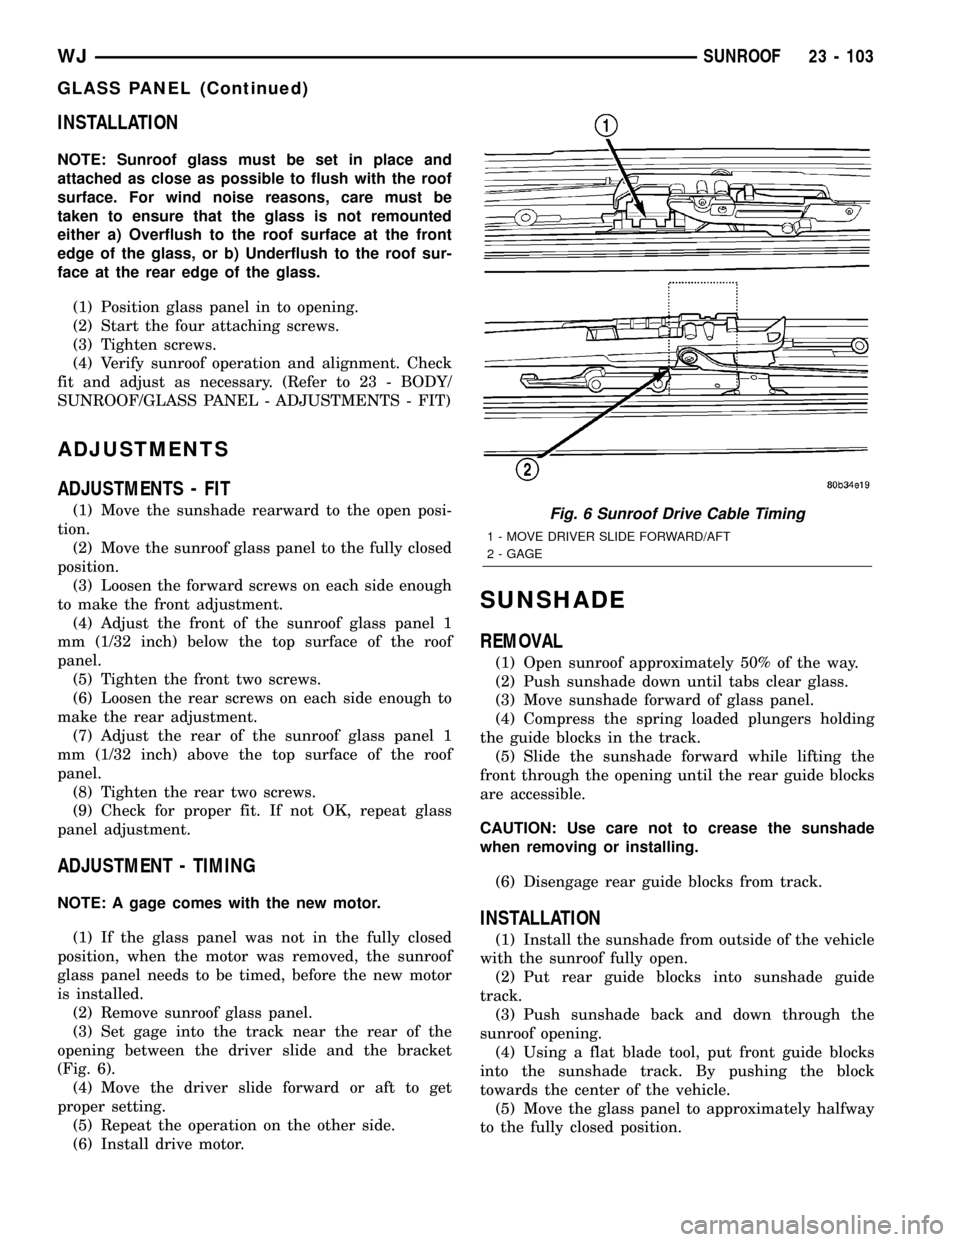
(3) Set gage into the track near the rear of the
opening between the driver slide and the bracket
(Fig. 6).
(4) Move the driver slide forward or aft to get
proper setting.
(5) Repeat the operation on the other side.
(6) Install drive motor.
SUNSHADE
REMOVAL
(1) Open sunroof approximately 50% of the way.
(2) Push sunshade down until tabs clear glass.
(3) Move sunshade forward of glass panel.
(4) Compress the spring loaded plungers holding
the guide blocks in the track.
(5) Slide the sunshade forward while lifting the
front through the opening until the rear guide blocks
are accessible.
CAUTION: Use care not to crease the sunshade
when removing or installing.
(6) Disengage rear guide blocks from track.
INSTALLATION
(1) Install the sunshade from outside of the vehicle
with the sunroof fully open.
(2) Put rear guide blocks into sunshade guide
track.
(3) Push sunshade back and down through the
sunroof opening.
(4) Using a flat blade tool, put front guide blocks
into the sunshade track. By pushing the block
towards the center of the vehicle.
(5) Move the glass panel to approximately halfway
to the fully closed position.
Fig. 6 Sunroof Drive Cable Timing
1 - MOVE DRIVER SLIDE FORWARD/AFT
2 - GAGE
WJSUNROOF 23 - 103
GLASS PANEL (Continued)
Page 1980 of 2199
INSTALLATION
(1) Position the seal on the door flange.
(2) Firmly press downward to seat seal on the door
flange.
(3)
Install the door trim panel (Refer to 23 - BODY/
DOOR - FRONT/TRIM PANEL - INSTALLATION).
FDR OUTER BELT
WEATHERSTRIP
REMOVAL
(1) Lower the door glass.
(2) Remove the screw from the inner door panel
attaching the seal to outer door panel (Fig. 4).
(3) Pull the seal rearward to release from the side
view mirror bezel.
(4) Lift seal and separate from door panel.
INSTALLATION
(1) Position seal on the door panel.
(2) Push the seal forward to install under the side
view mirror bezel.
(3) Install the screw from the inner door panel
attaching the seal to outer door panel.
(4) Raise the door glass.
FLIP-UP GLASS
WEATHERSTRIP
REMOVAL
(1) Raise flip up glass.
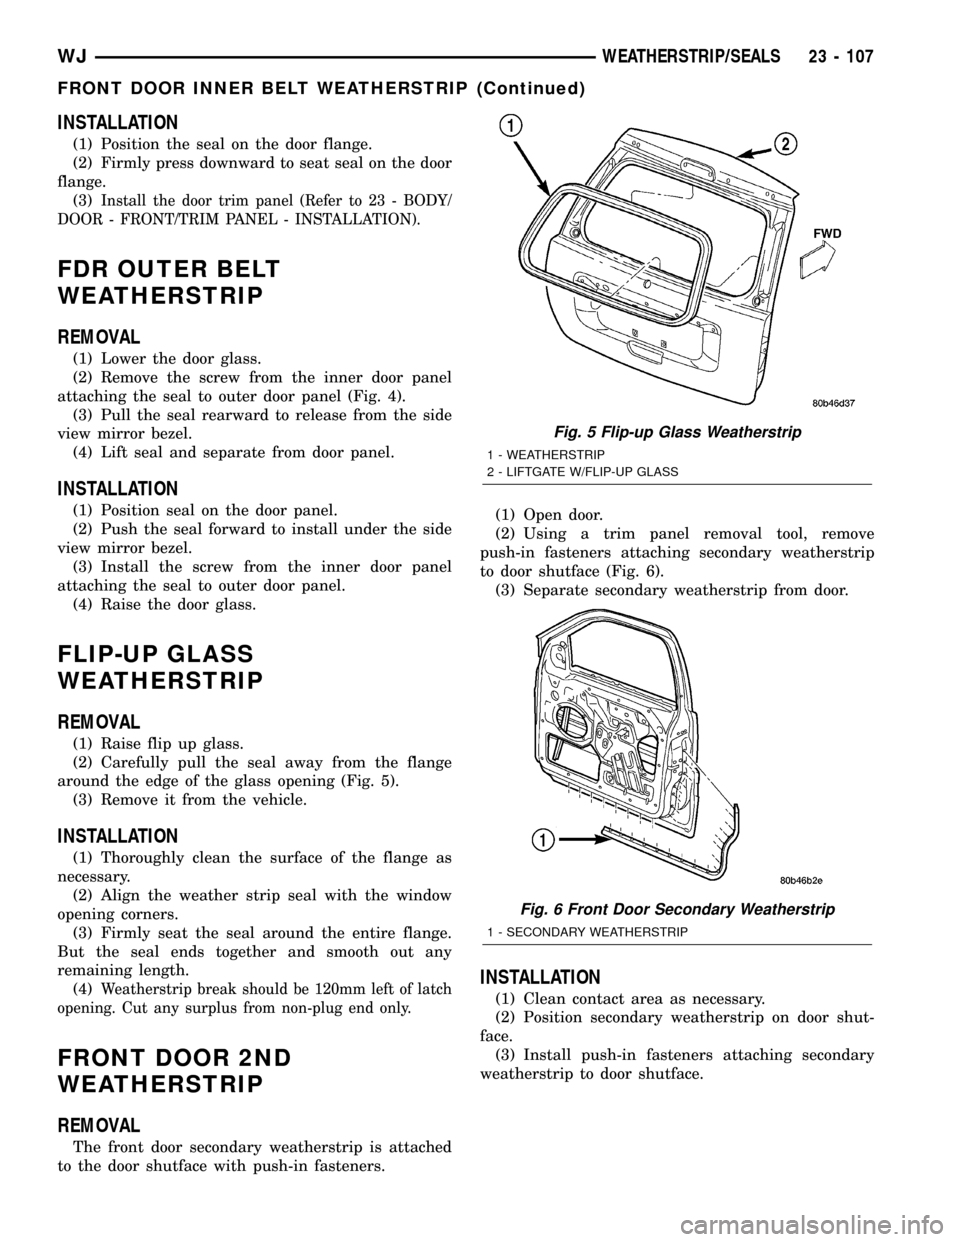
(2) Carefully pull the seal away from the flange
around the edge of the glass opening (Fig. 5).
(3) Remove it from the vehicle.
INSTALLATION
(1) Thoroughly clean the surface of the flange as
necessary.
(2) Align the weather strip seal with the window
opening corners.
(3) Firmly seat the seal around the entire flange.
But the seal ends together and smooth out any
remaining length.
(4)
Weatherstrip break should be 120mm left of latch
opening. Cut any surplus from non-plug end only.
FRONT DOOR 2ND
WEATHERSTRIP
REMOVAL
The front door secondary weatherstrip is attached
to the door shutface with push-in fasteners.(1) Open door.
(2) Using a trim panel removal tool, remove
push-in fasteners attaching secondary weatherstrip
to door shutface (Fig. 6).
(3) Separate secondary weatherstrip from door.
INSTALLATION
(1) Clean contact area as necessary.
(2) Position secondary weatherstrip on door shut-
face.
(3) Install push-in fasteners attaching secondary
weatherstrip to door shutface.
Fig. 5 Flip-up Glass Weatherstrip
1 - WEATHERSTRIP
2 - LIFTGATE W/FLIP-UP GLASS
Fig. 6 Front Door Secondary Weatherstrip
1 - SECONDARY WEATHERSTRIP
WJWEATHERSTRIP/SEALS 23 - 107
FRONT DOOR INNER BELT WEATHERSTRIP (Continued)
Page 1985 of 2199
NOTE:
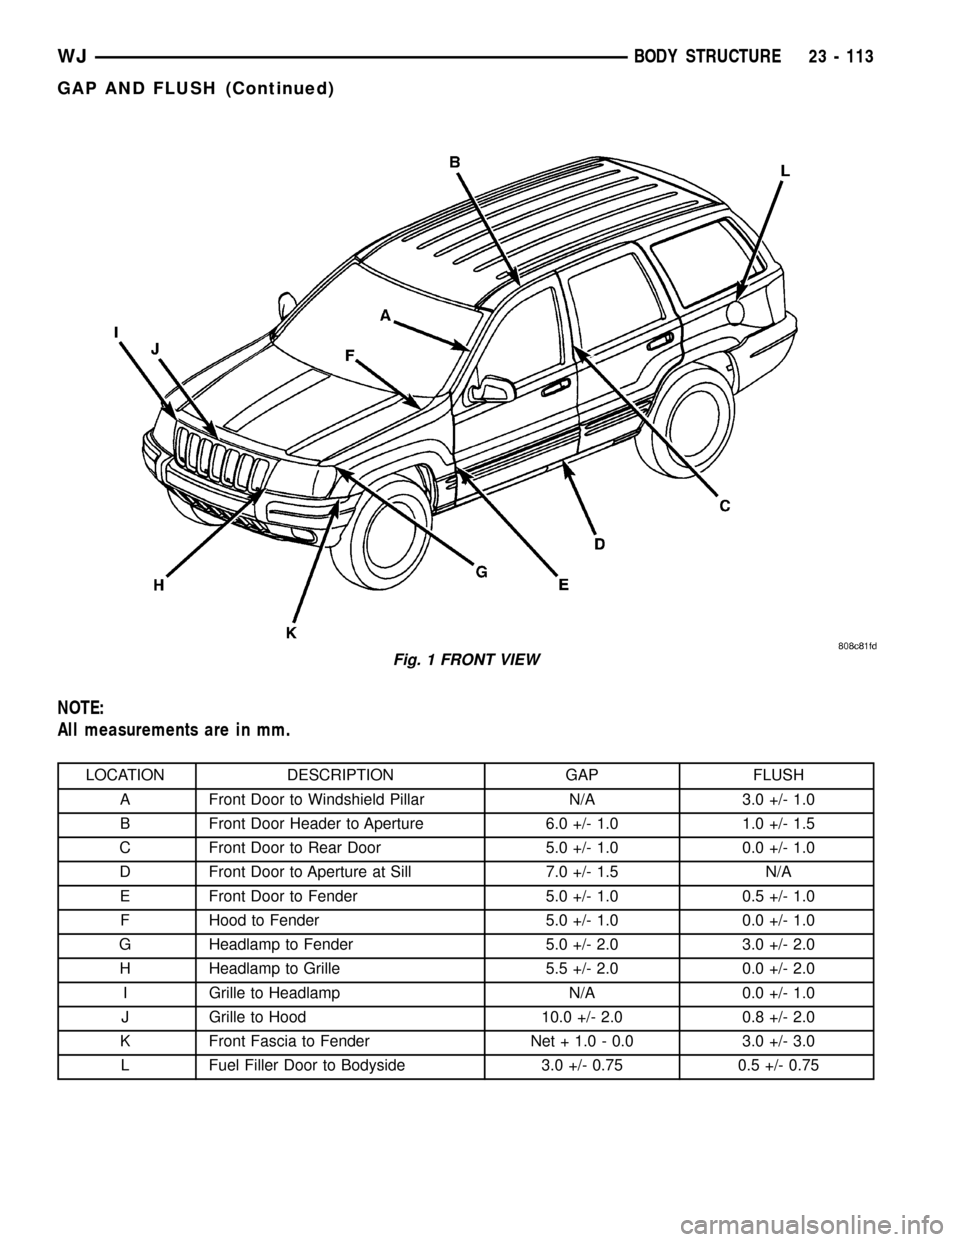
All measurements are in mm.
LOCATION DESCRIPTION GAP FLUSH
A Front Door to Windshield Pillar N/A 3.0 +/- 1.0
B Front Door Header to Aperture 6.0 +/- 1.0 1.0 +/- 1.5
C Front Door to Rear Door 5.0 +/- 1.0 0.0 +/- 1.0
D Front Door to Aperture at Sill 7.0 +/- 1.5 N/A
E Front Door to Fender 5.0 +/- 1.0 0.5 +/- 1.0
F Hood to Fender 5.0 +/- 1.0 0.0 +/- 1.0
G Headlamp to Fender 5.0 +/- 2.0 3.0 +/- 2.0
H Headlamp to Grille 5.5 +/- 2.0 0.0 +/- 2.0
I Grille to Headlamp N/A 0.0 +/- 1.0
J Grille to Hood 10.0 +/- 2.0 0.8 +/- 2.0
K Front Fascia to Fender Net + 1.0 - 0.0 3.0 +/- 3.0
L Fuel Filler Door to Bodyside 3.0 +/- 0.75 0.5 +/- 0.75
Fig. 1 FRONT VIEW
WJBODY STRUCTURE 23 - 113
GAP AND FLUSH (Continued)
Page 1987 of 2199
OPENING DIMENSIONS
SPECIFICATIONS - BODY OPENING
DIMENSIONS
DESCRIPTION FIGURE
WINDSHIELD AND
FRONT DOOR
OPENING3
REAR DOOR AND
QUARTER GLASS
OPENING4
LIFTGATE OPENING
AND ENGINE
COMPARTMENT5
23 - 114 BODY STRUCTUREWJ
Page 1988 of 2199
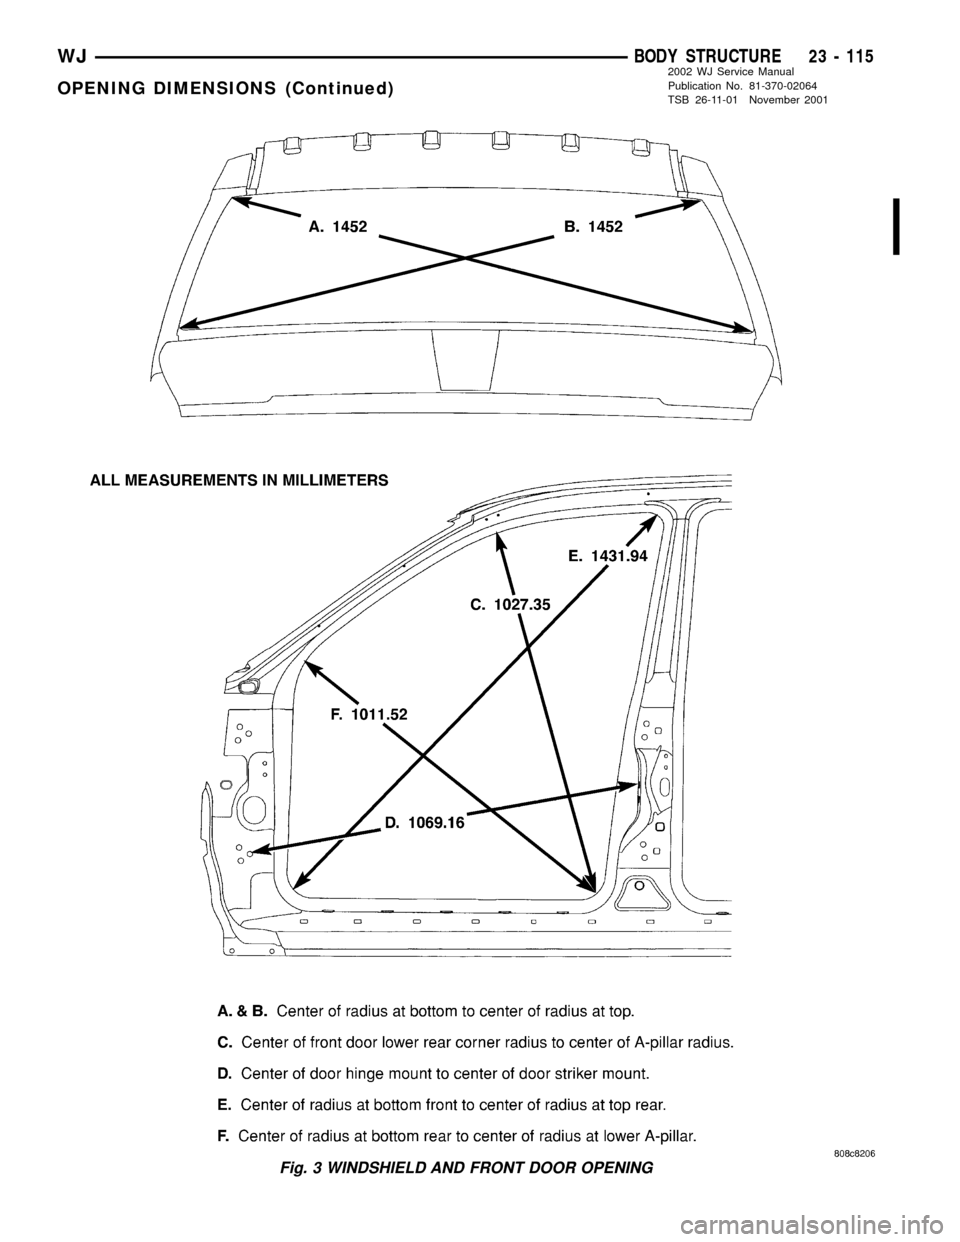
Fig. 3 WINDSHIELD AND FRONT DOOR OPENING
WJBODY STRUCTURE 23 - 115
OPENING DIMENSIONS (Continued)
2002 WJ Service Manual
Publication No. 81-370-02064
TSB 26-11-01 November 2001
Page 2010 of 2199
STUCTURAL ADHESIVE
LOCATIONS
SPECIFICATIONS - STRUCTURAL ADHESIVE
LOCATIONS
INDEX
DESCRIPTION FIGURE
COWL PLENUM 28
DASH PANEL AND FRONT FLOOR PAN 29
PLENUM AND WINDSHIELD WIPER MOUNTING 30
FRONT FLOOR PAN AND SILLS 31
FRONT AND CENTER FLOOR PAN 32
FRONT PAN AND INNER BODY SIDE APERTURE 33
REAR SEAT CROSSMEMBER 34
REAR INNER WHEELHOUSE 35
FLOOR PAN AND SILL ASSEMBLY 36
FLOOR PAN 37
REAR INNER WHEELHOUSE AND REAR FLOOR PAN 38
RIGHT INNER BODYSIDE APERTURE 39
BODY SIDE INNER PANEL AND WHEELHOUSE 40
BODY SIDE OUTER PANEL AND REAR WHEELHOUSE OUTER PANEL 41
D-PILLAR AND FUEL FILLER GUSSETS 42
LIFTGATE 43
TAILLAMP MOUNTING PANEL 44
TAILLAMP 45
REAR INNER CROSSMEMBER 46
ROOF BOWS 47
REAR LOWER HEADER 48
WJBODY STRUCTURE 23 - 137
Page 2012 of 2199
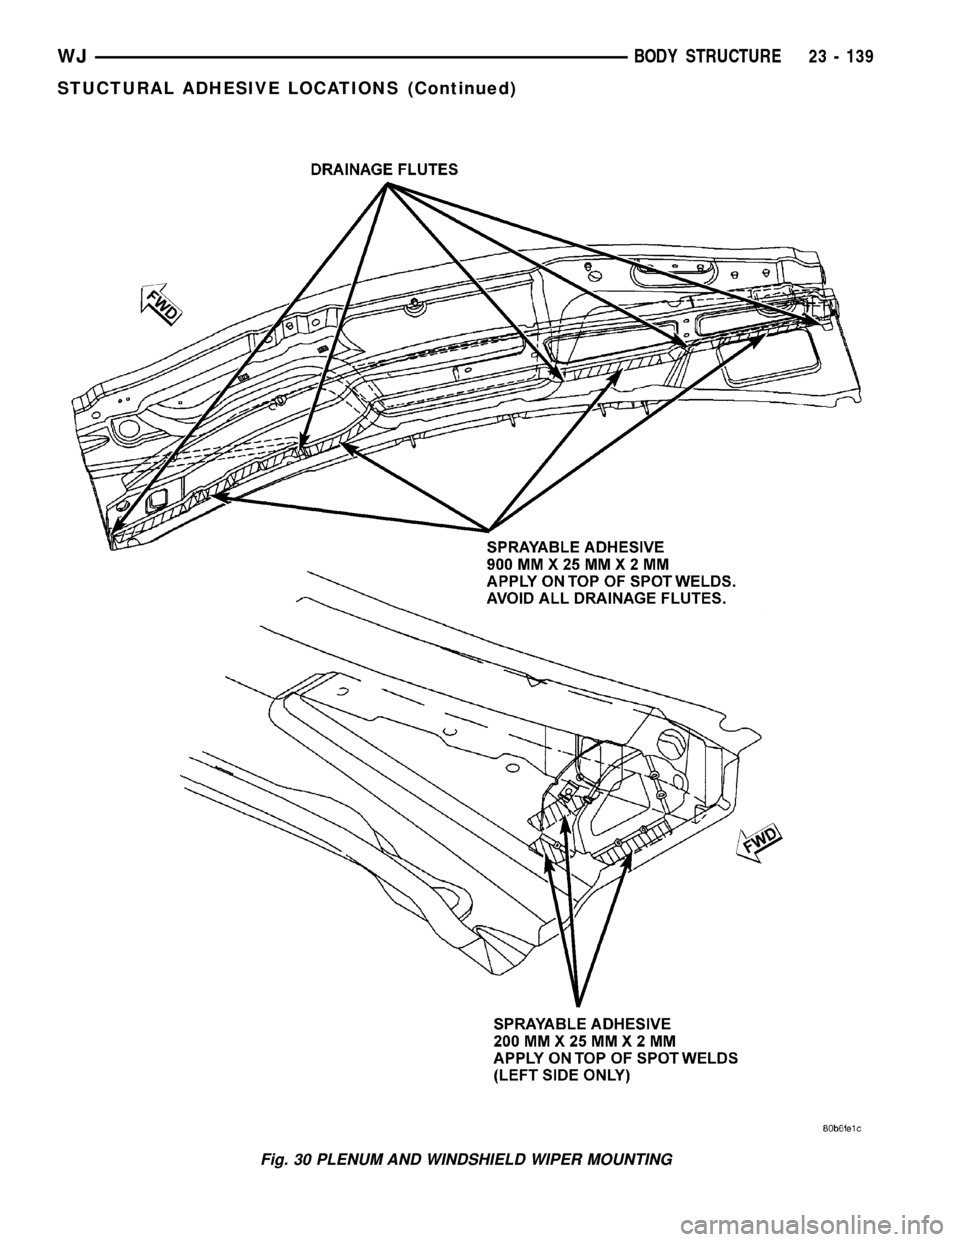
Fig. 30 PLENUM AND WINDSHIELD WIPER MOUNTING
WJBODY STRUCTURE 23 - 139
STUCTURAL ADHESIVE LOCATIONS (Continued)
Page 2026 of 2199
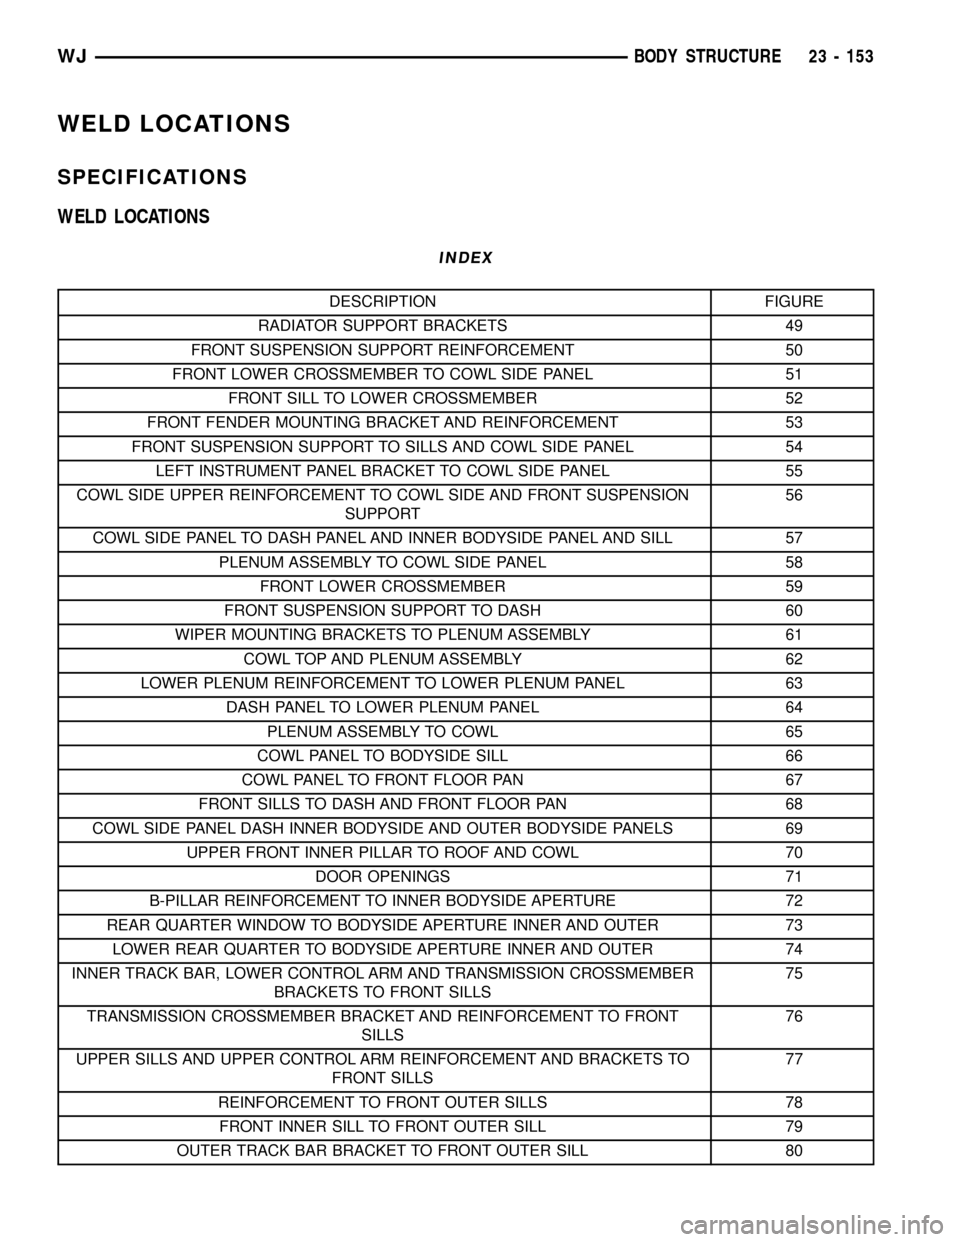
WELD LOCATIONS
SPECIFICATIONS
WELD LOCATIONS
INDEX
DESCRIPTION FIGURE
RADIATOR SUPPORT BRACKETS 49
FRONT SUSPENSION SUPPORT REINFORCEMENT 50
FRONT LOWER CROSSMEMBER TO COWL SIDE PANEL 51
FRONT SILL TO LOWER CROSSMEMBER 52
FRONT FENDER MOUNTING BRACKET AND REINFORCEMENT 53
FRONT SUSPENSION SUPPORT TO SILLS AND COWL SIDE PANEL 54
LEFT INSTRUMENT PANEL BRACKET TO COWL SIDE PANEL 55
COWL SIDE UPPER REINFORCEMENT TO COWL SIDE AND FRONT SUSPENSION
SUPPORT56
COWL SIDE PANEL TO DASH PANEL AND INNER BODYSIDE PANEL AND SILL 57
PLENUM ASSEMBLY TO COWL SIDE PANEL 58
FRONT LOWER CROSSMEMBER 59
FRONT SUSPENSION SUPPORT TO DASH 60
WIPER MOUNTING BRACKETS TO PLENUM ASSEMBLY 61
COWL TOP AND PLENUM ASSEMBLY 62
LOWER PLENUM REINFORCEMENT TO LOWER PLENUM PANEL 63
DASH PANEL TO LOWER PLENUM PANEL 64
PLENUM ASSEMBLY TO COWL 65
COWL PANEL TO BODYSIDE SILL 66
COWL PANEL TO FRONT FLOOR PAN 67
FRONT SILLS TO DASH AND FRONT FLOOR PAN 68
COWL SIDE PANEL DASH INNER BODYSIDE AND OUTER BODYSIDE PANELS 69
UPPER FRONT INNER PILLAR TO ROOF AND COWL 70
DOOR OPENINGS 71
B-PILLAR REINFORCEMENT TO INNER BODYSIDE APERTURE 72
REAR QUARTER WINDOW TO BODYSIDE APERTURE INNER AND OUTER 73
LOWER REAR QUARTER TO BODYSIDE APERTURE INNER AND OUTER 74
INNER TRACK BAR, LOWER CONTROL ARM AND TRANSMISSION CROSSMEMBER
BRACKETS TO FRONT SILLS75
TRANSMISSION CROSSMEMBER BRACKET AND REINFORCEMENT TO FRONT
SILLS76
UPPER SILLS AND UPPER CONTROL ARM REINFORCEMENT AND BRACKETS TO
FRONT SILLS77
REINFORCEMENT TO FRONT OUTER SILLS 78
FRONT INNER SILL TO FRONT OUTER SILL 79
OUTER TRACK BAR BRACKET TO FRONT OUTER SILL 80
WJBODY STRUCTURE 23 - 153
Page 2047 of 2199
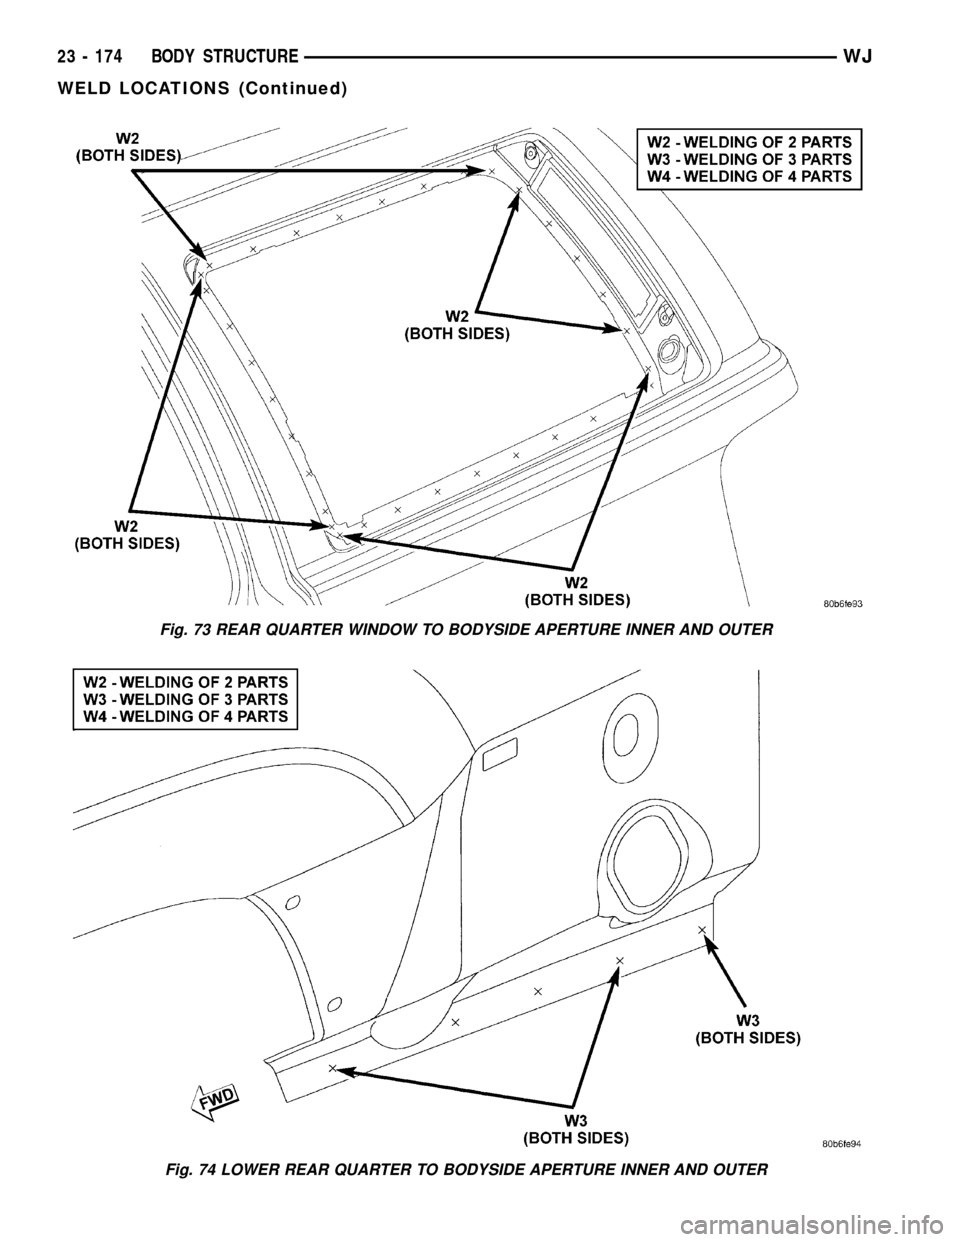
Fig. 73 REAR QUARTER WINDOW TO BODYSIDE APERTURE INNER AND OUTER
Fig. 74 LOWER REAR QUARTER TO BODYSIDE APERTURE INNER AND OUTER
23 - 174 BODY STRUCTUREWJ
WELD LOCATIONS (Continued)