JEEP GRAND CHEROKEE 2004 WK / 3.G Owners Manual
Manufacturer: JEEP, Model Year: 2004, Model line: GRAND CHEROKEE, Model: JEEP GRAND CHEROKEE 2004 WK / 3.GPages: 344, PDF Size: 6.09 MB
Page 281 of 344
Drain
First remove fill plug, then remove drain plug. Recom-
mended tightening torque for drain and fill plugs is
15±25 ft. lbs (20±34 N´m).
CAUTION!
When installing plugs, do not overtighten. You could
damage them and cause them to leak.
Selection of Lubricant
Use only manufacturer's recommended fluid, refer to
Recommended Fluids, Lubricants, and Genuine Parts for
correct fluid type.
Front/Rear Axle Fluid
Fluid Level Check
Lubricant should be 1/2º (1 cm) below the oil fill hole.
Adding Fluid
Add lubricant only at the fill hole and only to the level
specified above.
Selection of Lubricant
Use only manufacturer's recommended fluid, refer to
Recommended Fluids, Lubricants, and Genuine Parts for
correct fluid type.
Appearance Care And Protection From Corrosion
Protection of Body and Paint from Corrosion
Vehicle body care requirements vary according to geo-
graphic locations and usage. Chemicals that make roads
passable in snow and ice, and those that are sprayed on
trees and road surfaces during other seasons, are highly
corrosive to the metal in your vehicle.
MAINTAINING YOUR VEHICLE 281
7
Page 282 of 344

The following maintenance recommendations will enable
you to obtain maximum benefit from the corrosion
resistance built into your vehicle.
What Causes Corrosion?
Corrosion is the result of deterioration or removal of
paint and protective coatings from your vehicle.
The most common causes are:
²Road salt, dirt and moisture accumulation.
²Stone and gravel impact.
²Insects, tree sap and tar.
²Salt in the air near seacoast localities.
²Atmospheric fallout/industrial pollutants.
Washing
²
Wash your vehicle regularly. Always wash your ve-
hicle in the shade using a mild car wash soap and rinse
the panels completely with clear water.
²If insects, tar or other similar deposits have accumu-
lated on your vehicle, wash it as soon as possible.
²Use MopartAuto Polish to remove road film and
stains and to polish your vehicle. Take care never to
scratch the paint.
²Avoid using abrasive compounds and power buffing
that may diminish the gloss or thin out the paint
finish.
282 MAINTAINING YOUR VEHICLE
Page 283 of 344
CAUTION!
Do not use abrasive or strong cleaning materials
such as steel wool or scouring powder, which will
scratch metal and painted surfaces.
Special Care
²
If you drive on salted or dusty roads or if you drive
near the ocean, hose off the undercarriage at least once
a month.
²The drain holes in the lower edges of the doors, rocker
panels, and rear liftgate must be kept clear and open.
²If you detect any stone chips or scratches in the paint,
touch them up immediately. The cost of such repairs is
considered the responsibility of the owner.
²If your vehicle is damaged due to an accident or
similar cause which destroys the paint and protectivecoating, have your vehicle repaired as soon as pos-
sible. The cost of such repairs is considered the respon-
sibility of the owner.
²If you carry special cargo such as chemicals, fertilizers,
de-icer salt, etc., assure that such materials are well
packaged and sealed.
²If a lot of driving is done on gravel roads, consider
mud or stone shields behind each wheel.
²Use MopartTouch-Up Paint on scratches as soon as
possible. Your authorized dealer has touch-up paint to
match the color of your vehicle.
²Aluminum wheels should be cleaned regularly with
mild soap and water to prevent corrosion. To remove
heavy soil, select a nonabrasive, non-acidic cleaner. Do
not use scouring pads or metal polishes. Avoid auto-
matic car washes that use acidic solutions or harsh
brushes that may damage the wheels' protective finish.
MAINTAINING YOUR VEHICLE 283
7
Page 284 of 344

Interior Care
Use MopartFabric Cleaner to clean fabric upholstery
and carpeting.
Use MopartVinyl Cleaner to clean vinyl upholstery.
MopartVinyl Cleaner is specifically recommended for
interior vinyl trim.
Do not use silicon based cleaning products on leather
seats. They could cause cracking of the seat leather.
Leather Seat Care & Cleaning
Leather is best preserved by regular cleaning with a
damp soft cloth. Small particles of dirt can act as an
abrasive and damage the leather surface and should be
removed promptly with a damp cloth. Stubborn soils can
be removed easily with a soft cloth and MopartTotalClean. Care should be taken to avoid soaking the leather
with any liquid. Please do not use polishes, oils, cleaning
fluids, solvents, detergents, or ammonia based cleaners
to clean the leather. Application of a leather conditioner is
not required to maintain the original condition.
Glass Surfaces
All glass surfaces should be cleaned on a regular basis
with any commercial household-type glass cleaner.
Never use an abrasive type cleaner. Use caution when
cleaning inside rear windows equipped with electric
defrosters. Do not use scrapers or other sharp instru-
ments which may scratch the elements.
When cleaning the rear view mirror, spray cleaner on the
towel or rag that you are using. Do not spray cleaner
directly on the mirror.
284 MAINTAINING YOUR VEHICLE
Page 285 of 344
WARNING!
Do not use volatile solvents for cleaning purposes.
Many are potentially flammable, and if used in
closed areas they may cause respiratory harm. Do not
use gasoline, turpentine, kerosene, etc. for cleaning.
Use the Mopartrecommended products or the
equivalents.
Carpet
Vacuum your carpet regularly to prevent a soil build-up.
Shampoo soiled carpet with a reliable upholstery cleaner,
using a natural sponge or soft bristle brush. After carpet
dries, vacuum it thoroughly.
Seat Belt Maintenance
Do not bleach, dye or clean the belts with chemical
solvents or abrasive cleaners. This will weaken the fabric.
Sun damage will also weaken the fabric.If the belts need cleaning, use a mild soap solution or
lukewarm water. Do not remove the belts from the
vehicle to wash them.
Replace the belts if they appear frayed or worn or if the
buckles do not work properly.
Maintenance After Off-Pavement Driving
After extended operation in mud, sand or water, or
similar dirty conditions, have your brake drums, brake
linings, and axle joints inspected and cleaned as soon as
possible. This will prevent any abrasive material from
causing excessive wear or unpredictable braking action.
Following off-pavement usage, completely inspect the
underbody of your vehicle. Check tires, body structure,
steering, suspension and exhaust system for damage.
Check threaded fasteners for looseness, particularly on
the chassis, drivetrain components, steering and suspen-
sion. Retighten, if required, to torque values specified in
the Service Manual. Also check for accumulations of
MAINTAINING YOUR VEHICLE 285
7
Page 286 of 344

vegetation or brush that could become a fire hazard, or
conceal damage to fuel lines, brake hoses, axle pinion
seals, and propeller shafts.
CAUTION!
Under frequent heavy-duty driving conditions,
change all lubricants and lubricate body compo-
nents, all driveline joints and steering linkage more
often than in normal service to prevent excessive
wear.
FUSE PANEL
Interior Fuses
The fuse panel is on the lower instrument panel just to
the left of the steering column. A label is stamped on the
fuse panel cover to identify each fuse for ease of replace-
ment.
286 MAINTAINING YOUR VEHICLE
Page 287 of 344
Cavity Fuse Description
1 Spare
2 Spare
3 10 Amp Red Headlight High Beam Left
4 15 Amp Lt. Blue Flasher
5 25 Amp Natural Radio/Amplifier
6 15 Amp Lt. Blue Park Lights
7 10 Amp Red Interior Lights
8 15 Amp Lt. Blue Overhead Console, Rear
Wiper, IP Lights, Rear Flip-
per Glass Solenoid
9 20 Amp Yellow Power Outlets
10 20 Amp Yellow Adjustable Pedals
11 10 Amp Red Rear Window Defroster In-
dicator
12 10 Amp Red Auto Shut Down Relay/
9Fuel9Cavity Fuse Description
13 Spare
14 10 Amp Red Headlight Low Left
15 10 Amp Red Headlight Low Right
16 10 Amp Red Headlight High Right
17 10 Amp Red Instrument Cluster, Diag-
nostic Connector
18 30 Amp Trailer Tow
19 10 Amp Red Antilock Brakes
20 10 Amp Red Ignition Run
21 10 Amp Red Ignition Run/Start - PDC
22 10 Amp Red Ignition Run/Start
23 15 Amp Lt. Blue Brake Switch
24 15 Amp Lt. Blue Fog Lamps
25 20 Amp Yellow Accessory Delay Relay
(Sunroof)
MAINTAINING YOUR VEHICLE 287
7
Page 288 of 344
Cavity Fuse Description
26 15 Amp Lt. Blue Cigar
27 15 Amp Lt. Blue Rear Fog Lamps (If
Equipped)
28 10 Amp Red Body Control Module, Acc/
Run
29 10 Amp Red Rear Wiper Switch, Washer
Motors
30 15 Amp Lt. Blue Radio
31 10 Amp Red Ignition Start
32 10 Amp Red Ignition Run/Start- Airbag
33 10 Amp Red Ignition Run/Only - Airbag
C1 20 Amp Wiper (Circuit Breaker)
C2 20 Amp Seats (Circuit Breaker)
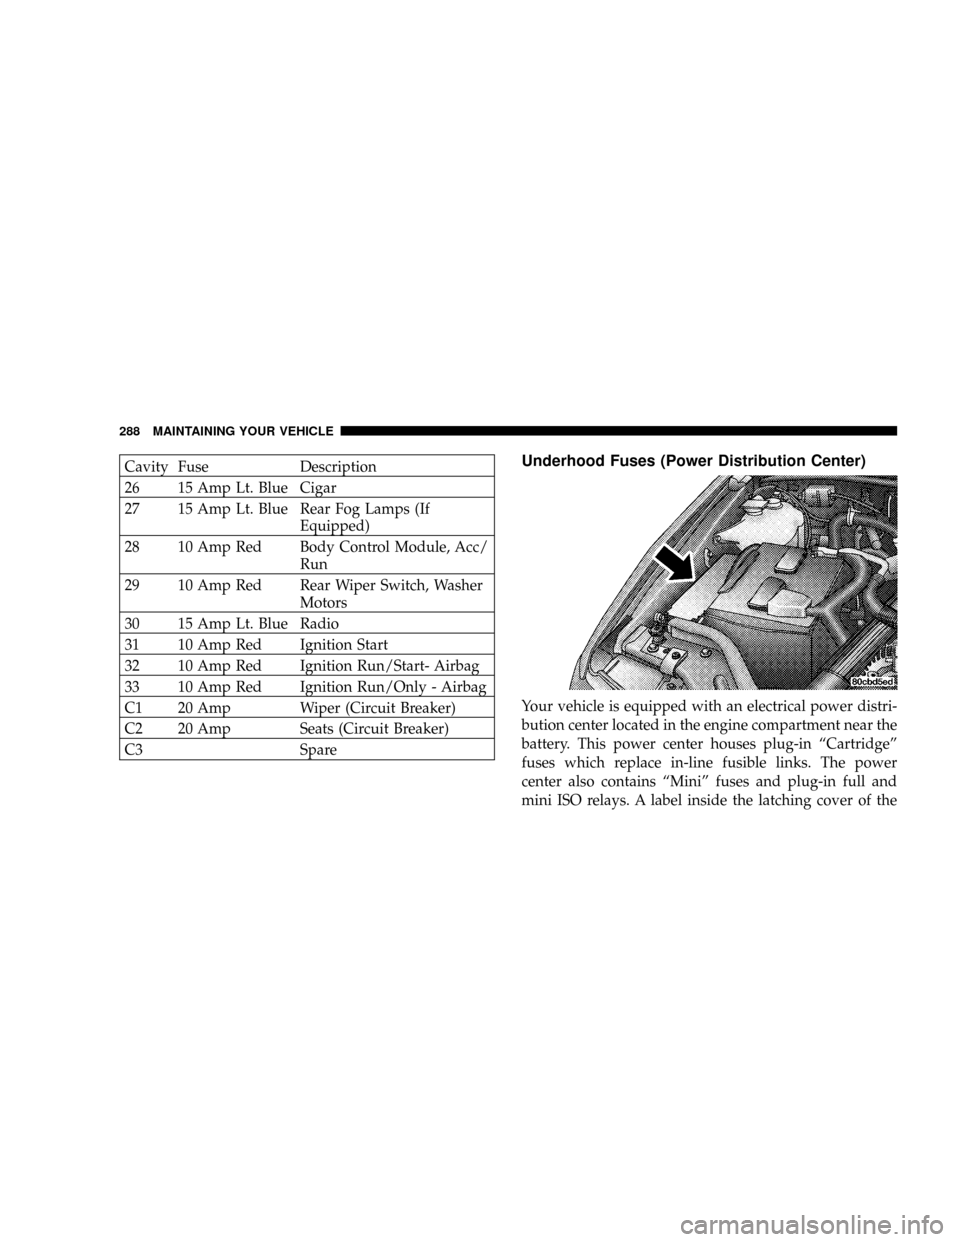
C3 SpareUnderhood Fuses (Power Distribution Center)
Your vehicle is equipped with an electrical power distri-
bution center located in the engine compartment near the
battery. This power center houses plug-in ªCartridgeº
fuses which replace in-line fusible links. The power
center also contains ªMiniº fuses and plug-in full and
mini ISO relays. A label inside the latching cover of the
288 MAINTAINING YOUR VEHICLE
Page 289 of 344

center identifies each component for ease of replacement,
if necessary. ªCartridgeº fuses and relays can be obtained
from your authorized dealer.
VEHICLE STORAGE
If you are leaving your vehicle dormant for more than 21
days you may want to take steps to protect your battery.
You may:
²Remove Cartridge fuse #15 in the Power Distribution
Center labeled Ignition-Off Draw (IOD).
²Store the removed IOD fuse in the Power Distribution
Center location #11 labeled ªIOD Storage.º
²Or, disconnect the negative cable from the battery.
²Anytime you store your vehicle, or keep it out of
service (i.e. vacation) for two weeks or more, run the
air conditioning system at idle for about five minutes
in the fresh air and high blower setting. This willinsure adequate system lubrication to minimize the
possibility of compressor damage when the system is
started again.
REPLACEMENT BULBS
Interior Lights Bulb Type
A/C Heater.................... NotServiceable
Ashtray Receiver Light.................... 161
Climate Control
(Dual Zone Automatic)............ NotServiceable
Climate Control (Manual A/C)................ 74
Front Reading........................... 192
Glove Box Light......................... 194
Overhead Console........................ 192
Radio................................ ASC
Rear Cargo Light.......................214±2
Passenger Assist Handle Lights.............214±2
Lighted Vanity Mirror *.............. P/N6501966
MAINTAINING YOUR VEHICLE 289
7
Page 290 of 344

Interior Lights Bulb Type
Underpanel Courtesy Lights................. 906
Instrument Cluster (General Illumination)....... 103
Telltale/Hazard Light...................... 74
* Available only from authorized dealers.
Exterior Lights Bulb Type
Backup Lights.........................3157A
Center High-Mounted Stoplight.............. 921
Fog Lights.............................9145
Front Park Lights (Limited)...............194NA
Front Park Lights (Laredo)................194NA
Front Park/Turn Light (Limited)............3157AExterior Lights Bulb Type
Front Park/Turn Light (Laredo)............3157A
Front Side Marker (Limited)..............194NA
Front Side Marker (Laredo)...............194NA
Headlights (Low Beam).................9006XS
Headlights (High Beam).................9005XS
Rear License Plate Light.................... 168
Rear Stop/Tail Lights....................3157A
Rear Turn Signal Lights (2)................3157A
NOTE:Numbers refer to commercial bulb types that
can be purchased from your authorized dealer.
If a bulb needs to be replaced, visit your authorized
dealer or refer to the applicable Service Manual.
290 MAINTAINING YOUR VEHICLE