ECU JEEP GRAND CHEROKEE 2013 Owner handbook (in English)
[x] Cancel search | Manufacturer: JEEP, Model Year: 2013, Model line: GRAND CHEROKEE, Model: JEEP GRAND CHEROKEE 2013Pages: 408, PDF Size: 3.21 MB
Page 236 of 408
•If there is a need to restart the engine, be
sure to cycle the ignition to the OFF
position before restarting. Transmission
gear engagement may be delayed after
restarting the engine if the key is not
cycled to the OFF position first.
PARK
This range supplements the parking brake by
locking the transmission. The engine can be
started in this range. Never attempt to use
PARK while the vehicle is in motion. Apply the
parking brake when leaving the vehicle in this
range.
When parking on a level surface, you may place
the shift lever in PARK first, and then apply the
parking brake.
When parking on a hill, apply the parking brake
before placing the shift lever in PARK, otherwise
the load on the transmission locking mecha-
nism may make it difficult to move the shift lever
out of PARK. As an added precaution, turn the
front wheels toward the curb on a downhill
grade and away from the curb on an uphill
grade.WARNING!
• Never use the PARK position as a substi-
tute for the parking brake. Always apply
the parking brake fully when parked to
guard against vehicle movement and pos-
sible injury or damage.
• Your vehicle could move and injure you
and others if it is not completely in PARK.
Check by trying to move the shift lever out
of PARK with the brake pedal released.
Make sure the transmission is in PARK
before leaving the vehicle.
• It is dangerous to shift out of PARK or
NEUTRAL if the engine speed is higher
than idle speed. If your foot is not firmly
pressing the brake pedal, the vehicle could
accelerate quickly forward or in reverse.
You could lose control of the vehicle and
hit someone or something. Only shift into
gear when the engine is idling normally
and your foot is firmly pressing the brake
pedal.
(Continued)
WARNING!(Continued)
•Unintended movement of a vehicle could
injure those in or near the vehicle. As with
all vehicles, you should never exit a ve-
hicle while the engine is running. Before
exiting a vehicle, always apply the parking
brake, shift the transmission into PARK
turn the engine OFF, and remove the key
fob. When the ignition is in the LOCK/OFF
position, the shift lever is locked in PARK,
securing the vehicle against unwanted
movement.
• When leaving the vehicle, always remove
the key fob and lock your vehicle.
• Never leave children alone in a vehicle, or
with access to an unlocked vehicle.
• Allowing children to be in a vehicle unat-
tended is dangerous for a number of rea-
sons. A child or others could be seriously
or fatally injured. Children should be
warned not to touch the parking brake,
brake pedal or the shift lever.
(Continued)
232
Page 239 of 408
In the event of a momentary problem, the
transmission can be reset to regain all forward
gears by performing the following steps:
1. Stop the vehicle.
2. Shift the transmission into PARK.
3. Turn the ignition switch to the LOCK/OFF
position.
4. Wait approximately 10 seconds.
5. Restart the engine.
6.
Shift into the desired gear range. If the prob-
lem is no longer detected, the transmission will
return to normal operation.
NOTE:
Even if the transmission can be reset, we
recommend that you visit your authorized
dealer at your earliest possible conve-
nience. Your authorized dealer has diagnos-
tic equipment to determine if the problem
could recur. If the transmission cannot be
reset, authorized dealer service is required. Electronic Range Select (ERS) Operation
The Electronic Range Select (ERS) shift control
allows the driver to limit the highest available
gear when the shift lever is in the DRIVE
position. For example, if you shift the transmis-
sion into 3 (third gear), the transmission will
never shift above third gear, but will shift down
into second and first gears normally.
Use of ERS (or TOW/HAUL mode) also enables
an additional underdrive gear which is not nor-
mally used during through-gear accelerations.
This additional gear can improve vehicle perfor-
mance and cooling capability when towing a
trailer on certain grades. In ERS mode, gears 1
though 3 are underdrive gears, and ERS 4 is
direct drive. ERS 5 and 6 (Overdrive gears ) are
the same as the normal fourth and fifth gears.
You can switch between DRIVE and ERS mode at
any vehicle speed. When the shift lever is in the
DRIVE position, the transmission will operate
automatically, shifting between all available
gears. Tapping the shift lever to the left (-) will
activate ERS mode, display the current gear in
the instrument cluster, and maintain that gear as
the top available gear. Once in ERS mode, tap-
ping the shift lever to the left (-) or right (+) will
change the top available gear.
The instrument cluster display will show the
requested top gear limit, however the transmis-
sion will not downshift to the requested gear if
doing so would overspeed the engine. The
transmission will downshift once the vehicle
speed has slowed sufficiently.
To exit ERS mode, simply press and hold the
shift lever to the right (+) until “D” is once again
displayed in the shift lever position indicator in
the instrument cluster.
WARNING!
Do not downshift for additional engine brak-
ing on a slippery surface. The drive wheels
could lose their grip and the vehicle could
skid, causing a collision or personal injury.
NOTE:
To select the proper gear position for maxi-
mum deceleration (engine braking), simply
press and hold the shift lever to the left (-).
The transmission will shift to the range from
which the vehicle can best be slowed down.
235
Page 286 of 408
NOTE:
Remember that everything put into or on the
trailer adds to the load on your vehicle. Also,
additional factory-installed options, or au-
thorized dealer-installed options, must be
considered as part of the total load on your
vehicle. Refer to the tire loading information
placard located on the drivers door pillar for
the maximum combined weight of occu-
pants and cargo for your vehicle.
Towing RequirementsTo promote proper break-in of your new vehicle
drivetrain components, the following guidelines
are recommended.
CAUTION!
•Do not tow a trailer at all during the first
500 miles (805 km) the new vehicle is
driven. The engine, axle or other parts
could be damaged.
(Continued)
CAUTION!(Continued)
•Then, during the first 500 miles (805 km)
that a trailer is towed, do not drive over
50 mph (80 km/h) and do not make starts
at full throttle. This helps the engine and
other parts of the vehicle wear in at the
heavier loads.
Perform the maintenance listed in the “Mainte-
nance Schedule.” Refer to “Maintenance Sched-
ule” for the proper maintenance intervals. When
towing a trailer, never exceed the GAWR or
GCWR ratings.
WARNING!
Improper towing can lead to a collision. Fol-
low these guidelines to make your trailer
towing as safe as possible:
•Make certain that the load is secured in the
trailer and will not shift during travel. When
trailering cargo that is not fully secured,
dynamic load shifts can occur that may be
(Continued)
WARNING!(Continued)
difficult for the driver to control. You could
lose control of your vehicle and have a
collision.
• When hauling cargo or towing a trailer, do
not overload your vehicle or trailer. Over-
loading can cause a loss of control, poor
performance or damage to brakes, axle,
engine, transmission, steering, suspen-
sion, chassis structure or tires.
• Safety chains must always be used be-
tween your vehicle and trailer. Always con-
nect the chains to the hook retainers of the
vehicle hitch. Cross the chains under the
trailer tongue and allow enough slack for
turning corners.
(Continued)
282
Page 293 of 408
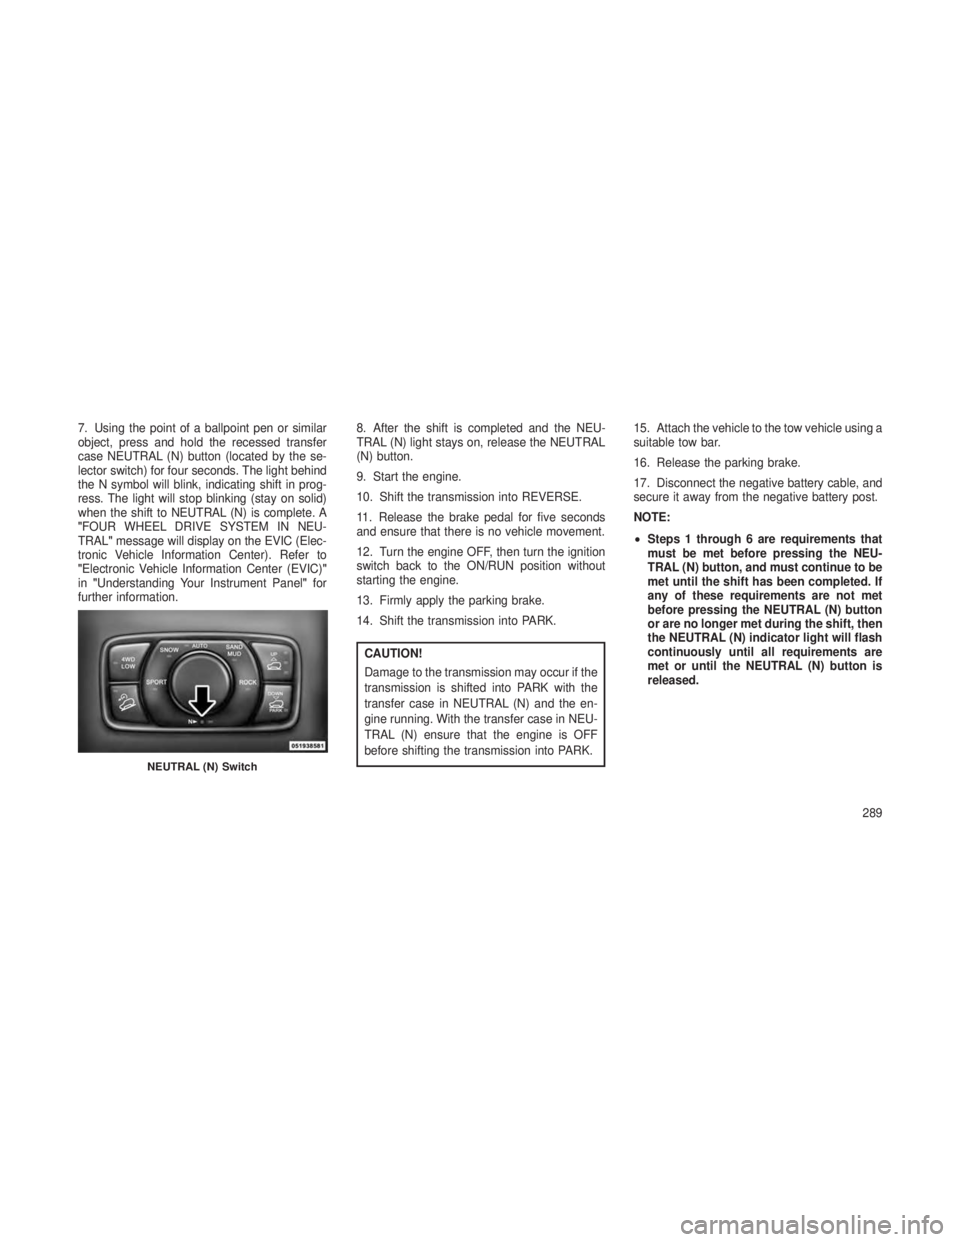
7. Using the point of a ballpoint pen or similar
object, press and hold the recessed transfer
case NEUTRAL (N) button (located by the se-
lector switch) for four seconds. The light behind
the N symbol will blink, indicating shift in prog-
ress. The light will stop blinking (stay on solid)
when the shift to NEUTRAL (N) is complete. A
"FOUR WHEEL DRIVE SYSTEM IN NEU-
TRAL"message will display on the EVIC (Elec-
tronic Vehicle Information Center). Refer to
"Electronic Vehicle Information Center (EVIC)"
in "Understanding Your Instrument Panel "for
further information. 8. After the shift is completed and the NEU-
TRAL (N) light stays on, release the NEUTRAL
(N) button.
9. Start the engine.
10. Shift the transmission into REVERSE.
11. Release the brake pedal for five seconds
and ensure that there is no vehicle movement.
12. Turn the engine OFF, then turn the ignition
switch back to the ON/RUN position without
starting the engine.
13. Firmly apply the parking brake.
14. Shift the transmission into PARK.
CAUTION!
Damage to the transmission may occur if the
transmission is shifted into PARK with the
transfer case in NEUTRAL (N) and the en-
gine running. With the transfer case in NEU-
TRAL (N) ensure that the engine is OFF
before shifting the transmission into PARK.15. Attach the vehicle to the tow vehicle using a
suitable tow bar.
16. Release the parking brake.
17. Disconnect the negative battery cable, and
secure it away from the negative battery post.
NOTE:
•
Steps 1 through 6 are requirements that
must be met before pressing the NEU-
TRAL (N) button, and must continue to be
met until the shift has been completed. If
any of these requirements are not met
before pressing the NEUTRAL (N) button
or are no longer met during the shift, then
the NEUTRAL (N) indicator light will flash
continuously until all requirements are
met or until the NEUTRAL (N) button is
released.
NEUTRAL (N) Switch
289
Page 299 of 408
JACKING AND TIRE
CHANGING
WARNING!
•Do not attempt to change a tire on the side
of the vehicle close to moving traffic. Pull
far enough off the road to avoid the danger
of being hit when operating the jack or
changing the wheel.
• Being under a jacked-up vehicle is danger-
ous. The vehicle could slip off the jack and
fall on you. You could be crushed. Never
put any part of your body under a vehicle
that is on a jack. If you need to get under a
raised vehicle, take it to a service center
where it can be raised on a lift.
• Never start or run the engine while the
vehicle is on a jack.
(Continued)
WARNING!(Continued)
•The jack is designed to be used as a tool
for changing tires only. The jack should not
be used to lift the vehicle for service pur-
poses. The vehicle should be jacked on a
firm level surface only. Avoid ice or slippery
areas.
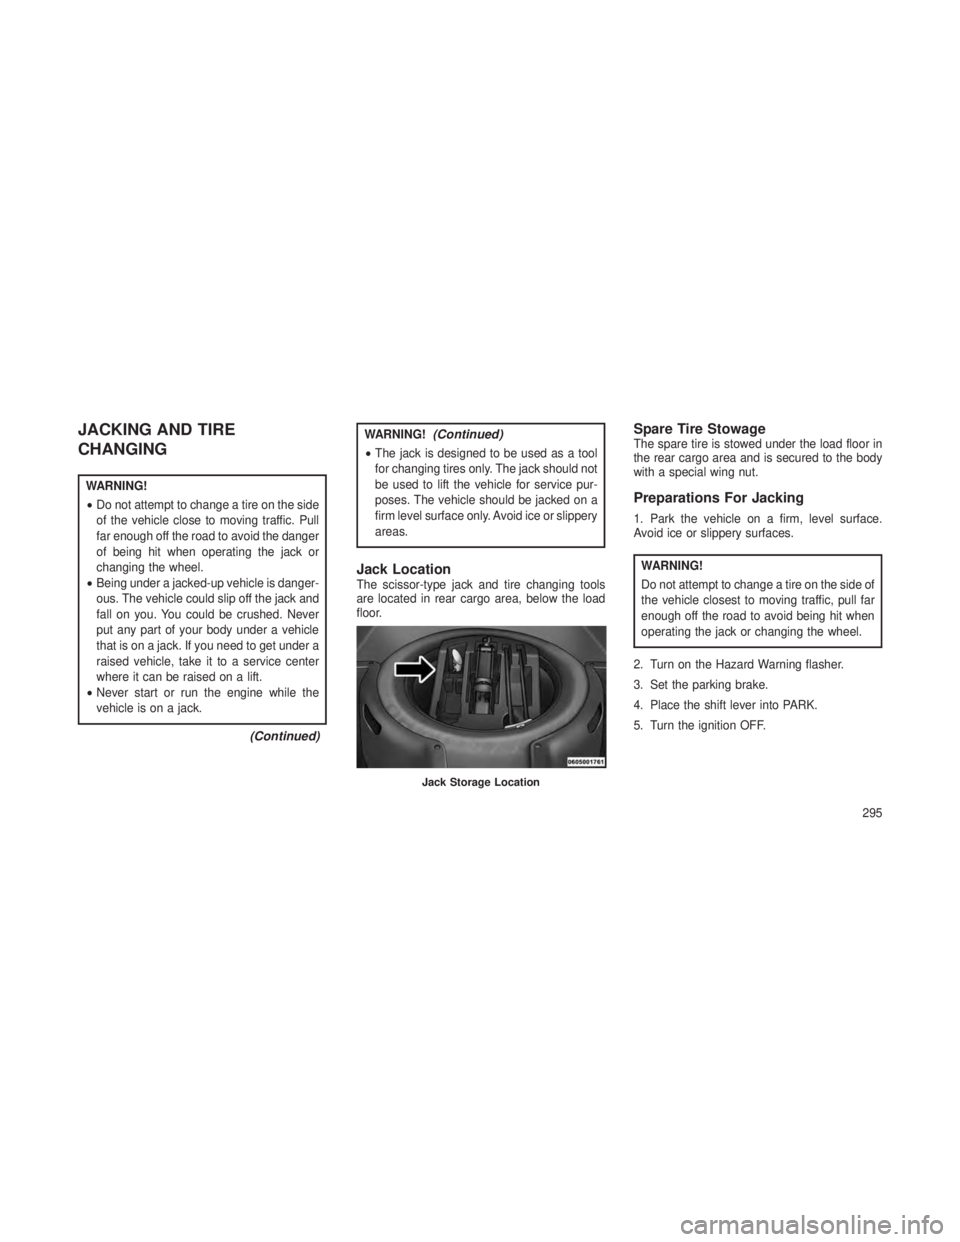
Jack LocationThe scissor-type jack and tire changing tools
are located in rear cargo area, below the load
floor.
Spare Tire StowageThe spare tire is stowed under the load floor in
the rear cargo area and is secured to the body
with a special wing nut.
Preparations For Jacking
1. Park the vehicle on a firm, level surface.
Avoid ice or slippery surfaces.
WARNING!
Do not attempt to change a tire on the side of
the vehicle closest to moving traffic, pull far
enough off the road to avoid being hit when
operating the jack or changing the wheel.
2. Turn on the Hazard Warning flasher.
3. Set the parking brake.
4. Place the shift lever into PARK.
5. Turn the ignition OFF.
Jack Storage Location
295
Page 300 of 408
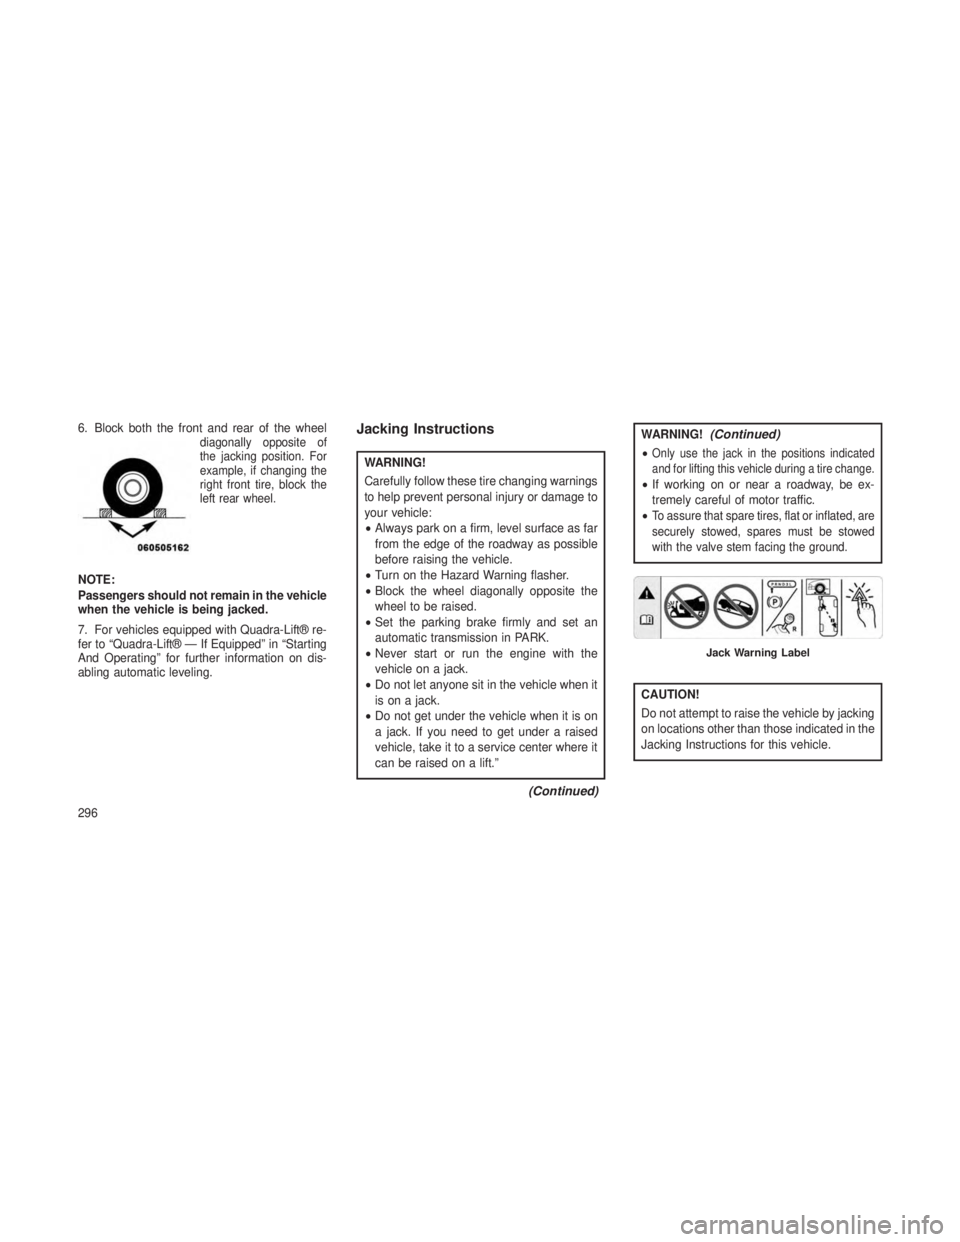
6. Block both the front and rear of the wheeldiagonally opposite of
the jacking position. For
example, if changing the
right front tire, block the
left rear wheel.
NOTE:
Passengers should not remain in the vehicle
when the vehicle is being jacked.
7. For vehicles equipped with Quadra-Lift® re-
fer to “Quadra-Lift® — If Equipped” in “Starting
And Operating” for further information on dis-
abling automatic leveling.
Jacking Instructions
WARNING!
Carefully follow these tire changing warnings
to help prevent personal injury or damage to
your vehicle:
•Always park on a firm, level surface as far
from the edge of the roadway as possible
before raising the vehicle.
• Turn on the Hazard Warning flasher.
• Block the wheel diagonally opposite the
wheel to be raised.
• Set the parking brake firmly and set an
automatic transmission in PARK.
• Never start or run the engine with the
vehicle on a jack.
• Do not let anyone sit in the vehicle when it
is on a jack.
• Do not get under the vehicle when it is on
a jack. If you need to get under a raised
vehicle, take it to a service center where it
can be raised on a lift.”
(Continued)
WARNING!(Continued)
•Only use the jack in the positions indicated
and for lifting this vehicle during a tire change.
•If working on or near a roadway, be ex-
tremely careful of motor traffic.
•
To assure that spare tires, flat or inflated, are
securely stowed, spares must be stowed
with the valve stem facing the ground.
CAUTION!
Do not attempt to raise the vehicle by jacking
on locations other than those indicated in the
Jacking Instructions for this vehicle.
Jack Warning Label
296
Page 303 of 408
WARNING!
To avoid the risk of forcing the vehicle off the
jack, do not tighten the lug nuts fully until the
vehicle has been lowered. Failure to follow
this warning may result in personal injury.
9. Lower the vehicle by turning the jack screw
counterclockwise, and remove the jack and
wheel blocks.
10. Finish tightening the lug nuts. Push down
on the wrench while at the end of the handle for
increased leverage. Tighten the lug nuts in a
star pattern until each nut has been tightened
twice. The correct wheel nut tightness is
110 ft-lbs (150 N·m). If in doubt about the
correct tightness, have them checked with a
torque wrench by your authorized dealer or at a
service station.
11. Lower the jack to the fully closed position
and return it and the tools to the proper posi-
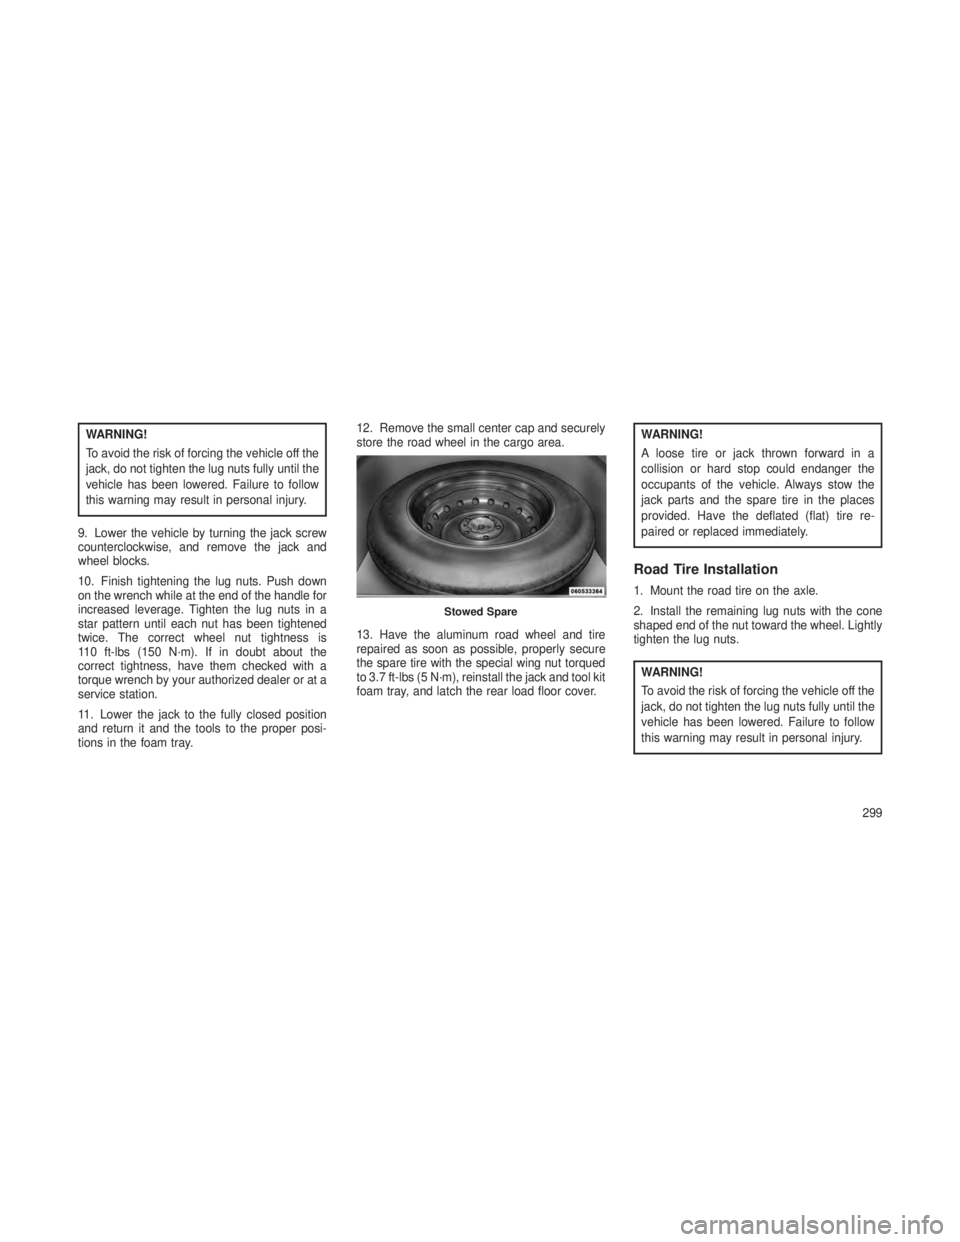
tions in the foam tray. 12. Remove the small center cap and securely
store the road wheel in the cargo area.
13. Have the aluminum road wheel and tire
repaired as soon as possible, properly secure
the spare tire with the special wing nut torqued
to 3.7 ft-lbs (5 N·m), reinstall the jack and tool kit
foam tray, and latch the rear load floor cover.WARNING!
A loose tire or jack thrown forward in a
collision or hard stop could endanger the
occupants of the vehicle. Always stow the
jack parts and the spare tire in the places
provided. Have the deflated (flat) tire re-
paired or replaced immediately.
Road Tire Installation
1. Mount the road tire on the axle.
2. Install the remaining lug nuts with the cone
shaped end of the nut toward the wheel. Lightly
tighten the lug nuts.
WARNING!
To avoid the risk of forcing the vehicle off the
jack, do not tighten the lug nuts fully until the
vehicle has been lowered. Failure to follow
this warning may result in personal injury.
Stowed Spare
299
Page 309 of 408
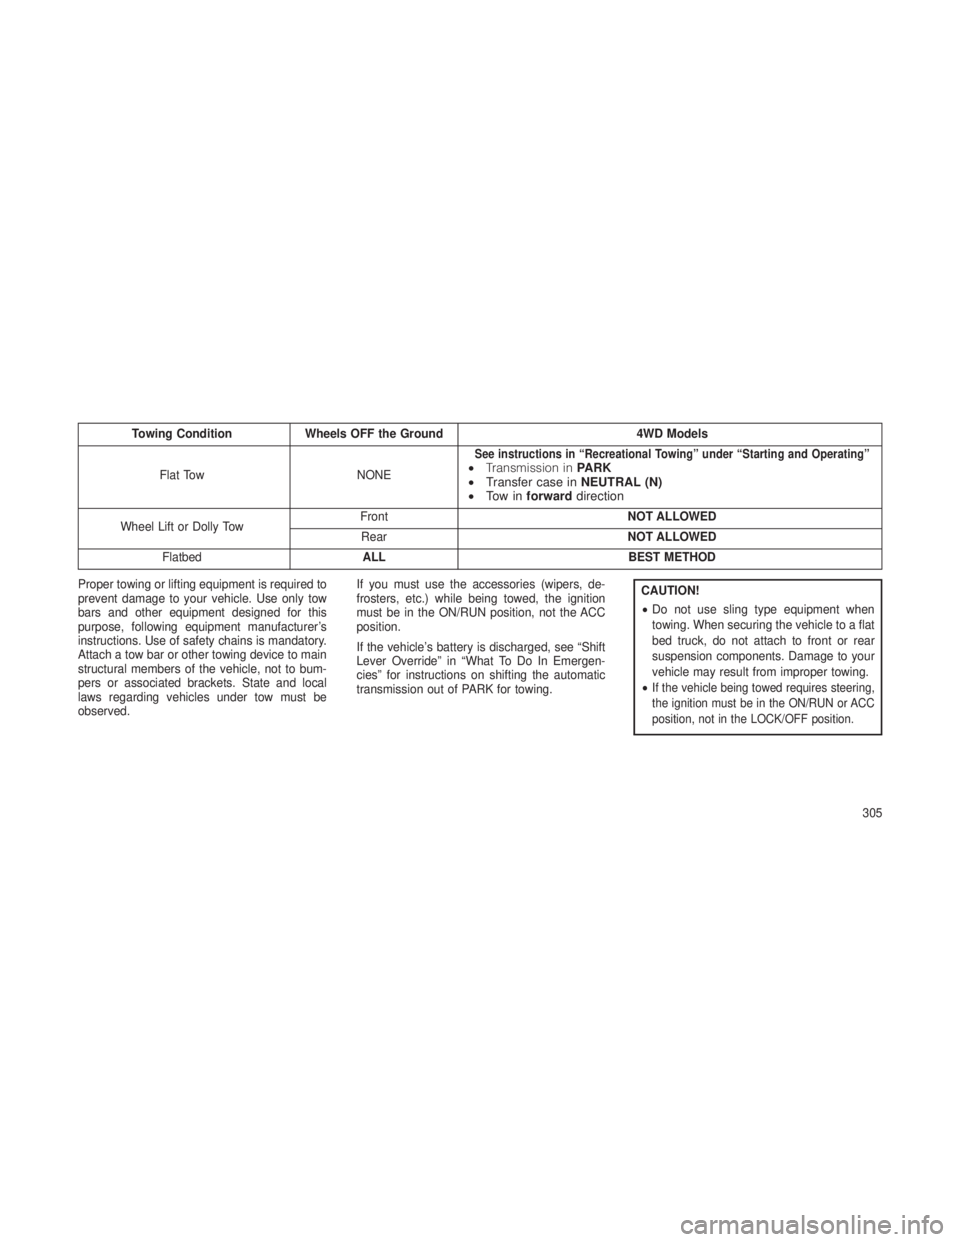
Towing ConditionWheels OFF the Ground 4WD Models
Flat Tow NONE
See instructions in “Recreational Towing” under “Starting and Operating”•Transmission in PARK
• Transfer case in NEUTRAL (N)
• To w i n forward direction
Wheel Lift or Dolly Tow Front
NOT ALLOWED
Rear NOT ALLOWED
Flatbed ALL BEST METHOD
Proper towing or lifting equipment is required to
prevent damage to your vehicle. Use only tow
bars and other equipment designed for this
purpose, following equipment manufacturer’s
instructions. Use of safety chains is mandatory.
Attach a tow bar or other towing device to main
structural members of the vehicle, not to bum-
pers or associated brackets. State and local
laws regarding vehicles under tow must be
observed. If you must use the accessories (wipers, de-
frosters, etc.) while being towed, the ignition
must be in the ON/RUN position, not the ACC
position.
If the vehicle’s battery is discharged, see “Shift
Lever Override” in “What To Do In Emergen-
cies” for instructions on shifting the automatic
transmission out of PARK for towing.
CAUTION!
•
Do not use sling type equipment when
towing. When securing the vehicle to a flat
bed truck, do not attach to front or rear
suspension components. Damage to your
vehicle may result from improper towing.
•
If the vehicle being towed requires steering,
the ignition must be in the ON/RUN or ACC
position, not in the LOCK/OFF position.
305
Page 321 of 408
WARNING!
•Use only refrigerants and compressor lu-
bricants approved by the manufacturer for
your air conditioning system. Some unap-
proved refrigerants are flammable and can
explode, injuring you. Other unapproved
refrigerants or lubricants can cause the
system to fail, requiring costly repairs.
• The air conditioning system contains re-
frigerant under high pressure. To avoid risk
of personal injury or damage to the sys-
tem, adding refrigerant or any repair re-
quiring lines to be disconnected should be
done by an experienced repairman.
NOTE:
Use only manufacturer approved A/C Sys-
tem Sealers, Stop Leak Products, Seal Con-
ditioners, Compressor Oil, and Refrigerants. Refrigerant Recovery And Recycling
R-134a Air Conditioning Refrigerant is a hydro-
fluorocarbon (HFC) that is endorsed by the
Environmental Protection Agency and is an
ozone-saving product. However, the manufac-
turer recommends that air conditioning service
be performed by authorized dealer or other
service facilities using recovery and recycling
equipment.
NOTE:
Use only manufacturer approved A/C sys-
tem sealers, stop leak products, seal condi-
tioners, compressor oil, and refrigerants.
A/C Air Filter
Refer to the “Maintenance Schedule” for the
proper maintenance intervals.
WARNING!
Do not remove the A/C air filter while the
blower is operating or personal injury may
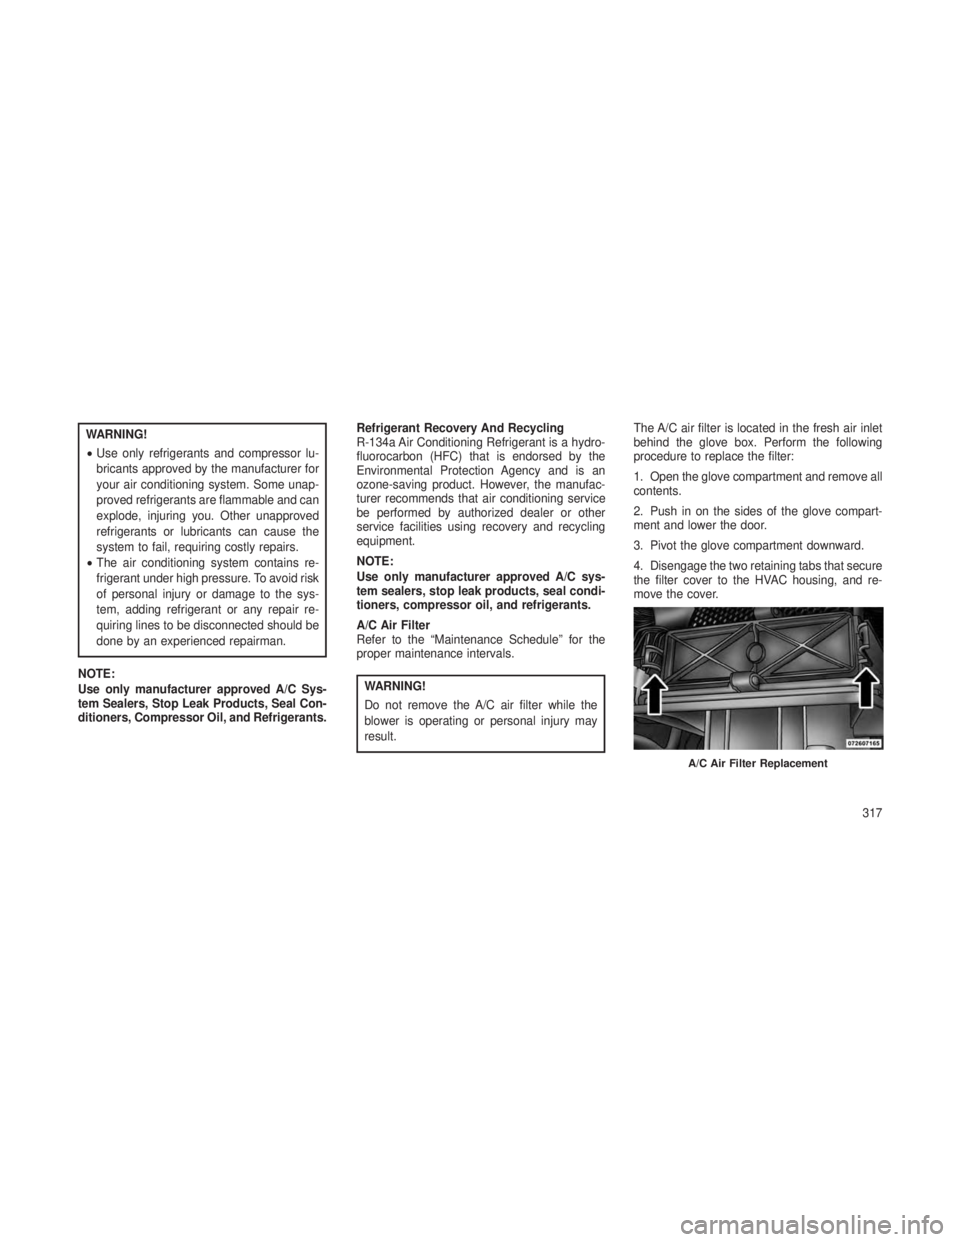
result.The A/C air filter is located in the fresh air inlet
behind the glove box. Perform the following
procedure to replace the filter:
1. Open the glove compartment and remove all
contents.
2. Push in on the sides of the glove compart-
ment and lower the door.
3. Pivot the glove compartment downward.
4. Disengage the two retaining tabs that secure
the filter cover to the HVAC housing, and re-
move the cover.
A/C Air Filter Replacement
317
Page 373 of 408
9
IF YOU NEED CONSUMER ASSISTANCE
•IF YOU NEED ASSISTANCE ......................372•ARGENTINA .............................. .373
• AUSTRALIA .............................. .373
• AUSTRIA ................................ .373
• BALANCE OF THE CARIBBEAN ...................374
• BELGIUM ................................ .374
• BOLIVIA ................................ .374
• BRAZIL ................................. .375
• BULGARIA ............................... .375
• CHILE .................................. .375
• CHINA .................................. .376
• COLOMBIA ............................... .376
• COSTA RICA .............................. .376
• CROATIA ................................ .377
• CZECH REPUBLIC .......................... .377
• DENMARK ............................... .377
• DOMINICAN REPUBLIC ........................378
• ECUADOR ............................... .378
• EL SALVADOR ............................. .378
369