AUX JEEP GRAND CHEROKEE 2013 Owner handbook (in English)
[x] Cancel search | Manufacturer: JEEP, Model Year: 2013, Model line: GRAND CHEROKEE, Model: JEEP GRAND CHEROKEE 2013Pages: 408, PDF Size: 3.21 MB
Page 163 of 408
•Information Mode Display ...................... .203
• Mode Selection Menu ........................ .204
• Numeric Keypad Menu ........................ .205
• Disc Menu ............................... .205
• Display Settings ............................ .206
• Listening To Audio With The Screen Closed ............206
• Why Does The Screen Mode Change Automatically? .......206
• Auxiliary Inputs ............................ .207
•STEERING WHEEL AUDIO CONTROLS ...............207•Radio Operation ............................ .208
• CD Player ............................... .208
•CD/DVD DISC MAINTENANCE .....................208
• RADIO OPERATION AND MOBILE PHONES ............209
• CLIMATE CONTROLS ..........................209
•Dual-Zone Automatic Temperature Control (ATC) —
If Equipped .............................. .209
• Operating Tips ............................. .213
159
Page 193 of 408
iPod®/USB/MP3 CONTROL —
IF EQUIPPED
This feature allows an iPod® or external USB
device to be plugged into the USB port, located
in the center console or glove compartment.
iPod® control supports Mini, 4G, Photo, Nano,
5G iPod® and iPhone® devices. Some iPod®
software versions may not fully support the
iPod® control features. Please visit Apple’s
website for software updates.
NOTE:
•If the radio has a USB port, refer to the
appropriate Uconnect® Multimedia radio
User’s Manual for iPod® or external USB
device support capability.
• Connecting an iPod® or consumer elec-
tronic audio device to the AUX port lo-
cated in the radio faceplate, plays media,
but does not use the iPod® /MP3 control
feature to control the connected device.
Connecting The iPod® Or External
USB Device
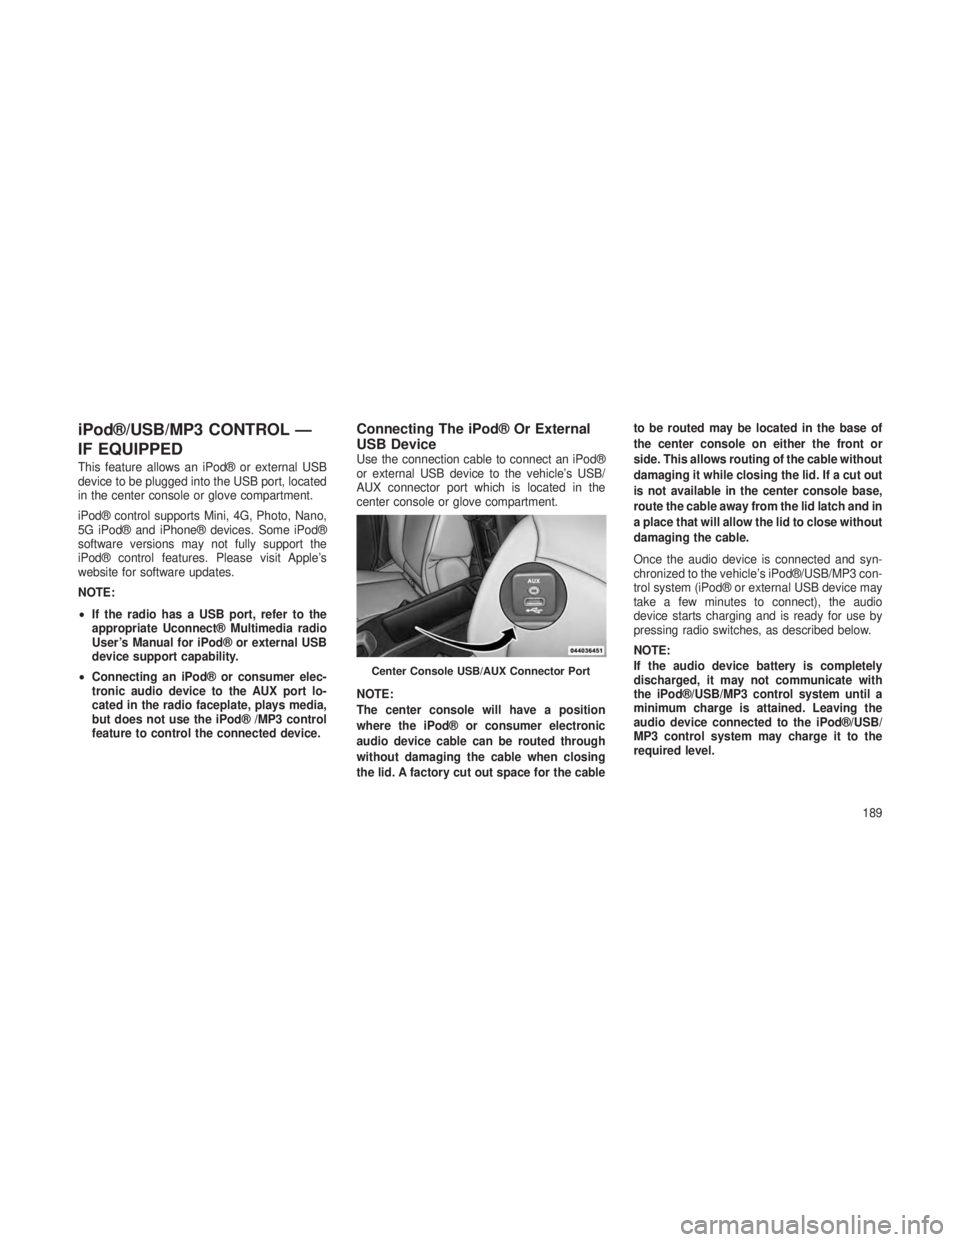
Use the connection cable to connect an iPod®
or external USB device to the vehicle’s USB/
AUX connector port which is located in the
center console or glove compartment.
NOTE:
The center console will have a position
where the iPod® or consumer electronic
audio device cable can be routed through
without damaging the cable when closing
the lid. A factory cut out space for the cable to be routed may be located in the base of
the center console on either the front or
side. This allows routing of the cable without
damaging it while closing the lid. If a cut out
is not available in the center console base,
route the cable away from the lid latch and in
a place that will allow the lid to close without
damaging the cable.
Once the audio device is connected and syn-
chronized to the vehicle’s iPod®/USB/MP3 con-
trol system (iPod® or external USB device may
take a few minutes to connect), the audio
device starts charging and is ready for use by
pressing radio switches, as described below.
NOTE:
If the audio device battery is completely
discharged, it may not communicate with
the iPod®/USB/MP3 control system until a
minimum charge is attained. Leaving the
audio device connected to the iPod®/USB/
MP3 control system may charge it to the
required level.
Center Console USB/AUX Connector Port
189
Page 194 of 408
Using This FeatureBy using an iPod® cable, or an external USB
device to connect to the USB port:
•The audio device can be played on the
vehicle’s sound system, providing metadata
(artist, track title, album, etc.) information on
the radio display.
• The audio device can be controlled using the
radio buttons to Play, Browse, and List the
iPod® contents.
• The audio device battery charges when
plugged into the USB/AUX connector (if sup-
ported by the specific audio device).
Controlling The iPod® Or External
USB Device Using Radio Buttons
To get into the iPod®/USB/MP3 control mode
and access a connected audio device, either
press the “AUX” button on the radio faceplate or
press the VR button and say "USB"or"Switch
to USB". Once in the iPod®/USB/MP3 control
mode, audio tracks (if available from audio
device) start playing over the vehicle’s audio
system.
Play ModeWhen switched to iPod®/USB/MP3 control
mode, the iPod® or external USB device auto-
matically starts Play mode. In Play mode, the
following buttons on the radio faceplate may be
used to control the iPod® or external USB
device and display data:
• Use the TUNE control knob to select the next
or previous track.
• Turning it clockwise (forward) by one click,
while playing a track, skips to the next
track or press the VR button and say "Next
Track".
• Turning it counterclockwise (backward) by
one click, will jump to the previous track in
the list or press the VR button and say
"Previous Track"
• Jump backward in the current track by press-
ing and holding the << RWbutton. Holding
the << RWbutton long enough will jump to
the beginning of the current track.
• Jump forward in the current track by pressing
and holding the FF>> button. •
A single press backward << RWor forward
FF>> will jump backward or forward respec-
tively, for five seconds.
•
Use the << SEEKandSEEK>> buttons to
jump to the previous or next track. Pressing the
SEEK>> button during play mode will jump to
the next track in the list, or press the VR button
and say "Next or Previous Track".
•While a track is playing, press the INFO
button to see the associated metadata (artist,
track title, album, etc.) for that track. Pressing
the INFO button again jumps to the next
screen of data for that track. Once all screens
have been viewed, the last INFObutton
press will go back to the play mode screen on
the radio.
• Pressing the REPEATbutton will change the
audio device mode to repeat the current
playing track or press the VR button and say
"Repeat ON" or"Repeat Off".
190
Page 196 of 408
CAUTION!
•Leaving the iPod® or external USB device
(or any supported device) anywhere in the
vehicle in extreme heat or cold can alter
the operation or damage the device. Fol-
low the device manufacturer’s guidelines.
• Placing items on the iPod® or external
USB device, or connections to the iPod®
or external USB device in the vehicle, can
cause damage to the device and/or to the
connectors.
WARNING!
Do not plug in or remove the iPod® or external
USB device while driving. Failure to follow this
warning could result in an accident.
Bluetooth Streaming Audio (BTSA)Music can be streamed from your cellular
phone to the Uconnect® phone system.
Controlling BTSA Using Radio Buttons
To get into the BTSA mode, press either “AUX”
button on the radio or press the VR button and
say “Bluetooth Streaming Audio”.
Play Mode
When switched to BTSA mode, some audio
devices can start playing music over the vehi-
cle’s audio system, but some devices require
the music to be initiated on the device first, then
it will get streamed to the Uconnect® phone
system. Seven devices can be paired to the
Uconnect® phone system, but just one can be
selected and played.
Selecting A Different Audio Device
1. Press the PHONE button to begin.
2. After the "Ready"prompt and following the
beep, say "Setup", then say "Select Audio De-
vices". 3. Say the name of the audio device or ask the
Uconnect® phone system to list the audio de-
vices.
Next Track
Use the SEEK UP button, or press the VR
button on the radio and say “Next Track”, to
jump to the next music track on your cellular
phone.
Previous Track
Use the SEEK DOWN button, or press the VR
button on the radio and say “Previous Track”, to
jump to the previous music track on your cellular
phone.
Browse
Browsing is not available on a Bluetooth
Streaming Audio (BTSA) device. Only the cur-
rent song that is playing will display info.
192
Page 197 of 408
Uconnect® MULTIMEDIA
VIDEO ENTERTAINMENT
SYSTEM (VES™) — IF
EQUIPPED
Your rear seat Video Entertainment System
(VES™) is designed to give your family years of
enjoyment. You can play your favorite CDs or
DVDs, listen to audio over the wireless head-
phones, or plug and play a variety of standard
video games or audio devices. Please review
this Owner’s Manual to become familiar with its
features and operation.
System OverviewThe rear seat Video Entertainment System
(VES™) consists of:
•Your vehicle may be equipped with a single
LCD overhead console screen system.
• One infrared remote control to allow rear seat
audio and video control function capability of
the VES™. •
Two infrared wireless dual channel head-
phones for rear passenger listening.
• Auxiliary RCA audio/video inputs (AUX jacks)
for listening and viewing of other consumer
electronic device media such as MP3 players
or video games.
• Radio capable of playing DVDs.
Video Entertainment System (VES™)This manual is intended to aid with the opera-
tion of the rear seat Video Entertainment Sys-
tem (VES™).
The Video Entertainment System (VES™) ex-
pands the vehicle’s audio and video capabilities
so that rear passengers can enjoy movies,
music and external audio/video devices such as
video games or MP3 players. The VES™ inte-
grates seamlessly with the vehicle’s radio so the
audio may be heard through the cabin speakers
and/or headphones. The system may be con-
trolled by the radio for front seat occupants or
controlled by the remote control for rear seat
occupants. The VES™ is a dual channel system. The video
screen displays information in a split screen
format. The left side of the screen is referred to
as Channel 1 and the right side of the screen is
referred to as Channel 2. All modes except
video modes (DVD video, Aux video) are dis-
played in a split screen format. When a video
mode is displayed it is displayed on the full
screen. The remote control is designed to con-
trol either channel by the use of the selector
switch located on the right side of the remote
control. The headphones are designed to listen
to either channel by use of the selector switch
located on the right ear cup.
Using the included dual channel wireless head-
phones, the VES™ allows rear passengers to
listen to two different audio sources simultane-
ously. The wireless remote control allows rear
passengers to change stations, tracks, discs
and audio/video modes.
193
Page 198 of 408
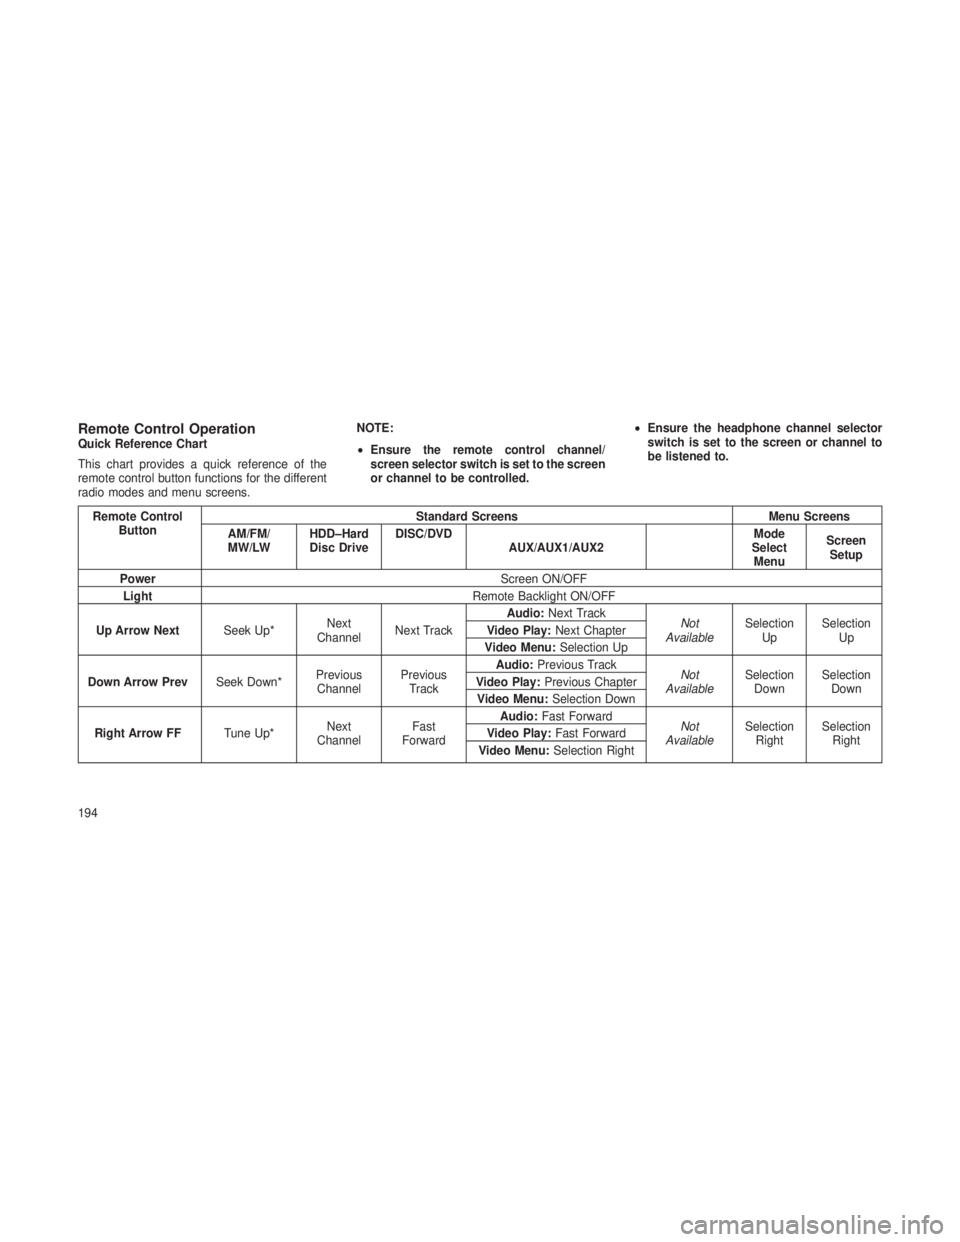
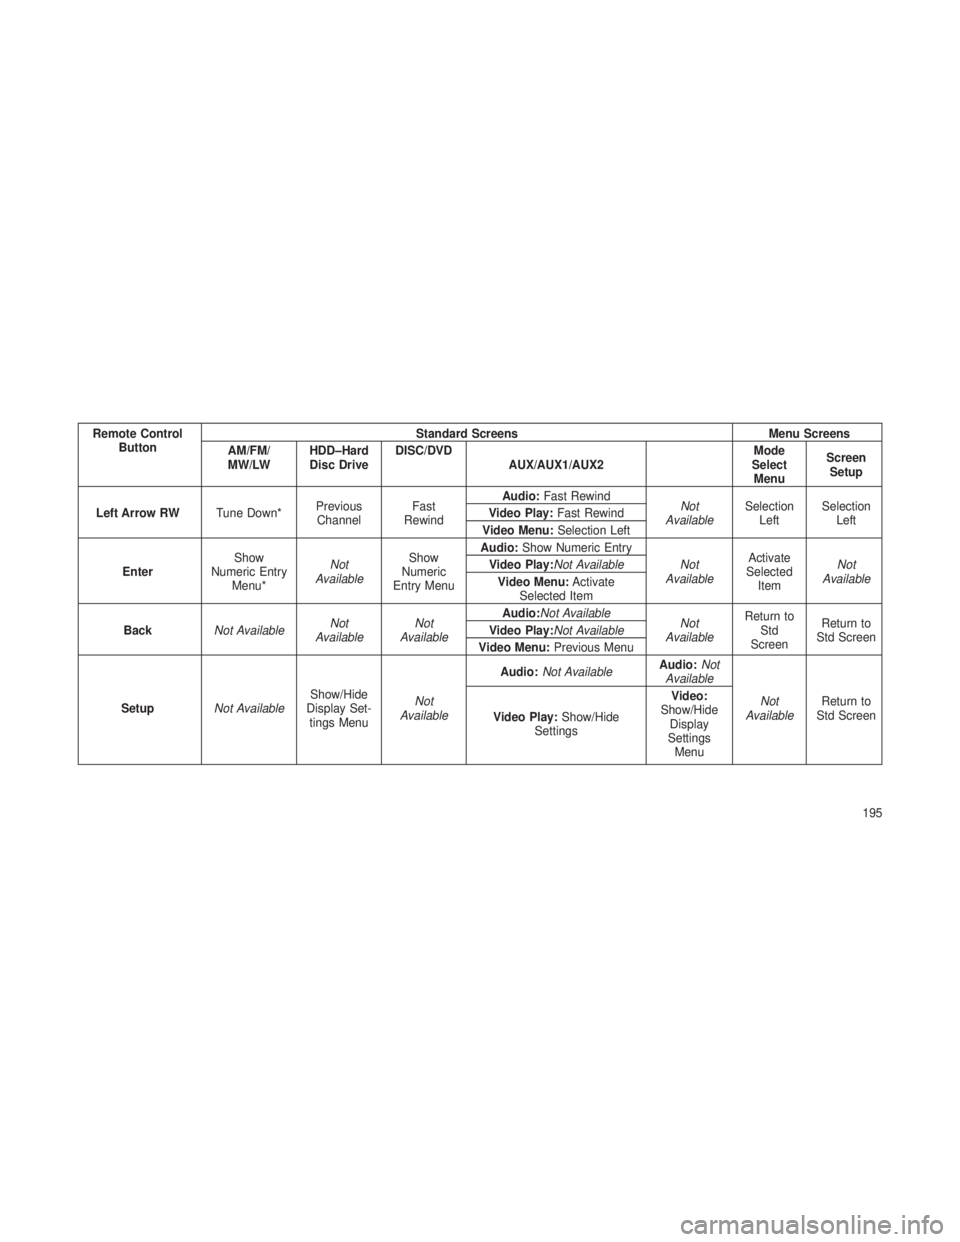
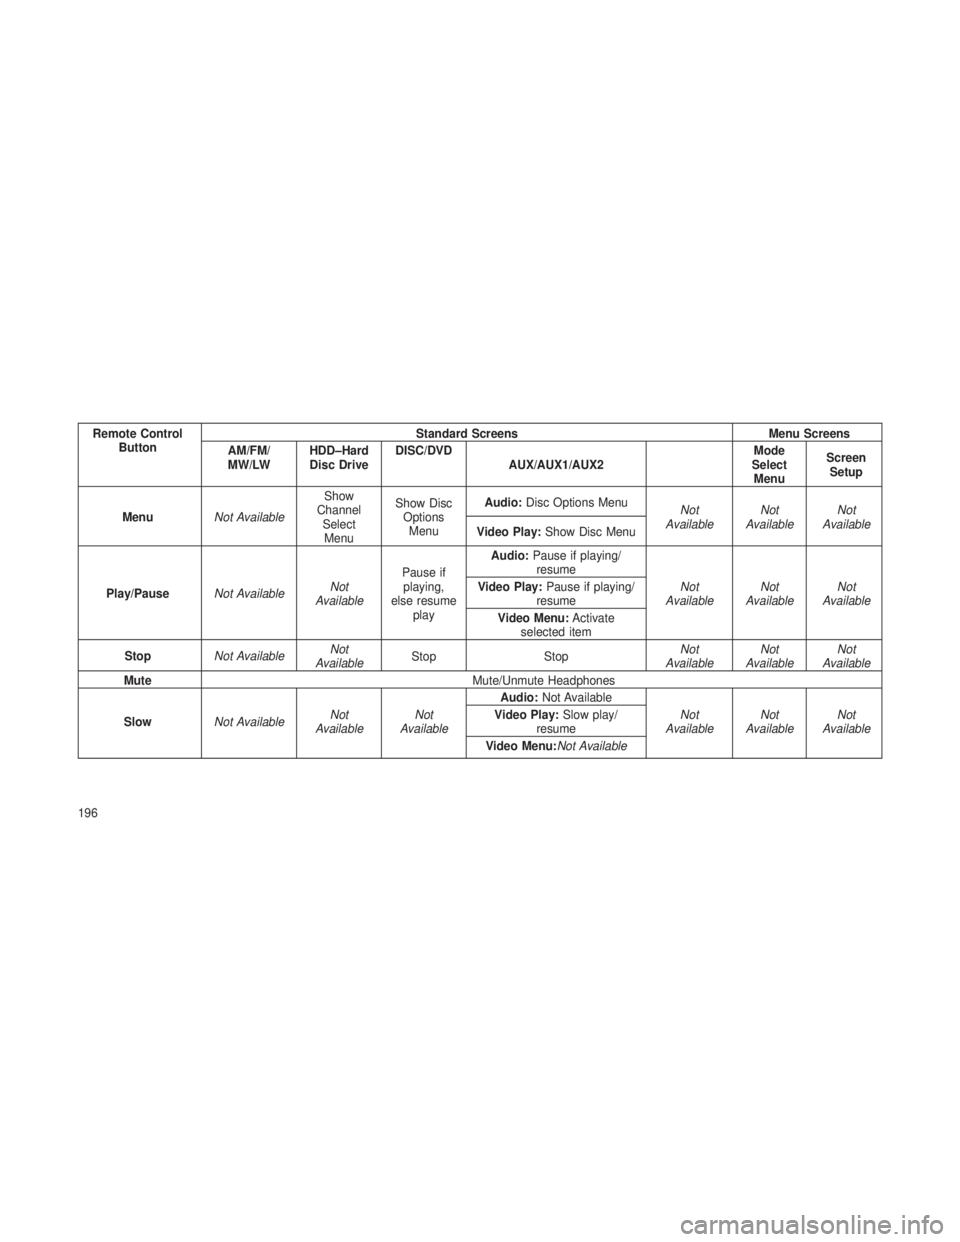
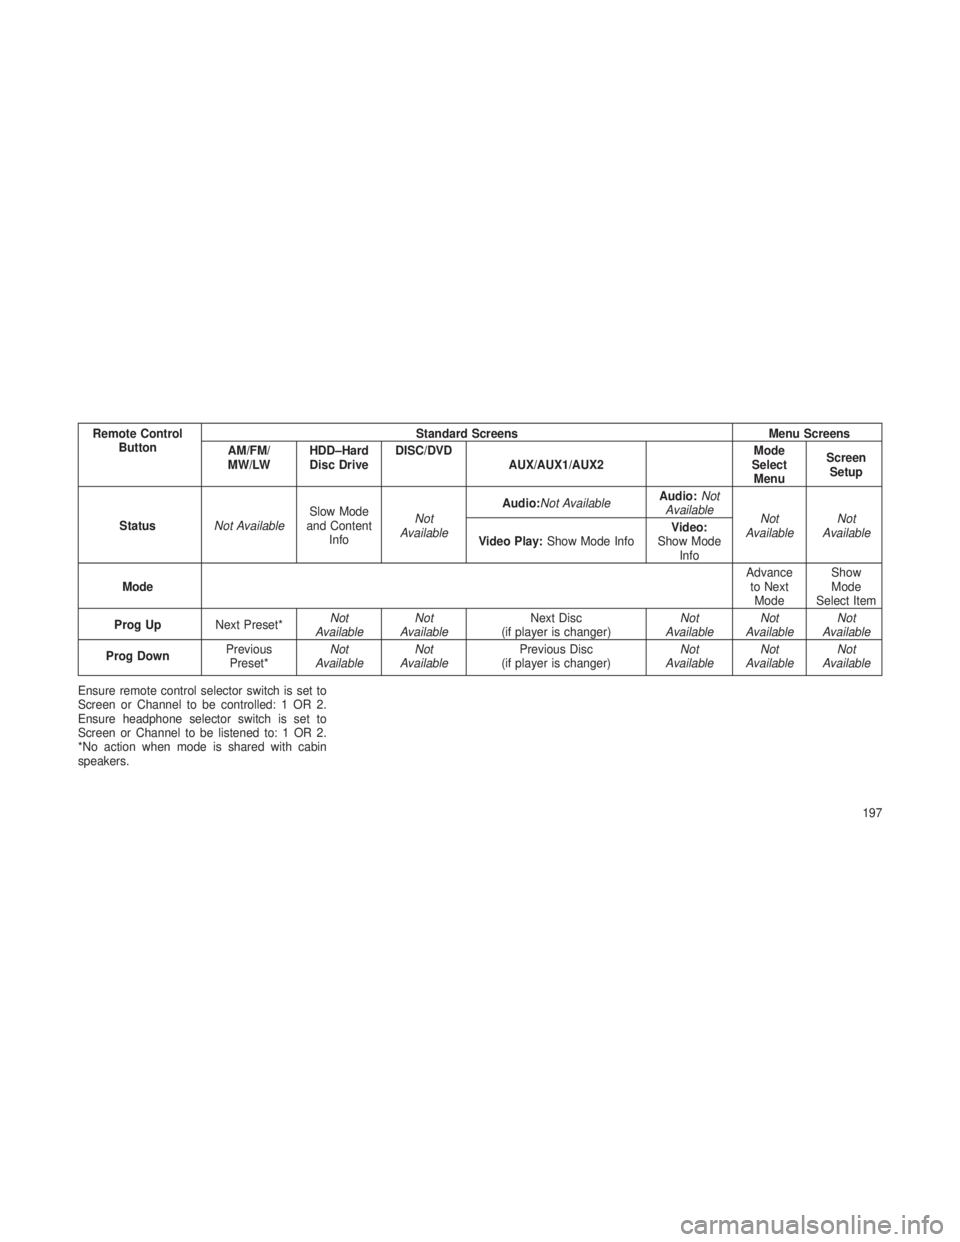
Remote Control OperationQuick Reference Chart
This chart provides a quick reference of the
remote control button functions for the different
radio modes and menu screens.NOTE:
•
Ensure the remote control channel/
screen selector switch is set to the screen
or channel to be controlled. •
Ensure the headphone channel selector
switch is set to the screen or channel to
be listened to.
Remote Control
Button Standard Screens
Menu Screens
AM/FM/
MW/LW HDD–Hard
Disc Drive DISC/DVD
AUX/AUX1/AUX2 Mode
Select Menu Screen
Setup
Power Screen ON/OFF
Light Remote Backlight ON/OFF
Up Arrow Next Seek Up*Next
Channel Next Track Audio:
Next Track
Not
Available Selection
Up Selection
Up
Video Play:
Next Chapter
Video Menu: Selection Up
Down Arrow Prev Seek Down*Previous
Channel Previous
Track Audio:
Previous Track
Not
Available Selection
Down Selection
Down
Video Play:
Previous Chapter
Video Menu: Selection Down
Right Arrow FF Tune Up*Next
Channel Fast
Forward Audio:
Fast Forward
Not
Available Selection
Right Selection
Right
Video Play:
Fast Forward
Video Menu: Selection Right
194
Page 199 of 408
Remote ControlButton Standard Screens
Menu Screens
AM/FM/
MW/LW HDD–Hard
Disc Drive DISC/DVD
AUX/AUX1/AUX2 Mode
Select Menu Screen
Setup
Left Arrow RW Tune Down*Previous
Channel Fast
Rewind Audio:
Fast Rewind
Not
Available Selection
Left Selection
Left
Video Play:
Fast Rewind
Video Menu: Selection Left
Enter Show
Numeric Entry Menu* Not
Available Show
Numeric
Entry Menu Audio:
Show Numeric Entry
Not
Available Activate
Selected Item Not
Available
Video Play:Not Available
Video Menu: Activate
Selected Item
Back Not Available Not
Available Not
Available Audio:Not Available
Not
Available Return to
Std
Screen Return to
Std Screen
Video Play:Not Available
Video Menu: Previous Menu
Setup Not Available Show/Hide
Display Set- tings Menu Not
Available Audio:
Not Available Audio:
Not
Available
Not
Available Return to
Std Screen
Video Play: Show/Hide
Settings Video:
Show/Hide Display
Settings Menu
195
Page 200 of 408
Remote ControlButton Standard Screens
Menu Screens
AM/FM/
MW/LW HDD–Hard
Disc Drive DISC/DVD
AUX/AUX1/AUX2 Mode
Select Menu Screen
Setup
Menu Not Available Show
Channel SelectMenu Show Disc
OptionsMenu Audio:
Disc Options Menu
Not
Available Not
Available Not
Available
Video Play: Show Disc Menu
Play/Pause Not Available Not
Available Pause if
playing,
else resume play Audio:
Pause if playing/
resume
Not
Available Not
Available Not
Available
Video Play:
Pause if playing/
resume
Video Menu: Activate
selected item
Stop Not Available Not
Available Stop
Stop Not
Available Not
Available Not
Available
Mute Mute/Unmute Headphones
Slow Not Available Not
Available Not
Available Audio:
Not Available
Not
Available Not
Available Not
Available
Video Play:
Slow play/
resume
Video Menu:Not Available
196
Page 201 of 408
Remote ControlButton Standard Screens
Menu Screens
AM/FM/
MW/LW HDD–Hard
Disc Drive DISC/DVD
AUX/AUX1/AUX2 Mode
Select Menu Screen
Setup
Status Not Available Slow Mode
and Content Info Not
Available Audio:Not Available
Audio:
Not
Available Not
Available Not
Available
Video Play: Show Mode Info Video:
Show Mode Info
Mode Advance
to Next Mode Show
Mode
Select Item
Prog Up Next Preset* Not
Available Not
Available Next Disc
(if player is changer) Not
Available Not
Available Not
Available
Prog Down Previous
Preset* Not
Available Not
Available Previous Disc
(if player is changer) Not
Available Not
Available Not
Available
Ensure remote control selector switch is set to
Screen or Channel to be controlled: 1 OR 2.
Ensure headphone selector switch is set to
Screen or Channel to be listened to: 1 OR 2.
*No action when mode is shared with cabin
speakers.
197
Page 206 of 408
Video Screen Operation
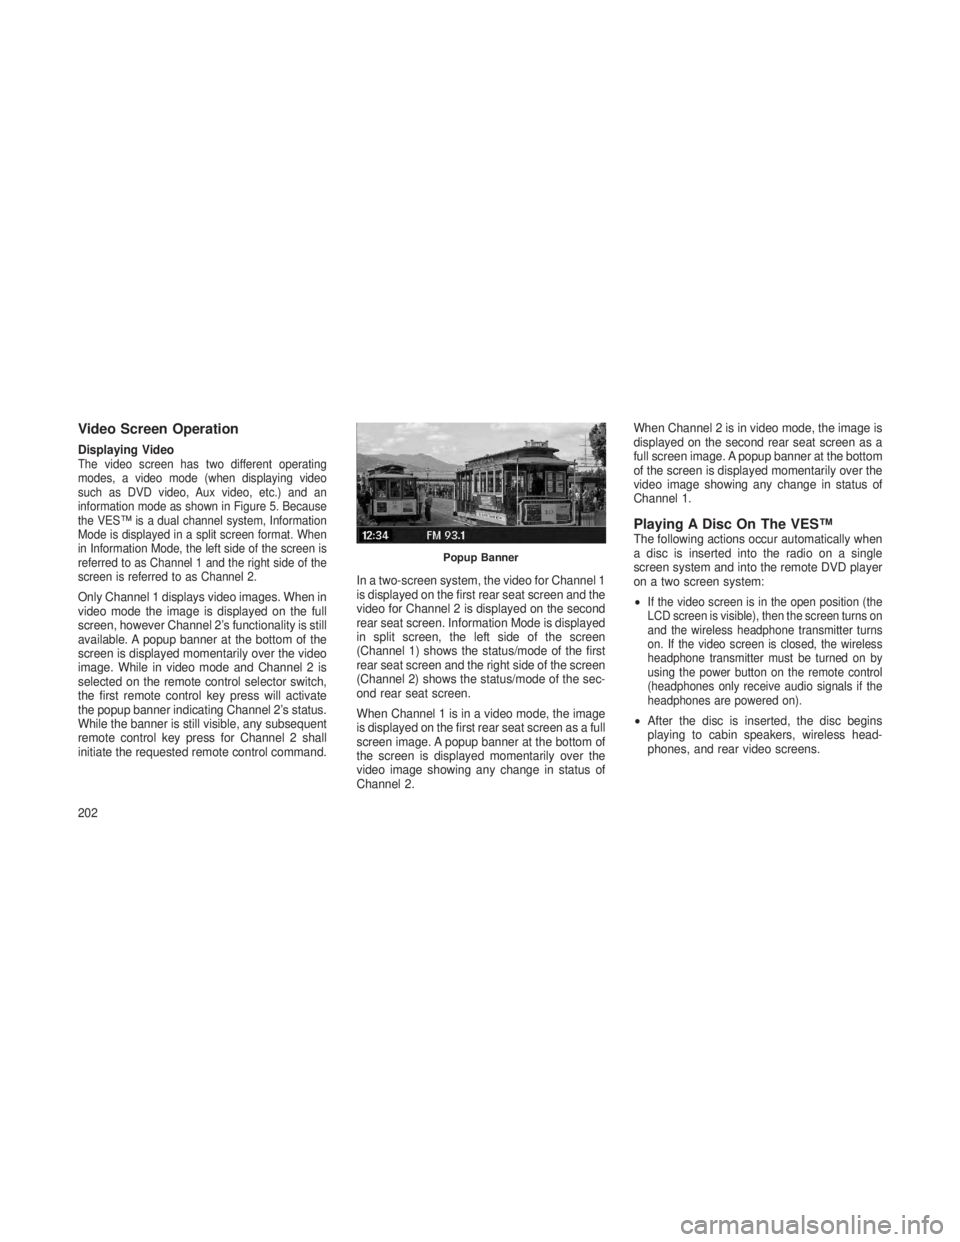
Displaying VideoThe video screen has two different operating
modes, a video mode (when displaying video
such as DVD video, Aux video, etc.) and an
information mode as shown in Figure 5. Because
the VES™ is a dual channel system, Information
Mode is displayed in a split screen format. When
in Information Mode, the left side of the screen is
referred to as Channel 1 and the right side of the
screen is referred to as Channel 2.
Only Channel 1 displays video images. When in
video mode the image is displayed on the full
screen, however Channel 2’s functionality is still
available. A popup banner at the bottom of the
screen is displayed momentarily over the video
image. While in video mode and Channel 2 is
selected on the remote control selector switch,
the first remote control key press will activate
the popup banner indicating Channel 2’s status.
While the banner is still visible, any subsequent
remote control key press for Channel 2 shall
initiate the requested remote control command.In a two-screen system, the video for Channel 1
is displayed on the first rear seat screen and the
video for Channel 2 is displayed on the second
rear seat screen. Information Mode is displayed
in split screen, the left side of the screen
(Channel 1) shows the status/mode of the first
rear seat screen and the right side of the screen
(Channel 2) shows the status/mode of the sec-
ond rear seat screen.
When Channel 1 is in a video mode, the image
is displayed on the first rear seat screen as a full
screen image. A popup banner at the bottom of
the screen is displayed momentarily over the
video image showing any change in status of
Channel 2.When Channel 2 is in video mode, the image is
displayed on the second rear seat screen as a
full screen image. A popup banner at the bottom
of the screen is displayed momentarily over the
video image showing any change in status of
Channel 1.
Playing A Disc On The VES™The following actions occur automatically when
a disc is inserted into the radio on a single
screen system and into the remote DVD player
on a two screen system:
•
If the video screen is in the open position (the
LCD screen is visible), then the screen turns on
and the wireless headphone transmitter turns
on. If the video screen is closed, the wireless
headphone transmitter must be turned on by
using the power button on the remote control
(headphones only receive audio signals if the
headphones are powered on).
•
After the disc is inserted, the disc begins
playing to cabin speakers, wireless head-
phones, and rear video screens.
Popup Banner
202