JEEP GRAND CHEROKEE 2015 WK2 / 4.G SRT Owners Manual
Manufacturer: JEEP, Model Year: 2015, Model line: GRAND CHEROKEE, Model: JEEP GRAND CHEROKEE 2015 WK2 / 4.GPages: 636, PDF Size: 5.35 MB
Page 101 of 636
Installing Child Restraints Using The Vehicle Seat
Belt
The seat belts in the passenger seating positions are
equipped with a Switchable Automatic Locking Retractor
(ALR) that is designed to keep the lap portion of the seat
belt tight around the child restraint so that it is not
necessary to use a locking clip. The ALR retractor can be
“switched” into a locked mode by pulling all of the
webbing out of the retractor and then letting the webbing
retract back into the retractor. If it is locked, the ALR will
make a clicking noise while the webbing is pulled back
into the retractor. Refer to the “Automatic Locking
Mode” description under “Occupant Restraints” for ad-
ditional information on ALR.
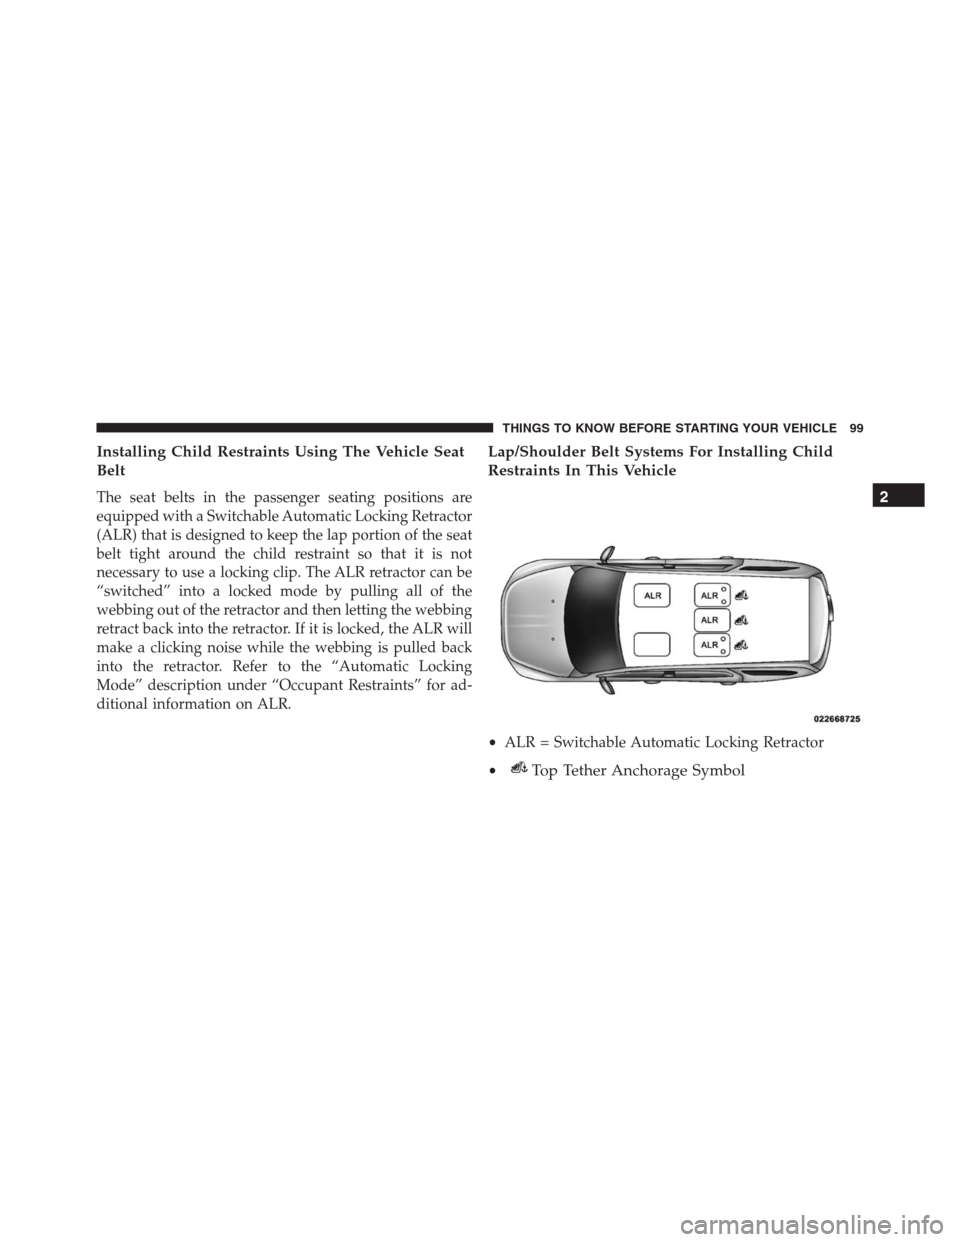
Lap/Shoulder Belt Systems For Installing Child
Restraints In This Vehicle
•ALR = Switchable Automatic Locking Retractor
•
Top Tether Anchorage Symbol
2
THINGS TO KNOW BEFORE STARTING YOUR VEHICLE 99
Page 102 of 636
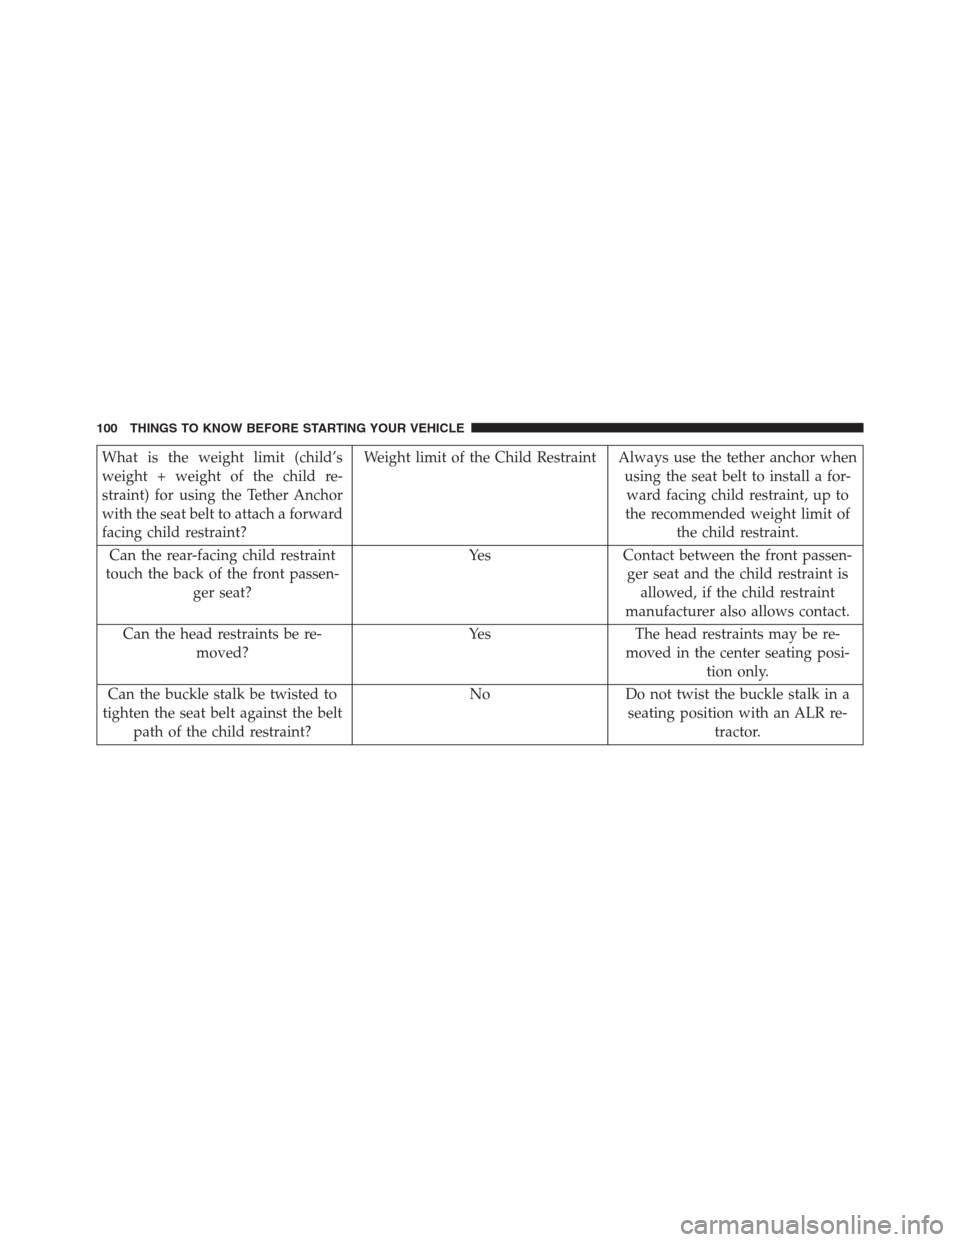
What is the weight limit (child’s
weight + weight of the child re-
straint) for using the Tether Anchor
with the seat belt to attach a forward
facing child restraint?Weight limit of the Child Restraint Always use the tether anchor when
using the seat belt to install a for-
ward facing child restraint, up to
the recommended weight limit of
the child restraint.
Can the rear-facing child restraint
touch the back of the front passen-
ger seat?Yes Contact between the front passen-
ger seat and the child restraint is
allowed, if the child restraint
manufacturer also allows contact.
Can the head restraints be re-
moved?Yes The head restraints may be re-
moved in the center seating posi-
tion only.
Can the buckle stalk be twisted to
tighten the seat belt against the belt
path of the child restraint?No Do not twist the buckle stalk in a
seating position with an ALR re-
tractor.
100 THINGS TO KNOW BEFORE STARTING YOUR VEHICLE
Page 103 of 636
Installing A Child Restraint With A Switchable
Automatic Locking Retractor (ALR)
1. Place the child seat in the center of the seating
position. For some second row seats, you may need to
recline the seat and/or raise the head restraint to get a
better fit. If the rear seat can be moved forward and
rearward in the vehicle, you may wish to move it to its
rear-most position to make room for the child seat.
You may also move the front seat forward to allow
more room for the child seat.
2.
Pull enough of the seat belt webbing from the retractor to
pass it through the seat belt path of the child restraint. Do
not twist the belt webbing in the belt path.
3. Slide the latch plate into the buckle until you hear a
“click.”
4. Pull on the webbing to make the lap portion tight
against the child seat.5. To lock the seat belt, pull down on the shoulder part of
the seat belt until you have pulled all the seat belt
webbing out of the retractor. Then, allow the webbing
to retract back into the retractor. As the webbing
retracts, you will hear a clicking sound. This means the
seat belt is now in the Automatic Locking mode.
6. Try to pull the webbing out of the retractor. If it is
locked, you should not be able to pull out any web-
bing. If the retractor is not locked, repeat step 5.
7. Finally, pull up on any excess webbing to tighten the
lap portion around the child restraint while you push
the child restraint rearward and downward into the
vehicle seat.
8. If the child restraint has a top tether strap and the
seating position has a top tether anchorage, connect
the tether strap to the anchorage and tighten the tether
strap. See the section “Installing Child Restraints
Using the Top Tether Anchorage” for directions to
attach a tether anchor.
2
THINGS TO KNOW BEFORE STARTING YOUR VEHICLE 101
Page 104 of 636
9. Test that the child restraint is installed tightly by
pulling back and forth on the child seat at the seat belt
path. It should not move more than 1 inch (25.4 mm)
in any direction.
Any seat belt system will loosen with time, so check the
seat belt occasionally, and pull it tight if necessary.
Installing Child Restraints Using the Top Tether
Anchorage
WARNING!
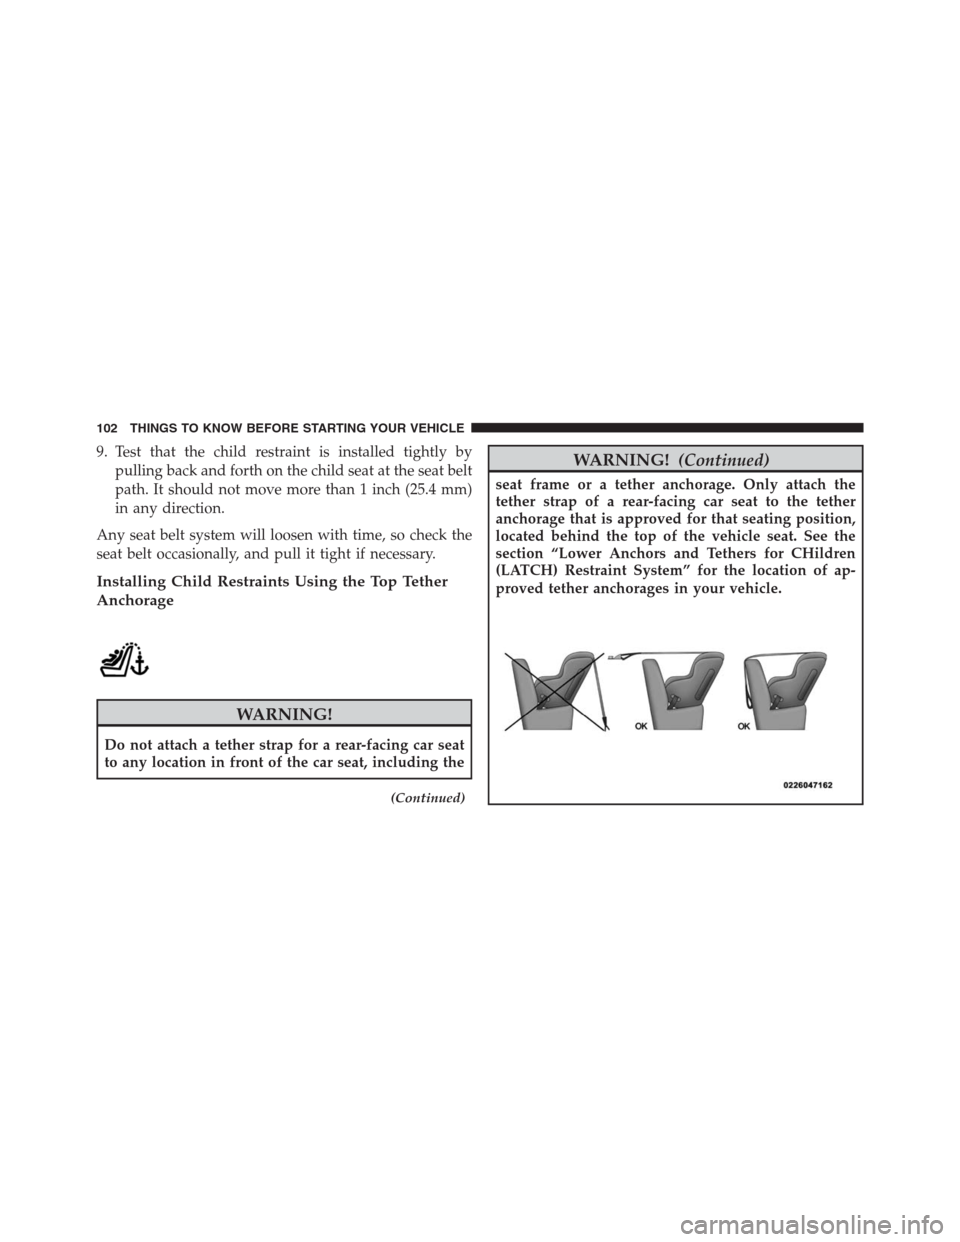
Do not attach a tether strap for a rear-facing car seat
to any location in front of the car seat, including the
(Continued)
WARNING!(Continued)
seat frame or a tether anchorage. Only attach the
tether strap of a rear-facing car seat to the tether
anchorage that is approved for that seating position,
located behind the top of the vehicle seat. See the
section “Lower Anchors and Tethers for CHildren
(LATCH) Restraint System” for the location of ap-
proved tether anchorages in your vehicle.
102 THINGS TO KNOW BEFORE STARTING YOUR VEHICLE
Page 105 of 636
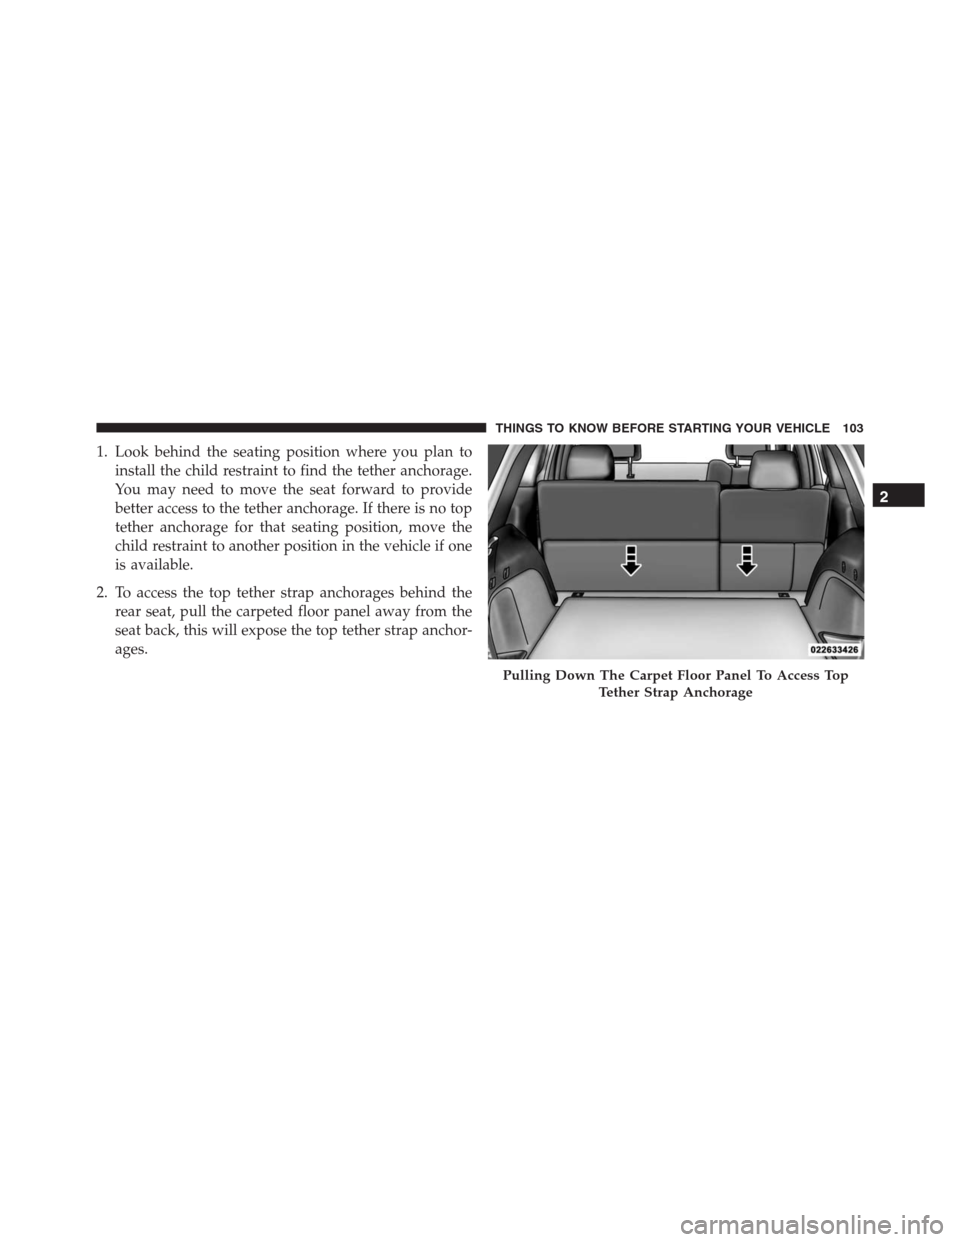
1. Look behind the seating position where you plan to
install the child restraint to find the tether anchorage.
You may need to move the seat forward to provide
better access to the tether anchorage. If there is no top
tether anchorage for that seating position, move the
child restraint to another position in the vehicle if one
is available.
2. To access the top tether strap anchorages behind the
rear seat, pull the carpeted floor panel away from the
seat back, this will expose the top tether strap anchor-
ages.
Pulling Down The Carpet Floor Panel To Access Top
Tether Strap Anchorage
2
THINGS TO KNOW BEFORE STARTING YOUR VEHICLE 103
Page 106 of 636
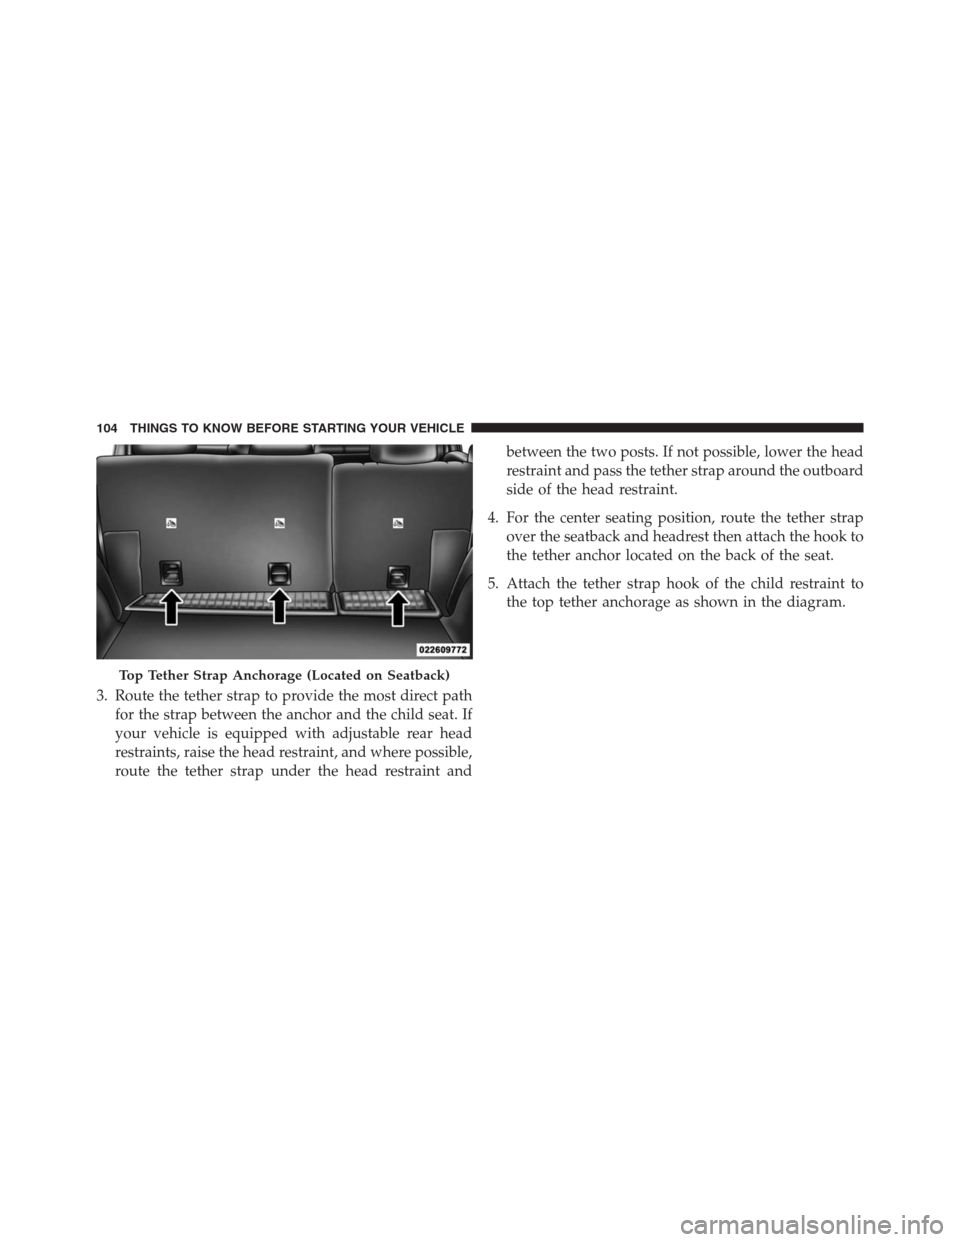
3. Route the tether strap to provide the most direct path
for the strap between the anchor and the child seat. If
your vehicle is equipped with adjustable rear head
restraints, raise the head restraint, and where possible,
route the tether strap under the head restraint andbetween the two posts. If not possible, lower the head
restraint and pass the tether strap around the outboard
side of the head restraint.
4. For the center seating position, route the tether strap
over the seatback and headrest then attach the hook to
the tether anchor located on the back of the seat.
5. Attach the tether strap hook of the child restraint to
the top tether anchorage as shown in the diagram.
Top Tether Strap Anchorage (Located on Seatback)
104 THINGS TO KNOW BEFORE STARTING YOUR VEHICLE
Page 107 of 636
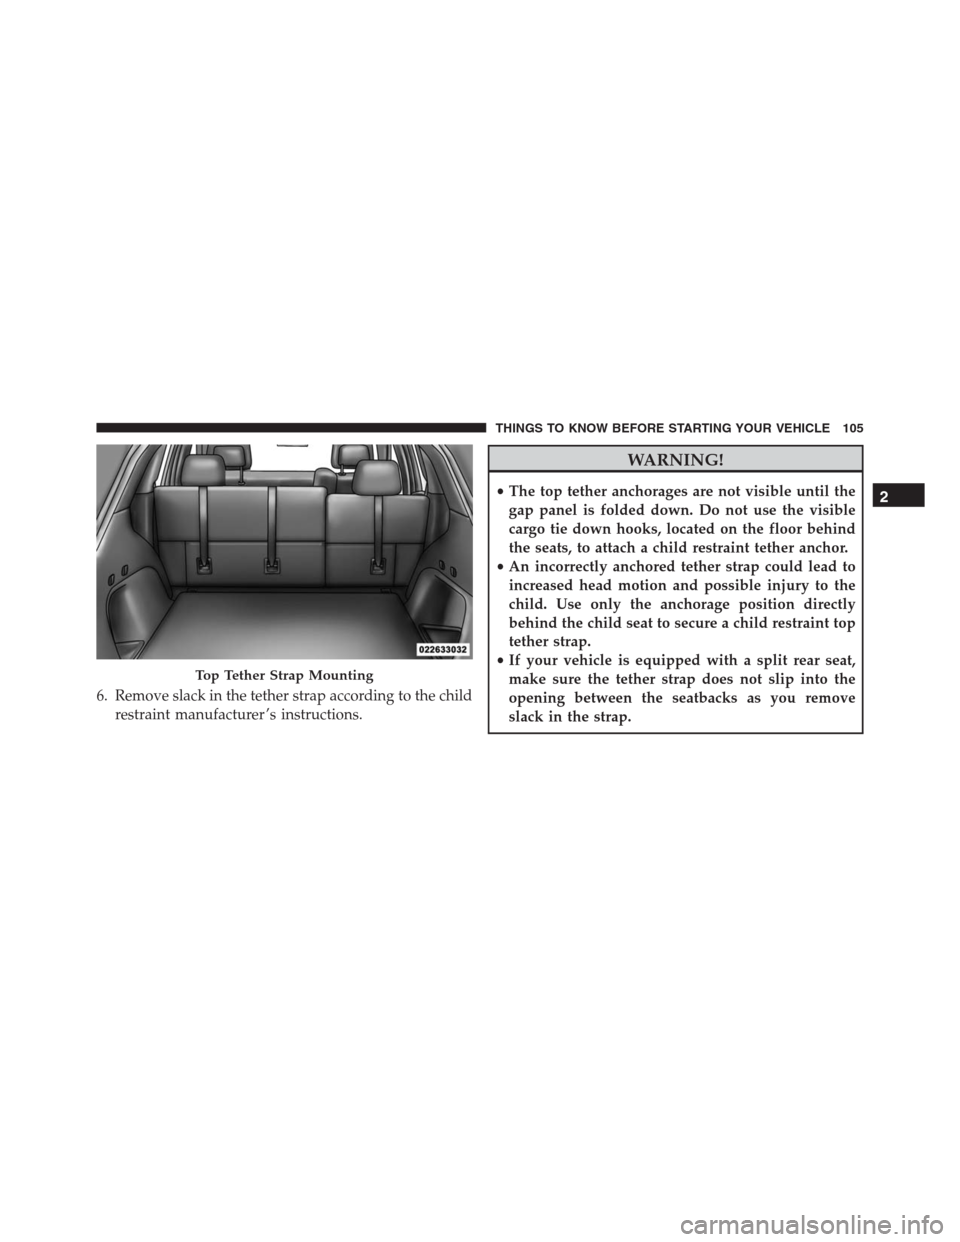
6. Remove slack in the tether strap according to the child
restraint manufacturer ’s instructions.
WARNING!
•The top tether anchorages are not visible until the
gap panel is folded down. Do not use the visible
cargo tie down hooks, located on the floor behind
the seats, to attach a child restraint tether anchor.
•An incorrectly anchored tether strap could lead to
increased head motion and possible injury to the
child. Use only the anchorage position directly
behind the child seat to secure a child restraint top
tether strap.
•If your vehicle is equipped with a split rear seat,
make sure the tether strap does not slip into the
opening between the seatbacks as you remove
slack in the strap.
Top Tether Strap Mounting
2
THINGS TO KNOW BEFORE STARTING YOUR VEHICLE 105
Page 108 of 636
Transporting Pets
Air Bags deploying in the front seat could harm your pet.
An unrestrained pet will be thrown about and possibly
injured, or injure a passenger during panic braking or in
a collision.
Pets should be restrained in the rear seat in pet harnesses
or pet carriers that are secured by seat belts.
SRT ENGINE BREAK-IN RECOMMENDATIONS
SRT Engine Break-In Recommendations: The following
tips will be helpful in obtaining optimum performance
and maximum durability for your new SRT Vehicle.
Despite modern technology and World Class manufac-
turing methods, the moving parts of the vehicle must still
wear in with each other. This wearing in occurs mainly
during the first 500 miles (805 km) and continues through
the first oil change interval.It is recommended for the operator to observe the follow-
ing driving behaviors during the new vehicle break-in
period:
0 to 100 miles (0 to 161 km):
•Do not allow the engine to operate at idle for an
extended period of time.
•Depress the accelerator pedal slowly and not more
than halfway to avoid rapid acceleration.
•Avoid aggressive braking.
•Drive with the engine speed less than 3,500 RPM.
•Maintain vehicle speed below 55 mph (88 km/h) and
observe local speed limits.
106 THINGS TO KNOW BEFORE STARTING YOUR VEHICLE
Page 109 of 636
100 to 300 miles (161 to 483 km):
•Depress the accelerator pedal slowly and not more
than halfway to avoid rapid acceleration in lower
gears (1st to 3rd gears).
•Avoid aggressive braking.
•Drive with the engine speed less than 5,000 RPM.
•Maintain vehicle speed below 70 mph (112 km/h) and
observe local speed limits.
300 to 500 miles (483 to 805 km):
•Exercise the full engine rpm range, shifting manually
(paddles or gear shift) at higher rpms when possible.
•Do not perform sustained operation with the accelera-
tor pedal at wide open throttle.
•Maintain vehicle speed below 85 mph (136 km/h) and
observe local speed limits.For the first 1500 mi (2414 km):
•Do not participate in track events, sport driving
schools, or similar activities during the first 1500 mi
(2414 km).
NOTE:Check engine oil with every refueling and add if
necessary. Oil and fuel consumption may be higher
through the first oil change interval.
SAFETY TIPS
Transporting Passengers
NEVER TRANSPORT PASSENGERS IN THE CARGO
AREA.
WARNING!
•Do not leave children or animals inside parked
vehicles in hot weather. Interior heat build-up may
(Continued)
2
THINGS TO KNOW BEFORE STARTING YOUR VEHICLE 107
Page 110 of 636
WARNING!(Continued)
cause serious injury or death.
•It is extremely dangerous to ride in a cargo area,
inside or outside of a vehicle. In a collision, people
riding in these areas are more likely to be seriously
injured or killed.
•Do not allow people to ride in any area of your
vehicle that is not equipped with seats and seat
belts.
•Be sure everyone in your vehicle is in a seat and
using a seat belt properly.
Exhaust Gas
WARNING!
Exhaust gases can injure or kill. They contain carbon
monoxide (CO), which is colorless and odorless.
(Continued)
WARNING!(Continued)
Breathing it can make you unconscious and can
eventually poison you. To avoid breathing (CO),
follow these safety tips:
•Do not run the engine in a closed garage or in
confined areas any longer than needed to move
your vehicle in or out of the area.
•If you are required to drive with the trunk/liftgate/
rear doors open, make sure that all windows are
closed and the climate control BLOWER switch is
set at high speed. DO NOT use the recirculation
mode.
•If it is necessary to sit in a parked vehicle with the
engine running, adjust your heating or cooling
controls to force outside air into the vehicle. Set the
blower at high speed.
108 THINGS TO KNOW BEFORE STARTING YOUR VEHICLE