warning JEEP GRAND CHEROKEE 2017 WK2 / 4.G User Guide
[x] Cancel search | Manufacturer: JEEP, Model Year: 2017, Model line: GRAND CHEROKEE, Model: JEEP GRAND CHEROKEE 2017 WK2 / 4.GPages: 372
Page 267 of 372
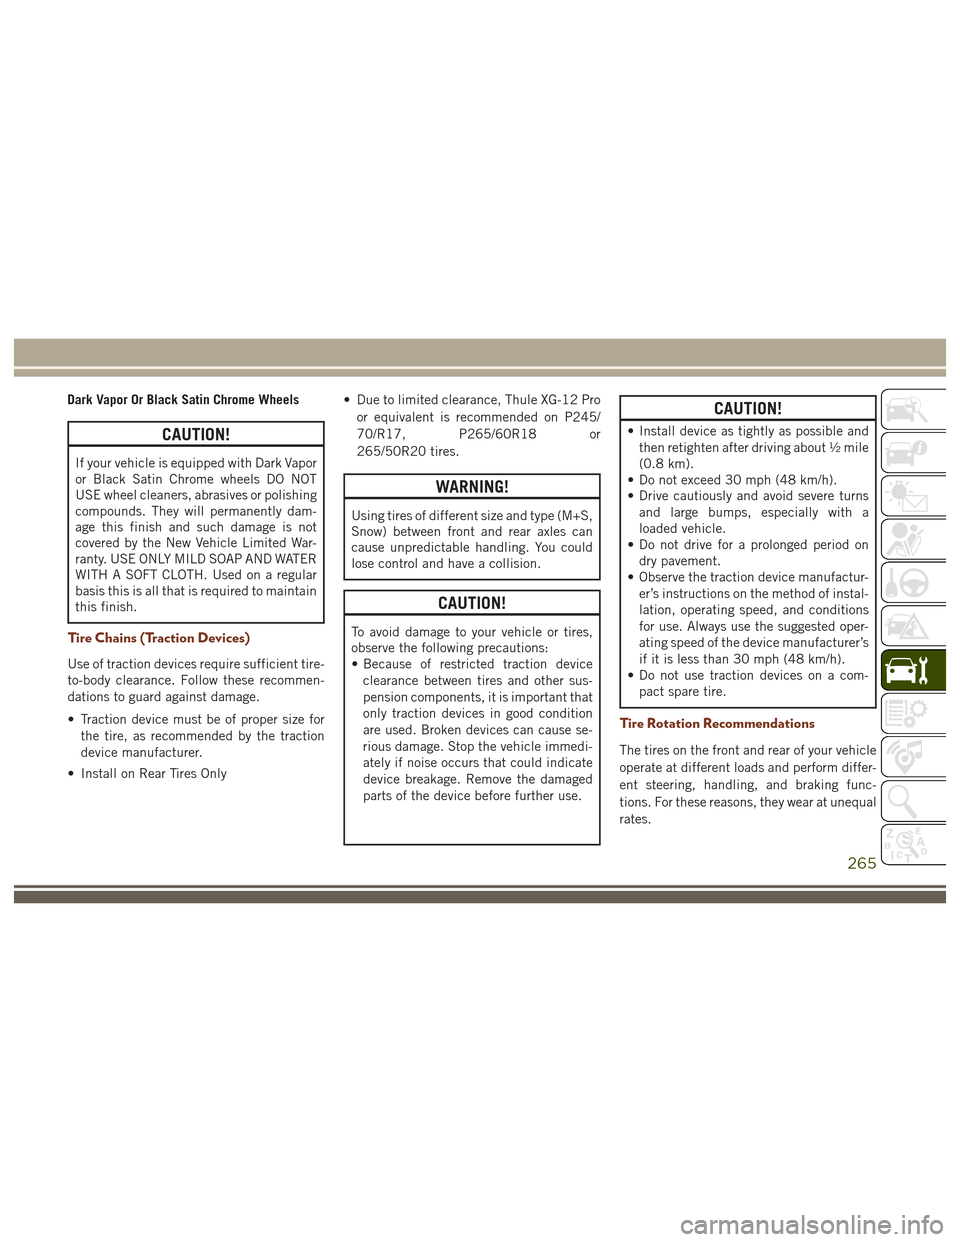
Dark Vapor Or Black Satin Chrome Wheels
CAUTION!
If your vehicle is equipped with Dark Vapor
or Black Satin Chrome wheels DO NOT
USE wheel cleaners, abrasives or polishing
compounds. They will permanently dam-
age this finish and such damage is not
covered by the New Vehicle Limited War-
ranty. USE ONLY MILD SOAP AND WATER
WITH A SOFT CLOTH. Used on a regular
basis this is all that is required to maintain
this finish.
Tire Chains (Traction Devices)
Use of traction devices require sufficient tire-
to-body clearance. Follow these recommen-
dations to guard against damage.
• Traction device must be of proper size forthe tire, as recommended by the traction
device manufacturer.
• Install on Rear Tires Only • Due to limited clearance, Thule XG-12 Pro
or equivalent is recommended on P245/
70/R17, P265/60R18 or
265/50R20 tires.
WARNING!
Using tires of different size and type (M+S,
Snow) between front and rear axles can
cause unpredictable handling. You could
lose control and have a collision.
CAUTION!
To avoid damage to your vehicle or tires,
observe the following precautions:
• Because of restricted traction deviceclearance between tires and other sus-
pension components, it is important that
only traction devices in good condition
are used. Broken devices can cause se-
rious damage. Stop the vehicle immedi-
ately if noise occurs that could indicate
device breakage. Remove the damaged
parts of the device before further use.
CAUTION!
• Install device as tightly as possible andthen retighten after driving about ½ mile
(0.8 km).
• Do not exceed 30 mph (48 km/h).
• Drive cautiously and avoid severe turns
and large bumps, especially with a
loaded vehicle.
• Do not drive for a prolonged period on
dry pavement.
• Observe the traction device manufactur-
er’s instructions on the method of instal-
lation, operating speed, and conditions
for use. Always use the suggested oper-
ating speed of the device manufacturer’s
if it is less than 30 mph (48 km/h).
• Do not use traction devices on a com-
pact spare tire.
Tire Rotation Recommendations
The tires on the front and rear of your vehicle
operate at different loads and perform differ-
ent steering, handling, and braking func-
tions. For these reasons, they wear at unequal
rates.
265
Page 269 of 372
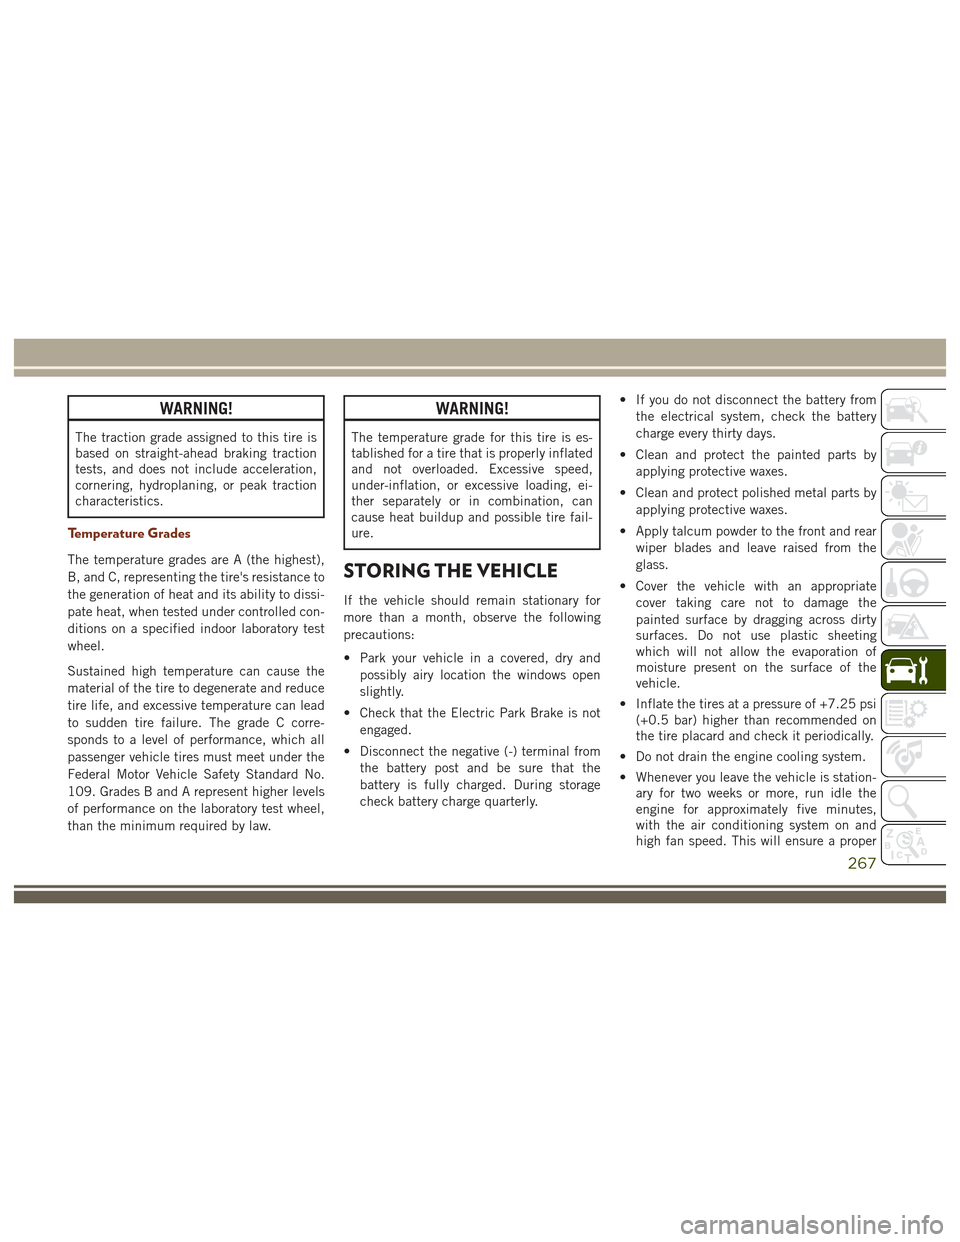
WARNING!
The traction grade assigned to this tire is
based on straight-ahead braking traction
tests, and does not include acceleration,
cornering, hydroplaning, or peak traction
characteristics.
Temperature Grades
The temperature grades are A (the highest),
B, and C, representing the tire's resistance to
the generation of heat and its ability to dissi-
pate heat, when tested under controlled con-
ditions on a specified indoor laboratory test
wheel.
Sustained high temperature can cause the
material of the tire to degenerate and reduce
tire life, and excessive temperature can lead
to sudden tire failure. The grade C corre-
sponds to a level of performance, which all
passenger vehicle tires must meet under the
Federal Motor Vehicle Safety Standard No.
109. Grades B and A represent higher levels
of performance on the laboratory test wheel,
than the minimum required by law.
WARNING!
The temperature grade for this tire is es-
tablished for a tire that is properly inflated
and not overloaded. Excessive speed,
under-inflation, or excessive loading, ei-
ther separately or in combination, can
cause heat buildup and possible tire fail-
ure.
STORING THE VEHICLE
If the vehicle should remain stationary for
more than a month, observe the following
precautions:
• Park your vehicle in a covered, dry andpossibly airy location the windows open
slightly.
• Check that the Electric Park Brake is not engaged.
• Disconnect the negative (-) terminal from the battery post and be sure that the
battery is fully charged. During storage
check battery charge quarterly. • If you do not disconnect the battery from
the electrical system, check the battery
charge every thirty days.
• Clean and protect the painted parts by applying protective waxes.
• Clean and protect polished metal parts by applying protective waxes.
• Apply talcum powder to the front and rear wiper blades and leave raised from the
glass.
• Cover the vehicle with an appropriate cover taking care not to damage the
painted surface by dragging across dirty
surfaces. Do not use plastic sheeting
which will not allow the evaporation of
moisture present on the surface of the
vehicle.
• Inflate the tires at a pressure of +7.25 psi (+0.5 bar) higher than recommended on
the tire placard and check it periodically.
• Do not drain the engine cooling system.
• Whenever you leave the vehicle is station- ary for two weeks or more, run idle the
engine for approximately five minutes,
with the air conditioning system on and
high fan speed. This will ensure a proper
267
Page 271 of 372
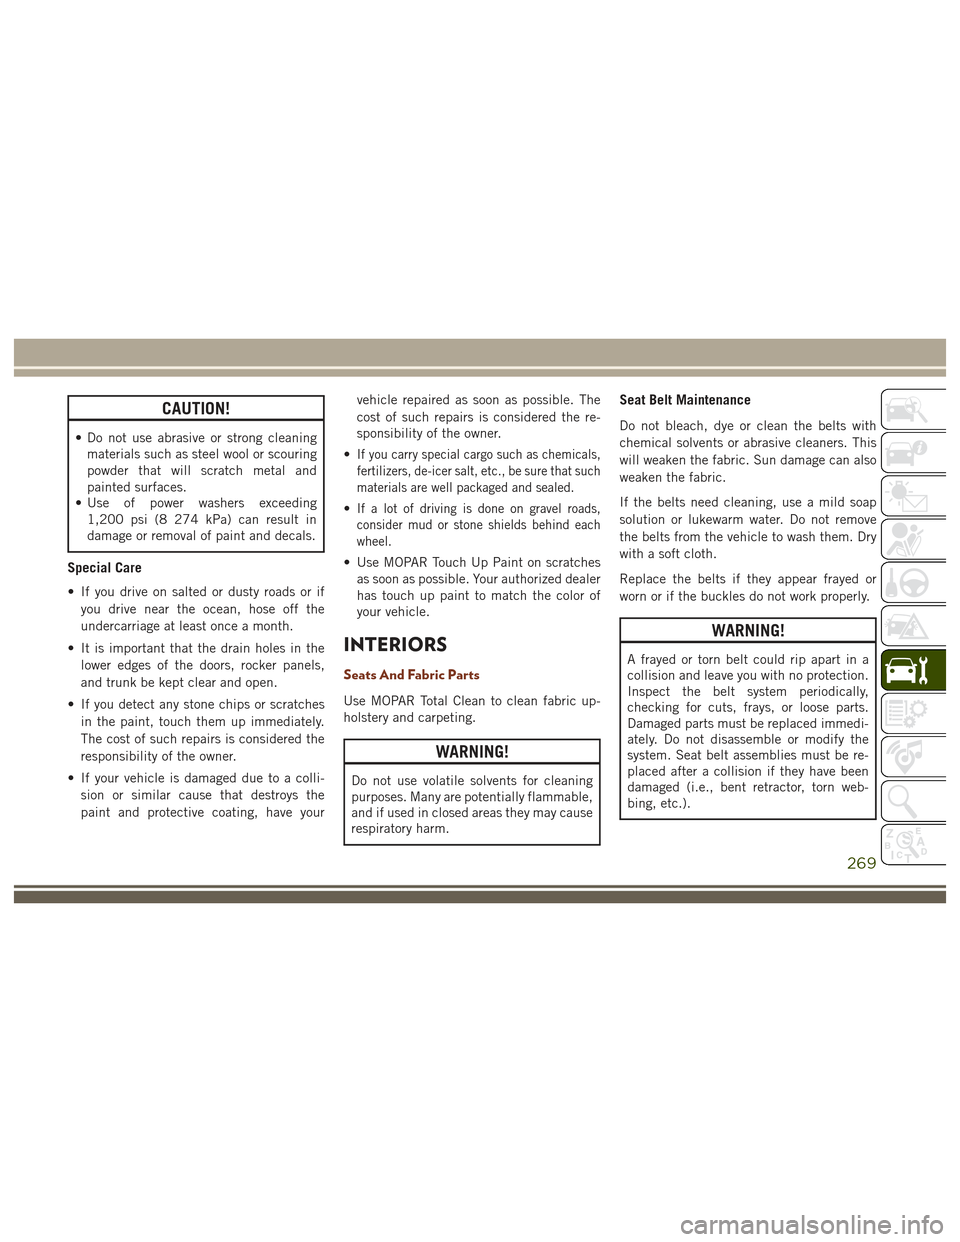
CAUTION!
• Do not use abrasive or strong cleaningmaterials such as steel wool or scouring
powder that will scratch metal and
painted surfaces.
• Use of power washers exceeding
1,200 psi (8 274 kPa) can result in
damage or removal of paint and decals.
Special Care
• If you drive on salted or dusty roads or if
you drive near the ocean, hose off the
undercarriage at least once a month.
• It is important that the drain holes in the lower edges of the doors, rocker panels,
and trunk be kept clear and open.
• If you detect any stone chips or scratches in the paint, touch them up immediately.
The cost of such repairs is considered the
responsibility of the owner.
• If your vehicle is damaged due to a colli- sion or similar cause that destroys the
paint and protective coating, have your vehicle repaired as soon as possible. The
cost of such repairs is considered the re-
sponsibility of the owner.
•
If you carry special cargo such as chemicals,
fertilizers, de-icer salt, etc., be sure that such
materials are well packaged and sealed.
•If a lot of driving is done on gravel roads,
consider mud or stone shields behind each
wheel.
• Use MOPAR Touch Up Paint on scratches as soon as possible. Your authorized dealer
has touch up paint to match the color of
your vehicle.
INTERIORS
Seats And Fabric Parts
Use MOPAR Total Clean to clean fabric up-
holstery and carpeting.
WARNING!
Do not use volatile solvents for cleaning
purposes. Many are potentially flammable,
and if used in closed areas they may cause
respiratory harm.
Seat Belt Maintenance
Do not bleach, dye or clean the belts with
chemical solvents or abrasive cleaners. This
will weaken the fabric. Sun damage can also
weaken the fabric.
If the belts need cleaning, use a mild soap
solution or lukewarm water. Do not remove
the belts from the vehicle to wash them. Dry
with a soft cloth.
Replace the belts if they appear frayed or
worn or if the buckles do not work properly.
WARNING!
A frayed or torn belt could rip apart in a
collision and leave you with no protection.
Inspect the belt system periodically,
checking for cuts, frays, or loose parts.
Damaged parts must be replaced immedi-
ately. Do not disassemble or modify the
system. Seat belt assemblies must be re-
placed after a collision if they have been
damaged (i.e., bent retractor, torn web-
bing, etc.).
269
Page 275 of 372
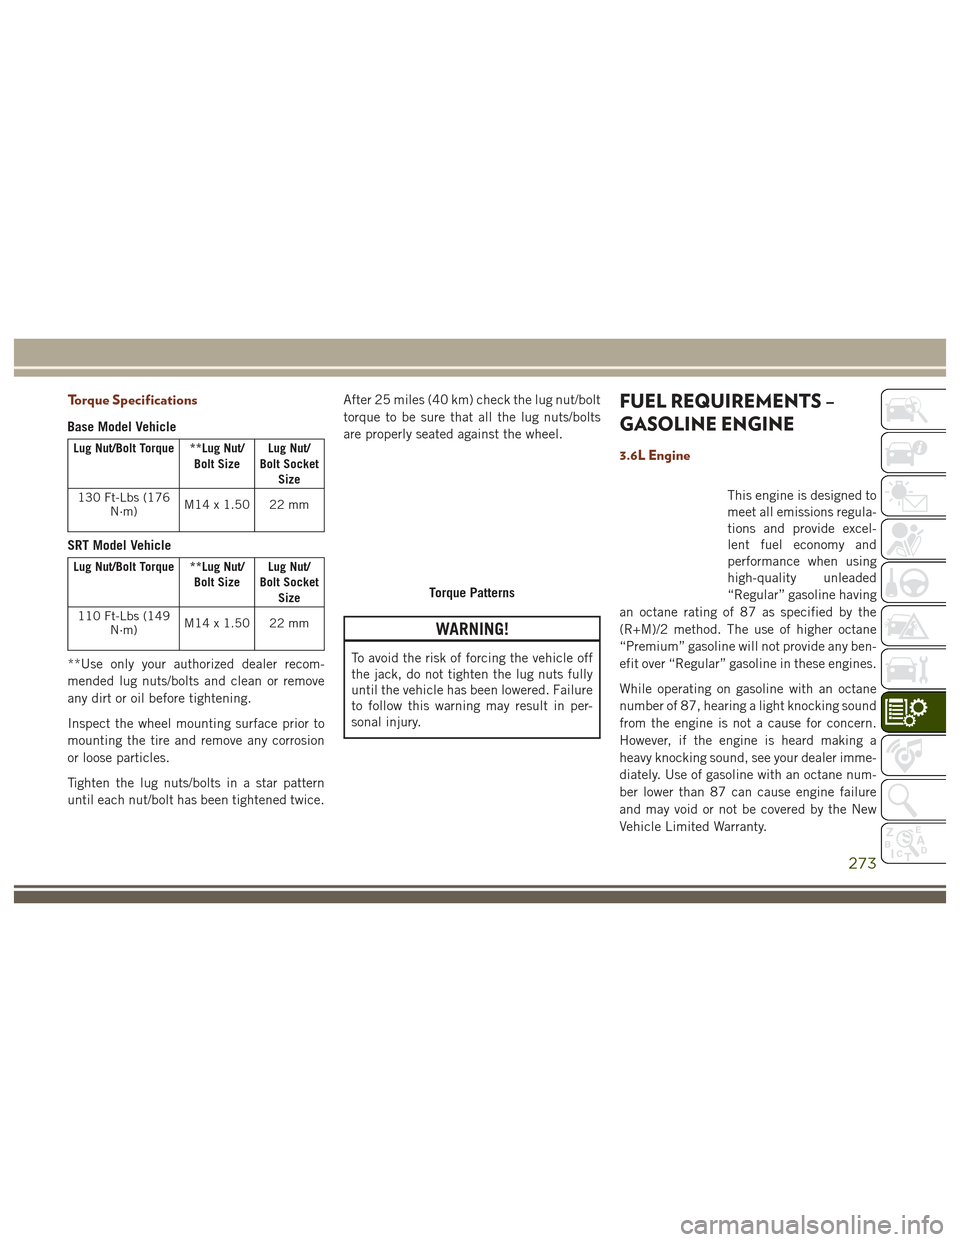
Torque Specifications
Base Model Vehicle
Lug Nut/Bolt Torque **Lug Nut/Bolt SizeLug Nut/
Bolt Socket Size
130 Ft-Lbs (176 N·m) M14x1.50 22mm
SRT Model Vehicle
Lug Nut/Bolt Torque **Lug Nut/
Bolt SizeLug Nut/
Bolt Socket Size
110 Ft-Lbs (149 N·m) M14x1.50 22mm
**Use only your authorized dealer recom-
mended lug nuts/bolts and clean or remove
any dirt or oil before tightening.
Inspect the wheel mounting surface prior to
mounting the tire and remove any corrosion
or loose particles.
Tighten the lug nuts/bolts in a star pattern
until each nut/bolt has been tightened twice. After 25 miles (40 km) check the lug nut/bolt
torque to be sure that all the lug nuts/bolts
are properly seated against the wheel.
WARNING!
To avoid the risk of forcing the vehicle off
the jack, do not tighten the lug nuts fully
until the vehicle has been lowered. Failure
to follow this warning may result in per-
sonal injury.
FUEL REQUIREMENTS –
GASOLINE ENGINE
3.6L Engine
This engine is designed to
meet all emissions regula-
tions and provide excel-
lent fuel economy and
performance when using
high-quality unleaded
“Regular” gasoline having
an octane rating of 87 as specified by the
(R+M)/2 method. The use of higher octane
“Premium” gasoline will not provide any ben-
efit over “Regular” gasoline in these engines.
While operating on gasoline with an octane
number of 87, hearing a light knocking sound
from the engine is not a cause for concern.
However, if the engine is heard making a
heavy knocking sound, see your dealer imme-
diately. Use of gasoline with an octane num-
ber lower than 87 can cause engine failure
and may void or not be covered by the New
Vehicle Limited Warranty.
Torque Patterns
273
Page 277 of 372
moval may contain active solvents or similar
ingredients. These can harm fuel system gas-
ket and diaphragm materials.
FUEL REQUIREMENTS –
DIESEL ENGINE
Use good quality diesel fuel from a reputable
supplier in your vehicle. Federal law requires
that you must fuel this vehicle with Ultra Low
Sulfur Highway Diesel fuel (15 ppm Sulfur
maximum) and prohibits the use of Low Sul-
fur Highway Diesel fuel (500 ppm Sulfur
maximum) to avoid damage to the emissions
control system.
For most year-round service, No. 2 diesel fuel
meeting ASTM (formerly known as the Ameri-
can Society for Testing and Materials) speci-
fication D-975 Grade S15 will provide good
performance. If the vehicle is exposed to
extreme cold (below 20°F or -7°C), or is
required to operate at colder-than-normal
conditions for prolonged periods, use clima-
tized No. 2 diesel fuel or dilute the No.
2 diesel fuel with 50% No. 1 diesel fuel. This
will provide better protection from fuel gell-
ing or wax-plugging of the fuel filters.
WARNING!
Do not use alcohol or gasoline as a fuel
blending agent. They can be unstable un-
der certain conditions and hazardous or
explosive when mixed with diesel fuel.
Diesel fuel is seldom completely free of wa-
ter. To prevent fuel system trouble, drain the
accumulated water from the fuel/water sepa-
rator using the fuel/water separator drain pro-
vided on the fuel filter housing. If you buy
good quality fuel and follow the cold weather
advice above, fuel conditioners should not be
required in your vehicle. If available in your
area, a high cetane “premium” diesel fuel
may offer improved cold-starting and
warm-up performance.
CAUTION!
If the “Water in Fuel Indicator Light” re-
mains on, DO NOT START engine before
you drain the water from the fuel filter(s) to
avoid engine damage. Refer to “Draining
Fuel/Water Separator Filter” in “Servicing
And Maintenance” for further information.
Diesel Fuel Specifications
This diesel engine has been developed to
take advantage of the high energy content
and generally lower cost No. 2 Ultra Low
Sulfur diesel fuel or No. 2 Ultra Low Sulfur
climatized diesel fuels.
NOTE:
• If you accidentally fill the fuel tank with gasoline on your diesel vehicle, do not
start the engine. Damage to the engine
and fuel system could occur. Please call
your authorized dealer for service.
• A maximum blend of 5% biodiesel meet- ing ASTM specification D-975 may be
used with your diesel engine without any
adjustments to regular service schedules.
• Commercially available fuel additives are not necessary for the proper operation of
your diesel engine.
• No. 1 Ultra Low Sulfur diesel fuel should only be used where extended arctic condi-
tions (-10°F or -23°C) exist.
275
Page 289 of 372
CYBERSECURITY
Your vehicle may be a connected vehicle and
may be equipped with both wired and wire-
less networks. These networks allow your ve-
hicle to send and receive information. This
information allows systems and features in
your vehicle to function properly.
Your vehicle may be equipped with certain
security features to reduce the risk of unau-
thorized and unlawful access to vehicle sys-
tems and wireless communications. Vehicle
software technology continues to evolve over
time and FCA US LLC, working with its sup-
pliers, evaluates and takes appropriate steps
as needed. Similar to a computer or other
devices, your vehicle may require software
updates to improve the usability and perfor-
mance of your systems or to reduce the po-
tential risk of unauthorized and unlawful ac-
cess to your vehicle systems.
The risk of unauthorized and unlawful access
to your vehicle systems may still exist, even if
the most recent version of vehicle software
(such as Uconnect software) is installed.
WARNING!
• It is not possible to know or to predict allof the possible outcomes if your vehi-
cle’s systems are breached. It may be
possible that vehicle systems, including
safety related systems, could be im-
paired or a loss of vehicle control could
occur that may result in an accident
involving serious injury or death.
• ONLY insert media (e.g., USB, SD card,
or CD) into your vehicle if it came from a
trusted source. Media of unknown origin
could possibly contain malicious soft-
ware, and if installed in your vehicle, it
may increase the possibility for vehicle
systems to be breached.
• As always, if you experience unusual
vehicle behavior, take your vehicle to
your nearest authorized dealer immedi-
ately.
NOTE:
• FCA US LLC or your dealer may contact you directly regarding software updates. • To help further improve vehicle security
and minimize the potential risk of a secu-
rity breach, vehicle owners should:–Routinely check
www.driveuconnect.com/
software-update to learn about avail-
able Uconnect software updates.
– Only connect and use trusted media devices (e.g. personal mobile phones,
USBs, CDs).
Privacy of any wireless and wired communi-
cations cannot be assured. Third parties may
unlawfully intercept information and private
communications without your consent. For
further information, refer to “Privacy Prac-
tices - If Equipped with Uconnect 8.4 Radio”
in your Uconnect Owner's Manual Supple-
ment and “Onboard Diagnostic System (OBD
II) Cybersecurity” in “Getting To Know Your
Instrument Panel” in your Owner’s Manual on
www.jeep.com/en/owners/manuals/.
287
Page 293 of 372
• Prevent any liquid from entering the sys-tem: this could damage it beyond repair.
Anti-theft Protection
The system is equipped with an anti-theft
protection system based on the exchange of
information with the electronic control unit
(Body Computer) on the vehicle.
This guarantees maximum safety and pre-
vents the secret code from being entered
after the power supply has been discon-
nected.
If the check has a positive outcome, the
system will start to operate, whereas if the
comparison codes are not the same or if the
electronic control unit (Body Computer) is
replaced, the system will ask the user to enter
the secret code according to the procedure
described in the paragraph below.
Entering The Secret Code
When the system is switched on, if the code is
requested, the display will show "Please enter
Anti-Theft Code" followed by the screen
showing a keypad to enter the secret code. The secret code has four numbers from 0 to
9: to insert the code numbers, rotate the
BROWSE/ENTER dial and press to confirm.
After entering the fourth number the system
will start functioning.
If an incorrect code is entered, the system
displays "Incorrect Code" to notify the user of
the need to enter the correct code.
After the 3 available attempts to enter the
code, the system displays "Incorrect Code.
Radio locked. Wait for 30 minutes". After the
text has disappeared it is possible to start the
code entering procedure again.
Vehicle Radio Passport
This document certifies ownership of the sys-
tem. The vehicle radio passport shows the
system model, serial number and secret
code.
In case you lose the radio passport, please go
to Jeep Assistance Network with an ID and
the car papers.
Keep the vehicle radio passport in a safe place
so that you can give the information to the
relevant authorities if the system is stolen.
UCONNECT ACCESS
Uconnect Access — If Equipped (Available
On Uconnect 8.4/8.4 NAV — U.S.
Residents Only)
WARNING!
ALWAYS drive safely with your hands on
the wheel. You have full responsibility and
assume all risks related to the use of the
Uconnect features and applications in this
vehicle. Only use Uconnect when it is safe
to do so. Failure to do so may result in an
accident involving serious injury or death.
WARNING!
ALWAYS obey traffic laws and pay atten-
tion to the road. Some Uconnect Access
services, including 9-1-1 and Assist, will
NOT work without an operable 1X (voice/
data) or 3G (data) network connection.
NOTE:
Your vehicle may be transmitting data as
authorized by the subscriber.
291
Page 300 of 372
Maintaining Your Uconnect Access
Account
Selling Your Vehicle
When you sell your vehicle, we recommend
that you remove your Uconnect Access Ac-
count information from the vehicle. You can
do this on the Mopar Owner Connect website
moparownerconnect.com. Removing your ac-
count information cancels your subscription
and makes your vehicle factory-ready for a
new owner/subscriber.
For additional information on Uconnect, visit
DriveUconnect.com or call 1-877-855-8400
Built-In Features
WARNING!
ALWAYS drive safely with your hands on
the wheel. You have full responsibility and
assume all risks related to the use of the
Uconnect features and applications in this
vehicle. Only use Uconnect when it is safe
to do so. Failure to do so may result in an
accident involving serious injury or death.
WARNING!
• ALWAYS obey traffic laws and pay atten-tion to the road. Some Uconnect Access
services, including 9-1-1 and Assist,
will NOT work without an operable 1X
(voice/data) or 3G (data) network con-
nection.
• Ignoring the rearview mirror light could
mean you may not have 9-1-1 Call ser-
vice if needed. If the rearview mirror
light is illuminated, have an authorized
dealer service the 9-1-1 Call system
immediately.
• The Occupant Restraint Controller
(ORC) turns on the Air Bag Warning
Light on the instrument panel if a mal-
function is detected in any part of the
airbag system. If the Air Bag Warning
Light is illuminated, the air bag system
may not be working properly and the
9-1-1 system may not send a signal to a
9-1-1 operator if an air bag is deployed.
If the Air Bag Warning Light is illumi-
nated, have an authorized dealer service
your vehicle immediately.
WARNING!
• If anyone in the vehicle could be indanger (e.g., fire or smoke is visible,
dangerous road conditions or location),
do not wait for voice contact from a
9-1-1 operator. All occupants should
exit the vehicle immediately and move
to a safe location.
• The 9-1-1 Call system is embedded into
the vehicle’s electrical system. Do not
add aftermarket electrical equipment to
the vehicle’s electrical system. This may
prevent your vehicle from sending a sig-
nal to initiate an emergency call. To
avoid interference that can cause the
9-1-1 Call system to fail, never add
aftermarket equipment (e.g., two-way
mobile radio, CB radio, data recorder,
etc.) to your vehicle’s electrical system
or modify the antennas on your vehicle.
• IF YOUR VEHICLE LOSES BATTERY
POWER FOR ANY REASON (INCLUD-
ING DURING OR AFTER AN ACCI-
DENT), the Uconnect features, apps and
services, among others, will not operate.
MULTIMEDIA
298
Page 303 of 372
3G Wi-Fi Hotspot
3G Wi-Fi Hotspot is an in-vehicle feature that
connects your device to an operable 1X
(voice/data) or 3G (data) network using
Uconnect Access and is ready to go where
ever you are. Once your vehicle is registered
for Uconnect Access, you can purchase a 3G
Wi-Fi Hotspot subscription at the Uconnect
Store. After you've made your purchase, turn
on your signal and connect your passengers’
devices. It's never been easier to bring your
home or office with you.
WARNING!
NEVER use the 3G Wi-Fi Hotspot when
you are driving the vehicle. As the driver,
you should only use the 3G Wi-Fi Hotspot
when the vehicle is parked in a safe loca-
tion. Failure to do so may result in an
accident involving serious injury or death.
Vehicle Health Report/Alert
Your vehicle will send you a monthly email
report, which summarizes the performance of
your vehicle’s key systems so you can stay ontop of your vehicle’s maintenance needs.
Your vehicle will also send you Vehicle Health
Alerts when it detects issues with its key
systems that need your attention. For further
information, go to the Mopar Owner Connect
website moparownerconnect.com.
Uconnect Access Remote Features
If you own a compatible iPhone or Android
powered device, the Uconnect Access App
allows you to remotely lock or unlock your
doors, start your engine or activate your horn
and lights from virtually anywhere. Your ve-
hicle must be equipped with remote start and
your vehicle must have an operable 1X (voice/
data) or 3G (data) network connection). Ser-
vices can only be used where coverage is
available; see coverage map for details. You
can download the App from Mopar Owner
Connect or from the App Store (iPhone) or
Google Play Store (Android). Visit
UconnectPhone.com to determine if your de-
vice is compatible. For Uconnect Phone cus-
tomer support and to determine if your device
is compatible.
U.S. residents - visit UconnectPhone.com or
call 1-877-855-8400.
Remote Start (If Equipped)
This feature provides the ability to start the
engine on your vehicle, without the keys and
from virtually any distance. You can send a
request to your vehicle in one of two ways:
1. Using the Uconnect Access App from a
compatible device.
2. From the Mopar Owner Connect website.
• After 15 minutes if you have not en-tered your vehicle with the key, the
engine will shut off automatically.
• You can also send a command to turn- off an engine that has been remote
started.
• This remote function requires your ve- hicle to be equipped with a factory-
installed Remote Start system. To uti-
lize this feature after the Uconnect
Access App is downloaded, login with
your user name and password.
To use this feature after the Uconnect Access
App is downloaded, login using your user
name and password. You will need your four
301
Page 319 of 372
WARNING!
ALWAYS drive safely with your hands on
the wheel. You have full responsibility and
assume all risks related to the use of the
Uconnect features and applications in this
vehicle. Only use Uconnect when it is safe
to do so. Failure to do so may result in an
accident involving serious injury or death.
CAUTION!
Do NOT attach any object to the touch-
screen, doing so can result in damage to
the screen.
Setting The Time
• Model 8.4 NAV synchronizes time auto-matically via GPS, so it should not require
any time adjustment. If you do need to set
the time manually, follow the instructions
below for Model 8.4.
• For Model 8.4, turn the unit on, then press the time display at the top of the screen.
Press “Yes.”
• If the time is not displayed at the top of the screen, press the “Settings” button on the touchscreen. In the Settings screen, press
the “Clock” button on the touchscreen,
then check or uncheck this option.
• Press “+” or “–” next to Set Time Hours and Set Time Minutes to adjust the time.
• If these features are not available, un- check the Sync Time box.
• Press “X” to save your settings and exit out of the Clock Setting screen.
Background Themes
• Screen background themes are selectablefrom a pre-loaded list of themes. If you’d
like to set a theme, follow the instructions
below.
• Press the “Settings” button on the touch- screen.
• Press the “Display” button on the touch- screen.
• Then press “Set Theme” button on the touchscreen and select a theme.
Audio Settings
• Press of the “Audio” button on the touch-screen to activate the Audio settings
screen to adjust Balance\Fade, Equalizer,
and Speed Adjusted Volume.
• You can return to the Radio screen by pressing the “X” located at the top right.
Balance/Fade
• Press the “Balance/Fade” button on thetouchscreen to Balance audio between the
front speakers or fade the audio between
the rear and front speakers.
• Pressing the “Front,” “Rear,” “Left,” or “Right” buttons on the touchscreen or
press and drag the Speaker Icon to adjust
the Balance/Fade.
Equalizer
• Press the “Equalizer” button on the touch-screen to activate the Equalizer screen.
• Press the “+” or “–” buttons on the touch- screen, or press and drag over the level bar
for each of the equalizer bands. The level
value, which spans between plus or minus
9, is displayed at the bottom of each of the
Bands.
317