ECO mode JEEP GRAND CHEROKEE 2020 Owner handbook (in English)
[x] Cancel search | Manufacturer: JEEP, Model Year: 2020, Model line: GRAND CHEROKEE, Model: JEEP GRAND CHEROKEE 2020Pages: 378, PDF Size: 6.88 MB
Page 166 of 378
•Off-Road 1 (OR1) (Raises the vehicle approxi-
mately 1.1 inches (28 mm))– This is the
primary position for all off-road driving until
OR2 is needed. A smoother and more com-
fortable ride will result. Push the “UP”
button once from the NRH position while
the vehicle speed is below 38 mph
(61 km/h). When in the OR1 position, if the
vehicle speed remains between 40 mph
(64 km/h) and 50 mph (80 km/h) for
greater than 20 seconds or if the vehicle
speed exceeds 50 mph (80 km/h), the
vehicle will be automatically lowered to
NRH.
•Off-Road 2 (OR2) (Raises the vehicle approxi-
mately 2.2 inches (55 mm))– This position is
intended for off-roading use only where
maximum ground clearance is required. To
enter OR2, push the “UP” button twice
from the NRH position or once from the
OR1 position while vehicle speed is below
20 mph (32 km/h). While in OR2, if the
vehicle speed exceeds 25 mph (40 km/h)
the vehicle height will be automatically
lowered to OR1.•Aero Mode (Lowers the vehicle approximately
0.6 inches (15 mm))– This position provides
improved aerodynamics by lowering the ve-
hicle. The vehicle will automatically enter
Aero Mode when the vehicle speed remains
between 52 mph (83 km/h) and 56 mph
(90 km/h) for greater than 20 seconds or if
the vehicle speed exceeds 56 mph
(90 km/h). The vehicle will return to NRH
from Aero Mode if the vehicle speed re-
mains between 20 mph (32 km/h) and
25 mph (40 km/h) for greater than 20 sec-
onds or if the vehicle speed falls below
20 mph (32 km/h). The vehicle will enter
Aero Mode, regardless of vehicle speed if
the vehicle is in “SPORT” mode.
•Entry/Exit Mode (Lowers the vehicle approxi-
mately 1.6 inches (40 mm)– This position
lowers the vehicle for easier passenger en-
try and exit as well as lowering the rear of
the vehicle for easier loading and unloading
of cargo. To enter Entry/Exit Mode, push the
“DOWN” button once from (NRH) while the
vehicle speed is below 25 mph (40 km/h).
Once the vehicle speed goes below 15 mph
(24 km/h) the vehicle height will begin to
lower. If the vehicle speed remains between15 mph (24 km/h) and 25 mph (40 km/h)
for greater than 60 seconds, or the vehicle
speed exceeds 25 mph (40 km/h) the
Entry/Exit Mode change will be cancelled.
To exit Entry/Exit Mode, press the “Up”
button once while in Entry/Exit Mode or
drive the vehicle over 15 mph (24 km/h).
NOTE:
Automatic lowering of the vehicle into Entry/
Exit Mode can be enabled through the
Uconnect Touch-Screen Radio. If this feature
is enabled, the vehicle will only lower if the
gear selector is in "PARK", the terrain switch
is in "AUTO", the transfer-case is in "AUTO”
and the vehicle level should be either in
Normal or Aero Mode. The Vehicle will not
automatically lower if the air suspension level
is in Off Rd 2 or Off Rd 1. If the vehicle is
equipped with Intrusion Theft Module (ITM),
the lowering will be suppressed when the
ignition is switched OFF and the door is open
to prevent setting the alarm off.
The Selec-Terrain switch will automatically
change the vehicle to the proper height based
on the position of the Selec-Terrain switch.
The height can be changed from the default
STARTING AND OPERATING
164
Page 169 of 378
Automatic height changes will occur based
on vehicle speed and the current vehicle
height. The indicator lamps and instrument
cluster display messages will operate the
same for automatic changes and user re-
quested changes.
• Off-Road 2 (OR2) – Indicator lamps 4, 5,
and 6 will be illuminated when the vehicle
is in OR2.
• Off-Road 1 (OR1) – Indicator lamps 4 and
5 will be illuminated when the vehicle is in
OR1.
• Normal Ride Height (NRH) – Indicator
lamp 4 will be illuminated when the vehicle
is in this position.
• Entry/Exit Mode – Indicator lamp 3 will be
illuminated when the vehicle is in Entry/
Exit Mode. If Entry/Exit Mode is requested
while vehicle speed is between 15 mph
(24 km/h) and 25 mph (40 km/h), indicator
lamp 4 will remain on solid and indicator
lamp 3 will flash as the system waits for the
vehicle to reduce speed. If vehicle speed is
reduced to, and kept below, 15 mph
(24 km/h) indicator lamp 4 will turn off and
indicator lamp 3 will flash until Entry/ExitMode is achieved at which point indicator
lamp 3 will go solid. If during the height
change to Entry/Exit Mode, the vehicle
speed exceeds 15 mph (24 km/h), the
height change will be paused until the
vehicle speed either goes below 15 mph
(24 km/h) and the height change continues
to Entry/Exit Mode, or exceeds 25 mph
(40 km/h) and the vehicle height will return
to NRH. Entry/Exit Mode may be selected
while the vehicle is not moving provided
that the engine is still running and all doors
remain closed.
• Transport Mode - No indicator lamps will be
illuminated. Customer driving will disable
Transport Mode.
• Tire/Jack Mode - Indicator lamps 3 and
6 will be illuminated. Customer driving will
disable Tire/Jack Mode.
• Wheel Alignment Mode - Indicator lamps
3 and 4 will be illuminated. Customer driv-
ing will disable Wheel Alignment Mode.SELEC-TERRAIN — IF
EQUIPPED
Selec-Terrain Mode Selection
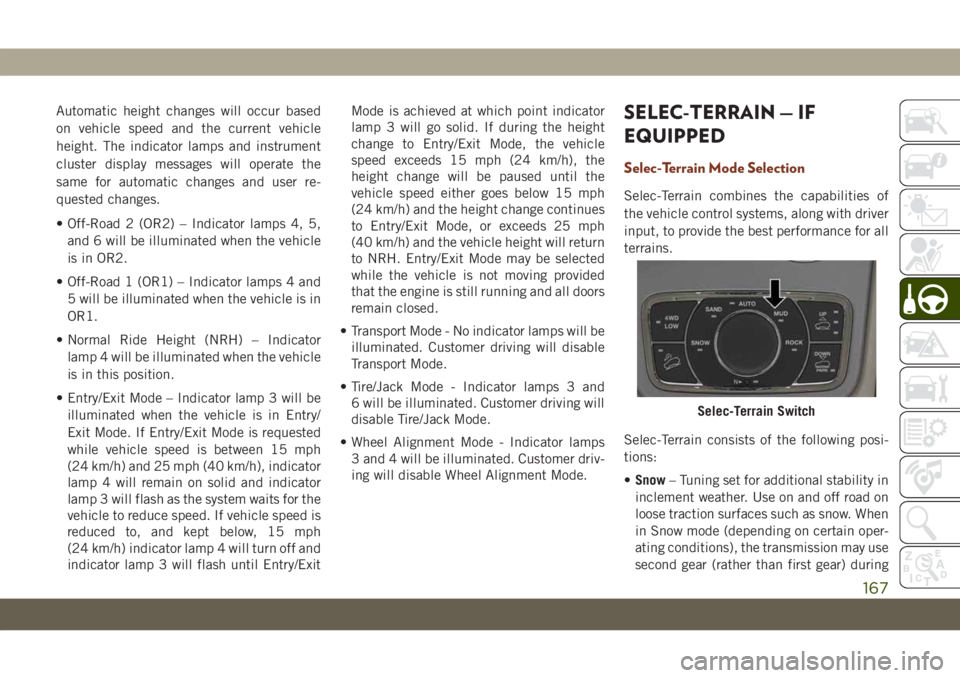
Selec-Terrain combines the capabilities of
the vehicle control systems, along with driver
input, to provide the best performance for all
terrains.
Selec-Terrain consists of the following posi-
tions:
•Snow– Tuning set for additional stability in
inclement weather. Use on and off road on
loose traction surfaces such as snow. When
in Snow mode (depending on certain oper-
ating conditions), the transmission may use
second gear (rather than first gear) during
Selec-Terrain Switch
167
Page 172 of 378
Launch Control— If Equipped
This vehicle is equipped with a Launch Con-
trol system that is designed to allow the driver
to achieve maximum vehicle acceleration in a
straight line. Launch Control is a form of
traction control that manages tire slip while
launching the vehicle. This feature is in-
tended for use during race events on a closed
course where consistent quarter mile and
zero to sixty times are desired. The system is
not intended to compensate for lack of driver
experience or familiarity with the race track.
Use of this feature in low traction (cold, wet,
gravel, etc.) conditions may results in excess
wheel slip outside this systems control result-
ing in an aborted launch.
Preconditions:
• Launch Control should not be used on pub-
lic roads. Always check track conditions
and the surrounding area.
•L
aunch Control is not available within the first
500 miles (805 km) of engine break-in.
• Launch Control should only be used when
the engine and transmission are at operat-
ing temperature.• Launch Control is intended to be used on
dry, paved road surfaces only.
CAUTION!
Use on slippery or loose surfaces may
cause damage to vehicle components and
is not recommended.
Launch Control is only available when the
following procedure is followed:
NOTE:
Pushing the SRT button on the Select-Track
switch or pressing the “Apps” button on the
touchscreen are the two options to access
launch control features. Please refer to “SRT
Drive Modes” in “Multimedia” in your Own-
er’s Manual for further information.
1. Press the “Race Options” button on the
touchscreen or push the LAUNCH button
on the Select-Track switch.
2. Press the “Launch RPM Set-Up” button
on the touchscreen. This screen will allow
you to adjust your launch RPM’s for opti-
mum launch/traction.3. Press the “Activate Launch Control” but-
ton on the touchscreen, follow instruc-
tions in the instrument cluster display.
• Make sure the vehicle is not moving.
• Put vehicle in first gear.
• Steering wheel must be pointing
straight.
• Vehicle must be on level ground.
• Apply brake pressure.
• While holding the brake, rapidly apply
and hold the accelerator pedal to wide
open throttle. The engine speed will
hold at the RPM that was set in the
“Launch RPM Set-up” screen.
NOTE:
Messages will appear in the instrument
cluster display to inform the driver if one
or more of the above conditions have not
been met.
4. When the above conditions have been
met, the instrument cluster display will
read “Release Brake”.
5. Keep the vehicle pointed straight.
STARTING AND OPERATING
170
Page 173 of 378
Launch control will be active until the vehicle
reaches 62 mph (100 km/h), at which point
the Electronic Stability Control (ESC) system
will return to its current ESC mode.
Launch control will abort before launch
completion, display “Launch Aborted” in the
cluster under any the following conditions:
• The accelerator pedal is released during
launch.
• The ESC system detects that the vehicle is
no longer moving in a straight line.
• The “ESC OFF” button is pressed to change
the system to another mode.
NOTE:
After launch control has been aborted, ESC
will return to its current ESC mode.
CAUTION!
Do not attempt to shift when the drive
wheels are spinning and do not have trac-
tion. Damage to the transmission may oc-
cur.
Guidelines For Track Use
NOTE:
Because of the extreme conditions encoun-
tered during track use, any damage or wear
associated with track use may not be covered
by warranty.
• If your SRT vehicle is equipped with Drive
Modes they will alter the vehicle’s perfor-
mance in various driving situations. It is
recommended that your vehicle operates in
SPORT or TRACK modes during the track
event.
• Prior to each track event/day, verify all flu-
ids are at the correct levels. Refer to “Fluid
Capacities” in “Technical Specifications”
for further information.
• Prior to each track event, verify the front
and rear brake pads have more than ½ pad
thickness remaining. If the brake pads re-
quire changing, please burnish prior to
track outing at full pace.
NOTE:
Use of DOT 4 brake fluid is suggested for
extended track usage due to increased ther-
mal capacity.• At the conclusion of each track event, it is
recommended that a brake bleed procedure
is performed to maintain the pedal feel and
stopping capability of your Brembo High
Performance brake system.
• It is recommended that each track outing
should end with a minimum of one cool
down lap using minimal braking.
• If equipped with a removable lower front
fascia grille, it is recommended to remove it
for track use during warm/hot weather to
improve cooling airflow to critical pow-
ertrain and cooling system components.
• All SRT vehicles are track tested for
24 hours of endurance, however, it is rec-
ommended that suspension system, brake
system, prop shaft, and ½ shaft boots
should be checked for wear or damage after
every track event.
• Track usage results in increased operating
temperatures of the engine, transmission,
driveline and brake system. This may affect
noise vibrations and harshness (NVH)
countermeasures designed into your ve-
hicle. New components may need to be
installed to return the system to the original
NVH performance.
171
Page 178 of 378
in the Owner’s Manual for more information.
The speed increment shown is dependant on
the chosen speed unit of U.S. (mph) or Met-
ric (km/h):
U.S. Speed (mph)
• Pushing the SET(+)button once will result
in a 1 mph increase in set speed. Each
subsequent tap of the button results in an
increase of 1 mph.
• If the button is continually pushed, the set
speed will continue to increase in 5 mph
increments until the button is released.
The increase in set speed is reflected in the
instrument cluster display.
Metric Speed (km/h)
• Pushing the SET(+)button once will result
in a 1 km/h increase in set speed. Each
subsequent tap of the button results in an
increase of 1 km/h.
• If the button is continually pushed, the set
speed will continue to increase in 10 km/h
increments until the button is released.
The increase in set speed is reflected in the
instrument cluster display.To Decrease Speed
While ACC is set, the set speed can be de-
creased by pushing the SET(-)button.
The driver's preferred units can be selected
through the instrument panel settings. Refer
to “Getting To Know Your Instrument Panel”
in the Owner’s Manual for more information.
The speed increment shown is dependant on
the chosen speed unit of U.S. (mph) or Met-
ric (km/h):
U.S. Speed (mph)
• Pushing the SET(-)button once will result
in a 1 mph decrease in set speed. Each
subsequent tap of the button results in a
decrease of 1 mph.
• If the button is continually pushed, the set
speed will continue to decrease in 5 mph
decrements until the button is released.
The decrease in set speed is reflected in
the instrument cluster display.
Metric Speed (km/h)
• Pushing the SET(-)button once will result
in a 1 km/h decrease in set speed. Each
subsequent tap of the button results in a
decrease of 1 km/h.• If the button is continually pushed, the set
speed will continue to decrease in 10 km/h
decrements until the button is released.
The decrease in set speed is reflected in
the instrument cluster display.
NOTE:
• When you override and push the SET(+)
button or SET(-)buttons, the new set
speed will be the current speed of the
vehicle.
• When you use the SET(-)button to decel-
erate, if the engine’s braking power does
not slow the vehicle sufficiently to reach
the set speed, the brake system will auto-
matically slow the vehicle.
• The ACC system applies the brake down to
a full stop when following a target vehicle.
If an ACC host vehicle follows a target
vehicle to a standstill, the host vehicle will
release the vehicle brakes two seconds af-
ter coming to a full stop.
• The ACC system maintains set speed when
driving up hill and down hill. However, a
slight speed change on moderate hills is
normal. In addition, downshifting may oc-
cur while climbing uphill or descending
STARTING AND OPERATING
176
Page 186 of 378
PARKVIEW REAR BACK UP
CAMERA — IF EQUIPPED
The ParkView Rear Back Up Camera allows
you to see an on-screen image of the rear
surroundings of your vehicle whenever the
gear selector is put into REVERSE. The im-
age will be displayed on the Navigation/
Multimedia radio display screen along with a
caution note to “check entire surroundings”
across the top of the screen. After five sec-
onds this note will disappear. The ParkView
camera is located on the rear of the vehicle
above the rear license plate.
When the vehicle is shifted out of REVERSE
(with camera delay turned off), the rear cam-
era mode is exited and the navigation or
audio screen appears again.Manual Activation Of The Rear View Camera
1. Press the “Controls” button located on
the bottom of the Uconnect display.
2. Press the “Backup Camera” button to
turn the Rear View Camera system on.
NOTE:
The ParkView Rear Back Up Camera has
programmable modes of operation that may
be selected through the Uconnect System.
Refer to “Uconnect Settings” in “Multime-
dia” in your Owner’s Manual for further infor-
mation.
When the vehicle is shifted out of REVERSE
(with camera delay turned off), the rear cam-
era mode is exited and the previous screen
appears again. When the vehicle is shifted
out of REVERSE (with camera delay turnedon), the camera image will continue to be
displayed for up to ten seconds after shifting
out of REVERSE unless the vehicle speed
exceeds 8 mph (13 km/h), the vehicle is
shifted into PARK, the vehicle’s ignition is
cycled to the OFF position, or the user
presses image defeat [X] to exit out of the
camera video display.
When enabled, active guide lines are overlaid
on the image to illustrate the width of the
vehicle and its projected backup path based
on the steering wheel position. A dashed
center line overlay indicates the center of the
vehicle to assist with parking or aligning to a
hitch/receiver. Different colored zones indi-
cate the distance to the rear of the vehicle.
The following table shows the approximate
distances for each zone:
Zone Distance To The Rear Of The Vehicle
Red 0-1ft(0-30cm)
Yellow 1 ft - 6.5 ft (30 cm-2m)
Green 6.5 ft or greater (2 m or greater)
STARTING AND OPERATING
184
Page 201 of 378
Recreational Towing — Two Wheel Drive
Models
DO NOT flat tow this vehicle. Damage to the
drivetrain will result.
Recreational towing (for two-wheel drive
models) is allowed ONLY if the rear wheels
are OFF the ground. This may be accom-
plished using a tow dolly or vehicle trailer. If
using a tow dolly, follow this procedure:
1. Properly secure the dolly to the tow ve-
hicle, following the dolly manufacturer's
instructions.
NOTE:
If vehicle is equipped with Quadra-Lift air
suspension, ensure the vehicle is set to
Normal Ride Height.
2. Drive the rear wheels onto the tow dolly.
3. Firmly apply the parking brake. Shift the
transmission into PARK.
4. Turn the ignition OFF.
5. Properly secure the rear wheels to the
dolly, following the dolly manufacturer’s
instructions.6. Turn the ignition to the ON/RUN mode,
but do not start the engine.
7. Confirm that the steering column is
unlocked.
8. Install a suitable clamping device, de-
signed for towing, to secure the front
wheels in the straight position.
9. Disconnect the negative battery cable,
and secure it away from the battery post.
NOTE:
Disconnecting your vehicle battery will
erase radio presets and may affect other
vehicle settings. It may also trigger vari-
ous fault codes, causing MIL illumination
when the battery is reconnected.
CAUTION!
Towing with the rear wheels on the ground
will cause severe transmission damage.
Damage from improper towing is not cov-
ered under the New Vehicle Limited
Warranty.
Recreational Towing — Quadra-Trac I
(Single-Speed Transfer Case) Four-Wheel
Drive Models
Recreational towing is not allowed.These
models do not have a NEUTRAL (N) position
in the transfer case.
NOTE:
This vehicle may be towed on a flatbed or
vehicle trailer provided all four wheels areOFF
the ground.
CAUTION!
Towing this vehicle in violation of the
above requirements can cause severe
transmission and/or transfer case damage.
Damage from improper towing is not cov-
ered under the New Vehicle Limited
Warranty.
199
Page 203 of 378
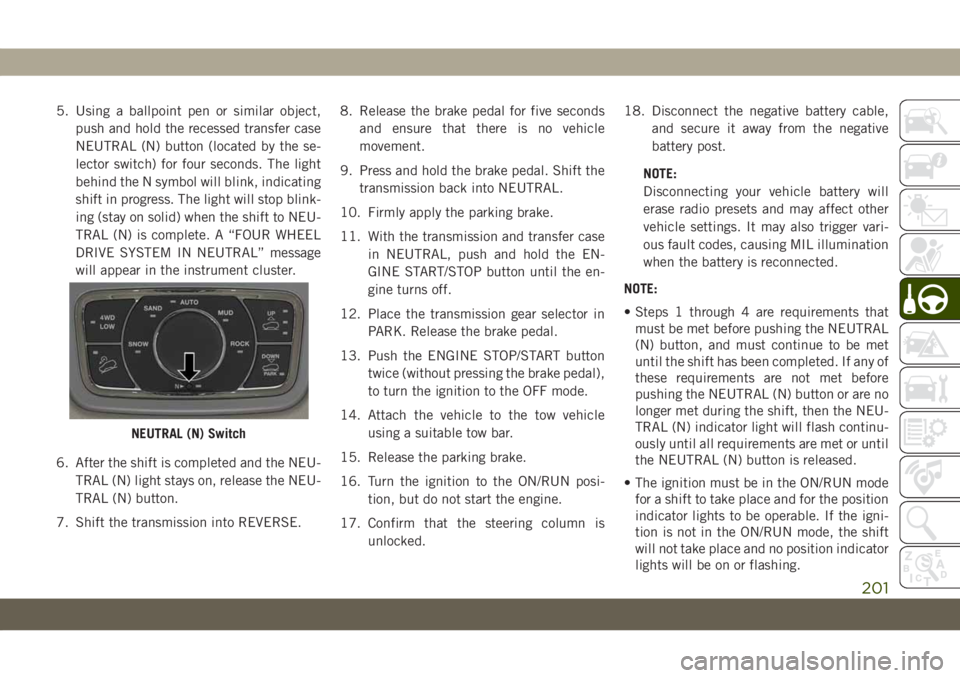
5. Using a ballpoint pen or similar object,
push and hold the recessed transfer case
NEUTRAL (N) button (located by the se-
lector switch) for four seconds. The light
behind the N symbol will blink, indicating
shift in progress. The light will stop blink-
ing (stay on solid) when the shift to NEU-
TRAL (N) is complete. A “FOUR WHEEL
DRIVE SYSTEM IN NEUTRAL” message
will appear in the instrument cluster.
6. After the shift is completed and the NEU-
TRAL (N) light stays on, release the NEU-
TRAL (N) button.
7. Shift the transmission into REVERSE.8. Release the brake pedal for five seconds
and ensure that there is no vehicle
movement.
9. Press and hold the brake pedal. Shift the
transmission back into NEUTRAL.
10. Firmly apply the parking brake.
11. With the transmission and transfer case
in NEUTRAL, push and hold the EN-
GINE START/STOP button until the en-
gine turns off.
12. Place the transmission gear selector in
PARK. Release the brake pedal.
13. Push the ENGINE STOP/START button
twice (without pressing the brake pedal),
to turn the ignition to the OFF mode.
14. Attach the vehicle to the tow vehicle
using a suitable tow bar.
15. Release the parking brake.
16. Turn the ignition to the ON/RUN posi-
tion, but do not start the engine.
17. Confirm that the steering column is
unlocked.18. Disconnect the negative battery cable,
and secure it away from the negative
battery post.
NOTE:
Disconnecting your vehicle battery will
erase radio presets and may affect other
vehicle settings. It may also trigger vari-
ous fault codes, causing MIL illumination
when the battery is reconnected.
NOTE:
• Steps 1 through 4 are requirements that
must be met before pushing the NEUTRAL
(N) button, and must continue to be met
until the shift has been completed. If any of
these requirements are not met before
pushing the NEUTRAL (N) button or are no
longer met during the shift, then the NEU-
TRAL (N) indicator light will flash continu-
ously until all requirements are met or until
the NEUTRAL (N) button is released.
• The ignition must be in the ON/RUN mode
for a shift to take place and for the position
indicator lights to be operable. If the igni-
tion is not in the ON/RUN mode, the shift
will not take place and no position indicator
lights will be on or flashing.
NEUTRAL (N) Switch
201
Page 204 of 378
• A flashing NEUTRAL (N) position indicator
light indicates that shift requirements have
not been met.
• If the vehicle is equipped with Quadra-Lift
air suspension, the engine should be
started and left running for a minimum of
60 seconds (with all the doors closed) at
least once every 24 hours. This process
allows the air suspension to adjust the
vehicle’s ride height to compensate for
temperature effects.
Shifting Out Of NEUTRAL (N)
Use the following procedure to prepare your
vehicle for normal usage.
1. Bring the vehicle to a complete stop,
leaving it connected to the tow vehicle.
2. Firmly apply the parking brake.
3. Reconnect the negative battery cable.
4. Turn the ignition to the LOCK/OFF mode.
5. Start the engine.
6. Press and hold the brake pedal.
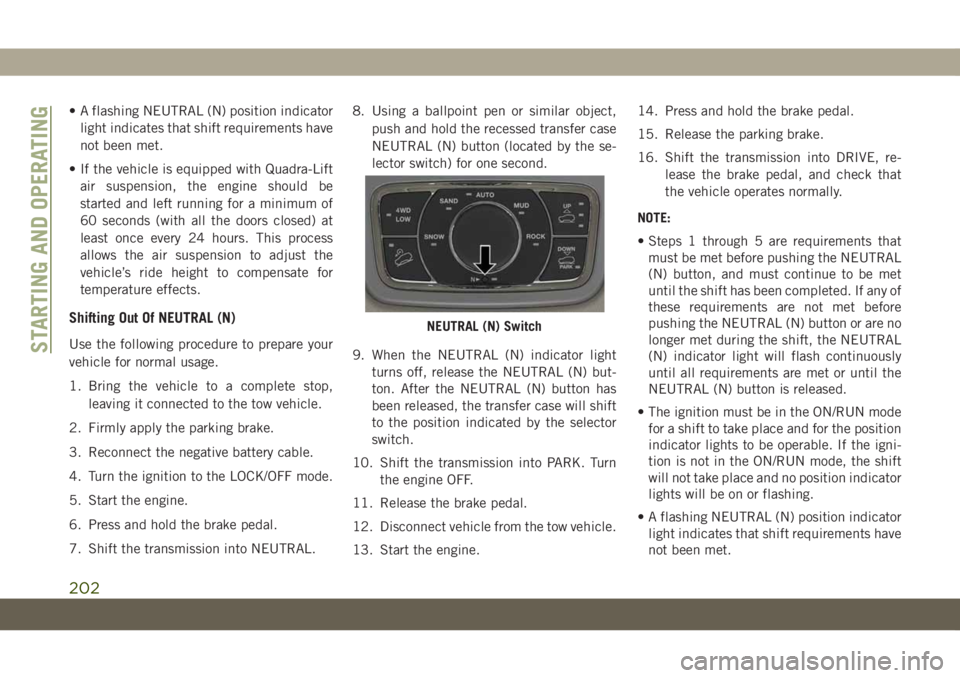
7. Shift the transmission into NEUTRAL.8. Using a ballpoint pen or similar object,
push and hold the recessed transfer case
NEUTRAL (N) button (located by the se-
lector switch) for one second.
9. When the NEUTRAL (N) indicator light
turns off, release the NEUTRAL (N) but-
ton. After the NEUTRAL (N) button has
been released, the transfer case will shift
to the position indicated by the selector
switch.
10. Shift the transmission into PARK. Turn
the engine OFF.
11. Release the brake pedal.
12. Disconnect vehicle from the tow vehicle.
13. Start the engine.14. Press and hold the brake pedal.
15. Release the parking brake.
16. Shift the transmission into DRIVE, re-
lease the brake pedal, and check that
the vehicle operates normally.
NOTE:
• Steps 1 through 5 are requirements that
must be met before pushing the NEUTRAL
(N) button, and must continue to be met
until the shift has been completed. If any of
these requirements are not met before
pushing the NEUTRAL (N) button or are no
longer met during the shift, the NEUTRAL
(N) indicator light will flash continuously
until all requirements are met or until the
NEUTRAL (N) button is released.
• The ignition must be in the ON/RUN mode
for a shift to take place and for the position
indicator lights to be operable. If the igni-
tion is not in the ON/RUN mode, the shift
will not take place and no position indicator
lights will be on or flashing.
• A flashing NEUTRAL (N) position indicator
light indicates that shift requirements have
not been met.
NEUTRAL (N) Switch
STARTING AND OPERATING
202
Page 227 of 378
Jack Usage Precautions
To complete the Use and Maintenance Hand-
book to which this supplement is attached,
given below are some instructions on the
proper use of the jack.
WARNING!
When using the crank, make sure it turns
freely without the risk of scraping hands
against the ground.
Even the moving parts of the jack, the
“worm screw” and joints can cause inju-
ries: avoid contact with them. Clean it
thoroughly if dirtied with grease.
CAUTION!
The jack is a tool designed exclusively for
changing a wheel, in case of a puncture or
damage to a tire of the vehicle on which it
is fitted or on vehicles of the same model.
Any other use, e.g. to jack up other vehicle
models or different things, is strictly pro-
hibited. Never use it to carry out mainte-
nance or repairs under the vehicle or to
CAUTION!
change summer/winter wheels and vice
versa. Never go under the raised vehicle. If
any work under the vehicle is necessary,
contact an authorized dealer. Incorrect
placing of the jack can cause the vehicle to
drop: use it only in the positions indicated.
Do not use the jack for loads higher than
that specified on the label. Never start the
engine with vehicle raised. If the vehicle is
raised more than necessary, everything
can become more unstable, with the risk of
the vehicle dropping violently. Therefore
raise the vehicle only as much as neces-
sary for the wheel/spare.
Maintenance
• Make sure grime does not build up on the
“worm screw.”
• Keep the “worm screw” lubricated.
• Never modify the jack.
Conditions Of Non-Use:
• Temperatures below −40°F (-40°C).
• On sandy or muddy ground.
• On uneven ground.• On steep roads.
• In extreme weather conditions: thunder-
storms, typhoons, hurricanes, blizzards,
storms, etc.
NOTE:
• The jack requires no adjustment.
• The jack cannot be repaired, and in the
event of a fault, it must be replaced by
another genuine one.
• No tool other than its cranking device may
be fitted on the jack.
JUMP STARTING
If your vehicle has a discharged battery, it can
be jump started using a set of jumper cables
and a battery in another vehicle, or by using a
portable battery booster pack. Jump starting
can be dangerous if done improperly, so
please follow the procedures in this section
carefully.
225