ECO mode JEEP GRAND CHEROKEE 2020 Owner handbook (in English)
[x] Cancel search | Manufacturer: JEEP, Model Year: 2020, Model line: GRAND CHEROKEE, Model: JEEP GRAND CHEROKEE 2020Pages: 378, PDF Size: 6.88 MB
Page 232 of 378
CAUTION!
Closing the armrest while the Manual Park
Release is activated may damage the
Manual Park Release mechanism, the
transmission, and/or the armrest.
NOTE:
To prevent the vehicle from rolling uninten-
tionally, firmly apply the parking brake.To Disengage The Manual Park Release Le-
ver:
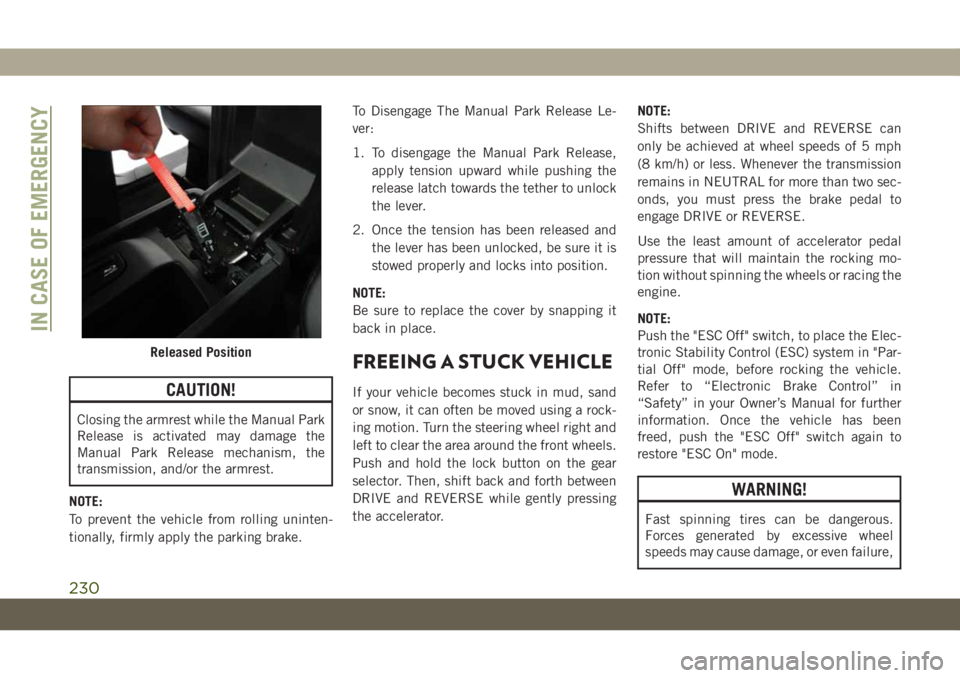
1. To disengage the Manual Park Release,
apply tension upward while pushing the
release latch towards the tether to unlock
the lever.
2. Once the tension has been released and
the lever has been unlocked, be sure it is
stowed properly and locks into position.
NOTE:
Be sure to replace the cover by snapping it
back in place.
FREEING A STUCK VEHICLE
If your vehicle becomes stuck in mud, sand
or snow, it can often be moved using a rock-
ing motion. Turn the steering wheel right and
left to clear the area around the front wheels.
Push and hold the lock button on the gear
selector. Then, shift back and forth between
DRIVE and REVERSE while gently pressing
the accelerator.NOTE:
Shifts between DRIVE and REVERSE can
only be achieved at wheel speeds of 5 mph
(8 km/h) or less. Whenever the transmission
remains in NEUTRAL for more than two sec-
onds, you must press the brake pedal to
engage DRIVE or REVERSE.
Use the least amount of accelerator pedal
pressure that will maintain the rocking mo-
tion without spinning the wheels or racing the
engine.
NOTE:
Push the "ESC Off" switch, to place the Elec-
tronic Stability Control (ESC) system in "Par-
tial Off" mode, before rocking the vehicle.
Refer to “Electronic Brake Control” in
“Safety” in your Owner’s Manual for further
information. Once the vehicle has been
freed, push the "ESC Off" switch again to
restore "ESC On" mode.
WARNING!
Fast spinning tires can be dangerous.
Forces generated by excessive wheel
speeds may cause damage, or even failure,
Released Position
IN CASE OF EMERGENCY
230
Page 233 of 378
WARNING!
of the axle and tires. A tire could explode
and injure someone. Do not spin your
vehicle's wheels faster than 30 mph
(48 km/h) or for longer than 30 seconds
continuously without stopping when you
are stuck and do not let anyone near a
spinning wheel, no matter what the speed.
CAUTION!
• Racing the engine or spinning the
wheels may lead to transmission over-
heating and failure. Allow the engine to
idle with the transmission in NEUTRAL
for at least one minute after every five
rocking-motion cycles. This will mini-
mize overheating and reduce the risk of
transmission failure during prolonged
efforts to free a stuck vehicle.
CAUTION!
• When “rocking” a stuck vehicle by shift-
ing between DRIVE and REVERSE, do
not spin the wheels faster than 15 mph
(24 km/h), or drivetrain damage may
result.
• Revving the engine or spinning the
wheels too fast may lead to transmission
overheating and failure. It can also dam-
age the tires. Do not spin the wheels
above 30 mph (48 km/h) while in gear
(no transmission shifting occurring).
TOWING A DISABLED
VEHICLE
This section describes procedures for towing
a disabled vehicle using a commercial towing
service. If the transmission and drivetrain are
operable, disabled vehicles may also be
towed as described under “Recreational Tow-
ing” in the “Starting And Operating” section
of the Owner’s Manual.
NOTE:
Vehicles equipped with Quadra-Lift must be
placed in Transport mode, before tying them
down (from the body) on a trailer or flatbed
truck. Refer to the section on Quadra-Lift for
more information. If the vehicle cannot be
placed in Transport mode (for example, en-
gine will not run), tie-downs should be fas-
tened over the tires using specific tire tie-
down nets. Failure to follow these
instructions may cause fault codes to be set
and/or cause loss of proper tie-down tension.
231
Page 235 of 378
Without The Key Fob
Special care must be taken when the vehicle
is towed with the ignition in the LOCK/OFF
mode. The only approved method of towing
without the key fob is with a flatbed truck.
Proper towing equipment is necessary to pre-
vent damage to the vehicle.
Two-Wheel Drive Models
The manufacturer recommends towing your
vehicle with all four wheelsOFFthe ground
using a flatbed.
If flatbed equipment is not available, and the
transmission is operable, the vehicle may be
towed (with rear wheels on the ground) under
the following conditions:
• The transmission must be in NEUTRAL.
Refer to "Manual Park Release" in this sec-
tion for instructions on shifting the trans-
mission to NEUTRAL when the engine is
off.
• The towing speed must not exceed 30 mph
(48 km/h).
• The towing distance must not exceed
30 miles (48 km).If the transmission is not operable, or the
vehicle must be towed faster than 30 mph
(48 km/h) or farther than 30 miles (48 km),
tow with the rear wheelsOFFthe ground.
Acceptable methods are to tow the vehicle on
a flatbed, or with the front wheels raised and
the rear wheels on a towing dolly, or (when
using a suitable steering wheel stabilizer to
hold the front wheels in the straight position)
with the rear wheels raised and the front
wheels on the ground.
CAUTION!
• Towing faster than 30 mph (48 km/h) or
farther than 30 miles (48 km) with rear
wheels on the ground can cause severe
transmission damage. Damage from im-
proper towing is not covered under the
New Vehicle Limited Warranty.
Four-Wheel Drive Models
The manufacturer recommends towing with
all wheelsOFFthe ground. Acceptable meth-
ods are to tow the vehicle on a flatbed or with
one end of vehicle raised and the opposite
end on a towing dolly.
If flatbed equipment is not available, and the
transfer case is operable, vehicles may be
towed (in the forward direction, withALL
wheels on the ground),IFthe transfer case is
in NEUTRAL (N) and the transmission is in
PARK. Refer to “Recreational Towing” in
“Starting And Operating” in the Owner’s
Manual for detailed instructions.
Vehicles equipped with a single-speed trans-
fer case have no NEUTRAL position, and
thereforemustbe towed with all four wheels
OFFthe ground.
CAUTION!
• Front or rear wheel lifts must not be used
(if the remaining wheels are on the
ground). Internal damage to the trans-
mission or transfer case will occur if a
233
Page 264 of 378
Cooling System
WARNING!
• You or others can be badly burned by hot
engine coolant (antifreeze) or steam
from your radiator. If you see or hear
steam coming from under the hood, do
not open the hood until the radiator has
had time to cool. Never open a cooling
system pressure cap when the radiator
or coolant bottle is hot.
• Keep hands, tools, clothing, and jewelry
away from the radiator cooling fan when
the hood is raised. The fan starts auto-
matically and may start at any time,
whether the engine is running or not.
• When working near the radiator cooling
fan, turn the ignition to the OFF mode.
The fan is temperature controlled and
can start at any time the ignition is in the
ON mode.
Engine Coolant Checks
Check the engine coolant (antifreeze) protec-
tion every 12 months (before the onset of
freezing weather, where applicable). If the
engine coolant (antifreeze) is dirty, the sys-
tem should be drained, flushed, and refilled
with fresh OAT coolant (conforming to
MS.90032) by an authorized dealer. Check
the front of the A/C condenser for any accu-
mulation of bugs, leaves, etc. If dirty, clean
by gently spraying water from a garden hose
vertically down the face of the condenser.
Check the engine cooling system hoses for
brittle rubber, cracking, tears, cuts, and
tightness of the connection at the coolant
recovery bottle and radiator. Inspect the en-
tire system for leaks. DO NOT REMOVE THE
COOLANT PRESSURE CAP WHEN THE
COOLING SYSTEM IS HOT.
RAISING THE VEHICLE
In the case where it is necessary to raise the
vehicle, go to an authorized dealer or service
station.
TIRES
Tires — General Information
Tire Pressure
Proper tire inflation pressure is essential to
the safe and satisfactory operation of your
vehicle. Four primary areas are affected by
improper tire pressure:
• Safety and Vehicle Stability
• Economy
• Tread Wear
• Ride Comfort
Safety
WARNING!
• Improperly inflated tires are dangerous
and can cause collisions.
• Underinflation increases tire flexing and
can result in overheating and tire failure.
• Overinflation reduces a tire's ability to
cushion shock. Objects on the road and
chuckholes can cause damage that re-
sult in tire failure.
SERVICING AND MAINTENANCE
262
Page 267 of 378
WARNING!
Overloading of your tires is dangerous.
Overloading can cause tire failure, affect
vehicle handling, and increase your stop-
ping distance. Use tires of the recom-
mended load capacity for your vehicle.
Never overload them.
Radial Ply Tires
WARNING!
Combining radial ply tires with other types
of tires on your vehicle will cause your
vehicle to handle poorly. The instability
could cause a collision. Always use radial
ply tires in sets of four. Never combine
them with other types of tires.
Tire Repair
If your tire becomes damaged, it may be
repaired if it meets the following criteria:
• The tire has not been driven on when flat.
• The damage is only on the tread section of
your tire (sidewall damage is not repair-
able).• The puncture is no greater thana¼ofan
inch (6 mm).
Consult an authorized tire dealer for tire re-
pairs and additional information.
Damaged Run Flat tires, or Run Flat tires that
have experienced a loss of pressure should be
replaced immediately with another Run Flat
tire of identical size and service description
(Load Index and Speed Symbol). Replace the
tire pressure sensor as well as it is not de-
signed to be reused.Run Flat Tires — If Equipped
Run Flat tires allow you the capability to drive
50 miles (80 km) at 50 mph (80 km/h) after
a rapid loss of inflation pressure. This rapid
loss of inflation is referred to as the Run Flat
mode. A Run Flat mode occurs when the tire
inflation pressure is of/or below 14 psi
(96 kPa). Once a Run Flat tire reaches the
run flat mode it has limited driving capabili-
ties and needs to be replaced immediately. A
Run Flat tire is not repairable. When a run flat
tire is changed after driving with underin-flated tire condition, please replace the TPM
sensor as it is not designed to be reused when
driven under run flat mode (14 psi (96 kPa))
condition.
NOTE:
TPM Sensor must be replaced after driving
the vehicle on a flat tire condition.
It is not recommended driving a vehicle
loaded at full capacity or to tow a trailer while
a tire is in the run flat mode.
See the tire pressure monitoring section for
more information.Tire Spinning
When stuck in mud, sand, snow, or ice con-
ditions, do not spin your vehicle's wheels
above 30 mph (48 km/h) or for longer than
30 seconds continuously without stopping.
Refer to “Freeing A Stuck Vehicle” in “In
Case Of Emergency” for further information.
WARNING!
Fast spinning tires can be dangerous.
Forces generated by excessive wheel
265
Page 280 of 378
WHEEL AND TIRE TORQUE
SPECIFICATIONS
Proper lug nut/bolt torque is very important to
ensure that the wheel is properly mounted to
the vehicle. Any time a wheel has been re-
moved and reinstalled on the vehicle, the lug
nuts/bolts should be torqued using a properly
calibrated torque wrench using a high quality
six sided (hex) deep wall socket.
Torque Specifications
Base Model Vehicle
Lug Nut/Bolt
Torque**Lug Nut/Bolt
SizeLug Nut/Bolt
Socket Size
130 Ft-Lbs
(176 N·m)M14 x 1.50 22 mm
SRT Model Vehicle
Lug Nut/Bolt
Torque**Lug Nut/Bolt
SizeLug Nut/Bolt
Socket Size
110 Ft-Lbs
(149 N·m)M14 x 1.50 22 mm
**Use only your authorized dealer recom-
mended lug nuts/bolts and clean or remove
any dirt or oil before tightening.Inspect the wheel mounting surface prior to
mounting the tire and remove any corrosion
or loose particles.
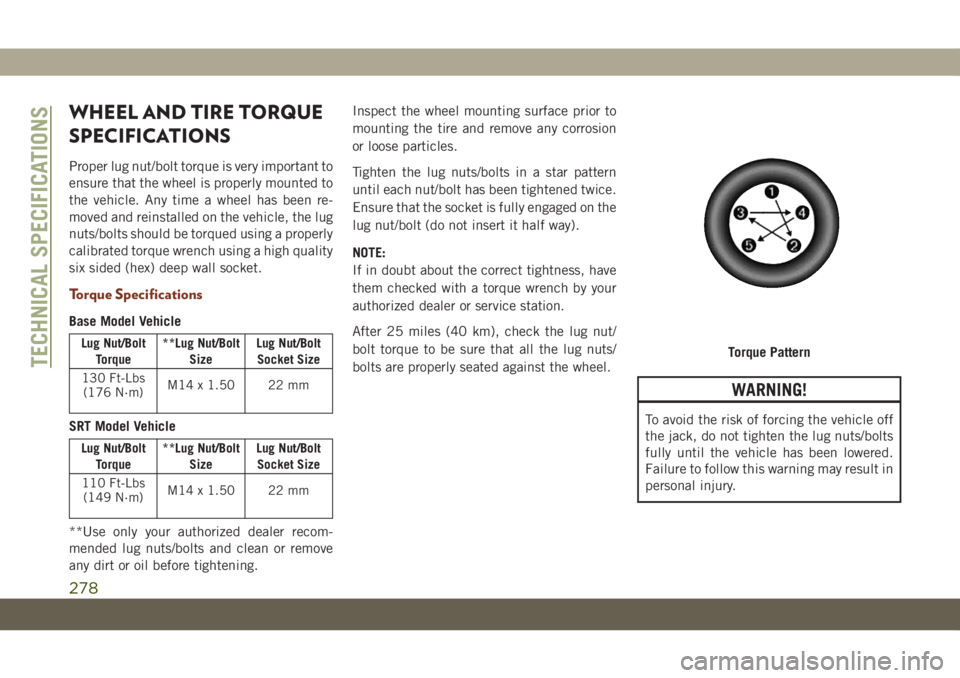
Tighten the lug nuts/bolts in a star pattern
until each nut/bolt has been tightened twice.
Ensure that the socket is fully engaged on the
lug nut/bolt (do not insert it half way).
NOTE:
If in doubt about the correct tightness, have
them checked with a torque wrench by your
authorized dealer or service station.
After 25 miles (40 km), check the lug nut/
bolt torque to be sure that all the lug nuts/
bolts are properly seated against the wheel.
WARNING!
To avoid the risk of forcing the vehicle off
the jack, do not tighten the lug nuts/bolts
fully until the vehicle has been lowered.
Failure to follow this warning may result in
personal injury.
Torque PatternTECHNICAL SPECIFICATIONS
278
Page 286 of 378
Reformulated Gasoline
Many areas of the country require the use of
cleaner burning gasoline referred to as “Re-
formulated Gasoline”. Reformulated gaso-
line contains oxygenates and are specifically
blended to reduce vehicle emissions and im-
prove air quality.
The use of reformulated gasoline is recom-
mended. Properly blended reformulated
gasoline will provide improved performance
and durability of engine and fuel system
components.
Do Not Use E-85 In Non-Flex Fuel
Vehicles
Non-Flex Fuel Vehicles (FFV) are compatible
with gasoline containing up to 15% ethanol
(E-15). Use of gasoline with higher ethanol
content may void the New Vehicle Limited
Warranty.If a Non-FFV vehicle is inadvertently fueled
with E-85 fuel, the engine will have some or
all of these symptoms:
• Operate in a lean mode.
• OBD II Malfunction Indicator Light on.
• Poor engine performance.
• Poor cold start and cold drivability.
• Increased risk for fuel system component
corrosion.
CNG And LP Fuel System Modifications
Modifications that allow the engine to run on
Compressed Natural Gas (CNG) or Liquid
Propane (LP) may result in damage to the
engine, emissions, and fuel system compo-
nents. Problems that result from running
CNG or LP are not the responsibility of the
manufacturer and may void or not be covered
under the New Vehicle Limited Warranty.
Materials Added To Fuel
Indiscriminate use of fuel system cleaning
agents should be avoided. Many of these
materials intended for gum and varnish re-
moval may contain active solvents or similar
ingredients. These can harm fuel system gas-
ket and diaphragm materials.
Fuel Icon Identification Compliant To
EN16942
The following symbols make it easier to rec-
ognize the correct type of fuel to be used on
your vehicle. Before proceeding with the sup-
ply, check the symbols placed inside the fuel
filler flap (if present) and compare them with
the symbol on the fuel pump (if present).
TECHNICAL SPECIFICATIONS
284
Page 306 of 378
WARNING!
ALWAYS drive safely with your hands on
the wheel. You have full responsibility and
assume all risks related to the use of the
Uconnect features and applications in this
vehicle. Only use Uconnect when it is safe
to do so. Failure to do so may result in an
accident involving serious injury or death.
• To access the Radio mode, press the “Ra-
dio” button on the touchscreen.
Selecting Radio Stations
• Press the desired radio band (AM, FM or
DAB) button on the touchscreen.
Seek Up/Seek Down
• Press the Seek up or down arrow buttons on
the touchscreen for less than two seconds
to seek through radio stations.
• Press and hold either arrow button on the
touchscreen for more than two seconds to
bypass stations without stopping. The radio
will stop at the next listenable station once
the arrow button on the touchscreen is
released.Direct Tune
• Tune directly to a radio station by pressing
the “Tune” button on the screen, and en-
tering the desired station number.
Store Radio Presets Manually
Your radio can store 36 total preset stations,
12 presets per band (AM, FM and DAB). They
are shown at the top of your radio screen. To
see the 12 preset stations per band, press the
arrow button on the touchscreen at the top
right of the screen to toggle between the two
sets of six presets.
To store a radio preset manually, follow the
steps below:
1. Tune to the desired station.
2. Press and hold the desired numbered but-
ton on the touchscreen for more than two
seconds or until you hear a confirmation
beep.
Android Auto — If Equipped
NOTE:
Feature availability depends on your carrier
and mobile phone manufacturer. Some
Android Auto features may or may not be
available in every region and/or language.
Android Auto is a feature of your Uconnect
system, and your Android 5.0 Lollipop, or
higher, powered smartphone with a data
plan, that allows you to project your smart-
phone and a number of its apps onto the
touchscreen radio display. Android Auto au-
tomatically brings you useful information,
and organizes it into simple cards that appear
just when they are needed. Android Auto can
be used with Google's best-in-class speech
technology, the steering wheel controls, the
knobs and buttons on your radio faceplate,
and the radio display’s touchscreen to control
many of your apps. To use Android Auto
follow the following steps:
1. Download the Android Auto app from the
Google Play store on your Android-
powered smartphone.
MULTIMEDIA
304
Page 312 of 378
WARNING!
ALWAYS drive safely with your hands on
the wheel. You have full responsibility and
assume all risks related to the use of the
Uconnect features and applications in this
vehicle. Only use Uconnect when it is safe
to do so. Failure to do so may result in an
accident involving serious injury or death.
• To access the Radio mode, press the “Ra-
dio” button on the touchscreen.
Selecting Radio Stations
• Press the desired radio band (AM, FM or
DAB) button on the touchscreen.
Seek Up/Seek Down
• Press the Seek up or down arrow buttons on
the touchscreen for less than two seconds
to seek through radio stations.
• Press and hold either arrow button on the
touchscreen for more than two seconds to
bypass stations without stopping. The radio
will stop at the next listenable station once
the arrow button on the touchscreen is
released.Direct Tune
• Tune directly to a radio station by pressing
the “Tune” button on the screen, and en-
tering the desired station number.
Store Radio Presets Manually
Your radio can store 36 total preset stations,
12 presets per band (AM, FM and DAB). They
are shown at the top of your radio screen. To
see the 12 preset stations per band, press the
arrow button on the touchscreen at the top
right of the screen to toggle between the two
sets of six presets.
To store a radio preset manually, follow the
steps below:
1. Tune to the desired station.
2. Press and hold the desired numbered but-
ton on the touchscreen for more than two
seconds or until you hear a confirmation
beep.
Android Auto — If Equipped
NOTE:
Feature availability depends on your carrier
and mobile phone manufacturer. Some
Android Auto features may or may not be
available in every region and/or language.
Android Auto is a feature of your Uconnect
system, and your Android 5.0 Lollipop, or
higher, powered smartphone with a data
plan, that allows you to project your smart-
phone and a number of its apps onto the
touchscreen radio display. Android Auto au-
tomatically brings you useful information,
and organizes it into simple cards that appear
just when they are needed. Android Auto can
be used with Google's best-in-class speech
technology, the steering wheel controls, the
knobs and buttons on your radio faceplate,
and the radio display’s touchscreen to control
many of your apps. To use Android Auto
follow these steps:
1. Download the Android Auto app from the
Google Play store on your Android-
powered smartphone.
MULTIMEDIA
310
Page 326 of 378
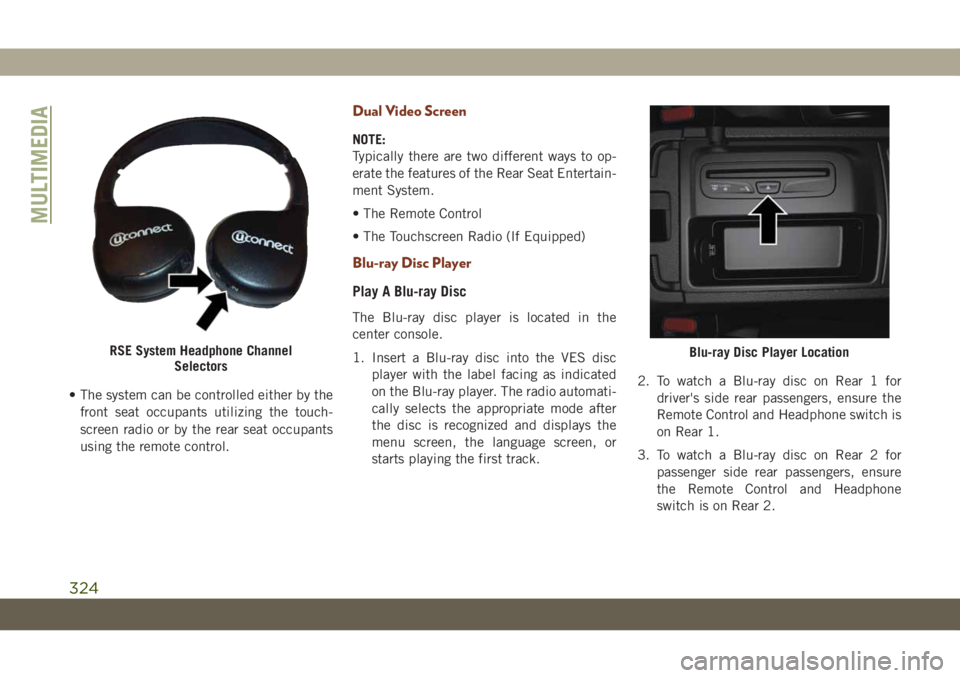
• The system can be controlled either by the
front seat occupants utilizing the touch-
screen radio or by the rear seat occupants
using the remote control.
Dual Video Screen
NOTE:
Typically there are two different ways to op-
erate the features of the Rear Seat Entertain-
ment System.
• The Remote Control
• The Touchscreen Radio (If Equipped)
Blu-ray Disc Player
Play A Blu-ray Disc
The Blu-ray disc player is located in the
center console.
1. Insert a Blu-ray disc into the VES disc
player with the label facing as indicated
on the Blu-ray player. The radio automati-
cally selects the appropriate mode after
the disc is recognized and displays the
menu screen, the language screen, or
starts playing the first track.2. To watch a Blu-ray disc on Rear 1 for
driver's side rear passengers, ensure the
Remote Control and Headphone switch is
on Rear 1.
3. To watch a Blu-ray disc on Rear 2 for
passenger side rear passengers, ensure
the Remote Control and Headphone
switch is on Rear 2.
RSE System Headphone Channel
SelectorsBlu-ray Disc Player Location
MULTIMEDIA
324