engine JEEP GRAND CHEROKEE 2020 Owner handbook (in English)
[x] Cancel search | Manufacturer: JEEP, Model Year: 2020, Model line: GRAND CHEROKEE, Model: JEEP GRAND CHEROKEE 2020Pages: 378, PDF Size: 6.88 MB
Page 173 of 378
Launch control will be active until the vehicle
reaches 62 mph (100 km/h), at which point
the Electronic Stability Control (ESC) system
will return to its current ESC mode.
Launch control will abort before launch
completion, display “Launch Aborted” in the
cluster under any the following conditions:
• The accelerator pedal is released during
launch.
• The ESC system detects that the vehicle is
no longer moving in a straight line.
• The “ESC OFF” button is pressed to change
the system to another mode.
NOTE:
After launch control has been aborted, ESC
will return to its current ESC mode.
CAUTION!
Do not attempt to shift when the drive
wheels are spinning and do not have trac-
tion. Damage to the transmission may oc-
cur.
Guidelines For Track Use
NOTE:
Because of the extreme conditions encoun-
tered during track use, any damage or wear
associated with track use may not be covered
by warranty.
• If your SRT vehicle is equipped with Drive
Modes they will alter the vehicle’s perfor-
mance in various driving situations. It is
recommended that your vehicle operates in
SPORT or TRACK modes during the track
event.
• Prior to each track event/day, verify all flu-
ids are at the correct levels. Refer to “Fluid
Capacities” in “Technical Specifications”
for further information.
• Prior to each track event, verify the front
and rear brake pads have more than ½ pad
thickness remaining. If the brake pads re-
quire changing, please burnish prior to
track outing at full pace.
NOTE:
Use of DOT 4 brake fluid is suggested for
extended track usage due to increased ther-
mal capacity.• At the conclusion of each track event, it is
recommended that a brake bleed procedure
is performed to maintain the pedal feel and
stopping capability of your Brembo High
Performance brake system.
• It is recommended that each track outing
should end with a minimum of one cool
down lap using minimal braking.
• If equipped with a removable lower front
fascia grille, it is recommended to remove it
for track use during warm/hot weather to
improve cooling airflow to critical pow-
ertrain and cooling system components.
• All SRT vehicles are track tested for
24 hours of endurance, however, it is rec-
ommended that suspension system, brake
system, prop shaft, and ½ shaft boots
should be checked for wear or damage after
every track event.
• Track usage results in increased operating
temperatures of the engine, transmission,
driveline and brake system. This may affect
noise vibrations and harshness (NVH)
countermeasures designed into your ve-
hicle. New components may need to be
installed to return the system to the original
NVH performance.
171
Page 178 of 378
in the Owner’s Manual for more information.
The speed increment shown is dependant on
the chosen speed unit of U.S. (mph) or Met-
ric (km/h):
U.S. Speed (mph)
• Pushing the SET(+)button once will result
in a 1 mph increase in set speed. Each
subsequent tap of the button results in an
increase of 1 mph.
• If the button is continually pushed, the set
speed will continue to increase in 5 mph
increments until the button is released.
The increase in set speed is reflected in the
instrument cluster display.
Metric Speed (km/h)
• Pushing the SET(+)button once will result
in a 1 km/h increase in set speed. Each
subsequent tap of the button results in an
increase of 1 km/h.
• If the button is continually pushed, the set
speed will continue to increase in 10 km/h
increments until the button is released.
The increase in set speed is reflected in the
instrument cluster display.To Decrease Speed
While ACC is set, the set speed can be de-
creased by pushing the SET(-)button.
The driver's preferred units can be selected
through the instrument panel settings. Refer
to “Getting To Know Your Instrument Panel”
in the Owner’s Manual for more information.
The speed increment shown is dependant on
the chosen speed unit of U.S. (mph) or Met-
ric (km/h):
U.S. Speed (mph)
• Pushing the SET(-)button once will result
in a 1 mph decrease in set speed. Each
subsequent tap of the button results in a
decrease of 1 mph.
• If the button is continually pushed, the set
speed will continue to decrease in 5 mph
decrements until the button is released.
The decrease in set speed is reflected in
the instrument cluster display.
Metric Speed (km/h)
• Pushing the SET(-)button once will result
in a 1 km/h decrease in set speed. Each
subsequent tap of the button results in a
decrease of 1 km/h.• If the button is continually pushed, the set
speed will continue to decrease in 10 km/h
decrements until the button is released.
The decrease in set speed is reflected in
the instrument cluster display.
NOTE:
• When you override and push the SET(+)
button or SET(-)buttons, the new set
speed will be the current speed of the
vehicle.
• When you use the SET(-)button to decel-
erate, if the engine’s braking power does
not slow the vehicle sufficiently to reach
the set speed, the brake system will auto-
matically slow the vehicle.
• The ACC system applies the brake down to
a full stop when following a target vehicle.
If an ACC host vehicle follows a target
vehicle to a standstill, the host vehicle will
release the vehicle brakes two seconds af-
ter coming to a full stop.
• The ACC system maintains set speed when
driving up hill and down hill. However, a
slight speed change on moderate hills is
normal. In addition, downshifting may oc-
cur while climbing uphill or descending
STARTING AND OPERATING
176
Page 187 of 378
WARNING!
Drivers must be careful when backing up
even when using the ParkView Rear Back
Up Camera. Always check carefully behind
your vehicle, and be sure to check for
pedestrians, animals, other vehicles, ob-
structions, or blind spots before backing
up. You are responsible for the safety of
your surroundings and must continue to
pay attention while backing up. Failure to
do so can result in serious injury or death.
CAUTION!
• To avoid vehicle damage, ParkView
should only be used as a parking aid.
The ParkView camera is unable to view
every obstacle or object in your drive
path.
• To avoid vehicle damage, the vehicle
must be driven slowly when using
ParkView to be able to stop in time when
an obstacle is seen. It is recommended
that the driver look frequently over his/
her shoulder when using ParkView.NOTE:
If snow, ice, mud, or any foreign substance
builds up on the camera lens, clean the lens,
rinse with water, and dry with a soft cloth. Do
not cover the lens.
Rear Camera — Viewing At Speed
When the vehicle is in park, neutral or drive,
the Rear View Camera can be activated with
the “Rear View Camera” button in the Con-
trols menu. This feature allows the customer
to monitor the area directly behind the ve-
hicle (or trailer, if equipped) for up to ten
seconds while at speed. If the vehicle speed
remains below 8 mph (13 km/h), the Rear
View Camera image will be displayed con-
tinuously until deactivated via the “X” button
on the touchscreen.
REFUELING THE VEHICLE —
GASOLINE ENGINE
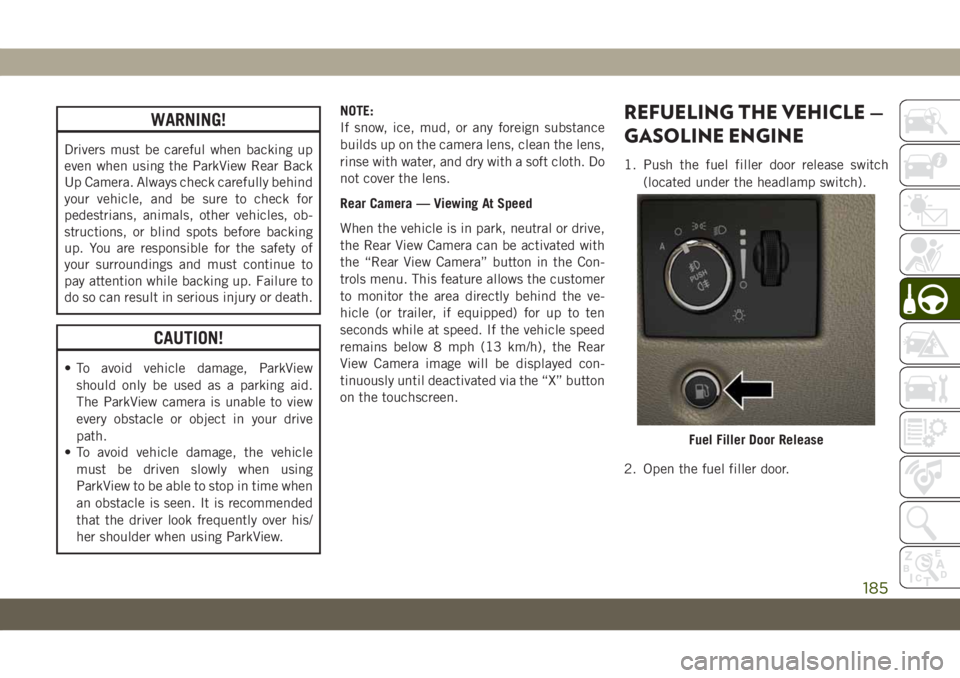
1. Push the fuel filler door release switch
(located under the headlamp switch).
2. Open the fuel filler door.
Fuel Filler Door Release
185
Page 189 of 378
WARNING!
• Never have any smoking materials lit in
or near the vehicle when the fuel door is
open or the tank is being filled.
• Never add fuel when the engine is run-
ning. This is in violation of most coun-
tries regulations and may cause the
“Malfunction Indicator Light” to turn
on.
• Do not apply any object/cap to the end of
the filler which is not provided for the
car. The use of non-compliant objects/
plugs could cause a pressure increase
inside the tank, resulting in dangerous
situations.
• A fire may result if fuel is pumped into a
portable container that is inside of a
vehicle. You could be burned. Always
place fuel containers on the ground
while filling.
CAUTION!
To avoid fuel spillage and overfilling, do
not “top off” the fuel tank after filling.
Emergency Fuel Filler Door Release
If you are unable to open the fuel filler door,
use the fuel filler door emergency release.
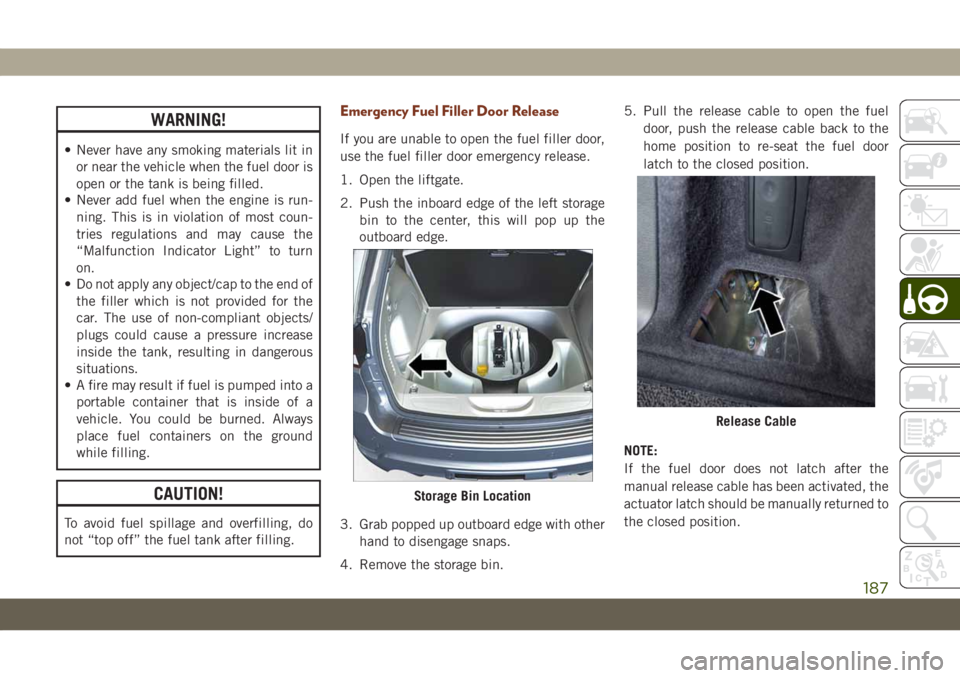
1. Open the liftgate.
2. Push the inboard edge of the left storage
bin to the center, this will pop up the
outboard edge.
3. Grab popped up outboard edge with other
hand to disengage snaps.
4. Remove the storage bin.5. Pull the release cable to open the fuel
door, push the release cable back to the
home position to re-seat the fuel door
latch to the closed position.
NOTE:
If the fuel door does not latch after the
manual release cable has been activated, the
actuator latch should be manually returned to
the closed position.
Storage Bin Location
Release Cable
187
Page 190 of 378
REFUELING THE VEHICLE —
DIESEL ENGINE
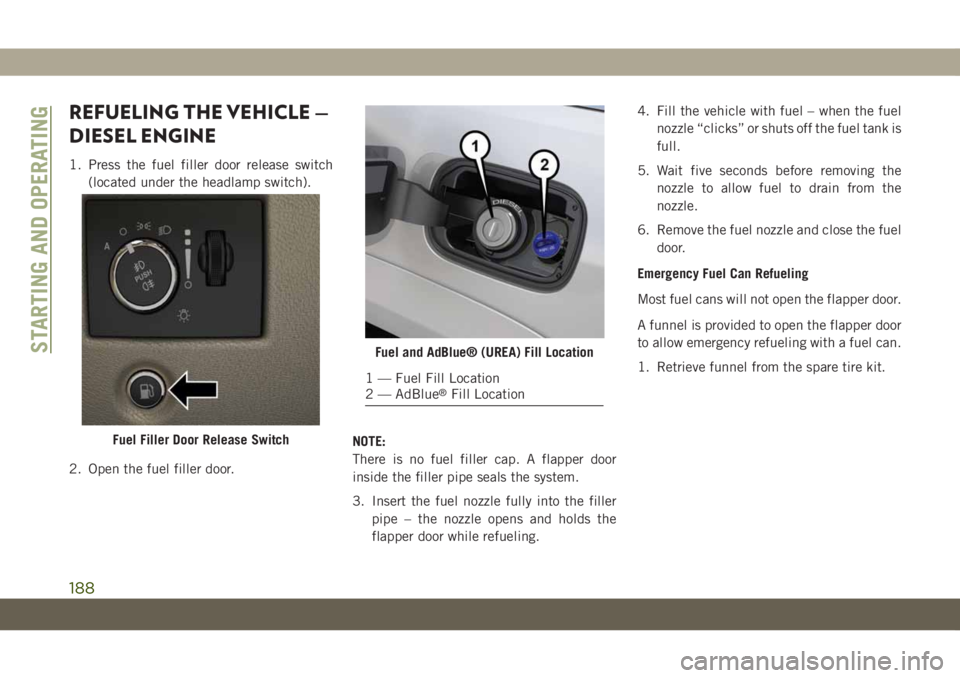
1. Press the fuel filler door release switch
(located under the headlamp switch).
2. Open the fuel filler door.NOTE:
There is no fuel filler cap. A flapper door
inside the filler pipe seals the system.
3. Insert the fuel nozzle fully into the filler
pipe – the nozzle opens and holds the
flapper door while refueling.4. Fill the vehicle with fuel – when the fuel
nozzle “clicks” or shuts off the fuel tank is
full.
5. Wait five seconds before removing the
nozzle to allow fuel to drain from the
nozzle.
6. Remove the fuel nozzle and close the fuel
door.
Emergency Fuel Can Refueling
Most fuel cans will not open the flapper door.
A funnel is provided to open the flapper door
to allow emergency refueling with a fuel can.
1. Retrieve funnel from the spare tire kit.
Fuel Filler Door Release Switch
Fuel and AdBlue® (UREA) Fill Location
1 — Fuel Fill Location
2 — AdBlue®Fill Location
STARTING AND OPERATING
188
Page 191 of 378
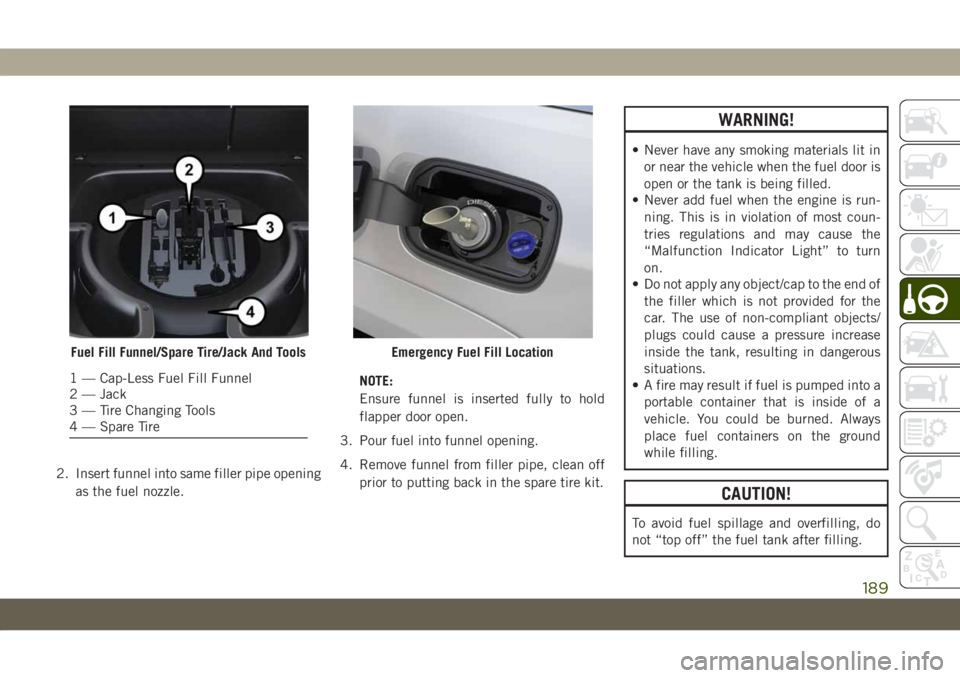
2. Insert funnel into same filler pipe opening
as the fuel nozzle.NOTE:
Ensure funnel is inserted fully to hold
flapper door open.
3. Pour fuel into funnel opening.
4. Remove funnel from filler pipe, clean off
prior to putting back in the spare tire kit.
WARNING!
• Never have any smoking materials lit in
or near the vehicle when the fuel door is
open or the tank is being filled.
• Never add fuel when the engine is run-
ning. This is in violation of most coun-
tries regulations and may cause the
“Malfunction Indicator Light” to turn
on.
• Do not apply any object/cap to the end of
the filler which is not provided for the
car. The use of non-compliant objects/
plugs could cause a pressure increase
inside the tank, resulting in dangerous
situations.
• A fire may result if fuel is pumped into a
portable container that is inside of a
vehicle. You could be burned. Always
place fuel containers on the ground
while filling.
CAUTION!
To avoid fuel spillage and overfilling, do
not “top off” the fuel tank after filling.
Fuel Fill Funnel/Spare Tire/Jack And Tools
1 — Cap-Less Fuel Fill Funnel
2 — Jack
3 — Tire Changing Tools
4 — Spare Tire
Emergency Fuel Fill Location
189
Page 192 of 378
CAUTION!
For diesel engines, only use diesel fuel for
motor vehicles in accordance with EN 590
European specifications. The use of other
products or mixtures may damage the en-
gine beyond repair and consequently void
the warranty, due to the damage caused. If
you accidentally introduce other types of
fuel into the tank, do not start the engine.
Empty the tank. If the engine has been run
for even an extremely limited amount of
time, you must not only drain the fuel
tank, but the rest of the supply circuit as
well.
Avoid Using Contaminated Fuel
Fuel that is contaminated by water or dirt can
cause severe damage to the engine fuel sys-
tem. Proper maintenance of the engine fuel
filter and fuel tank is essential. Refer to
“Dealer Service” in “Servicing And Mainte-
nance” in your Owner’s Manual for further
information.
AdBlue® (UREA) — If Equipped
The vehicle is equipped with an UREA injec-
tion system and Selective Catalytic Reduc-
tion to meet emission standards. These two
systems ensure compliance with the diesel
emissions requirements; at the same, they
ensure fuel-efficiency, handling, torque and
power. For messages and system warnings,
refer to the "Warning Lights And Messages" in
the "Getting To Know Your Instrument Panel"
section. AdBlue
®is a very stable product
with a long shelf life. Stored at temperatures
LOWER than 90 °F (32 °C), it has a shelf life
of at least one year. For more information on
the AdBlue
®liquid type, see the “Fluids and
lubricants” in the “Technical specifications”
section. The vehicle is equipped with an
automatic AdBlue
®heating system when the
engine starts allowing the system to work
correctly at temperatures lower than 12 °F
(-11 °C).
NOTE:
• AdBlue
®freezes at temperatures lower
than 12 °F (-11 °C).• Your vehicle is equipped with a AdBlue
®
injection system. You may occasionally
hear an audible clicking noise from under
the vehicle at a stop. This is normal opera-
tion.
• The AdBlue
®pump will run for a period of
time after engine shutdown to purge the
AdBlue
®system. This is normal operation
and may be audible from the rear of the
vehicle.
AdBlue® Storage
AdBlue®is considered a very stable product
with a long shelf life. If AdBlue®is kept in
temperatures between 10° and 90°F
(-12° and 32°C), it will last a minimum of
one year.
AdBlue
®is subject to freezing at the lowest
temperatures. For example, AdBlue®may
freeze at temperatures at or below 12° F
(-11° C). The system has been designed to
operate in this environment.
STARTING AND OPERATING
190
Page 193 of 378
NOTE:
When working with AdBlue®, it is important
to know that:
• Any containers or parts that come into con-
tact with AdBlue
®must be AdBlue®com-
patible (plastic or stainless steel). Copper,
brass, aluminum, iron or non-stainless
steel should be avoided as they are subject
to corrosion by AdBlue
®.
• If AdBlue
®is spilled, it should be wiped up
completely.
Adding AdBlue®
Preliminary Conditions
AdBlue
®freezes at temperatures lower than
12° F (-11° C). If the car stands for a long
time at this temperature refilling could be
difficult. For this reason, it is advised to park
the vehicle in a garage and/or heated environ-
ment and wait for the urea to return to liquid
state before topping up.Proceed as follows:
• Park the car on flat ground and stop the
engine by cycling the ignition to the OFF
position.
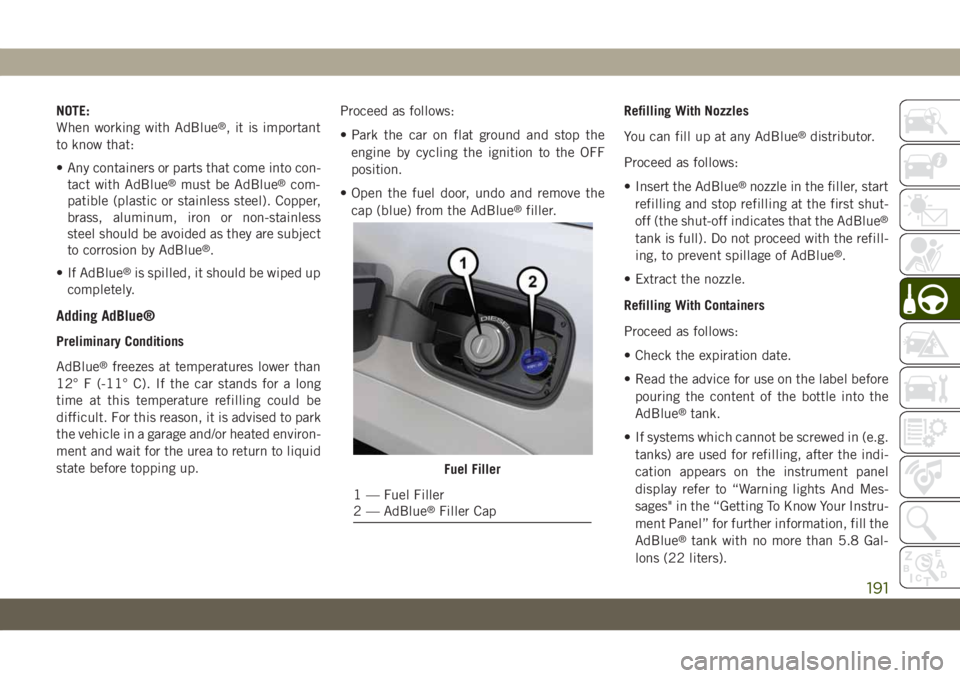
• Open the fuel door, undo and remove the
cap (blue) from the AdBlue
®filler.Refilling With Nozzles
You can fill up at any AdBlue
®distributor.
Proceed as follows:
• Insert the AdBlue
®nozzle in the filler, start
refilling and stop refilling at the first shut-
off (the shut-off indicates that the AdBlue
®
tank is full). Do not proceed with the refill-
ing, to prevent spillage of AdBlue®.
• Extract the nozzle.
Refilling With Containers
Proceed as follows:
• Check the expiration date.
• Read the advice for use on the label before
pouring the content of the bottle into the
AdBlue
®tank.
• If systems which cannot be screwed in (e.g.
tanks) are used for refilling, after the indi-
cation appears on the instrument panel
display refer to “Warning lights And Mes-
sages" in the “Getting To Know Your Instru-
ment Panel” for further information, fill the
AdBlue
®tank with no more than 5.8 Gal-
lons (22 liters).
Fuel Filler
1 — Fuel Filler
2 — AdBlue®Filler Cap
191
Page 194 of 378
• If containers which can be screwed to the
filler are used, the reservoir is full when the
AdBlue
®level in the container stops pour-
ing out. Do not proceed further.
CAUTION!
To avoid fuel spillage and overfilling, do
not “top off” the fuel tank after filling.
Operations After Refilling
Proceed as follows:
• Fit the cap back on the AdBlue
®filler by
turning it clockwise and screwing it com-
pletely.
• Cycle the ignition to RUN (it is not neces-
sary to start the engine).
• Wait for the indication on the instrument
panel to switch off before moving the car.
The indication may stay on for a few sec-
onds to approximately half a minute. If the
engine is started and the car is moved, the
indication will remain on for longer. This
will not compromise engine operation.• If the AdBlue
®was topped up when the
tank was empty, wait for 2 minutes before
starting the engine.
NOTE:
• If AdBlue
®is spilled out of the filler neck,
clean up well the area and proceed to filling
up again. If the liquid crystallizes, elimi-
nate it with a sponge and warm water.
• DO NOT EXCEED THE MAXIMUM LEVEL:
this could cause damage to the reservoir.
AdBlue
®freezes at under 12° F (-11° C).
Although the system is designed to operate
below the freezing point of the AdBlue
®,it
is advisable not to fill the tank beyond the
maximum level because if the AdBlue
®
freezes the system can be damaged. Follow
the instructions in this section.
• If the AdBlue
®is spilled on painted sur-
faces or aluminium, immediately clean the
area with water and use absorbent material
to collect the fluid that has been spilled on
the ground.
• Do not try to start the engine if AdBlue
®
was accidentally added to the diesel fuel
tank, this can result in serious engine dam-
age, contact an authorized dealer.• Do not add additives or other fluids to
AdBlue
®, doing so could damage the
system.
• The use of non-conforming or degraded
AdBlue
®may lead to indications appearing
on the instrument panel display refer to
“Warning Lights And Messages" in the
“Getting To Know Your Instrument Panel”
for further information.
• Never pour AdBlue
®into another con-
tainer: it could be contaminated.
• If the AdBlue
®runs out, see refer to “Warn-
ing Lights And Messages" in the “Getting To
Know Your Instrument Panel” for further
information to continue using the car
normally.
TRAILER TOWING
Trailer Towing Weights (Maximum Trailer
Weight Ratings) — Non SRT
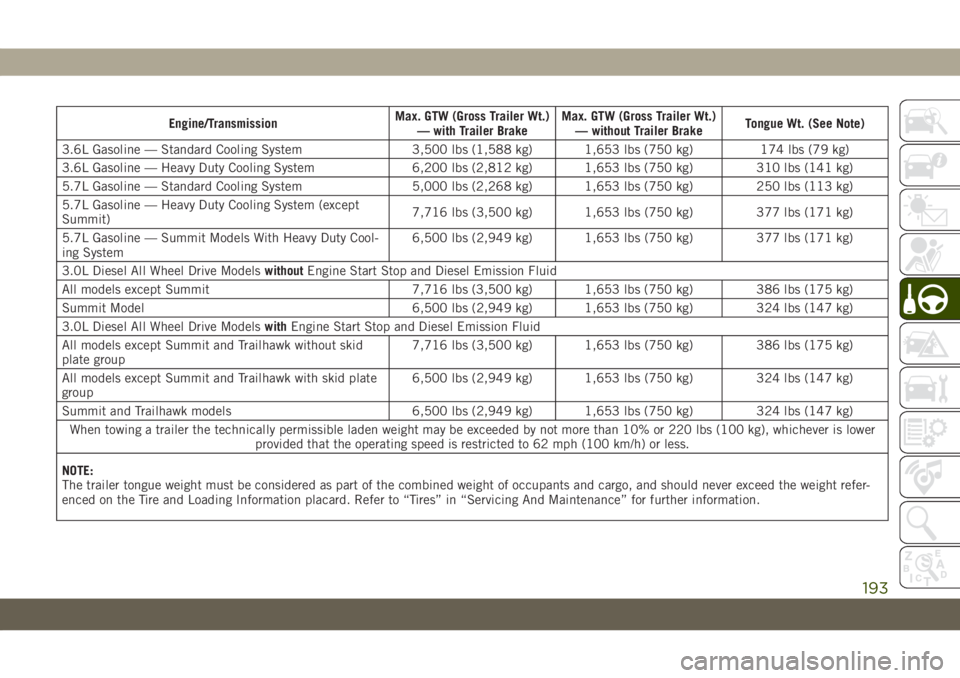
The following chart provides the maximum
trailer weight ratings towable for your given
drivetrain.
STARTING AND OPERATING
192
Page 195 of 378
Engine/TransmissionMax. GTW (Gross Trailer Wt.)
— with Trailer BrakeMax. GTW (Gross Trailer Wt.)
— without Trailer BrakeTongue Wt. (See Note)
3.6L Gasoline — Standard Cooling System 3,500 lbs (1,588 kg) 1,653 lbs (750 kg) 174 lbs (79 kg)
3.6L Gasoline — Heavy Duty Cooling System 6,200 lbs (2,812 kg) 1,653 lbs (750 kg) 310 lbs (141 kg)
5.7L Gasoline — Standard Cooling System 5,000 lbs (2,268 kg) 1,653 lbs (750 kg) 250 lbs (113 kg)
5.7L Gasoline — Heavy Duty Cooling System (except
Summit)7,716 lbs (3,500 kg) 1,653 lbs (750 kg) 377 lbs (171 kg)
5.7L Gasoline — Summit Models With Heavy Duty Cool-
ing System6,500 lbs (2,949 kg) 1,653 lbs (750 kg) 377 lbs (171 kg)
3.0L Diesel All Wheel Drive ModelswithoutEngine Start Stop and Diesel Emission Fluid
All models except Summit 7,716 lbs (3,500 kg) 1,653 lbs (750 kg) 386 lbs (175 kg)
Summit Model 6,500 lbs (2,949 kg) 1,653 lbs (750 kg) 324 lbs (147 kg)
3.0L Diesel All Wheel Drive ModelswithEngine Start Stop and Diesel Emission Fluid
All models except Summit and Trailhawk without skid
plate group7,716 lbs (3,500 kg) 1,653 lbs (750 kg) 386 lbs (175 kg)
All models except Summit and Trailhawk with skid plate
group6,500 lbs (2,949 kg) 1,653 lbs (750 kg) 324 lbs (147 kg)
Summit and Trailhawk models 6,500 lbs (2,949 kg) 1,653 lbs (750 kg) 324 lbs (147 kg)
When towing a trailer the technically permissible laden weight may be exceeded by not more than 10% or 220 lbs (100 kg), whichever is lower
provided that the operating speed is restricted to 62 mph (100 km/h) or less.
NOTE:
The trailer tongue weight must be considered as part of the combined weight of occupants and cargo, and should never exceed the weight refer-
enced on the Tire and Loading Information placard. Refer to “Tires” in “Servicing And Maintenance” for further information.
193