engine JEEP GRAND CHEROKEE 2020 Owner handbook (in English)
[x] Cancel search | Manufacturer: JEEP, Model Year: 2020, Model line: GRAND CHEROKEE, Model: JEEP GRAND CHEROKEE 2020Pages: 378, PDF Size: 6.88 MB
Page 216 of 378
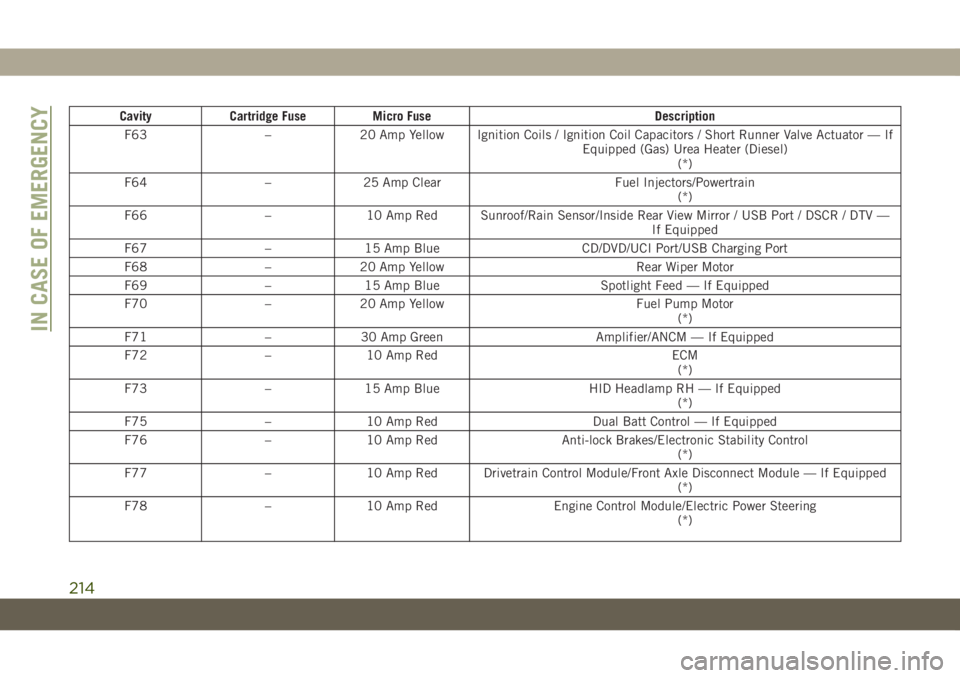
Cavity Cartridge Fuse Micro Fuse Description
F63 – 20 Amp Yellow Ignition Coils / Ignition Coil Capacitors / Short Runner Valve Actuator — If
Equipped (Gas) Urea Heater (Diesel)
(*)
F64 – 25 Amp Clear Fuel Injectors/Powertrain
(*)
F66 – 10 Amp Red Sunroof/Rain Sensor/Inside Rear View Mirror / USB Port / DSCR / DTV —
If Equipped
F67 – 15 Amp Blue CD/DVD/UCI Port/USB Charging Port
F68 – 20 Amp Yellow Rear Wiper Motor
F69 – 15 Amp Blue Spotlight Feed — If Equipped
F70 – 20 Amp Yellow Fuel Pump Motor
(*)
F71 – 30 Amp Green Amplifier/ANCM — If Equipped
F72 – 10 Amp Red ECM
(*)
F73 – 15 Amp Blue HID Headlamp RH — If Equipped
(*)
F75 – 10 Amp Red Dual Batt Control — If Equipped
F76 – 10 Amp Red Anti-lock Brakes/Electronic Stability Control
(*)
F77 – 10 Amp Red Drivetrain Control Module/Front Axle Disconnect Module — If Equipped
(*)
F78 – 10 Amp Red Engine Control Module/Electric Power Steering
(*)
IN CASE OF EMERGENCY
214
Page 218 of 378
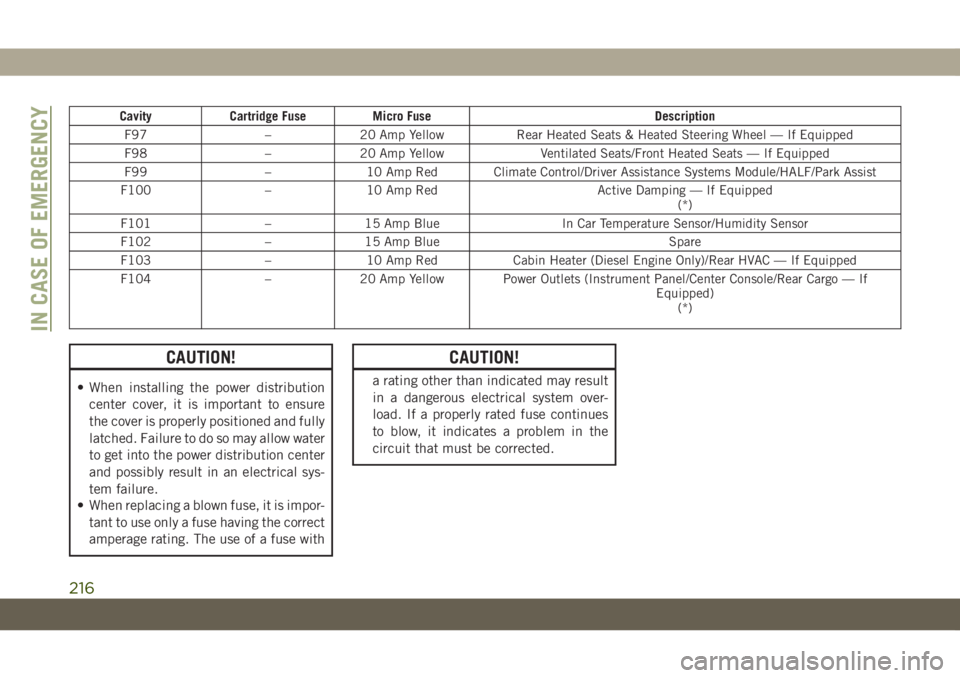
Cavity Cartridge Fuse Micro Fuse Description
F97 – 20 Amp Yellow Rear Heated Seats & Heated Steering Wheel — If Equipped
F98 – 20 Amp Yellow Ventilated Seats/Front Heated Seats — If Equipped
F99 – 10 Amp Red Climate Control/Driver Assistance Systems Module/HALF/Park Assist
F100 – 10 Amp Red Active Damping — If Equipped
(*)
F101 – 15 Amp Blue In Car Temperature Sensor/Humidity Sensor
F102 – 15 Amp Blue Spare
F103 – 10 Amp Red Cabin Heater (Diesel Engine Only)/Rear HVAC — If Equipped
F104 – 20 Amp Yellow Power Outlets (Instrument Panel/Center Console/Rear Cargo — If
Equipped)
(*)
CAUTION!
• When installing the power distribution
center cover, it is important to ensure
the cover is properly positioned and fully
latched. Failure to do so may allow water
to get into the power distribution center
and possibly result in an electrical sys-
tem failure.
• When replacing a blown fuse, it is impor-
tant to use only a fuse having the correct
amperage rating. The use of a fuse with
CAUTION!
a rating other than indicated may result
in a dangerous electrical system over-
load. If a properly rated fuse continues
to blow, it indicates a problem in the
circuit that must be corrected.
IN CASE OF EMERGENCY
216
Page 219 of 378
JACKING AND TIRE
CHANGING
WARNING!
• Do not attempt to change a tire on the
side of the vehicle close to moving traf-
fic. Pull far enough off the road to avoid
the danger of being hit when operating
the jack or changing the wheel.
• Being under a jacked-up vehicle is dan-
gerous. The vehicle could slip off the
jack and fall on you. You could be
crushed. Never put any part of your body
under a vehicle that is on a jack. If you
need to get under a raised vehicle, take
it to a service center where it can be
raised on a lift.
• Never start or run the engine while the
vehicle is on a jack.
• The jack is designed to be used as a tool
for changing tires only. The jack should
not be used to lift the vehicle for service
purposes. The vehicle should be jacked
on a firm level surface only. Avoid ice or
slippery areas.
Run Flat Tires — SRT Models
SRT models are equipped with “run flat”
tires. Run flat tires allow the vehicle to be
driven approximately 50 miles (80 km) at
55 mph (88 km/h). Tire service should be
obtained to avoid prolonged run flat feature
usage.
WARNING!
Do not exceed 50 mph (80 km/h) if the
“Tire Pressure Monitoring Telltale Light” is
illuminated. Vehicle handling and braking
may be reduced. You could have a collision
and be severely or fatally injured.
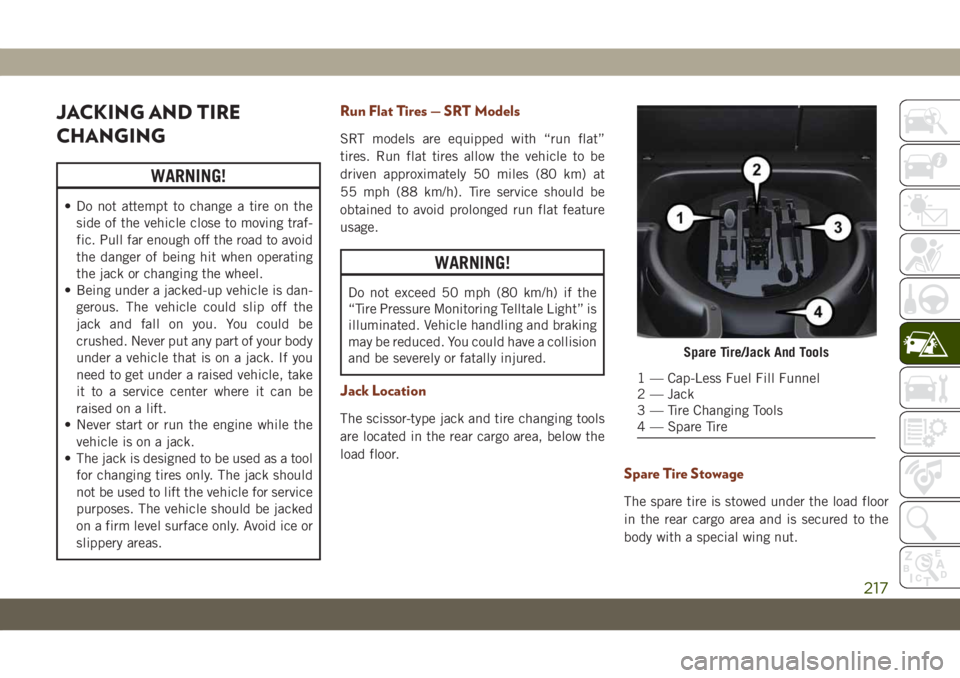
Jack Location
The scissor-type jack and tire changing tools
are located in the rear cargo area, below the
load floor.
Spare Tire Stowage
The spare tire is stowed under the load floor
in the rear cargo area and is secured to the
body with a special wing nut.
Spare Tire/Jack And Tools
1 — Cap-Less Fuel Fill Funnel
2 — Jack
3 — Tire Changing Tools
4 — Spare Tire
217
Page 220 of 378
Preparations For Jacking
CAUTION!
Always lift or jack the vehicle from the
correct jacking points. Failure to follow
this information could cause damage to
the vehicle or underbody components.
NOTE:
To assist with changing a spare tire, the air
suspension system (if equipped) has a fea-
ture which allows the automatic leveling to
be disabled.
1. Park the vehicle on a firm, level surface.
Avoid ice or slippery surfaces.
WARNING!
Do not attempt to change a tire on the side
of the vehicle close to moving traffic. Pull
far enough off the road to avoid being hit
when operating the jack or changing the
wheel.
2. Turn on the Hazard Warning flasher.
3. Apply the parking brake.4. Place the gear selector into PARK.
5. Turn the ignition OFF.
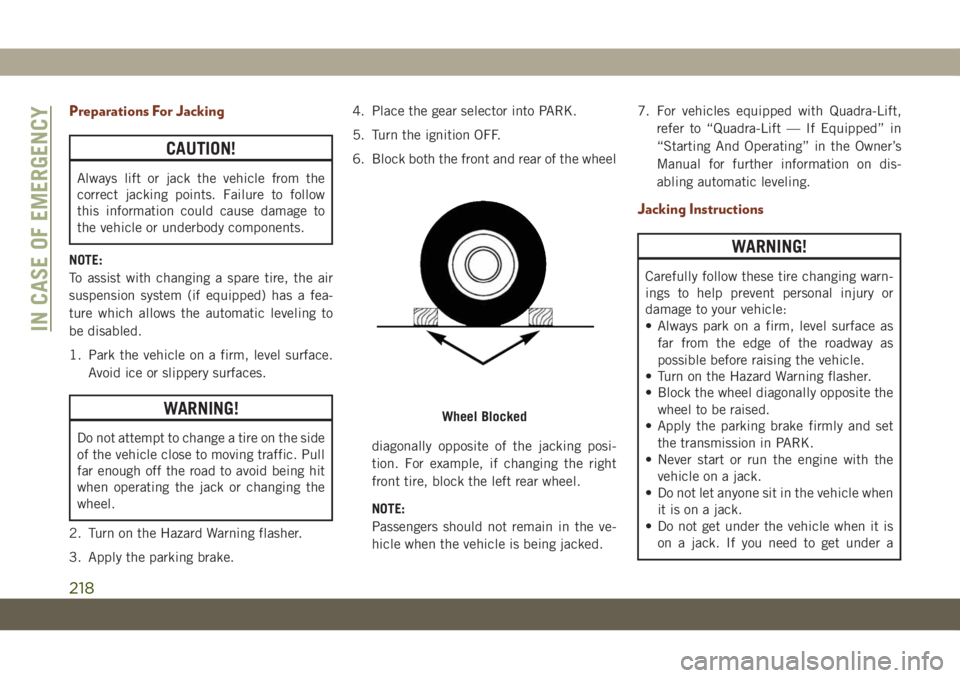
6. Block both the front and rear of the wheel
diagonally opposite of the jacking posi-
tion. For example, if changing the right
front tire, block the left rear wheel.
NOTE:
Passengers should not remain in the ve-
hicle when the vehicle is being jacked.7. For vehicles equipped with Quadra-Lift,
refer to “Quadra-Lift — If Equipped” in
“Starting And Operating” in the Owner’s
Manual for further information on dis-
abling automatic leveling.
Jacking Instructions
WARNING!
Carefully follow these tire changing warn-
ings to help prevent personal injury or
damage to your vehicle:
• Always park on a firm, level surface as
far from the edge of the roadway as
possible before raising the vehicle.
• Turn on the Hazard Warning flasher.
• Block the wheel diagonally opposite the
wheel to be raised.
• Apply the parking brake firmly and set
the transmission in PARK.
• Never start or run the engine with the
vehicle on a jack.
• Do not let anyone sit in the vehicle when
it is on a jack.
• Do not get under the vehicle when it is
on a jack. If you need to get under a
Wheel Blocked
IN CASE OF EMERGENCY
218
Page 227 of 378
Jack Usage Precautions
To complete the Use and Maintenance Hand-
book to which this supplement is attached,
given below are some instructions on the
proper use of the jack.
WARNING!
When using the crank, make sure it turns
freely without the risk of scraping hands
against the ground.
Even the moving parts of the jack, the
“worm screw” and joints can cause inju-
ries: avoid contact with them. Clean it
thoroughly if dirtied with grease.
CAUTION!
The jack is a tool designed exclusively for
changing a wheel, in case of a puncture or
damage to a tire of the vehicle on which it
is fitted or on vehicles of the same model.
Any other use, e.g. to jack up other vehicle
models or different things, is strictly pro-
hibited. Never use it to carry out mainte-
nance or repairs under the vehicle or to
CAUTION!
change summer/winter wheels and vice
versa. Never go under the raised vehicle. If
any work under the vehicle is necessary,
contact an authorized dealer. Incorrect
placing of the jack can cause the vehicle to
drop: use it only in the positions indicated.
Do not use the jack for loads higher than
that specified on the label. Never start the
engine with vehicle raised. If the vehicle is
raised more than necessary, everything
can become more unstable, with the risk of
the vehicle dropping violently. Therefore
raise the vehicle only as much as neces-
sary for the wheel/spare.
Maintenance
• Make sure grime does not build up on the
“worm screw.”
• Keep the “worm screw” lubricated.
• Never modify the jack.
Conditions Of Non-Use:
• Temperatures below −40°F (-40°C).
• On sandy or muddy ground.
• On uneven ground.• On steep roads.
• In extreme weather conditions: thunder-
storms, typhoons, hurricanes, blizzards,
storms, etc.
NOTE:
• The jack requires no adjustment.
• The jack cannot be repaired, and in the
event of a fault, it must be replaced by
another genuine one.
• No tool other than its cranking device may
be fitted on the jack.
JUMP STARTING
If your vehicle has a discharged battery, it can
be jump started using a set of jumper cables
and a battery in another vehicle, or by using a
portable battery booster pack. Jump starting
can be dangerous if done improperly, so
please follow the procedures in this section
carefully.
225
Page 229 of 378
4. If using another vehicle to jump start the
battery, park the vehicle within the jumper
cables reach, apply the parking brake and
make sure the ignition is OFF.
WARNING!
Do not allow vehicles to touch each other
as this could establish a ground connec-
tion and personal injury could result.
Jump Starting Procedure
WARNING!
Failure to follow this jump starting proce-
dure could result in personal injury or
property damage due to battery explosion.
CAUTION!
Failure to follow these procedures could
result in damage to the charging system of
the booster vehicle or the discharged ve-
hicle.NOTE:
Make sure at all times that unused ends of
jumper cables are not contacting each other
or either vehicle while making connections.
Connecting The Jumper Cables
1. Connect the positive(+)end of the jumper
cable to the remote positive(+)post of the
discharged vehicle.
2. Connect the opposite end of the positive
(+)jumper cable to the positive(+)post of
the booster battery.
3. Connect the negative end(-)of the jumper
cable to the negative(-)post of the
booster battery.
4. Connect the opposite end of the negative
(-)jumper cable to the remote negative(-)
post of the vehicle with the discharged
battery.WARNING!
Do not connect the jumper cable to the
negative (-) post of the discharged battery.
The resulting electrical spark could cause
the battery to explode and could result in
WARNING!
personal injury. Only use the specific
ground point, do not use any other exposed
metal parts.
5. Start the engine in the vehicle that has the
booster battery, let the engine idle a few
minutes, and then start the engine in the
vehicle with the discharged battery.
CAUTION!
Do not run the booster vehicle engine
above 2,000 rpm since it provides no
charging benefit, wastes fuel, and can
damage booster vehicle engine.
6. Once the engine is started, remove the
jumper cables in the reverse sequence:
Disconnecting The Jumper Cables
1. Disconnect the negative(-)end of the
jumper cable from the remote negative(-)
post of the discharged vehicle.
2. Disconnect the opposite end of the nega-
tive(-)jumper cable from the negative(-)
post of the booster battery.
227
Page 230 of 378
3. Disconnect the positive(+)end of the
jumper cable from the positive(+)post of
the booster battery.
4. Disconnect the opposite end of the posi-
tive(+)jumper cable from the remote
positive(+)post of the discharged
vehicle.
5. Reinstall the protective cover over the
remote positive(+)post of the discharged
vehicle.
If frequent jump starting is required to start
your vehicle you should have the battery and
charging system tested at an authorized
dealer.
CAUTION!
Accessories plugged into the vehicle
power outlets draw power from the vehi-
cle’s battery, even when not in use (i.e.,
cellular devices, etc.). Eventually, if
plugged in long enough without engine
operation, the vehicle’s battery will dis-
charge sufficiently to degrade battery life
and/or prevent the engine from starting.
REFUELING IN EMERGENCY
The funnel for the Cap-Less Fuel System is
located in the spare tire storage area. If your
vehicle is out of fuel and an auxiliary fuel can
is needed, insert the funnel into the filler
neck and proceed to fill the vehicle.
For more information on the Cap-Less Fuel
System refer to “Refueling The Vehicle” in
“Starting And Operating”.
IF YOUR ENGINE
OVERHEATS
In any of the following situations, you can
reduce the potential for overheating by taking
the appropriate action.
• On the highways — slow down.
• In city traffic — while stopped, place the
transmission in NEUTRAL, but do not in-
crease the engine idle speed while prevent-
ing vehicle motion with the brakes.NOTE:
There are steps that you can take to slow
down an impending overheat condition:
• If your air conditioner (A/C) is on, turn it off.
The A/C system adds heat to the engine
cooling system and turning the A/C off can
help remove this heat.
• You can also turn the temperature control
to maximum heat, the mode control to floor
and the blower control to high. This allows
the heater core to act as a supplement to
the radiator and aids in removing heat from
the engine cooling system.WARNING!
You or others can be badly burned by hot
engine coolant (antifreeze) or steam from
your radiator. If you see or hear steam
coming from under the hood, do not open
the hood until the radiator has had time to
cool. Never try to open a cooling system
pressure cap when the radiator or coolant
bottle is hot.
IN CASE OF EMERGENCY
228
Page 231 of 378
CAUTION!
Driving with a hot cooling system could
damage your vehicle. If the temperature
gauge reads HOT (H), pull over and stop
the vehicle. Idle the vehicle with the air
conditioner turned off until the pointer
drops back into the normal range. If the
pointer remains on HOT (H), and you hear
continuous chimes, turn the engine off
immediately and call for service.
MANUAL PARK RELEASE
WARNING!
Always secure your vehicle by fully apply-
ing the parking brake before activating the
Manual Park Release. In addition, you
should be seated in the driver’s seat with
your foot firmly on the brake pedal when
activating the Manual Park Release. Acti-
vating the Manual Park Release will allow
your vehicle to roll away if it is not secured
by the parking brake, or by proper connec-
tion to a tow vehicle. Activating the
WARNING!
Manual Park Release on an unsecured
vehicle could lead to serious injury or
death for those in or around the vehicle.
In order to move the vehicle in cases where
the transmission will not shift out of PARK
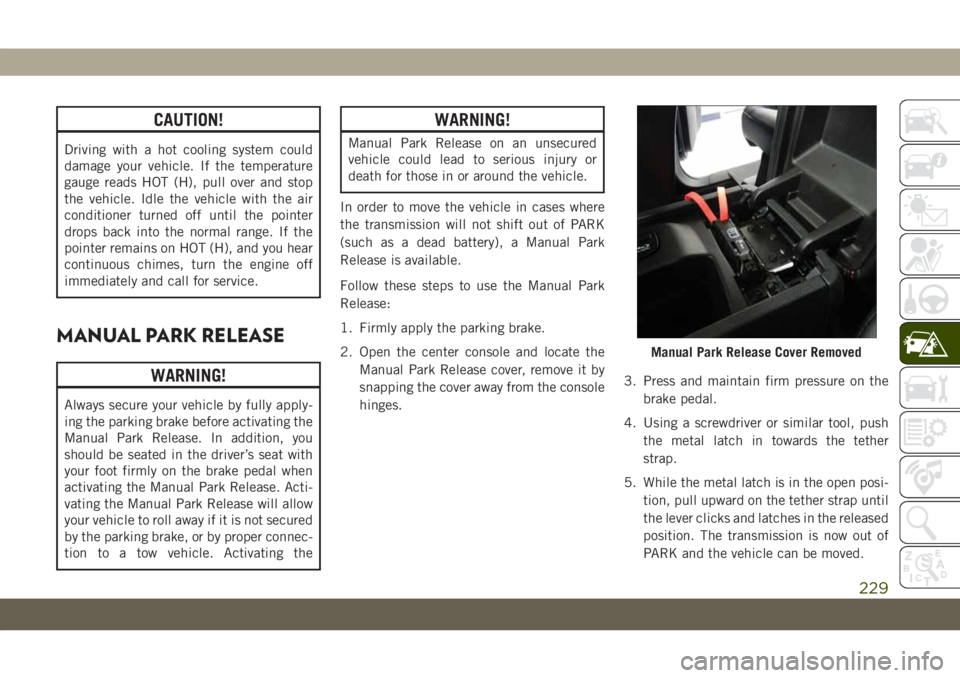
(such as a dead battery), a Manual Park
Release is available.
Follow these steps to use the Manual Park
Release:
1. Firmly apply the parking brake.
2. Open the center console and locate the
Manual Park Release cover, remove it by
snapping the cover away from the console
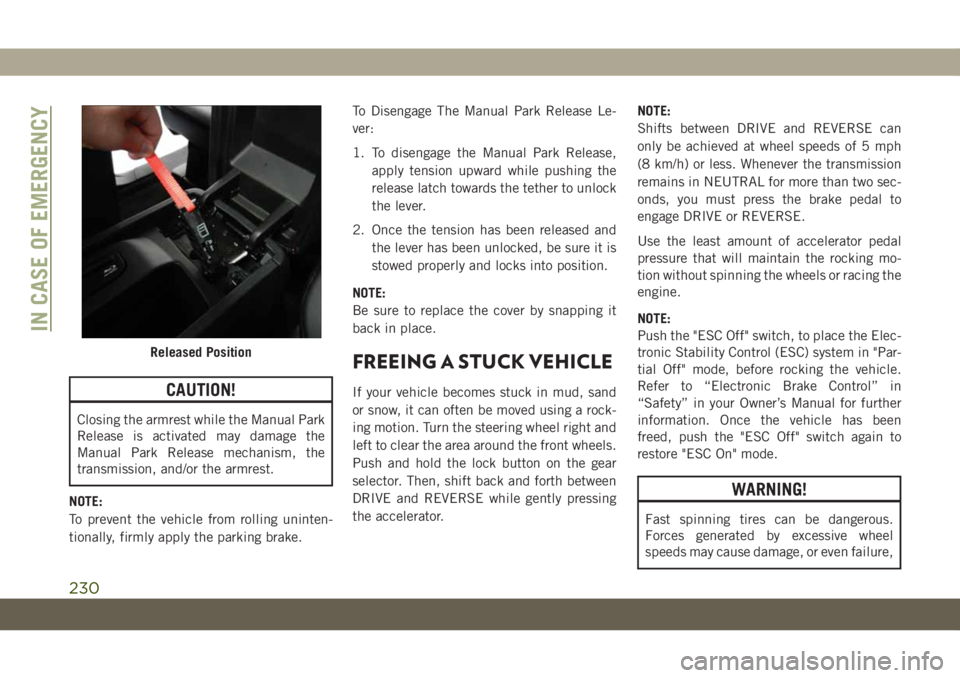
hinges.3. Press and maintain firm pressure on the
brake pedal.
4. Using a screwdriver or similar tool, push
the metal latch in towards the tether
strap.
5. While the metal latch is in the open posi-
tion, pull upward on the tether strap until
the lever clicks and latches in the released
position. The transmission is now out of
PARK and the vehicle can be moved.
Manual Park Release Cover Removed
229
Page 232 of 378
CAUTION!
Closing the armrest while the Manual Park
Release is activated may damage the
Manual Park Release mechanism, the
transmission, and/or the armrest.
NOTE:
To prevent the vehicle from rolling uninten-
tionally, firmly apply the parking brake.To Disengage The Manual Park Release Le-
ver:
1. To disengage the Manual Park Release,
apply tension upward while pushing the
release latch towards the tether to unlock
the lever.
2. Once the tension has been released and
the lever has been unlocked, be sure it is
stowed properly and locks into position.
NOTE:
Be sure to replace the cover by snapping it
back in place.
FREEING A STUCK VEHICLE
If your vehicle becomes stuck in mud, sand
or snow, it can often be moved using a rock-
ing motion. Turn the steering wheel right and
left to clear the area around the front wheels.
Push and hold the lock button on the gear
selector. Then, shift back and forth between
DRIVE and REVERSE while gently pressing
the accelerator.NOTE:
Shifts between DRIVE and REVERSE can
only be achieved at wheel speeds of 5 mph
(8 km/h) or less. Whenever the transmission
remains in NEUTRAL for more than two sec-
onds, you must press the brake pedal to
engage DRIVE or REVERSE.
Use the least amount of accelerator pedal
pressure that will maintain the rocking mo-
tion without spinning the wheels or racing the
engine.
NOTE:
Push the "ESC Off" switch, to place the Elec-
tronic Stability Control (ESC) system in "Par-
tial Off" mode, before rocking the vehicle.
Refer to “Electronic Brake Control” in
“Safety” in your Owner’s Manual for further
information. Once the vehicle has been
freed, push the "ESC Off" switch again to
restore "ESC On" mode.
WARNING!
Fast spinning tires can be dangerous.
Forces generated by excessive wheel
speeds may cause damage, or even failure,
Released Position
IN CASE OF EMERGENCY
230
Page 233 of 378
WARNING!
of the axle and tires. A tire could explode
and injure someone. Do not spin your
vehicle's wheels faster than 30 mph
(48 km/h) or for longer than 30 seconds
continuously without stopping when you
are stuck and do not let anyone near a
spinning wheel, no matter what the speed.
CAUTION!
• Racing the engine or spinning the
wheels may lead to transmission over-
heating and failure. Allow the engine to
idle with the transmission in NEUTRAL
for at least one minute after every five
rocking-motion cycles. This will mini-
mize overheating and reduce the risk of
transmission failure during prolonged
efforts to free a stuck vehicle.
CAUTION!
• When “rocking” a stuck vehicle by shift-
ing between DRIVE and REVERSE, do
not spin the wheels faster than 15 mph
(24 km/h), or drivetrain damage may
result.
• Revving the engine or spinning the
wheels too fast may lead to transmission
overheating and failure. It can also dam-
age the tires. Do not spin the wheels
above 30 mph (48 km/h) while in gear
(no transmission shifting occurring).
TOWING A DISABLED
VEHICLE
This section describes procedures for towing
a disabled vehicle using a commercial towing
service. If the transmission and drivetrain are
operable, disabled vehicles may also be
towed as described under “Recreational Tow-
ing” in the “Starting And Operating” section
of the Owner’s Manual.
NOTE:
Vehicles equipped with Quadra-Lift must be
placed in Transport mode, before tying them
down (from the body) on a trailer or flatbed
truck. Refer to the section on Quadra-Lift for
more information. If the vehicle cannot be
placed in Transport mode (for example, en-
gine will not run), tie-downs should be fas-
tened over the tires using specific tire tie-
down nets. Failure to follow these
instructions may cause fault codes to be set
and/or cause loss of proper tie-down tension.
231