display JEEP GRAND CHEROKEE 2020 Owner handbook (in English)
[x] Cancel search | Manufacturer: JEEP, Model Year: 2020, Model line: GRAND CHEROKEE, Model: JEEP GRAND CHEROKEE 2020Pages: 378, PDF Size: 6.88 MB
Page 318 of 378
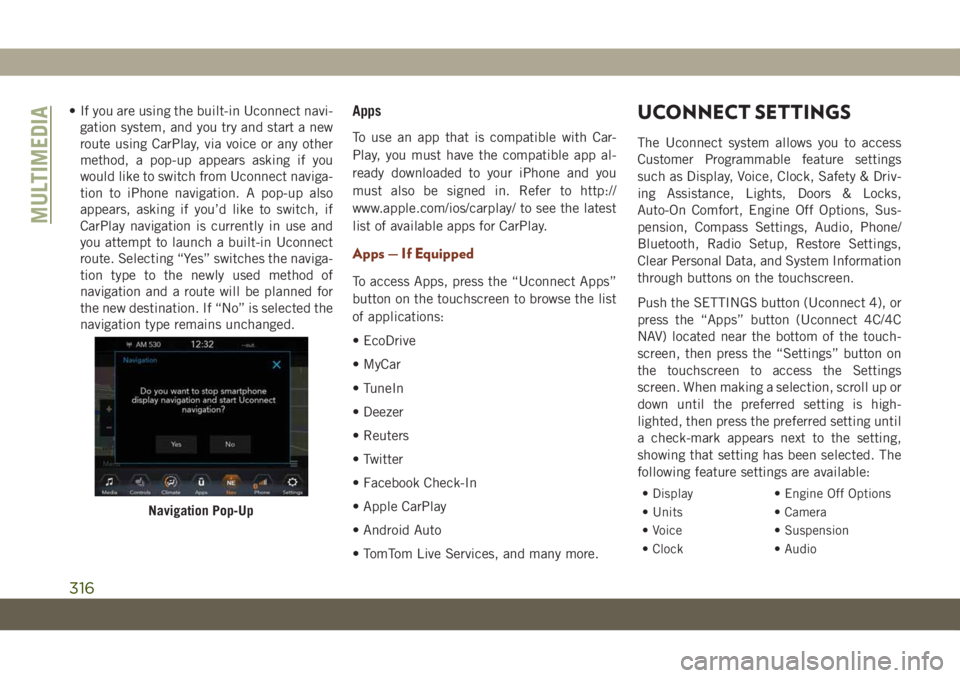
• If you are using the built-in Uconnect navi-
gation system, and you try and start a new
route using CarPlay, via voice or any other
method, a pop-up appears asking if you
would like to switch from Uconnect naviga-
tion to iPhone navigation. A pop-up also
appears, asking if you’d like to switch, if
CarPlay navigation is currently in use and
you attempt to launch a built-in Uconnect
route. Selecting “Yes” switches the naviga-
tion type to the newly used method of
navigation and a route will be planned for
the new destination. If “No” is selected the
navigation type remains unchanged.Apps
To use an app that is compatible with Car-
Play, you must have the compatible app al-
ready downloaded to your iPhone and you
must also be signed in. Refer to http://
www.apple.com/ios/carplay/ to see the latest
list of available apps for CarPlay.
Apps — If Equipped
To access Apps, press the “Uconnect Apps”
button on the touchscreen to browse the list
of applications:
• EcoDrive
• MyCar
• TuneIn
• Deezer
• Reuters
• Twitter
• Facebook Check-In
• Apple CarPlay
• Android Auto
• TomTom Live Services, and many more.
UCONNECT SETTINGS
The Uconnect system allows you to access
Customer Programmable feature settings
such as Display, Voice, Clock, Safety & Driv-
ing Assistance, Lights, Doors & Locks,
Auto-On Comfort, Engine Off Options, Sus-
pension, Compass Settings, Audio, Phone/
Bluetooth, Radio Setup, Restore Settings,
Clear Personal Data, and System Information
through buttons on the touchscreen.
Push the SETTINGS button (Uconnect 4), or
press the “Apps” button (Uconnect 4C/4C
NAV) located near the bottom of the touch-
screen, then press the “Settings” button on
the touchscreen to access the Settings
screen. When making a selection, scroll up or
down until the preferred setting is high-
lighted, then press the preferred setting until
a check-mark appears next to the setting,
showing that setting has been selected. The
following feature settings are available:
• Display • Engine Off Options
• Units • Camera
• Voice • Suspension
• Clock • Audio
Navigation Pop-Up
MULTIMEDIA
316
Page 320 of 378
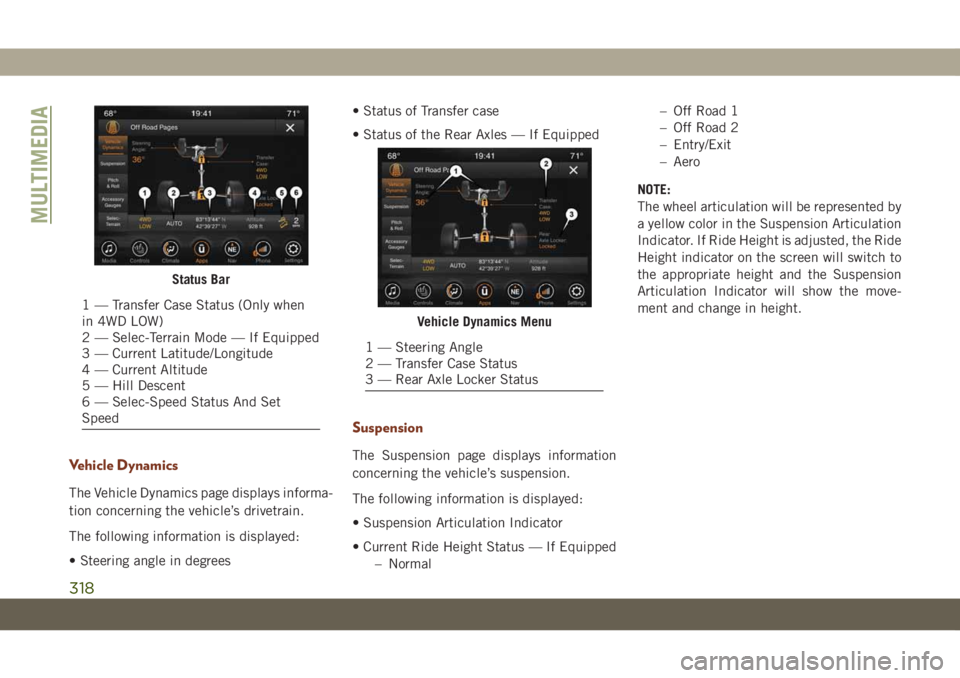
Vehicle Dynamics
The Vehicle Dynamics page displays informa-
tion concerning the vehicle’s drivetrain.
The following information is displayed:
• Steering angle in degrees• Status of Transfer case
• Status of the Rear Axles — If Equipped
Suspension
The Suspension page displays information
concerning the vehicle’s suspension.
The following information is displayed:
• Suspension Articulation Indicator
• Current Ride Height Status — If Equipped
– Normal– Off Road 1
– Off Road 2
– Entry/Exit
– Aero
NOTE:
The wheel articulation will be represented by
a yellow color in the Suspension Articulation
Indicator. If Ride Height is adjusted, the Ride
Height indicator on the screen will switch to
the appropriate height and the Suspension
Articulation Indicator will show the move-
ment and change in height.
Status Bar
1 — Transfer Case Status (Only when
in 4WD LOW)
2 — Selec-Terrain Mode — If Equipped
3 — Current Latitude/Longitude
4 — Current Altitude
5 — Hill Descent
6 — Selec-Speed Status And Set
Speed
Vehicle Dynamics Menu
1 — Steering Angle
2 — Transfer Case Status
3 — Rear Axle Locker Status
MULTIMEDIA
318
Page 321 of 378
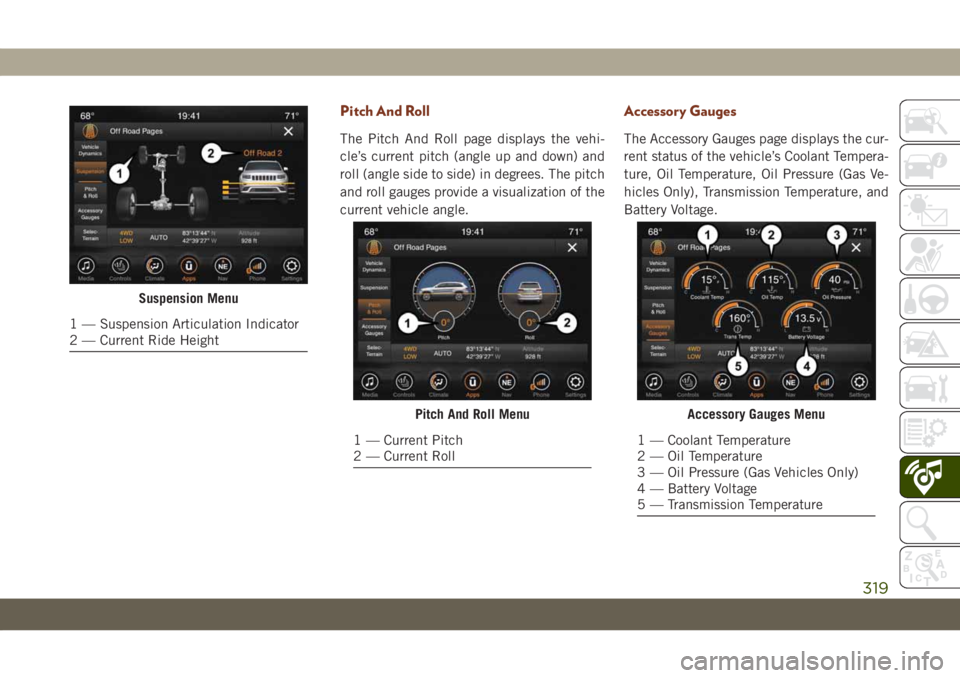
Pitch And Roll
The Pitch And Roll page displays the vehi-
cle’s current pitch (angle up and down) and
roll (angle side to side) in degrees. The pitch
and roll gauges provide a visualization of the
current vehicle angle.
Accessory Gauges
The Accessory Gauges page displays the cur-
rent status of the vehicle’s Coolant Tempera-
ture, Oil Temperature, Oil Pressure (Gas Ve-
hicles Only), Transmission Temperature, and
Battery Voltage.
Suspension Menu
1 — Suspension Articulation Indicator
2 — Current Ride Height
Pitch And Roll Menu
1 — Current Pitch
2 — Current Roll
Accessory Gauges Menu
1 — Coolant Temperature
2 — Oil Temperature
3 — Oil Pressure (Gas Vehicles Only)
4 — Battery Voltage
5 — Transmission Temperature
319
Page 322 of 378
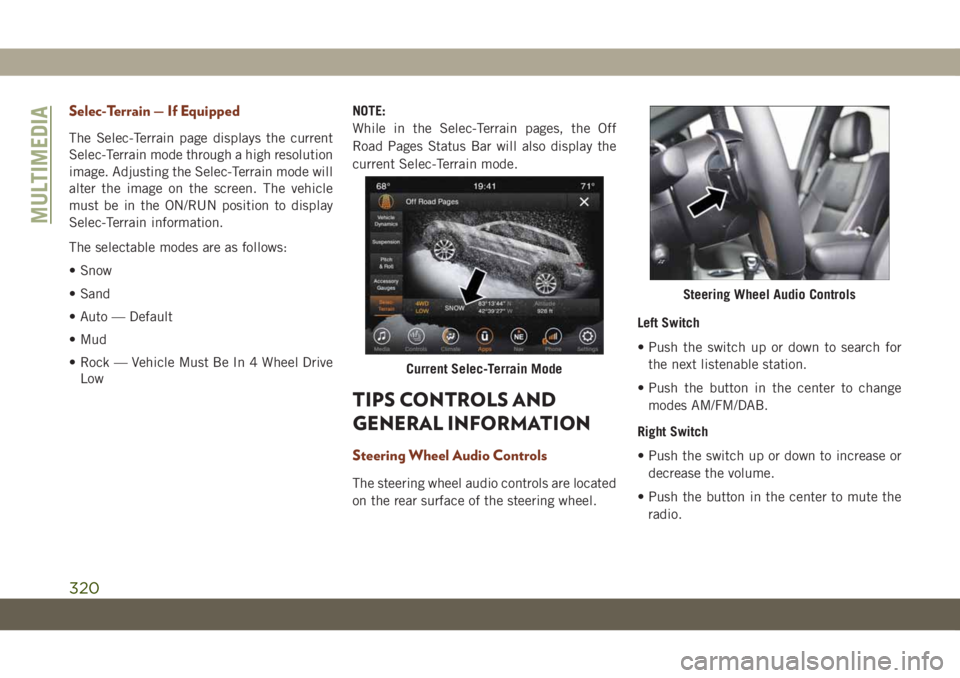
Selec-Terrain — If Equipped
The Selec-Terrain page displays the current
Selec-Terrain mode through a high resolution
image. Adjusting the Selec-Terrain mode will
alter the image on the screen. The vehicle
must be in the ON/RUN position to display
Selec-Terrain information.
The selectable modes are as follows:
• Snow
• Sand
• Auto — Default
• Mud
• Rock — Vehicle Must Be In 4 Wheel Drive
LowNOTE:
While in the Selec-Terrain pages, the Off
Road Pages Status Bar will also display the
current Selec-Terrain mode.
TIPS CONTROLS AND
GENERAL INFORMATION
Steering Wheel Audio Controls
The steering wheel audio controls are located
on the rear surface of the steering wheel.Left Switch
• Push the switch up or down to search for
the next listenable station.
• Push the button in the center to change
modes AM/FM/DAB.
Right Switch
• Push the switch up or down to increase or
decrease the volume.
• Push the button in the center to mute the
radio.
Current Selec-Terrain Mode
Steering Wheel Audio Controls
MULTIMEDIA
320
Page 323 of 378
Reception Conditions
Reception conditions change constantly
while driving. Reception may be interfered
with by the presence of mountains, buildings
or bridges, especially when you are far away
from the broadcaster.
The volume may be increased when receiving
traffic alerts and news.
Care And Maintenance
Observe the following precautions to ensure
the system is fully operational:
• The display lens should not come into con-
tact with pointed or rigid objects which
could damage its surface; use a soft, dry,
anti-static cloth to clean and do not press.
• Never use alcohol, gas and derivatives to
clean the display lens.
• Prevent any liquid from entering the sys-
tem: this could damage it beyond repair.
Anti-Theft Protection
The system is equipped with an anti-theft
protection system based on the exchange of
information with the electronic control unit
(Body Computer) on the vehicle. This guaran-
tees maximum safety.
If the check has a positive outcome, the
system will start to operate. See an autho-
rized dealer for further information.
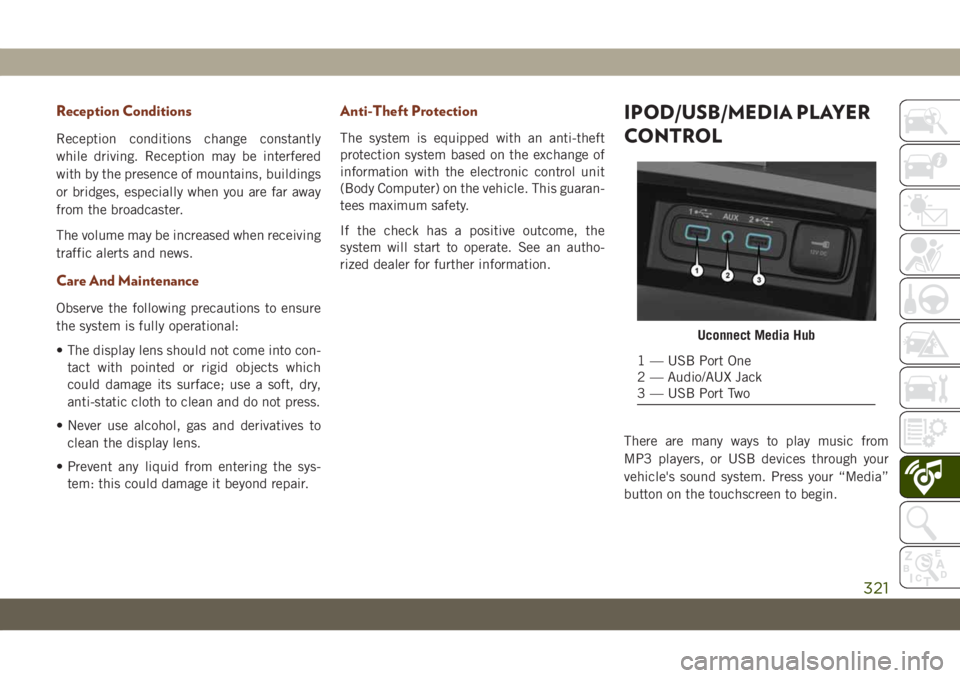
IPOD/USB/MEDIA PLAYER
CONTROL
There are many ways to play music from
MP3 players, or USB devices through your
vehicle's sound system. Press your “Media”
button on the touchscreen to begin.
Uconnect Media Hub
1 — USB Port One
2 — Audio/AUX Jack
3 — USB Port Two
321
Page 324 of 378
Audio Jack (AUX)
• The AUX allows a device to be plugged into
the radio and utilize the vehicle’s sound
system, using a 3.5 mm audio cable, to
amplify the source and play through the
vehicle speakers.
• Pressing the “AUX” button on the touch-
screen will change the mode to auxiliary
device if the audio jack is connected, allow-
ing the music from your device to be heard
through the vehicle's speakers. To activate
the AUX, plug in the audio jack.
• The functions of the device are controlled
using the device buttons. The volume may
be controlled using the radio or device.
USB Port
• Connect your compatible device into the
USB Port using a USB cable. USB Memory
sticks with audio files can also be used.
Audio from the device can be played on the
vehicle’s sound system while providing
metadata (artist, track title, album, etc.)
information on the radio display.• When connected, the compatible USB de-
vice can be controlled using the radio or
Steering Wheel Audio Controls to play, skip
to the next or previous track, browse, and
list the contents.
• The battery charges when plugged into the
USB port (if supported by the specific de-
vice).
• To route the USB cable out of the center
console, use the access cut out.
NOTE:
When connecting your device for the first
time, the system may take several minutes to
read your music, depending on the number of
files. For example, the system will take ap-
proximately five minutes for every
1,000 songs loaded on the device. Also dur-
ing the reading process, the Shuffle and
Browse functions will be disabled. This pro-
cess is needed to ensure the full use of your
features and only happens the first time it is
connected. After the first time, the reading
process of your device will take considerably
less time unless changes are made or new
songs are added to the playlist.
Bluetooth Streaming Audio
If using a Bluetooth equipped device you may
also be able to stream music to your vehicle's
sound system. Your connected device must
be Bluetooth compatible and paired with
your system (see Uconnect Phone for pairing
instructions). You can access the music from
your connected Bluetooth device by pressing
the “Bluetooth” button on the touchscreen
while in Media mode.
UCONNECT REAR SEAT
ENTERTAINMENT (RSE)
SYSTEM — IF EQUIPPED
Your Rear Seat Entertainment System is de-
signed to give your family years of enjoyment.
You can play your favorite CDs, DVDs or
Blu-ray Discs, listen to audio over the wire-
less headphones, or plug and play a variety of
standard video games or audio devices.
Getting Started
•Screen(s) located in the rear of front seats:
Open the LCD screen cover by lifting up on
the cover.
MULTIMEDIA
322
Page 326 of 378
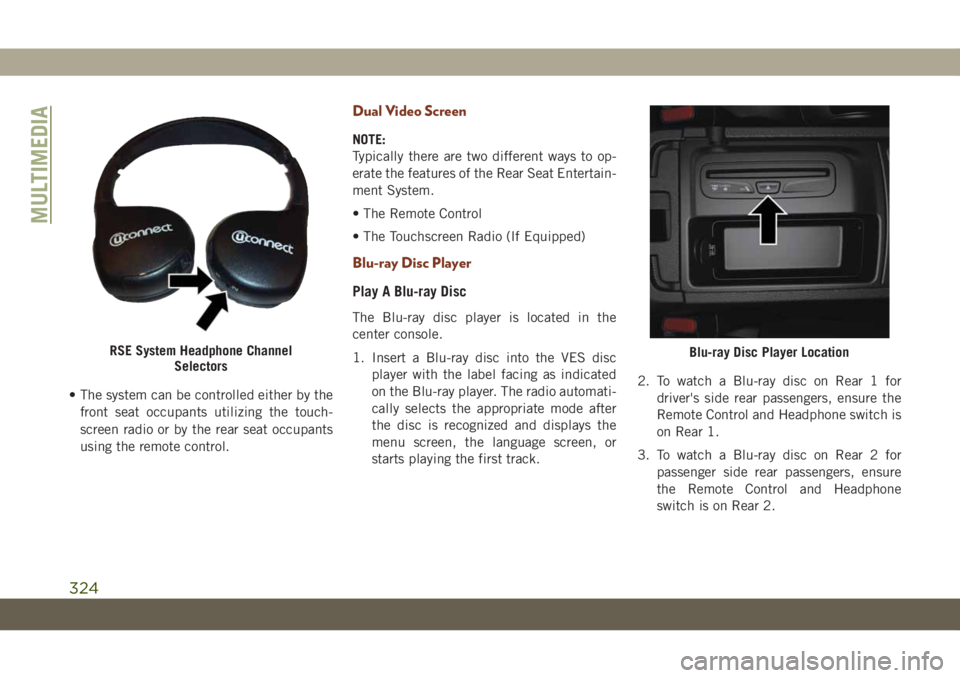
• The system can be controlled either by the
front seat occupants utilizing the touch-
screen radio or by the rear seat occupants
using the remote control.
Dual Video Screen
NOTE:
Typically there are two different ways to op-
erate the features of the Rear Seat Entertain-
ment System.
• The Remote Control
• The Touchscreen Radio (If Equipped)
Blu-ray Disc Player
Play A Blu-ray Disc
The Blu-ray disc player is located in the
center console.
1. Insert a Blu-ray disc into the VES disc
player with the label facing as indicated
on the Blu-ray player. The radio automati-
cally selects the appropriate mode after
the disc is recognized and displays the
menu screen, the language screen, or
starts playing the first track.2. To watch a Blu-ray disc on Rear 1 for
driver's side rear passengers, ensure the
Remote Control and Headphone switch is
on Rear 1.
3. To watch a Blu-ray disc on Rear 2 for
passenger side rear passengers, ensure
the Remote Control and Headphone
switch is on Rear 2.
RSE System Headphone Channel
SelectorsBlu-ray Disc Player Location
MULTIMEDIA
324
Page 329 of 378
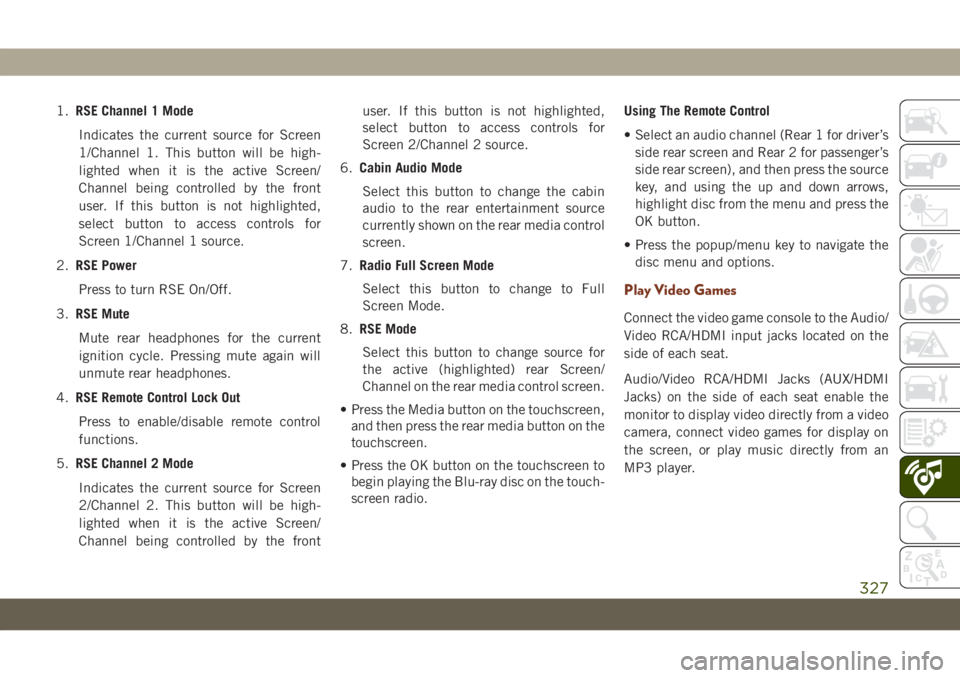
1.RSE Channel 1 Mode
Indicates the current source for Screen
1/Channel 1. This button will be high-
lighted when it is the active Screen/
Channel being controlled by the front
user. If this button is not highlighted,
select button to access controls for
Screen 1/Channel 1 source.
2.RSE Power
Press to turn RSE On/Off.
3.RSE Mute
Mute rear headphones for the current
ignition cycle. Pressing mute again will
unmute rear headphones.
4.RSE Remote Control Lock Out
Press to enable/disable remote control
functions.
5.RSE Channel 2 Mode
Indicates the current source for Screen
2/Channel 2. This button will be high-
lighted when it is the active Screen/
Channel being controlled by the frontuser. If this button is not highlighted,
select button to access controls for
Screen 2/Channel 2 source.
6.Cabin Audio Mode
Select this button to change the cabin
audio to the rear entertainment source
currently shown on the rear media control
screen.
7.Radio Full Screen Mode
Select this button to change to Full
Screen Mode.
8.RSE Mode
Select this button to change source for
the active (highlighted) rear Screen/
Channel on the rear media control screen.
• Press the Media button on the touchscreen,
and then press the rear media button on the
touchscreen.
• Press the OK button on the touchscreen to
begin playing the Blu-ray disc on the touch-
screen radio.Using The Remote Control
• Select an audio channel (Rear 1 for driver’s
side rear screen and Rear 2 for passenger’s
side rear screen), and then press the source
key, and using the up and down arrows,
highlight disc from the menu and press the
OK button.
• Press the popup/menu key to navigate the
disc menu and options.
Play Video Games
Connect the video game console to the Audio/
Video RCA/HDMI input jacks located on the
side of each seat.
Audio/Video RCA/HDMI Jacks (AUX/HDMI
Jacks) on the side of each seat enable the
monitor to display video directly from a video
camera, connect video games for display on
the screen, or play music directly from an
MP3 player.
327
Page 330 of 378
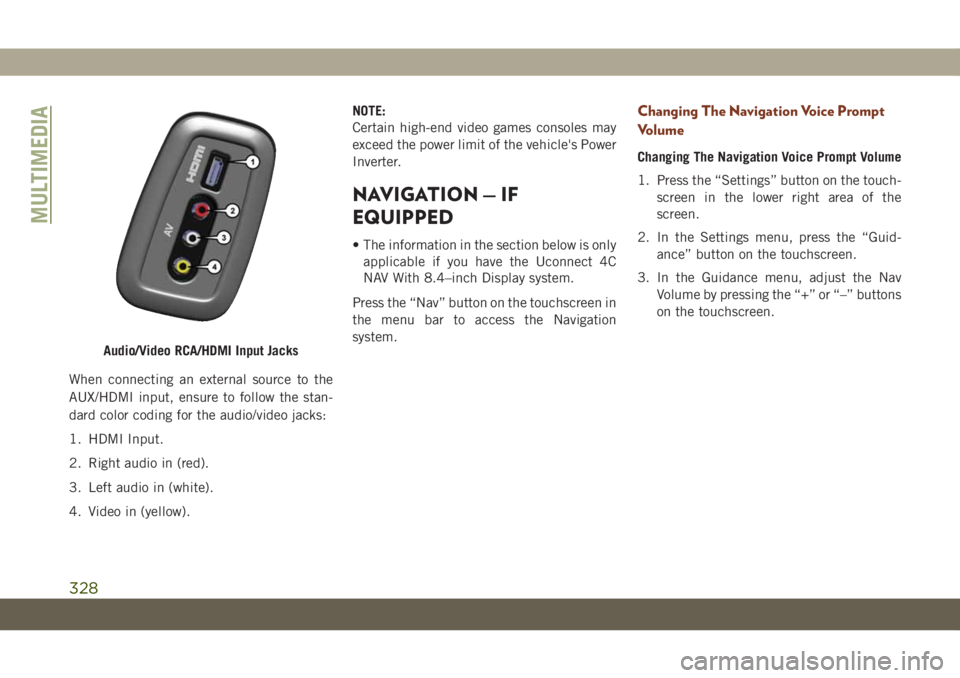
When connecting an external source to the
AUX/HDMI input, ensure to follow the stan-
dard color coding for the audio/video jacks:
1. HDMI Input.
2. Right audio in (red).
3. Left audio in (white).
4. Video in (yellow).NOTE:
Certain high-end video games consoles may
exceed the power limit of the vehicle's Power
Inverter.
NAVIGATION — IF
EQUIPPED
• The information in the section below is only
applicable if you have the Uconnect 4C
NAV With 8.4–inch Display system.
Press the “Nav” button on the touchscreen in
the menu bar to access the Navigation
system.
Changing The Navigation Voice Prompt
Volume
Changing The Navigation Voice Prompt Volume
1. Press the “Settings” button on the touch-
screen in the lower right area of the
screen.
2. In the Settings menu, press the “Guid-
ance” button on the touchscreen.
3. In the Guidance menu, adjust the Nav
Volume by pressing the “+” or “–” buttons
on the touchscreen.
Audio/Video RCA/HDMI Input Jacks
MULTIMEDIA
328
Page 331 of 378
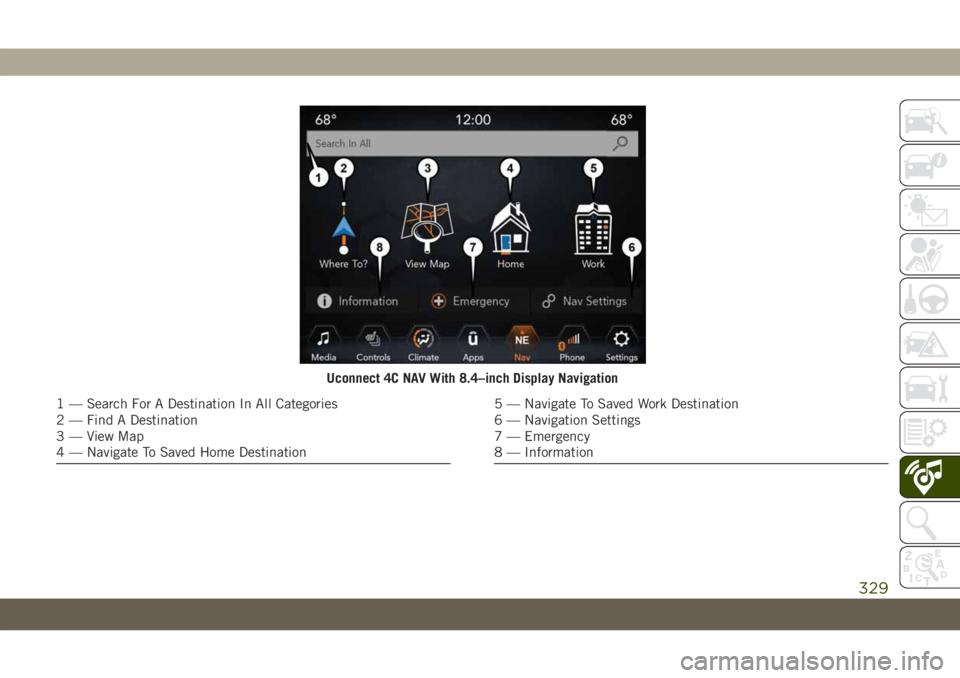
Uconnect 4C NAV With 8.4–inch Display Navigation
1 — Search For A Destination In All Categories
2 — Find A Destination
3 — View Map
4 — Navigate To Saved Home Destination5 — Navigate To Saved Work Destination
6 — Navigation Settings
7 — Emergency
8 — Information
329