wheel JEEP GRAND CHEROKEE 2023 Owners Manual
[x] Cancel search | Manufacturer: JEEP, Model Year: 2023, Model line: GRAND CHEROKEE, Model: JEEP GRAND CHEROKEE 2023Pages: 424, PDF Size: 15.48 MB
Page 313 of 424
IN CASE OF EMERGENCY311
NOTE:Before changing a tire or using the jack please
disable the hands free lift gate, This feature can be
disabled through the Uconnect system
Úpage 219.
PREPARATIONS FOR JACKING
1. Park the vehicle on a firm, level surface as far
from the edge of the roadway as possible.
Avoid icy or slippery areas.
2. Turn on the Hazard Warning Flashers.
3. Apply the parking brake.
4. Place the gear selector into PARK (P).
5. Turn OFF the ignition.
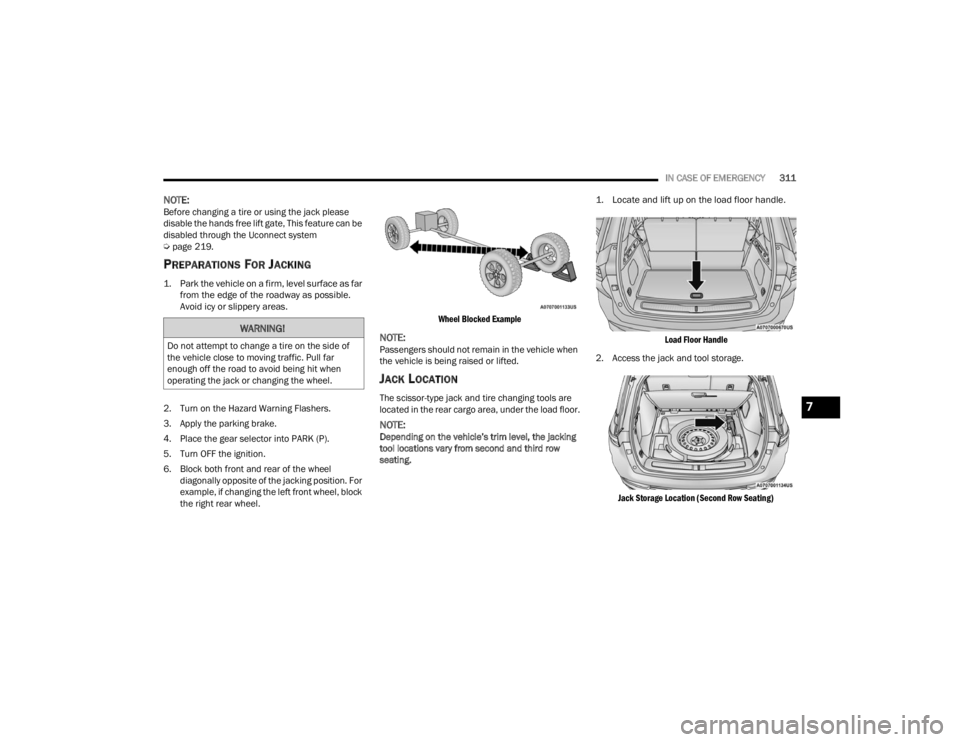
6. Block both front and rear of the wheel diagonally opposite of the jacking position. For
example, if changing the left front wheel, block
the right rear wheel.
Wheel Blocked Example
NOTE:Passengers should not remain in the vehicle when
the vehicle is being raised or lifted.
JACK LOCATION
The scissor-type jack and tire changing tools are
located in the rear cargo area, under the load floor.
NOTE:Depending on the vehicle’s trim level, the jacking
tool locations vary from second and third row
seating.
1. Locate and lift up on the load floor handle.
Load Floor Handle
2. Access the jack and tool storage.
Jack Storage Location (Second Row Seating)
WARNING!
Do not attempt to change a tire on the side of
the vehicle close to moving traffic. Pull far
enough off the road to avoid being hit when
operating the jack or changing the wheel.
7
23_WL_OM_EN_USC_t.book Page 311
Page 317 of 424
IN CASE OF EMERGENCY315
(Continued)
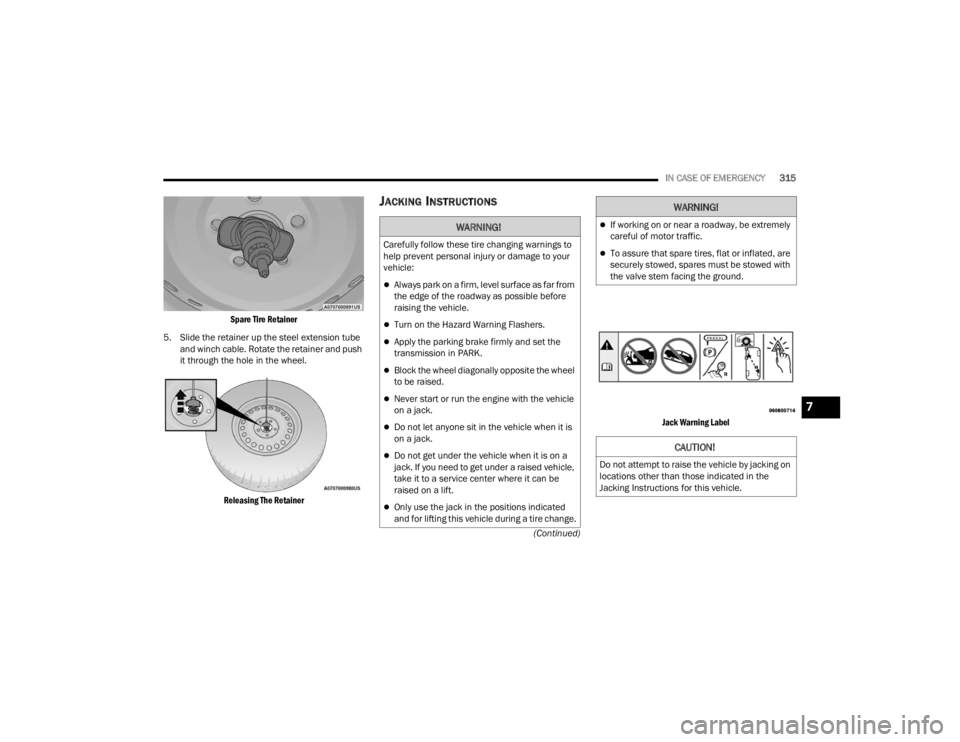
Spare Tire Retainer
5. Slide the retainer up the steel extension tube and winch cable. Rotate the retainer and push
it through the hole in the wheel.
Releasing The Retainer
JACKING INSTRUCTIONS
Jack Warning Label
WARNING!
Carefully follow these tire changing warnings to
help prevent personal injury or damage to your
vehicle:
Always park on a firm, level surface as far from
the edge of the roadway as possible before
raising the vehicle.
Turn on the Hazard Warning Flashers.
Apply the parking brake firmly and set the
transmission in PARK.
Block the wheel diagonally opposite the wheel
to be raised.
Never start or run the engine with the vehicle
on a jack.
Do not let anyone sit in the vehicle when it is
on a jack.
Do not get under the vehicle when it is on a
jack. If you need to get under a raised vehicle,
take it to a service center where it can be
raised on a lift.
Only use the jack in the positions indicated
and for lifting this vehicle during a tire change.
If working on or near a roadway, be extremely
careful of motor traffic.
To assure that spare tires, flat or inflated, are
securely stowed, spares must be stowed with
the valve stem facing the ground.
CAUTION!
Do not attempt to raise the vehicle by jacking on
locations other than those indicated in the
Jacking Instructions for this vehicle.
WARNING!
7
23_WL_OM_EN_USC_t.book Page 315
Page 318 of 424
316IN CASE OF EMERGENCY
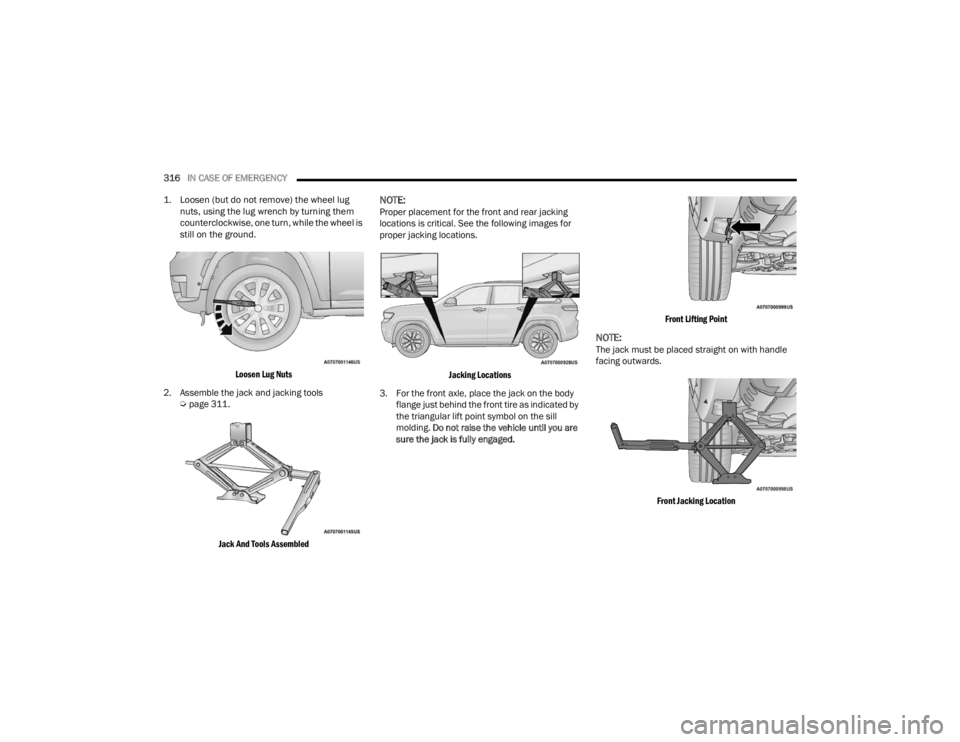
1. Loosen (but do not remove) the wheel lug nuts, using the lug wrench by turning them
counterclockwise, one turn, while the wheel is
still on the ground.
Loosen Lug Nuts
2. Assemble the jack and jacking tools Úpage 311.
Jack And Tools Assembled
NOTE:Proper placement for the front and rear jacking
locations is critical. See the following images for
proper jacking locations.
Jacking Locations
3. For the front axle, place the jack on the body flange just behind the front tire as indicated by
the triangular lift point symbol on the sill
molding. Do not raise the vehicle until you are
sure the jack is fully engaged.
Front Lifting Point
NOTE:The jack must be placed straight on with handle
facing outwards.
Front Jacking Location
23_WL_OM_EN_USC_t.book Page 316
Page 319 of 424
IN CASE OF EMERGENCY317
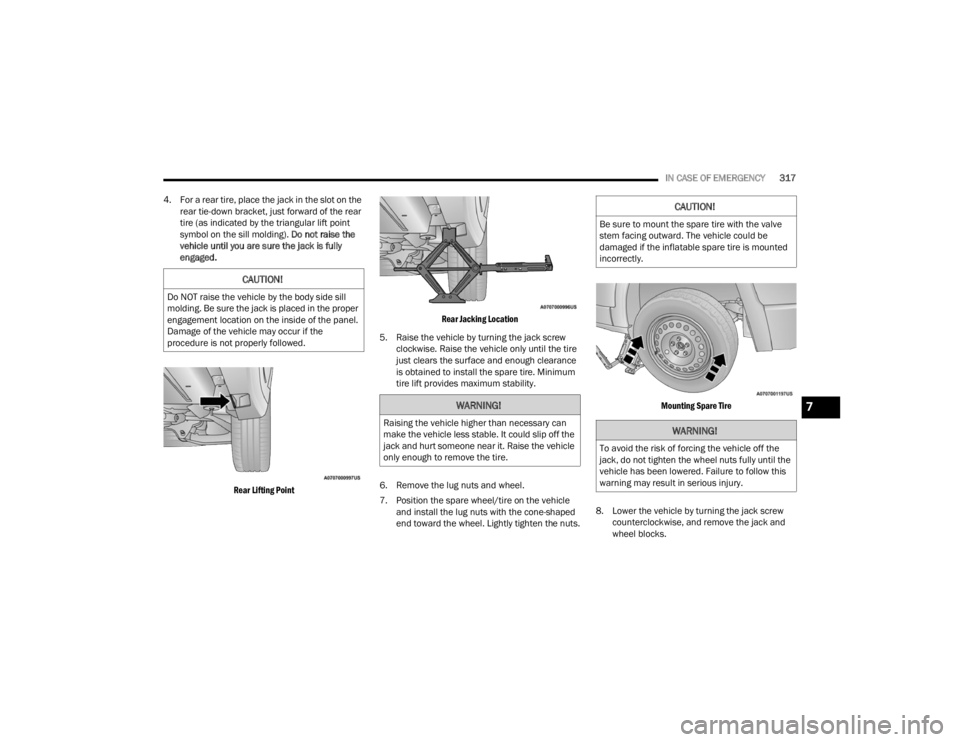
4. For a rear tire, place the jack in the slot on the rear tie-down bracket, just forward of the rear
tire (as indicated by the triangular lift point
symbol on the sill molding). Do not raise the
vehicle until you are sure the jack is fully
engaged.
Rear Lifting Point Rear Jacking Location
5. Raise the vehicle by turning the jack screw clockwise. Raise the vehicle only until the tire
just clears the surface and enough clearance
is obtained to install the spare tire. Minimum
tire lift provides maximum stability.
6. Remove the lug nuts and wheel.
7. Position the spare wheel/tire on the vehicle and install the lug nuts with the cone-shaped
end toward the wheel. Lightly tighten the nuts.
Mounting Spare Tire
8. Lower the vehicle by turning the jack screw counterclockwise, and remove the jack and
wheel blocks.
CAUTION!
Do NOT raise the vehicle by the body side sill
molding. Be sure the jack is placed in the proper
engagement location on the inside of the panel.
Damage of the vehicle may occur if the
procedure is not properly followed.
WARNING!
Raising the vehicle higher than necessary can
make the vehicle less stable. It could slip off the
jack and hurt someone near it. Raise the vehicle
only enough to remove the tire.
CAUTION!
Be sure to mount the spare tire with the valve
stem facing outward. The vehicle could be
damaged if the inflatable spare tire is mounted
incorrectly.
WARNING!
To avoid the risk of forcing the vehicle off the
jack, do not tighten the wheel nuts fully until the
vehicle has been lowered. Failure to follow this
warning may result in serious injury.
7
23_WL_OM_EN_USC_t.book Page 317
Page 320 of 424
318IN CASE OF EMERGENCY
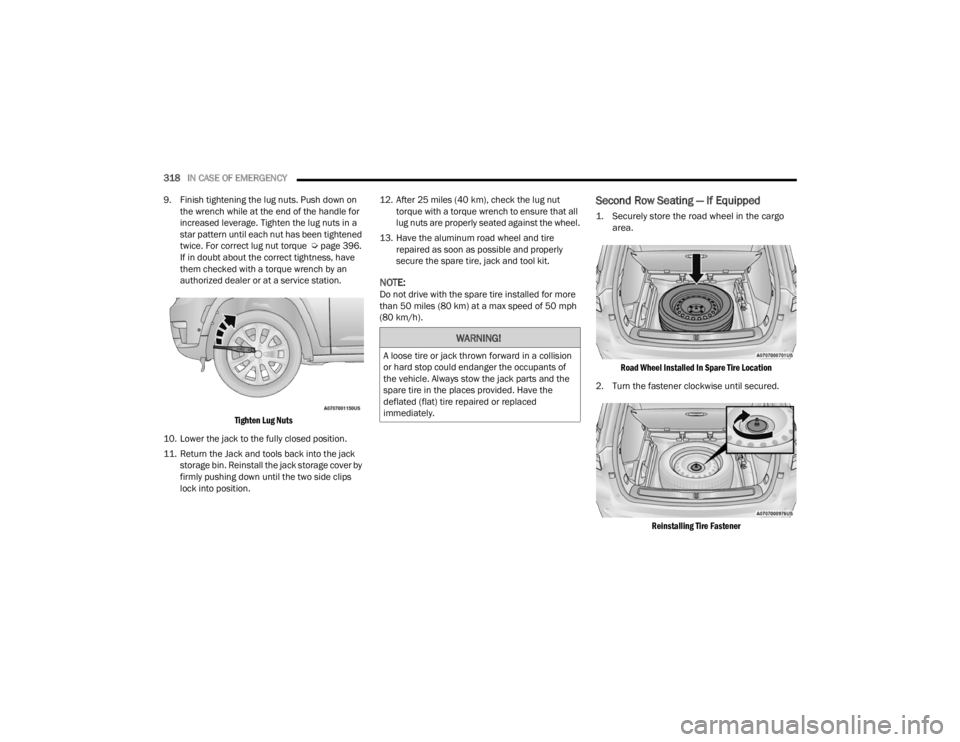
9. Finish tightening the lug nuts. Push down on the wrench while at the end of the handle for
increased leverage. Tighten the lug nuts in a
star pattern until each nut has been tightened
twice. For correct lug nut torque Úpage 396.
If in doubt about the correct tightness, have
them checked with a torque wrench by an
authorized dealer or at a service station.
Tighten Lug Nuts
10. Lower the jack to the fully closed position.
11. Return the Jack and tools back into the jack storage bin. Reinstall the jack storage cover by
firmly pushing down until the two side clips
lock into position. 12. After 25 miles (40 km), check the lug nut
torque with a torque wrench to ensure that all
lug nuts are properly seated against the wheel.
13. Have the aluminum road wheel and tire repaired as soon as possible and properly
secure the spare tire, jack and tool kit.
NOTE:Do not drive with the spare tire installed for more
than 50 miles (80 km) at a max speed of 50 mph
(80 km/h).
Second Row Seating — If Equipped
1. Securely store the road wheel in the cargo area.
Road Wheel Installed In Spare Tire Location
2. Turn the fastener clockwise until secured.
Reinstalling Tire Fastener
WARNING!
A loose tire or jack thrown forward in a collision
or hard stop could endanger the occupants of
the vehicle. Always stow the jack parts and the
spare tire in the places provided. Have the
deflated (flat) tire repaired or replaced
immediately.
23_WL_OM_EN_USC_t.book Page 318
Page 321 of 424
IN CASE OF EMERGENCY319
Third Row Seating — If Equipped
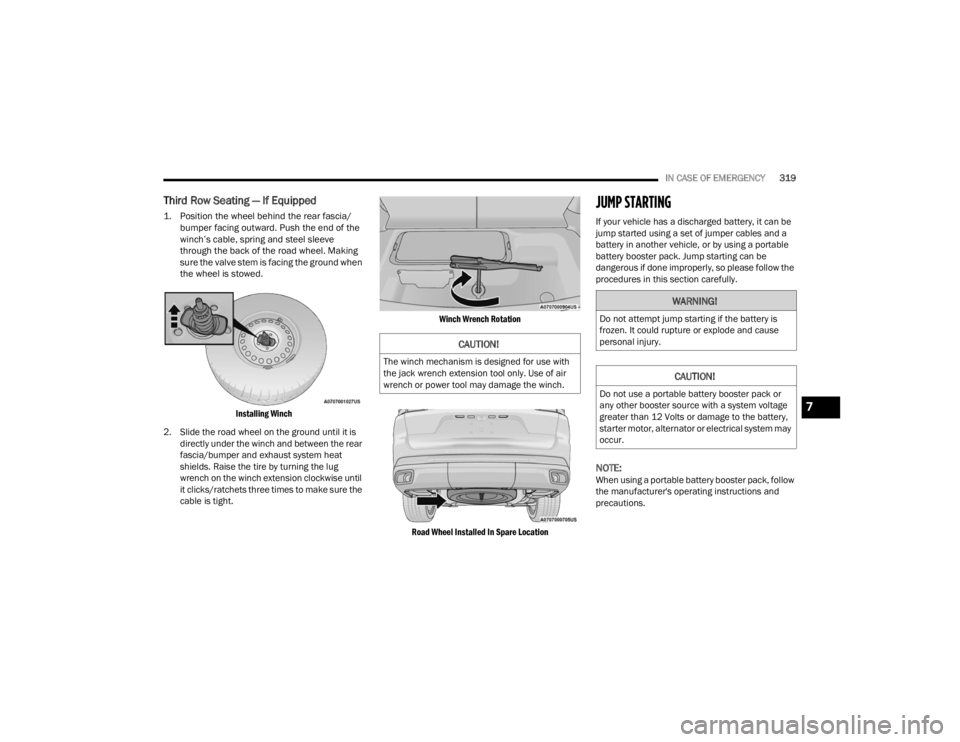
1. Position the wheel behind the rear fascia/
bumper facing outward. Push the end of the
winch’s cable, spring and steel sleeve
through the back of the road wheel. Making
sure the valve stem is facing the ground when
the wheel is stowed.
Installing Winch
2. Slide the road wheel on the ground until it is directly under the winch and between the rear
fascia/bumper and exhaust system heat
shields. Raise the tire by turning the lug
wrench on the winch extension clockwise until
it clicks/ratchets three times to make sure the
cable is tight.
Winch Wrench Rotation
Road Wheel Installed In Spare Location
JUMP STARTING
If your vehicle has a discharged battery, it can be
jump started using a set of jumper cables and a
battery in another vehicle, or by using a portable
battery booster pack. Jump starting can be
dangerous if done improperly, so please follow the
procedures in this section carefully.
NOTE:When using a portable battery booster pack, follow
the manufacturer's operating instructions and
precautions.
CAUTION!
The winch mechanism is designed for use with
the jack wrench extension tool only. Use of air
wrench or power tool may damage the winch.
WARNING!
Do not attempt jump starting if the battery is
frozen. It could rupture or explode and cause
personal injury.
CAUTION!
Do not use a portable battery booster pack or
any other booster source with a system voltage
greater than 12 Volts or damage to the battery,
starter motor, alternator or electrical system may
occur.
7
23_WL_OM_EN_USC_t.book Page 319
Page 327 of 424

IN CASE OF EMERGENCY325
FREEING A STUCK VEHICLE
If your vehicle becomes stuck in mud, sand or
snow, it can often be moved using a rocking
motion. Turn the steering wheel right and left to
clear the area around the front wheels. Then, shift
back and forth between DRIVE (D) and REVERSE
(R) while gently pressing the accelerator.
NOTE:Shifts between DRIVE (D) and REVERSE (R) can
only be achieved at wheel speeds of 5 mph
(8 km/h) or less. Whenever the transmission
remains in NEUTRAL (N) for more than two
seconds, you must press the brake pedal to
engage DRIVE (D) or REVERSE (R).
Use the least amount of accelerator pedal
pressure that will maintain the rocking motion
without spinning the wheels or racing the engine.
NOTE:Push the ESC OFF button to place the Electronic
Stability Control (ESC) system in “Partial OFF”
mode, before rocking the vehicle Ú page 251.
Once the vehicle has been freed, push the ESC OFF
button again to restore “ESC On” mode.
WARNING!
Fast spinning tires can be dangerous. Forces
generated by excessive wheel speeds may
cause damage, or even failure, of the axle and
tires. A tire could explode and injure someone.
Do not spin your vehicle's wheels faster than
30 mph (48 km/h) or for longer than 30
seconds continuously without stopping when
you are stuck and do not let anyone near a
spinning wheel, no matter what the speed.
CAUTION!
Racing the engine or spinning the wheels may
lead to transmission overheating and failure.
Allow the engine to idle with the transmission
in NEUTRAL for at least one minute after every
five rocking-motion cycles. This will minimize
overheating and reduce the risk of transmis -
sion failure during prolonged efforts to free a
stuck vehicle.
When “rocking” a stuck vehicle by shifting
between DRIVE and REVERSE, do not spin the
wheels faster than 15 mph (24 km/h), or
drivetrain damage may result.
Revving the engine or spinning the wheels too
fast may lead to transmission overheating and
failure. It can also damage the tires. Do not
spin the wheels above 30 mph (48 km/h)
while in gear (no transmission shifting occur -
ring).
7
23_WL_OM_EN_USC_t.book Page 325
Page 328 of 424

326IN CASE OF EMERGENCY
TOWING A DISABLED VEHICLE
This section describes procedures for towing a disabled vehicle using a commercial towing service.
If the transmission and drivetrain are operable, disabled 4x4 vehicles may also be towed as described on Ú page 195.
Proper towing or lifting equipment is required to prevent damage to your vehicle. Use only tow bars and other equipment designed for this purpose, following
equipment manufacturer’s instructions. Use of safety chains is mandatory. Attach a tow bar or other towing device to main structural members of the vehicle,
not to fascia/bumpers or associated brackets. State and local laws regarding vehicles under tow must be observed.
Towing Condition Wheels OFF The Ground Two-Wheel Drive Models Four-Wheel Drive Models
Without 4WD Low Range Four-Wheel Drive Models
With 4WD Low Range
Flat Tow NONENOT ALLOWEDNOT ALLOWEDSee Instructions
Transmission in PARK
Transfer case in N
(NEUTRAL)
Tow in forward direction
Dolly Tow Front
NOT ALLOWEDNOT ALLOWEDNOT ALLOWED
Rear OKNOT ALLOWEDNOT ALLOWED
On Trailer ALLOKOKOK
23_WL_OM_EN_USC_t.book Page 326
Page 329 of 424

IN CASE OF EMERGENCY327
NOTE:
You must ensure that the Auto Park Brake
Úpage 123 feature is disabled before towing
this vehicle to avoid inadvertent Electric Park
Brake engagement. The Auto Park Brake
feature is enabled or disabled via the customer
programmable features in the Uconnect
Settings.
Vehicles with a discharged battery, or total elec -
trical failure when the Electric Park Brake (EPB)
is engaged, will need a wheel dolly or jack to
raise the rear wheels off the ground when
moving the vehicle onto a flatbed.
The Safehold feature will engage the Electric
Park Brake whenever the driver's door is
opened (if the battery is connected, ignition is
ON, transmission is not in PARK, and brake
pedal is released). If you are towing this vehicle
with the ignition in the ON/RUN mode, you must
manually disable the Electric Park Brake each
time the driver's door is opened by pressing the
brake pedal and then releasing the EPB. If you must use the accessories (wipers,
defrosters, etc.) while being towed, the ignition
must be in the ON/RUN mode.
If the vehicle's battery is discharged, instructions
on shifting the automatic transmission out of PARK
(P) in order to move the vehicle Ú
page 323.
REAR-WHEEL DRIVE MODELS
FCA US LLC recommends towing your vehicle with
all four wheels OFF the ground using a flatbed.
If flatbed equipment is not available, and the
transmission is operable, the vehicle may be towed
(with rear wheels off the ground) under the
following conditions:
The transmission must be in NEUTRAL (N). For
instructions on shifting the transmission to
NEUTRAL (N) when the engine is off
Ú page 323.
The towing speed must not exceed 30 mph
(48 km/h).
The towing distance must not exceed 30 miles
(48 km).
CAUTION!
Do not use sling type equipment when towing.
Vehicle damage may occur.
When securing the vehicle to a flat bed truck,
do not attach to front or rear suspension
components. If vehicle is equipped with
Quadra-lift air suspension, secure vehicle only
with tire/wheel straps (no suspension compo -
nents or body) to prevent air suspension from
adjusting during towing against securement
straps and causing damage. Damage to your
vehicle may result from improper towing.
CAUTION!
Towing faster than 30 mph (48 km/h) or
farther than 30 miles (48 km) with rear
wheels on the ground can cause severe trans -
mission damage. Damage from improper
towing is not covered under the New Vehicle
Limited Warranty.
7
23_WL_OM_EN_USC_t.book Page 327
Page 330 of 424
328IN CASE OF EMERGENCY
If the transmission is not operable, or the vehicle
must be towed faster than 30 mph (48 km/h) or
farther than 30 miles (48 km), tow with the rear
wheels OFF the ground. Acceptable methods are to
tow the vehicle on a flatbed, or with the front
wheels raised and the rear wheels on a towing
dolly, or (when using a suitable steering wheel
stabilizer to hold the front wheels in the straight
position) with the rear wheels raised and the front
wheels ON the ground.
FOUR-WHEEL DRIVE MODELS
FCA US LLC recommends towing with all wheels
OFF the ground. Acceptable methods are to tow
the vehicle on a flatbed or with one end of the
vehicle raised and the opposite end on a towing
dolly.
If flatbed equipment is not available, and the
transfer case is operable, vehicles with a
two-speed transfer case may be towed (in the
forward direction, with ALL wheels on the ground),
IF the transfer case is in NEUTRAL (N) and the
transmission is in PARK Úpage 195. Vehicles equipped with a single-speed transfer
case have no NEUTRAL (N) position, and therefore
must
be towed will all four wheels OFF the ground.
EMERGENCY TOW HOOKS —
I
F EQUIPPED
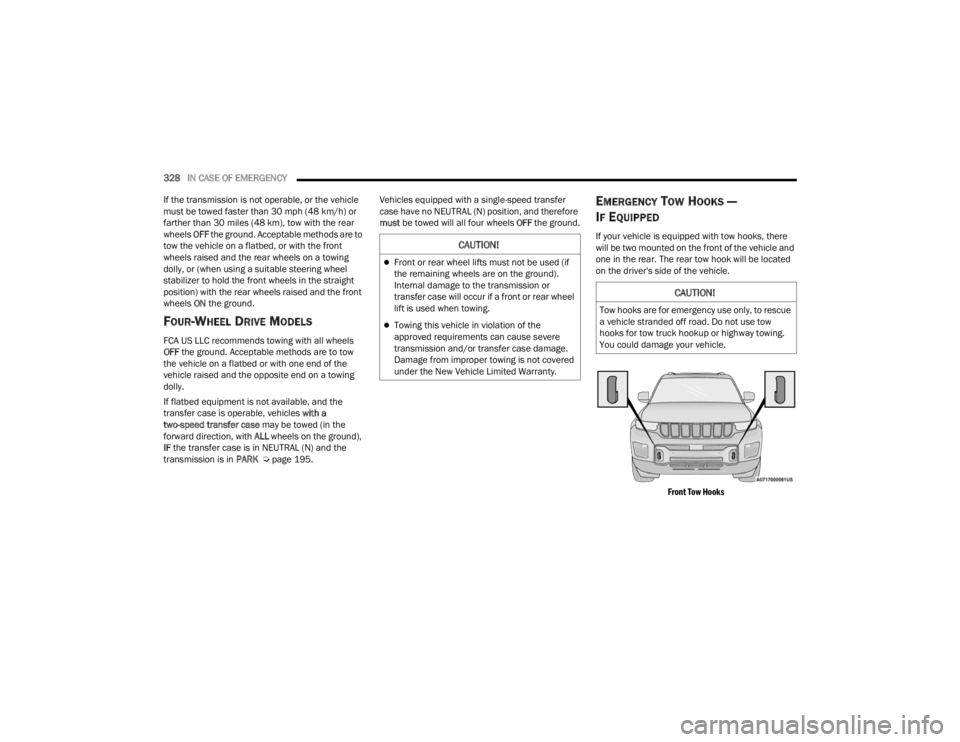
If your vehicle is equipped with tow hooks, there
will be two mounted on the front of the vehicle and
one in the rear. The rear tow hook will be located
on the driver's side of the vehicle.
Front Tow Hooks
CAUTION!
Front or rear wheel lifts must not be used (if
the remaining wheels are on the ground).
Internal damage to the transmission or
transfer case will occur if a front or rear wheel
lift is used when towing.
Towing this vehicle in violation of the
approved requirements can cause severe
transmission and/or transfer case damage.
Damage from improper towing is not covered
under the New Vehicle Limited Warranty.
CAUTION!
Tow hooks are for emergency use only, to rescue
a vehicle stranded off road. Do not use tow
hooks for tow truck hookup or highway towing.
You could damage your vehicle.
23_WL_OM_EN_USC_t.book Page 328