wheel JEEP GRAND CHEROKEE 2023 Repair Manual
[x] Cancel search | Manufacturer: JEEP, Model Year: 2023, Model line: GRAND CHEROKEE, Model: JEEP GRAND CHEROKEE 2023Pages: 424, PDF Size: 15.48 MB
Page 199 of 424
STARTING AND OPERATING197
Shifting Into Transfer Case N (NEUTRAL)
Use the following procedure to prepare your
vehicle for recreational towing:
1. Bring the vehicle to a complete stop on level
ground, with the engine running.
2. Press and hold the brake pedal.
3. Shift the transmission into NEUTRAL. 4. If vehicle is equipped with Quadra-Lift air
suspension, ensure the vehicle is set to
Normal Ride Height with the Auto Entry/Exit
setting deselected.
NOTE:
Steps 1 through 4 are requirements that
must be met before pushing the N
(NEUTRAL) button, and must continue to be
met until the shift has been completed. If
any of these requirements are not met
before pushing the N (NEUTRAL) button or
are no longer met during the shift, then the
N (NEUTRAL) indicator light will flash contin -
uously until all requirements are met or until
the N (NEUTRAL) button is released.
The ignition must be in the ON/RUN position
for a shift to take place and for the position
indicator lights to be operable. If the ignition
is not in the ON/RUN position, the shift will
not take place and no position indicator
lights will be on or flashing.
A flashing N (NEUTRAL) position indicator
light indicates that shift requirements have
not been met.
CAUTION!
DO NOT dolly tow any 4WD vehicle. Towing
with only one set of wheels on the ground
(front or rear) will cause severe transmission
and/or transfer case damage. Tow with all
four wheels either ON the ground, or OFF the
ground (using a vehicle trailer).
Tow only in a forward direction. Towing this
vehicle backwards can cause severe damage
to the transfer case.
The transmission must be in PARK for recre -
ational towing.
Before recreational towing, perform the proce -
dure outlined under “Shifting into N
(NEUTRAL)” to be certain that the transfer
case is fully in N (NEUTRAL). Otherwise,
internal damage will result.
Towing this vehicle in violation of the above
requirements can cause severe transmission
and/or transfer case damage. Damage from
improper towing is not covered under the New
Vehicle Limited Warranty.
Do not use a bumper-mounted clamp-on tow
bar on your vehicle. The bumper face bar will
be damaged.
WARNING!
You or others could be injured or killed if you
leave the vehicle unattended with the transfer
case in the N (NEUTRAL) position without first
fully engaging the Electric Park Brake. The
transfer case N (NEUTRAL) position disengages
both the front and rear driveshafts from the
powertrain and will allow the vehicle to roll, even
if the transmission is in PARK. The Electric Park
Brake should always be applied when the driver
is not in the vehicle.
CAUTION!
It is necessary to follow these steps to be certain
that the transfer case is fully in N (NEUTRAL)
before recreational towing to prevent damage to
internal parts.
4
23_WL_OM_EN_USC_t.book Page 197
Page 200 of 424
198STARTING AND OPERATING
If the vehicle is equipped with Quadra-Lift
air suspension, the engine should be
started and left running for a minimum of
60 seconds (with all the doors closed) at
least once every 24 hours. This process
allows the air suspension to adjust the
vehicle’s ride height to compensate for
temperature effects.
Engaging/disengaging of the Electric Park
Brake requires the ignition to be in the ON/
RUN position.
If shift conditions/interlocks are not met, a
“4WD Shift Canceled” or a “4WD Shift
Aborted/ Retry Shift” message will be
displayed on the instrument cluster. To reat -
tempt shift, put the transmission in
NEUTRAL (N) and push and hold the 4WD
LOW button.
If shift conditions/interlocks are not met, a
“To Complete 4WD Shift Put Transmission
In Neutral” or a “To Complete 4WD Shift
Speed Must Be Below 3 MPH” or a “To
Complete 4WD Shift Allow Engine To Return
To Idle” message will flash from the instru -
ment cluster display Ú page 98.
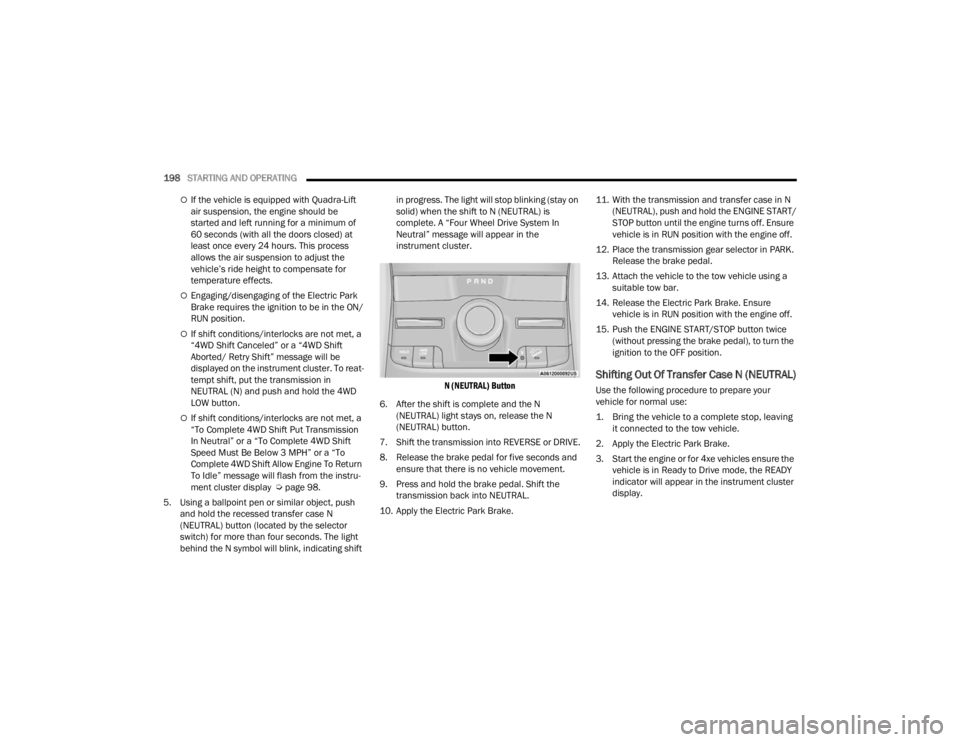
5. Using a ballpoint pen or similar object, push and hold the recessed transfer case N
(NEUTRAL) button (located by the selector
switch) for more than four seconds. The light
behind the N symbol will blink, indicating shift in progress. The light will stop blinking (stay on
solid) when the shift to N (NEUTRAL) is
complete. A “Four Wheel Drive System In
Neutral” message will appear in the
instrument cluster.
N (NEUTRAL) Button
6. After the shift is complete and the N (NEUTRAL) light stays on, release the N
(NEUTRAL) button.
7. Shift the transmission into REVERSE or DRIVE.
8. Release the brake pedal for five seconds and ensure that there is no vehicle movement.
9. Press and hold the brake pedal. Shift the transmission back into NEUTRAL.
10. Apply the Electric Park Brake. 11. With the transmission and transfer case in N
(NEUTRAL), push and hold the ENGINE START/
STOP button until the engine turns off. Ensure
vehicle is in RUN position with the engine off.
12. Place the transmission gear selector in PARK. Release the brake pedal.
13. Attach the vehicle to the tow vehicle using a suitable tow bar.
14. Release the Electric Park Brake. Ensure vehicle is in RUN position with the engine off.
15. Push the ENGINE START/STOP button twice (without pressing the brake pedal), to turn the
ignition to the OFF position.
Shifting Out Of Transfer Case N (NEUTRAL)
Use the following procedure to prepare your
vehicle for normal use:
1. Bring the vehicle to a complete stop, leaving it connected to the tow vehicle.
2. Apply the Electric Park Brake.
3. Start the engine or for 4xe vehicles ensure the vehicle is in Ready to Drive mode, the READY
indicator will appear in the instrument cluster
display.
23_WL_OM_EN_USC_t.book Page 198
Page 203 of 424
STARTING AND OPERATING201
Standing Water
Avoid driving in standing water deeper than
24 inches (61 cm) with air suspension or
21 inches (53 cm) without air suspension, and
reduce speed appropriately to minimize wave
effects. Maximum speed is 5 mph (8 km/h).
Maintenance
After driving through deep water, inspect your
vehicle fluids and lubricants (engine oil,
transmission oil, axle, transfer case) to ensure the
fluids have not been contaminated. Contaminated
fluid (milky, foamy in appearance) should be
flushed/changed as soon as possible to prevent
component damage.
Driving In Snow, Mud And Sand
In heavy snow, when pulling a load, or for
additional control at slower speeds, shift the
transmission to a low gear and shift the transfer
case to 4WD LOW if necessary Ú page 131. Only
shift into a lower gear to maintain forward motion.
Over-revving the engine can spin the wheels and
traction will be lost.
Avoid abrupt downshifts on icy or slippery roads,
because engine braking may cause skidding and
loss of control.
Hill Climbing
NOTE:Before attempting to climb a hill, determine the
conditions at the crest and/or on the other side.
Before climbing a steep hill, shift the transmission
to a lower gear and shift the transfer case to 4WD
LOW. Use FIRST gear and 4WD LOW for very steep
hills.
If you stall or begin to lose forward motion while
climbing a steep hill, allow your vehicle to come to
a stop and immediately apply the brakes. Restart
the engine, and shift into REVERSE (R). Back slowly
down the hill, allowing the compression braking of
the engine to help regulate your speed. If the
brakes are required to control vehicle speed, apply
them lightly and avoid locking or skidding the tires. Remember, never drive diagonally across a hill.
Always drive straight up or down.
If the wheels start to slip as you approach the crest
of a hill, ease off the accelerator and maintain
forward motion by turning the front wheels slowly.
This may provide a fresh “bite” into the surface and
will usually provide traction to complete the climb.
Traction Downhill
When descending mountains or hills, use Hill
Descent Control or Selec-Speed Control to avoid
repeated heavy braking.
If not equipped with Hill Descent Control or
Selec-Speed Control use the following procedure:
Shift the transmission into a low gear, and the
transfer case into 4WD LOW range. Let the vehicle
go slowly down the hill with all four wheels turning
against engine compression drag. This will permit
you to control the vehicle speed and direction.
When descending mountains or hills, repeated
braking can cause brake fade with loss of braking
control. Avoid repeated heavy braking by
downshifting the transmission whenever possible.
WARNING!
If the engine stalls, you lose forward motion, or
cannot make it to the top of a steep hill or grade,
never attempt to turn around. To do so may
result in tipping and rolling the vehicle. Always
back carefully straight down a hill in REVERSE
gear. Never back down a hill in NEUTRAL using
only the brake.
4
23_WL_OM_EN_USC_t.book Page 201
Page 204 of 424
202STARTING AND OPERATING
After Driving Off-Road
Off-road operation puts more stress on your
vehicle than does most on-road driving. After going
off-road, it is always a good idea to check for
damage. That way you can get any problems taken
care of right away and have your vehicle ready
when you need it.
Completely inspect the underbody of your
vehicle. Check tires, body structure, steering,
suspension, and exhaust system for damage.
Inspect the radiator for mud and debris and
clean as required.
Check threaded fasteners for looseness, partic -
ularly on the chassis, drivetrain components,
steering, and suspension. Retighten them, if
required, and torque to the values specified in
the Service Manual.
Check for accumulations of plants or brush.
These things could be a fire hazard. They might
hide damage to fuel lines, brake hoses, axle
pinion seals, and propeller shafts.
After extended operation in mud, sand, water, or
similar dirty conditions, have the radiator, fan,
brake rotors, wheels, brake linings, and axle
yokes inspected and cleaned as soon as
possible.
If you experience unusual vibration after driving
in mud, slush or similar conditions, check the
wheels for impacted material. Impacted mate -
rial can cause a wheel imbalance and freeing
the wheels of it will correct the situation.
WARNING!
Abrasive material in any part of the brakes may
cause excessive wear or unpredictable braking.
You might not have full braking power when you
need it to prevent a collision. If you have been
operating your vehicle in dirty conditions, get
your brakes checked and cleaned as necessary.
23_WL_OM_EN_USC_t.book Page 202
Page 211 of 424

MULTIMEDIA209
Auto-On Driver Heated/Ventilated Seat & Heated Steering Wheel This setting will activate the vehicle’s comfort system and heated seats or
heated steering wheel when the vehicle is remote started or ignition is
started. The “Off” setting will not activate the comfort systems. The “Remote
Start” setting will only activate the comfort systems when using Remote Start.
The “All Start” setting will activate the comfort systems whenever the vehicle
is started.
Radio Off Delay This setting will keep certain electrical features running after the engine is
turned off. When any door is opened, the electronics will deactivate. The
available settings are “0 sec”, “45 sec”, “5 min”, and “10 min”.
Radio Off With Door This setting will allow you to determine if the radio shuts off when any of the
doors are opened.
Audio Settings This setting will open the submenu, containing the audio settings
Ú
page 223.
App Drawer Favoriting Pop-ups This setting will allow you to favorite app drawer pop-ups with “On” and “Off”
options.
App Drawer Unfavoritings Pop-ups This setting will allow you to unfavorite app drawer pop-ups with “On” and
“Off” options.
New Text Message Pop-ups This setting will allow you to have pop-up notifications for new text messages.
Setting options are “On” and “Off”.
Missed Calls Message This setting will allow you to have pop-up notifications for missed calls. Setting
options are “On” and “Off”.
Navigation Pop-ups This setting will allow you to have pop-up notifications for Navigation. Setting
options are “On” and “Off”.
Reset App Drawer to Default Order This setting will reset the app drawer to its factory default layout.
Setting NameDescription
5
23_WL_OM_EN_USC_t.book Page 209
Page 213 of 424

MULTIMEDIA211
Pedestrian Emergency Braking — Located In Automatic Emergency Braking
Submenu This setting will turn the Pedestrian Emergency Braking system on or off. If
“Off” is selected, an Off icon will display on your Instrument Cluster Display.
Active Driving Assist Steering Wheel Vibration
This setting will turn the Active Driving Assist Steering Wheel Vibration on or off.
Traffic Sign Assist This setting will turn Traffic Sign Assist on or off.
Traffic Sign Assist Warning This setting will allow you to set the warning type related to the traffic sign.
The available options are “Off”, “Visual”, and “Visual + Chime”.
Traffic Sign Assist Sensitivity This setting will change the Traffic Sign Assist Sensitivity. The available
options are “+ 0”, “+ 5”, and “+ 10”.
Traffic Sign Assist Offset This setting will alter the Traffic Sign Assist Offset. The available options will
allow you to adjust the offset from a range of 0 to 5 mph.
Traffic Sign Within this setting are three additional settings: “Traffic Sign Blinking” with
“On” and “Off” options, “Traffic Sign Sensitivity” with “+ 0”, “+ 5”, and “+ 10”
options, and “Traffic Sign Information Offset” with selectable options between
0 to 5 mph.
New Speed Zone Indication
This setting will allow you to set if the system will warn you that the speed
limit has changed in an area. The available options are “Off”, “Visual”, and
“Visual + Chime”.
Active Lane Management This setting will alert the driver when a lane departure is detected. The
available options are “Vibration Only”, “Steering Assist Only”, and “Vibration +
Steering Assist”.
Lane Warning This setting will let you choose between “Early”, “Medium”, and “Late”.
Vibration Strength This setting will allow you to change the vibration strength between “Low”,
“Medium”, and “High”.
Steering Assist Strength This setting will change the strength of the steering wheel feedback during a
lane departure. The available settings are “Low”, “Medium”, and “High”.
Setting Name
Description
5
23_WL_OM_EN_USC_t.book Page 211
Page 220 of 424

218MULTIMEDIA
Brakes
Greeting Lights When the “Greeting Lights” feature is selected, it enables “Headlight
Illumination On Approach”. When “Headlight Illumination On Approach” is
selected, it allows the adjustment of the amount of time the headlights
remain on after the doors are unlocked with the key fob. “Greeting Lights”
must be selected and “Headlight Illumination On Approach” must be selected
above zero seconds for the feature to be enabled. The available settings are
“On” and “Off”.
Auto Dim High Beams This setting will allow you to turn the Auto Dim High Beams on or off.
Daytime Running Lights This setting will allow you to turn the Daytime Running Lights on or off.
Cornering Lights When this setting is selected, if the steering wheel rotation angle is large or
the turn signal indicators are on, a light (incorporated in the fog light) will turn
on, on the relevant side to improve visibility at night.
Flash Lights With Lock This setting will allow you to turn the flashing of the lights when the Lock
button is pushed on the key fob on or off.
Setting Name
Description
When the Brakes button is pressed on the touchscreen, the system will display settings related to the vehicle’s brake system.
NOTE:Depending on the vehicle’s options, feature settings may vary.
Setting NameDescription
Auto Park Brake This setting will turn the Auto Park Brake on or off.
Brake Service This setting will allow you to set the brakes for service. When the setting is
selected, a pop-up will display with “Yes” and “No” options.
23_WL_OM_EN_USC_t.book Page 218
Page 223 of 424

MULTIMEDIA221
Key Off Options
Auto-On Driver Heated/Ventilated Seat & Heated Steering Wheel With Vehicle
Start This setting will activate the vehicle’s comfort systems and heated seats or
heated steering wheel when the vehicle is remote started or ignition is
started. The “Off” setting will not activate the comfort systems. The “Remote
Start” setting (if equipped) will only activate the comfort systems when using
Remote Start. The “All Start” setting will activate the comfort systems
whenever the vehicle is started.
3rd Row Seat Recline Lockout This setting will activate the 3rd Row Seat Recline Lockout. Selectable options
are “Off”, “Lock On Ignition”, and “Always Locked”.
Setting Name
Description
When the Key Off Options button is pressed on the touchscreen, the system displays the options related to vehicle shutoff. These settings will only activate
when the ignition is set to OFF.
NOTE:Depending on the vehicle’s options, feature settings may vary.
Setting NameDescription
Sound Horn With Lower
This setting will sound the horn when the Lower button is pressed on the key fob.
Flash Lights With Lower
This setting will flash the lights when the Lower button is pressed on the key fob.
Easy Exit Seat This setting adjusts the seats to make exiting the vehicle easier.
Headlight Off Delay This setting will allow you to set the amount of time the headlights remain on
after the vehicle has been turned off. The available settings are “0 sec”, “30
sec”, “60 sec”, and “90 sec”.
Auto Entry/Exit Suspension This setting will turn the Auto Entry/Exit Suspension system on or off.
5
23_WL_OM_EN_USC_t.book Page 221
Page 224 of 424

222MULTIMEDIA
Suspension
Radio Off Delay
This setting will keep the radio on for the selected amount of time after vehicle
shut off. The available options are “0 sec”, “45 sec”, “5 min”, and “10 min”.
Radio Off With Door This setting will keep the radio on when a door is opened or until the Radio Off
Delay time is reached. The available settings are “On” and “Off”.
Windows With Key Fob This setting will allow you to control window function while the vehicle is off.
The available options are “On” and “Off”.
Setting Name
Description
When the Suspension button is pressed on the touchscreen, the system will display settings related to the vehicle’s air suspension.
NOTE:Depending on the vehicle’s options, feature settings may vary.
Setting NameDescription
Auto Entry/Exit Suspension This setting will turn the Auto Entry/Exit Suspension system on or off.
Display Suspension Messages This setting will display suspension messages in the Instrument Cluster
Display. The “All” setting will display all available messages. The “Warnings
Only” setting will only display warning messages.
Tire Jack Mode This setting will disable the Air Suspension system to assist in changing a
spare tire.
Auxiliary Mode This setting will allow you to set the Auxiliary Suspension Mode. The available
options are “Off”, “Transport Mode”, and “Wheel Alignment Mode”. In
Transport Mode, the vehicle will not auto level when being transported by
another vehicle. In Wheel Alignment Mode, the vehicle will not auto level when
a wheel alignment is being performed.
23_WL_OM_EN_USC_t.book Page 222
Page 230 of 424
228MULTIMEDIA
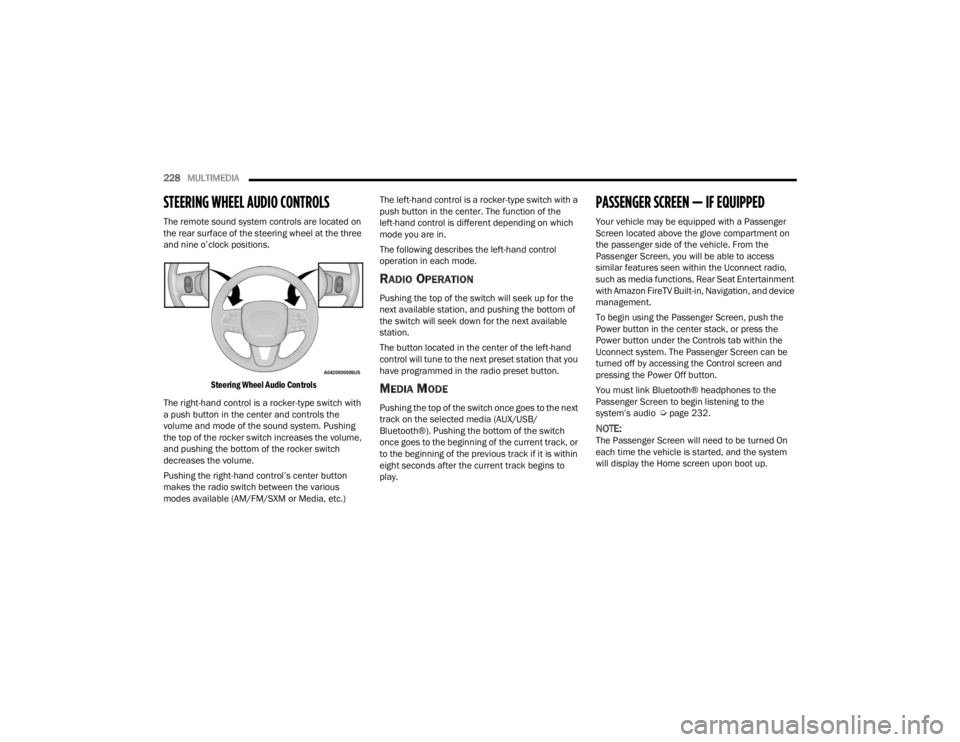
STEERING WHEEL AUDIO CONTROLS
The remote sound system controls are located on
the rear surface of the steering wheel at the three
and nine o’clock positions.
Steering Wheel Audio Controls
The right-hand control is a rocker-type switch with
a push button in the center and controls the
volume and mode of the sound system. Pushing
the top of the rocker switch increases the volume,
and pushing the bottom of the rocker switch
decreases the volume.
Pushing the right-hand control’s center button
makes the radio switch between the various
modes available (AM/FM/SXM or Media, etc.) The left-hand control is a rocker-type switch with a
push button in the center. The function of the
left-hand control is different depending on which
mode you are in.
The following describes the left-hand control
operation in each mode.
RADIO OPERATION
Pushing the top of the switch will seek up for the
next available station, and pushing the bottom of
the switch will seek down for the next available
station.
The button located in the center of the left-hand
control will tune to the next preset station that you
have programmed in the radio preset button.
MEDIA MODE
Pushing the top of the switch once goes to the next
track on the selected media (AUX/USB/
Bluetooth®). Pushing the bottom of the switch
once goes to the beginning of the current track, or
to the beginning of the previous track if it is within
eight seconds after the current track begins to
play.
PASSENGER SCREEN — IF EQUIPPED
Your vehicle may be equipped with a Passenger
Screen located above the glove compartment on
the passenger side of the vehicle. From the
Passenger Screen, you will be able to access
similar features seen within the Uconnect radio,
such as media functions, Rear Seat Entertainment
with Amazon FireTV Built-in, Navigation, and device
management.
To begin using the Passenger Screen, push the
Power button in the center stack, or press the
Power button under the Controls tab within the
Uconnect system. The Passenger Screen can be
turned off by accessing the Control screen and
pressing the Power Off button.
You must link Bluetooth® headphones to the
Passenger Screen to begin listening to the
system’s audio Ú
page 232.
NOTE:The Passenger Screen will need to be turned On
each time the vehicle is started, and the system
will display the Home screen upon boot up.
23_WL_OM_EN_USC_t.book Page 228