ECO mode JEEP GRAND CHEROKEE 2023 User Guide
[x] Cancel search | Manufacturer: JEEP, Model Year: 2023, Model line: GRAND CHEROKEE, Model: JEEP GRAND CHEROKEE 2023Pages: 424, PDF Size: 15.48 MB
Page 36 of 424
34GETTING TO KNOW YOUR VEHICLE
GET STARTED
The VR button is used to activate/deactivate
your Voice Recognition system. You can also use
the system’s “Wake Up” word to activate voice
recognition. The “Wake Up” word can be set
through the Uconnect Settings Úpage 204.
Helpful hints for using Voice Recognition:
Reduce background noise. Wind noise and
passenger conversations are examples of noise
that may impact recognition.
Speak clearly at a normal pace and volume
while facing straight ahead.
Each time you give a Voice Command, first push
the VR button or say the “Wake Up” word,
wait until after the beep, then say your Voice
Command.
You can interrupt the help message or system
prompts by pushing the VR button and saying a
Voice Command from the current category.
You can also interrupt the help message or
system prompts by speaking. This feature is
called “barge-in” and can be set through the
Uconnect Settings Ú page 204.
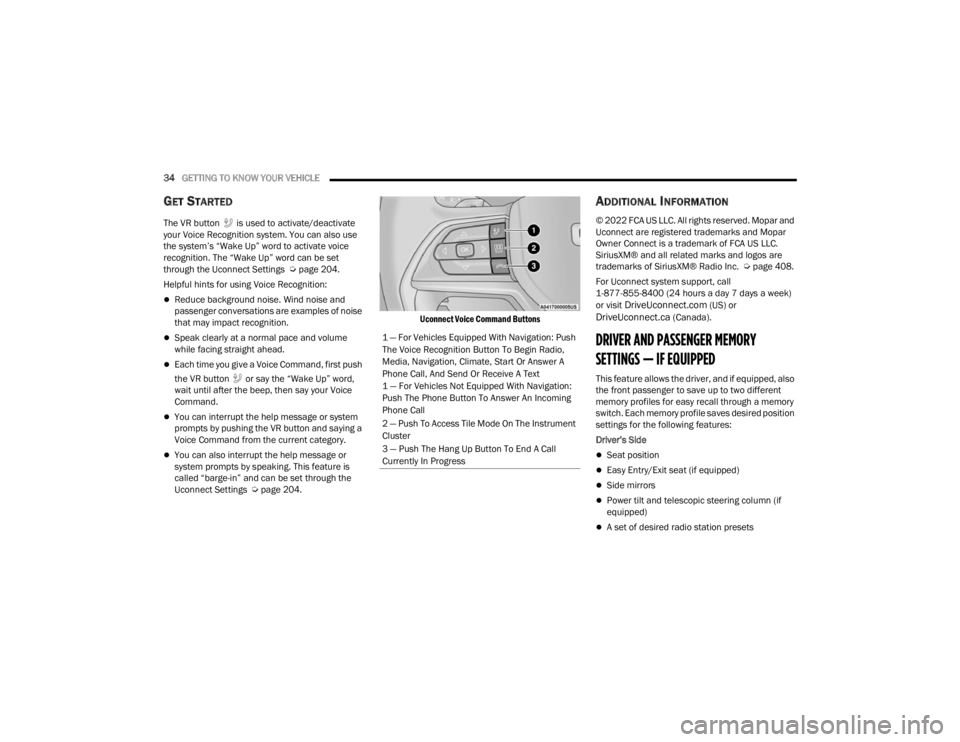
Uconnect Voice Command Buttons
ADDITIONAL INFORMATION
© 2022 FCA US LLC. All rights reserved. Mopar and
Uconnect are registered trademarks and Mopar
Owner Connect is a trademark of FCA US LLC.
SiriusXM® and all related marks and logos are
trademarks of SiriusXM® Radio Inc. Ú
page 408.
For Uconnect system support, call
1-877-855-8400 (24 hours a day 7 days a week)
or visit
DriveUconnect.com (US) or DriveUconnect.ca (Canada).
DRIVER AND PASSENGER MEMORY
SETTINGS — IF EQUIPPED
This feature allows the driver, and if equipped, also
the front passenger to save up to two different
memory profiles for easy recall through a memory
switch. Each memory profile saves desired position
settings for the following features:
Driver’s Side
Seat position
Easy Entry/Exit seat (if equipped)
Side mirrors
Power tilt and telescopic steering column (if
equipped)
A set of desired radio station presets
1 — For Vehicles Equipped With Navigation: Push
The Voice Recognition Button To Begin Radio,
Media, Navigation, Climate, Start Or Answer A
Phone Call, And Send Or Receive A Text
1 — For Vehicles Not Equipped With Navigation:
Push The Phone Button To Answer An Incoming
Phone Call
2 — Push To Access Tile Mode On The Instrument
Cluster
3 — Push The Hang Up Button To End A Call
Currently In Progress
23_WL_OM_EN_USC_t.book Page 34
Page 38 of 424
36GETTING TO KNOW YOUR VEHICLE
(Continued)
MEMORY POSITION RECALL
NOTE:Memory Recall is available when not in PARK, if the
vehicle speed is below 5 mph (8 km/h).
To recall a memory settings profile using the
memory switches, push memory button (1) or
(2) on the memory switch.
To recall the driver’s side memory settings using
the key fob, push the unlock button on the key
fob linked to memory position 1 or 2.
A recall can be canceled by pushing any of the
memory buttons during a recall (S, 1, or 2), or by
pushing any of the seat adjustment switches.
When a recall is canceled, the seat and power tilt/
telescopic steering column (if equipped) will stop
moving. A delay of one second will occur before
another recall can be selected.
SEATS
Seats are a part of the Occupant Restraint system
of the vehicle.
MANUAL ADJUSTMENT (FRONT SEATS) —
I
F EQUIPPED
Manual Front Passenger Seat Forward/
Rearward Adjustment
Some models may be equipped with a manual
front passenger seat. The passenger seat can be
adjusted forward or rearward by using a bar
located by the front of the seat cushion, near the
floor.
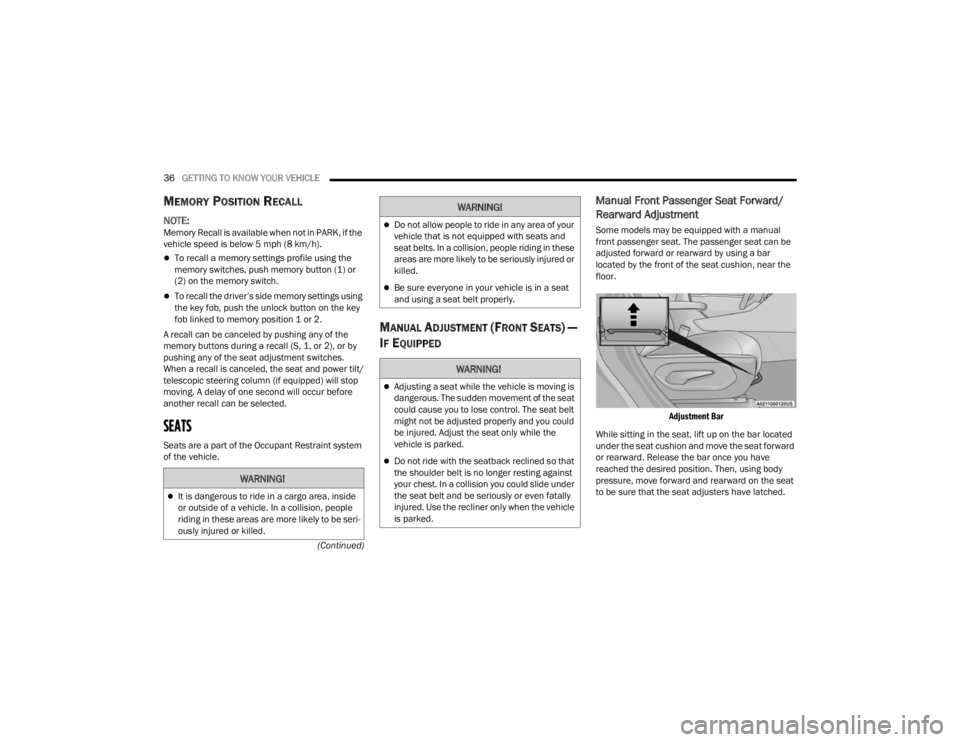
Adjustment Bar
While sitting in the seat, lift up on the bar located
under the seat cushion and move the seat forward
or rearward. Release the bar once you have
reached the desired position. Then, using body
pressure, move forward and rearward on the seat
to be sure that the seat adjusters have latched.
WARNING!
It is dangerous to ride in a cargo area, inside
or outside of a vehicle. In a collision, people
riding in these areas are more likely to be seri -
ously injured or killed.
Do not allow people to ride in any area of your
vehicle that is not equipped with seats and
seat belts. In a collision, people riding in these
areas are more likely to be seriously injured or
killed.
Be sure everyone in your vehicle is in a seat
and using a seat belt properly.
WARNING!
Adjusting a seat while the vehicle is moving is
dangerous. The sudden movement of the seat
could cause you to lose control. The seat belt
might not be adjusted properly and you could
be injured. Adjust the seat only while the
vehicle is parked.
Do not ride with the seatback reclined so that
the shoulder belt is no longer resting against
your chest. In a collision you could slide under
the seat belt and be seriously or even fatally
injured. Use the recliner only when the vehicle
is parked.
WARNING!
23_WL_OM_EN_USC_t.book Page 36
Page 43 of 424
GETTING TO KNOW YOUR VEHICLE41
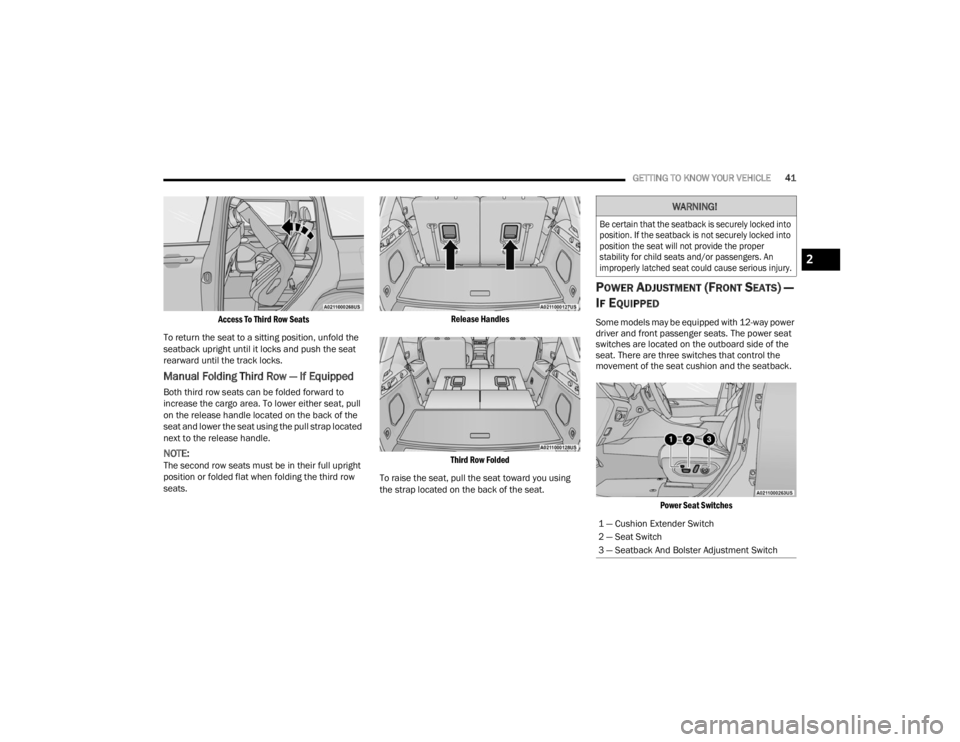
Access To Third Row Seats
To return the seat to a sitting position, unfold the
seatback upright until it locks and push the seat
rearward until the track locks.
Manual Folding Third Row — If Equipped
Both third row seats can be folded forward to
increase the cargo area. To lower either seat, pull
on the release handle located on the back of the
seat and lower the seat using the pull strap located
next to the release handle.
NOTE:The second row seats must be in their full upright
position or folded flat when folding the third row
seats.
Release Handles
Third Row Folded
To raise the seat, pull the seat toward you using
the strap located on the back of the seat.
POWER ADJUSTMENT (FRONT SEATS) —
I
F EQUIPPED
Some models may be equipped with 12-way power
driver and front passenger seats. The power seat
switches are located on the outboard side of the
seat. There are three switches that control the
movement of the seat cushion and the seatback.
Power Seat Switches
WARNING!
Be certain that the seatback is securely locked into
position. If the seatback is not securely locked into
position the seat will not provide the proper
stability for child seats and/or passengers. An
improperly latched seat could cause serious injury.
1 — Cushion Extender Switch
2 — Seat Switch
3 — Seatback And Bolster Adjustment Switch
2
23_WL_OM_EN_USC_t.book Page 41
Page 59 of 424
GETTING TO KNOW YOUR VEHICLE57
SECURITY
It is advised to erase all channels before you sell or
turn in your vehicle.
To do this, push and hold the two outside buttons
for 20 seconds until the indicator flashes. Note
that all channels will be erased. Individual
channels cannot be erased.
The HomeLink® Universal Transceiver is disabled
when the Vehicle Security system is active.
TROUBLESHOOTING TIPS
If you are having trouble programming
HomeLink®, here are some of the most common
solutions:
Replace the battery in the garage door opener
hand-held transmitter.
Push the LEARN button on the garage door
opener to complete the training for a rolling
code.
Did you unplug the device for programming and
remember to plug it back in?
If you have any problems, or require assistance,
please call toll-free 1-800-355-3515 or on the
Internet at
HomeLink.com for information or
assistance.
EXTERIOR LIGHTS
HEADLIGHT SWITCH
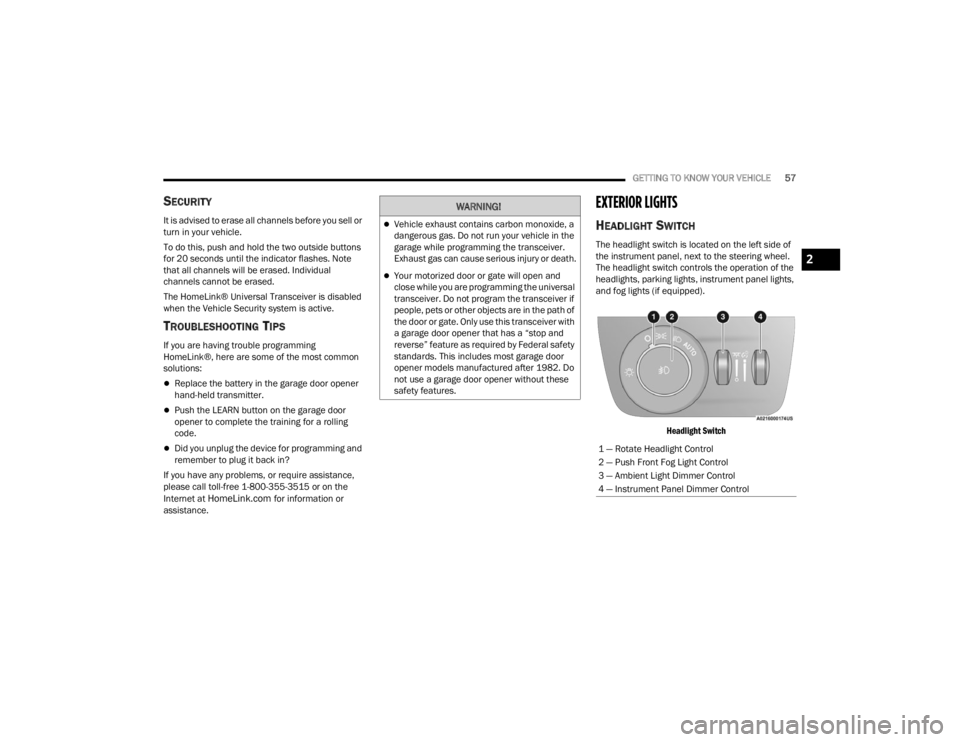
The headlight switch is located on the left side of
the instrument panel, next to the steering wheel.
The headlight switch controls the operation of the
headlights, parking lights, instrument panel lights,
and fog lights (if equipped).
Headlight Switch
WARNING!
Vehicle exhaust contains carbon monoxide, a
dangerous gas. Do not run your vehicle in the
garage while programming the transceiver.
Exhaust gas can cause serious injury or death.
Your motorized door or gate will open and
close while you are programming the universal
transceiver. Do not program the transceiver if
people, pets or other objects are in the path of
the door or gate. Only use this transceiver with
a garage door opener that has a “stop and
reverse” feature as required by Federal safety
standards. This includes most garage door
opener models manufactured after 1982. Do
not use a garage door opener without these
safety features.
1 — Rotate Headlight Control
2 — Push Front Fog Light Control
3 — Ambient Light Dimmer Control
4 — Instrument Panel Dimmer Control
2
23_WL_OM_EN_USC_t.book Page 57
Page 61 of 424
GETTING TO KNOW YOUR VEHICLE59
On some vehicles, the Daytime Running Lights
may deactivate, or reduce intensity, on one side
of the vehicle (when a turn signal is activated on
that side), or on both sides of the vehicle (when
the hazard warning lights are activated).
HIGH/LOW BEAM SWITCH
Push the multifunction lever toward the instrument
panel to switch the headlights to high beams.
Pulling the multifunction back toward the steering
wheel will turn the low beams back on, or shut the
high beams off.
AUTOMATIC HIGH BEAMS —
I
F EQUIPPED
The Automatic High Beam Headlight system
provides increased forward lighting at night by
automating high beam control through the use of a
digital camera mounted on the inside rearview
mirror. This camera detects vehicle specific light
and automatically switches from high beams to low
beams until the approaching vehicle is out of view.
NOTE:
The Automatic High Beam Headlight system can
be turned on or off by selecting or deselecting
“Auto Dim High Beams” within Uconnect
Settings Ú page 204.
The headlight switch must also be turned to the
AUTO position after Automatic High Beams is
enabled within Uconnect Settings for the
feature to activate.
Automatic High Beams will only activate when
the vehicle speed is above 22 mph (35 km/h).
Broken, muddy, or obstructed headlights and
taillights of vehicles in the field of view will
cause headlights to remain on longer (closer to
the vehicle). Also, dirt, film, and other obstruc -
tions on the windshield or camera lens will
cause the system to function improperly.
If the windshield or Automatic High Beam
Headlight Control mirror is replaced, the mirror
must be re-aimed to ensure proper performance.
See a local authorized dealer.
FLASH-TO-PASS
You can signal another vehicle with your headlights
by lightly pulling the multifunction lever toward you.
This will cause the high beam headlights to turn on,
and remain on, until the lever is released.
AUTOMATIC HEADLIGHTS
This system automatically turns the headlights on
or off according to ambient light levels. To turn the
system on, rotate the headlight switch
counterclockwise to the AUTO position. When the
system is on, the headlight time delay feature is
also on. This means the headlights will stay on for up to 90 seconds after you place the ignition into
the OFF position. The headlight time delay can be
programmed to 0/30/60/90 seconds within the
Uconnect system Ú
page 204.
To turn the automatic system off, move the
headlight switch out of the AUTO position.
NOTE:The engine must be running before the headlights
will come on in the automatic mode.
PARKING LIGHTS AND PANEL LIGHTS
To turn on the parking lights and instrument panel
lights, rotate the headlight switch clockwise. To
turn off the parking lights, rotate the headlight
switch back to the O (off) position.
NOTE:Vehicles sold in Canada are equipped with a head -
light switch with an AUTO and ON detent but
without an OFF detent. Headlights will be deacti -
vated when the headlight switch is placed in the
parking lights position. However, the Daytime
Running Lights (DRLs) will be activated along with
the front and rear marker lights. The DRLs may be
deactivated when the parking brake is engaged.
2
23_WL_OM_EN_USC_t.book Page 59
Page 62 of 424
60GETTING TO KNOW YOUR VEHICLE
HEADLIGHTS ON AUTOMATICALLY WITH
W
IPERS
If your vehicle is equipped with Automatic
Headlights, it also has this
customer-programmable feature. When your
headlights are in the automatic mode and the
engine is running, they will automatically turn on
when the wiper system is on. This feature is
programmable through the Uconnect system
Ú page 204.
NOTE:When your headlights come on during the daytime,
the vehicle will monitor outside brightness and
decide if the instrument panel needs to be dimmed
Úpage 62.
HEADLIGHT ILLUMINATION ON
A
PPROACH
When enabled, the headlights, exterior door
handle pocket lights (if equipped), and interior
lights will illuminate when the unlock button on the
key fob is pushed as the operator is approaching
the vehicle. This feature can be turned on/off, and
the length of time the headlights stay on can be
programmed for up to 90 seconds within Uconnect
Settings Ú page 204. Proximity Wake-Up — If Equipped
This feature is enabled/disabled within the
Uconnect system, and is activated when the
operator approaches the driver’s door,
passenger’s door, or liftgate with a valid key fob on
their person. Some exterior and interior lights will
illuminate in order to provide an increased sense
of welcome and security as the operator
approaches the vehicle in the dark. “Headlight
Illumination On Approach” must be selected and
set to a time value other than zero within Uconnect
Settings for Proximity Wake-Up to activate.
The doors may be locked or unlocked for this
feature to activate, as long as the ignition is in the
OFF position, or during a Remote Start event. It will
not activate if the doors are locked and the ignition
was placed in the ON/RUN position.
NOTE:Proximity Wake-Up may not activate under the
following conditions:
After numerous consecutive activations, in
order to conserve the vehicle’s battery
After the vehicle’s engine has been off for
several days
Headlight Animation — If Equipped
When “Headlight Illumination On Approach” is
turned on, and set to a time value above zero, the
exterior lights illuminate in a theatrical manner
during approach to the vehicle. This feature is
activated in the following situations:
Proximity Wake-Up (if equipped) is activated
Remote Start is activated
The unlock button on the key fob is pushed
NOTE:For Headlight Animation to activate with Remote
Start or with the push of the unlock button,
“Greeting Lights” must also be selected within the
Uconnect system.
HEADLIGHT DELAY
To aid in your exit, your vehicle is equipped with a
headlight delay that will leave the headlights on for
approximately 90 seconds. This delay is initiated
when the ignition is placed in the OFF position
while the headlight switch is on, and then the
headlight switch is cycled off. Headlight delay can
be canceled by either turning the headlight switch
on then off, or by placing the ignition in the ON/
RUN position.
NOTE:The headlight delay time is programmable through
Uconnect Settings Ú
page 204.
23_WL_OM_EN_USC_t.book Page 60
Page 64 of 424
62GETTING TO KNOW YOUR VEHICLE
BATTERY SAVER
To protect the life of your vehicle’s battery, load
shedding is provided for both the interior and
exterior lights.
If the ignition is placed in the OFF position and any
door is left ajar for 10 minutes or the overhead
console Dome On switch is left on for 10 minutes,
the interior lights will automatically turn off.
NOTE:Battery saver mode is canceled if the ignition is in
the ON/RUN position.
If the headlights remain on while the ignition is
placed in the OFF position, the exterior lights will
automatically turn off after eight minutes. If the
headlights are turned on and left on for eight
minutes while the ignition is in the OFF position,
the exterior lights will automatically turn off.
INTERIOR LIGHTS
COURTESY LIGHTS
Courtesy and dome lights are turned on when the
front doors are opened or the Dome ON button is
pushed on the overhead console. If your vehicle is
equipped with Remote Keyless Entry and the
unlock button is pushed on the key fob, the
courtesy and dome lights will turn on. When a door
is open and the interior lights are on, pressing the Dome Defeat button on the overhead console will
cause all of the interior lights to turn off.
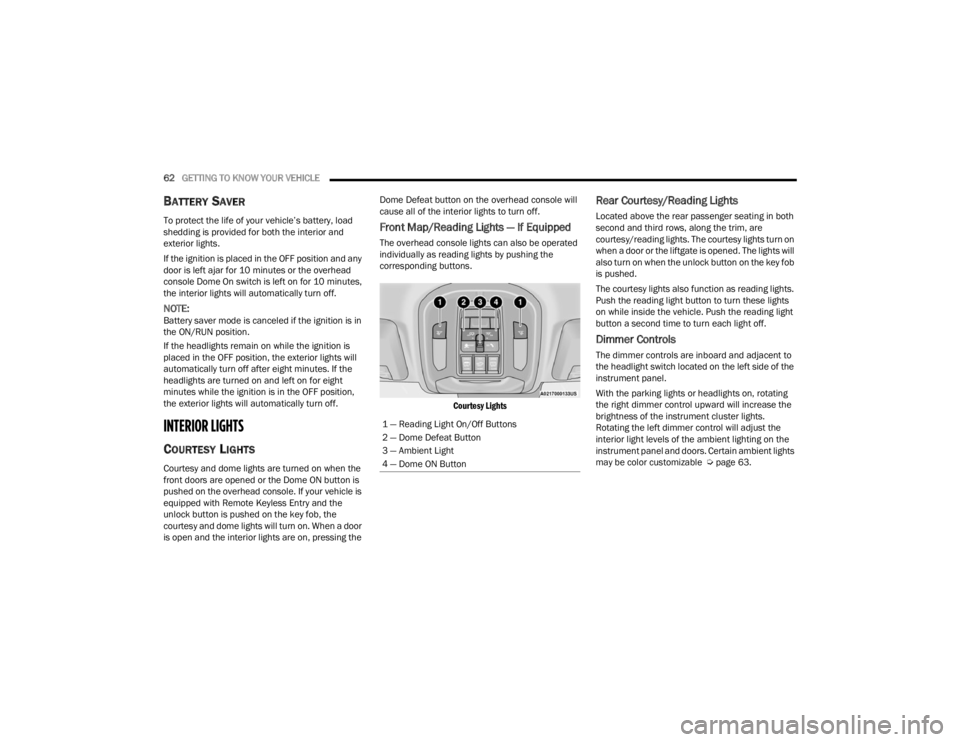
Front Map/Reading Lights — If Equipped
The overhead console lights can also be operated
individually as reading lights by pushing the
corresponding buttons.
Courtesy Lights
Rear Courtesy/Reading Lights
Located above the rear passenger seating in both
second and third rows, along the trim, are
courtesy/reading lights. The courtesy lights turn on
when a door or the liftgate is opened. The lights will
also turn on when the unlock button on the key fob
is pushed.
The courtesy lights also function as reading lights.
Push the reading light button to turn these lights
on while inside the vehicle. Push the reading light
button a second time to turn each light off.
Dimmer Controls
The dimmer controls are inboard and adjacent to
the headlight switch located on the left side of the
instrument panel.
With the parking lights or headlights on, rotating
the right dimmer control upward will increase the
brightness of the instrument cluster lights.
Rotating the left dimmer control will adjust the
interior light levels of the ambient lighting on the
instrument panel and doors. Certain ambient lights
may be color customizable Ú page 63.
1 — Reading Light On/Off Buttons
2 — Dome Defeat Button
3 — Ambient Light
4 — Dome ON Button
23_WL_OM_EN_USC_t.book Page 62
Page 67 of 424
GETTING TO KNOW YOUR VEHICLE65
Mist
Use the Mist feature when weather conditions
make occasional usage of the wipers necessary.
Push the lever upward to the MIST position and
release for a single wiping cycle.
NOTE:The Mist feature does not activate the washer
pump; therefore, no washer fluid will be sprayed on
the windshield. The washer function must be used
in order to spray the windshield with washer fluid.
For information on wiper care and replacement,
see Úpage 343.
RAIN SENSING WIPERS — IF EQUIPPED
This feature senses rain or snowfall on the
windshield and automatically activates the wipers.
Rotate the end of the windshield wiper lever to one
of the four detent positions to activate this feature.
The sensitivity of the system is adjustable from the
windshield wiper lever. Wiper sensitivity position 1
is the least sensitive, and wiper sensitivity position
4 is the most sensitive.
NOTE:
The Rain Sensing feature will not operate when
the wiper switch is in the low, high, or OFF posi -
tion. Only in one of the intermittent positions.
The Rain Sensing feature may not function prop -
erly when ice or dried saltwater is present on the
windshield.
Use of products containing wax or silicone may
reduce rain sensor performance.
The Rain Sensing feature can be turned on and
off through the Uconnect system Ú page 204.The Rain Sensing system has protective features
for the wiper blades and arms. It will not operate
under the following conditions:
Low Temperature Wipe Inhibit
— The Rain
Sensing feature will not operate when the igni -
tion is first placed in the ON/RUN position, when
the vehicle is stationary and the outside
temperature is below 32°F (0°C), unless the
wiper control on the windshield wiper lever is
moved, the vehicle speed becomes greater than
3 mph (5 km/h) or the outside temperature
rises above freezing.
Neutral Wipe Inhibit — The Rain Sensing feature
will not operate when the ignition is placed in
the ON/RUN position, when the transmission
gear selector is in the NEUTRAL position and the
vehicle speed is less than 3 mph (5 km/h),
unless the wiper control on the windshield wiper
lever is moved, the vehicle speed is greater than
3 mph (5 km/h) or the gear selector is moved
out of the NEUTRAL position.
Remote Start Mode Inhibit — On vehicles
equipped with the Remote Start system, Rain
Sensing wipers are not operational when the
vehicle is in the Remote Start mode. Once the
operator is in the vehicle and has placed the
ignition switch in the ON/RUN position, rain
sensing wiper operation can resume, if it has
been selected, and no other inhibit conditions
(mentioned previously) exist.
WARNING!
Sudden loss of visibility through the windshield
could lead to a collision. You might not see other
vehicles or other obstacles. To avoid sudden
icing of the windshield during freezing weather,
warm the windshield with the defroster before
and during windshield washer use.
2
23_WL_OM_EN_USC_t.book Page 65
Page 69 of 424
GETTING TO KNOW YOUR VEHICLE67
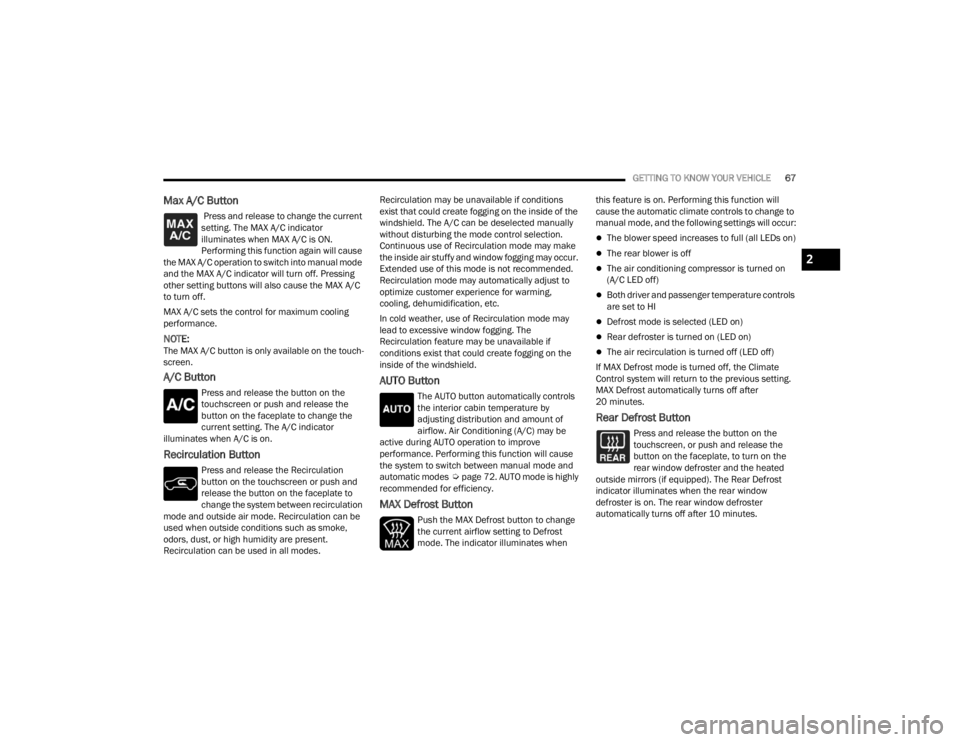
Max A/C Button
Press and release to change the current
setting. The MAX A/C indicator
illuminates when MAX A/C is ON.
Performing this function again will cause
the MAX A/C operation to switch into manual mode
and the MAX A/C indicator will turn off. Pressing
other setting buttons will also cause the MAX A/C
to turn off.
MAX A/C sets the control for maximum cooling
performance.
NOTE:The MAX A/C button is only available on the touch -
screen.
A/C Button
Press and release the button on the
touchscreen or push and release the
button on the faceplate to change the
current setting. The A/C indicator
illuminates when A/C is on.
Recirculation Button
Press and release the Recirculation
button on the touchscreen or push and
release the button on the faceplate to
change the system between recirculation
mode and outside air mode. Recirculation can be
used when outside conditions such as smoke,
odors, dust, or high humidity are present.
Recirculation can be used in all modes. Recirculation may be unavailable if conditions
exist that could create fogging on the inside of the
windshield. The A/C can be deselected manually
without disturbing the mode control selection.
Continuous use of Recirculation mode may make
the inside air stuffy and window fogging may occur.
Extended use of this mode is not recommended.
Recirculation mode may automatically adjust to
optimize customer experience for warming,
cooling, dehumidification, etc.
In cold weather, use of Recirculation mode may
lead to excessive window fogging. The
Recirculation feature may be unavailable if
conditions exist that could create fogging on the
inside of the windshield.
AUTO Button
The AUTO button automatically controls
the interior cabin temperature by
adjusting distribution and amount of
airflow. Air Conditioning (A/C) may be
active during AUTO operation to improve
performance. Performing this function will cause
the system to switch between manual mode and
automatic modes Úpage 72. AUTO mode is highly
recommended for efficiency.
MAX Defrost Button
Push the MAX Defrost button to change
the current airflow setting to Defrost
mode. The indicator illuminates when this feature is on. Performing this function will
cause the automatic climate controls to change to
manual mode, and the following settings will occur:
The blower speed increases to full (all LEDs on)
The rear blower is off
The air conditioning compressor is turned on
(A/C LED off)
Both driver and passenger temperature controls
are set to HI
Defrost mode is selected (LED on)
Rear defroster is turned on (LED on)
The air recirculation is turned off (LED off)
If MAX Defrost mode is turned off, the Climate
Control system will return to the previous setting.
MAX Defrost automatically turns off after
20 minutes.
Rear Defrost Button
Press and release the button on the
touchscreen, or push and release the
button on the faceplate, to turn on the
rear window defroster and the heated
outside mirrors (if equipped). The Rear Defrost
indicator illuminates when the rear window
defroster is on. The rear window defroster
automatically turns off after 10 minutes.
2
23_WL_OM_EN_USC_t.book Page 67
Page 74 of 424
72GETTING TO KNOW YOUR VEHICLE
REAR TEMPERATURE LOCK
The Rear Temperature Lock symbol on
the rear display is illuminated when the
rear controls are locked by the front
system.
Rear Lock
Pressing the Rear Temperature Lock button on the
Uconnect touchscreen will illuminate a lock symbol
in the rear display. The rear temperature and air
source are then controlled from the front Uconnect
system.
Rear seat occupants can only adjust the rear ATC
control when the Rear Temperature Lock button is
turned off.
The rear ATC is located on the rear of the front
center console.
Press the Rear Temperature Lock button on the
front Uconnect touchscreen a second time to
turn the Rear Temperature Lock icon off in the
rear display.
Push a rear blower button, adjust the tempera -
ture using the rear up and down arrows, and
select a control mode to suit the rear occupant’s
needs.
ATC is selected by pushing the AUTO button on
the rear climate control faceplate. Once the desired temperature is shown on the rear
display, the ATC System will automatically achieve
and maintain that comfort level. When the system
is set up for your comfort level, it is not necessary
to change the settings. You will experience the
greatest efficiency by simply allowing the system to
function automatically.
AUTOMATIC TEMPERATURE CONTROL
(ATC)
Automatic Operation
1. Push the AUTO button on the front Automatic
Temperature Control (ATC) Panel and the
word “AUTO” will illuminate in the front ATC
display, along with two temperatures for the
driver and front passenger. The system will
then automatically regulate the amount of
airflow.
2. Adjust the temperature you would like the system to maintain, by adjusting the driver,
passenger, and rear temperatures. Once the
desired temperature is displayed, the system
will achieve and automatically maintain that
comfort level.
3. When the system is set up for your comfort level, it is not necessary to change the
settings. You will experience the greatest
efficiency by simply allowing the system to
function automatically.
NOTE:It is not necessary to move the temperature
settings. The system automatically adjusts the
temperature, mode and fan speed to provide
comfort as quickly as possible.
To provide you with maximum comfort in the
automatic mode, during cold start-ups, the blower
fan will remain on low until the engine warms up.
The fan will engage immediately if the Defrost
mode is selected, or by changing the front blower
knob setting.
Manual Operation Override
This system offers a full complement of manual
override features. The AUTO symbol in the front
ATC display will be turned off when the system is
being used in the manual mode.
NOTE:The system will not automatically sense the
presence of fog, mist or ice on the windshield.
Defrost mode must be manually selected to clear
the windshield and side glass.
CLIMATE VOICE RECOGNITION
Adjust vehicle temperatures hands-free and keep
everyone comfortable while you keep moving
ahead (if vehicle is equipped with climate
controls).
23_WL_OM_EN_USC_t.book Page 72