JEEP PATRIOT 2015 1.G User Guide
Manufacturer: JEEP, Model Year: 2015, Model line: PATRIOT, Model: JEEP PATRIOT 2015 1.GPages: 132, PDF Size: 19.28 MB
Page 111 of 132
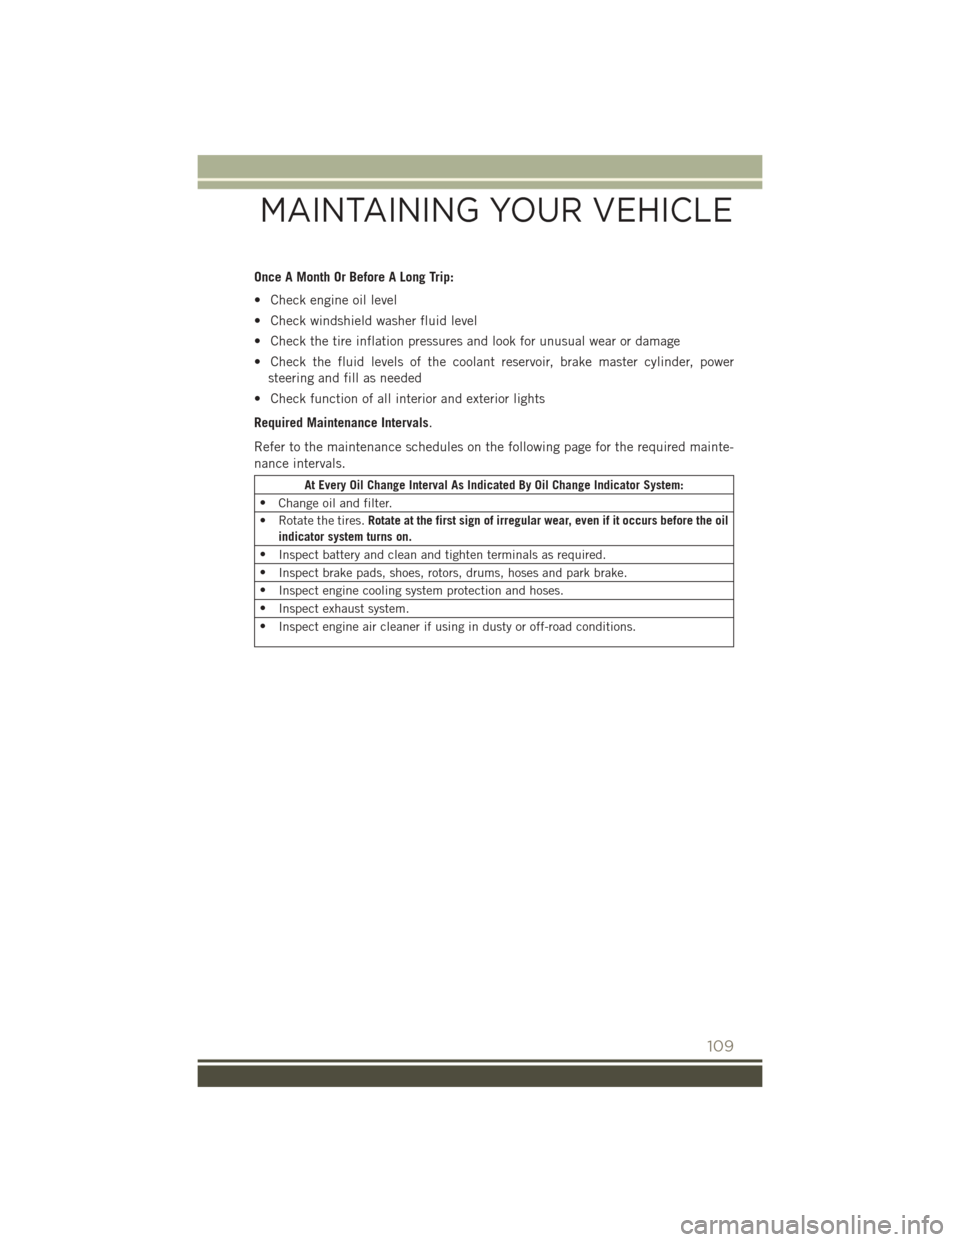
Once A Month Or Before A Long Trip:
• Check engine oil level
• Check windshield washer fluid level
• Check the tire inflation pressures and look for unusual wear or damage
• Check the fluid levels of the coolant reservoir, brake master cylinder, power
steering and fill as needed
• Check function of all interior and exterior lights
Required Maintenance Intervals.
Refer to the maintenance schedules on the following page for the required mainte-
nance intervals.
At Every Oil Change Interval As Indicated By Oil Change Indicator System:
•Change oil and filter.
• Rotate the tires.Rotate at the first sign of irregular wear, even if it occurs before the oil
indicator system turns on.
•Inspect battery and clean and tighten terminals as required.
•Inspect brake pads, shoes, rotors, drums, hoses and park brake.
•Inspect engine cooling system protection and hoses.
•Inspect exhaust system.
•Inspect engine air cleaner if using in dusty or off-road conditions.
MAINTAINING YOUR VEHICLE
109
Page 112 of 132
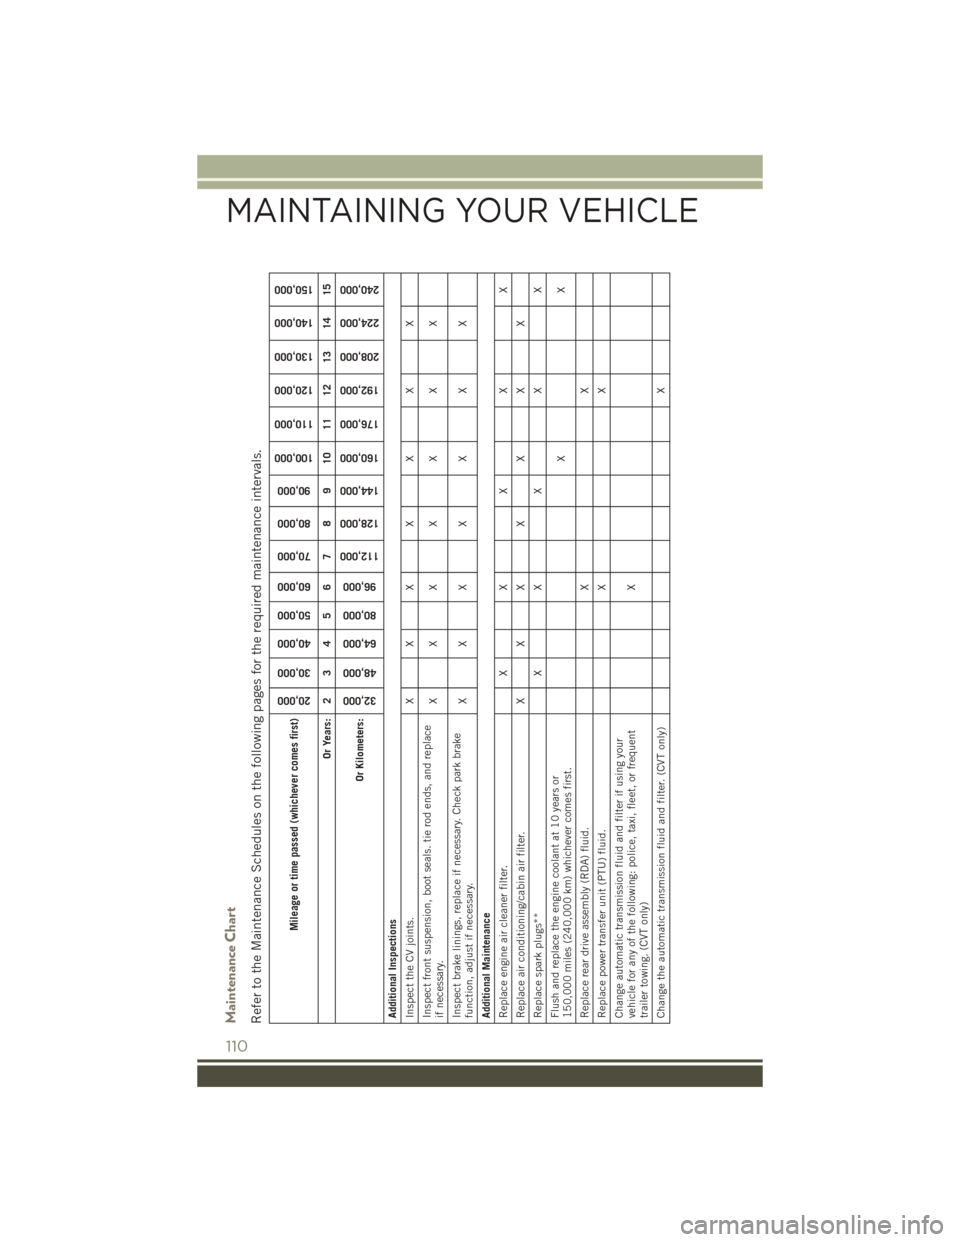
Maintenance ChartRefer to the Maintenance Schedules on the following pages for the required maintenance intervals.
Mileage or time passed (whichever comes first)
20,000
30,000
40,000
50,000
60,000
70,000
80,000
90,000
100,000
110,000
120,000
130,000
140,000
150,000
Or Years: 2 3 4 5 6 7 8 9 10 11 12 13 14 15
Or Kilometers:
32,000
48,000
64,000
80,000
96,000
112,000
128,000
144,000
160,000
176,000
192,000
208,000
224,000
240,000
Additional InspectionsInspect the CV joints. X X X X X X XInspect front suspension, boot seals. tie rod ends, and replaceif necessary.
XXX X X X X
Inspect brake linings, replace if necessary. Check park brakefunction, adjust if necessary.
XXX X X X X
Additional MaintenanceReplace engine air cleaner filter. X X X X XReplace air conditioning/cabin air filter. X X X X X X XReplace spark plugs** X X X X XFlush and replace the engine coolant at 10 years or150,000 miles (240,000 km) whichever comes first.
XX
Replace rear drive assembly (RDA) fluid. X XReplace power transfer unit (PTU) fluid. X XChange automatic transmission fluid and filter if using yourvehicle for any of the following: police, taxi, fleet, or frequenttrailer towing. (CVT only)
X
Change the automatic transmission fluid and filter. (CVT only) X
MAINTAINING YOUR VEHICLE
110
Page 113 of 132
Mileage or time passed (whichever comes first)
20,000
30,000
40,000
50,000
60,000
70,000
80,000
90,000
100,000
110,000
120,000
130,000
140,000
150,000
Or Years: 2 3 4 5 6 7 8 9 10 11 12 13 14 15
Or Kilometers:
32,000
48,000
64,000
80,000
96,000
112,000
128,000
144,000
160,000
176,000
192,000
208,000
224,000
240,000
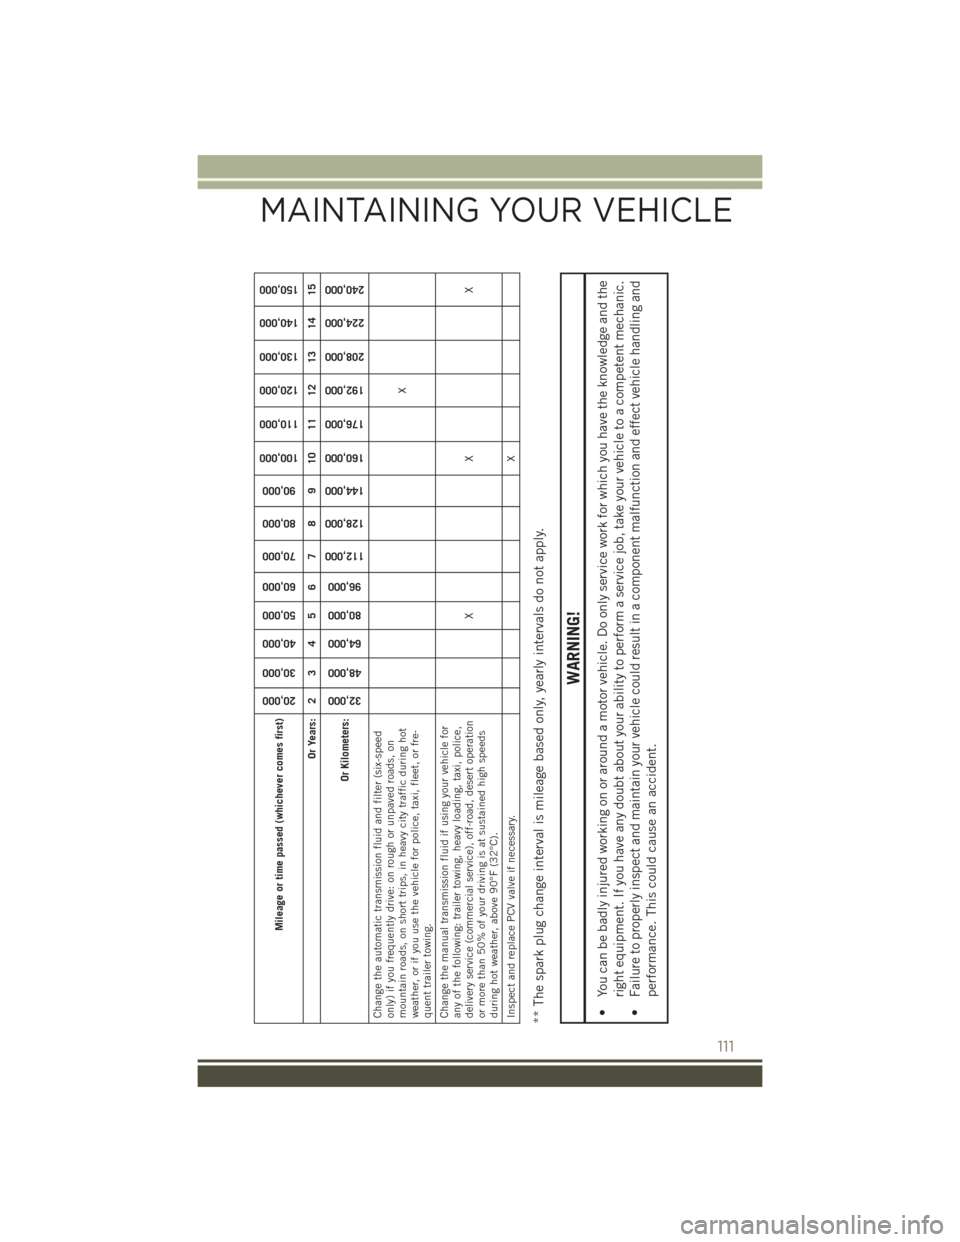
Change the automatic transmission fluid and filter (six-speedonly) if you frequently drive: on rough or unpaved roads, onmountain roads, on short trips, in heavy city traffic during hotweather, or if you use the vehicle for police, taxi, fleet, or fre-quent trailer towing.
X
Change the manual transmission fluid if using your vehicle forany of the following: trailer towing, heavy loading, taxi, police,delivery service (commercial service), off-road, desert operationor more than 50% of your driving is at sustained high speedsduring hot weather, above 90°F (32°C).
XX X
Inspect and replace PCV valve if necessary.
X
** The spark plug change interval is mileage based only, yearly intervals do not apply.
WARNING!
• You can be badly injured working on or around a motor vehicle. Do only service work for which you have the knowledge and the
right equipment. If you have any doubt about your ability to perform a service job, take your vehicle to a competent mechanic.
• Failure to properly inspect and maintain your vehicle could result in a component malfunction and effect vehicle handling and
performance. This could cause an accident.
MAINTAINING YOUR VEHICLE
111
Page 114 of 132
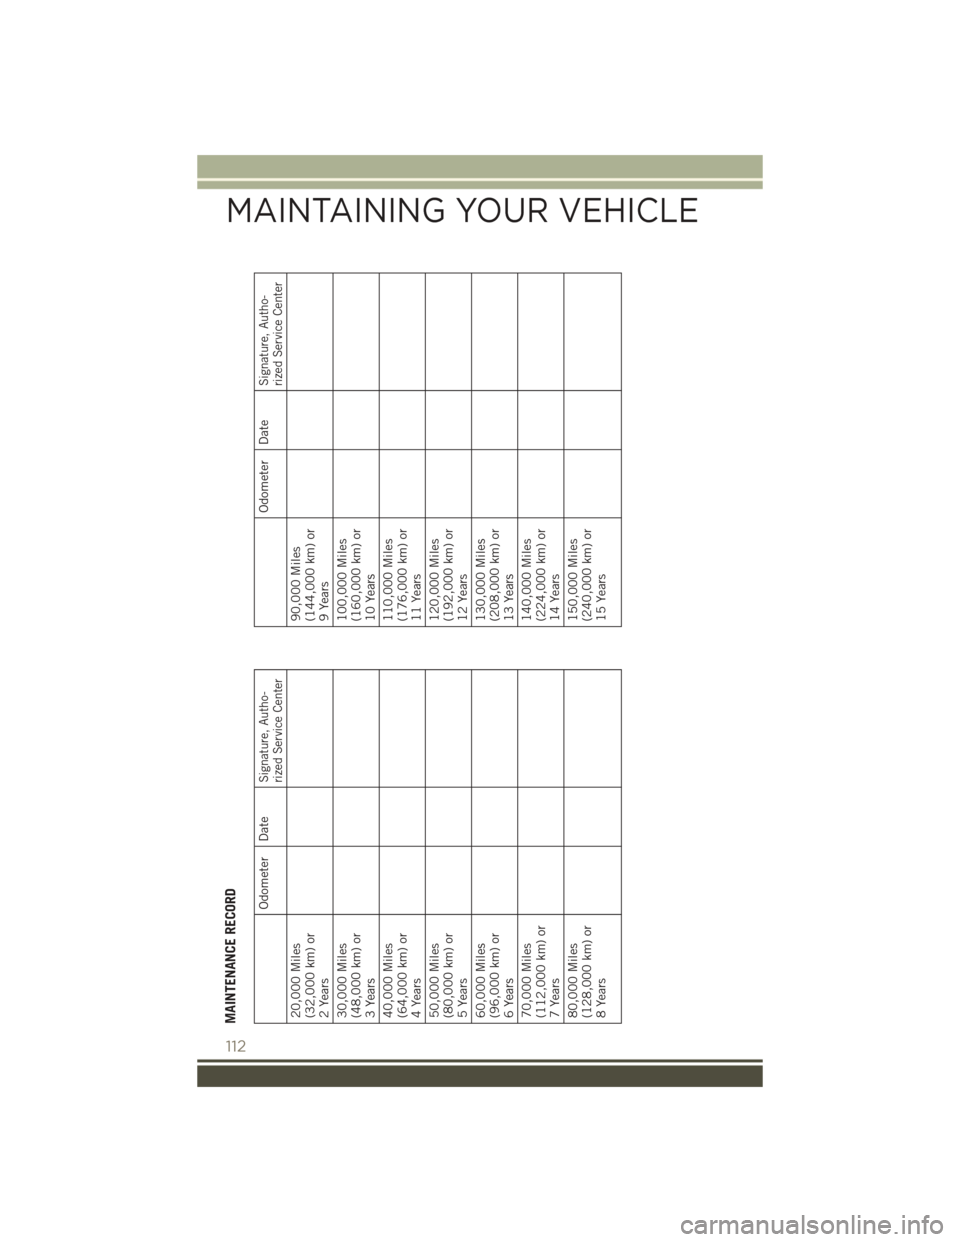
MAINTENANCE RECORD
Odometer Date
Signature, Autho-rized Service Center
20,000 Miles(32,000 km) or2 Years30,000 Miles(48,000 km) or3 Years40,000 Miles(64,000 km) or4 Years50,000 Miles(80,000 km) or5 Years60,000 Miles(96,000 km) or6 Years70,000 Miles(112,000 km) or7 Years80,000 Miles(128,000 km) or8 Years
Odometer Date
Signature, Autho-rized Service Center
90,000 Miles(144,000 km) or9 Years100,000 Miles(160,000 km) or10 Years110,000 Miles(176,000 km) or11 Years120,000 Miles(192,000 km) or12 Years130,000 Miles(208,000 km) or13 Years140,000 Miles(224,000 km) or14 Years150,000 Miles(240,000 km) or15 Years
MAINTAINING YOUR VEHICLE
112
Page 115 of 132
FUSES
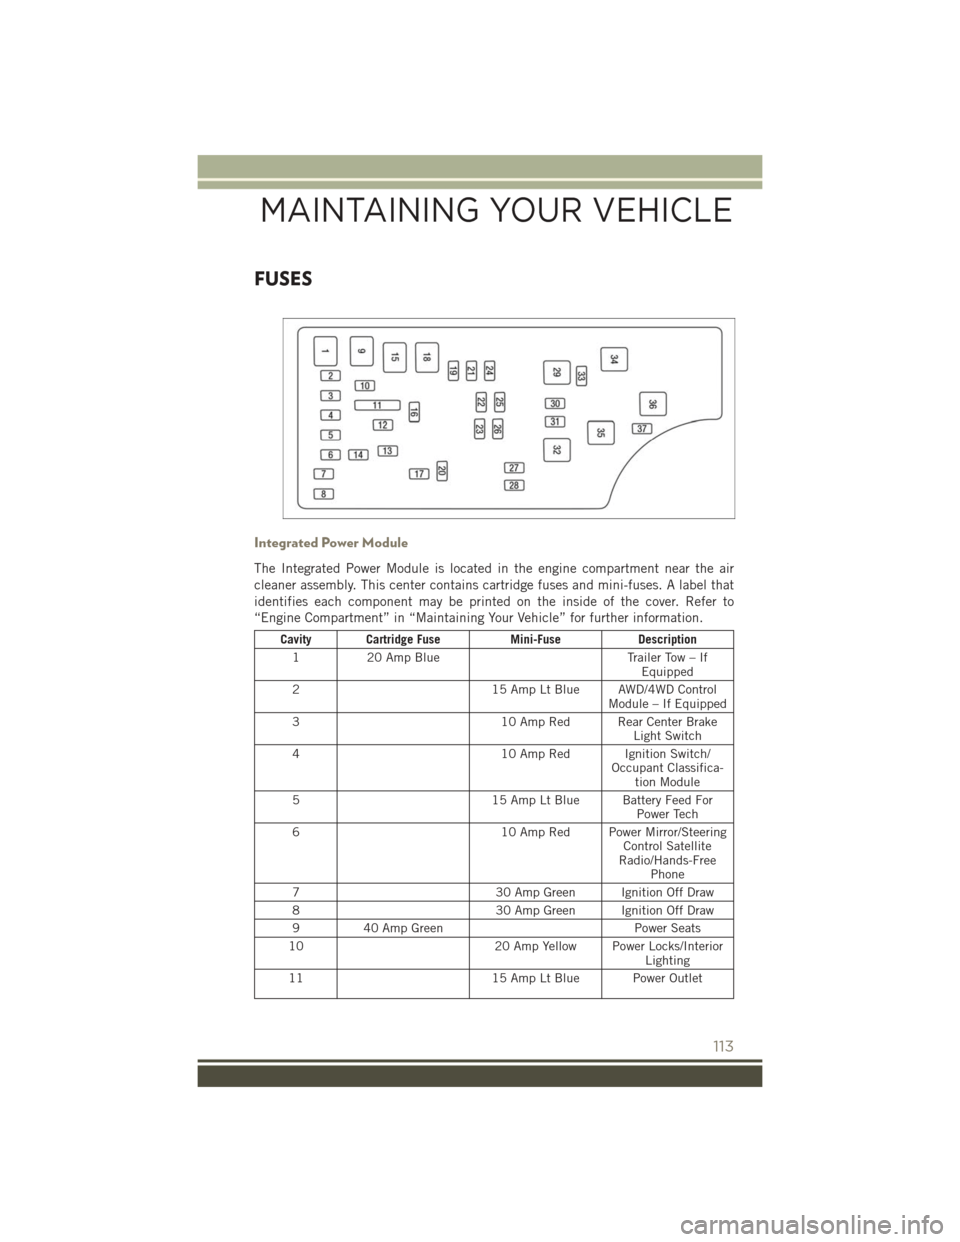
Integrated Power Module
The Integrated Power Module is located in the engine compartment near the air
cleaner assembly. This center contains cartridge fuses and mini-fuses. A label that
identifies each component may be printed on the inside of the cover. Refer to
“Engine Compartment” in “Maintaining Your Vehicle” for further information.
Cavity Cartridge FuseMini-FuseDescription
120 Amp BlueTrailer Tow – IfEquipped
215 Amp Lt Blue AWD/4WD ControlModule – If Equipped
310 Amp Red Rear Center BrakeLight Switch
410 Amp Red Ignition Switch/Occupant Classifica-tion Module
515 Amp Lt Blue Battery Feed ForPower Tech
610 Amp Red Power Mirror/SteeringControl SatelliteRadio/Hands-FreePhone
730 Amp Green Ignition Off Draw
830 Amp Green Ignition Off Draw
940 Amp GreenPower Seats
1020 Amp Yellow Power Locks/InteriorLighting
1115 Amp Lt Blue Power Outlet
MAINTAINING YOUR VEHICLE
113
Page 116 of 132
Cavity Cartridge FuseMini-FuseDescription
1220 Amp Yellow 115V AC Inverter – IfEquipped
1320 Amp Yellow Cigar Lighter
1410 Amp Red Instrument Cluster
15 40 Amp GreenRadiator Fan
1615 Amp Lt Blue Dome Lamp/Sunroof/Rear Wiper Motor
1710 Amp Red Wireless ControlModule
18 40 Amp GreenAuto Shutdown Relay
1920 Amp Yellow Radio Amplifiers
2015 Amp Lt BlueRadio
2110 Amp Red Intrusion Module/Siren – If Equipped
2210 Amp Red Heating, AC/Compass
2315 Amp Lt Blue Auto Shutdown Relay
2415 Amp Lt Blue Power Sunroof – IfEquipped
2510 Amp Red Heated Mirror – IfEquipped
2615 Amp Lt Blue Auto Shutdown Relay
2710 Amp Red Airbag Control Module
2810 Amp Red Airbag ControlModule/OccupantClassification Module
29Hot Car (No Fuse Re-quired)
3020 Amp Yellow Heated Seat – IfEquipped
3110 Amp Red Headlamp Washer – IfEquipped
3230 Amp PinkAuto Shutdown Relay
3310 Amp Red J1962 Conn/Powertrain ControlModule
3430 Amp PinkAntilock BrakeValve
35 40 Amp GreenAntilock Brake Pump
3630 Amp PinkHeadlamp/WasherControl/Smart Glass –If Equipped
3725 Amp Clear Diesel Heater and H2/MOD power top
MAINTAINING YOUR VEHICLE
114
Page 117 of 132
CAUTION!
• When installing the IPM cover, it is important to ensure the cover is properly
positioned and fully latched. Failure to do so may allow water to get into the
IPM, and possibly result in an electrical system failure.
•When replacing a blown fuse, it is important to use only a fuse having the correct
amperage rating. The use of a fuse with a rating other than indicated may result
in a dangerous electrical system overload. If a properly rated fuse continues to
blow, it indicates a problem in the circuit that must be corrected.
TIRE PRESSURES
Check the inflation pressure of each tire, including the spare tire (if equipped), at
least monthly and inflate to the recommended pressure for your vehicle.
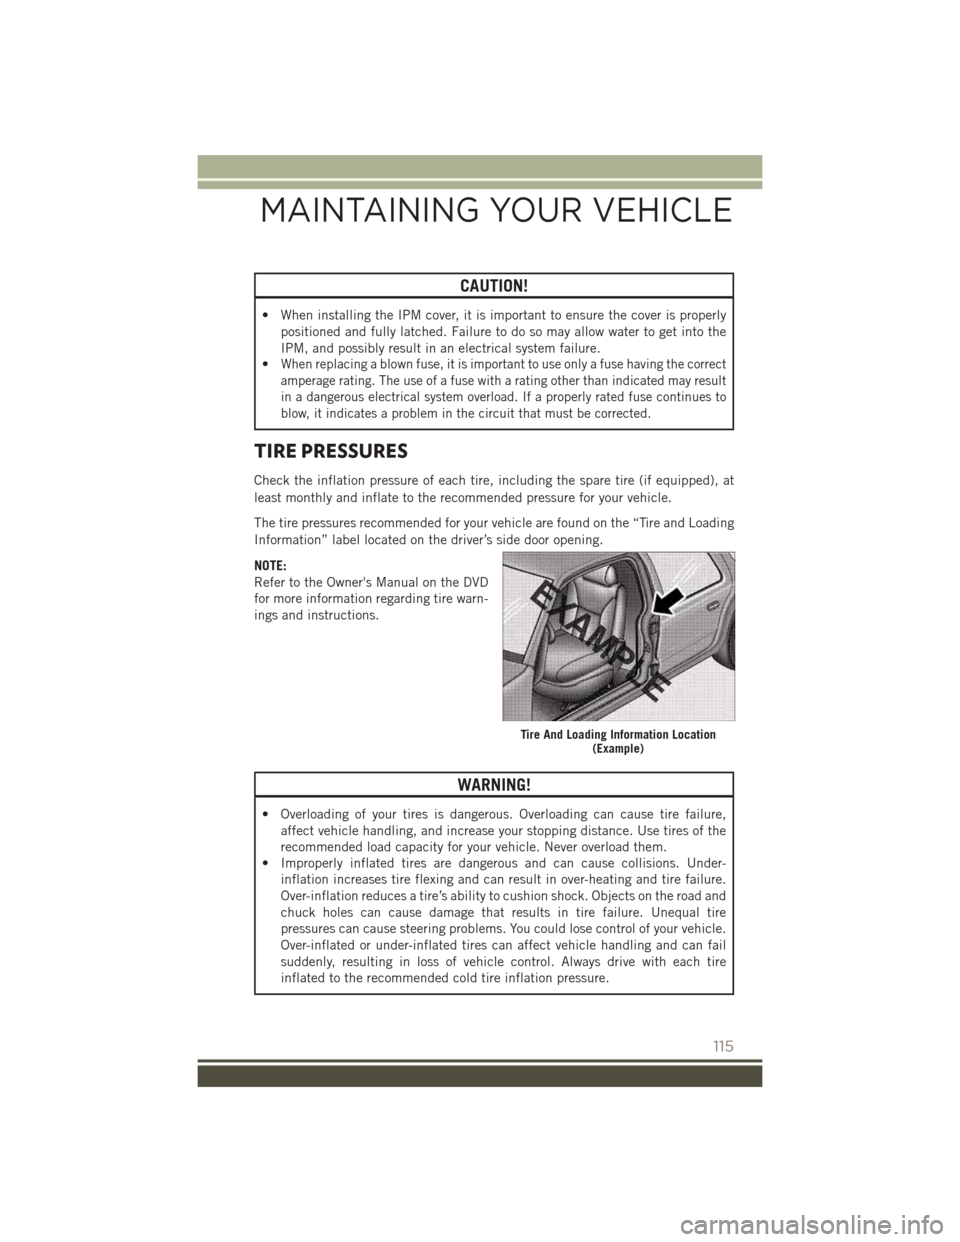
The tire pressures recommended for your vehicle are found on the “Tire and Loading
Information” label located on the driver’s side door opening.
NOTE:
Refer to the Owner's Manual on the DVD
for more information regarding tire warn-
ings and instructions.
WARNING!
• Overloading of your tires is dangerous. Overloading can cause tire failure,
affect vehicle handling, and increase your stopping distance. Use tires of the
recommended load capacity for your vehicle. Never overload them.
• Improperly inflated tires are dangerous and can cause collisions. Under-
inflation increases tire flexing and can result in over-heating and tire failure.
Over-inflation reduces a tire’s ability to cushion shock. Objects on the road and
chuck holes can cause damage that results in tire failure. Unequal tire
pressures can cause steering problems. You could lose control of your vehicle.
Over-inflated or under-inflated tires can affect vehicle handling and can fail
suddenly, resulting in loss of vehicle control. Always drive with each tire
inflated to the recommended cold tire inflation pressure.
Tire And Loading Information Location(Example)
MAINTAINING YOUR VEHICLE
115
Page 118 of 132
SPARE TIRES — IF EQUIPPED
NOTE:
For vehicles equipped with Tire Service Kit instead of a spare tire, please refer to “Tire
Service Kit” in “What To Do In Emergencies” on your DVD for further information.
CAUTION!
Because of the reduced ground clearance, do not take your vehicle through an
automatic car wash with a compact or limited-use temporary spare installed.
Damage to the vehicle may result.
Spare Tire Matching Original Equipped Tire And Wheel — If Equipped
Your vehicle may be equipped with a spare tire and wheel equivalent in look and
function to the original equipment tire and wheel found on the front or rear axle of
your vehicle. This spare tire may be used in the tire rotation for your vehicle. If your
vehicle has this option, refer to an authorized tire dealer for the recommended tire
rotation pattern.
Compact Spare Tire — If Equipped
The compact spare is for temporary emergency use only. You can identify if your
vehicle is equipped with a compact spare by looking at the spare tire description on
the Tire and Loading Information Placard located on the driver’s side door opening or
on the sidewall of the tire. Compact spare tire descriptions begin with the letter “T”
or “S” preceding the size designation. Example: T145/80D18 103M.
T, S = Temporary Spare Tire
Since this tire has limited tread life, the original equipment tire should be repaired
(or replaced) and reinstalled on your vehicle at the first opportunity.
Do not install a wheel cover or attempt to mount a conventional tire on the compact
spare wheel, since the wheel is designed specifically for the compact spare tire. Do
not install more than one compact spare tire and wheel on the vehicle at any given
time.
WARNING!
Compact spares are for temporary emergency use only. With these spares, do not
drive more than 50 mph (80 km/h). Temporary use spares have limited tread life.
When the tread is worn to the tread wear indicators, the temporary use spare tire
needs to be replaced. Be sure to follow the warnings, which apply to your spare.
Failure to do so could result in spare tire failure and loss of vehicle control.
MAINTAINING YOUR VEHICLE
116
Page 119 of 132
Full Size Spare — If Equipped
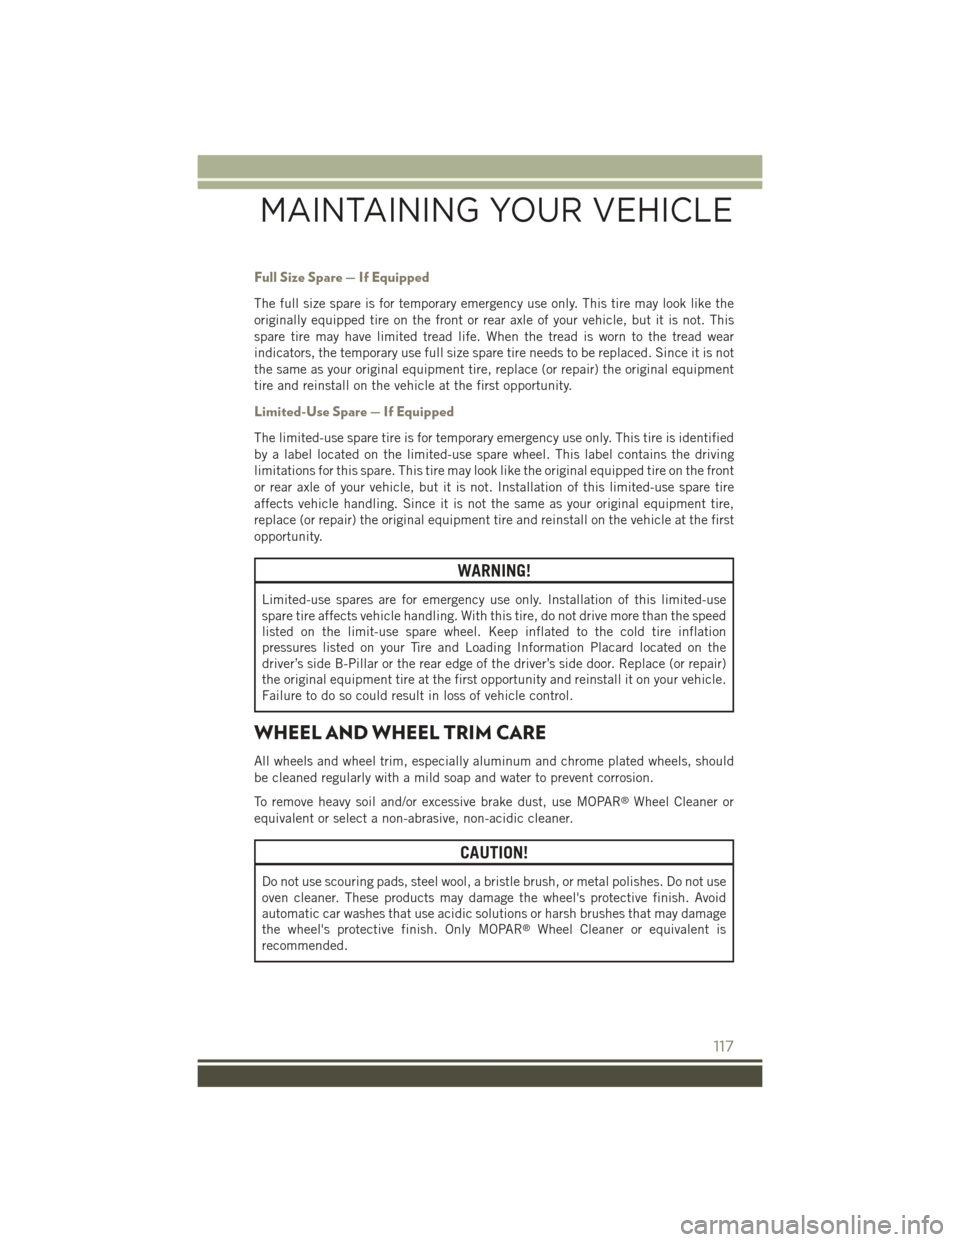
The full size spare is for temporary emergency use only. This tire may look like the
originally equipped tire on the front or rear axle of your vehicle, but it is not. This
spare tire may have limited tread life. When the tread is worn to the tread wear
indicators, the temporary use full size spare tire needs to be replaced. Since it is not
the same as your original equipment tire, replace (or repair) the original equipment
tire and reinstall on the vehicle at the first opportunity.
Limited-Use Spare — If Equipped
The limited-use spare tire is for temporary emergency use only. This tire is identified
by a label located on the limited-use spare wheel. This label contains the driving
limitations for this spare. This tire may look like the original equipped tire on the front
or rear axle of your vehicle, but it is not. Installation of this limited-use spare tire
affects vehicle handling. Since it is not the same as your original equipment tire,
replace (or repair) the original equipment tire and reinstall on the vehicle at the first
opportunity.
WARNING!
Limited-use spares are for emergency use only. Installation of this limited-use
spare tire affects vehicle handling. With this tire, do not drive more than the speed
listed on the limit-use spare wheel. Keep inflated to the cold tire inflation
pressures listed on your Tire and Loading Information Placard located on the
driver’s side B-Pillar or the rear edge of the driver’s side door. Replace (or repair)
the original equipment tire at the first opportunity and reinstall it on your vehicle.
Failure to do so could result in loss of vehicle control.
WHEEL AND WHEEL TRIM CARE
All wheels and wheel trim, especially aluminum and chrome plated wheels, should
be cleaned regularly with a mild soap and water to prevent corrosion.
To remove heavy soil and/or excessive brake dust, use MOPAR®Wheel Cleaner or
equivalent or select a non-abrasive, non-acidic cleaner.
CAUTION!
Do not use scouring pads, steel wool, a bristle brush, or metal polishes. Do not use
oven cleaner. These products may damage the wheel's protective finish. Avoid
automatic car washes that use acidic solutions or harsh brushes that may damage
the wheel's protective finish. Only MOPAR®Wheel Cleaner or equivalent is
recommended.
MAINTAINING YOUR VEHICLE
117
Page 120 of 132
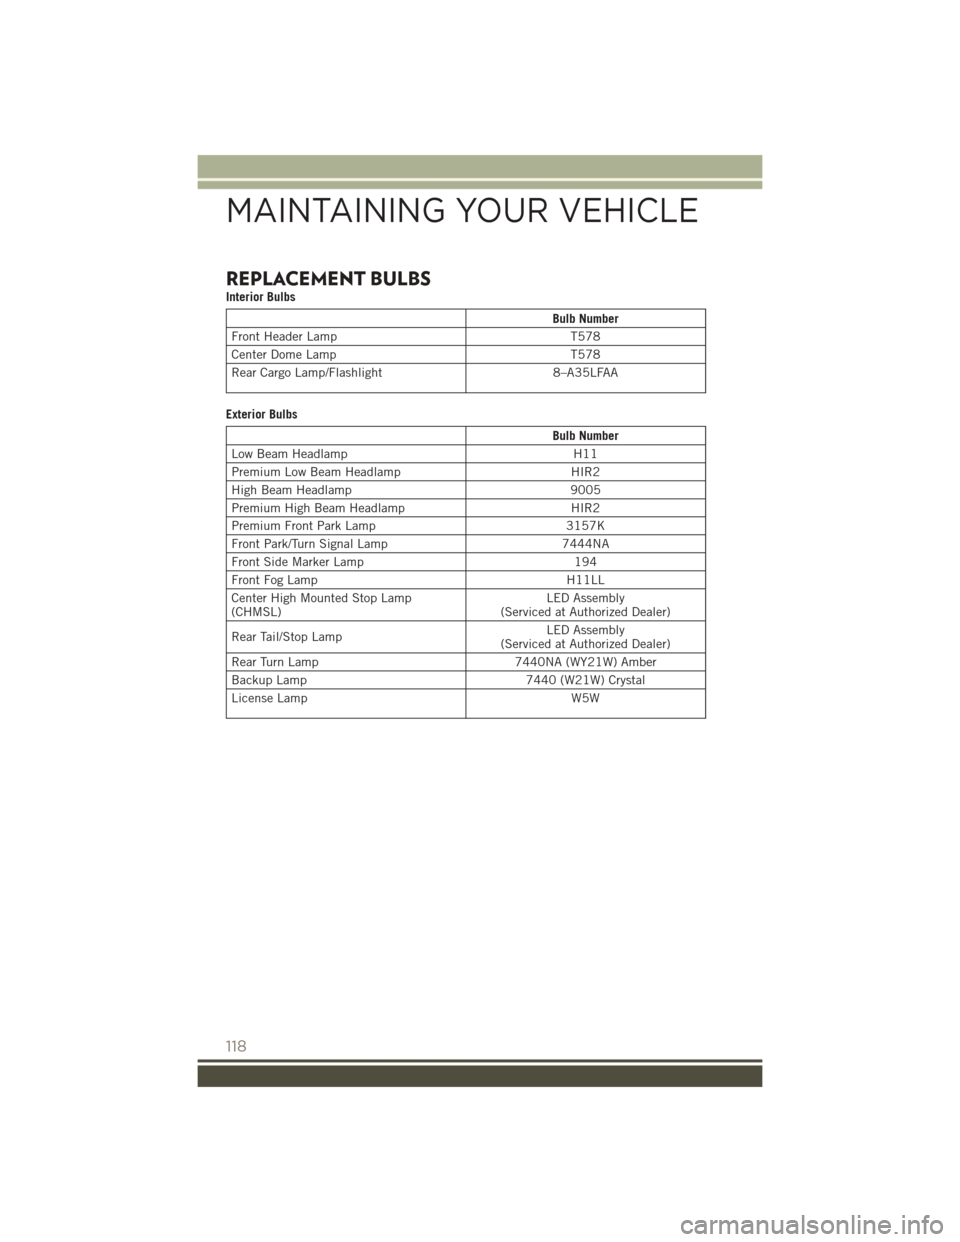
REPLACEMENT BULBS
Interior Bulbs
Bulb Number
Front Header LampT578
Center Dome LampT578
Rear Cargo Lamp/Flashlight8–A35LFAA
Exterior Bulbs
Bulb Number
Low Beam HeadlampH11
Premium Low Beam HeadlampHIR2
High Beam Headlamp9005
Premium High Beam HeadlampHIR2
Premium Front Park Lamp3157K
Front Park/Turn Signal Lamp7444NA
Front Side Marker Lamp194
Front Fog LampH11LL
Center High Mounted Stop Lamp(CHMSL)LED Assembly(Serviced at Authorized Dealer)
Rear Tail/Stop LampLED Assembly(Serviced at Authorized Dealer)
Rear Turn Lamp7440NA (WY21W) Amber
Backup Lamp7440 (W21W) Crystal
License LampW5W
MAINTAINING YOUR VEHICLE
118