mirror JEEP RENEGADE 2014 1.G Owners Manual
[x] Cancel search | Manufacturer: JEEP, Model Year: 2014, Model line: RENEGADE, Model: JEEP RENEGADE 2014 1.GPages: 212, PDF Size: 17.48 MB
Page 6 of 212
USE OF THE OWNER HANDBOOK
OPERATING INSTRUCTIONS
Each time direction instructions (left/right or forwards/backwards) about the vehicle are given, these must be intended as
regarding an occupant in the driver's seat. Special cases not complying with this rule will be properly specified in the text.
The figures in the Owner Handbook are provided by way of example only: this might imply that some details of the image do
not correspond to the actual arrangement of your vehicle. In addition, the Handbook has been conceived considering vehicles
with steering wheel on the left side; it is therefore possible that on vehicles with steering wheel on the right side, some controls
position or construction is not exactly mirror-like with respect to the figure.
To identify the chapter with the information needed you can consult the index at the end of this Owner Handbook.
Chapters can be rapidly identified with dedicated graphic tabs, at the side of each odd page. A few pages further there is a key
for getting to know the chapter order and the relevant symbols in the tabs. There is anyway a textual indication of the current
chapter at the side of each even page.
WARNINGS AND PRECAUTIONS
While reading this Owner Handbook you will find a series ofWARNINGSto prevent procedures that could damage your
vehicle.
There are alsoPRECAUTIONSthat must be carefully followed to prevent incorrect use of the components of the vehicle,
which could cause accidents or injuries.
Therefore allWARNINGSandPRECAUTIONSmust always be carefully followed.
WARNINGSandPRECAUTIONSare recalled in the text with the following symbols:
personal safety;
vehicle safety;
environmental protection.
NOTE These symbols, when necessary, are indicated besides the title or at the end of the line and are followed by a number.
That number recalls the corresponding warning at the end of the relevant section.
Page 8 of 212
GETTING TO KNOW YOUR CAR
In-depth knowledge of your new vehicle
starts here.
The booklet that you are reading simply
and directly explains how it is made
and how it works.
That’s why we advise you to read it
seated comfortably on board, so that
you can see immediately what is
described here for yourself.THE KEYS....................................... 7
IGNITION DEVICE ........................... 8
SENTRY KEY® ............................... 10
ALARM ........................................... 11
DOORS ........................................... 11
SEATS ............................................ 14
HEAD RESTRAINTS ........................ 16
STEERING WHEEL ......................... 17
REAR VIEW MIRRORS .................... 18
EXTERIOR LIGHTS ......................... 19
INTERIOR LIGHTS .......................... 21
WINDSCREEN/REAR WINDOW
WIPER ............................................ 22
CLIMATE CONTROL ...................... 24
ELECTRIC WINDOWS .................... 28
ELECTRIC SUN ROOF .................... 29
MYSKY SUN ROOF ........................ 31
BONNET ......................................... 33
LUGGAGE COMPARTMENT ........... 34
6
GETTING TO KNOW YOUR CAR
Page 20 of 212
REAR VIEW
MIRRORS
INTERIOR MIRROR
The mirror is fitted with a safety device
that causes its release in the event of
a violent impact with the passenger.
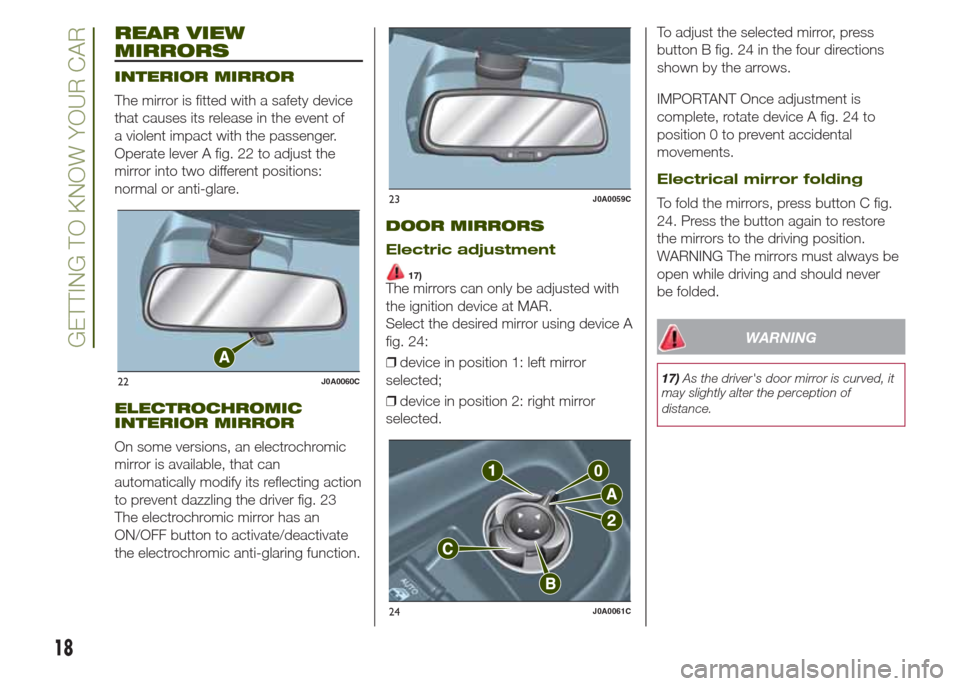
Operate lever A fig. 22 to adjust the
mirror into two different positions:
normal or anti-glare.
ELECTROCHROMIC
INTERIOR MIRROR
On some versions, an electrochromic
mirror is available, that can
automatically modify its reflecting action
to prevent dazzling the driver fig. 23
The electrochromic mirror has an
ON/OFF button to activate/deactivate
the electrochromic anti-glaring function.
DOOR MIRRORS
Electric adjustment
17)The mirrors can only be adjusted with
the ignition device at MAR.
Select the desired mirror using device A
fig. 24:
❒device in position 1: left mirror
selected;
❒device in position 2: right mirror
selected.To adjust the selected mirror, press
button B fig. 24 in the four directions
shown by the arrows.
IMPORTANT Once adjustment is
complete, rotate device A fig. 24 to
position 0 to prevent accidental
movements.
Electrical mirror folding
To fold the mirrors, press button C fig.
24. Press the button again to restore
the mirrors to the driving position.
WARNING The mirrors must always be
open while driving and should never
be folded.
WARNING
17)As the driver's door mirror is curved, it
may slightly alter the perception of
distance.22J0A0060C
23J0A0059C
24J0A0061C
18
GETTING TO KNOW YOUR CAR
Page 25 of 212
RAIN SENSOR(where provided)
This is located behind the interior rear
view mirror, in contact with the
windscreen and can detect the
presence of rain and, consequently,
manage the cleaning of the windscreen
in accordance with the amount of
water on the screen.
Activation/deactivation
9) 10)
By acting on the display menu or on the
Uconnect™system you can
activate/deactivate the rain sensor. The
sensor can also be deactivated by
bringing the ignition device to STOP.
The activation of the sensor is signalled
by a "stroke" to show that the
command has been acquired.
If the ignition device is moved to STOP
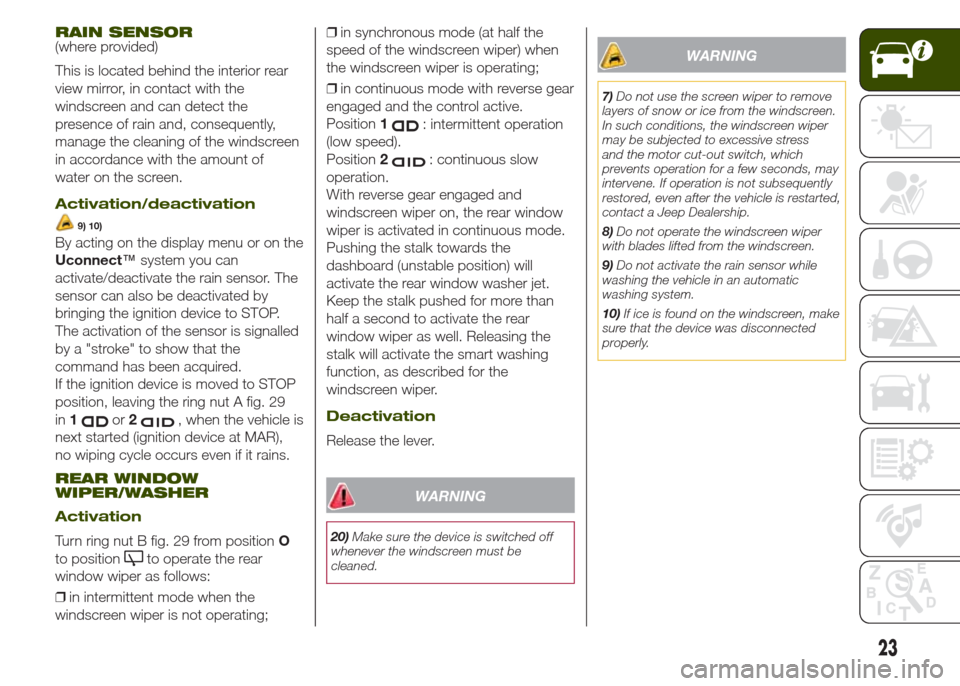
position, leaving the ring nut A fig. 29
in1
or2, when the vehicle is
next started (ignition device at MAR),
no wiping cycle occurs even if it rains.
REAR WINDOW
WIPER/WASHER
Activation
Turn ring nut B fig. 29 from positionO
to position
to operate the rear
window wiper as follows:
❒in intermittent mode when the
windscreen wiper is not operating;❒in synchronous mode (at half the
speed of the windscreen wiper) when
the windscreen wiper is operating;
❒in continuous mode with reverse gear
engaged and the control active.
Position1
: intermittent operation
(low speed).
Position2
: continuous slow
operation.
With reverse gear engaged and
windscreen wiper on, the rear window
wiper is activated in continuous mode.
Pushing the stalk towards the
dashboard (unstable position) will
activate the rear window washer jet.
Keep the stalk pushed for more than
half a second to activate the rear
window wiper as well. Releasing the
stalk will activate the smart washing
function, as described for the
windscreen wiper.
Deactivation
Release the lever.
WARNING
20)Make sure the device is switched off
whenever the windscreen must be
cleaned.
WARNING
7)Do not use the screen wiper to remove
layers of snow or ice from the windscreen.
In such conditions, the windscreen wiper
may be subjected to excessive stress
and the motor cut-out switch, which
prevents operation for a few seconds, may
intervene. If operation is not subsequently
restored, even after the vehicle is restarted,
contact a Jeep Dealership.
8)Do not operate the windscreen wiper
with blades lifted from the windscreen.
9)Do not activate the rain sensor while
washing the vehicle in an automatic
washing system.
10)If ice is found on the windscreen, make
sure that the device was disconnected
properly.
23
Page 27 of 212
E - air distribution knob:
air from central outlets and side vents
air from central outlets, side vents and front and rear footwell vents
air outlet from the front and rear footwell vents and a light air flow also from the side vents on the dashboard
air outlet from the front and rear footwell vents, to the windscreen, the side windows and a light air flow also at the side
vents on the dashboard
air outlet to the windscreen, the side windows and a light air flow also at the side vents on the dashboard
4 further intermediate positions are also possible in the 5 main distributions described above.
F - heated rear window on/off button and, where provided, door mirror electric heating;
IMPORTANT Do not affix stickers to the inside of the heated rear window over the heating filaments, to avoid damage that
might cause them to stop working properly.
IMPORTANT Internal air recirculation makes it possible to reach the required heating or cooling conditions more quickly
depending on the mode selected. Do not use the internal air recirculation function on rainy/cold days as it would considerably
increase the possibility of the windows misting.
Additional heater(where provided)
The additional heater ensures more
rapid passenger compartment heating.
It activates in cold weather conditions,
if the following conditions are verified:
❒outside temperature low;
❒engine coolant temperature low;
❒engine on;
❒fan speed set at least to 1st speed;
❒knob C turned completely clockwise
to red section.
The heater is switched off when at least
one of the conditions above is no
longer verified.NoteThe power of the electric heater is
modulated according to the battery
voltage.
WARNING
2)The system uses R1234YF coolant,
which does not pollute the environment in
the event of accidental leakage. Under
no circumstances use R134a and R12
fluids, which are incompatible with the
components of the system.
25
Page 29 of 212
Air flow to the front and rear footwell diffusers. This air distribution setting heats the passenger compartment most quickly,
giving a prompt sensation of warmth.
+Air flow distributed between footwell diffusers (hotter air) and central and side dashboard vents (cooler air). This
distribution setting is useful in spring and autumn on sunny days.
+Air flow distributed between footwell diffusers and windscreen and front side window defrosting/demisting diffusers.
This distribution setting allows the passenger compartment to be warmed up efficiently and prevents the windows
from misting up.
+Air flow distribution between windscreen demisting/defrosting diffusers and side and central dashboard vents. This
allows air to be sent to the windscreen in conditions of strong sunlight.
++Air flow distribution to all diffusers on the vehicle.
I - heated rear window on/off button; (where this function is provided, pressing the button also activates demisting/defrosting of
the door mirrors);
L - passenger side temperature adjustment knob;
M - SYNC function activation button (alignment of set temperatures) driver/passenger side;
N - AUTO function activation button (automatic operation).
In AUTO mode, the climate control
system automatically manages air
distribution (the LEDs on buttons H are
off). When set manually, the air
distribution is shown by the LEDs on
the selected buttons.
In combined function mode the relevant
function is enabled simultaneously
with those already set by pressing the
corresponding button. If a button
whose function is already active is
pressed, its operation is cancelled and
the corresponding LED switches off.
To restore automatic control of the
air distribution after a manual selection,
press the AUTO button.NOTES
The automatic climate control manages
the Stop/Start system (engine off and
vehicle at a standstill) in order to
guarantee sufficient comfort inside the
vehicle. In particularly severe climate
conditions it is recommended to limit
the use of the Stop/Start system to
prevent the compressor from
continuously switching on and off, with
consequent rapid misting of the
windows and accumulation of humidity
with unpleasant smells in the passenger
compartment.When the Stop/Start system is on
(engine off and vehicle at a standstill),
the automatic recirculation
management is turned off always taking
air in from outside, to reduce the
probability of the windows misting up
(as the compressor is off).
27
Page 63 of 212
Messages on the display
Message on the display
SERV 4WDFOUR WHEEL DRIVE FAILURE
This indicator switches on to report a four wheel drive system failure. Contact a Jeep
Dealership as soon as possible.
BLIND-SPOT MONITORINGBLIND-SPOT MONITORING SYSTEM
Sensor locking: a dedicated message is displayed in the case of failure of the Blind-spot
Monitoring system sensor. In this case, the LEDs on the door mirrors are switched on
constantly. An acoustic signal is also issued.
Free the bumper of any obstacles, cleaning it.
System not available: a dedicated message is displayed if the Blind-spot Monitoring
system is not available. In this case, the LEDs on the door mirrors are switched on
constantly.
The failed operation of the system might be due to the insufficient voltage from the battery
or other failures on the electrical system. Contact a Jeep Dealership as soon as possible
to have the electrical system checked.
PARKSENSEPARKSENSE SYSTEM
(where provided)
Sensor locking: the message is displayed in the case of a failure of the ParkSense
system sensors. An acoustic signal is also issued.
Free the bumper of any obstacles, cleaning it.
System not available: a dedicated message is displayed if the Parksense system is not
available.
The failed operation of the system might be due to the insufficient voltage from the battery
or other failures on the electrical system. Contact a Jeep Dealership as soon as possible
to have the electrical system checked.
61
Page 71 of 212
62)When "Systems disabled" mode is
selected, the ESC system will not be
available in the event of emergency
manoeuvres. "Systems disabled" mode is
only for off-road use.AUXILIARY DRIVING
SYSTEMS
BSM (Blind Spot
Monitoring) SYSTEM
(where provided)
The system uses two radar sensors,
located in the rear bumper (one for
each side - see fig. 55), to detect the
presence of vehicles (vehicles, trucks,
motorbikes, etc.) in the rear side blind
spots of your vehicle.
The system warns the driver about the
presence of vehicles in the detection
area by lighting up, on the relevant side,
the warning light located on the door
mirror fig. 56, along with an acoustic
warning. When the vehicle is started the
warning light turns on to signal the
driver that the system is active.
Sensors
The sensors are activated engaging any
forward gear at a speed higher than
about 10 km/h, or engaging the reverse
gear.
The sensors are temporarily
deactivated with vehicle at a standstill
and the gear lever in position P (Park)
(versions with automatic transmission),
or with vehicle at a standstill and
electric parking brake engaged
(versions with manual gearbox).
55J0A0220C
56J0A0217C
69
Page 72 of 212
The detection area of the system
covers about a lane on both sides of
the vehicle (around 3 metres). This area
begins from the door mirror and
extends for about 6 metres towards the
rear part of the vehicle.
When the sensors are active the system
monitors the detection areas on both
sides of the vehicle and warns the
driver about the possible presence of
vehicles in these areas.
While driving the system monitors the
detection area from three different input
points (side, rear and front) to check
whether a signal needs to be sent
to the driver. The system can detect the
presence of a vehicle in one of these
three areas.
Important
63)The system does not signal the
presence of fixed object (e.g. safety
barriers, poles, walls, etc.). However, in
some circumstances, the system may
activate in the presence of these
objects. This is normal and does not
indicate a system malfunction.
The system does not warn the driver
about the presence of vehicles coming
from the opposite direction, in the
adjacent lanes.
If a trailer is hitched to the vehicle, the
system automatically deactivates.The rear bumper area where the radar
sensors are located must stay free from
snow, ice and dirt gathered from the
road surface for the system to operate
correctly.
Do not cover the rear bumper area
where the radar sensors are located
with any object (e.g. adhesives, bike
rack, etc.).
Rear view: the system detects vehicles
approaching to the rear part of your
vehicle on both sides and entering the
rear detection area with a speed delta
lower than 50 km/h with respect to your
vehicle.
Overtaking vehicles: if another vehicle
is overtaken slowly (with a speed delta
lower than about 25 km/h) and this
stays in the blind spot for about 1.5
seconds, the warning light on the door
mirror of the corresponding side lights
up. If the speed delta between the
two vehicles is higher than about 25
km/h, the warning light does not light
up.
RCP (Rear Cross Path
detection) system
This system helps the driver during
reverse manoeuvres in the case of
reduced visibility. During "RCP"
operating mode, the system emits
acoustic and visual warnings if
the presence of an object is detected.
When an acoustic warning is sent,
theUconnect™volume is lowered.
The system can be activated/
deactivated through the display Menu
or theUconnect™system.
The system monitors the rear detection
areas on both sides of the vehicle, to
detect objects moving towards the
sides of the vehicle at a minimum
speed comprised between about 1
km/h and 3 km/h and objects moving
at a maximum speed of 35 km/h, as
generally happens in the parking areas.
The system activation is signalled to
the driver by means of a visual and
acoustic warning.
IMPORTANT If the sensors are covered
by objects or vehicles, the system will
not warn the driver.
70
SAFETY
Page 73 of 212
"Blind spot alert", "Visual" mode:
when this mode is active, the BSM
system sends a visual warning to the
relevant door mirror, according to
the detected object. When operating in
RCP mode, the system sends visual
and acoustic warnings when the
presence of an approaching object is
detected. When an acoustic warning is
sent, theUconnect™volume is
lowered.
"Blind spot alert", "Visual &
acoustic" mode: when this mode is
active, the BSM system sends a visual
warning to the relevant door mirror,
according to the detected object. If the
direction indicator on the side where
an obstacle has been detected is
activated, an acoustic warning is
emitted as well. When the acoustic
warning is emitted, theUconnect™
volume is lowered.
"Blind spot alert" function
deactivation: when the system is
deactivated ("Blind spot alert" mode at
"OFF"), the BSM or RCP systems will
not emit neither acoustic nor visual
warnings. The BSM system will store
the operating mode running when
the engine was switched off: each time
the engine is started, the operating
mode stored previously will be recalled
and used.FORWARD COLLISION
WARNING PLUS SYSTEM
64) 65) 66) 67)
23) 24) 25) 26) 27) 28) 29) 30) 31)
It comprises a radar located behind the
front bumper fig. 57 and a camera
located in the central part of the
windscreen fig. 58.
In the event of an imminent collision the
system intervenes by automatically
braking the vehicle to prevent the crash
or reduce its effects.The system may lightly brake to warn
the driver if a possible frontal accident
is detected. Signals and limited braking
are intended to allow the driver to
react promptly, in order to prevent or
reduce the effects of a potential
accident.
Versions equipped with Stop/Start
system: at the end of the automatic
braking, the Stop/Start system will
activate as described in paragraph
"Stop/Start system" of this chapter.
Versions equipped with manual
gearbox: at the end of the automatic
braking the engine may stall and turn
off, unless the clutch pedal is pressed.
Versions equipped with automatic
transmission: at the end of the
braking, the latest stored gear
is engaged: the vehicle may restart after
a few seconds from the automatic
stop.
IMPORTANT After the vehicle is
stopped, the brake calipers may be
locked for about 2 seconds for safety
reasons. Make sure you press the
brake pedal if the vehicle moves slightly
forwards.
57J0A0334C
58J0A0241C
71