JEEP RENEGADE 2015 1.G Owners Manual
Manufacturer: JEEP, Model Year: 2015, Model line: RENEGADE, Model: JEEP RENEGADE 2015 1.GPages: 678, PDF Size: 29.84 MB
Page 401 of 678
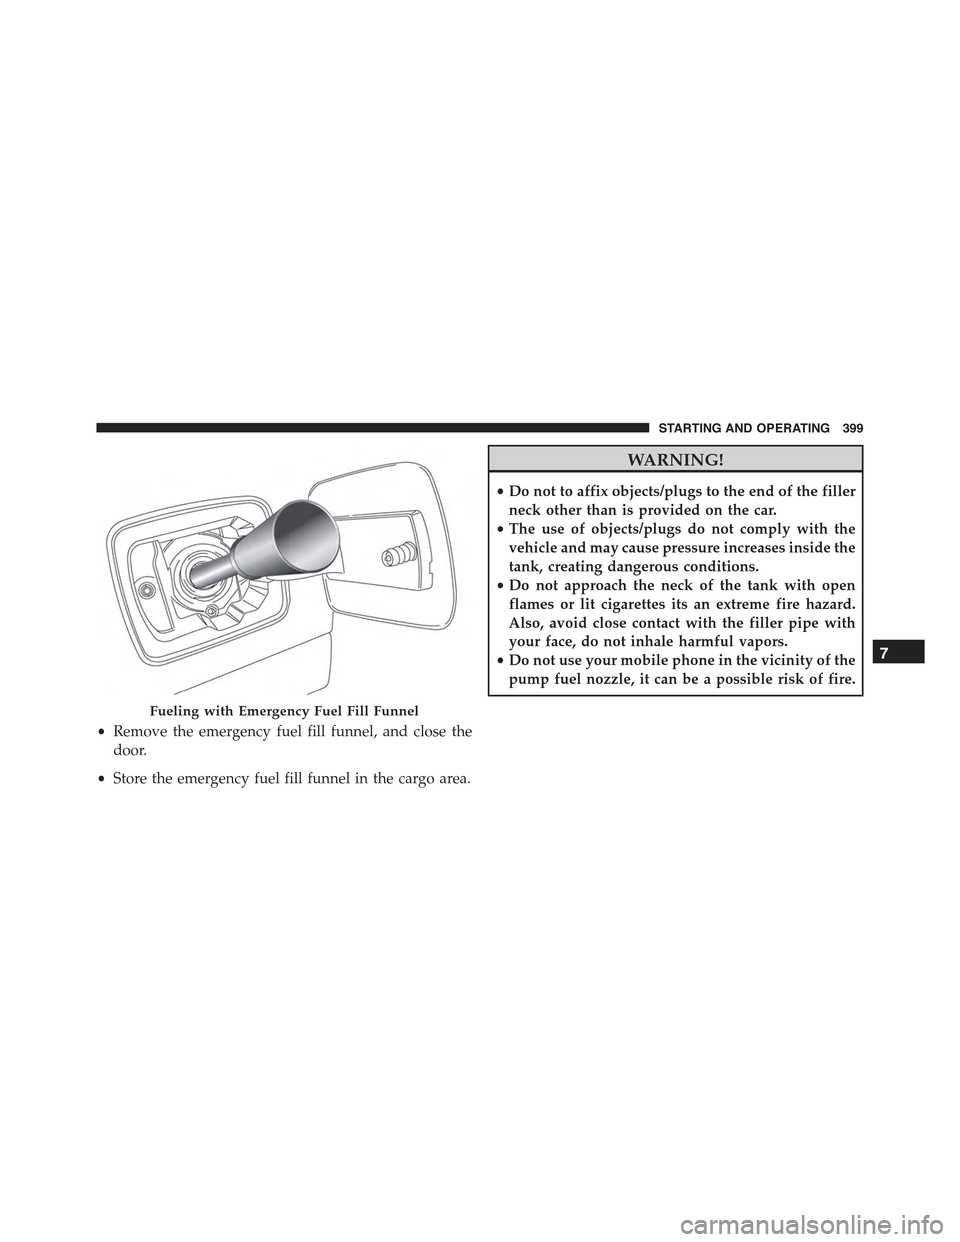
•Remove the emergency fuel fill funnel, and close the
door.
•Store the emergency fuel fill funnel in the cargo area.
WARNING!
•Do not to affix objects/plugs to the end of the filler
neck other than is provided on the car.
•The use of objects/plugs do not comply with the
vehicle and may cause pressure increases inside the
tank, creating dangerous conditions.
•Do not approach the neck of the tank with open
flames or lit cigarettes its an extreme fire hazard.
Also, avoid close contact with the filler pipe with
your face, do not inhale harmful vapors.
•Do not use your mobile phone in the vicinity of the
pump fuel nozzle, it can be a possible risk of fire.
Fueling with Emergency Fuel Fill Funnel
7
STARTING AND OPERATING 399
Page 402 of 678
VEHICLE LOADING
Certification Label
As required by National Highway Traffic Safety Admin-
istration regulations, your vehicle has a certification label
affixed to the driver’s side door or pillar.
This label contains the month and year of manufacture,
Gross Vehicle Weight Rating (GVWR), Gross Axle Weight
Rating (GAWR) front and rear, and Vehicle Identification
Number (VIN). A Month-Day-Hour (MDH) number is
included on this label and indicates the Month, Day and
Hour of manufacture. The bar code that appears on the
bottom of the label is your VIN.
Gross Vehicle Weight Rating (GVWR)
The GVWR is the total permissible weight of your vehicle
including driver, passengers, vehicle, options and cargo.
The label also specifies maximum capacities of front and
rear axle systems (GAWR). Total load must be limited so
GVWR and front and rear GAWR are not exceeded.
Payload
The payload of a vehicle is defined as the allowable load
weight a truck can carry, including the weight of the
driver, all passengers, options and cargo.
Gross Axle Weight Rating (GAWR)
The GAWR is the maximum permissible load on the front
and rear axles. The load must be distributed in the cargo
area so that the GAWR of each axle is not exceeded.
Each axle GAWR is determined by the components in the
system with the lowest load carrying capacity (axle,
springs, tires or wheels). Heavier axles or suspension
components sometimes specified by purchasers for in-
creased durability does not necessarily increase the vehi-
cle’s GVWR.
400 STARTING AND OPERATING
Page 403 of 678
Tire Size
The tire size on the Vehicle Certification Label represents
the actual tire size on your vehicle. Replacement tires
must be equal to the load capacity of this tire size.
Rim Size
This is the rim size that is appropriate for the tire size
listed.
Inflation Pressure
This is the cold tire inflation pressure for your vehicle for
all loading conditions up to full GAWR.
Curb Weight
The curb weight of a vehicle is defined as the total weight
of the vehicle with all fluids, including vehicle fuel, at full
capacity conditions, and with no occupants or cargo
loaded into the vehicle. The front and rear curb weight
values are determined by weighing your vehicle on a
commercial scale before any occupants or cargo are
added.
Loading
The actual total weight and the weight of the front and
rear of your vehicle at the ground can best be determined
by weighing it when it is loaded and ready for operation.
The entire vehicle should first be weighed on a commer-
cial scale to insure that the GVWR has not been exceeded.
The weight on the front and rear of the vehicle should
then be determined separately to be sure that the load is
properly distributed over the front and rear axle. Weigh-
ing the vehicle may show that the GAWR of either the
front or rear axles has been exceeded but the total load is
within the specified GVWR. If so, weight must be shifted
from front to rear or rear to front as appropriate until the
specified weight limitations are met. Store the heavier
7
STARTING AND OPERATING 401
Page 404 of 678
items down low and be sure that the weight is distributed
equally. Stow all loose items securely before driving.
Improper weight distributions can have an adverse effect
on the way your vehicle steers and handles and the way
the brakes operate.
CAUTION!
Do not load your vehicle any heavier than the GVWR
or the maximum front and rear GAWR. If you do,
parts on your vehicle can break, or it can change the
way your vehicle handles. This could cause you to
lose control. Also overloading can shorten the life of
your vehicle.
ON-ROAD DRIVING TIPS
Utility vehicles have higher ground clearance and a
narrower track to make them capable of performing in a
wide variety of off-road applications. Specific design
characteristics give them a higher center of gravity than
ordinary cars.
An advantage of the higher ground clearance is a better
view of the road, allowing you to anticipate problems.
They are not designed for cornering at the same speeds as
conventional two-wheel drive vehicles any more than
low-slung sports cars are designed to perform satisfacto-
rily in off-road conditions. If at all possible, avoid sharp
turns or abrupt maneuvers. As with other vehicles of this
type, failure to operate this vehicle correctly may result in
loss of control or vehicle rollover.
402 STARTING AND OPERATING
Page 405 of 678
OFF-ROAD DRIVING TIPS
When To Use 4WD LOW Range
When off-road driving, shift to 4WD LOW for additional
traction and control on slippery or difficult terrain,
ascending or descending steep hills, and to increase
low-speed pulling power (refer to “All Wheel Drive and
Four-Wheel Drive Operation” in this section for further
details). This range should be limited to extreme situa-
tions such as deep snow, mud, or sand where additional
low speed pulling power is needed. Vehicle speeds in
excess of 25 mph (40 km/h) should be avoided when in
4WD LOW range.
Driving Through Water
Although your vehicle is capable of driving through
water, there are a number of precautions that must be
considered before entering the water:
CAUTION!
When driving through water, do not exceed 5 mph
(8 km/h). Always check water depth before entering
as a precaution, and check all fluids afterward. Driv-
ing through water may cause damage that may not be
covered by the new vehicle limited warranty.
Driving through water more than a few inches/
centimeters deep will require extra caution to ensure
safety and prevent damage to your vehicle. If you must
drive through water, try to determine the depth and the
bottom condition (and location of any obstacles) prior to
entering. Proceed with caution and maintain a steady
controlled speed less than 5 mph (8 km/h) in deep water
to minimize wave effects.
Flowing Water
If the water is swift flowing and rising (as in storm
run-off) avoid crossing until the water level recedes
7
STARTING AND OPERATING 403
Page 406 of 678
and/or the flow rate is reduced. If you must cross
flowing-water, avoid depths in excess of 9 inches (22 cm).
The flowing water can erode the streambed causing your
vehicle to sink into deeper water. Determine exit point(s)
that are downstream of your entry point to allow for
drifting.
Standing Water
Avoid driving in standing water deeper than 20 inches
(51 cm), and reduce speed appropriately to minimize
wave effects. Maximum speed in 20 inches (51 cm) of
water is less than 5 mph (8 km/h).
Maintenance
After driving through deep water, inspect your vehicle
fluids and lubricants (engine, transmission, Power Trans-
fer Unit and Rear Drive Module) to assure they have not
been contaminated. Contaminated fluids and lubricants
(milky, foamy in appearance) should be flushed/changed
as soon as possible to prevent component damage.
Driving In Snow, Mud And Sand
In heavy snow, when pulling a load, or for additional
control at slower speeds, shift the transmission to a low
gear and shift the 4WD system to the appropriate terrain
mode, using 4WD LOW if necessary. Refer to “Four-
Wheel Drive Operation” in “Starting And Operating” for
further information. Do not shift to a lower gear than
necessary to maintain headway. Over-revving the engine
can spin the wheels and traction will be lost.
Avoid abrupt downshifts on icy or slippery roads be-
cause engine braking may cause skidding and loss of
control.
Hill Climbing
NOTE:Before attempting to climb a hill, determine the
conditions at the crest and/or on the other side.
404 STARTING AND OPERATING
Page 407 of 678
Before climbing a steep hill,shift the transmission to a
lower gear and shift the 4WD System to 4WD LOW. Use
first gear and 4WD LOW for very steep hills.
If you stall or begin to lose headwaywhile climbing a
steep hill, allow your vehicle to come to a stop and
immediately apply the brakes. Restart the engine and
shift to REVERSE. Back slowly down the hill allowing the
compression braking of the engine to help regulate your
speed. If the brakes are required to control vehicle speed,
apply them lightly and avoid locking or skidding the
tires.
WARNING!
If the engine stalls or you lose headway or cannot
make it to the top of a steep hill or grade, never
attempt to turn around. To do so may result in
tipping and rolling the vehicle. Always back straight
(Continued)
WARNING!(Continued)
down a hill in REVERSE gear carefully. Never back
down a hill in NEUTRAL using only the brake.
NOTE:Remember, never drive diagonally across a hill -
drive straight up or down.
If the wheels start to slip as you approach the crest of a
hill, ease off the accelerator and maintain headway by
turning the front wheels slowly left and right. This may
provide a fresh “bite” into the surface and will usually
provide traction to complete the climb.
Traction Downhill
Shift the transmission into a low gear and the 4WD
System to 4WD LOW range or Select Hill Descent
Control if equipped (refer to#Electronic Brake Control
System#in this section for further information). Let the
vehicle go slowly down the hill with all four wheels
7
STARTING AND OPERATING 405
Page 408 of 678
turning against engine compression drag. This will per-
mit you to control the vehicle speed and direction.
When descending mountains or hills, repeated braking
can cause brake fade with loss of braking control. Avoid
repeated heavy braking by downshifting the transmis-
sion whenever possible.
After Driving Off-Road
Off-road operation puts more stress on your vehicle than
does most on-road driving. After going off-road, it is
always a good idea to check for damage. That way you
can get any problems taken care of right away and have
your vehicle ready when you need it.
•Completely inspect the underbody of your vehicle.
Check tires, body structure, steering, suspension, and
exhaust system for damage.
•Inspect the radiator for mud and debris and clean as
required.
•Check threaded fasteners for looseness, particularly on
the chassis, drivetrain components, steering, and sus-
pension. Retighten them, if required, and torque to the
values specified in the Service Manual.
•Check for accumulations of plants or brush. These
things could be a fire hazard. They might hide damage
to fuel lines, brake hoses, axle pinion seals, and
propeller shafts.
•After extended operation in mud, sand, water, or
similar dirty conditions, have the radiator, fan, brake
rotors, wheels, brake linings, and axle yokes inspected
and cleaned as soon as possible.
WARNING!
Abrasive material in any part of the brakes may cause
excessive wear or unpredictable braking. You might
(Continued)
406 STARTING AND OPERATING
Page 409 of 678
WARNING!(Continued)
not have full braking power when you need it to
prevent a collision. If you have been operating your
vehicle in dirty conditions, get your brakes checked
and cleaned as necessary.
•If you experience unusual vibration after driving in
mud, slush or similar conditions, check the wheels for
impacted material. Impacted material can cause a
wheel imbalance and freeing the wheels of it will
correct the situation.
POWER STEERING
The electric power steering system will give you good
vehicle response and increased ease of maneuverability
in tight spaces. The system will vary its assist to provide
light efforts while parking and good feel while driving. If
the electric steering system experiences a fault that
reduces assist or prevents the vehicle from providing
assist, you will still have the ability to steer the vehicle
manually.
WARNING!
Continued operation with reduced assist could pose
a safety risk to yourself and others. Service should be
obtained as soon as possible.
7
STARTING AND OPERATING 407
Page 410 of 678
If the “SERVICE POWER STEERING#OR
#POWER STEERING ASSIST OFF - SERVICE
SYSTEM” message and a steering wheel icon
are displayed on the EVIC/DID screen, it indicates that
the vehicle needs to be taken to the dealer for service. It
is likely the vehicle has lost power steering assistance.
Refer to “Electronic Vehicle Information (EVIC) or
#Driver Information Display (DID)” in “Getting To Know
Your Instrument Panel” for further information.
If the “POWER STEERING SYSTEM HOT - PERFOR-
MANCE MAY BE LIMITED” message and an icon are
displayed on the EVIC/DID screen, it indicates that
extreme steering maneuvers may have occurred, which
caused an over temperature condition in the power
steering system. You will lose power steering assistance
momentarily until the over temperature condition no
longer exists. Once driving conditions are safe, then pull
over and let vehicle idle for a few moments until the light
turns off. Refer to “Electronic Vehicle Information
(EVIC)/Driver Information Display (DID)” in “Getting
To Know Your Instrument Panel” for further information.
NOTE:
•Even if the power steering assistance is no longer
operational, it is still possible to steer the vehicle.
Under these conditions there will be a substantial
increase in steering effort, especially at low speeds and
during parking maneuvers.
•If the condition persists, see your authorized dealer for
service.
TRAILER TOWING
In this section you will find safety tips and information
on limits to the type of towing you can reasonably do
with your vehicle. Before towing a trailer, carefully
review this information to tow your load as efficiently
and safely as possible.
408 STARTING AND OPERATING