gearbox JEEP RENEGADE 2018 Owner handbook (in English)
[x] Cancel search | Manufacturer: JEEP, Model Year: 2018, Model line: RENEGADE, Model: JEEP RENEGADE 2018Pages: 356, PDF Size: 6.11 MB
Page 152 of 356
SAFE HOLD
It is a safety function that automatically
engages the electric parking brake in the
event of a dangerous condition for the
vehicle.
If:
the vehicle speed is below 3 km/h;the gear lever is not at P (Park)
(versions with automatic transmission);
the driver's seat belt is not fastened;the driver side door is open;no attempted operation of the brake
pedal or the accelerator pedal, or, in
versions with manual gearbox, the clutch
pedal is detected;
the parking brake engages automatically
to prevent the vehicle movement.
The Safe Hold function can be
temporarily disabled by pressing the
switch located on the central tunnel and
the brake pedal at the same time, with
the vehicle stationary and the driver side
door open.
Once disabled, the function will activate
again when the vehicle speed reaches
20 km/h or the ignition device is moved
to STOP and then to MAR.
WARNING
119)In the case of parking manoeuvres on
roads on a gradient, the front wheels must
be steered towards the pavement (when
parking downhill), or in the opposite
direction if the vehicle is parked uphill.
Block the wheels with a wedge or a stone
if the car is parked on a steep slope.
120)Never leave children unattended in
the car. Always remove the key from the
ignition when leaving the car and take it
with you.
121)The electric parking brake must
always be engaged when leaving the
vehicle.
MANUAL GEARBOX
122)48)
To engage the gears, press the clutch
pedal fully and put the gear lever into the
required position (the diagram for gear
engagement is shown on the knob ).
To engage reverse R from neutral, lift the
ring Afig. 105 under the knob and at the
same time move the lever to the left and
then forwards.
To engage 6
thgear, operate the lever by
pressing it towards the right in order to
avoid engaging 4
thgear by mistake. The
same applies to the shift from 6thto 5th
gear.
105J0A0923C
150
STARTING AND DRIVING
Page 153 of 356
Versions 1.4 Turbo Multi Air / 1.6 Multijet /
2.0 Multijet: to engage reverse R from
neutral, lift ring A fig. 105 and at the
same time move the lever to the left and
then forwards.
Versions 1.6 E.Torq: o engage reverse gear
R from the neutral position, lift up ring A
fig. 105 and simultaneously move the
lever to the right and then backwards.
IMPORTANT Reverse can only be
engaged when the vehicle is
completely stationary. With the engine
running, wait for at least 2 seconds
with the clutch pedal fully pressed
before engaging reverse to prevent
damage to the gears and grating.
IMPORTANT The clutch pedal should
be used only for gear changes. Do not
drive with your foot resting on the
clutch pedal, however lightly. In some
circumstances, the electronic clutch
control could cut in by interpreting the
incorrect driving style as a fault.
WARNING
122)Depress the clutch pedal fully to
change gear correctly. It is therefore
essential that there is nothing under the
pedals: make sure the mats are lying flat
and do not get in the way of the pedals.
IMPORTANT
48)Do not drive with your hand resting on
the gear lever as the force exerted, even if
slight, could lead over time to premature
wear of the gearbox internal components.
AUTOMATIC
TRANSMISSION
The vehicle can be equipped with a
9-speed automatic transmission.
The transmission can operate in two
different modes: "Automatic mode" or
"Sequential mode".
GEAR LEVER
123) 124) 125) 126) 127)
The lever has the following positions:P= ParkR= ReverseN= NeutralD= Drive, (automatic forward speed)AutoStick: + shifting to higher gear in
sequential driving mode; – shifting to
lower gear in sequential driving mode.
151
Page 159 of 356
FOUR WHEEL DRIVE -
JEEP ACTIVE DRIVE (4WD)
and JEEP ACTIVE DRIVE
LOW (4WD LOW)
FOUR-WHEEL DRIVE
The four wheel drive (4WD) is fully
automatic in standard driving mode.
IMPORTANT Changing mode is not
possible when the vehicle speed is
over 120 km/h.
Four-wheel-drive activation
51) 52)
The buttons to activate the four-wheel
drive are located on theSelec-Terrain™
device and can select:
4WD LOCK (fig. 109 versions with
manual gearbox and automatic
transmission): deactivates the function
for disconnecting the propeller shaft,
guaranteeing the immediate availability
of the torque to the rear coupling. This
function can be selected in AUTO mode
and is automatic in the other driving
modes.
4WD LOW (fig. 110 versions with
automatic transmission): it enhances the
"off-road" performance of the vehicle in
all driving modes;The 4WD LOCK function can be
activated by pressing the dedicated
button or when the selector is rotated
from AUTO to SNOW/SAND/MUD or
ROCK (Trailhawk versions) and 4WD LOW
was not selected before.
The engagement of one function (e.g.
4WD LOW) deactivates the other one
automatically.
IMPORTANT On some versions,
pressing the button 4WD LOW the
4WD LOCK function is automatically
activated as well. If the 4WD LOW
button is pressed again, the 4WD
LOCK function will be activated. If,
however, the 4WD LOCK button is
pressed again, both functions will be
deactivated.
IMPORTANT The 4WD LOW function is
recommended for irregular and
slippery terrain only.
4WD LOW MODE ENGAGEMENT/
RELEASE
4WD LOW mode engagement
With vehicle at a standstill, ignition
device in MAR position or with engine
on, move the gear lever to position D
(Drive), R (Reverse) or N (Neutral) and
press the 4WD LOW button.
109J0A0908C
110J0A0909C
157
Page 161 of 356
solid. The other LEDs switch on
sequentially, depending on the positions
set on the knob, so that the driver can
understand which is the new required
mode.
Once the required mode is set (LED close
to the wording switched on), just keep
the knob in that position so that the
Selec-Terrain™system actuates to
engage the wished mode.STOP/START SYSTEM
The Stop/Start system automatically
stops the engine each time the vehicle is
stationary and starts it again when the
driver wants to move off.
In this way, the vehicle efficiency is
increased, by reducing consumption,
dangerous gas emissions and noise
pollution.
129) 130)53)
OPERATING MODES
Engine stopping mode
Versions with manual gearbox
With the vehicle stopped, the engine
stops with gearbox in neutral and clutch
pedal released.
Versions with automatic transmission
With vehicle at a standstill and brake
pedal pressed, the engine switches off if
the gear lever is in a position other than
R.
In the event of stops uphill, the engine
switching off is disabled to activate the
"Hill Start Assist" function (works only
with running engine).
The
warning light on the instrumentpanel switches on to signal that the
engine was stopped.
Engine restarting mode
Versions with manual gearbox
To restart the engine, press the clutch
pedal.
If the vehicle does not start pressing the
clutch, place the gear lever in neutral
and repeat the procedure. If the problem
persists, contact a Jeep Dealership.
Versions with automatic transmission
To restart the engine, release the brake
pedal.
With brake pressed, if the gear lever is in
automatic mode - D (Drive) - the engine
can be restarted moving the lever to R
(Reverse) or N (Neutral) or "AutoStick".
With brake pressed, if the gear lever is in
"AutoStick" mode, the engine can be
restarted moving the lever to "+" or "–", or
R (Reverse) or N (Neutral).
When the engine has been stopped
automatically, keeping the brake pedal
pressed, the brake can be released
keeping the engine off by quickly shifting
the gear lever to P (Park).
To restart the engine, just move the lever
out of position P.
159
Page 164 of 356
SETTING THE DESIRED SPEED
Activate the device and then, when the
vehicle has reached the desired speed,
press button SET + (or SET –) and
release it to activate the device. When
the accelerator is released, the vehicle
will proceed at the selected speed.
If needed (when overtaking for instance),
you can accelerate simply by pressing the
accelerator; when you release the pedal,
the vehicle goes back to the speed stored
previously.
When travelling downhills with the device
active, the vehicle speed may slightly
exceed the stored one.
IMPORTANT Before pressing buttons
SET + (or SET –) the vehicle must be
travelling at a constant speed on a flat
surface.
INCREASING/DECREASING
SPEED
Once the electronic Cruise Control has
been activated, the speed can be
increased by pressing button SET + or
decreased by pressing button SET – .
ACCELERATING WHEN
OVERTAKING
Depress the accelerator pedal: when this
is released the vehicle will gradually go
back to the stored speed.
IMPORTANT The device keeps the
speed stored even uphill and downhill.
A slight variation in the speed on slight
rises is completely normal.
RECALLING THE SPEED
Versions with automatic
transmission(operating in Drive mode -
automatic): press and release the RES
button.
Versions with manual gearbox or
automatic transmission in Autostick
(sequential) mode: before recalling the
previously set speed you should
accelerate until getting close to it, then
press and release the RES button.
DEACTIVATING THE DEVICE
Pressing the CANC button or pressing the
brake pedal as the vehicle is slowing
down deactivates the electronic Cruise
Control without deleting the stored
speed.
The Cruise Control can also be
deactivated if the electric parking brake(EPB) is activated or if the braking
system intervenes (e.g. the ESC system).
DEACTIVATING THE DEVICE
The device is deactivated by pressing
buttonor bringing the ignition device
to STOP.
WARNING
131)When travelling with the device
active, never move the gear lever to
neutral.
132)In case of a malfunction or failure of
the device, contact a Jeep Dealership.
133)The electronic Cruise Control can be
dangerous if the system cannot keep a
constant speed. In specific conditions
speed may be excessive, resulting in the
risk of losing control of the vehicle and
causing accidents. Do not use the device
in heavy traffic or on winding, icy, snowy
or slippery roads.
162
STARTING AND DRIVING
Page 175 of 356
PARALLEL AND
PERPENDICULAR PARKING
DESCRIPTION
Activation
The system is activated pressing the
button on the dashboard (see "On/off"
paragraph): after being selected, the
system activates in search mode.
Considering that the system recognises
parking places even when it has not been
selected, it can be activated even
immediately after passing close to a
parking place suitable for the type of car.
The system will inform the driver,
through the instrument panel display,
about the operations to be performed for
a correct manoeuvre.
Selecting the type of parking
During the search and until the reverse
gear is engaged, the preferred type can
be selected for parking:
"Parallel": the car will search a parking
place parallel to the driving direction;
"Perpendicular": the vehicle will
search a parking place perpendicular to
the driving direction.
Selection of the search side
To select the search side and perform the
correct manoeuvre, act as follows:
Select the search for the parking
place and the manoeuvre on thepassenger side placing the direction
indicator in centre position (deactivated)
or pushed upwards.
Select the search for the parking
area and manoeuvre on the driver side
pushing the direction indicator
downwards.
Search for a parking place
Through the side sensors, the system
continuously searches for a free parking
place, suitable for the car’s dimensions.
While searching the vehicle should
continue following its route at a speed of
below 30 km/h and at a distance of
around 50 cm to 1.5 m from parked
vehicles.
A parking place is considered suitable if
it is about 80 cm longer than the
dimensions of the vehicle for parking
placesparallelto the driving direction
and about 1 m per parking places
perpendicularto the driving direction,
compared to the vehicle's dimensions.
IMPORTANT While searching, vehicle
speed should not exceed 30 km/h;
when 25 km/h have been reached, the
driver is asked to decrease the speed;
if the speed of 30 km/h is exceeded, it
is deactivated (in this case, the system
can be restarted by pressing the button
on the instrument panel).
Manoeuvre
During manoeuvre, the vehicle's
movements can be controlled by
operating the accelerator, brake and
clutch pedals (versions with manual
gearbox), or the accelerator and brake
pedals (versions with automatic
transmission). Once a parking place has
been found, you will be asked to engage
reverse, leave the steering wheel and use
the pedals, while the system handles the
steering automatically to perform the
parking operation in the dedicated area.
During the manoeuvre it will be possible
to take advantage of the information
coming from the parking sensors (when
driving in reverse it is advisable to reach
the area where the rear sensors sound
continuously), but it is always advisable
to keep an eye on the surrounding area.
The car can be stopped during the
manoeuvre and, whilst remaining
stationary, reverse gear can temporarily
be released (for example, to allow a
pedestrian to go by in the area of the
manoeuvre).
The parking manoeuvre will be
interrupted in the following cases:
vehicle's speed is above 7 km/h;the steering is (voluntarily or
unintentionally) moved (by grabbing it or
preventing it from moving);
173
Page 220 of 356
IMPORTANT
79)The sealant is effective with external
temperatures of between -40°C and
+55°C. The sealant has an expiry date. It
is possible to repair tyres which have been
damaged on tread up to a diameter of
6 mm. Show the cartridge and the label to
the personnel charged with handling the
tyre treated with the tyre repair kit.
IMPORTANT
3)Dispose of the bottle and the sealant
liquid properly. Have them disposed of in
compliance with national and local
regulations.
JUMP STARTING
If the battery is flat, a jump starting can
be performed using the battery and the
cables of another vehicle, or using a
booster battery.
IMPORTANT
When using booster battery is used,
comply with the utilisation and
precaution instructions specified by the
producer.
Do not use the booster battery or any
other source of external supply with a
voltage above 12 V: the battery, the
starter, the alternator and the electrical
system of the vehicle could be damaged.
Do not attempt jump starting if the
battery is wet. The battery could break
and explode!
PREPARATION TO JUMP
STARTING
170) 171) 172)80)
IMPORTANT The positive terminal (+)
of the battery is shielded by a
protective cover. Lift the cover to
access the positive terminal.
Proceed as follows:operate the parking brake, move the
automatic transmission lever to P (Park)or, for versions with manual gearbox, to
neutral and bring the ignition device to
STOP;
switch off all the other electrical
appliances in the vehicle;
if another vehicle is ready for
emergency starting, park the vehicle
within the reach of the cables to be used
for starting, operate the parking brake
and make sure that the ignition is
deactivated.
IMPORTANT Avoid contact between
the two vehicles since this could cause
a connection to earth and may result in
serious injury to any people nearby.
PROCEDURE FOR JUMP
STARTING
IMPORTANT If the procedure below is
carried out incorrectly can cause
severe injuries to people or damage the
recharging system of one or both
vehicles. Carefully follow the
instructions given below.
Cable connection
Proceed as follows to carry out a jump
starting:
connect one end of the cable used for
positive (+) to the positive terminal (+) of
the vehicle with flat battery;
218
IN AN EMERGENCY
Page 227 of 356
TOWING THE VEHICLE
ATTACHING THE TOW RING
174) 175) 176)
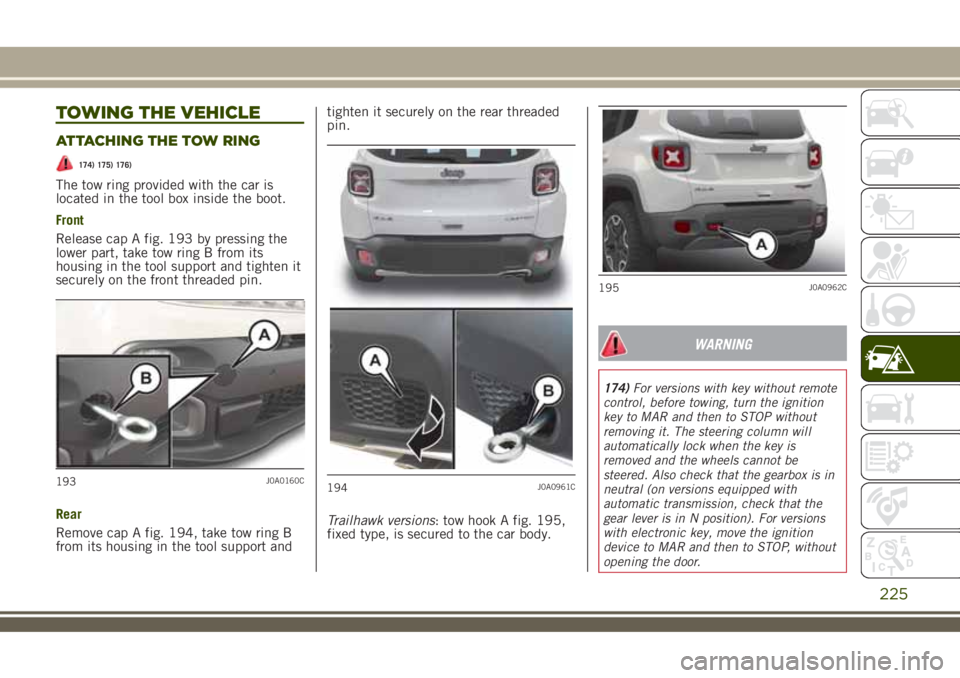
The tow ring provided with the car is
located in the tool box inside the boot.
Front
Release cap A fig. 193 by pressing the
lower part, take tow ring B from its
housing in the tool support and tighten it
securely on the front threaded pin.
Rear
Remove cap A fig. 194, take tow ring B
from its housing in the tool support andtighten it securely on the rear threaded
pin.
Trailhawk versions: tow hook A fig. 195,
fixed type, is secured to the car body.
WARNING
174)For versions with key without remote
control, before towing, turn the ignition
key to MAR and then to STOP without
removing it. The steering column will
automatically lock when the key is
removed and the wheels cannot be
steered. Also check that the gearbox is in
neutral (on versions equipped with
automatic transmission, check that the
gear lever is in N position). For versions
with electronic key, move the ignition
device to MAR and then to STOP, without
opening the door.
193J0A0160C194J0A0961C
195J0A0962C
225
Page 230 of 356
SCHEDULED SERVICING
Correct servicing is crucial for
guaranteeing a long life for the car under
the best conditions. For this reason, Jeep
has planned a series of checks and
services at fixed distance intervals and,
where provided, at fixed time intervals,
as described in the Scheduled Servicing
Plan.
Before each coupon however you always
need to pay attention to what is written
in the Scheduled Servicing Plan (e.g.
periodically check liquid levels, tire
pressure, etc.).
The Scheduled Servicing is carried out
by the Jeep Assistance Network at
pre-set times. If, during each operation,
in addition to the ones scheduled, the
need arises for further replacements or
repairs, these may be carried out with the
owner's explicit agreement only. If your
car is used frequently for towing, the
interval between one scheduled servicing
operation and the next should be
reduced.
IMPORTANT Scheduled Servicing
interventions are set out by the
Manufacturer. Failure to have them
carried out may invalidate the
warranty. It is advisable to inform aJeep Dealership of any small operating
irregularities without waiting for the
next service.
PERIODIC CHECKS
Every1,000km or before long trips
check and, if necessary, top up:
engine coolant level;brake fluid level;windscreen washer fluid level;tyre inflation pressure and condition;operation of lighting system
(headlights, direction indicators, hazard
warning lights, etc.);
operation of screen washer/wiper
system and positioning/wear of
windscreen/rear window wiper blades.
Every3,000km, check and top up if
required: engine oil level.
DEMANDING USE OF THE CAR
If the vehicle is used in one of the
following conditions:
Law enforcement (or security service),
taxi service
towing a trailer or caravan;dusty roads;short, repeated journeys (less than
7-8 km) at sub-zero outside
temperatures;
engine often idling or driving long
distances at low speeds or long periods
of inactivity;the following checks must be carried out
more often than indicated in the
Scheduled Service Plan:
check front disc brake pad condition
and wear;
check cleanliness of bonnet and
luggage compartment locks, cleanliness
and lubrication of linkage;
visually inspect conditions of: engine,
gearbox, transmission, pipes and hoses
(exhaust/fuel system/brakes) and rubber
elements (gaiters/sleeves/bushes, etc.);
check battery charge and battery fluid
level (electrolyte);
visually inspect conditions of the
accessory drive belts;
check and, if necessary, change
engine oil and replace oil filter;
check and, if necessary, replace pollen
filter;
check and, if necessary, replace air
cleaner.
228
SERVICING AND MAINTENANCE
Page 255 of 356
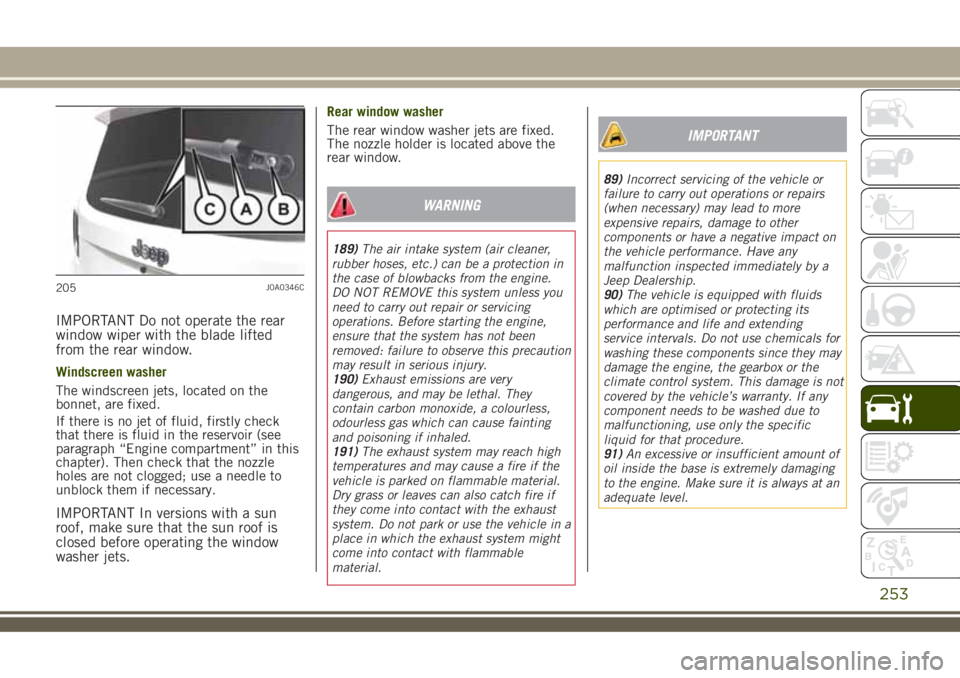
IMPORTANT Do not operate the rear
window wiper with the blade lifted
from the rear window.
Windscreen washer
The windscreen jets, located on the
bonnet, are fixed.
If there is no jet of fluid, firstly check
that there is fluid in the reservoir (see
paragraph “Engine compartment” in this
chapter). Then check that the nozzle
holes are not clogged; use a needle to
unblock them if necessary.
IMPORTANT In versions with a sun
roof, make sure that the sun roof is
closed before operating the window
washer jets.
Rear window washer
The rear window washer jets are fixed.
The nozzle holder is located above the
rear window.
WARNING
189)The air intake system (air cleaner,
rubber hoses, etc.) can be a protection in
the case of blowbacks from the engine.
DO NOT REMOVE this system unless you
need to carry out repair or servicing
operations. Before starting the engine,
ensure that the system has not been
removed: failure to observe this precaution
may result in serious injury.
190)Exhaust emissions are very
dangerous, and may be lethal. They
contain carbon monoxide, a colourless,
odourless gas which can cause fainting
and poisoning if inhaled.
191)The exhaust system may reach high
temperatures and may cause a fire if the
vehicle is parked on flammable material.
Dry grass or leaves can also catch fire if
they come into contact with the exhaust
system. Do not park or use the vehicle in a
place in which the exhaust system might
come into contact with flammable
material.
IMPORTANT
89)Incorrect servicing of the vehicle or
failure to carry out operations or repairs
(when necessary) may lead to more
expensive repairs, damage to other
components or have a negative impact on
the vehicle performance. Have any
malfunction inspected immediately by a
Jeep Dealership.
90)The vehicle is equipped with fluids
which are optimised or protecting its
performance and life and extending
service intervals. Do not use chemicals for
washing these components since they may
damage the engine, the gearbox or the
climate control system. This damage is not
covered by the vehicle’s warranty. If any
component needs to be washed due to
malfunctioning, use only the specific
liquid for that procedure.
91)An excessive or insufficient amount of
oil inside the base is extremely damaging
to the engine. Make sure it is always at an
adequate level.
205J0A0346C
253