warning lights JEEP RENEGADE 2018 Owner handbook (in English)
[x] Cancel search | Manufacturer: JEEP, Model Year: 2018, Model line: RENEGADE, Model: JEEP RENEGADE 2018Pages: 356, PDF Size: 6.11 MB
Page 171 of 356
VERSIONS WITH 12 SENSORS
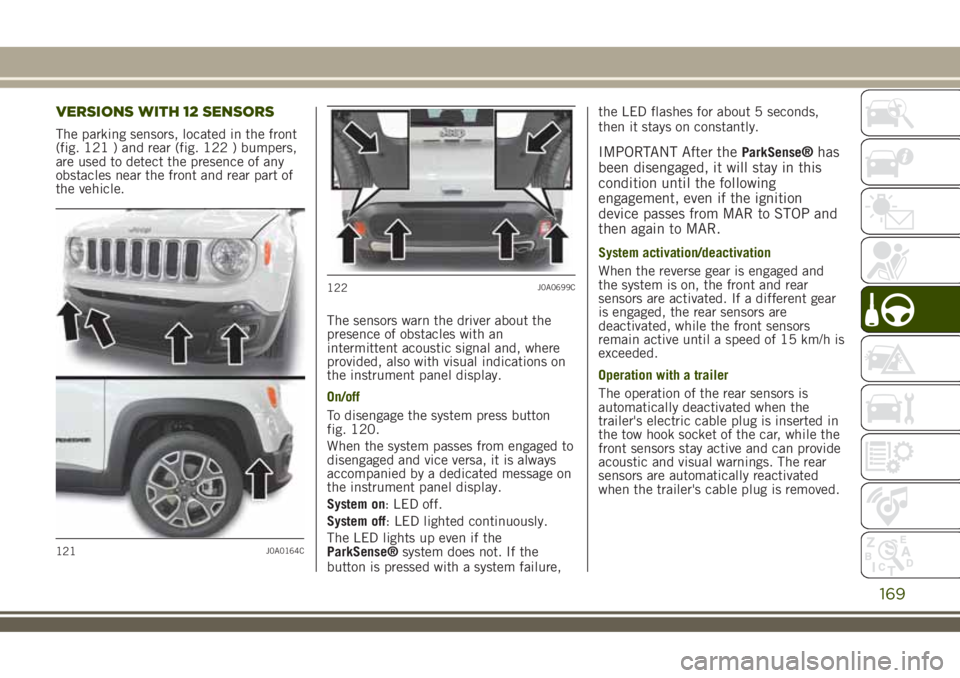
The parking sensors, located in the front
(fig. 121 ) and rear (fig. 122 ) bumpers,
are used to detect the presence of any
obstacles near the front and rear part of
the vehicle.
The sensors warn the driver about the
presence of obstacles with an
intermittent acoustic signal and, where
provided, also with visual indications on
the instrument panel display.
On/off
To disengage the system press button
fig. 120.
When the system passes from engaged to
disengaged and vice versa, it is always
accompanied by a dedicated message on
the instrument panel display.
System on: LED off.
System off: LED lighted continuously.
The LED lights up even if the
ParkSense®system does not. If the
button is pressed with a system failure,the LED flashes for about 5 seconds,
then it stays on constantly.
IMPORTANT After theParkSense®has
been disengaged, it will stay in this
condition until the following
engagement, even if the ignition
device passes from MAR to STOP and
then again to MAR.
System activation/deactivation
When the reverse gear is engaged and
the system is on, the front and rear
sensors are activated. If a different gear
is engaged, the rear sensors are
deactivated, while the front sensors
remain active until a speed of 15 km/h is
exceeded.
Operation with a trailer
The operation of the rear sensors is
automatically deactivated when the
trailer's electric cable plug is inserted in
the tow hook socket of the car, while the
front sensors stay active and can provide
acoustic and visual warnings. The rear
sensors are automatically reactivated
when the trailer's cable plug is removed.
121J0A0164C
122J0A0699C
169
Page 193 of 356
IN AN EMERGENCY
A punctured tyre or a burnt-out bulb?
At times, a problem may interfere with
our journey.
The pages on emergencies can help you
to deal with critical situations
independently and with calm.
In an emergency we recommend that you
call the freephone number found in the
Warranty Booklet.
It is also possible to call the national or
international universal freephone number
to search for the nearest Dealership.HAZARD WARNING LIGHTS......192
CHANGING A BULB...........193
REPLACING FUSES...........202
CHANGING A WHEEL.........209
TIREKIT..................215
JUMP STARTING.............218
FUEL CUT-OFF SYSTEM........220
AUTOMATIC TRANSMISSION GEAR
LEVER UNLOCKING..........220
TWIN CLUTCH AUTOMATIC
TRANSMISSION LEVER UNLOCK . .222
BROKEN-DOWN VEHICLE TOWING .224
TOWING THE VEHICLE.........225
191
Page 194 of 356

HAZARD WARNING
LIGHTS
CONTROL
Press the button fig. 141 to switch the
lights on/off.
When the hazard warning lights are on,
the
andwarning lights flash.
IMPORTANT The use of hazard
warning lights is governed by the
highway code of the country you are
driving in: comply with legal
requirements.
Emergency braking
In the event of emergency braking the
hazard warning lights switch on
automatically as well as warning lights
andin the instrument panel.
The lights switch off automatically when
emergency braking ceases.
141J0A0954C
192
IN AN EMERGENCY
Page 212 of 356
CHANGING PROCEDURE
Proceed as follows:stop the car in a position that does
not cause any danger to traffic and lets
you change the tire in safety, as far as
possible from the edge of the driving
lane. The ground must be flat and
sufficiently compact;
engage the hazard warning lights and
the electric parking brake;
engage first gear or reverse or, for
versions with automatic transmission,
move the lever to position P (Park);
stop the engine and put on the
reflective safety jacket (for your own
safety and in compliance with national
laws) before getting out of the vehicle.
The motor must be kept off as long as
the car is lifted off the ground.
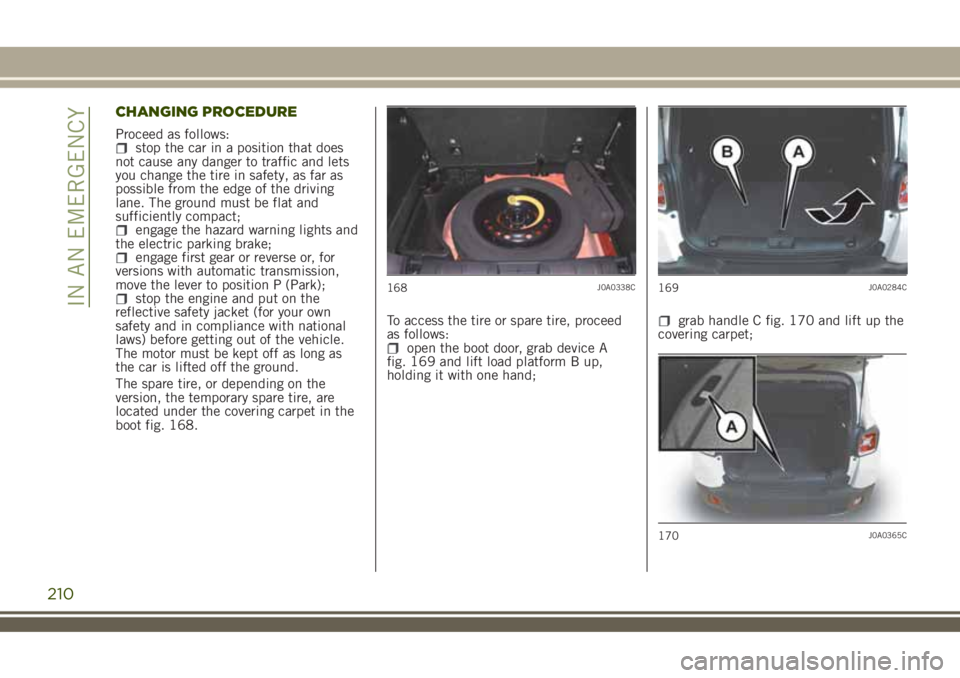
The spare tire, or depending on the
version, the temporary spare tire, are
located under the covering carpet in the
boot fig. 168.To access the tire or spare tire, proceed
as follows:
open the boot door, grab device A
fig. 169 and lift load platform B up,
holding it with one hand;
grab handle C fig. 170 and lift up the
covering carpet;
168J0A0338C169J0A0284C
170J0A0365C
210
IN AN EMERGENCY
Page 215 of 356
compartment, ensuring that they are
locked correctly.
IMPORTANT
Should it be absolutely necessary to
operate on the road surface or near it,
pay the utmost attention to vehicles in
transit.
Pay particular attention when using
the key to remove the bolts: it may have
sharp edges.
Raising the vehicle any more than
necessary may lower its stability: the jack
may slip and injure those nearby. Do not
raise the vehicle any more than required
for the removal of the wheel.
Tyres with unidirectional tread can be
recognised by arrows on the side of the
tyre which indicate the direction ofrotation. This must of necessity be
complied with. Only in this way can the
tyres maintain their characteristics in
terms of grip, noise, resistance to wear
and drainage on wet surfaces.
If, after a puncture, it is necessary to
fit such a tyre the wrong way round, it
will be necessary to continue driving with
great care, since the tyre’s performance
is limited in these conditions. This
precaution must be borne in mind above
all when the road surface is wet.
In order to benefit completely from
the unidirectional tread, it is advisable to
restore all wheels to the correct direction
of rotation as soon as possible.
Make sure that the spare wheel is
fitted with the valve facing outwards. The
wheel may be damaged if fitted
incorrectly.
If the vehicle has a hub cap or wheel
cover, do not attempt to fit it on the
spare wheel.
To prevent injury to persons, the
complete tightening of the bolts must
only be carried out when all of the
vehicle’s wheels are on the ground, to
prevent the vehicle falling from the jack.
After having travelled for about
40 km, stop and check that the bolts are
tightened correctly.
WARNING
159)If left in the passenger compartment,
the punctured wheel and jack constitute a
serious risk to the safety of occupants in
the event of accidents or sharp braking.
Therefore, always place both the jack and
punctured wheel in the dedicated housing
in the luggage compartment.
160)It is extremely dangerous to attempt
to change a wheel on the side of the
vehicle next to the driving lane: make sure
that the vehicle is at a sufficient distance
from the road, to avoid being run over.
161)Alert other drivers that the car is
stationary in compliance with local
regulations: hazard warning lights,
warning triangle, etc. Any passengers on
board should leave the car, especially if it
is heavily laden. Passengers should stay
away from on-coming traffic while the
wheel is being changed. On slopes or on
unsurfaced roads, chock the wheels with
the chocks provided.
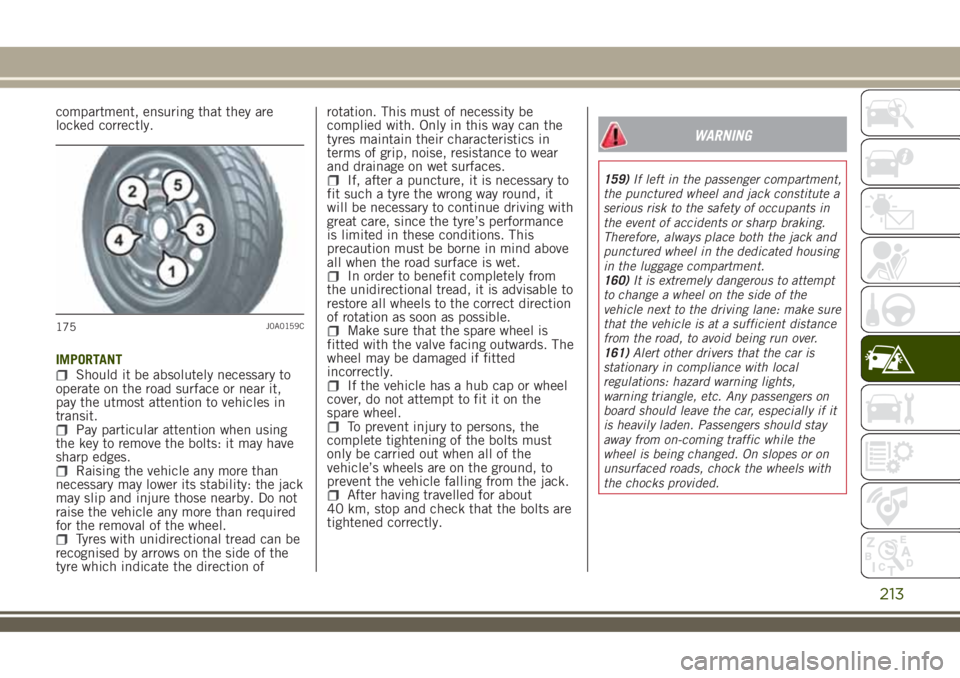
175J0A0159C
213
Page 222 of 356
FUEL CUT-OFF SYSTEM
173)
This intervenes in the case of an impact
causing:
the interruption of the fuel supply with
the engine consequently cutting out;
the automatic unlocking of the doors;turning on the lights inside the car;deactivation of climate control system
ventilation;
switching on the hazard warning lights
(to disable the lights, perform the “reset”
procedure as described below).
On some versions, the intervention of the
system is indicated by a message shown
on the display. In the same way, a
dedicated message on the display warns
the driver if system operation is
compromised.
IMPORTANT Carefully check the
vehicle for fuel leaks, for instance in
the engine compartment, under the
vehicle or near the tank area. After a
collision, bring the ignition device to
STOP to prevent the battery from
running down.
Reset procedure
To restore correct operation of the
vehicle, carry out the following procedure(this procedure must be started and
completed within less than one minute):
bring the ignition device to MAR;turn on the direction indicators on the
right, then on the left, then again on the
right and again on the left;
now deactivate the direction indicators
on the left;
bring the ignition device to STOP;move the ignition device to MAR.
LPG versions
In case of collision, the petrol feed is
immediately closed, the LPG safety
solenoid valves are closed and injection
is interrupted to stop the engine.
WARNING
173)If, after an impact, you smell fuel or
notice leaks from the fuel system, do not
reactivate the system to avoid the risk of
fire.
AUTOMATIC
TRANSMISSION GEAR
LEVER UNLOCKING
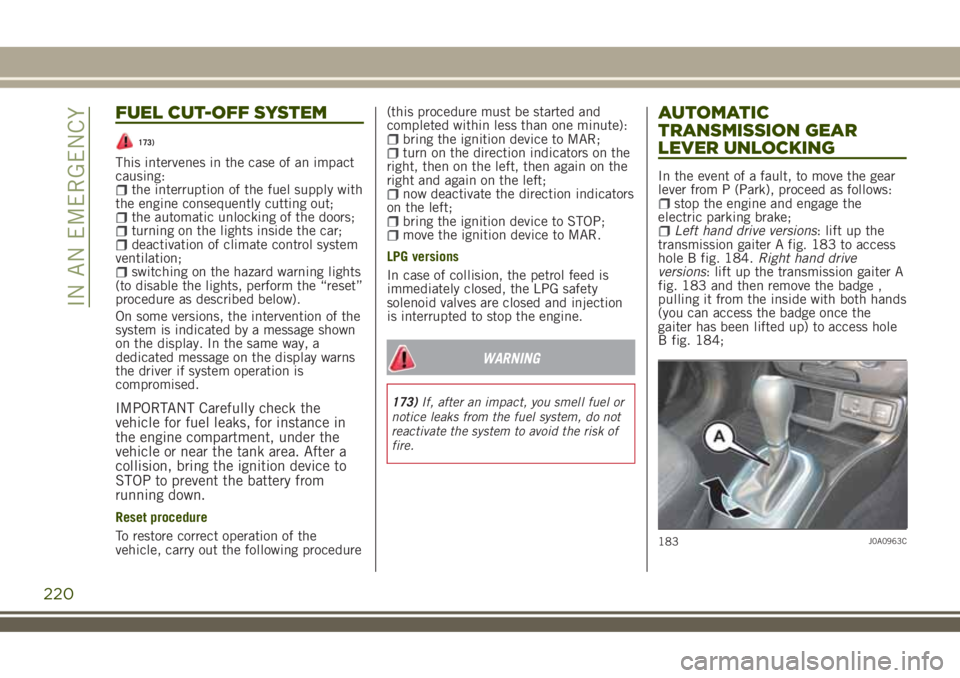
In the event of a fault, to move the gear
lever from P (Park), proceed as follows:
stop the engine and engage the
electric parking brake;
Left hand drive versions: lift up the
transmission gaiter A fig. 183 to access
hole B fig. 184.Right hand drive
versions: lift up the transmission gaiter A
fig. 183 and then remove the badge ,
pulling it from the inside with both hands
(you can access the badge once the
gaiter has been lifted up) to access hole
B fig. 184;
183J0A0963C
220
IN AN EMERGENCY
Page 230 of 356
SCHEDULED SERVICING
Correct servicing is crucial for
guaranteeing a long life for the car under
the best conditions. For this reason, Jeep
has planned a series of checks and
services at fixed distance intervals and,
where provided, at fixed time intervals,
as described in the Scheduled Servicing
Plan.
Before each coupon however you always
need to pay attention to what is written
in the Scheduled Servicing Plan (e.g.
periodically check liquid levels, tire
pressure, etc.).
The Scheduled Servicing is carried out
by the Jeep Assistance Network at
pre-set times. If, during each operation,
in addition to the ones scheduled, the
need arises for further replacements or
repairs, these may be carried out with the
owner's explicit agreement only. If your
car is used frequently for towing, the
interval between one scheduled servicing
operation and the next should be
reduced.
IMPORTANT Scheduled Servicing
interventions are set out by the
Manufacturer. Failure to have them
carried out may invalidate the
warranty. It is advisable to inform aJeep Dealership of any small operating
irregularities without waiting for the
next service.
PERIODIC CHECKS
Every1,000km or before long trips
check and, if necessary, top up:
engine coolant level;brake fluid level;windscreen washer fluid level;tyre inflation pressure and condition;operation of lighting system
(headlights, direction indicators, hazard
warning lights, etc.);
operation of screen washer/wiper
system and positioning/wear of
windscreen/rear window wiper blades.
Every3,000km, check and top up if
required: engine oil level.
DEMANDING USE OF THE CAR
If the vehicle is used in one of the
following conditions:
Law enforcement (or security service),
taxi service
towing a trailer or caravan;dusty roads;short, repeated journeys (less than
7-8 km) at sub-zero outside
temperatures;
engine often idling or driving long
distances at low speeds or long periods
of inactivity;the following checks must be carried out
more often than indicated in the
Scheduled Service Plan:
check front disc brake pad condition
and wear;
check cleanliness of bonnet and
luggage compartment locks, cleanliness
and lubrication of linkage;
visually inspect conditions of: engine,
gearbox, transmission, pipes and hoses
(exhaust/fuel system/brakes) and rubber
elements (gaiters/sleeves/bushes, etc.);
check battery charge and battery fluid
level (electrolyte);
visually inspect conditions of the
accessory drive belts;
check and, if necessary, change
engine oil and replace oil filter;
check and, if necessary, replace pollen
filter;
check and, if necessary, replace air
cleaner.
228
SERVICING AND MAINTENANCE
Page 231 of 356
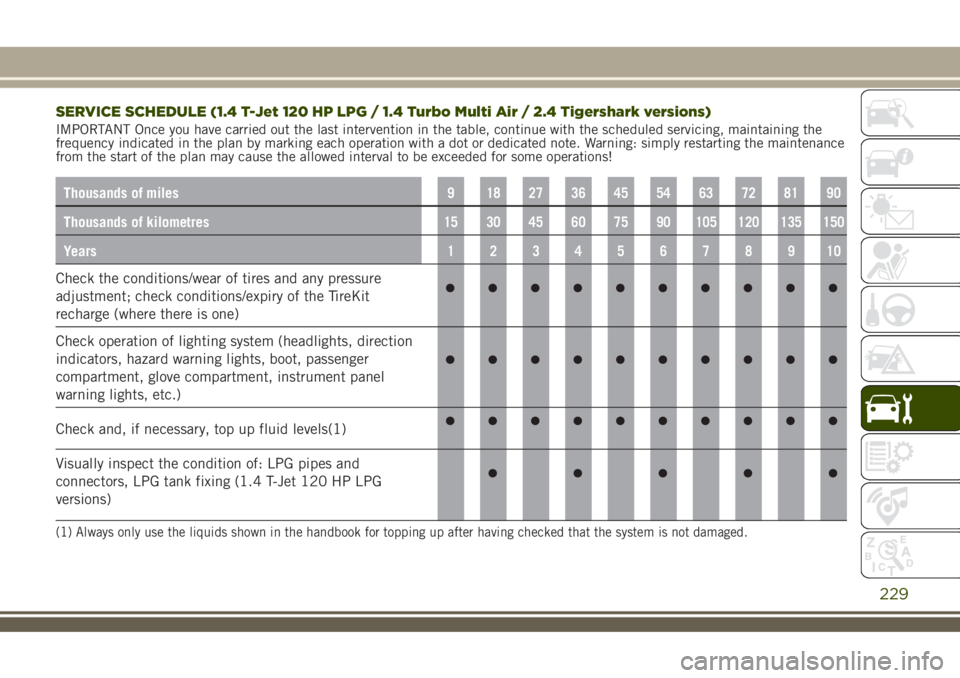
SERVICE SCHEDULE (1.4 T-Jet 120 HP LPG / 1.4 Turbo Multi Air / 2.4 Tigershark versions)
IMPORTANT Once you have carried out the last intervention in the table, continue with the scheduled servicing, maintaining the
frequency indicated in the plan by marking each operation with a dot or dedicated note. Warning: simply restarting the maintenance
from the start of the plan may cause the allowed interval to be exceeded for some operations!
Thousands of miles9 182736455463728190
Thousands of kilometres15 30 45 60 75 90 105 120 135 150
Years12345678910
Check the conditions/wear of tires and any pressure
adjustment; check conditions/expiry of the TireKit
recharge (where there is one)
Check operation of lighting system (headlights, direction
indicators, hazard warning lights, boot, passenger
compartment, glove compartment, instrument panel
warning lights, etc.)
Check and, if necessary, top up fluid levels(1)
Visually inspect the condition of: LPG pipes and
connectors, LPG tank fixing (1.4 T-Jet 120 HP LPG
versions)
(1) Always only use the liquids shown in the handbook for topping up after having checked that the system is not damaged.
229
Page 237 of 356
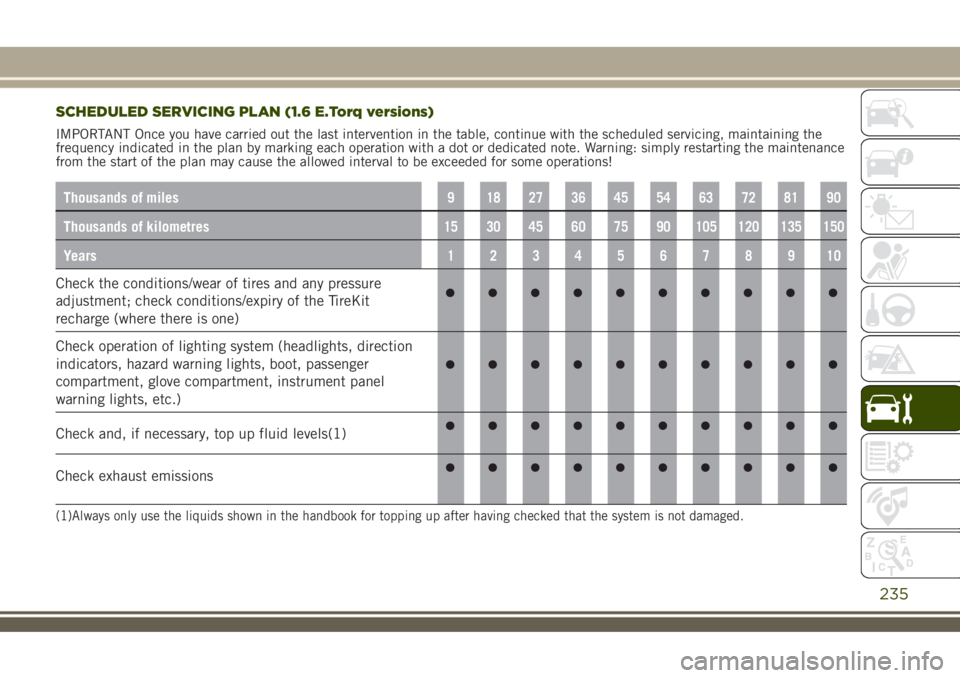
SCHEDULED SERVICING PLAN (1.6 E.Torq versions)
IMPORTANT Once you have carried out the last intervention in the table, continue with the scheduled servicing, maintaining the
frequency indicated in the plan by marking each operation with a dot or dedicated note. Warning: simply restarting the maintenance
from the start of the plan may cause the allowed interval to be exceeded for some operations!
Thousands of miles9 182736455463728190
Thousands of kilometres15 30 45 60 75 90 105 120 135 150
Years12345678910
Check the conditions/wear of tires and any pressure
adjustment; check conditions/expiry of the TireKit
recharge (where there is one)
Check operation of lighting system (headlights, direction
indicators, hazard warning lights, boot, passenger
compartment, glove compartment, instrument panel
warning lights, etc.)
Check and, if necessary, top up fluid levels(1)
Check exhaust emissions
(1)Always only use the liquids shown in the handbook for topping up after having checked that the system is not damaged.
235
Page 240 of 356
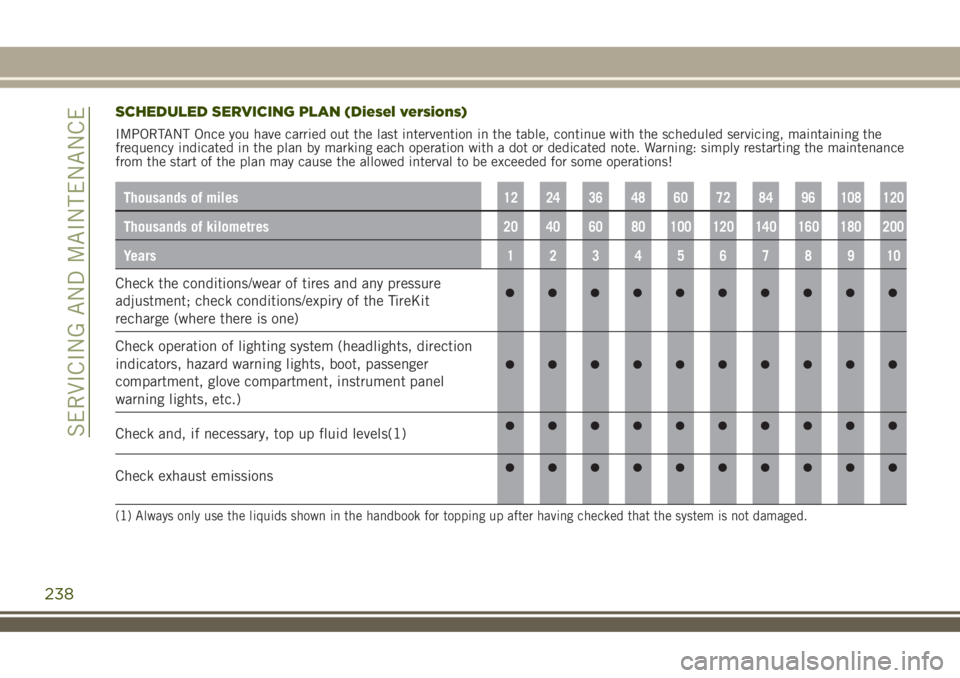
SCHEDULED SERVICING PLAN (Diesel versions)
IMPORTANT Once you have carried out the last intervention in the table, continue with the scheduled servicing, maintaining the
frequency indicated in the plan by marking each operation with a dot or dedicated note. Warning: simply restarting the maintenance
from the start of the plan may cause the allowed interval to be exceeded for some operations!
Thousands of miles12 24 36 48 60 72 84 96 108 120
Thousands of kilometres20 40 60 80 100 120 140 160 180 200
Years12345678910
Check the conditions/wear of tires and any pressure
adjustment; check conditions/expiry of the TireKit
recharge (where there is one)
Check operation of lighting system (headlights, direction
indicators, hazard warning lights, boot, passenger
compartment, glove compartment, instrument panel
warning lights, etc.)
Check and, if necessary, top up fluid levels(1)
Check exhaust emissions
(1) Always only use the liquids shown in the handbook for topping up after having checked that the system is not damaged.
238
SERVICING AND MAINTENANCE