warning JEEP RENEGADE 2023 Owners Manual
[x] Cancel search | Manufacturer: JEEP, Model Year: 2023, Model line: RENEGADE, Model: JEEP RENEGADE 2023Pages: 364, PDF Size: 18.65 MB
Page 300 of 364
298 SERVICING AND MAINTENANCE
Function Deactivation:
The functionality is reset if:
The ignition is turned to the MAR/RUN position.
Number of subsequent activations is three.
Two minutes timer has expired after turning the
ignition OFF.
NOTE:
When turning the ignition ON, the blades will go
into t h
e parking position.
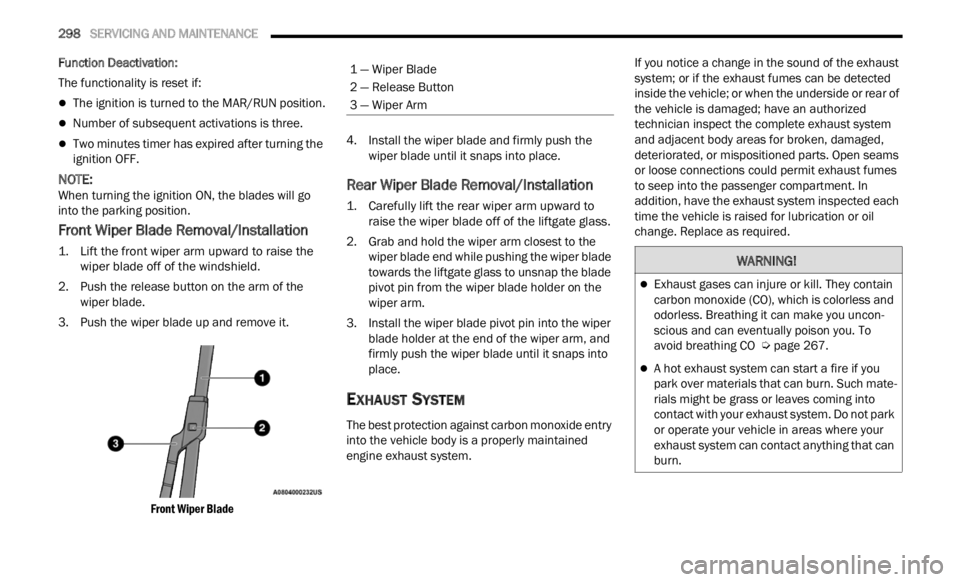
Front Wiper Blade Removal/Installation
1. Lift the front wiper arm upward to raise the wiper blade off of the windshield.
2. Push the release button on the arm of the wiper
blade.
3. Push the wiper blade up and remove it.
Front
Wiper Blade
4. Install the wiper blade and firmly push the
wipe r
blade until it snaps into place.
Rear Wiper Blade Removal/Installation
1. Carefully lift the rear wiper arm upward to raise the wiper blade off of the liftgate glass.
2. Grab and hold the wiper arm closest to the wiper
blade end while pushing the wiper blade
towards the liftgate glass to unsnap the blade
pivot pin from the wiper blade holder on the
wiper arm.
3. Install the wiper blade pivot pin into the wiper blad e
holder at the end of the wiper arm, and
firmly push the wiper blade until it snaps into
place.
EXHAUST SYSTEM
The best protection against carbon monoxide entry
into the vehicle body is a properly maintained
engine exhaust system. If you notice a change in the sound of the exhaust
syste
m
; or if the exhaust fumes can be detected
inside the vehicle; or when the underside or rear of
the vehicle is damaged; have an authorized
technician inspect the complete exhaust system
and adjacent body areas for broken, damaged,
deteriorated, or mispositioned parts. Open seams
or loose connections could permit exhaust fumes
to seep into the passenger compartment. In
addition, have the exhaust system inspected each
time the vehicle is raised for lubrication or oil
change. Replace as required.1 — Wiper Blade
2 — Release Button
3 — Wiper Arm
WARNING!
Exhaust gases can injure or kill. They contain
carbon monoxide (CO), which is colorless and
odorless. Breathing it can make you uncon -
scious and can eventually poison you. To
avoid b
reathing CO Ú page 267.
A hot exhaust system can start a fire if you
park over materials that can burn. Such mate -
rials might be grass or leaves coming into
c ontact
with your exhaust system. Do not park
or operate your vehicle in areas where your
exhaust system can contact anything that can
burn.
Page 301 of 364
SERVICING AND MAINTENANCE 299
(Continued)
Under normal operating conditions, the catalytic
converter will not require maintenance. However, it
is important to keep the engine properly tuned to
ensure proper catalyst operation and prevent
possible catalyst damage.
NOTE:
Intentional tampering with emissions control
syste m
s can result in civil penalties being
assessed against you.
In unusual situations involving grossly
malfu n
ctioning engine operation, a scorching odor
may suggest severe and abnormal catalyst overheating. If this occurs, stop the vehicle, turn off
the engine and allow it to cool. Service, including a
tune-up to manufacturer's specifications, should
be obtained immediately.
To minimize the possibility of catalytic converter
damag
e
:
Do not interrupt the ignition when the transmis -
sion is in gear and the vehicle is in motion.
Do not try to start the vehicle by pushing or
towing the vehicle.
Do not idle the engine with any ignition compo -
nents disconnected or removed, such as when
diagn os
tic testing, or for prolonged periods
during very rough idle or malfunctioning oper -
ating conditions.
COOLING SYSTEM
Coolant Checks
Check engine coolant (antifreeze) protection every
12 months (before the onset of freezing weather,
where
applicable). If the engine coolant is dirty or
rusty in appearance, the system should be
drained, flushed and refilled with fresh engine
coolant. Check the front of the A/C condenser for
any accumulation of bugs, leaves, etc. If dirty,
clean by gently spraying water from a garden hose
vertically down the face of the condenser.
CAUTION!
The catalytic converter requires the use of
unleaded fuel only. Leaded gasoline will
destroy the effectiveness of the catalyst as an
emissions control device and may seriously
reduce engine performance and cause
serious damage to the engine.
Damage to the catalytic converter can result if
your vehicle is not kept in proper operating
condition. In the event of engine malfunction,
particularly involving engine misfire or other
apparent loss of performance, have your
vehicle serviced promptly. Continued operation
of your vehicle with a severe malfunction could
cause the converter to overheat, resulting in
possible damage to the converter and vehicle.
WARNING!
You or others can be badly burned by hot
engine coolant (antifreeze) or steam from your
radiator. If you see or hear steam coming from
under the hood, do not open the hood until the
radiator has had time to cool. Never open a
cooling system pressure cap when the radi -
ator or coolant bottle is hot.
Keep hands, tools, clothing, and jewelry away
from the radiator cooling fan when the hood is
raised. The fan starts automatically and may
start at any time, whether the engine is
running or not.
When working near the radiator cooling fan,
disconnect the fan motor lead or turn the igni -
tion to the OFF mode. The fan is temperature
c ontroll
ed and can start at any time the igni -
tion is in the ON mode.
WARNING!
8
Page 303 of 364
SERVICING AND MAINTENANCE 301
damage. If HOAT and OAT coolant are mixed in
an emergency, have an authorized dealer drain,
flush, and refill with OAT coolant (conforming to
MS.90032) as soon as possible.
Cooling System Pressure Cap
The cap must be fully tightened to prevent loss of
engine coolant (antifreeze), and to ensure that
engine coolant will return to the radiator from the
coolant expansion bottle/recovery tank (if
equipped).
The cap should be inspected and cleaned if there
is an y
accumulation of foreign material on the
sealing surfaces.
Disposal Of Used Coolant
Used ethylene glycol-based coolant (antifreeze) is
a regulated substance requiring proper disposal.
Check with your local authorities to determine the
disposal rules for your community. To prevent
ingestion by animals or children, do not store
ethylene glycol-based coolant in open containers
or allow it to remain in puddles on the ground,
clean up any ground spills immediately. If ingested
by a child or pet, seek emergency assistance
immediately.
Coolant Level
The coolant expansion bottle provides a quick
visual method for determining that the coolant
level is adequate. With the engine off and cold, the
level of the coolant (antifreeze) in the bottle should
be between the “MAX” and “MIN” lines marked on
the bottle.
As long as the engine operating temperature is
satisf
actory, the coolant bottle need only be
checked once a month.
When additional coolant is needed to maintain the
proper
level, it should be added to the coolant
bottle. Do not overfill.
See an authorized dealer for service.
Cooling System Notes
NOTE:
When the vehicle is stopped after a few miles/kilo -
meters of operation, you may observe vapor
c oming
from the front of the engine compartment.
This is normally a result of moisture from rain,
snow, or high humidity accumulating on the
radiator and being vaporized when the thermostat
opens, allowing hot engine coolant (antifreeze) to
enter the radiator.
If an examination of your engine compartment
shows n
o evidence of radiator or hose leaks, the
vehicle may be safely driven. The vapor will soon
dissipate.
Do not overfill the coolant expansion bottle.
Check the coolant freeze point in the radiator
and in the coolant expansion bottle. If engine
coolant needs to be added, the contents of the
coolant expansion bottle must also be protected
against freezing.
If frequent engine coolant additions are
required, the cooling system should be pressure
tested for leaks.
Maintain engine coolant concentration at a
minimum of 50% OAT coolant (conforming to
MS.90032) and distilled water for proper corro -
sion protection of your engine which contains
alumi n
um components.
WARNING!
Do not open hot engine cooling system. Never
add engine coolant (antifreeze) when the
engine is overheated. Do not loosen or
remove the cap to cool an overheated engine.
Heat causes pressure to build up in the
cooling system. To prevent scalding or injury,
do not remove the pressure cap while the
system is hot or under pressure.
Do not use a pressure cap other than the one
specified for your vehicle. Personal injury or
engine damage may result.
8
Page 304 of 364
302 SERVICING AND MAINTENANCE
(Continued)
Keep the front of the radiator clean. If your
vehicle is equipped with air conditioning, keep
the front of the condenser clean.
Do not change the thermostat for Summer or
Winter operation. If replacement is ever neces-
sary, install ONLY the correct type thermostat.
O ther
designs may result in unsatisfactory
engine cooling performance, poor gas mileage,
and increased emissions.
BRAKE SYSTEM
In order to ensure brake system performance, all
brake system components should be inspected
periodically Ú page 287.
Brake Master Cylinder
The fluid level in the master cylinder should be
checked when performing under hood services, or
immediately if the Brake Warning Light is on.
Be sure to clean the top of the master cylinder area
before
removing the cap. If necessary, add fluid to
bring the fluid level up to the requirements
described on the brake fluid reservoir. Fluid level
can be expected to fall as the brake pads wear. The
brake fluid level should be checked when the pads
are replaced. However, low fluid level may be
caused by a leak and a checkup may be needed.
Use only manufacturer's recommended brake fluid
Ú page 345.
WARNING!
Riding the brakes can lead to brake failure and
possibly a collision. Driving with your foot resting
or riding on the brake pedal can result in
abnormally high brake temperatures, excessive
lining wear, and possible brake damage. Riding
the brakes may also reduce braking capacity in
an emergency.WARNING!
Use only manufacturer’s recommended brake
fluid
Ú page 345. Using the wrong type of
brake fluid can severely damage your brake
system
and/or impair its performance. The
proper type of brake fluid for your vehicle is
also identified on the original factory installed
hydraulic master cylinder reservoir.
To avoid contamination from foreign matter or
moisture, use only new brake fluid or fluid that
has been in a tightly closed container. Keep
the master cylinder reservoir cap secured at
all times. Brake fluid in an open container
absorbs moisture from the air resulting in a
lower boiling point. This may cause it to boil
unexpectedly during hard or prolonged
braking, resulting in sudden brake failure. This
could result in a collision.
Overfilling the brake fluid reservoir can result
in spilling brake fluid on hot engine parts,
causing the brake fluid to catch fire. Brake
fluid can also damage painted and vinyl
surfaces, care should be taken to avoid its
contact with these surfaces.
CAUTION!
Use of improper brake fluids will affect overall
clutch system performance. Improper brake
fluids may damage the clutch system resulting in
loss of clutch function and the ability to shift the
transmission.
WARNING!
Page 305 of 364

SERVICING AND MAINTENANCE 303
(Continued)
AUTOMATIC TRANSMISSION
Special Additives
The manufacturer strongly recommends against
using any special additives in the transmission.
Automatic Transmission Fluid (ATF) is an
engine
ered product and its performance may be
impaired by supplemental additives. Therefore, do
not add any fluid additives to the transmission. The
only exception to this policy is the use of special
dyes for diagnosing fluid leaks. Avoid using
transmission sealers as they may adversely affect
seals.
Fluid Level Check
The fluid level is preset at the factory and does not
require adjustment under normal operating
conditions. Routine fluid level checks are not
required; therefore the transmission has no
dipstick. An authorized dealer can check your
transmission fluid level using special service tools.
If you notice fluid leakage or transmission
malfunction, visit an authorized dealer immediately to have the transmission fluid level
checked. Operating the vehicle with an improper
fluid level can cause severe transmission damage.
Fluid And Filter Changes
Under normal operating conditions, the fluid
installed at the factory will provide satisfactory
lubrication for the life of the vehicle.
Routine fluid and filter changes are not required.
However
,
change the fluid and filter if the fluid
becomes contaminated (with water, etc.), or if the
transmission is disassembled for any reason.
Selection Of Lubricant
It is important to use the proper transmission fluid
to ensure optimum transmission performance and
life. Use the manufacturer specified transmission
fluid Ú page 345. It is important to maintain the
transmission fluid at the correct level using the
r ecomme
nded fluid.
NOTE:
No chemical flushes should be used in any trans -
mission; only the approved lubricant should be
u sed.
FUSES
General InformationCAUTION!
Do not use chemical flushes in your
transmission as the chemicals can damage your
transmission components. Such damage is not
covered by the New Vehicle Limited Warranty.
CAUTION!
If a transmission fluid leak occurs, visit an
authorized dealer immediately. Severe
transmission damage may occur. An authorized
dealer has the proper tools to adjust the fluid
level accurately.CAUTION!
Using a transmission fluid other than the
manufacturer recommended fluid may cause
deterioration in transmission shift quality and/or
torque converter shudder Ú page 345.
WARNING!
When replacing a blown fuse, always use an
appropriate replacement fuse with the same
amp rating as the original fuse. Never replace
a fuse with another fuse of higher amp rating.
Never replace a blown fuse with metal wires or
any other material. Failure to use proper fuses
may result in serious personal injury, fire and/
or property damage.
Before replacing a fuse, make sure that the
ignition is off and that all the other services
are switched off and/or disengaged.
8
Page 306 of 364
304 SERVICING AND MAINTENANCE
The fuses protect electrical systems against
excessive current.
When a device does not work, you must check the
electr
ical circuit inside the fuse for a break/melt.
Also please be aware that using power outlets for
extend
ed periods of time with the engine off may
result in vehicle battery discharge.
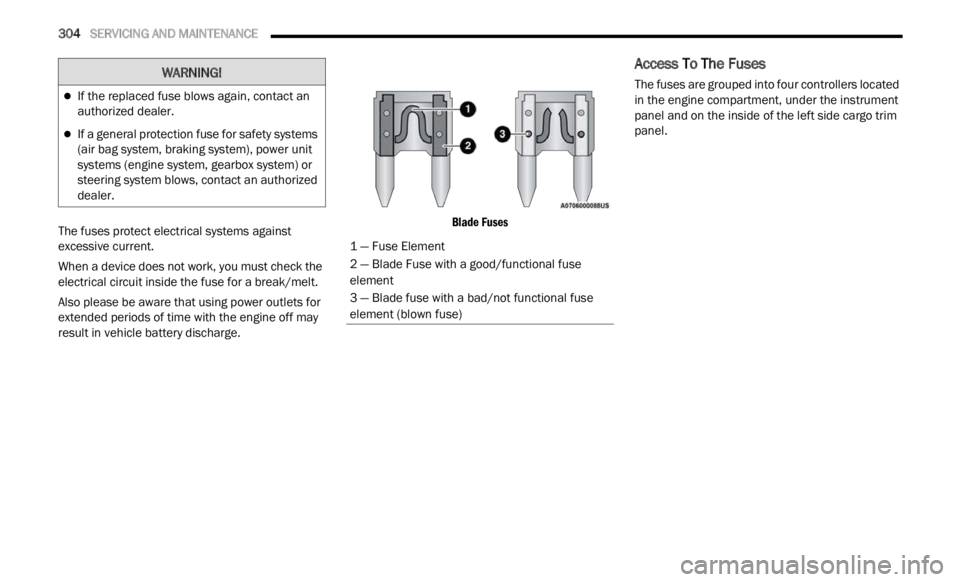
Blade Fuses
Access To The Fuses
The fuses are grouped into four controllers located
in the engine compartment, under the instrument
panel and on the inside of the left side cargo trim
panel.If the replaced fuse blows again, contact an
authorized dealer.
If a general protection fuse for safety systems
(air bag system, braking system), power unit
systems (engine system, gearbox system) or
steering system blows, contact an authorized
dealer.
WARNING!
1 — Fuse Element
2 — Blade Fuse with a good/functional fuse
element
3 — Blade fuse with a bad/not functional fuse
element (blown fuse)
Page 310 of 364
308 SERVICING AND MAINTENANCE
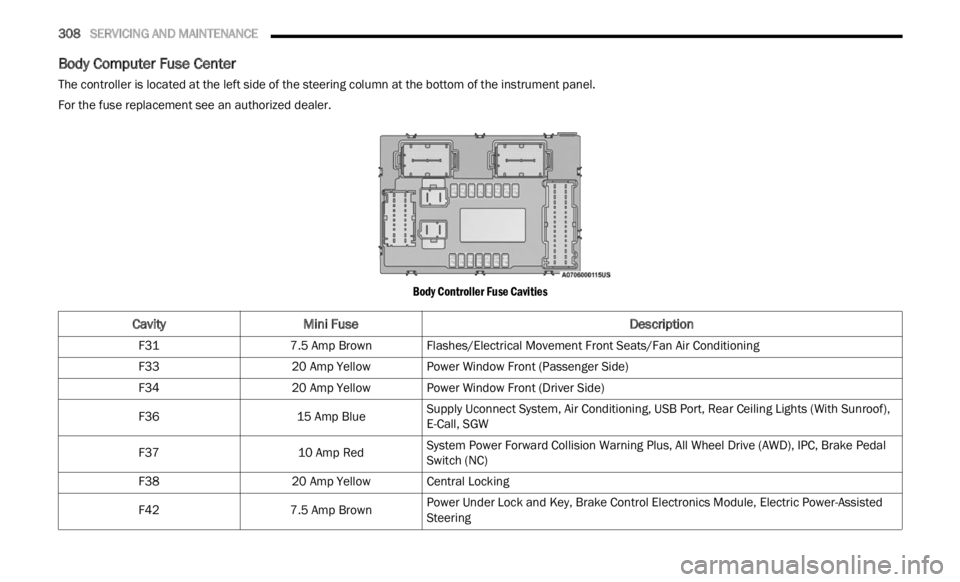
Body Computer Fuse Center
The controller is located at the left side of the steering column at the bottom of the instrument panel.
For the fuse replacement see an authorized dealer.
Body Controller Fuse Cavities
CavityMini Fuse Description
F317.5 Amp BrownFlashes/Electrical Movement Front Seats/Fan Air Conditioning
F33 20 Amp YellowPower Window Front (Passenger Side)
F34 20 Amp YellowPower Window Front (Driver Side)
F36 15 Amp BlueSupply Uconnect System, Air Conditioning, USB Port, Rear Ceiling Lights (With Sunroof),
E-Call
, SGW
F37 10 Amp RedSystem Power Forward Collision Warning Plus, All Wheel Drive (AWD), IPC, Brake Pedal
Switc
h
(NC)
F38 20 Amp YellowCentral Locking
F42 7.5 Amp BrownPower Under Lock and Key, Brake Control Electronics Module, Electric Power-Assisted
Steer
i
ng
Page 311 of 364
SERVICING AND MAINTENANCE 309
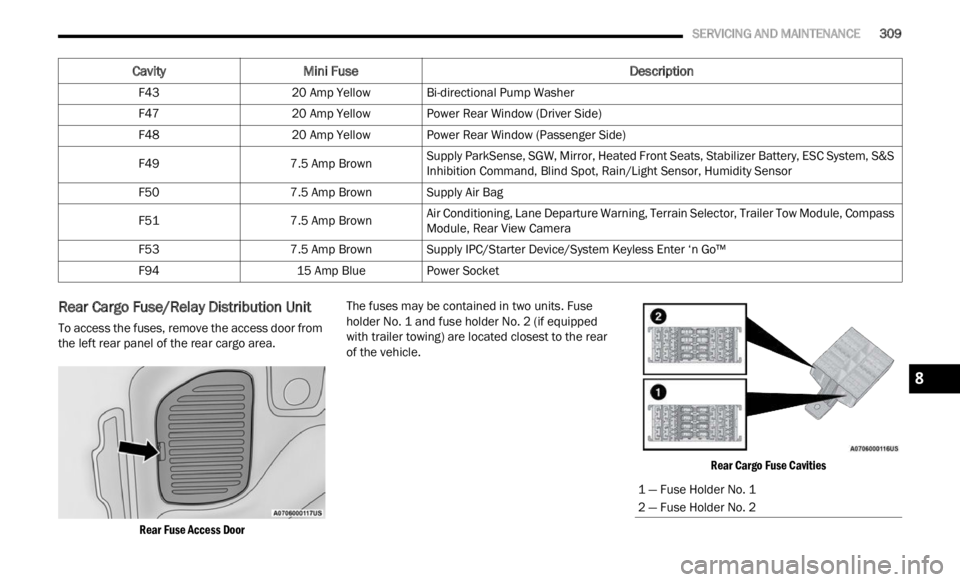
Rear Cargo Fuse/Relay Distribution Unit
To access the fuses, remove the access door from
the left rear panel of the rear cargo area.
Rear Fuse Access Door
The fuses may be contained in two units. Fuse
holder
No. 1 and fuse holder No. 2 (if equipped
with trailer towing) are located closest to the rear
of the vehicle.
Rear Cargo Fuse Cavities
F43
20 Amp YellowBi-directional Pump Washer
F47 20 Amp YellowPower Rear Window (Driver Side)
F48 20 Amp YellowPower Rear Window (Passenger Side)
F49 7.5 Amp BrownSupply ParkSense, SGW, Mirror, Heated Front Seats, Stabilizer Battery, ESC System, S&S
Inhib
i
tion Command, Blind Spot, Rain/Light Sensor, Humidity Sensor
F50 7.5 Amp BrownSupply Air Bag
F51 7.5 Amp BrownAir Conditioning, Lane Departure Warning, Terrain Selector, Trailer Tow Module, Compass
Module
,
Rear View Camera
F53 7.5 Amp BrownSupply IPC/Starter Device/System Keyless Enter ‘n Go™
F94 15 Amp BluePower Socket
Cavity Mini Fuse Description
1 — Fuse Holder No. 1
2 — Fuse Holder No. 2
8
Page 315 of 364
SERVICING AND MAINTENANCE 313
Replacing Exterior Bulbs
Headlamps
Hi/Lo Beam Light Halogen
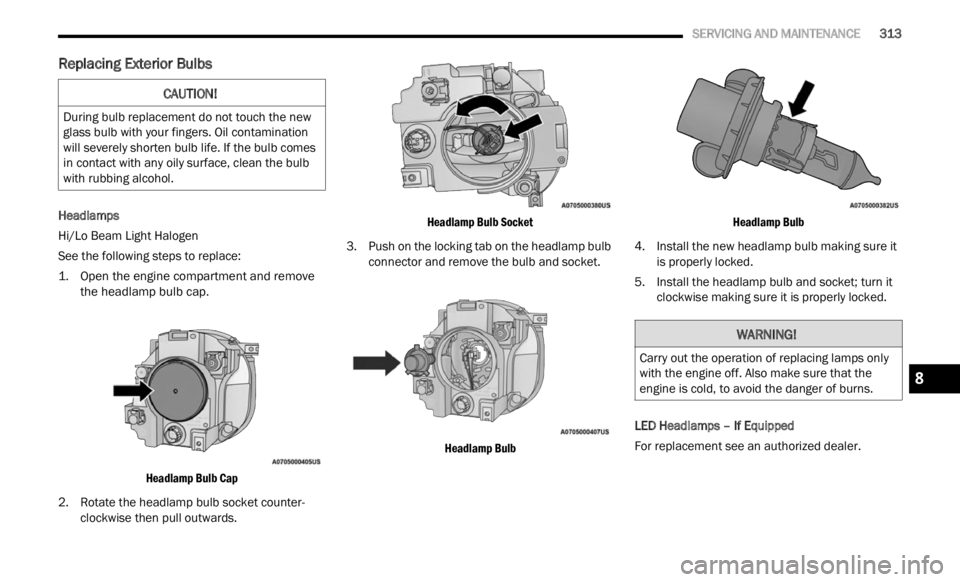
See the following steps to replace:
1. O
pen the engine compartment and remove
the he a
dlamp bulb cap.
Headlamp Bulb Cap
2. Rotate the headlamp bulb socket counter -
clock w
ise then pull outwards.
Headlamp Bulb Socket
3. P ush on the locking tab on the headlamp bulb
conne c
tor and remove the bulb and socket.
Headlamp Bulb Headlamp Bulb
4. Install the new headlamp bulb making sure it is pr operly locked.
5. Install the headlamp bulb and socket; turn it clockw
ise making sure it is properly locked.
LED Headlamps – If Equipped
For replacement see an authorized dealer.
CAUTION!
During bulb replacement do not touch the new
glass bulb with your fingers. Oil contamination
will severely shorten bulb life. If the bulb comes
in contact with any oily surface, clean the bulb
with rubbing alcohol.
WARNING!
Carry out the operation of replacing lamps only
with the engine off. Also make sure that the
engine is cold, to avoid the danger of burns.
8
Page 323 of 364
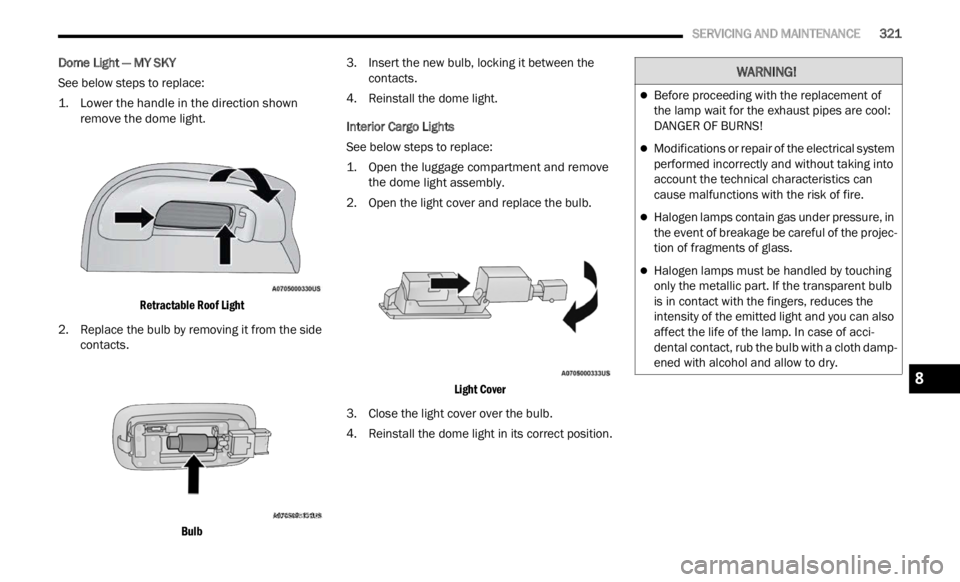
SERVICING AND MAINTENANCE 321
Dome Light — MY SKY
See below steps to replace:
1. L
ower the handle in the direction shown
remove
the dome light.
Retractable Roof Light
2. Replace the bulb by removing it from the side conta c
ts.
Bulb
3. I
nsert the new bulb, locking it between the
c on t
a c
ts.
4. Reinstall the dome light.
Inter
ior Cargo Lights
See below steps to replace:
1. Open the luggage compartment and remove the d o
me light assembly.
2. Open the light cover and replace the bulb.
Light
Cover
3. Close the light cover over the bulb.
4. R ein
stall the dome light in its correct position.
WARNING!
Before proceeding with the replacement of
the lamp wait for the exhaust pipes are cool:
DANGER OF BURNS!
Modifications or repair of the electrical system
performed incorrectly and without taking into
account the technical characteristics can
cause malfunctions with the risk of fire.
Halogen lamps contain gas under pressure, in
the event of breakage be careful of the projec -
tion of fragments of glass.
Halogen lamps must be handled by touching
only the metallic part. If the transparent bulb
is in contact with the fingers, reduces the
intensity of the emitted light and you can also
affect the life of the lamp. In case of acci -
dental contact, rub the bulb with a cloth damp -
ened with alcohol and allow to dry.
8