buttons JEEP RENEGADE 2023 Owner's Manual
[x] Cancel search | Manufacturer: JEEP, Model Year: 2023, Model line: RENEGADE, Model: JEEP RENEGADE 2023Pages: 364, PDF Size: 18.65 MB
Page 171 of 364
MULTIMEDIA 169
5. Press the Disconnect Device or the Delete
Device button on the touchscreen.
6. Press the X to exit out of the Settings screen.
MAKING A PHONE OR AUDIO DEVICE A
FAVORITE
1. On the Paired Phone/Audio Sources screen, press the Settings button located to the right
of the device name for a different phone or
audio device than the currently connected
device or press the preferred “Connected
Phone” from the list.
2. The option’s pop-up will be displayed.
3. Pr e
ss the Make Favorite button on the
touch s
creen; you will see the chosen device
move to the top of the list.
4. Press the X to exit out of the Settings screen.
PHONEBOOK DOWNLOAD (AUTOMATIC
PHONEBOOK TRANSFER FROM MOBILE
PHONE) — IF EQUIPPED
If supported by your phone, Uconnect Phone has
the ability to download contact names and number
entries from the mobile phone’s phonebook.
Specific Bluetooth® Phones with Phonebook
Access Profile may support this feature. Your
mobile phone may receive a pop-up asking for
permission for the Uconnect system to access your messages and contacts. Selecting “Ok” or “Allow”
will sync your contacts with the Uconnect system.
See the Uconnect website,
UconnectPhone.com,
for supported phones.
To call a name from a downloaded mobile
phonebook, Ú page 173.
Automatic download and update of a phone -
book, if supported, begins as soon as the
Bluet oot
h® wireless phone connection is made
to the Uconnect Phone, for example, after you
start the vehicle.
A maximum of 5,000 contact names with four
numbers per contact will be downloaded and
updated every time a phone is connected to the
Uconnect Phone.
Depending on the maximum number of entries
downloaded, there may be a short delay before
the latest downloaded names can be used. Until
then, if available, the previously downloaded
phonebook is available for use.
Only the phonebook of the currently connected
mobile phone is accessible.
This downloaded phonebook cannot be edited
or deleted on the Uconnect Phone. These can
only be edited on the mobile phone. The
changes are transferred and updated to
Uconnect Phone on the next phone connection.
MANAGING YOUR FAVORITES — IF EQUIPPED
There are two ways you can add an entry to your
favorites:
1. After loading the mobile phonebook, press the Fa
vorites button on the touchscreen, and
then press one of the +Add Favorite Contact
buttons that appears on the list.
2. After loading the mobile phonebook, select “Conta
cts” from the Phone main screen, and
then select the appropriate number. Press the
Down Arrow button or the Settings Gear button
next to the selected number to display the
option’s pop-up. In the pop-up, select “Add to
Favorites”.
NOTE:
If the Favorites list is full, you will be asked to
remove
an existing favorite.
TO REMOVE A FAVORITE — IF EQUIPPED
1. To remove a Favorite, select “Favorites” from the Phone main screen.
2. Next, select the Down Arrow icon or the Setti
ngs Gear icon next to the contact you want
to remove from your favorites. This will bring
up the options for that Favorite contact.
3. Deselect the Star icon to delete the Favorite.
5
Page 172 of 364
170 MULTIMEDIA
Phone Call Features
The following features can be accessed through
the Uconnect Phone if the feature(s) are available
and supported by Bluetooth® on your mobile
service plan. For example, if your mobile service
plan provides three-way calling, this feature can be
accessed through the Uconnect Phone. Check with
your mobile service provider for the features that
you have.
Listed below are the phone options with Uconnect:
Redial
Dial by pressing in the number
Voice Commands (Dial by Saying a Name, Call
by Saying a Phonebook Name, Redial or Call
Back)
Favorites
Mobile Phonebook
Recent Call Log
SMS Message Viewer
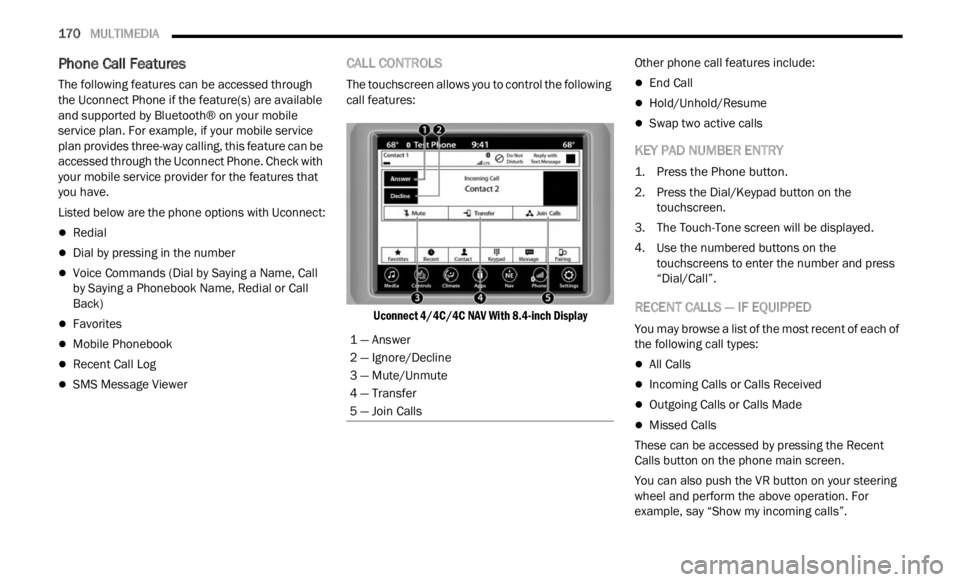
CALL CONTROLS
The touchscreen allows you to control the following
call features:
Uconnect 4/4C/4C NAV With 8.4-inch Display
Other phone call features include:End Call
Hold/Unhold/Resume
Swap two active calls
KEY PAD NUMBER ENTRY
1. Press the Phone button.
2. P
ress the Dial/Keypad button on the
t ou
ch
s
creen.
3. The Touch-Tone screen will be displayed.
4. U se
the numbered buttons on the
t ou
ch
s
creens to enter the number and press
“Dial/Call”.
RECENT CALLS — IF EQUIPPED
You may browse a list of the most recent of each of
the following call types:
All Calls
Incoming Calls or Calls Received
Outgoing Calls or Calls Made
Missed Calls
These can be accessed by pressing the Recent
Calls
button on the phone main screen.
You can also push the VR button on your steering
wheel
and perform the above operation. For
example, say “Show my incoming calls”.
1 — Answer
2 — Ignore/Decline
3 — Mute/Unmute
4 — Transfer
5 — Join Calls
Page 176 of 364
174 MULTIMEDIA
NOTE:
Only use the numbering listed in the provided
table .
Otherwise, the system will not transpose the
message.
Did You Know: Your m
obile phone must have the
full implementation of the Message Access Profile
(MAP) to take advantage of this feature. For details
about MAP, visit UconnectPhone.com .
Apple® iPhone® iOS 5 or later supports reading
i ncomin
g text messages only. For further
information on how to enable this feature on your
Apple® iPhone®, refer to your iPhone® “User
Manual”.
Did You Know: Voice
Text Reply is not compatible
with iPhone®, but if your vehicle is equipped with
Siri® Eyes Free, you can use your voice to send a
text message.
SIRI® EYES FREE — IF EQUIPPED
When used with your Apple® iPhone® connected
to your vehicle via Bluetooth®, Siri lets you use
your voice to send text messages, select media,
place phone calls and much more. Siri uses your
natural language to understand what you mean
and responds back to confirm your requests. The
system is designed to keep your eyes on the road
and your hands on the wheel by letting Siri help you
perform useful tasks.
To enable Siri, push and hold, then release the
Uconne c
t Voice Recognition (VR) button on the
steering wheel. After you hear a double beep, you
can ask Siri to play podcasts and music, get
directions, read text messages, and many other
useful requests.
BLUETOOTH® COMMUNICATION LINK
Mobile phones may lose connection to the
Uconnect Phone. When this happens, the
connection can generally be re-established by
restarting the mobile phone. Your mobile phone is
recommended to remain in Bluetooth® ON mode.
POWER-UP
After switching the ignition key from OFF to either
the ON/RUN or ACC position, or after a language
change, you must wait at least 15 seconds prior to
using the system Ú page 349.
ANDROID AUTO™ & APPLE CARPLAY® —
IF EQUIPPED
ANDROID AUTO™
Use this QR code to access your
digital experience.
Android Auto™ is a feature of your
U connec
t system, and your
Android™ 6.0 or higher powered
smartphone with a data plan, that
allows you to project your
smartphone and a number of its apps onto the
touchscreen radio display. Android Auto™ brings
you useful information, and organizes it into simple
cards that appear just when they are needed.
Android Auto™ can be used with speech
technology, the steering wheel controls, the knobs
and buttons on your radio faceplate, and the radio
display’s touchscreen to control many of your
apps. To use Android Auto™, perform the following
procedure:
NOTE:
Feature availability depends on your carrier and
mobile
phone manufacturer. Some Android Auto™
features may or may not be available in every
region and/or language.
I’ll call you
later . I
need
direct ions. See you in 5
minutes.
I’m on my way.
Can’t talk right
now.
I’m
lost. Thanks.
PRE-DEFINED VOICE TEXT REPLY
RESPONSES
Page 187 of 364
MULTIMEDIA 185
5. To display the options for a favorite
destination, press the Options icon that looks
like a gear.
The following options are available for each fa -
vorite destination:
Edit Name
Phone Number
Move Up
Move Down
Delete
Where To? — Point of Interest
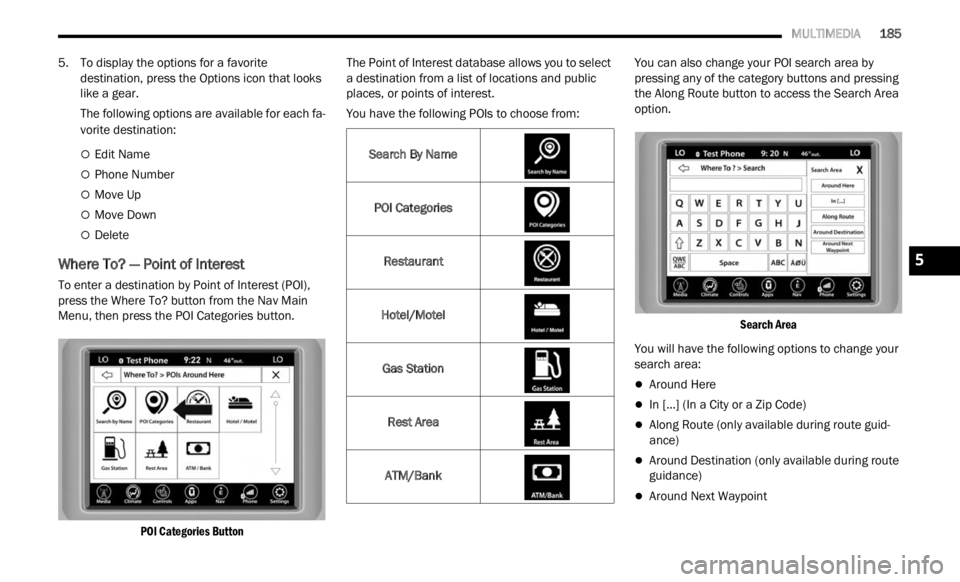
To enter a destination by Point of Interest (POI),
press the Where To? button from the Nav Main
Menu, then press the POI Categories button.
POI Categories Button
The Point of Interest database allows you to select
a des
t
ination from a list of locations and public
places, or points of interest.
You have the following POIs to choose from: You can also change your POI search area by
pressi
ng any of the category buttons and pressing
the Along Route button to access the Search Area
option.
Search Area
You will have the following options to change your
searc h
area:
Around Here
In [...] (In a City or a Zip Code)
Along Route (only available during route guid -
ance)
Around Destination (only available during route
guidance)
Around Next Waypoint
Search By Name
POI Categories
Restaurant
Hotel/Motel Gas Station Rest Area
ATM/Bank
5
Page 193 of 364
MULTIMEDIA 191
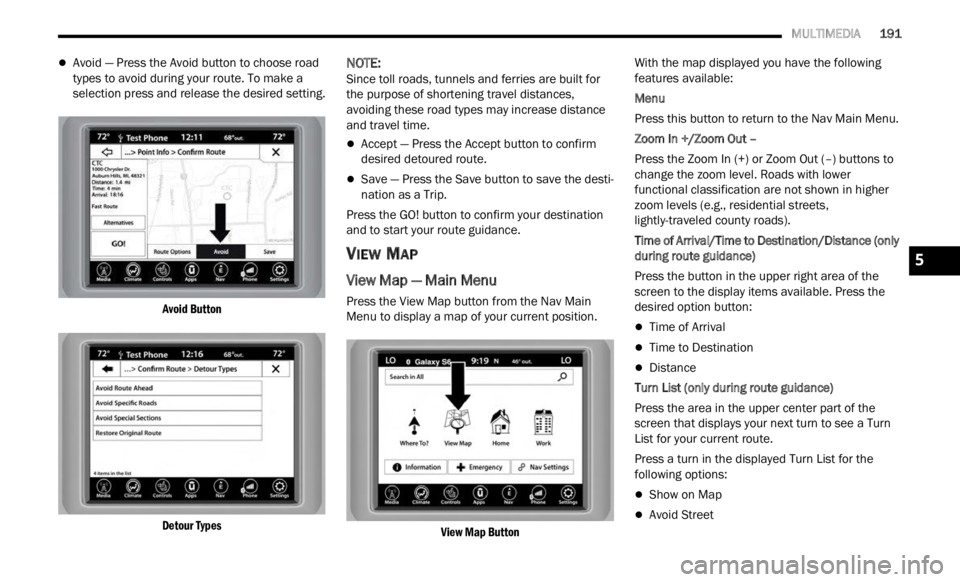
Avoid — Press the Avoid button to choose road
types to avoid during your route. To make a
selection press and release the desired setting.
Avoid Button
Detour Types
NOTE:
Since toll roads, tunnels and ferries are built for
the p u
rpose of shortening travel distances,
avoiding these road types may increase distance
and travel time.
Accept — Press the Accept button to confirm
desired detoured route.
Save — Press the Save button to save the desti -
nation as a Trip.
Press the GO! button to confirm your destination
a nd to
start your route guidance.
VIEW MAP
View Map — Main Menu
Press the View Map button from the Nav Main
Menu to display a map of your current position.
View Map Button
With the map displayed you have the following
f
eatu r
es available:
Menu
Press this button to return to the Nav Main Menu.
Zoom In +/Zoom Out –
Press the Zoom In (+) or Zoom Out (–) buttons to
c hang e
the zoom level. Roads with lower
functional classification are not shown in higher
zoom levels (e.g., residential streets,
lightly-traveled county roads).
Time of Arrival/Time to Destination/Distance (only
durin g
route guidance)
Press the button in the upper right area of the
screen
to the display items available. Press the
desired option button:
Time of Arrival
Time to Destination
Distance
Turn List (only during route guidance)
Press the area in the upper center part of the
s creen
that displays your next turn to see a Turn
List for your current route.
Press a turn in the displayed Turn List for the
followi n
g options:
Show on Map
Avoid Street
5
Page 198 of 364
196 MULTIMEDIA
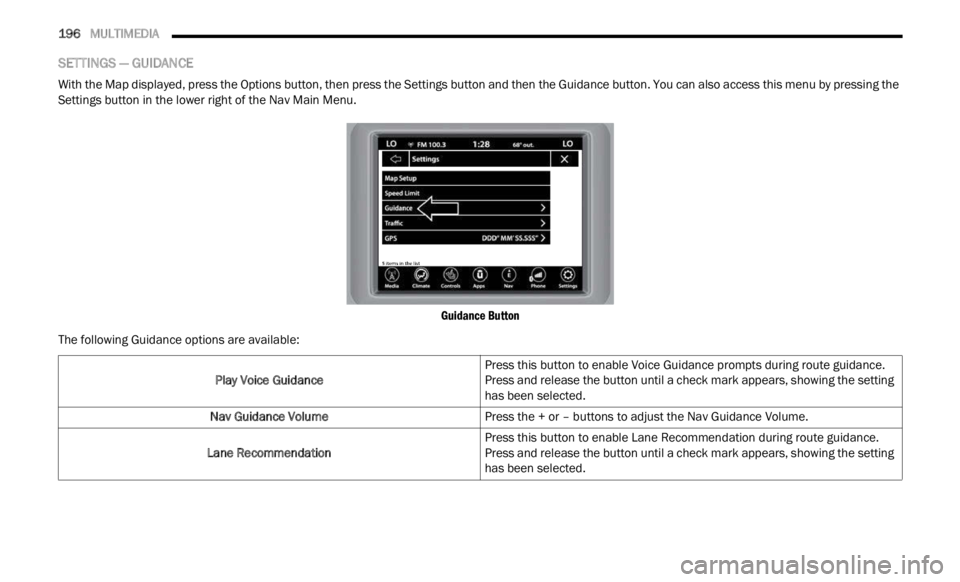
SETTINGS — GUIDANCE
With the Map displayed, press the Options button, then press the Settings button and then the Guidance button. You can also access this menu by pressing the
Settings button in the lower right of the Nav Main Menu.
Guidance Button
The following Guidance options are available:
Play Voice Guidance Press this button to enable Voice Guidance prompts during route guidance.
Press
and release the button until a check mark appears, showing the setting
has been selected.
Nav Guidance Volume Press the + or – buttons to adjust the Nav Guidance Volume.
Lane Recommendation Press this button to enable Lane Recommendation during route guidance.
Press
and release the button until a check mark appears, showing the setting
has been selected.
Page 204 of 364
202 MULTIMEDIA
service is integrated with a vehicle's Navigation
system, SiriusXM® Traffic Plus can help drivers
pick the fastest route based on traffic conditions.
1. Detailed information on traffic speed,
accid
ents, construction, and road closings.
2. Traffic information from multiple sources, inclu
ding police and emergency services,
cameras and road sensors.
3. Coast-to-coast delivery of traffic information.
4. Vi e
w conditions for points along your route and
beyon d
.
CONNECTED VEHICLE SERVICES —
IF EQUIPPED
IS MY VEHICLE CONNECTED?
If equipped, vehicles with an ASSIST and an SOS
button are connected vehicles. These buttons will
be located on either the rearview mirror or
overhead console, depending on the vehicle. If
these buttons are present in your vehicle, you have
a connected radio and can take advantage of the
many connected vehicle features.
For further information about the ASSIST and SOS
button s
Ú page 268.
INTRODUCTION TO CONNECTED VEHICLE
S
ERVICES
One of the many benefits of your vehicle’s
Uconnect system is that you can now take
advantage of SiriusXM Guardian™ connected
services. To unlock the full potential of SiriusXM
Guardian™ in your vehicle, you first need to
activate SiriusXM Guardian™ connected services.
NOTE:
SiriusXM Guardian™ involves the collection, trans -
mission and use of data from your vehicle
Ú page 220.
SiriusXM Guardian™ Contact Information
SiriusXM Guardian™/Care
US residents visit: https://www.driveucon -
nect.com/sirius-xm-guardian.html or call
1-844-796-4827
Canadian residents visit: https://www.driveuco-
nnect.ca/en/sirius-xm-guardian or call
1-877-324-9091
What Is SiriusXM Guardian™?
SiriusXM Guardian™ uses an embedded device in
the Uconnect system installed in your vehicle,
which receives GPS signals and communicates
with the SiriusXM Guardian™ Customer Care
center via wireless and landline communications
networks. Depending on the type of device in your
vehicle, some SiriusXM Guardian™ connected
services require an operable LTE (voice/data) or
3G or 4G (data) network compatible with your
device. SiriusXM Guardian™ is available only on
equipped vehicles purchased within the
continental United States, Alaska, Hawaii, Puerto
Rico and Canada.WARNING!
ALWAYS obey traffic laws and pay attention to
the road. ALWAYS drive safely with your hands on
the steering wheel. You have full responsibility
and assume all risks related to the use of the
features and applications in this vehicle. Only
use the features and applications when it is safe
to do so. Failure to comply may result in an
accident involving serious injury or death.
Page 205 of 364

MULTIMEDIA 203
NOTE:
Certain SiriusXM Guardian™ connected
services are dependent upon an operative
telematics device, a cellular connection, naviga
-
tion map data, and GPS satellite signal recep -
tion, which can limit the ability to reach the
r espons
e center or reach emergency support.
Not all features of SiriusXM Guardian™ are
available everywhere at all times, particularly in
remote or enclosed areas.
Other factors outside the control of SiriusXM
Guardian™ that may limit or prevent service
delivery are hills, structures, buildings, tunnels,
weather, damage to the electrical system or
other important parts of your vehicle, network
congestion, civil disturbances, actions of third
parties or the government, Internet failure, and/
or the physical location of your vehicle, such as
in an underground parking structure or under a
bridge.
Not all SiriusXM Guardian™ features are available
for al l
models.
SiriusXM Guardian™ provides:
The ability to remotely lock/unlock and remote
start your vehicle from virtually anywhere by
using the Mobile App or your computer.
If equipped — Send & Go capability with the
Mobile App. Use the Mobile App to easily search, map and send your locations directly to your
Uconnect Navigation.
The ability to locate your vehicle, when you
forget where you parked, using the Vehicle
Finder function of the Mobile App.
Before you drive, familiarize yourself with the
easy- t
o-use Uconnect system and SiriusXM
Guardian™ connected services.
The ASSIST and SOS Call Buttons On Your
Rearv i
ew Mirror Or Overhead Console
If equipped, the ASSIST Button is used for
contact
ing Roadside Assistance, Vehicle Care,
Uconnect Care, and SiriusXM Guardian™
Customer Care. The SOS Call button connects you
directly to SiriusXM Guardian™ Customer Care for
assistance in an emergency.
Activation — If Equipped
To unlock the full potential of SiriusXM Guardian™
in your vehicle, you must activate your SiriusXM
Guardian™ connected services.
1. Press the Apps icon on the bottom of your in-ve hi
cle touchscreen.
2. Select the Activate Services icon from your list of app
s.
3. For customers in the United States , sel
ect
“Customer Care” to speak with a SiriusXM
Guardian™ Customer Care agent who will activate services in your vehicle, or select
“Enter Email” to activate on the web.
For customers in Canada
, ente
r your email ad-
dress to activate services in your vehicle.
Included Trial Period For New Vehicles
Your new vehicle may come with an included trial*
period for use of SiriusXM Guardian™ connected
services starting on the date of vehicle purchase.
To get started with your trial, enrollment in
SiriusXM Guardian™ is required.
* Included trial applies to new vehicles only.
Features And Packages
After the trial period, you must purchase a
subscription to continue your services by calling a
SiriusXM Guardian™ Customer Care agent.
GETTING STARTED WITH CONNECTED
V
EHICLE SERVICES
Download The Mobile App
Once you have activated your services, you’re only
a few steps away from using connected services.
Download the Mobile App to your mobile device.
Use your Owner Account login and password to
open the app and then set up a PIN.
5
Page 221 of 364

MULTIMEDIA 219
8.Can I access every App and service while
driving? No, some applications and services
are not available while driving. For your own
safety, it is not possible to use some of the
touchscreen features while the vehicle is in
motion (e.g. key pad).
9. What happens when my subscription comes
up for
renewal? If you have added a credit card
to your account information, your subscription
will be automatically renewed for a term length
in accordance with the service plan that you
have selected at the then current subscription
rate and on every renewal date thereafter,
unless you cancel your subscription by calling
SiriusXM Guardian™ Care. If you have not
added a credit card to your account, SiriusXM
Guardian™ will send you an email or letter in
advance of your expiration date to remind you
that your subscription is ending soon.
10. How do I manage my SiriusXM Guardian™
notif i
cation preferences? Contact SiriusXM
Guardian™ Customer Care, or go to your
Owner’s Site and then update your
preferences on the SiriusXM Guardian™
customer web portal.
11. How do I purchase a subscription? Conta
ct
SiriusXM Guardian™ Customer Care by
pushing the ASSIST button on your rearview
mirror or overhead console. 12.
How do I update my credit card information?
Login t
o your Owner’s Site, and select Edit
Profile, then select SiriusXM Guardian™
Payment Account.
13. How do I find out how much longer I have on
my su
bscription? Contact SiriusXM Guardian™
Customer Care.
You also can visit your Owner’s Site and
choose a
subscription to view its expiration
date. When your subscription is about to ex -
pire, you will receive an email or letter of notifi -
cation.
14. Can I get a refund if I have not used the entire
subsc
ription? Prorated refunds are provided
from the date of cancellation for annual plans
or longer. Please see the Uconnect and
SiriusXM Guardian™ Terms & Conditions for
refunds related to billing plans of other lengths
and other circumstances.
15. Can I cancel a subscription before it expires?
Yes.
If you have an annual subscription, your
subscription will be canceled the day you
cancel. If you have a monthly subscription,
your subscription will be canceled on the last
day of the month in which you choose to
cancel. 16.
What should I do if I want to sell my vehicle?
Befor e
your vehicle is sold to a new owner,
you’ll want to remove your account
information. This process removes all personal
information, returns the Uconnect system to
its original factory settings, removes all
SiriusXM Guardian™ connected services and
account information. To remove your account
information from the Uconnect system,
contact SiriusXM Guardian™ Customer Care.
17. What if I forgot to remove my account
infor m
ation before I returned my lease vehicle
or sold it? Contact SiriusXM Guardian™
Customer Care.
18. What will happen if an operable LTE (voice/
data)
, 4G (data), or 5G (data) network
connection compatible with my device is
temporarily unavailable? The SOS Call and
ASSIST buttons will NOT function if you are not
connected to an operable LTE (voice/data) or
3G, 4G (data), 5G (data) network. Services that
required your smartphone only direct calls to
Roadside Assistance Call may be functioning if
you have an operable network.
5
Page 270 of 364
268
IN CASE OF EMERGENCY
HAZARD WARNING FLASHERS
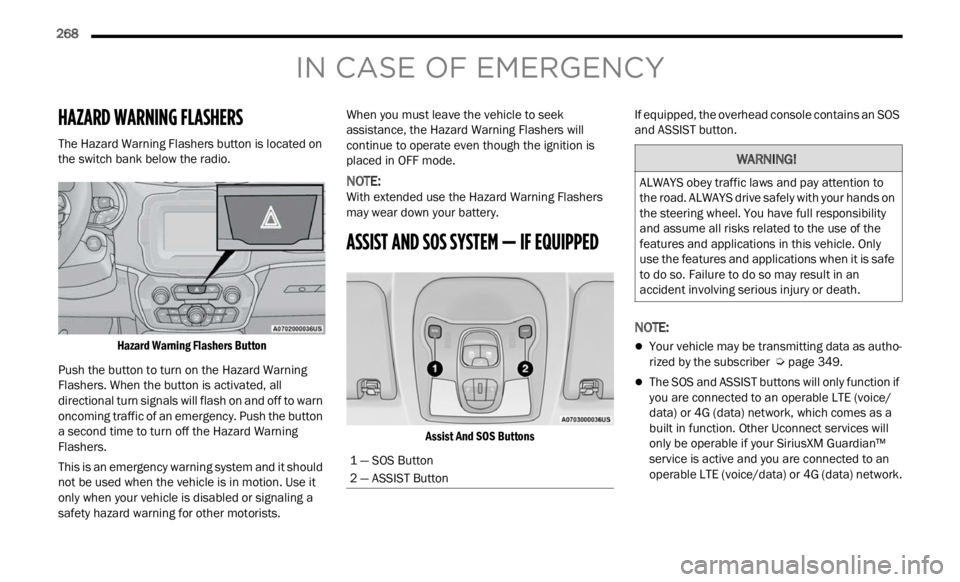
The Hazard Warning Flashers button is located on
the switch bank below the radio.
Hazard Warning Flashers Button
Push the button to turn on the Hazard Warning
Flash e
rs. When the button is activated, all
directional turn signals will flash on and off to warn
oncoming traffic of an emergency. Push the button
a second time to turn off the Hazard Warning
Flashers.
This is an emergency warning system and it should
not be
used when the vehicle is in motion. Use it
only when your vehicle is disabled or signaling a
safety hazard warning for other motorists. When you must leave the vehicle to seek
assis
t
ance, the Hazard Warning Flashers will
continue to operate even though the ignition is
placed in OFF mode.
NOTE:
With extended use the Hazard Warning Flashers
may w e
ar down your battery.
ASSIST AND SOS SYSTEM — IF EQUIPPED
Assist And SOS Buttons
If equipped, the overhead console contains an SOS
and A
S
SIST button.
NOTE:
Your vehicle may be transmitting data as autho -
rized by the subscriber Ú page 349.
The SOS and ASSIST buttons will only function if
you are connected to an operable LTE (voice/
data) or 4G (data) network, which comes as a
built in function. Other Uconnect services will
only be operable if your SiriusXM Guardian™
service is active and you are connected to an
operable LTE (voice/data) or 4G (data) network.
1 — SOS Button
2 — ASSIST Button
WARNING!
ALWAYS obey traffic laws and pay attention to
the road. ALWAYS drive safely with your hands on
the steering wheel. You have full responsibility
and assume all risks related to the use of the
features and applications in this vehicle. Only
use the features and applications when it is safe
to do so. Failure to do so may result in an
accident involving serious injury or death.