buttons JEEP RENEGADE 2023 User Guide
[x] Cancel search | Manufacturer: JEEP, Model Year: 2023, Model line: RENEGADE, Model: JEEP RENEGADE 2023Pages: 364, PDF Size: 18.65 MB
Page 100 of 364
98 STARTING AND OPERATING
Adaptive Cruise Control (ACC) Operation
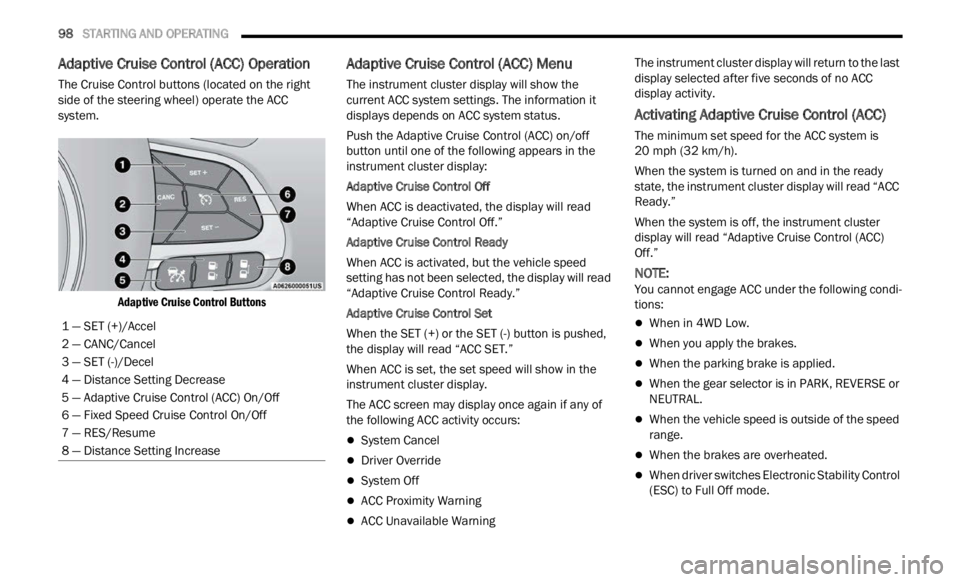
The Cruise Control buttons (located on the right
side of the steering wheel) operate the ACC
system.
Adaptive Cruise Control Buttons
Adaptive Cruise Control (ACC) Menu
The instrument cluster display will show the
current ACC system settings. The information it
displays depends on ACC system status.
Push the Adaptive Cruise Control (ACC) on/off
button
until one of the following appears in the
instrument cluster display:
Adaptive Cruise Control Off
When ACC is deactivated, the display will read
“ Adapt
ive Cruise Control Off.”
Adaptive Cruise Control Ready
When ACC is activated, but the vehicle speed
setti n
g has not been selected, the display will read
“Adaptive Cruise Control Ready.”
Adaptive Cruise Control Set
When the SET (+) or the SET (-) button is pushed,
t he di
splay will read “ACC SET.”
When ACC is set, the set speed will show in the
instru
ment cluster display.
The ACC screen may display once again if any of
the fol
lowing ACC activity occurs:
System Cancel
Driver Override
System Off
ACC Proximity Warning
ACC Unavailable Warning The instrument cluster display will return to the last
displ
a
y selected after five seconds of no ACC
display activity.
Activating Adaptive Cruise Control (ACC)
The minimum set speed for the ACC system is
20 mph (32 km/h).
When the system is turned on and in the ready
state,
the instrument cluster display will read “ACC
Ready.”
When the system is off, the instrument cluster
displ a
y will read “Adaptive Cruise Control (ACC)
Off.”
NOTE:
You cannot engage ACC under the following condi -
tions:
When in 4WD Low.
When you apply the brakes.
When the parking brake is applied.
When the gear selector is in PARK, REVERSE or
NEUTRAL.
When the vehicle speed is outside of the speed
range.
When the brakes are overheated.
When driver switches Electronic Stability Control
(ESC) to Full Off mode.
1 — SET (+)/Accel
2 — CANC/Cancel
3 — SET (-)/Decel
4 — Distance Setting Decrease
5 — Adaptive Cruise Control (ACC) On/Off
6 — Fixed Speed Cruise Control On/Off
7 — RES/Resume
8 — Distance Setting Increase
Page 115 of 364
STARTING AND OPERATING 113
PARALLEL/PERPENDICULAR PARKING
S
PACE ASSISTANCE OPERATION
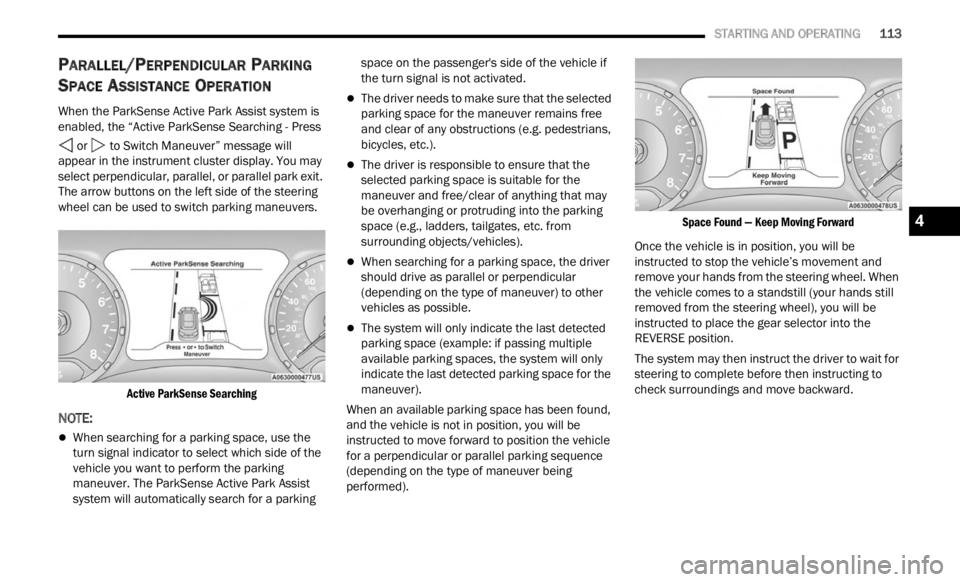
When the ParkSense Active Park Assist system is
enabled, the “Active ParkSense Searching - Press
or to Switch Maneuver” message will
appear in the instrument cluster display. You may
select
perpendicular, parallel, or parallel park exit.
The arrow buttons on the left side of the steering
wheel can be used to switch parking maneuvers.
Active ParkSense Searching
NOTE:
When searching for a parking space, use the
turn signal indicator to select which side of the
vehicle you want to perform the parking
maneuver. The ParkSense Active Park Assist
system will automatically search for a parking space on the passenger's side of the vehicle if
the turn signal is not activated.
The driver needs to make sure that the selected
parking space for the maneuver remains free
and clear of any obstructions (e.g. pedestrians,
bicycles, etc.).
The driver is responsible to ensure that the
selected parking space is suitable for the
maneuver and free/clear of anything that may
be overhanging or protruding into the parking
space (e.g., ladders, tailgates, etc. from
surrounding objects/vehicles).
When searching for a parking space, the driver
should drive as parallel or perpendicular
(depending on the type of maneuver) to other
vehicles as possible.
The system will only indicate the last detected
parking space (example: if passing multiple
available parking spaces, the system will only
indicate the last detected parking space for the
maneuver).
When an available parking space has been found,
and t h
e vehicle is not in position, you will be
instructed to move forward to position the vehicle
for a perpendicular or parallel parking sequence
(depending on the type of maneuver being
performed).
Space Found — Keep Moving Forward
Once the vehicle is in position, you will be
instr u
cted to stop the vehicle’s movement and
remove your hands from the steering wheel. When
the vehicle comes to a standstill (your hands still
removed from the steering wheel), you will be
instructed to place the gear selector into the
REVERSE position.
The system may then instruct the driver to wait for
steer i
ng to complete before then instructing to
check surroundings and move backward.
4
Page 117 of 364
STARTING AND OPERATING 115
(Continued)
EXITING THE PARKING SPACE
NOTE:
The function does not work for exiting a perpen -
dicular parking space, but only exiting parallel
p arki n
g spaces.
Activation
To activate this function, push the ParkSense
Activ e
Park Assist switch and then use the steering
wheel arrow buttons to select the Parallel Park Exit
feature. After the selection, the system activates
and instructs the driver through the instrument
cluster display about the operations that have to
be carried out to perform the maneuver correctly. Selection Of The Maneuver Side
Use the right and left arrow buttons on the steering
wheel
to select between parallel or perpendicular
parking mode. Then use the direction indicators
(turn signals) to choose the direction that you want
to perform the maneuver.
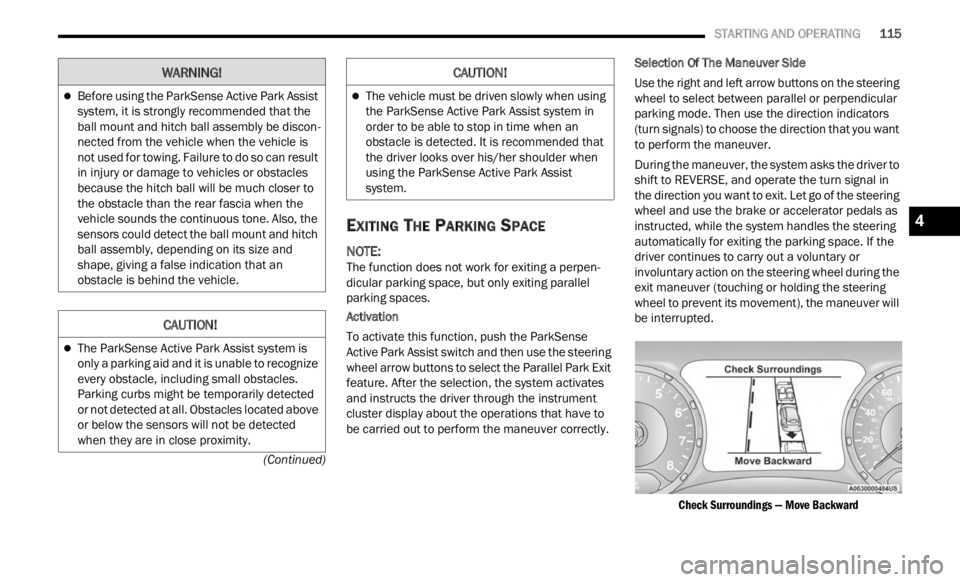
During the maneuver, the system asks the driver to
shift
to REVERSE, and operate the turn signal in
the direction you want to exit. Let go of the steering
wheel and use the brake or accelerator pedals as
instructed, while the system handles the steering
automatically for exiting the parking space. If the
driver continues to carry out a voluntary or
involuntary action on the steering wheel during the
exit maneuver (touching or holding the steering
wheel to prevent its movement), the maneuver will
be interrupted.
Check Surroundings — Move Backward
Before using the ParkSense Active Park Assist
system, it is strongly recommended that the
ball mount and hitch ball assembly be discon -
nected from the vehicle when the vehicle is
not us e
d for towing. Failure to do so can result
in injury or damage to vehicles or obstacles
because the hitch ball will be much closer to
the obstacle than the rear fascia when the
vehicle sounds the continuous tone. Also, the
sensors could detect the ball mount and hitch
ball assembly, depending on its size and
shape, giving a false indication that an
obstacle is behind the vehicle.
CAUTION!
The ParkSense Active Park Assist system is
only a parking aid and it is unable to recognize
every obstacle, including small obstacles.
Parking curbs might be temporarily detected
or not detected at all. Obstacles located above
or below the sensors will not be detected
when they are in close proximity.
WARNING!
The vehicle must be driven slowly when using
the ParkSense Active Park Assist system in
order to be able to stop in time when an
obstacle is detected. It is recommended that
the driver looks over his/her shoulder when
using the ParkSense Active Park Assist
system.
CAUTION!
4
Page 135 of 364
133
MULTIMEDIA
UCONNECT SYSTEMS
Uconnect screen images are for illustration
purposes only and may not reflect exact software
for your vehicle.
CYBERSECURITY
Your vehicle may be a connected vehicle and may
be equipped with both wired and wireless
networks. These networks allow your vehicle to
send and receive information. This information
allows systems and features in your vehicle to
function properly.
Your vehicle may be equipped with certain security
featur
es to reduce the risk of unauthorized and
unlawful access to vehicle systems and wireless
communications. Vehicle software technology
continues to evolve over time and FCA US LLC,
working with its suppliers, evaluates and takes
appropriate steps as needed. Similar to a computer or other devices, your vehicle may
requi
r
e software updates to improve the usability
and performance of your systems or to reduce the
potential risk of unauthorized and unlawful access
to your vehicle systems.
The risk of unauthorized and unlawful access to
your v e
hicle systems may still exist, even if the
most recent version of vehicle software (such as
Uconnect software) is installed.
NOTE:
FCA US LLC or your dealer may contact you
directly regarding software updates.
To help further improve vehicle security and
minimize the potential risk of a security breach,
vehicle owners should:
Routinely check www.driveuconnect.com
(US Residents) or www.driveuconnect.ca
(Canadian Residents) to learn about avail -
able Uconnect software updates.
Only connect and use trusted media
devices (e.g. personal mobile phones,
USBs, CDs).
UCONNECT SETTINGS
The Uconnect system uses a combination of
buttons on the touchscreen and buttons on the
faceplate located on the center of the instrument
panel. These buttons allow you to access and
change the Customer Programmable Features.
Many features can vary by vehicle.
WARNING!
ONLY insert trusted devices/components into
your vehicle. Media of unknown origin could
possibly contain malicious software, and if
installed in your vehicle, it may increase the
possibility for vehicle systems to be breached.
As always, if you experience unusual vehicle
behavior, take your vehicle to your nearest
authorized dealer immediately.
5
Page 136 of 364

134 MULTIMEDIA
Buttons on the faceplate are located below and/or
beside the Uconnect system in the center of the
instrument panel. In addition, there is a SCROLL/
ENTER control knob located on the right side. Turn
the control knob to scroll through menus and
change settings. Push the center of the control
knob one or more times to select or change a
setting.
Your Uconnect system may also have SCREEN OFF
and MU
TE buttons on the faceplate.
Push the SCREEN OFF button on the faceplate to
turn of
f the Uconnect screen. Push the button
again or tap the screen to turn the screen on.
Press the Back Arrow button to exit out of a Menu
or cer t
ain option on the Uconnect system.
CUSTOMER PROGRAMMABLE FEATURES
Uconnect 4/4C/4C NAV With 8.4-inch Display Buttons On
Faceplate And Buttons On Touchscreen
Press the Apps button, then press the Settings
button
on the touchscreen to display the menu
setting screen. In this mode, the Uconnect system
allows you to access programmable features.
NOTE:
Depending on the vehicle’s options, feature
settings may vary.
All settings should be changed with the ignition
in the ON/RUN position.
When making a selection, only press one button at
a time
to enter the desired menu. Once in the
desired menu, press and release the preferred
setting option until a check mark appears next to
the setting, showing that setting has been
selected. Once the setting is complete, press the X
button on the touchscreen to close out of the
settings screen. Pressing the Up or Down Arrow
button on the right side of the screen will allow you
to toggle up or down through the available settings.
1 — Uconnect Buttons On The Touchscreen
2 — Uconnect Buttons On The Faceplate
Page 153 of 364
MULTIMEDIA 151
RADIO MODE
Radio Controls
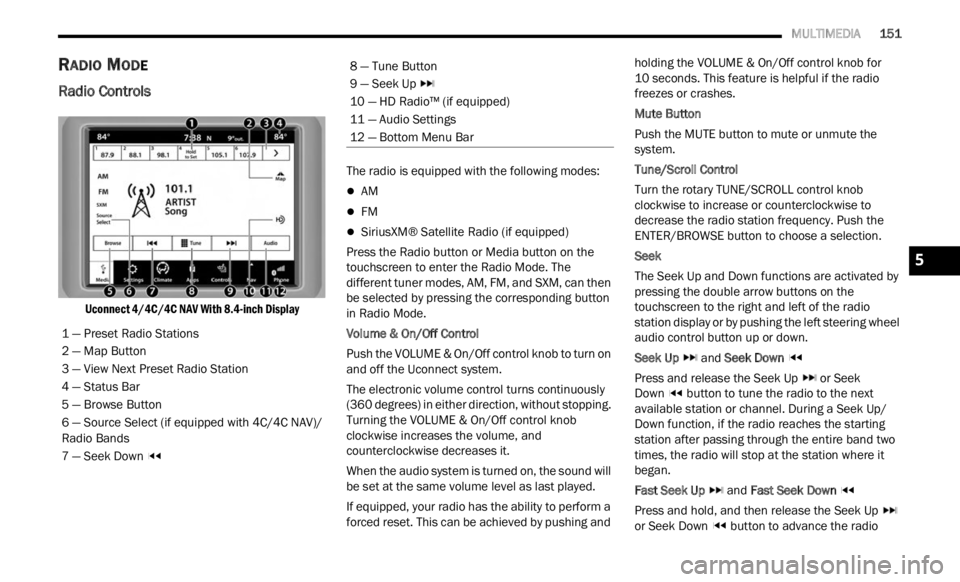
Uconnect 4/4C/4C NAV With 8.4-inch Display
The radio is equipped with the following modes:
AM
FM
SiriusXM® Satellite Radio (if equipped)
Press the Radio button or M
ed
i
a button on the
touchscreen to enter the Radio Mode. The
different tuner modes, AM, FM, and SXM, can then
be selected by pressing the corresponding button
in Radio Mode.
Volume & On/Off Control
Push the VOLUME & On/Off control knob to turn on
a nd of f
the Uconnect system.
The electronic volume control turns continuously
(360 d
egrees) in either direction, without stopping.
Turning the VOLUME & On/Off control knob
clockwise increases the volume, and
counterclockwise decreases it.
When the audio system is turned on, the sound will
be se t
at the same volume level as last played.
If equipped, your radio has the ability to perform a
forced
reset. This can be achieved by pushing and holding the VOLUME & On/Off control knob for
10 seconds. This feature is helpful if the radio
freez e
s or crashes.
Mute Button
Push the MUTE button to mute or unmute the
syste m
.
Tune/Scroll Control
Turn the rotary TUNE/SCROLL control knob
clock w
ise to increase or counterclockwise to
decrease the radio station frequency. Push the
ENTER/BROWSE button to choose a selection.
Seek
The Seek Up and Down functions are activated by
press i
ng the double arrow buttons on the
touchscreen to the right and left of the radio
station display or by pushing the left steering wheel
audio control button up or down.
Seek Up and Seek Down
Pres s
and release the Seek Up or Seek
Down button to tune the radio to the next
available station or channel. During a Seek Up/
D own f u
nction, if the radio reaches the starting
station after passing through the entire band two
times, the radio will stop at the station where it
began.
Fast Seek Up and Fast Seek Down
Pres s
and hold, and then release the Seek Up
or Seek Down button to advance the radio
1 — Preset Radio Stations
2 — Map Button
3 — View Next Preset Radio Station
4 — Status Bar
5 — Browse Button
6 — Source Select (if equipped with 4C/4C NAV)/
R
adio B
ands
7 — Seek Down
8 — Tune Button
9 — Seek Up
10 — HD Radio™ (if equipped)
11 — Audio Settings
12 — Bottom Menu Bar
5
Page 158 of 364
156 MULTIMEDIA
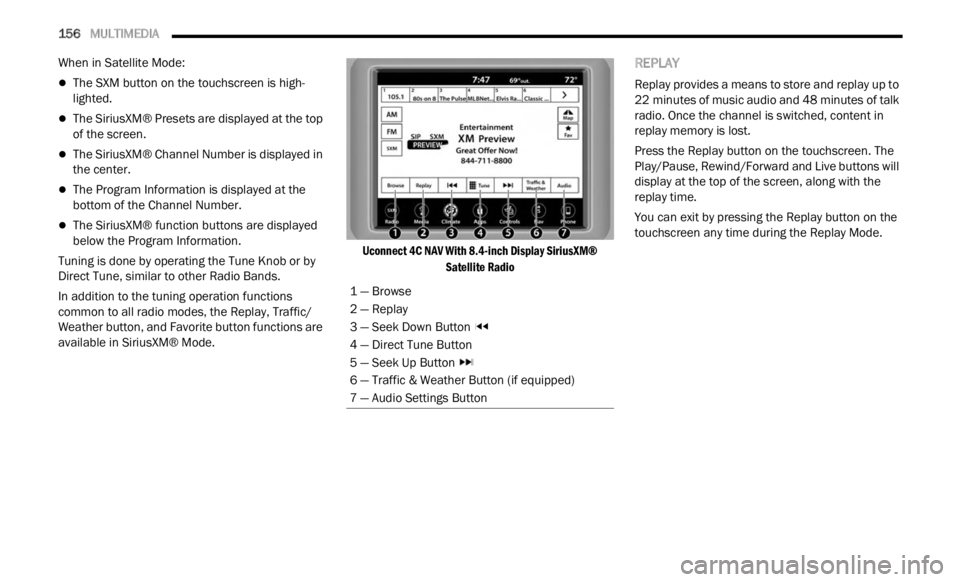
When in Satellite Mode:
The SXM button on the touchscreen is high -
lighted.
The SiriusXM® Presets are displayed at the top
of the screen.
The SiriusXM® Channel Number is displayed in
the center.
The Program Information is displayed at the
bottom of the Channel Number.
The SiriusXM® function buttons are displayed
below the Program Information.
Tuning is done by operating the Tune Knob or by
Direct
Tune, similar to other Radio Bands.
In addition to the tuning operation functions
common t
o all radio modes, the Replay, Traffic/
Weather button, and Favorite button functions are
available in SiriusXM® Mode.
Uconnect 4C NAV With 8.4-inch Display SiriusXM®
Satell
ite Radio
REPLAY
Replay provides a means to store and replay up to
22 minutes of music audio and 48 minutes of talk
r adio.
Once the channel is switched, content in
replay memory is lost.
Press the Replay button on the touchscreen. The
Play/ P
ause, Rewind/Forward and Live buttons will
display at the top of the screen, along with the
replay time.
You can exit by pressing the Replay button on the
touchsc
reen any time during the Replay Mode.
1 — Browse
2 — Replay
3 — Seek Down Button
4 — Direct Tune Button
5 — Seek Up Button
6 — Traffic & Weather Button (if equipped)
7 — Audio Settings Button
Page 162 of 364
160 MULTIMEDIA
Setting Presets
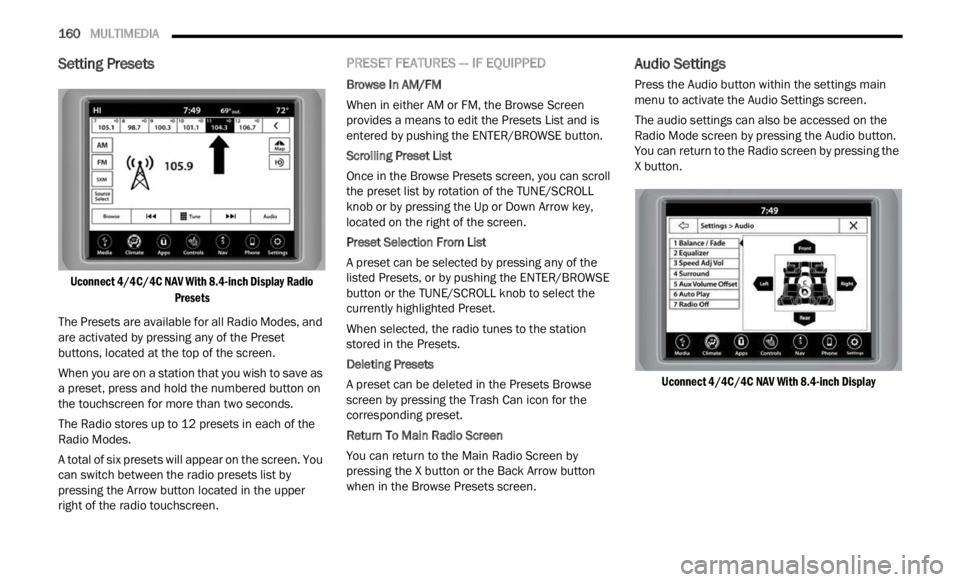
Uconnect 4/4C/4C NAV With 8.4-inch Display Radio
Presets
The Presets are available for all Radio Modes, and
are ac
tivated by pressing any of the Preset
buttons, located at the top of the screen.
When you are on a station that you wish to save as
a pre s
et, press and hold the numbered button on
the touchscreen for more than two seconds.
The Radio stores up to 12 presets in each of the
Radio M
odes.
A total of six presets will appear on the screen. You
can sw
itch between the radio presets list by
pressing the Arrow button located in the upper
right of the radio touchscreen.
PRESET FEATURES — IF EQUIPPED
Browse In AM/FM
When in either AM or FM, the Browse Screen
provid e
s a means to edit the Presets List and is
entered by pushing the ENTER/BROWSE button.
Scrolling Preset List
Once in the Browse Presets screen, you can scroll
t he pr
eset list by rotation of the TUNE/SCROLL
knob or by pressing the Up or Down Arrow key,
located on the right of the screen.
Preset Selection From List
A preset can be selected by pressing any of the
liste d
Presets, or by pushing the ENTER/BROWSE
button or the TUNE/SCROLL knob to select the
currently highlighted Preset.
When selected, the radio tunes to the station
stored
in the Presets.
Deleting Presets
A preset can be deleted in the Presets Browse
scree n
by pressing the Trash Can icon for the
corresponding preset.
Return To Main Radio Screen
You can return to the Main Radio Screen by
p ressi
ng the X button or the Back Arrow button
when in the Browse Presets screen.
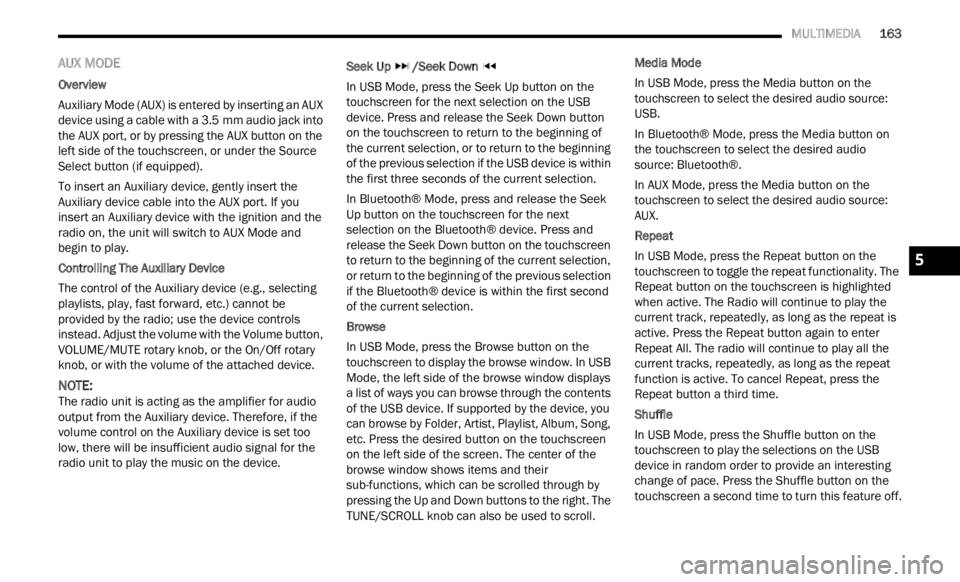
Audio Settings
Press the Audio button within the settings main
menu to activate the Audio Settings screen.
The audio settings can also be accessed on the
Radio M
ode screen by pressing the Audio button.
You can return to the Radio screen by pressing the
X button.
Uconnect 4/4C/4C NAV With 8.4-inch Display
Page 163 of 364

MULTIMEDIA 161
Audio Setting Description
Balance/FadePress the Balance/Fade button on the touchscreen to balance audio between
the f
r
ont speakers or fade the audio between the rear and front speakers.
Press the Front, Rear, Left or Right buttons or press and drag the red Speaker
icon to adjust the Balance/Fade.
Equalizer Press the + or – buttons or press and drag the level bar to increase or
d
ecre
a
se each of the equalizer bands. The level value, which spans between
plus or minus nine, is displayed at the top of each of the bands.
Speed Adjusted Volume The Speed Adjusted Volume is adjusted by selecting from “Off”, “1”, “2”, or
“3”. T
his alters the automatic adjustment of the audio volume with variation
to vehicle speed. Volume increases automatically as speed increases to
compensate for normal road noise.
Surround Sound — If Equipped When Surround Sound is on, you can hear audio coming from every direction
as in
a movie theatre or home theatre system.
AUX Volume Offset The AUX Volume Offset is adjusted by pressing + and – buttons. This alters the
A
UX in
p
ut audio volume. The level value, which spans between plus or minus
three, is displayed above the adjustment bar.
Auto Play The Auto Play feature begins playing music as soon as a USB Media device is
connect
ed to one of the vehicle’s Media USB ports, when it is turned on. Press
Off to turn the setting off.
Radio Off With Door — If Equipped The Radio Off With Door feature, when activated, keeps the radio on until the
driver
or passenger door is opened or until the Radio Off Delay selected time
has expired.
5
Page 165 of 364
MULTIMEDIA 163
AUX MODE
Overview
Auxiliary Mode (AUX) is entered by inserting an AUX
device
using a cable with a 3.5 mm audio jack into
t h
e
A U
X port, or by pressing the AUX button on the
left side of the touchscreen, or under the Source
Select button (if equipped).
To insert an Auxiliary device, gently insert the
Auxili
ary device cable into the AUX port. If you
insert an Auxiliary device with the ignition and the
radio on, the unit will switch to AUX Mode and
begin to play.
Controlling The Auxiliary Device
The control of the Auxiliary device (e.g., selecting
p layl i
sts, play, fast forward, etc.) cannot be
provided by the radio; use the device controls
instead. Adjust the volume with the Volume button,
VOLUME/MUTE rotary knob, or the On/Off rotary
knob, or with the volume of the attached device.
NOTE:
The radio unit is acting as the amplifier for audio
output
from the Auxiliary device. Therefore, if the
volume control on the Auxiliary device is set too
low, there will be insufficient audio signal for the
radio unit to play the music on the device. Seek Up
/Seek Down
In USB Mode, press the Seek Up button on the
t ouchs c
reen for the next selection on the USB
device. Press and release the Seek Down button
on the touchscreen to return to the beginning of
the current selection, or to return to the beginning
of the previous selection if the USB device is within
the first three seconds of the current selection.
In Bluetooth® Mode, press and release the Seek
Up bu t
ton on the touchscreen for the next
selection on the Bluetooth® device. Press and
release the Seek Down button on the touchscreen
to return to the beginning of the current selection,
or return to the beginning of the previous selection
if the Bluetooth® device is within the first second
of the current selection.
Browse
In USB Mode, press the Browse button on the
touchs c
reen to display the browse window. In USB
Mode, the left side of the browse window displays
a list of ways you can browse through the contents
of the USB device. If supported by the device, you
can browse by Folder, Artist, Playlist, Album, Song,
etc. Press the desired button on the touchscreen
on the left side of the screen. The center of the
browse window shows items and their
sub-functions, which can be scrolled through by
pressing the Up and Down buttons to the right. The
TUNE/SCROLL knob can also be used to scroll. Media Mode
In USB Mode, press the Media button on the
touchs
c
reen to select the desired audio source:
USB.
In Bluetooth® Mode, press the Media button on
the t ou
chscreen to select the desired audio
source: Bluetooth®.
In AUX Mode, press the Media button on the
touchs c
reen to select the desired audio source:
AUX.
Repeat
In USB Mode, press the Repeat button on the
t ouchsc
reen to toggle the repeat functionality. The
Repeat button on the touchscreen is highlighted
when active. The Radio will continue to play the
current track, repeatedly, as long as the repeat is
active. Press the Repeat button again to enter
Repeat All. The radio will continue to play all the
current tracks, repeatedly, as long as the repeat
function is active. To cancel Repeat, press the
Repeat button a third time.
Shuffle
In USB Mode, press the Shuffle button on the
touchs c
reen to play the selections on the USB
device in random order to provide an interesting
change of pace. Press the Shuffle button on the
touchscreen a second time to turn this feature off.
5